


47 Coast Guard Build

 05-19-2008, 10:52 PM
#53
Senior Member
Thread Starter
Join Date: Feb 2007
Location: Gilroy, CA
Posts: 147
Likes: 0
Received 0 Likes
on
0 Posts
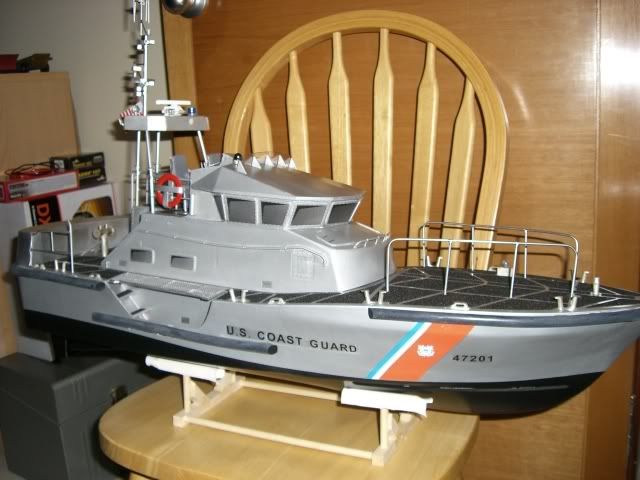
When I first did the railing I did it by the book and simply glued the rear railings to the flotation thingy. I must have re-glued them 30 times as they break free everytime they are lightly bumped. So I pulled them out and drilled holes for them. solid now.
Also dremeled out the old motor mount and made a custom aluminum one that is removable.
Also dremeled out the old motor mount and made a custom aluminum one that is removable.

 05-21-2008, 09:27 PM
#55
Junior Member
Join Date: May 2008
Location: APO, AA
Posts: 7
Likes: 0
Received 0 Likes
on
0 Posts
Great looking build so far!
I actually registered just to say that you are doing some great modifications to the kit. Some that I wish I had done.
I have not run the boat with the kit supplied props, but I got some after market ones that really tax the motors too much for direct drive. They are great looking boats when they are finished.
[link=http://www.rcgroups.com/forums/showthread.php?t=296632]Build Thread[/link]
05-21-2008, 11:30 PM
#56
Senior Member
Thread Starter
Join Date: Feb 2007
Location: Gilroy, CA
Posts: 147
Likes: 0
Received 0 Likes
on
0 Posts
Thanks for the input Kmot and Knotaddicted.
Also , Knotaddicted, thank you for the link to your build. I am using a sound board for the siren and strobe for the lights from xxxxxxxxx (I will get the specifics next time to the shed). They are nice because they include small pots for custom adjustments.
Also , Knotaddicted, thank you for the link to your build. I am using a sound board for the siren and strobe for the lights from xxxxxxxxx (I will get the specifics next time to the shed). They are nice because they include small pots for custom adjustments.
05-23-2008, 05:47 AM
#57
Senior Member
Join Date: Jan 2004
Location: Sneek, NETHERLANDS
Posts: 2,451
Likes: 0
Received 0 Likes
on
0 Posts
I just stumbled across this thread and I am impressed!
Very nice build indeed.
The aluminum motormount is a good idea, as it will dissepate the heat from the motors, adding a little heat conductive paste between the motor and the mount will help.
As you made it removable, I'd also cut out the cooling slots in the mount to allow airflow over the armature.
The cooling coil is a tad on the small side, make it as long as the can allows without covering the cooling slots and make one coil per motor, supplied with water seperately, otherwise the second motor will get the 'pre-heated' water from the first one.
If you want the motors to stay really cool, make them a cooling jacket like the one in the picture, I've made them for all kinds of motorsizes. (I have a 'how to' series of pics on request)
Adding brushtab cooling will make the cooling complete.
I didn't see noise suppressing caps on the outside of the motors, or are these motors factory equipped with caps inside the can?
Regards, Jan.
05-23-2008, 08:28 PM
#58
Senior Member
Thread Starter
Join Date: Feb 2007
Location: Gilroy, CA
Posts: 147
Likes: 0
Received 0 Likes
on
0 Posts
Jan,
Excelent input. I will cut slots in the mount to cool the armatures as you suggest. i have 2 independent pick-ups, one for each engine. I love your cooling jacket, please send me the how 2.
[email protected]
I have not put the caps on yet. I suppose I should before I forget. Actually, I need to add it to my finishing touches list.
I am open to all input, you all are the pros! Thanks again.
Larry
05-29-2008, 08:46 PM
#59
Junior Member
Join Date: Apr 2006
Location: Bloomington,
IN
Posts: 29
Likes: 0
Received 0 Likes
on
0 Posts
What a fantastic thread!
I started building my 47' CG boat about 8 months ago and just finished.
I'm noticing two problems...
The motors are overheating and shutting down after about 10 minutes of running. I'm thinking about some kind of water cooling system, but where are you guys installing the water pickup tubes?
Also, I'm getting a fair amount of water in the hull. My recovery wells are sealed, but I'm getting a fair amount of water from either around the pilothouse or around the rear hatch. Any ideas for this one?
...it's so cool that so many others have built this really neat boat. I've been building for the better part of a year all by my lonesome!!
Thanks!
PS pompebled, I too would greatly appreciate your instructions sent to [email protected]
05-30-2008, 08:31 AM
#61
Junior Member
Join Date: Apr 2006
Location: Bloomington,
IN
Posts: 29
Likes: 0
Received 0 Likes
on
0 Posts
Hmmm... Maybe I'm not understanding.
How would you be able to draw water through the rudder or prop shafts?
Also, where did you get the parts to make your faux exhaust/water discharge ports? Those look great and would be a perfect way to kick the water back out.
How would you be able to draw water through the rudder or prop shafts?
Also, where did you get the parts to make your faux exhaust/water discharge ports? Those look great and would be a perfect way to kick the water back out.
05-30-2008, 09:12 PM
#62
Senior Member
Thread Starter
Join Date: Feb 2007
Location: Gilroy, CA
Posts: 147
Likes: 0
Received 0 Likes
on
0 Posts
Brass tubing and sheet stock from the local hobby store. I have also seen it in home Depot and Orchard supply but I try to support my local hobby store as much as I can.
There is a gap between the prop shaft and tube as well as the rudder shafts and tubes. If the tops of the rudder tubes are above the water line you should not get water through there. The prop shaft is below the water lain and the high speed rotation can actually pump the water up the tube. It should not leak if it is full of oil or grease however.
Larry
05-30-2008, 11:05 PM
#63
Senior Member
Thread Starter
Join Date: Feb 2007
Location: Gilroy, CA
Posts: 147
Likes: 0
Received 0 Likes
on
0 Posts
Begining of speed control mounting floors. Early pics of electronic support systems....nothing secured, just kinda sitting in position. finish painting and mounting to come soon!
 05-30-2008, 11:49 PM
#65
Senior Member
Thread Starter
Join Date: Feb 2007
Location: Gilroy, CA
Posts: 147
Likes: 0
Received 0 Likes
on
0 Posts
Thanks K. The guy from the local hobby store who is very good with boats said the wood hull would be a good box. I have still been considering building a box anyway though. Thanks for the input.
05-31-2008, 03:19 PM
#66
Senior Member
Join Date: Jan 2004
Location: Sneek, NETHERLANDS
Posts: 2,451
Likes: 0
Received 0 Likes
on
0 Posts
ORIGINAL: coipus_coinpurse
The motors are overheating and shutting down after about 10 minutes of running. I'm thinking about some kind of water cooling system, but where are you guys installing the water pickup tubes?
The motors are overheating and shutting down after about 10 minutes of running. I'm thinking about some kind of water cooling system, but where are you guys installing the water pickup tubes?
In a scale boat I usually have the water inlet in the rear part of the bottom, where the propwash hits the hull, flow assured as soon as the prop turns.
The inlet itself is a 4mm brass or aluminum tube, facing forward and sanded flush with the hull (see sketch).
The outlet can be a similar tube, but facing towards the transom, sanded flush; this will create suction, as soon as the boat moves.
This is a pressureless system that, if properly installed, will always provide flow.
If the ESC can be watercooled, this might solve the shutting down, provided the ESC isn't way too small for the motors and props used to begin with.
Regards, Jan.
06-01-2008, 12:57 PM
#67
Junior Member
Join Date: Apr 2006
Location: Bloomington,
IN
Posts: 29
Likes: 0
Received 0 Likes
on
0 Posts
Thanks for the helpful info.
I'm not actually entirely sure if its the motors overheating or the ESC causing the shut downs. I'm using a Novak Heavy Duty ESC with the two stock motors that came on the boat. From what I've read, this speed control should be more than capable of running these two motors with two packs. Novak does, however, offer a fan kit to cool the speed control - maybe that would be a good next move?
Does anyone know how I could test to see if it's the ESC or motors overheating??
06-01-2008, 03:47 PM
#68
The Novak HD esc is designed as an E-Maxx replacement. It is meant to have an open body shell over it and copius amounts of air circulating around it. When car esc's get stuffed inside closed boat hulls, they overheat. The esc fan would be an excellent idea. Also, some open windows would help. I have installed water cooling tubes as well as a fan to blow over the car esc I will be using in my 47' MLB.
06-01-2008, 03:50 PM
#69
Senior Member
Join Date: Jan 2004
Location: Sneek, NETHERLANDS
Posts: 2,451
Likes: 0
Received 0 Likes
on
0 Posts
The fan kit is an option, but, if the motors have watercooling it would be more effective to watercool the ESC, by running a brass or aluminum pipe through the heatsink, either by drilling a tight fitting hole for it, or, if there is no room for drilling, make room on the heatsink for a rectangular piece of brass tubing (K&B), by machining(=filing) off one of the ribs from the heatsink.
Something like I did in the picture.
Regards, Jan.
Something like I did in the picture.
Regards, Jan.
06-04-2008, 03:20 AM
#70
Senior Member
Join Date: Jan 2004
Location: Sneek, NETHERLANDS
Posts: 2,451
Likes: 0
Received 0 Likes
on
0 Posts
@Larry and coipus_coinpurse,
Gents, I've mailed you the 'how to' pics, but haven't received any reply sofar, did everything arrive in good order?
Regards, Jan.
Gents, I've mailed you the 'how to' pics, but haven't received any reply sofar, did everything arrive in good order?
Regards, Jan.
08-05-2008, 11:30 PM
#73
Senior Member
Thread Starter
Join Date: Feb 2007
Location: Gilroy, CA
Posts: 147
Likes: 0
Received 0 Likes
on
0 Posts
OK...been working on and off on the boat due to work and being sick.....had to deviate from the water jacket a little due to all the cut-outs on the motor shell. Picks of how the jacket is coming along are attached. Please comment. Working on the outer shell now.
08-05-2008, 11:36 PM
#74
Senior Member
Thread Starter
Join Date: Feb 2007
Location: Gilroy, CA
Posts: 147
Likes: 0
Received 0 Likes
on
0 Posts
Now pics of the seats and the top end. Remember this is a San Fransico Police Boat hence the initials SFPD......top portions are painted , lights operating and clear coated (satin gloss). Comments?