


LOS ANGELES build logs
 02-06-2014, 02:20 AM
#1
Member
Thread Starter
Join Date: Mar 2010
Location: BUCHAREST, ROMANIA
Posts: 68
Likes: 0
Received 0 Likes
on
0 Posts
HELLO ALL, 
Be ADVICE : Is gonna be a very long thread so PLEASE have patience !
Earlier this week I took courage and I start working on these project .
That is a LOS ANGELES submarine bought it from someone on the forum .
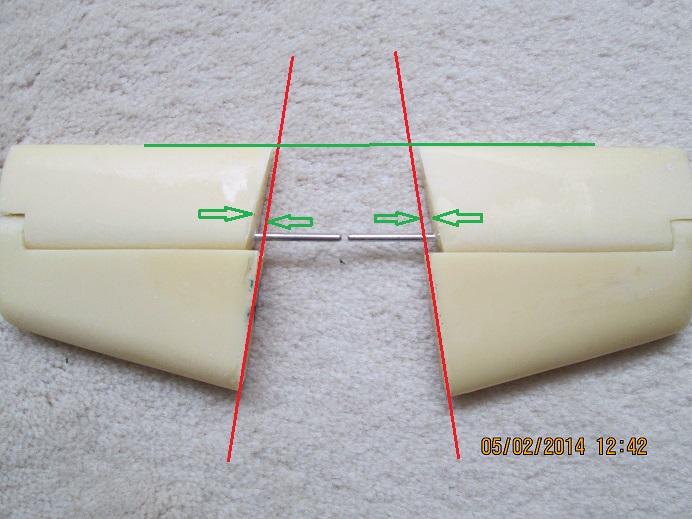
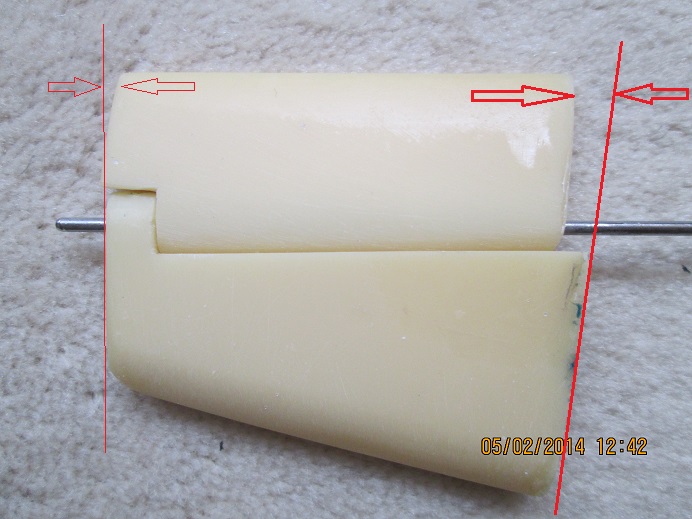
- I started with rudders depth as required for the large volume of Sisyphus work ....
- after many, many hours of sanding an file I managed to do what you can see in the pictures...
HOW TO FIX :
1) file until get same length?
2) fill until get same length ?
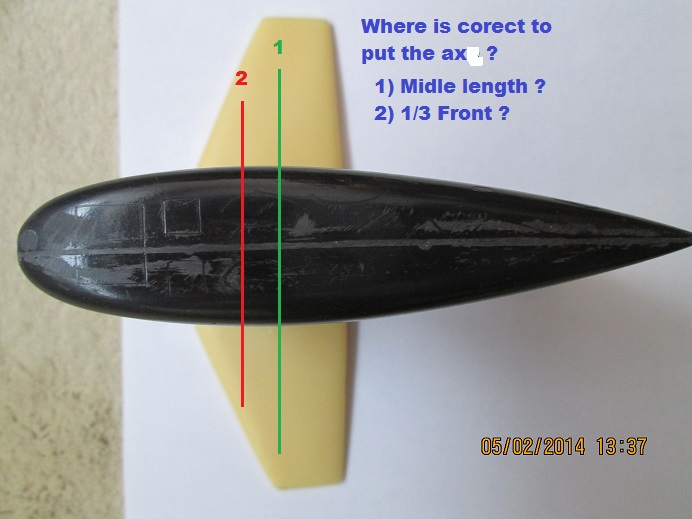
- then continued with bow rudders ....NO problems here ,
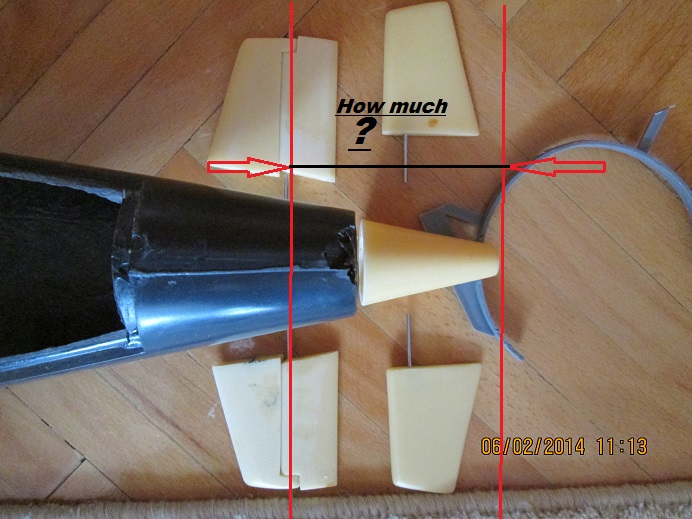
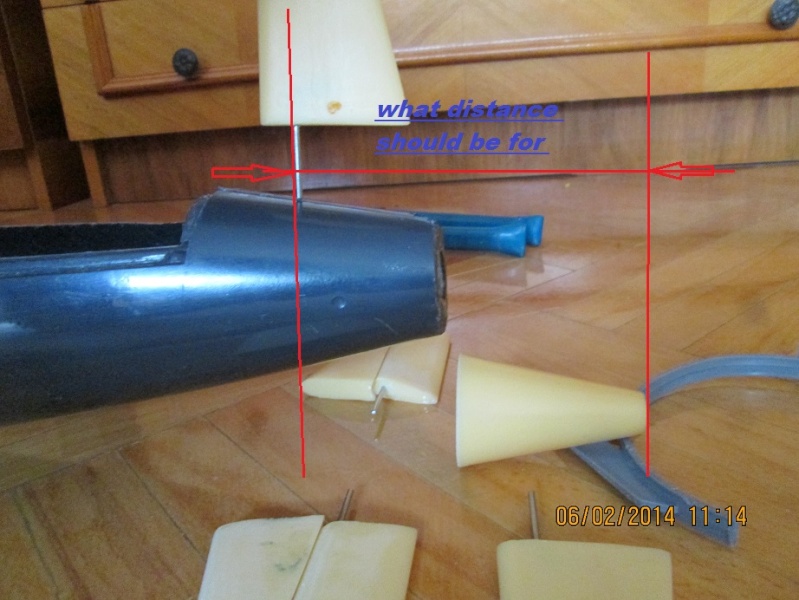
- with tower is another story and I have some questions about the place to put axis for Bow Rudders ....( see pictures )
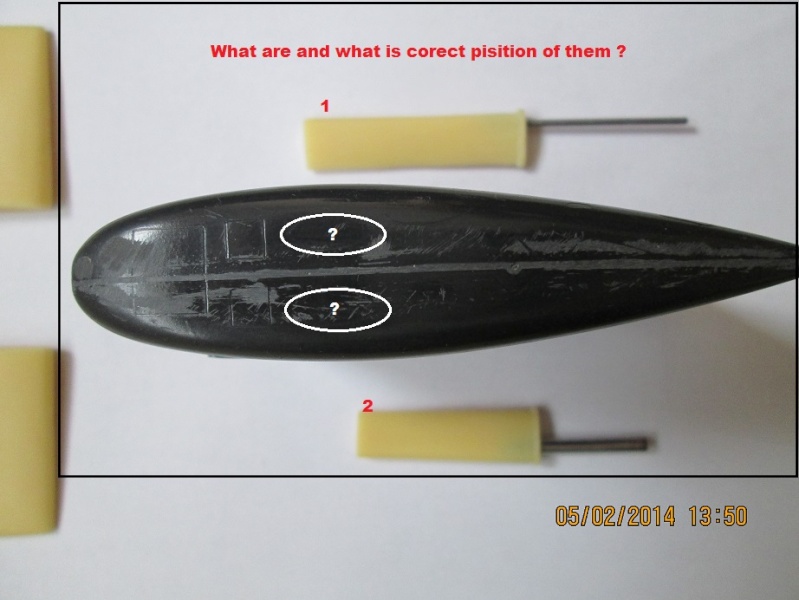
- I do not know what those two parts are and which should be put it ( see pictures )
and the last question from these series :
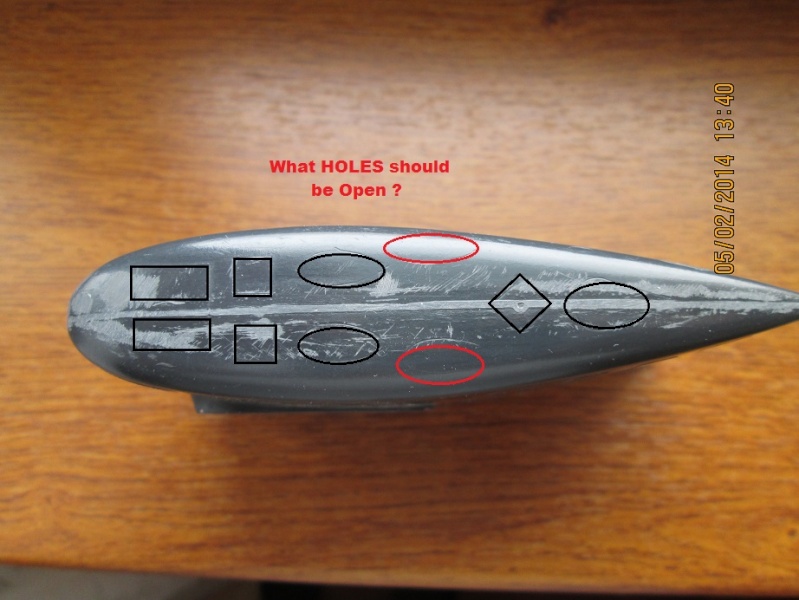
1) what are those holes and witch should be drilled ( I think some of them should be don do the captive air !)


OK for now,
THANK YOU
MARIUS
Be ADVICE : Is gonna be a very long thread so PLEASE have patience !
Earlier this week I took courage and I start working on these project .
That is a LOS ANGELES submarine bought it from someone on the forum .
- I started with rudders depth as required for the large volume of Sisyphus work ....
- after many, many hours of sanding an file I managed to do what you can see in the pictures...
HOW TO FIX :
1) file until get same length?
2) fill until get same length ?
- then continued with bow rudders ....NO problems here ,
- with tower is another story and I have some questions about the place to put axis for Bow Rudders ....( see pictures )
- I do not know what those two parts are and which should be put it ( see pictures )
and the last question from these series :
1) what are those holes and witch should be drilled ( I think some of them should be don do the captive air !)
OK for now,
THANK YOU
MARIUS
 02-07-2014, 01:35 AM
#2
Member
Thread Starter
Join Date: Mar 2010
Location: BUCHAREST, ROMANIA
Posts: 68
Likes: 0
Received 0 Likes
on
0 Posts
For the moment all I have is these :
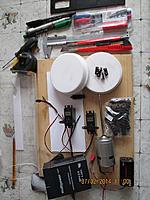
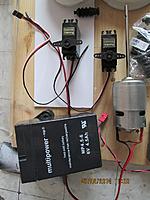
- any suggestion about Reliable Speed Controller ......Fail Safe devices and what else should be ?
- the RC is FUTABA 6EXP - 6 channels (4 + 2 ) ,40MHz .
I know is an very old model but that's gonna be do the small budget
Cam On don't be shy !.
MARIUS
- any suggestion about Reliable Speed Controller ......Fail Safe devices and what else should be ?
- the RC is FUTABA 6EXP - 6 channels (4 + 2 ) ,40MHz .
I know is an very old model but that's gonna be do the small budget
Cam On don't be shy !.
MARIUS
03-06-2014, 03:34 AM
#3
Member
Thread Starter
Join Date: Mar 2010
Location: BUCHAREST, ROMANIA
Posts: 68
Likes: 0
Received 0 Likes
on
0 Posts
 HI ,
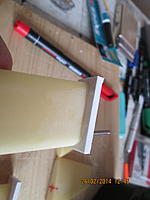
HI , To day I am very glad because I did some progress on the project.I know is NOT very much but when You don't have SPARE time at all and Your work shop is the kitchen and work bench is kitchen table - IF YOU GET THE PERMISSION from "MASTER CHEF" my WIFE !!!
is A PROGRESS . Couple days a go I glued a piece of PVC sheet on both Dive Planes . I din't have to file them to shape .

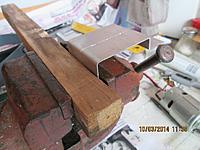
Yesterday and to day I did the Motor mount from a small piece of aluminum sheet .
It was necessary to Drill , cut , tap , file .
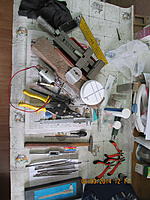
Doesn't look much but I keep the tools in to a small crowded closet , some of them on balcony , where is my lathe too !!! .
When I tray to do something it need 30min to get the tool down and another 30min - 40min to clean the work place .
I told You all these to see way is gonna be a very long thread plus the "dam found" always missing !.
See You soon I HOPE .
All the Best
MARIUS
03-10-2014, 03:16 AM
#4
Member
Thread Starter
Join Date: Mar 2010
Location: BUCHAREST, ROMANIA
Posts: 68
Likes: 0
Received 0 Likes
on
0 Posts
HI ,
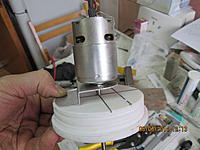
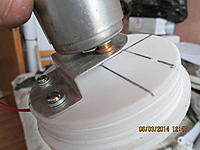
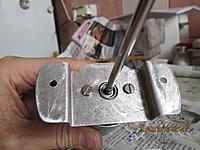
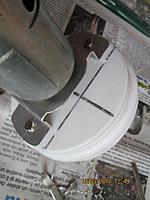
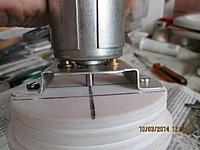
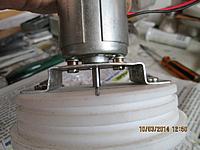
Regarding some Advices I did some Work on NEW Motor Mount , and these is the Result:
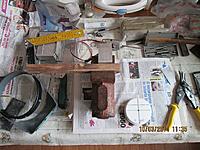
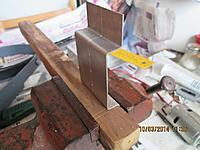
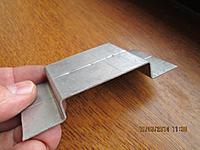
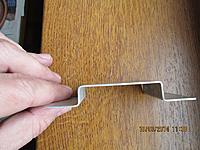
Here I encountered a small Problem solved by cutting some material :

All the Best and CLEAR WATERS
MARIUS
Regarding some Advices
I did some Work on NEW Motor Mount , and these is the Result:Here I encountered a small Problem solved by cutting some material :
All the Best and CLEAR WATERS
MARIUS
03-18-2014, 11:46 AM
#5
Member
Thread Starter
Join Date: Mar 2010
Location: BUCHAREST, ROMANIA
Posts: 68
Likes: 0
Received 0 Likes
on
0 Posts
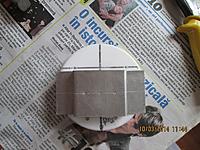
HI ,
Regarding some Advices I did some Work on NEW Motor Mount , and these is the Result:

 NEW_Motor_Mount_15%_1.jpg (123.34 kB, 692x519 - viewed 145 times.)

NEW_Motor_Mount_15%_2.jpg (177.87 kB, 692x519 - viewed 145 times.)

NEW_Motor_Mount_15%_3.jpg (119.85 kB, 692x519 - viewed 145 times.)

NEW_Motor_Mount_15%_4.jpg (119.08 kB, 692x519 - viewed 145 times.)

NEW_Motor_Mount_15%_6.jpg (174.75 kB, 692x519 - viewed 145 times.)

NEW_Motor_Mount_15%_7_PROBLEM.jpg (178.09 kB, 692x519 - viewed 144 times.)

NEW_Motor_Mount_15%_8_PROBLEM.jpg (159.43 kB, 692x519 - viewed 144 times.)

NEW_Motor_Mount_15%_9.jpg (129.33 kB, 692x519 - viewed 144 times.)

NEW_Motor_Mount_15%_10.jpg (109.96 kB, 692x519 - viewed 145 times.)

NEW_Motor_Mount_15%_12.jpg (108.62 kB, 692x519 - viewed 145 times.)

NEW_Motor_Mount_15%_11.jpg (109.05 kB, 692x519 - viewed 145 times.)
Regarding some Advices
I did some Work on NEW Motor Mount , and these is the Result:
03-18-2014, 11:47 AM
#6
Member
Thread Starter
Join Date: Mar 2010
Location: BUCHAREST, ROMANIA
Posts: 68
Likes: 0
Received 0 Likes
on
0 Posts
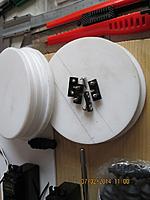
HI GUYS ,
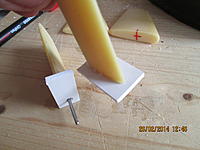
I did some work to day. Is not exactly " a piece of art" but is Hand Made , my HANDS ! so is perfect . I am joking of course . If there are some aspect witch can be improved be Free to tel me .
What I did today is actually 2 small bronze pieces , for rods control of rudders and dive planes . (I KNOW here is not quite Good English Grammatic !!!).


All The Best and CLEAR WATERS
MARIUS

01_15%.jpg (135.21 kB, 692x519 - viewed 92 times.)

02_15%.jpg (142.2 kB, 692x519 - viewed 91 times.)

03_15%.jpg (135.95 kB, 692x519 - viewed 91 times.)

04_15%.jpg (182.52 kB, 692x519 - viewed 90 times.)

05_15%.jpg (159.26 kB, 692x519 - viewed 90 times.)
I did some work to day. Is not exactly " a piece of art" but is Hand Made , my HANDS ! so is perfect . I am joking of course . If there are some aspect witch can be improved be Free to tel me .
What I did today is actually 2 small bronze pieces , for rods control of rudders and dive planes . (I KNOW here is not quite Good English Grammatic
!!!). All The Best and CLEAR WATERS
MARIUS
03-18-2014, 11:48 AM
#7
Member
Thread Starter
Join Date: Mar 2010
Location: BUCHAREST, ROMANIA
Posts: 68
Likes: 0
Received 0 Likes
on
0 Posts
HI there ,
I did some progress to day . I made the propeller shaft house . I don't know if is going to be the final , that's hard to say now . Wheel shall see . Any way these cames out after a 3 - 4 hours of hard work . Way take so much , is because I was going in just 0,010mm too MUCH  and the Ball Bearing wasn't going as is should be . You now what I mean . I HAVE MY LIMITS !!!. I don't have the skills and the technick to do that kind of work from the first time . On the 3rd TIME It was Good Anough to give hem a shot .
Any tips/tricks/ would be great for those kind of operation in a very close future .
 ...A = Hight for the Ball Bearing ; B = hight for the Simmering . You can see way was a Little difficult to succeed from the first tray .


All the Best and CLEAR WATERS
MARIUS
I did some progress to day . I made the propeller shaft house . I don't know if is going to be the final , that's hard to say now . Wheel shall see . Any way these cames out after a 3 - 4 hours of hard work
. Way take so much , is because I was going in just 0,010mm too MUCH and the Ball Bearing wasn't going as is should be . You now what I mean . I HAVE MY LIMITS !!!. I don't have the skills and the technick to do that kind of work from the first time . On the 3rd TIME It was Good Anough to give hem a shot . Any tips/tricks/ would be great for those kind of operation in a very close future .
...A = Hight for the Ball Bearing ; B = hight for the Simmering . You can see way was a Little difficult to succeed from the first tray . All the Best and CLEAR WATERS
MARIUS


 03-24-2014, 02:44 AM
#9
Member
Thread Starter
Join Date: Mar 2010
Location: BUCHAREST, ROMANIA
Posts: 68
Likes: 0
Received 0 Likes
on
0 Posts
HI there ,
Some activity on the project.
I did the rudders and dive planes bushings connectors for control rods ;
Materials:
- bronze bar 6mm diameter......I made the 2mm hole for rod and to hold them in place , was done with M3 threaded bolts ;
- bushings for rods were made of bronze 4mm bar with 2.1mm hole ;


MARIUS
Some activity on the project.
I did the rudders and dive planes bushings connectors for control rods ;
Materials:
- bronze bar 6mm diameter......I made the 2mm hole for rod and to hold them in place , was done with M3 threaded bolts ;
- bushings for rods were made of bronze 4mm bar with 2.1mm hole ;
MARIUS


 04-01-2014, 02:59 AM
#11
Member
Thread Starter
Join Date: Mar 2010
Location: BUCHAREST, ROMANIA
Posts: 68
Likes: 0
Received 0 Likes
on
0 Posts
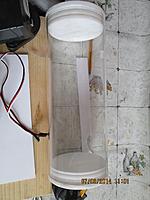
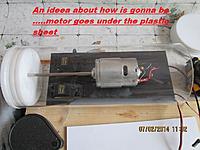
HI there ,  I have a bag pressure from a device to measure blood pressure and has the dimensions from the picture ...... would be enough water volume for my sub ?
What are the most used methods to calculate what volume of water is needed ?
PLEASE I need these answer FAST in order to buy the necessary length of the Acrylic Tube .


All the Best and CLEAR WATERS
MARIUS
I have a bag pressure from a device to measure blood pressure and has the dimensions from the picture ...... would be enough water volume for my sub ?What are the most used methods to calculate what volume of water is needed ?
PLEASE I need these answer FAST in order to buy the necessary length of the Acrylic Tube .
All the Best and CLEAR WATERS
MARIUS


 06-23-2014, 09:03 AM
#13
Junior Member
Join Date: Dec 2011
Location: feira de santanabahia, BRAZIL
Posts: 4
Likes: 0
Received 0 Likes
on
0 Posts
HELLO GOOD AFTERNOON, I WANT TO KNOW YOUR OPINION ABOUT THIS PRODUCT, RC SUB WORKSHOP, FOR THE VALLEY JUST BUY?
Gato wtc set USD$ 389.99
Specification:
End cap "OD"70mm "1"pair x1pc
Mark II End Caps "OD"70mm / "1pair" x1pc
ABP Hulls "OD"70mm "ID"74 " Long" 700mm x1pc
Brushless Motor + 30A ESC "forward" & "backward" Set x2pcs
Rubber Bellow + Copper Tube x3pcs
Water Pump ESC x1pc
Rolling Pump Type-B x1pc
Two Tube Ballast Tank Liner 215mm x110mm / volume 1400ml x1pc
Aostar 9gram Micro Servo x3pcs
Cable trough x1pc
Gato copper propellers 1pair x1pc
propeller shaft 1pair x2pcs
Uj 4mm x 3mm 1pair x1pc
Uj 3mm x 3mm 1pair x1pc
Free Shipping
06-24-2014, 01:08 AM
#14
Member
Thread Starter
Join Date: Mar 2010
Location: BUCHAREST, ROMANIA
Posts: 68
Likes: 0
Received 0 Likes
on
0 Posts
HI ,
Before I express my opinion I need to know on what project you working exactly ,
Put some picture here on forum by opening a thread with the project an be shore there is gonna be a lots of people to advice You , Is BETTER if You get access to one or two other forums or at least read as guest everything You can about that sub You build .
Any way the "RC SUB WORKSHOP " is one of the best in the field , I heard - I never bought from them ( too far from me and the taxes are huge )
NO MATTER on what project You are working , Take Your time and do a good and deep research in order to have as much information You can , before actually start working or spend money on components .
If is the first project of You and You choose GATO sub be aware is a VERY COMPLEX project with o LOTS of EXTERIOR DETAILS and not only . I think is one of the most complex project and requires a Lot of practice before , lots of knowledge in different areas , SO THINK TWICE BEFORE YOU START SPEND MONEY .
Anyway IS ONLY MY HUMBLE OPINION , You DECIDE WHAT and HOW .
BEST of LUCK
MARIUS
10-13-2014, 04:13 AM
#16
Member
Thread Starter
Join Date: Mar 2010
Location: BUCHAREST, ROMANIA
Posts: 68
Likes: 0
Received 0 Likes
on
0 Posts
Hello all ,
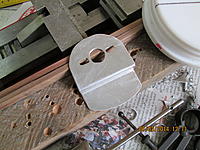
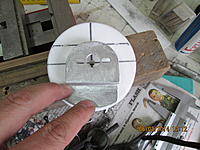
After couple months of absence I began working again on LA project . I start working on wtc components and in order to finalize the propeller shaft I need some help and guidance to do these :
- how to find the center of the AFT cone ?;
- how to fix the Bronze Bushing on that cone with the possibility of extraction if is needed ?.
- how do I know what is the correct position before make the hole for bushing ?;
To understand much better what I mean see the pictures:


and here :


Maybe I didn't express my self correctly but I think You know what I mean , I hope
MARIUS
After couple months of absence I began working again on LA project . I start working on wtc components and in order to finalize the propeller shaft I need some help and guidance to do these :
- how to find the center of the AFT cone ?;
- how to fix the Bronze Bushing on that cone with the possibility of extraction if is needed ?.
- how do I know what is the correct position before make the hole for bushing ?;
To understand much better what I mean see the pictures:
and here :
Maybe I didn't express my self correctly but I think You know what I mean , I hope
MARIUS
02-26-2015, 03:44 AM
#17
Member
Thread Starter
Join Date: Mar 2010
Location: BUCHAREST, ROMANIA
Posts: 68
Likes: 0
Received 0 Likes
on
0 Posts
Hello ,
Some small progres . Is a slow build , I know but .... . that's life !!!.
I made some small progress with , what I say is "ballast tank pump command Block" . I had some changes because when I glued those 2 microswitchs to the "komacel" piece , a tiny drop of glue was poured to the plastic axe of the metallic arm and melt it :


( I think I post some pictures twice , but I don't have much time to select them ) I Am Sorry .
I did last evnig and these mornig another mast , witch is the 3rd one . I intend to put a small withe 3mm super bright LED on top on it later on .
Pictures :


MARIUS
Some small progres . Is a slow build , I know but .... . that's life !!!.
I made some small progress with , what I say is "ballast tank pump command Block" . I had some changes because when I glued those 2 microswitchs to the "komacel" piece , a tiny drop of glue was poured to the plastic axe of the metallic arm and melt it :
( I think I post some pictures twice , but I don't have much time to select them ) I Am Sorry .
I did last evnig and these mornig another mast , witch is the 3rd one . I intend to put a small withe 3mm super bright LED on top on it later on .
Pictures :
MARIUS
03-03-2015, 01:48 AM
#18
Member
Thread Starter
Join Date: Mar 2010
Location: BUCHAREST, ROMANIA
Posts: 68
Likes: 0
Received 0 Likes
on
0 Posts
Hello there ,
I need some advices / guidance to find a way to rise the tower masts - all at once - for my sub .
Any one some ideeas , regarding there is not much space in the tower - see picture .
THANK YOU
-
-
-
-
MARIUS
I need some advices / guidance to find a way to rise the tower masts - all at once - for my sub .
Any one some ideeas , regarding there is not much space in the tower - see picture .
THANK YOU
-
-
-
-
MARIUS
03-10-2015, 07:03 AM
#19
Member
Thread Starter
Join Date: Mar 2010
Location: BUCHAREST, ROMANIA
Posts: 68
Likes: 0
Received 0 Likes
on
0 Posts
Some small steps those days .
I made the Lights for the Tower :

and a nasty holl in the hull for the Tower :
-
-
-
-
-
not having the propper tools I used the old fashion way : drilling hol next to hol as closer I could .
MARIUS
I made the Lights for the Tower :
and a nasty holl in the hull for the Tower :
-
-
-
-
-
not having the propper tools I used the old fashion way : drilling hol next to hol as closer I could .
MARIUS
03-11-2015, 02:56 AM
#20
Member
Thread Starter
Join Date: Mar 2010
Location: BUCHAREST, ROMANIA
Posts: 68
Likes: 0
Received 0 Likes
on
0 Posts
Some progress :


don't laugh too hard about my methods ..... when you don't have any help you need to find a way and that popped to mind quickly .
Also I succed to glue the Tower to the Upper Hull :


That's all for now .
MARIUS
don't laugh too hard about my methods ..... when you don't have any help you need to find a way and that popped to mind quickly .
Also I succed to glue the Tower to the Upper Hull :
That's all for now .
MARIUS
03-12-2015, 03:37 AM
#21
Member
Thread Starter
Join Date: Mar 2010
Location: BUCHAREST, ROMANIA
Posts: 68
Likes: 0
Received 0 Likes
on
0 Posts
HI there ,
Spring always been among my favorites ...... so with the arrival of the first warm days and especially sunny days - I am addicted / dependent for the sunlight like plants - I started working on submarine and see that I have some spore. .... this is what I managed to do today ,
Today I gave holes, I gave threads, I filed, I sanded, cut and that's what came out :


MARIUS
Spring always been among my favorites ...... so with the arrival of the first warm days and especially sunny days - I am addicted / dependent for the sunlight like plants - I started working on submarine and see that I have some spore. .... this is what I managed to do today ,
Today I gave holes, I gave threads, I filed, I sanded, cut and that's what came out :
MARIUS
04-18-2015, 12:52 AM
#23
Member
Thread Starter
Join Date: Mar 2010
Location: BUCHAREST, ROMANIA
Posts: 68
Likes: 0
Received 0 Likes
on
0 Posts
I am Extremely Delighted and above all, I am HONORED to know someone who has had the opportunity to spend a part of life and serving the most wonderful , Compex and Exquisite man-made machines .
I wheel take the advantage of knowing a man with complex knowledge about submarines and I wheel start a long discussions with YOU , if You are Agree .
First of all :
I don't know after what model was made my hull - and I can made pictures about any part You want , if that's help in order to find a way to determine which sub is .
If is not a specific type maybe You can help to Decide what sub wheel be after I made the improvements .
What do You say ?. Can we do that ?.
MARIUS
P.S . I had as a child passion for the sea and boats forwhen it came time to perform military service (which was obligatory in my country in those years) of course I chose to go to the Navy .... so between October 1983 - October 1985 I did military service in Navy as a radio operator on a motor torpedo boat .
On These Ship I served and in that Exact PLACE I spend 2 Years !!! .

Last edited by bijou; 04-18-2015 at 01:12 AM.
05-27-2015, 03:12 AM
#24
Member
Thread Starter
Join Date: Mar 2010
Location: BUCHAREST, ROMANIA
Posts: 68
Likes: 0
Received 0 Likes
on
0 Posts
HELLO There ,
I progressed a little work on the submarine. ...
Not having a laser level or other modern means of marking curved surfaces , I have found a way to draw a straight line inside the lower hull .
I did like the following:
On the exterior of the lower hull I had the axis allready trased � axis used to draw the flooding holes ...... I made a few very small holes along this axis , I�ve passed a more resistant rope inside the submarine , I caught as stretched out as I could at the ends , and on the other holes I made a connection to the outside as seen in pictures .
In the end I�ve put a few drops of glue on each link


then I moved to the next stage of the work consisted of making a bronze bushings have inside a 6mm hole for propeller shaft and a small flange at one end.
Flange and also will be a stop on it will slip when the propeller rotates.
Bush I did - a smaller more remain outside as much as in material thickness will give aft cone when the hole for attachment.
I found a shaft 6mm long enough, worked extremely fine (it was to a printer) at one end which I did a 5mm thread for the adoptive propeller and screwing nut


MARIUS
I progressed a little work on the submarine. ...
Not having a laser level or other modern means of marking curved surfaces , I have found a way to draw a straight line inside the lower hull .
I did like the following:
On the exterior of the lower hull I had the axis allready trased � axis used to draw the flooding holes ...... I made a few very small holes along this axis , I�ve passed a more resistant rope inside the submarine , I caught as stretched out as I could at the ends , and on the other holes I made a connection to the outside as seen in pictures .
In the end I�ve put a few drops of glue on each link
then I moved to the next stage of the work consisted of making a bronze bushings have inside a 6mm hole for propeller shaft and a small flange at one end.
Flange and also will be a stop on it will slip when the propeller rotates.
Bush I did - a smaller more remain outside as much as in material thickness will give aft cone when the hole for attachment.
I found a shaft 6mm long enough, worked extremely fine (it was to a printer) at one end which I did a 5mm thread for the adoptive propeller and screwing nut
MARIUS
05-27-2015, 03:13 AM
#25
Member
Thread Starter
Join Date: Mar 2010
Location: BUCHAREST, ROMANIA
Posts: 68
Likes: 0
Received 0 Likes
on
0 Posts
and the part II :
- And the last step :
- not having such thick material for WTC supports - and two component resin is very expensive here , I chose to do each support from light pvc , four layers of 2 mm glued , pressed and procesed on lathe - as seen in pictures .... a job that is extremely messy ,


MARIUS
- And the last step :
- not having such thick material for WTC supports - and two component resin is very expensive here , I chose to do each support from light pvc , four layers of 2 mm glued , pressed and procesed on lathe - as seen in pictures .... a job that is extremely messy ,
MARIUS