


My 1/6 Stuart tank detailed
 11-11-2011, 10:51 PM
#1
Senior Member
Thread Starter
Join Date: Oct 2006
Location: wauconda, IL
Posts: 184
Likes: 0
Received 0 Likes
on
0 Posts
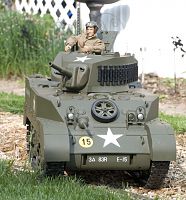
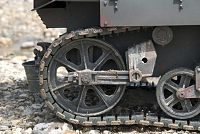
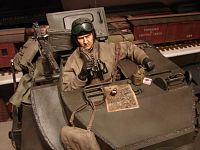
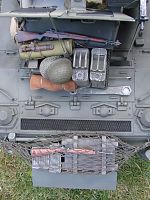
Thought Id get around to posting my stuart tank here. Just finished adding led headlights to the tank, still have to finish the search light. Last thing will be having the commander "Ted Daring" lol be animated. The back story on this got this tank at a wallie world on our honeymoon 7 years ago when the wife sent me there to get some blow up floatie things for the pool. Saw it there for a hundred bucks and said heck yeh. Flash forward to about 3 months ago and I tore it apart. I striped off the welds, the hand holds, just about everything other then the rear gas/oil etc covers. Then proceeded to appy new welds, new hand holds out of brass, the rear storage box, engine outtakes, cut out and meshed the top of the engine housing, drilled about 40 or 50 holes for new bolts and flathead screws, you get the idea. Then made my own stencils and lotsa weathering, using various different textured spray paints, pastels and docs weathering to name a few. It has beefed up metal gears, and slowly putting in brass tubing on the wheels for extra durability. Think thats about it.
  One final mod is I will be changing the upgraded speaker to fire up, once i cut out the back upper part of the tank and relocate it to that spot where the engine would normally go. I actually have to take some new pics to really show off the weathering detail outside, but you get the idea.
Lotsa detailed pics to see how it went from stock to what it is now in the photobucket album.
http://s254.photobucket.com/albums/h...ild/?start=all
Stock


to this


Then made my own stencils and lotsa weathering, using various different textured spray paints, pastels and docs weathering to name a few. It has beefed up metal gears, and slowly putting in brass tubing on the wheels for extra durability. Think thats about it. One final mod is I will be changing the upgraded speaker to fire up, once i cut out the back upper part of the tank and relocate it to that spot where the engine would normally go. I actually have to take some new pics to really show off the weathering detail outside, but you get the idea. Lotsa detailed pics to see how it went from stock to what it is now in the photobucket album.
http://s254.photobucket.com/albums/h...ild/?start=all
Stock
to this


 11-12-2011, 12:50 AM
#3
Very nicely done! Those were REAL popular back in 2003-2004 when I bought both of mine, then I discovered 1/16th tanks and never did anything with them.
I do have the round turret kit I need to build up for one of them. After seeing yours it has sparked renewed interest in finishing at least one of them.
I do plan on upgrading the electronics to something with a variable speed control, but not super fast. Not a bad platform for $150.00.
Thanks for sharing yours!!
~ Jeff
11-12-2011, 05:41 AM
#4
Senior Member

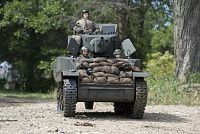
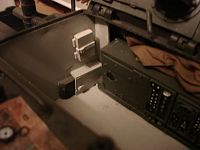
Looks prety nice. You should get a set of Jack Yang's tracks....they are much more appropriate tha the Mickey Mouse double pin track that same with it. Where did you get a 1;6 scale SCR-508 radio? I took a photo of my radio in my 1;1 scale Weapons Carrier and mounted it in a wooden block, but have never seen a model of the radio. Are you going to remove the TC's mg shield and block up the holes from the Cullin hedge cutter? As with most dust shields, they were usually all torn off or removed after a while in the field.
11-12-2011, 04:52 PM
#5
Senior Member
Thread Starter
Join Date: Oct 2006
Location: wauconda, IL
Posts: 184
Likes: 0
Received 0 Likes
on
0 Posts
Thanks guys, yea i plan on getting jacks tracks at some point, but I got two 1/16 tanks with elmods to go in both first, plus the plans for building a all metal king tiger 1/4. The radio was from a company in Georgia, Ill have to look for it and can pm ya it, ran like 40 bucks. No on the mg shield, holes only left are the screw holes in the front to remove the upper hull.
11-13-2011, 01:48 PM
#6
Senior Member
Join Date: May 2009
Location: Evans, GA
Posts: 1,506
Likes: 0
Received 0 Likes
on
0 Posts
Takevin,
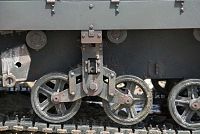
Great rebuild. I also have the same tank, but really haven't done much with it since I discovered 1/16 scale armor. It's kinda funny, but that is how I stumbled on 1/16 scale tanks. I was on the web looking for detail items for my Stuart when I found this forum and 1/16 tanks. The rest is as they say history LOL. I would like to detail my Stuart though. Do you have any pics of the gear boxes and what improvements you made to those. I have heard they are ratrher fragile?
Thanks for sharing.
Jim
