


My Tamiya King Tiger is ready!
 05-21-2012, 04:28 AM
#1

Thread Starter
My Feedback: (1)
Join Date: Jan 2012
Location: London, UNITED KINGDOM
Posts: 116
Likes: 0
Received 0 Likes
on
0 Posts
Hi all
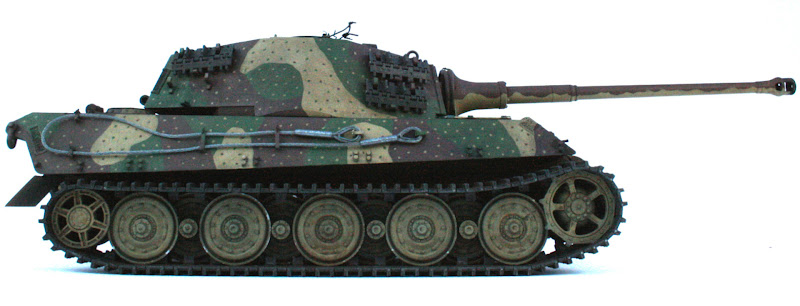
This is the spectacular Tamiya Full Option King Tiger.
Whilst the KT is great straight out of the box, I could not help myself and started upgrading it. This was a slippy slope! I kicked off by upgrading all the running parts so it is as good as it gets as a runner.
Up front are Impact all-metal gearboxes with upgraded motors enabling this heavy monster to easily handle 45 degree slopes.
The suspension was upgraded with more supple torsion bars and I spent far too much money buying Wecohe's all steel wheels which add a lot of weight. Finally I threw on some Impact metal tracks. The combination of the wheel weight and the supple suspension will really helps this glide over anything. At the rear I used the almost compulsory upgrade for the track tension adjustors.
I then moved on to the cosmetic upgrades and started by replacing almost all of the standard screws with hex-bolts which just seem more fitting for a beast like this.
I spent a lot of time trying to get the texture right, using Mr. Surfacer 500 and a lot of sanding to achieve the rolled-steel look and putty to create the weld seams.
Photo-etch meshes from Wecohe and the Schumo Kits detailing set and real steel towing cables give extra depth to the model.
I painted it in the classic 'ambush' scheme. This really was a labour of love and it has about 12 coats of paint on there! It was my first time out with an airbrush and I was delighted with how easy it actually was to create a realistic finish. I used the miraculous Silly Putty to mask of the complex camo and then just hand-painted the millions of small dots.
Finally it was all gently weathered with some oils and pigments to try to really pick out the texture and to give the paint some variation.
The steel tracks were washed in a variety of oils but I held back on over-rusting them.
There is no radio fitted yet and I also need to fit the machine gun and finally fit the turret rotation motor which I always do last after painting.
I hope you like it. Thanks for looking.


 05-21-2012, 10:25 AM
#7


That’s a rather nice looking Koti you have with a great deal of understanding how the Germans produced the hard edge camo, the heavier wheels won’t affect the suspension these are unsprang weight the tracks will add some weight to the suspension at the front and rear, very good work you should be very proud
05-21-2012, 10:39 AM
#8

Now that's a great looking tiger. Great camo and it has to be the one with best wire layout's I'we seen in a while . Do you have a build log ? And now pleez give us a video of this beast running with the impact TU's :-)
05-21-2012, 04:52 PM
#11

a little bit of weathering needs a bit of a dusting some dirt on the tracks and the front hull and put your machine gun in and then it will be done i have to say your camo is excellent your tank looks awesome
05-22-2012, 12:21 AM
#12
Thread Starter
My Feedback: (1)
Join Date: Jan 2012
Location: London, UNITED KINGDOM
Posts: 116
Likes: 0
Received 0 Likes
on
0 Posts
Thanks for the feedback chaps.
Rivetcounter - many thanks for your praise about the painting... that is praise indeed coming from you! And thanks for pointing out my stupidity regarding unsprung weight! I forgot all about the logic of your point!
Sollie - sorry but I never did a build log and really regret it now.
Airbrushler - I was thinking I might run it a few times first then blend in the natural wear and dust and mud with some pigments to smooth it out. There is a guy who goes by the name of Wyoming on Tamiyaclub who builds impressive off-road cars and he gently ages his vehicles as they get run. It seems to give a reallyrealistic weathering and also means that he is never finished with his work.
 05-22-2012, 03:12 AM
#14
This was for others as opposed to you, on second glances at your work it’s far better than I initially thought little details like the front plates and the weld lines make this a very unique build
05-22-2012, 04:19 AM
#15
Vonmarshall!!! Your King Tiger is deceiving at first glance. I agree with Rivitcounter, after a closer look the detail on the armor plate and weld beads is really good. I think if you were to take some more photos in better light this would stand out more. The hard edge camo is great as well. I have been a little intimidated to try it, but after seeing your results. I am inspired to give it a go. Like the idea of using Silly Putty to mask the hard edges. How simple and easy!!
05-22-2012, 03:07 PM
#18
Really LOVE the VERY FINE detail of the welds and the camo is EXCELLENT! I've always been partical to the sharp edge camo and ambush dots too!
And with the 'Heavy Metal' accessories and texturing you've did an OUTSTANDING JOB on your KT!
Mike in Kentucky
And with the 'Heavy Metal' accessories and texturing you've did an OUTSTANDING JOB on your KT!
Mike in Kentucky

 05-22-2012, 10:12 PM
#21

Join Date: Apr 2012
Location: Sellersville, PA
Posts: 775
Likes: 0
Received 0 Likes
on
0 Posts
ORIGINAL: Airbrushler
wouldn't it be like this in the second pic the weld would be just on edges wouldn't it? just wondering
wouldn't it be like this in the second pic the weld would be just on edges wouldn't it? just wondering
05-23-2012, 12:40 AM
#22
ORIGINAL: B.A.D.A.S.S.Force
In that 2nd picture, didn't you just cover up the jagged edges that were probably there from the thick metal plates when they were cut to size using a torch?
ORIGINAL: Airbrushler
wouldn't it be like this in the second pic the weld would be just on edges wouldn't it? just wondering
wouldn't it be like this in the second pic the weld would be just on edges wouldn't it? just wondering

 05-23-2012, 03:56 AM
#23
Thread Starter
My Feedback: (1)
Join Date: Jan 2012
Location: London, UNITED KINGDOM
Posts: 116
Likes: 0
Received 0 Likes
on
0 Posts
ORIGINAL: MAUS45
Vonmarshall!!! Your King Tiger is deceiving at first glance. I agree with Rivitcounter, after a closer look the detail on the armor plate and weld beads is really good. I think if you were to take some more photos in better light this would stand out more. The hard edge camo is great as well. I have been a little intimidated to try it, but after seeing your results. I am inspired to give it a go. Like the idea of using Silly Putty to mask the hard edges. How simple and easy!!
Vonmarshall!!! Your King Tiger is deceiving at first glance. I agree with Rivitcounter, after a closer look the detail on the armor plate and weld beads is really good. I think if you were to take some more photos in better light this would stand out more. The hard edge camo is great as well. I have been a little intimidated to try it, but after seeing your results. I am inspired to give it a go. Like the idea of using Silly Putty to mask the hard edges. How simple and easy!!
05-23-2012, 03:57 AM
#24
Thread Starter
My Feedback: (1)
Join Date: Jan 2012
Location: London, UNITED KINGDOM
Posts: 116
Likes: 0
Received 0 Likes
on
0 Posts
ORIGINAL: CCC2012
more pics...
more pics...
05-23-2012, 04:02 AM
#25
Thread Starter
My Feedback: (1)
Join Date: Jan 2012
Location: London, UNITED KINGDOM
Posts: 116
Likes: 0
Received 0 Likes
on
0 Posts
ORIGINAL: sollie
and video...
and video...
The Minister for Defence operates a strict "1 in 1 out" policy and she knows I am itchy for a new project so has her spies watching for secret ebay packages arriving from far flung places! So in order to keep some of the value locked up in this baby, I will probably not run her.
The Stug however will be given a white-wash and that will get run next time it snows!