


My New Heng Long KV-1
 03-10-2013, 02:26 PM
#126
Senior Member

Join Date: Nov 2006
Location: Grande Prairie,
AB, CANADA
Posts: 8,976
Likes: 0
Received 4 Likes
on
4 Posts
ORIGINAL: B.A.D.A.S.S.Force
Something else .... [img][/img] ... I found something better than the TK20E Clark boards, which I'd like to use in all my tanks instead.
~ Craig ~
ORIGINAL: YHR
Were these 6 older Clark boards you sent back for IR range modifications, or is there something else?
Were these 6 older Clark boards you sent back for IR range modifications, or is there something else?
~ Craig ~
LOL. What the heck, you can't hold out on us. What are you looking at. Or are you upgrading to the TK 22 with momentum.
Cheers
Dan
 03-10-2013, 02:52 PM
#127


Join Date: Jan 2006
Location: Hamilton,
ON, CANADA
Posts: 1,422
Likes: 0
Received 7 Likes
on
7 Posts
ORIGINAL: YHR
LOL. What the heck, you can't hold out on us. What are you looking at. Or are you upgrading to the TK 22 with momentum.
Cheers
Dan
ORIGINAL: B.A.D.A.S.S.Force
Something else .... [img][/img] ... I found something better than the TK20E Clark boards, which I'd like to use in all my tanks instead.
~ Craig ~
ORIGINAL: YHR
Were these 6 older Clark boards you sent back for IR range modifications, or is there something else?
Were these 6 older Clark boards you sent back for IR range modifications, or is there something else?
~ Craig ~
LOL. What the heck, you can't hold out on us. What are you looking at. Or are you upgrading to the TK 22 with momentum.
Cheers
Dan
 Bahahahaa
03-10-2013, 05:58 PM
Bahahahaa
03-10-2013, 05:58 PM
#128
ORIGINAL: B.A.D.A.S.S.Force
Hey thanks for the support Wade, but ....[img][/img] ... lol, my tanks will never be considered masterpieces, but as long as they don't perform & look like total junk, I'm OK with it! [img][/img]
~ Craig ~
ORIGINAL: Rebellion13
Craig,
Great job on the KV. Look at what a little bit of time an effort does. Turns a regular HL into a masterpiece.
Cheers,
Wade
Craig,
Great job on the KV. Look at what a little bit of time an effort does. Turns a regular HL into a masterpiece.
Cheers,
Wade
~ Craig ~
03-10-2013, 09:09 PM
#129
Thread Starter

Join Date: Apr 2012
Location: Sellersville, PA
Posts: 775
Likes: 0
Received 0 Likes
on
0 Posts
LOL ... ya got me Dan, of course I'm just replacing them all with TK22 Clark boards !!!
!!! 
Thanks Wade, the 360° is at least something most people don't do, so that's a plus+, & I have to admit, I am doing more than even I expected I was going to do aesthetically with it.
So with a little time tonight, I decided to take a quick stab at altering the stock HL headlight a bit.
First thing was to get the headlight out of the tank, then apart to take the LED out.

I then scrounged around in the recyclables a bit to find some nice clear plastic I could use for a lens.
I also found a round head bolt, where the round head just about perfectly fit when pushed into the headlight opening.
I filled the bolts Philip head groves with some solder & filed & sanded it pretty smooth.
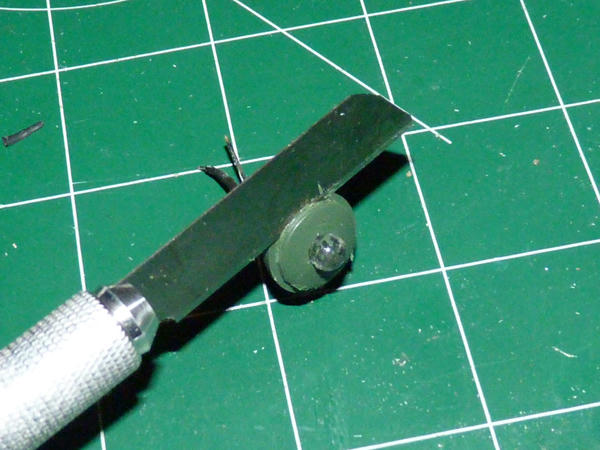
Next I take the razor knife & lightly score the plastic with criss-crossed lines over an area that is much larger than the headlight opening.

I then used my heat station's hot air blower to heat up the plastic over the scored area until it's very soft, but not so much as to have it start melting or warping too much.

While the plastic was still hot, I held the headlight on the back side & the bolt on the scored side, then quickly stamped out the lens by pressing the bolt very firmly into the headlight opening.
I held it there for about 20 - 30 seconds while it formed the lens & the plastic cooled a little.


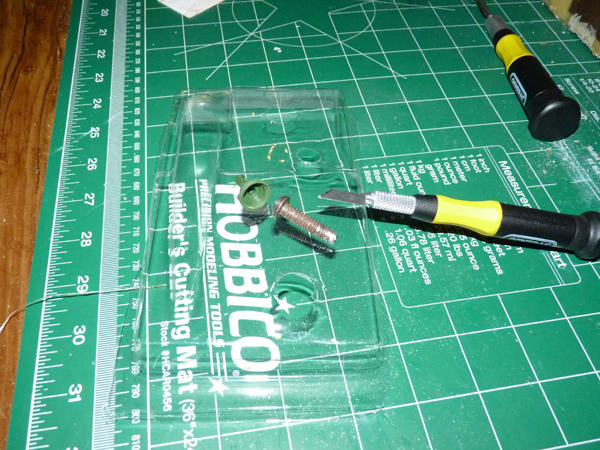
This was the stamping that I was left with after I removed the bolt. Then slightly trimmed.


This is what it looked like after it was trimmed to size, then just popped into the empty stock headlight fixture.


Here are a few images of it temporarily installed in the tank.
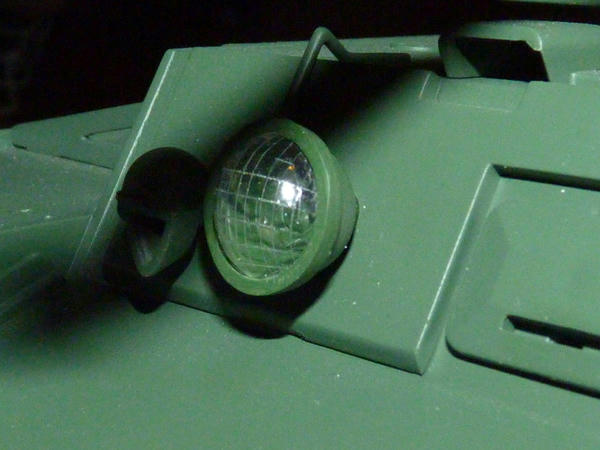


I'll have to see what it looks like after I install the LED & light it up, maybe it will look good enough. I did figure I might have to do something extra to make it look better, maybe paint the inner housing lighter in color, or possibly even giving the lens itself a slight mist coat of some sort on the inside to dull it just a tad, so when it's not lit up, you can't see too clearly all the way into it, but just see the scribe lines & an shiny outside reflection off the lens itself.
~ Craig ~
!!! Thanks Wade, the 360° is at least something most people don't do, so that's a plus+, & I have to admit, I am doing more than even I expected I was going to do aesthetically with it.
So with a little time tonight, I decided to take a quick stab at altering the stock HL headlight a bit.
First thing was to get the headlight out of the tank, then apart to take the LED out.
I then scrounged around in the recyclables a bit to find some nice clear plastic I could use for a lens.
I also found a round head bolt, where the round head just about perfectly fit when pushed into the headlight opening.
I filled the bolts Philip head groves with some solder & filed & sanded it pretty smooth.
Next I take the razor knife & lightly score the plastic with criss-crossed lines over an area that is much larger than the headlight opening.
I then used my heat station's hot air blower to heat up the plastic over the scored area until it's very soft, but not so much as to have it start melting or warping too much.
While the plastic was still hot, I held the headlight on the back side & the bolt on the scored side, then quickly stamped out the lens by pressing the bolt very firmly into the headlight opening.
I held it there for about 20 - 30 seconds while it formed the lens & the plastic cooled a little.
This was the stamping that I was left with after I removed the bolt. Then slightly trimmed.
This is what it looked like after it was trimmed to size, then just popped into the empty stock headlight fixture.
Here are a few images of it temporarily installed in the tank.
I'll have to see what it looks like after I install the LED & light it up, maybe it will look good enough. I did figure I might have to do something extra to make it look better, maybe paint the inner housing lighter in color, or possibly even giving the lens itself a slight mist coat of some sort on the inside to dull it just a tad, so when it's not lit up, you can't see too clearly all the way into it, but just see the scribe lines & an shiny outside reflection off the lens itself.
~ Craig ~
03-10-2013, 09:22 PM
#131

WOW nice touch with the molded lens you might want to see what a dull frosted slear will do on some scrap material it might not show your scribed lines
03-10-2013, 09:49 PM
#132
Thread Starter
Join Date: Apr 2012
Location: Sellersville, PA
Posts: 775
Likes: 0
Received 0 Likes
on
0 Posts
ORIGINAL: Ronan87
I like the saw/blade you have... Got a link or something?
I like the saw/blade you have... Got a link or something?
I have a full size hobby saw and it's a PITA to use when space is tight...
It was just an impulse buy because I didn't have much of anything else to use for some of the work I was trying to get done on my tanks.

If you do a Google or eBay search for "micro saw" or "photo etched saw" you should be able to find some nice, smaller saw blades that will work very well with this hobby.
There was a thread discussing them here on RCU too => http://www.rcuniverse.com/forum/m_10319368/anchors_10319512/mpage_1/key_/anchor/tm.htm#10319512
~ Craig ~
03-10-2013, 10:09 PM
#133
Thread Starter
Join Date: Apr 2012
Location: Sellersville, PA
Posts: 775
Likes: 0
Received 0 Likes
on
0 Posts
ORIGINAL: Airbrushler
WOW nice touch with the molded lens you might want to see what a dull frosted slear will do on some scrap material it might not show your scribed lines
WOW nice touch with the molded lens you might want to see what a dull frosted slear will do on some scrap material it might not show your scribed lines
 , I made a few lens just for practice & testing the process anyway ... & plenty of extra scrap plastic to test as well as make as many more lens as I need, lol
Sad thing about testing the best way to dull the lens without ruining it, I don't have any dull coats or frosted clears or anything that most modelers would probably have at their disposal to do the testing. I'll just use all the spare plastic & test various methods & stuff I have around the house ... should be fun!

The one other thing I'm thinking about this last lens too, "Is it slightly too rounded & bulging?" .... maybe I need to flatten my round head bolt a wee bit & stamp a couple more, so the lens doesn't look that bulbous & won't extend quite so far out from the housing ... hmmmm ....
~ Craig ~
03-11-2013, 11:03 AM
#134
Join Date: May 2009
Location: Perth, ON, CANADA
Posts: 278
Likes: 0
Received 0 Likes
on
0 Posts
This has been a great build thread and I'm coming in late on it, but loads of great info. I guess great minds think alike and all that stuff, bacause my KV1 headlight rebuild to get rid of the HL pimple was similar. I used the thick clear plastic from the bottom of a pill bottle for the lens. Heated it to the flexible point, then formed it over a shallow lag bolt head. Planning isn't my strong point at times, so I did the scoring of the lens after it was molded. It's pretty crude compared to your lens. Trimmed and filed it to fit the cleaned out light pot and it looks OK. I'll definitely try another to improve the looks.
I painted the LED with a coat of yellow, followed by several grey coats to get the yellowy light of an old headlight suffering from a bad ground. Kinda tones down things to suit the worn look I'm going for on my KV-1.
Mike.
I painted the LED with a coat of yellow, followed by several grey coats to get the yellowy light of an old headlight suffering from a bad ground. Kinda tones down things to suit the worn look I'm going for on my KV-1.
Mike.
03-11-2013, 11:17 AM
#135
Craig and Mike this is so cool. Give a more scale look to the head light.
03-11-2013, 04:25 PM
#136
Thread Starter
Join Date: Apr 2012
Location: Sellersville, PA
Posts: 775
Likes: 0
Received 0 Likes
on
0 Posts
I also tried the pulling of the plastic down over the bolt head while heating it when I first tried to make a lens, but found I got more consistent & even results, from lens to lens, when using the headlight housing & bolt like a press & die stamping. Either way it's still very easy to do.
I have tried a couple thicknesses of plastic too, & would have liked a little thicker lens myself, so I'll keep this one for now, but may look to make a thicker one later.
Yours still looks good too Mike, regardless of the score lines not being perfect, mine aren't either .... besides, step back a few feet & not many would even really notice ... though with unlimited plastic to mess with, it's good we can always try improving on them without digging into the old pocket book.
The yellow / grey tinged LED lighting looks like it works well. I'll have to think about that as I continue to finish up working on my own head light.
~ Craig ~
I have tried a couple thicknesses of plastic too, & would have liked a little thicker lens myself, so I'll keep this one for now, but may look to make a thicker one later.
Yours still looks good too Mike, regardless of the score lines not being perfect, mine aren't either
.... besides, step back a few feet & not many would even really notice ... though with unlimited plastic to mess with, it's good we can always try improving on them without digging into the old pocket book.The yellow / grey tinged LED lighting looks like it works well. I'll have to think about that as I continue to finish up working on my own head light.
~ Craig ~
03-13-2013, 09:36 PM
#138
Thread Starter
Join Date: Apr 2012
Location: Sellersville, PA
Posts: 775
Likes: 0
Received 0 Likes
on
0 Posts
 no, I haven't gotten around to doing anything with adding a new smoker & finishing the functional exhaust yet.
 I think that will be one of the very last things I will address with this tank, possibly even after painting, because I'm still not 100% set on which smoker I'll be using.
I just received some bearings today to keep me busy too .... & I was experimenting with the headlight again, something along the lines of what you used, a finishing washer, but using it in a slightly different fashion.
~ Craig ~
03-14-2013, 12:38 PM
#139
Thread Starter
Join Date: Apr 2012
Location: Sellersville, PA
Posts: 775
Likes: 0
Received 0 Likes
on
0 Posts
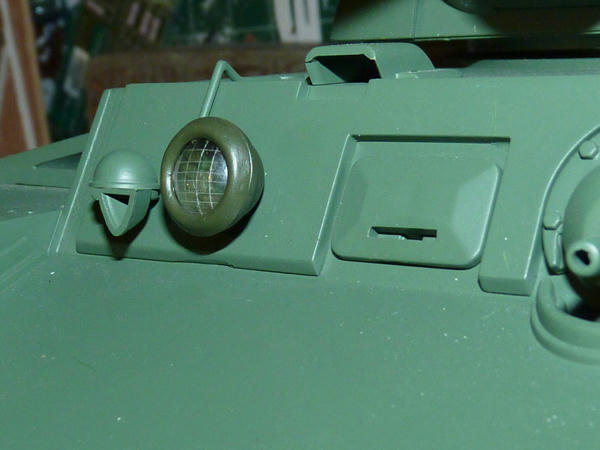
What I didn't like about the first, more simple headlight mod I did on the stock KV-1 piece, was that the rim was too squared off in the front where it meets the lens, so it didn't round down into the lens.
So kind of along Airbrushler's headlight mod, I went out & purchased a few #10 finishing washers.
I sanded the headlight housing's opening rim edge so it was thinner to lessen the depth slightly, as well sanded the original lens I had made so it was quite a bit smaller in diameter.
Beside the smaller lens is an extra one of the original size I was using for the first mod. I might sand that one down to fit the new light because I think I like the smaller lined pattern I created on that one better than the one with less lines.
I then ground out the inner & outer edges of the #10 washer to thin it, but made sure to keep that nice rounded edge on the inner area, & painted it. You can see how much I ground away compared to an original unpainted washer.

Here again are a couple images of the old look, then some images of how the new light will look as a result of the new mod.
I prefer the new look, anyone else believe I should have just left it alone because the first mod looked better?


~ Craig ~
So kind of along Airbrushler's headlight mod, I went out & purchased a few #10 finishing washers.
I sanded the headlight housing's opening rim edge so it was thinner to lessen the depth slightly, as well sanded the original lens I had made so it was quite a bit smaller in diameter.
Beside the smaller lens is an extra one of the original size I was using for the first mod. I might sand that one down to fit the new light because I think I like the smaller lined pattern I created on that one better than the one with less lines.
I then ground out the inner & outer edges of the #10 washer to thin it, but made sure to keep that nice rounded edge on the inner area, & painted it. You can see how much I ground away compared to an original unpainted washer.
Here again are a couple images of the old look, then some images of how the new light will look as a result of the new mod.
I prefer the new look, anyone else believe I should have just left it alone because the first mod looked better?
~ Craig ~
03-14-2013, 04:36 PM
#140
Thread Starter
Join Date: Apr 2012
Location: Sellersville, PA
Posts: 775
Likes: 0
Received 0 Likes
on
0 Posts
No bites yet giving me input on the new headlight mod, but any thoughts on what I've done here ... good or bad?
I got some 8x14x4 sealed flange bearings & added them to the lower hull to support the drive shafts.

Now, I've seen the bearings placed inside the rear hubs attached to the outer lower hull, but I decided to mount mine right into the lower hull instead.
First I hand reamed out the existing hole, then just needed a little more taken out before press fitting the bearings.

I just used a big nut on the inside with a flat washer on the outside, & squeezed them in with channel lock pliers, flange side on the inside of the lower hull.
Repeat process for second side. The fit was very tight for both bearings.


The Walterson drive shafts are slightly wider than 8mm, & didn't want to slide through the 8mm bearing, so I did have to very lightly sand the shafts.

The shafts could then both be slid through the bearings & the gearboxes put back into their proper place again


I placed the sprockets back on & checked the track movement .... everything seems great.
Couple of things I am wondering ... was this a bad idea to do it this way rather than having the bearings in the outer cover plate, if this should work well enough, then should I use CA gel glue or epoxy around the bearings along the inside flange area to help secure them, should I add an inside holding panel around the bearing, that is glued to the hull to help hold the bearing in its place?
~ Craig ~
I got some 8x14x4 sealed flange bearings & added them to the lower hull to support the drive shafts.
Now, I've seen the bearings placed inside the rear hubs attached to the outer lower hull, but I decided to mount mine right into the lower hull instead.
First I hand reamed out the existing hole, then just needed a little more taken out before press fitting the bearings.
I just used a big nut on the inside with a flat washer on the outside, & squeezed them in with channel lock pliers, flange side on the inside of the lower hull.
Repeat process for second side. The fit was very tight for both bearings.
The Walterson drive shafts are slightly wider than 8mm, & didn't want to slide through the 8mm bearing, so I did have to very lightly sand the shafts.
The shafts could then both be slid through the bearings & the gearboxes put back into their proper place again
I placed the sprockets back on & checked the track movement .... everything seems great.
Couple of things I am wondering ... was this a bad idea to do it this way rather than having the bearings in the outer cover plate, if this should work well enough, then should I use CA gel glue or epoxy around the bearings along the inside flange area to help secure them, should I add an inside holding panel around the bearing, that is glued to the hull to help hold the bearing in its place?
~ Craig ~
03-14-2013, 05:50 PM
#141
ORIGINAL: B.A.D.A.S.S.Force
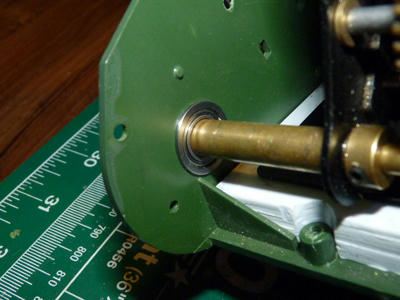
No bites yet giving me input on the new headlight mod, but any thoughts on what I've done here ... good or bad?I got some 8x14x4 sealed flange bearings & added them to the lower hull to support the drive shafts.
[img][/img]
Now, I've seen the bearings placed inside the rear hubs attached to the outer lower hull, but I decided to mount mine right into the lower hull instead.
First I hand reamed out the existing hole, then just needed a little more taken out before press fitting the bearings.
[img][/img]
I just used a big nut on the inside with a flat washer on the outside, & squeezed them in with channel lock pliers, flange side on the inside of the lower hull.
Repeat process for second side. The fit was very tight for both bearings.
[img][/img]
[img][/img]
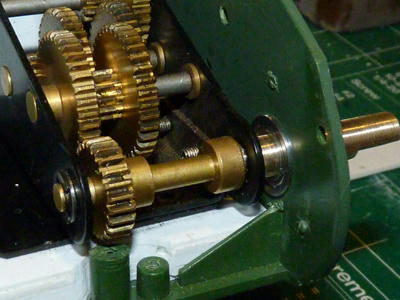
The Walterson drive shafts are slightly wider than 8mm, & didn't want to slide through the 8mm bearing, so I did have to very lightly sand the shafts.
[img][/img]
[img][/img]
The shafts could then both be slid through the bearings & the gearboxes put back into their proper place again
[img][/img]
[img][/img]
[img][/img]
I placed the sprockets back on & checked the track movement .... everything seems great.
Couple of things I am wondering ... was this a bad idea to do it this way rather than having the bearings in the outer cover plate, if this should work well enough, then should I use CA gel glue or epoxy around the bearings along the inside flange area to help secure them, should I add an inside holding panel around the bearing, that is glued to the hull to help hold the bearing in its place?
~ Craig ~
No bites yet giving me input on the new headlight mod, but any thoughts on what I've done here ... good or bad?I got some 8x14x4 sealed flange bearings & added them to the lower hull to support the drive shafts.
[img][/img]
Now, I've seen the bearings placed inside the rear hubs attached to the outer lower hull, but I decided to mount mine right into the lower hull instead.
First I hand reamed out the existing hole, then just needed a little more taken out before press fitting the bearings.
[img][/img]
I just used a big nut on the inside with a flat washer on the outside, & squeezed them in with channel lock pliers, flange side on the inside of the lower hull.
Repeat process for second side. The fit was very tight for both bearings.
[img][/img]
[img][/img]
The Walterson drive shafts are slightly wider than 8mm, & didn't want to slide through the 8mm bearing, so I did have to very lightly sand the shafts.
[img][/img]
[img][/img]
The shafts could then both be slid through the bearings & the gearboxes put back into their proper place again
[img][/img]
[img][/img]
[img][/img]
I placed the sprockets back on & checked the track movement .... everything seems great.
Couple of things I am wondering ... was this a bad idea to do it this way rather than having the bearings in the outer cover plate, if this should work well enough, then should I use CA gel glue or epoxy around the bearings along the inside flange area to help secure them, should I add an inside holding panel around the bearing, that is glued to the hull to help hold the bearing in its place?
~ Craig ~
LMAO
it looks Great i have to take one of mine now cause i tried the dome lens also
03-14-2013, 07:13 PM
#142
Join Date: May 2009
Location: Perth, ON, CANADA
Posts: 278
Likes: 0
Received 0 Likes
on
0 Posts
I like the bezel, but even thinner would look cooler. I can't find any decent pics of a KV1 front end to get some headlight detail so whadda I know!
Regardless, a great looking project and a quantum leap over the stock HL.
Mike.
Regardless, a great looking project and a quantum leap over the stock HL.
Mike.
03-14-2013, 07:29 PM
#143
Thread Starter
Join Date: Apr 2012
Location: Sellersville, PA
Posts: 775
Likes: 0
Received 0 Likes
on
0 Posts
ORIGINAL: Spitvalve
I like the bezel, but even thinner would look cooler. I can't find any decent pics of a KV1 front end to get some headlight detail so whadda I know!
Regardless, a great looking project and a quantum leap over the stock HL.
Mike.
I like the bezel, but even thinner would look cooler. I can't find any decent pics of a KV1 front end to get some headlight detail so whadda I know!
Regardless, a great looking project and a quantum leap over the stock HL.
Mike.
Which brings up the idea, maybe just construct a whole new housing purely out of milliput.
Hmmm, thinking about this more, maybe I should try (or "should" have tried) a larger #12 finishing washer. Even though the back side will be way bigger than the circumference of the headlight in the beginning, maybe by the time I grind most of the back away, until it's very thin & making it smaller in diameter, the size might then be right for the headlight housing anyway. The inside rounded bezel area will also be larger to start with, & it might produce a better looking headlight. I'll have to explore this idea now. LOL
~ Craig ~
03-16-2013, 05:52 PM
#144
Thread Starter
Join Date: Apr 2012
Location: Sellersville, PA
Posts: 775
Likes: 0
Received 0 Likes
on
0 Posts
Not to kick a dead horse ... but revisiting the headlight, I went out & purchased the #12 finishing washers & did it again.
This time is the last for the headlight, I'm satisified with how it looks now after this last modification, & I'll be keeping it this way, so here it is ...
Again, you can see the full #12 washer next to one of the same beginning size which I then had ground down, reamed out, & sanded thinner & smaller.
There is also the newer lens I made up with more score lines than the previous lens I was using.

Here is a close-up after I had painted the new metal rim washer & assembled the headlight again

Here are several pictures taken of the new headlight from different angles.


Last picture was taken with the headlight turned ON

~ Craig ~
This time is the last for the headlight, I'm satisified with how it looks now after this last modification, & I'll be keeping it this way, so here it is ...
Again, you can see the full #12 washer next to one of the same beginning size which I then had ground down, reamed out, & sanded thinner & smaller.
There is also the newer lens I made up with more score lines than the previous lens I was using.
Here is a close-up after I had painted the new metal rim washer & assembled the headlight again
Here are several pictures taken of the new headlight from different angles.
Last picture was taken with the headlight turned ON
~ Craig ~
03-16-2013, 06:23 PM
#145
Join Date: May 2009
Location: Perth, ON, CANADA
Posts: 278
Likes: 0
Received 0 Likes
on
0 Posts
Bullseye! Looks excellent. Of all the things to do to improve the looks of an HL KV1, this is it. The new lens looks sharp, too.
Demonstrably amiable!
Mike.
Demonstrably amiable!
Mike.
03-16-2013, 06:28 PM
#146
Member
Join Date: Mar 2013
Location: Conneaut, OH
Posts: 65
Likes: 0
Received 0 Likes
on
0 Posts
To make an incadescent light bulb nothing works better then the real thing. I like using grain of wheat lamps rated slightly higher then the operating voltage so they have that 'dim' look. But if only LEDs will do then a good trick is to use a warm white LED and dip it in Tamiya clear yellow. You can also paint the end of the LED and it will kill the beam and only let it illuminate the area. Also a larger resistor will dim the LED a bit.
Terry
03-17-2013, 04:17 PM
#147
Thread Starter
Join Date: Apr 2012
Location: Sellersville, PA
Posts: 775
Likes: 0
Received 0 Likes
on
0 Posts
ORIGINAL: Spitvalve
Bullseye! Looks excellent. Of all the things to do to improve the looks of an HL KV1, this is it. The new lens looks sharp, too.
Demonstrably amiable!
Mike.
Bullseye! Looks excellent. Of all the things to do to improve the looks of an HL KV1, this is it. The new lens looks sharp, too.
Demonstrably amiable!
Mike.
ORIGINAL: paintjockey
To make an incadescent light bulb nothing works better then the real thing. I like using grain of wheat lamps rated slightly higher thenthe operating voltage so they have that 'dim' look.But if only LEDs will do then a good trick is to use a warm white LED and dip itin Tamiya clear yellow. You can also paint the end of the LED and it will kill the beam and only let it illuminate the area. Also a larger resistor will dim the LED a bit.
Terry
Not sure I really want a really "dim" look, though I will want to make it more subdued than the full bright white LED lighting the bulb can put out. Besides tinting the LED itself, I can also sand the lens with 220 or a finer grit sand paper to cause the focused LED beam to diffuse a lot more, which should spread the illumination out better through the plastic lens I created, & soften up the harshness somewhat too. The earlier shot was just an unmodified LED hooked straight up to a battery on its own, not connected to the tank where the power will be shared between it & the rear red tail light LED, where I'm already using resistors to control the power going to it.
~ Craig ~
03-19-2013, 06:07 AM
#148
Member
Join Date: Mar 2013
Location: Conneaut, OH
Posts: 65
Likes: 0
Received 0 Likes
on
0 Posts
Incadescents last alot longer then people give them credit for. On my outdoor model railroad most of my buildings are lit this way and out of 30 or so incadescent lamps I have changed 1 in 6 years. My buildings are lit automaticly with a photosensor from dusk till dawn all of spring summer and fall. I also convert all of my locos to incadescent lamps.
BUT, as you said above they aren't getting bashed around in a tank so that probly would shorten their life.

As far as "dim" I could have used a better term. It takes the garrish bright hue away from LEDs and gives the LED a more realistic look. They also make flat top LEDs that do the same as sanding them. Just another option.
Love the work so far.
Terry
03-20-2013, 01:10 PM
#149
Thread Starter
Join Date: Apr 2012
Location: Sellersville, PA
Posts: 775
Likes: 0
Received 0 Likes
on
0 Posts
Can't seem to stop myself from doing additional tweaks here & there, so this time I decided to remove the front appliqué armor, do some plastic notching, & raise it up some, as well as removed the plastic electric conduit & made another one with wiring going to the horn & headlight.
This is the look of it so far ... I might start adding better detailed weld lines on this tank now too ... heaven help me!

The conduit & wiring was made using a similar gauge wire to the size of the original plastic conduit I pulled off, I then covered most of it with some heat shrink wrap to thicken the majority of it coming from the top of the hull.
I just put a curl in the wire where the horn is located, & then took the wire over to the headlight area.

To mount the new conduit in the existing original hole, I CA glued a small styrene tab to the shrink wrap, which plugs in nice & tight.

Here are a couple more close-up shots of the new look. I think once it's all painted it should look pretty good.


I realize the appliqué armor here probably should be even higher up over the top from some pictures I've seen, but going any higher & the current smaller sized piece would start to look odd. Since I didn't want to fabricate a larger piece, I thought this was a good enough compromise ... at least it isn't flush or slightly lower than the upper glacis plate anymore, & at least sticks up some. I guess it might look better to notch the plate to allow the conduit to go through it some too, rather than completely over the top of it. One thing for sure, if I add weld lines to the plate it will definitely look better.
~ Craig ~
This is the look of it so far ... I might start adding better detailed weld lines on this tank now too ... heaven help me!
The conduit & wiring was made using a similar gauge wire to the size of the original plastic conduit I pulled off, I then covered most of it with some heat shrink wrap to thicken the majority of it coming from the top of the hull.
I just put a curl in the wire where the horn is located, & then took the wire over to the headlight area.
To mount the new conduit in the existing original hole, I CA glued a small styrene tab to the shrink wrap, which plugs in nice & tight.
Here are a couple more close-up shots of the new look. I think once it's all painted it should look pretty good.
I realize the appliqué armor here probably should be even higher up over the top from some pictures I've seen, but going any higher & the current smaller sized piece would start to look odd. Since I didn't want to fabricate a larger piece, I thought this was a good enough compromise ... at least it isn't flush or slightly lower than the upper glacis plate anymore, & at least sticks up some. I guess it might look better to notch the plate to allow the conduit to go through it some too, rather than completely over the top of it. One thing for sure, if I add weld lines to the plate it will definitely look better.
~ Craig ~
03-31-2013, 02:09 PM
#150
Thread Starter
Join Date: Apr 2012
Location: Sellersville, PA
Posts: 775
Likes: 0
Received 0 Likes
on
0 Posts
Just wondering if modding the KV-1 road wheels is good enough with just 1 bearing in each wheel.
So far, this is what I have done.
Disassembled the road wheels into the basic parts for the bearing mod. I have some 6mm x 10mm x 3mm bearings (ID x OD x W)

The bearing fits nice & tight in the outer part of the road wheel just coming even with the notched area in the hub.

A close-up shows the inner wheel part having a key tab lock that will slip into the outer wheel's hub notch
Because of the large lip on the inner wheel which normally extends deep into the outer wheel, it all won't fit now because of the bearing


To make it fit properly, the inner wheel's lip was ground down to be even with the locking key tab, & the 2 parts then fit snuggly again


Things is, with just using 1 bearing on the outside wheel, the axle still goes through & rubs on the inner wheel's plastic hole. Because of the way the wheels are made, to use a bearing in the inner wheel too, by the time you drill it big enough to fit one, most the hub (that slides into the outer wheel) & the locking tab are gone.
So I would think I would have to use a flange bearing & just drill it all out, mount the bearing, then press the two parts together & glue them?
Is there another way using the stock wheels, or anyone see a thread with detailed pictures of someone installing 2 bearings per wheel already?
Finally, will the 1 bearing method I've done already be OK & better than nothing, so maybe just stick with that, or will it actually make things worse by just using one bearing in the road wheels like this?
Appreciate any input, thanks.
~Craig ~
So far, this is what I have done.
Disassembled the road wheels into the basic parts for the bearing mod. I have some 6mm x 10mm x 3mm bearings (ID x OD x W)
The bearing fits nice & tight in the outer part of the road wheel just coming even with the notched area in the hub.
A close-up shows the inner wheel part having a key tab lock that will slip into the outer wheel's hub notch
Because of the large lip on the inner wheel which normally extends deep into the outer wheel, it all won't fit now because of the bearing
To make it fit properly, the inner wheel's lip was ground down to be even with the locking key tab, & the 2 parts then fit snuggly again
Things is, with just using 1 bearing on the outside wheel, the axle still goes through & rubs on the inner wheel's plastic hole. Because of the way the wheels are made, to use a bearing in the inner wheel too, by the time you drill it big enough to fit one, most the hub (that slides into the outer wheel) & the locking tab are gone.
So I would think I would have to use a flange bearing & just drill it all out, mount the bearing, then press the two parts together & glue them?
Is there another way using the stock wheels, or anyone see a thread with detailed pictures of someone installing 2 bearings per wheel already?
Finally, will the 1 bearing method I've done already be OK & better than nothing, so maybe just stick with that, or will it actually make things worse by just using one bearing in the road wheels like this?
Appreciate any input, thanks.
~Craig ~