


1/6 Armortek Late Tiger I commission build
 03-18-2015, 07:44 AM
#26
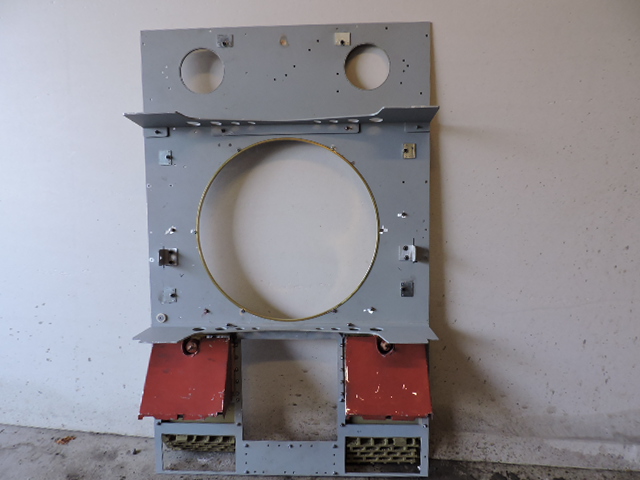
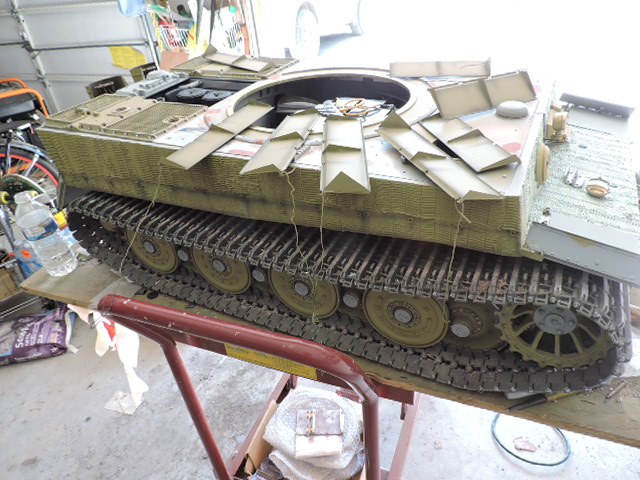
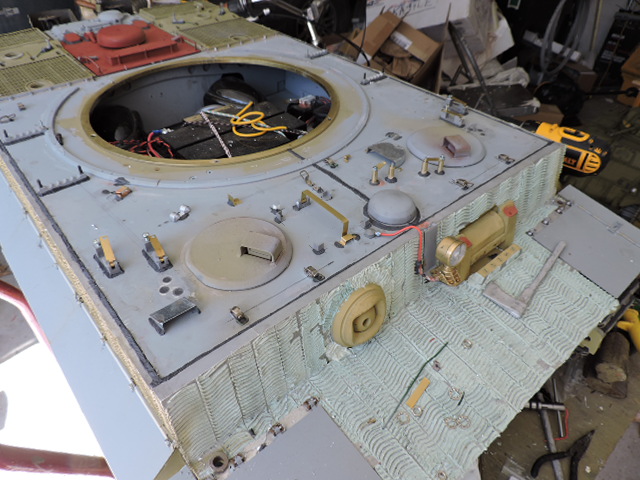
More progress has been made to the model,

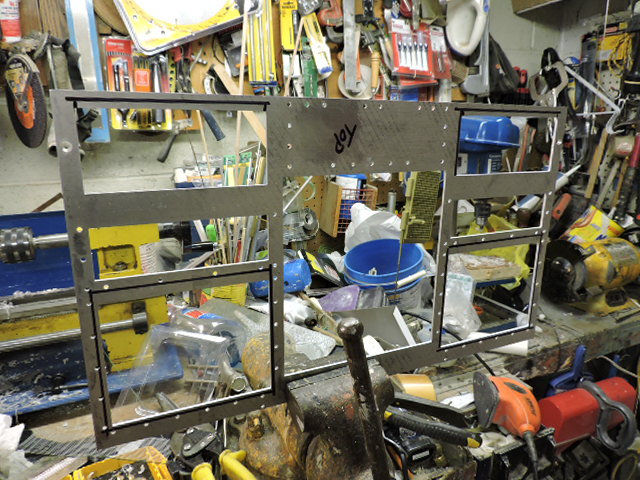
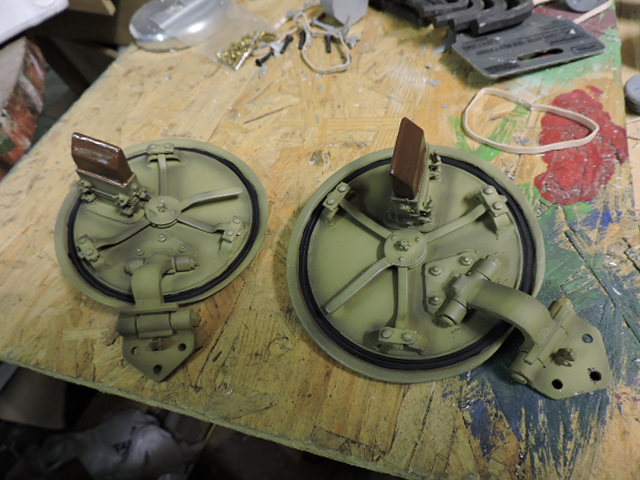
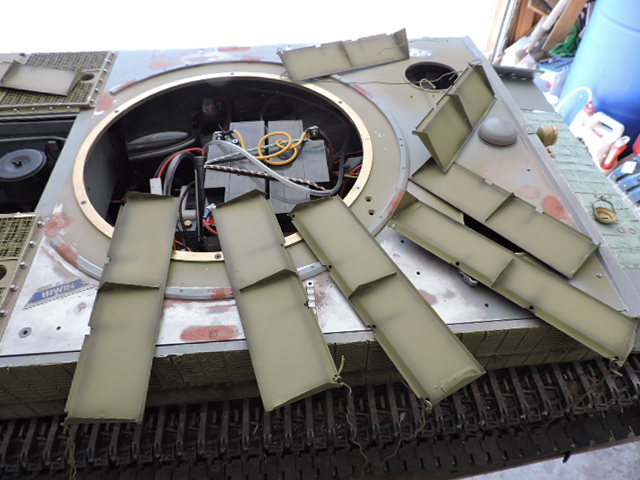
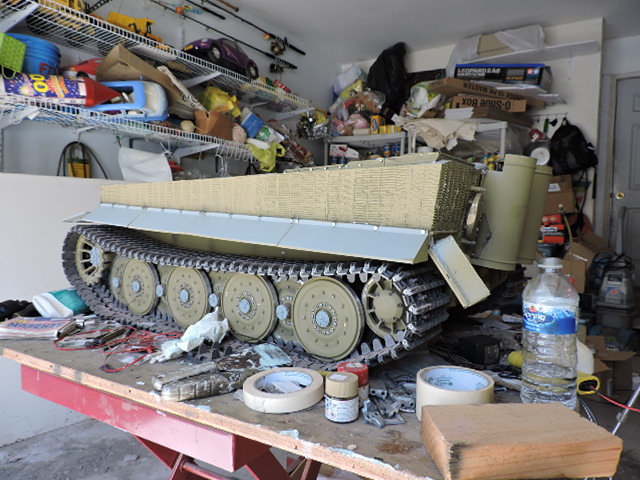
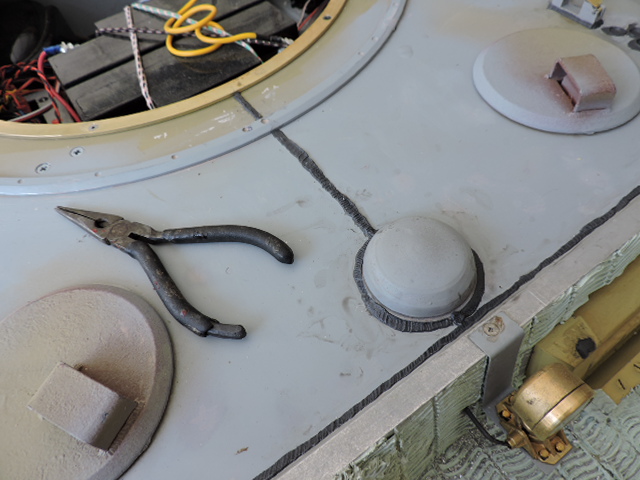
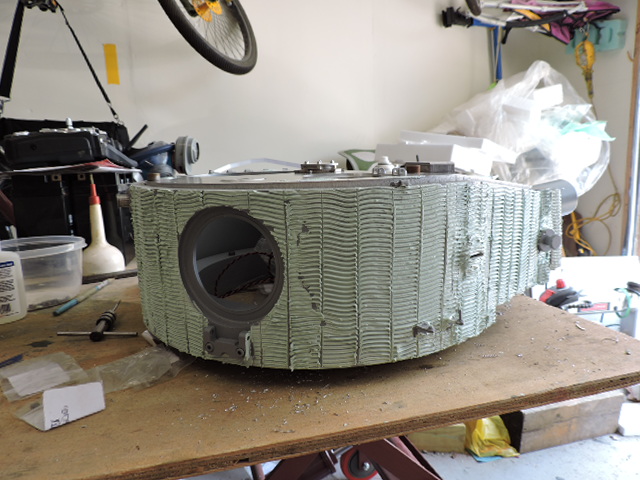
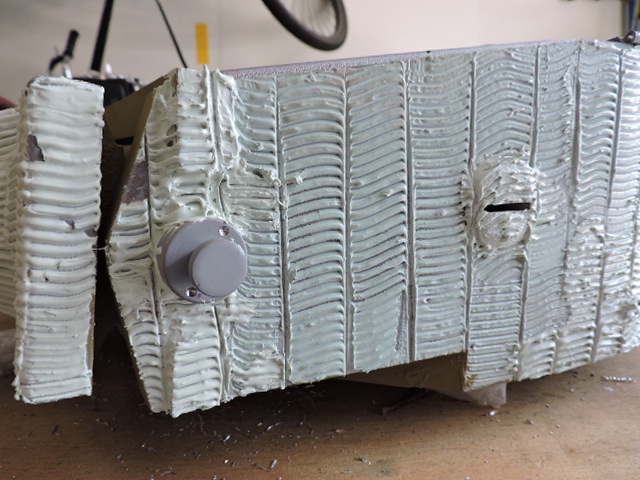
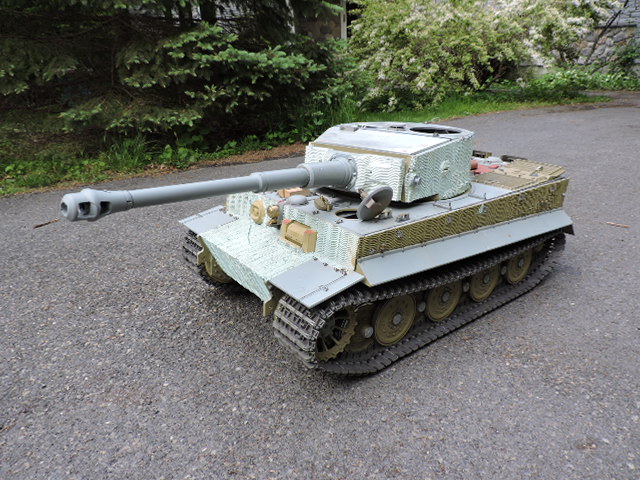
Lots of work was done to the top deck and the grillwork was mostly completed.
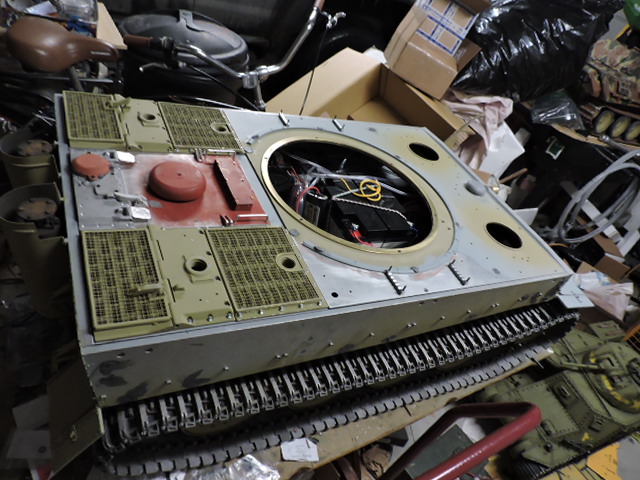
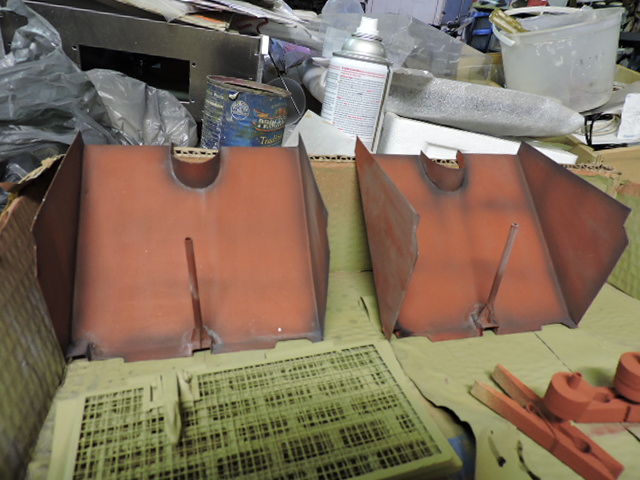
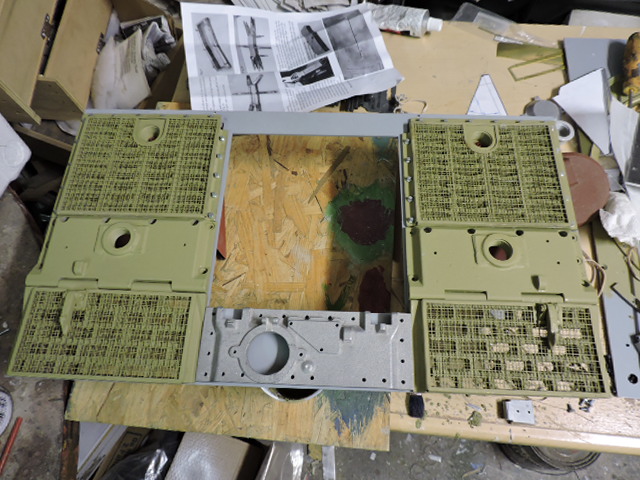
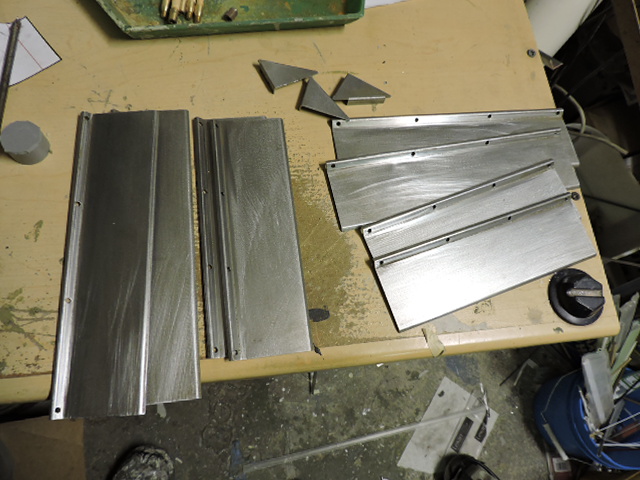
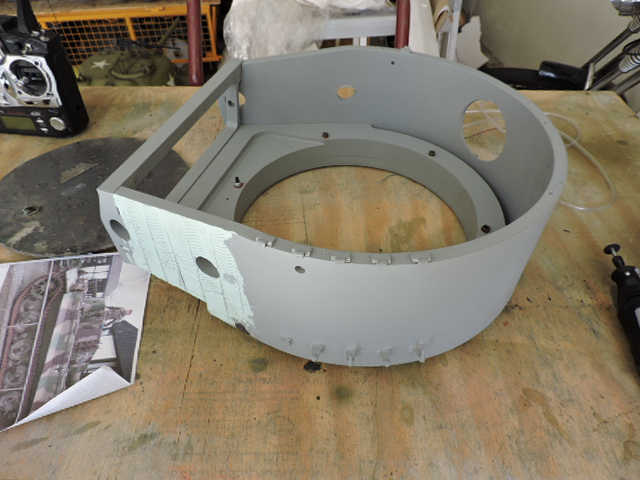
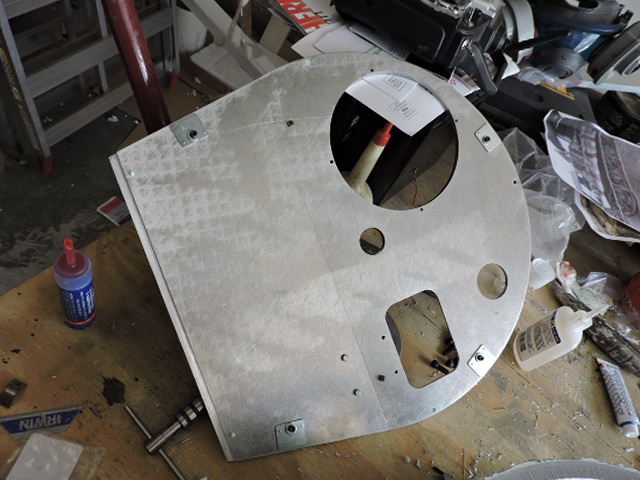
Before starting on the revisions the top deck was disassembled into it's major components. This newer version of the tiger features an multiple piece top deck made from Aluminum plate, while the earlier releases had this part made from a single steel plate.

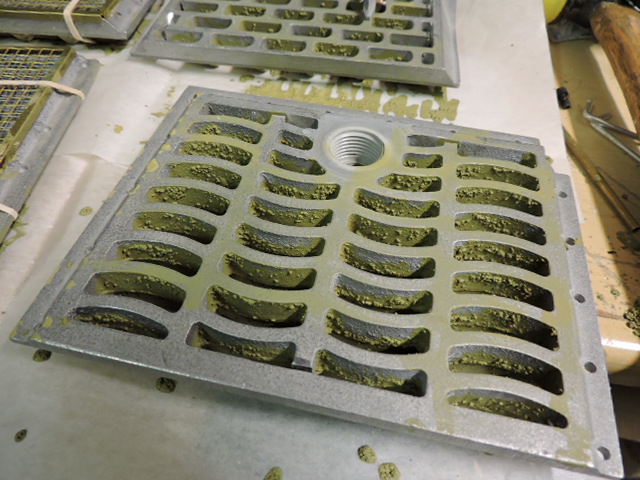
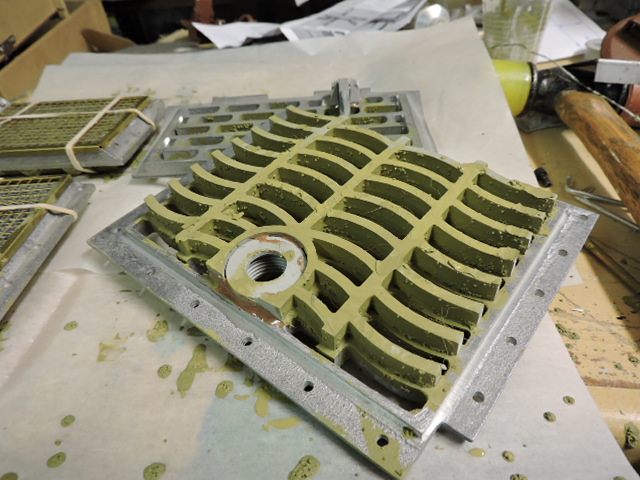
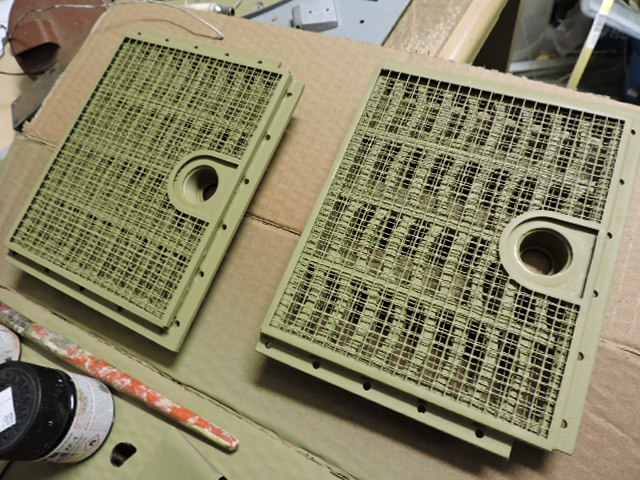
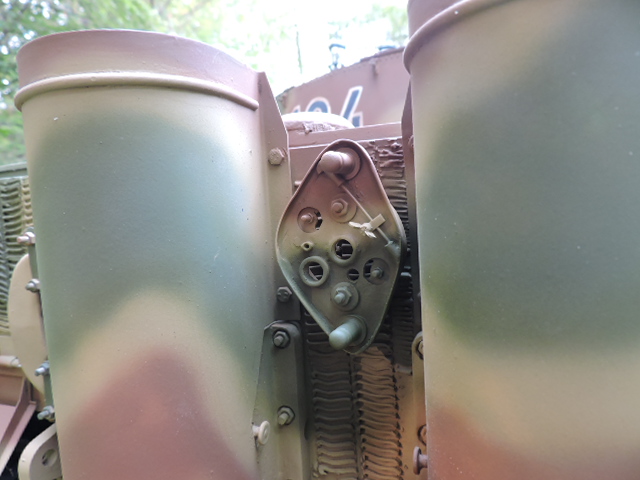
The grills themselves are made out of cast Aluminium and have a nice texture to them.
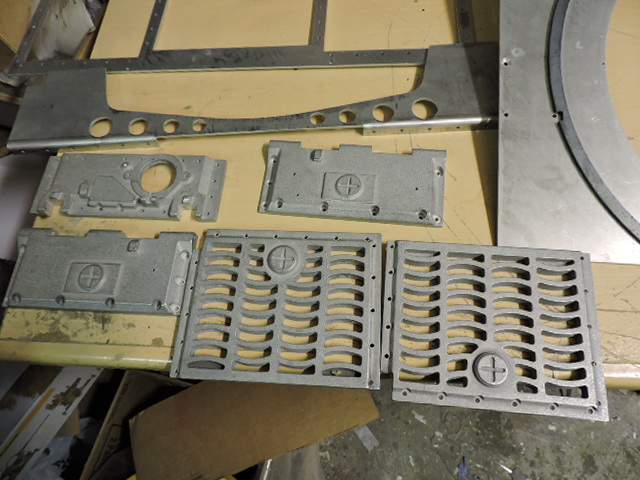
The grills are a nice starting point for further mods. To mod the grillwork I added the segment cut lines which are found on the real grills, and I removed the molded in fuel filler plug and replaced it with one of my resin drop in sets. The grills will be where you refill the smoke system
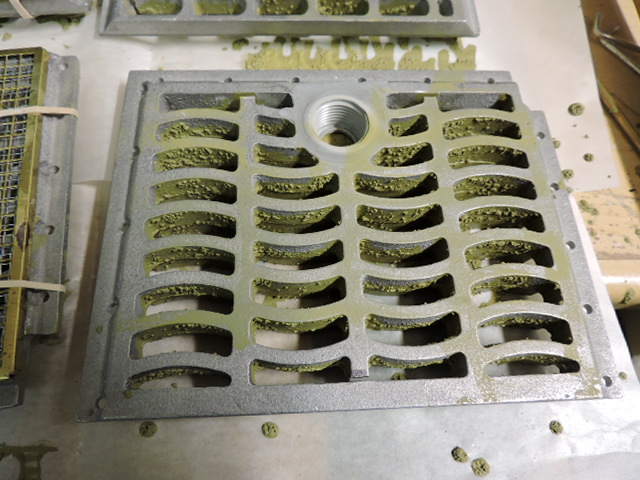
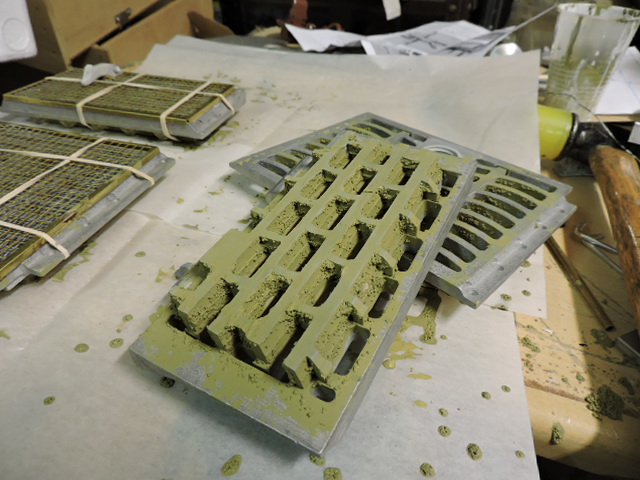
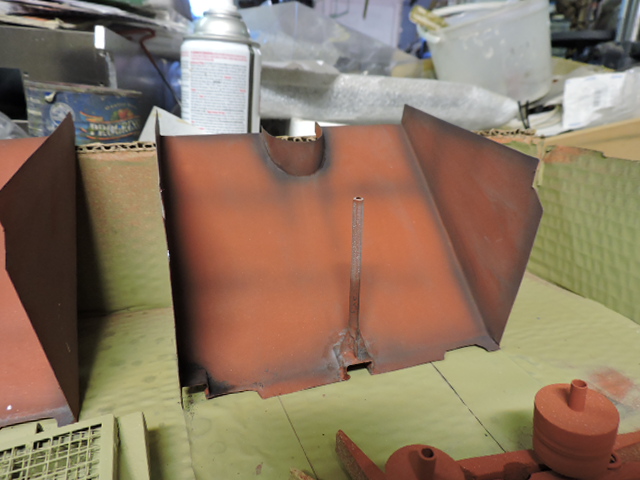
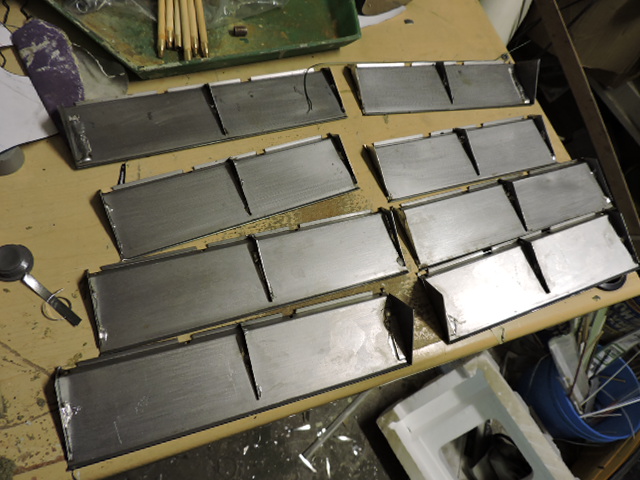
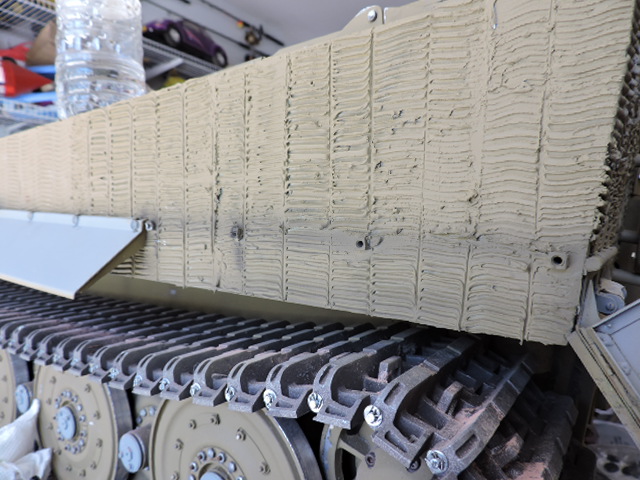
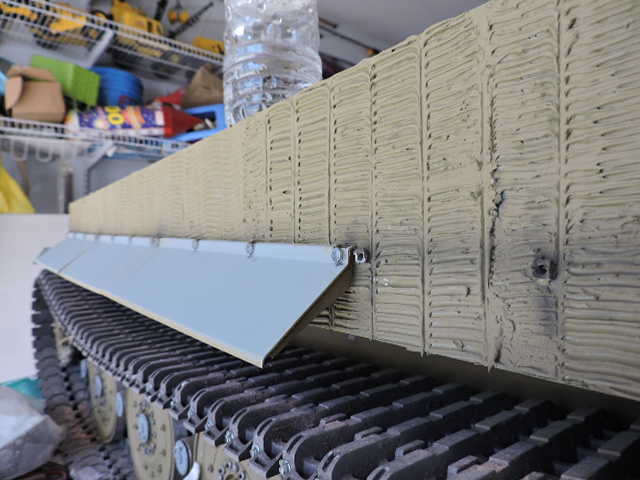
The Bottom portion of the grills were extended so that they have a better descend which is found on the real grillwork. Cast texture was added to help blend in the two parts and to give the rough texture that is found on the real tank.
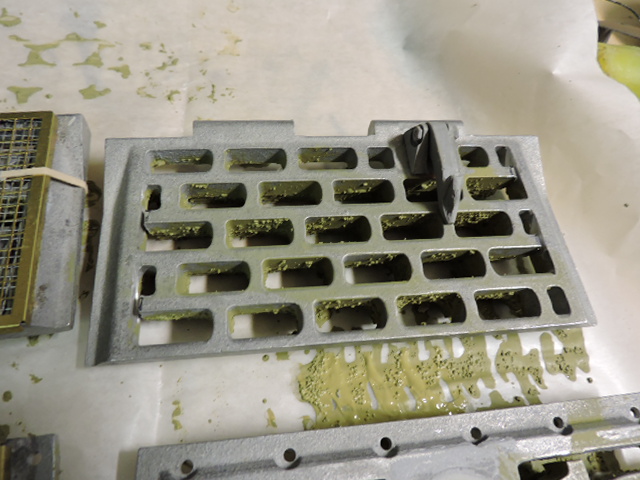
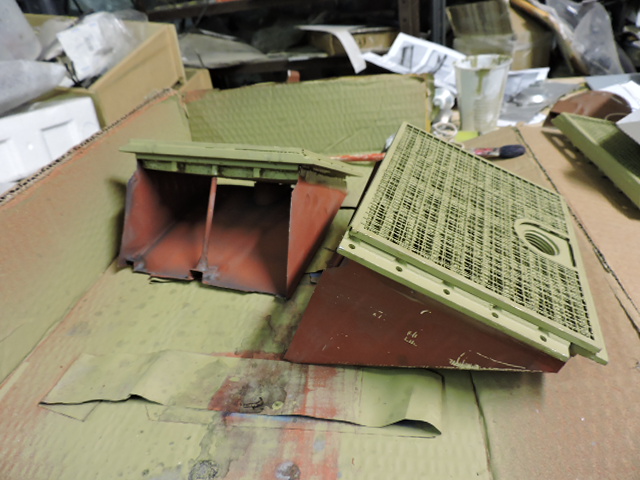
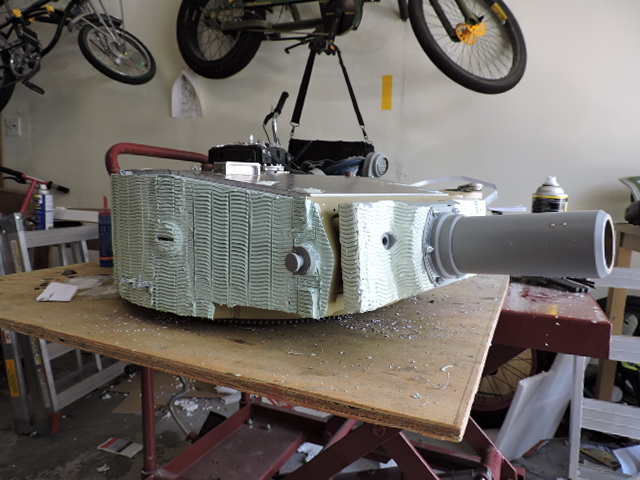
These mods were also made tothe fan grills, but also on the fan grills I replaced the molded in retaining hooks and replaced them with a set of my resin ones
The tank's grenade grills were also added. Unlike in the past where these would need to be either scratch built or acquired from aftermarket sources these 2012 release tigers have the grills supplied with the kit and are made from Photo Etch brass.
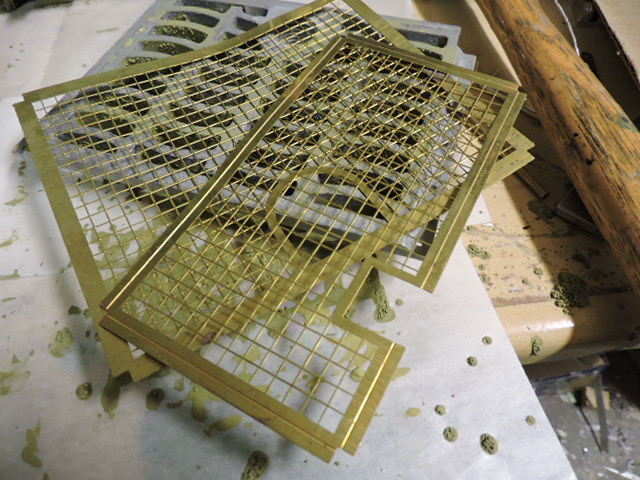
They simply bend together and get fitted to the grill work. not included are the finer mesh that was sandwiched in between the grill and the grill cover. The was a simple addition and was made out of varmint mesh. This is only added to the air intake / gas tank grills. The fan grills don't get this add on.

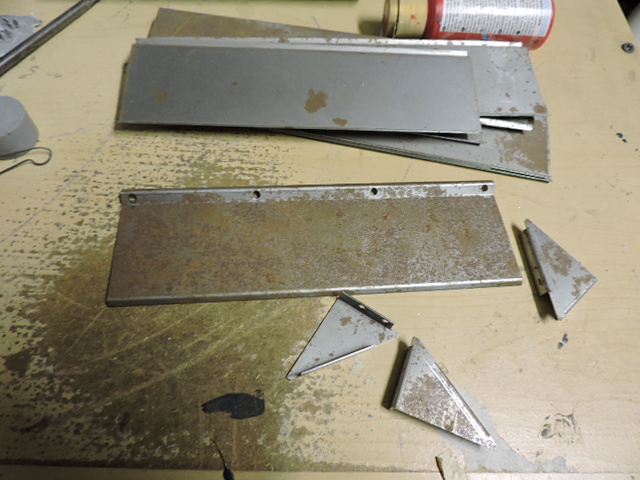
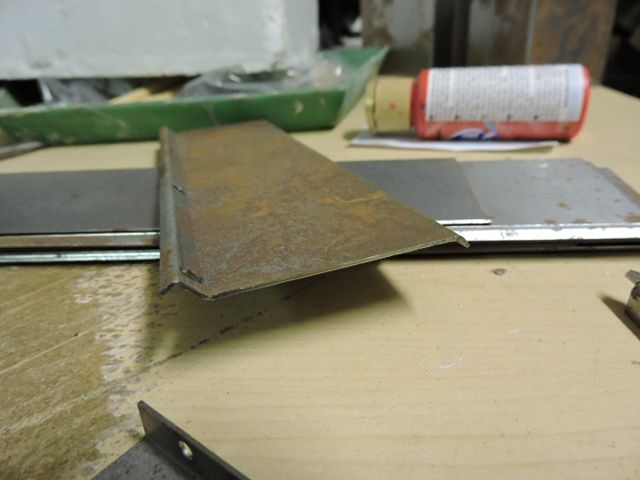
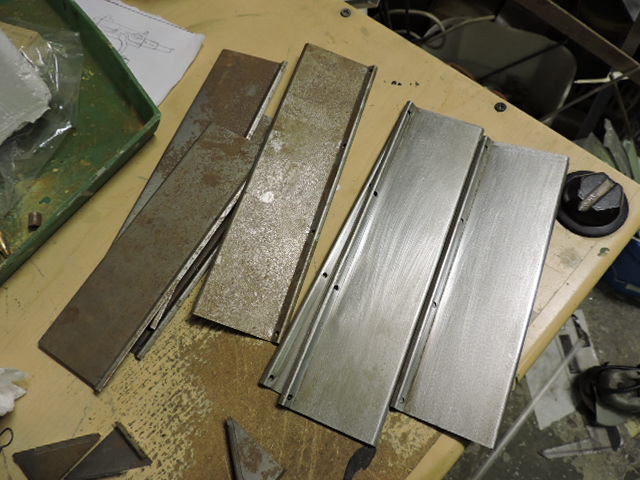
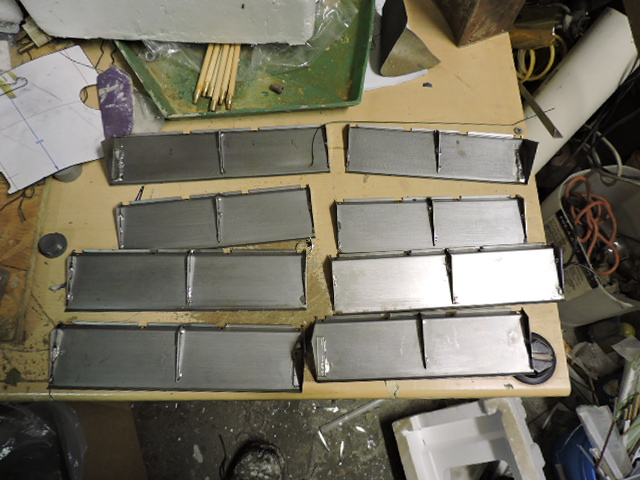
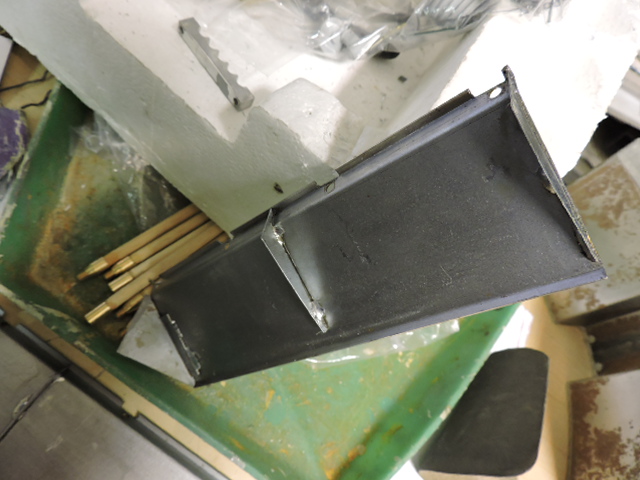
For the Intake grills the internal air duct was fabricated and painted / weathered. The duct is sheet metal and is another part listed on ECA. The duct protects the fuel tank from damage / debris. A common misconception is that the gas tanks are visible through the grill work, and that is not the case via the duct.
[img]http://eastcoastarmory.com/forumpic/late_tiger/grills/DSCN0011.JPG
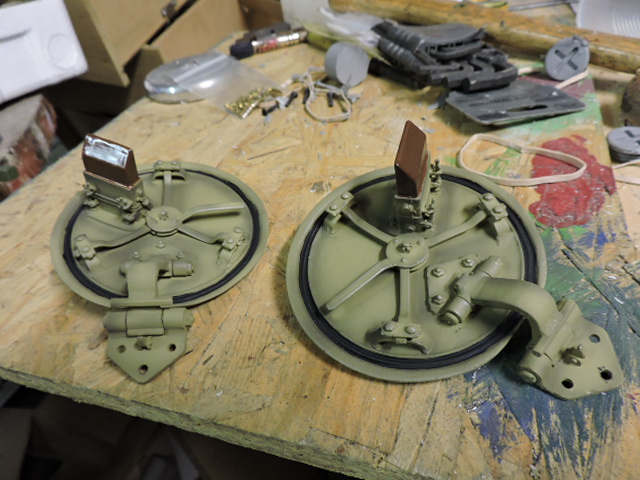
After painting the ducts were added and were ready for install
Lots of work was done to the top deck and the grillwork was mostly completed.
Before starting on the revisions the top deck was disassembled into it's major components. This newer version of the tiger features an multiple piece top deck made from Aluminum plate, while the earlier releases had this part made from a single steel plate.
The grills themselves are made out of cast Aluminium and have a nice texture to them.
The grills are a nice starting point for further mods. To mod the grillwork I added the segment cut lines which are found on the real grills, and I removed the molded in fuel filler plug and replaced it with one of my resin drop in sets. The grills will be where you refill the smoke system
The Bottom portion of the grills were extended so that they have a better descend which is found on the real grillwork. Cast texture was added to help blend in the two parts and to give the rough texture that is found on the real tank.
These mods were also made tothe fan grills, but also on the fan grills I replaced the molded in retaining hooks and replaced them with a set of my resin ones
The tank's grenade grills were also added. Unlike in the past where these would need to be either scratch built or acquired from aftermarket sources these 2012 release tigers have the grills supplied with the kit and are made from Photo Etch brass.
They simply bend together and get fitted to the grill work. not included are the finer mesh that was sandwiched in between the grill and the grill cover. The was a simple addition and was made out of varmint mesh. This is only added to the air intake / gas tank grills. The fan grills don't get this add on.
For the Intake grills the internal air duct was fabricated and painted / weathered. The duct is sheet metal and is another part listed on ECA. The duct protects the fuel tank from damage / debris. A common misconception is that the gas tanks are visible through the grill work, and that is not the case via the duct.
[img]http://eastcoastarmory.com/forumpic/late_tiger/grills/DSCN0011.JPG
After painting the ducts were added and were ready for install
Last edited by armourguy; 03-18-2015 at 07:46 AM.
 03-18-2015, 07:47 AM
#27
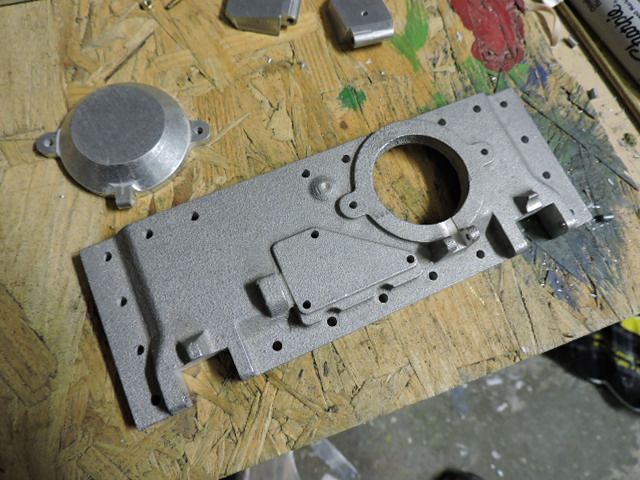
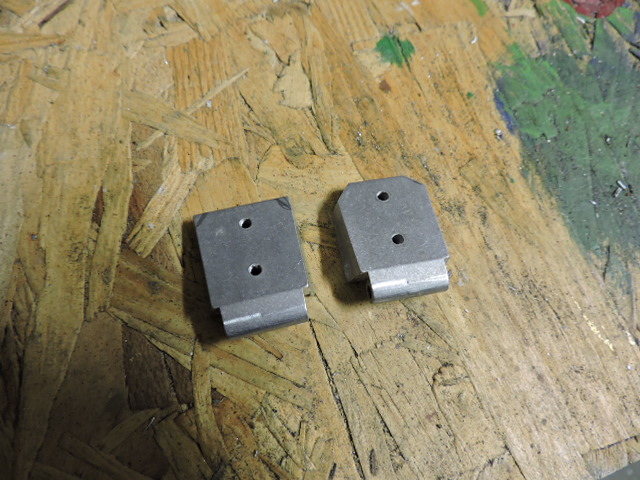
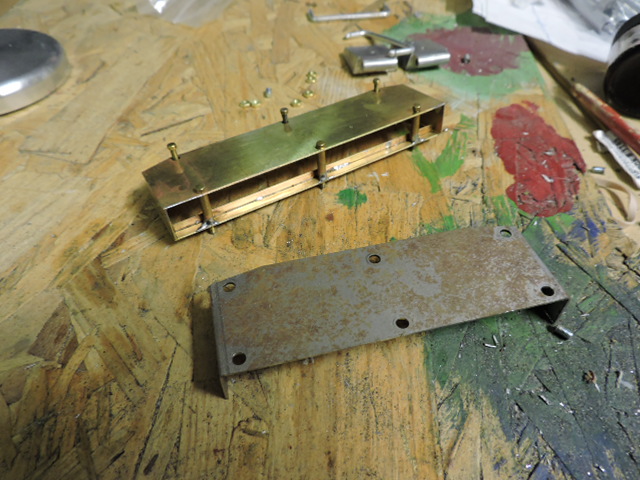
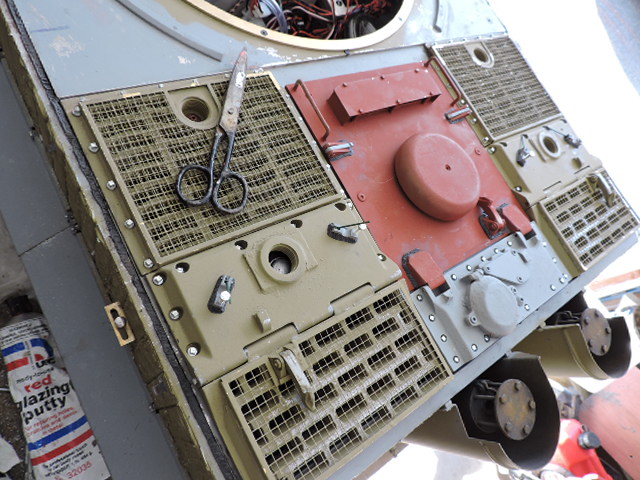
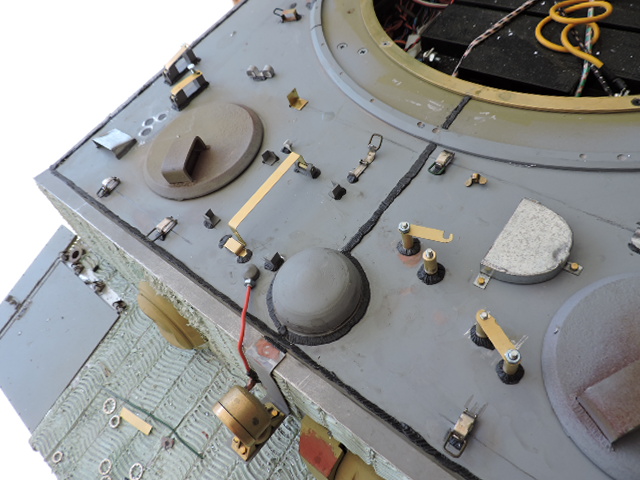
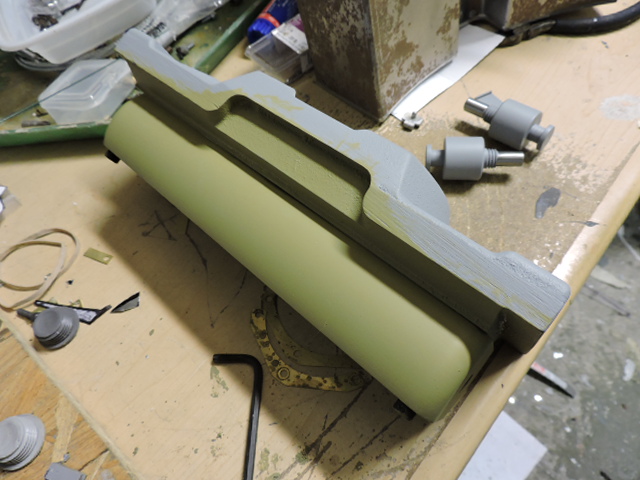
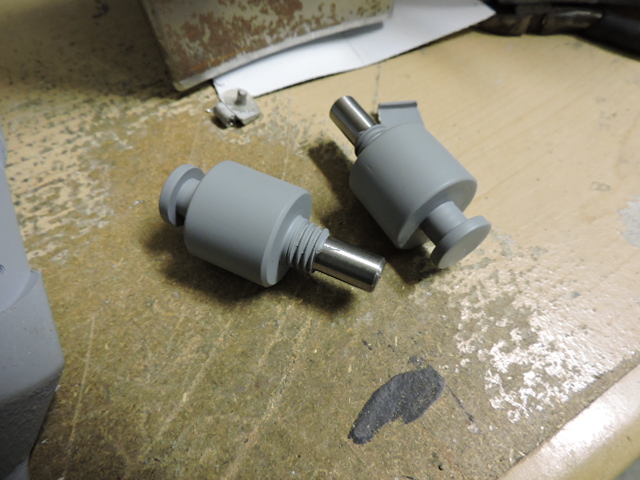
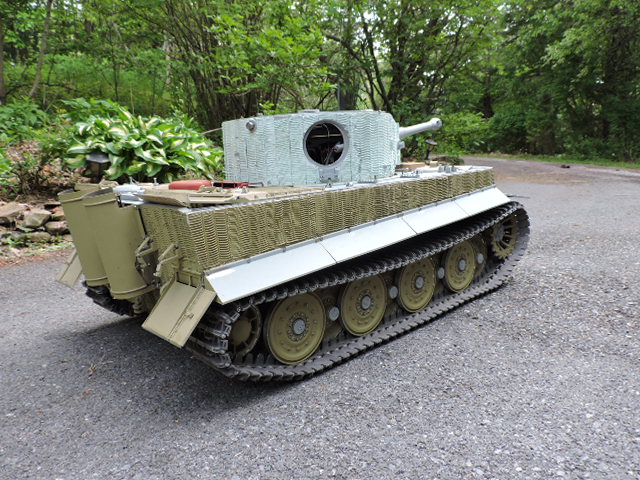
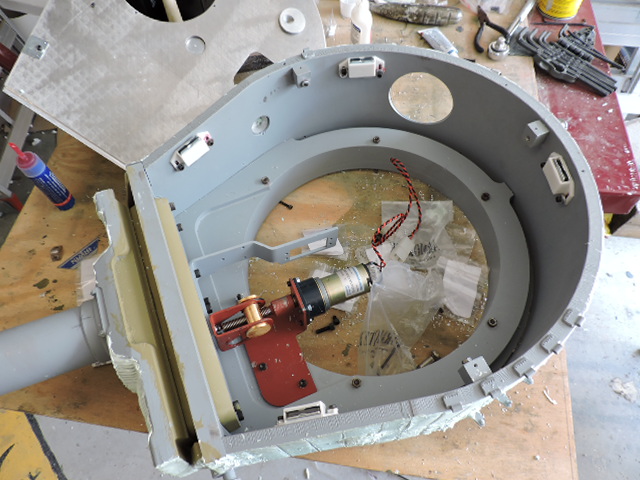
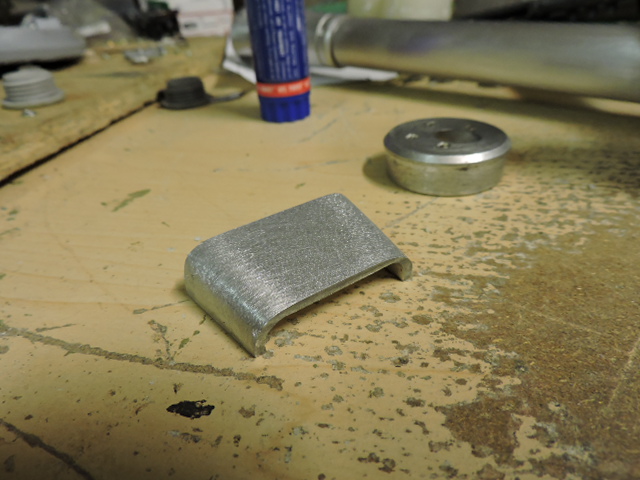
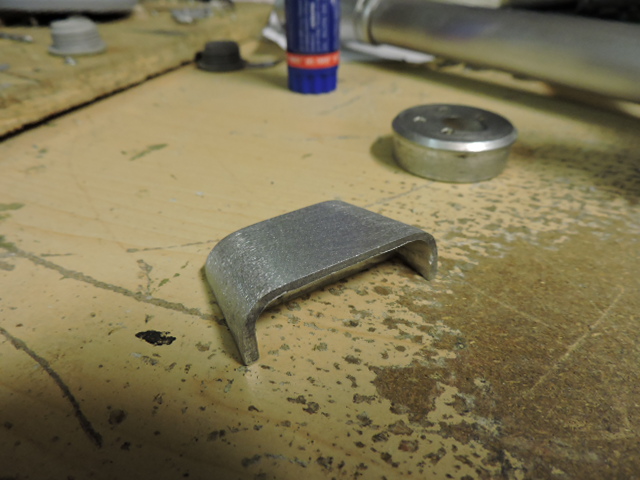
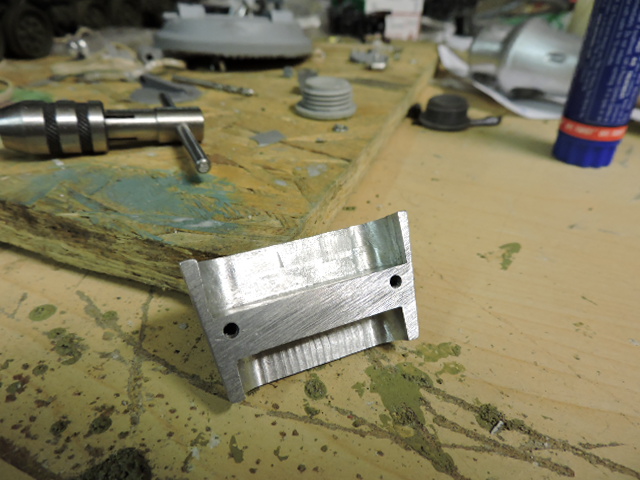
Because of the new descending parts the engine deck plate had to have been modded so the new modded grills can fit. Was not too difficult to add with a angle grinder and dremel as the top deck is all aluminum construction.
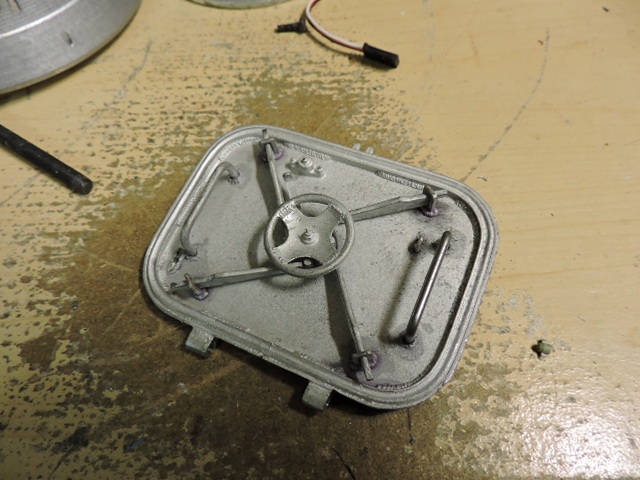
The tank's engine hatch also got a bit of a facelift, The kit supplied parts are the correct shape and make for a basic base to work from.
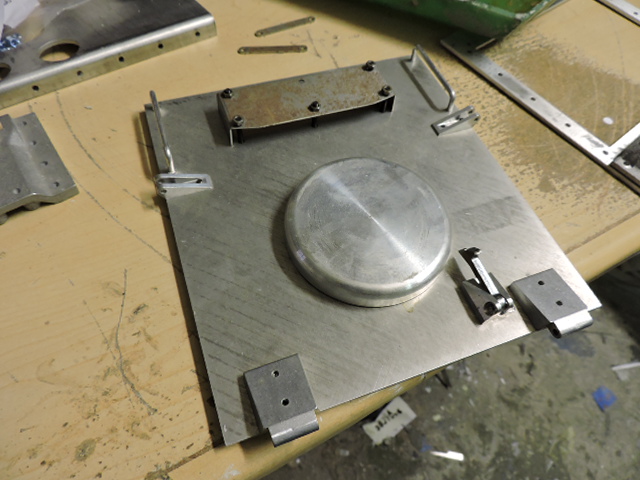
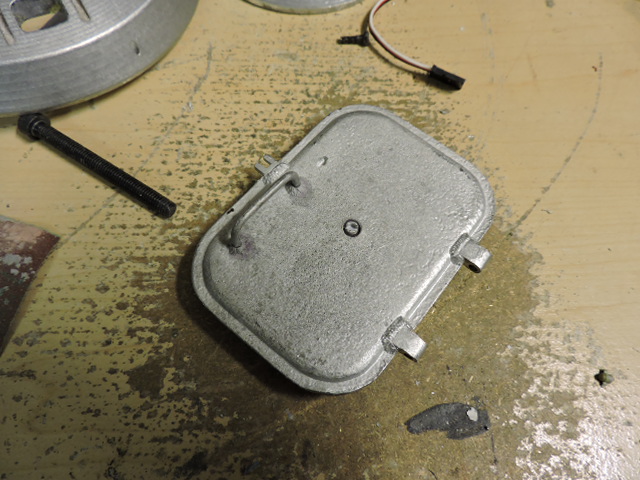
On the hinge plate the kit version is that of the later style with the absence of the snorkel screw cap. To polish the piece I removed the molded in cover cap plug and fabricated a new one out of turned resin. A new access plate was fabricated out of lexan and simply placed over the kit one.
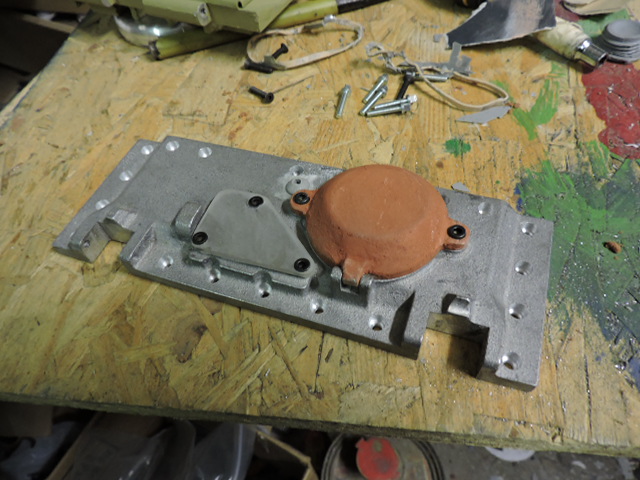
The Fastener holes were counter sunk in wells as was found on the real one. and the snorkel cover cap had cast texture and fastener wells added. Normally I would replace it with a resin hollow one, but because the fording feature was dropped the caps were no longer used, so since it will stay in the closed position replacing it was unnecessary.
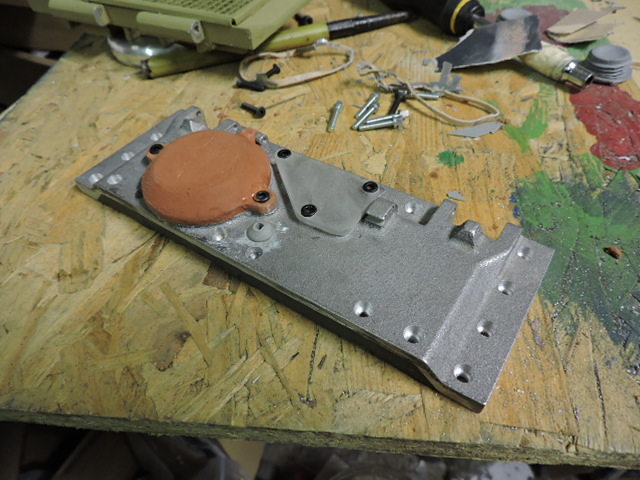
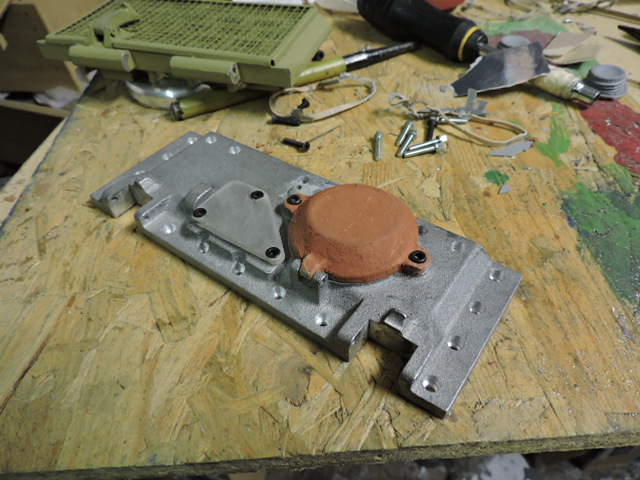
The hinge is also a hollow casting and the hollow back is seen when mounted to the model. To solve the problem the inside was filled with epoxy.
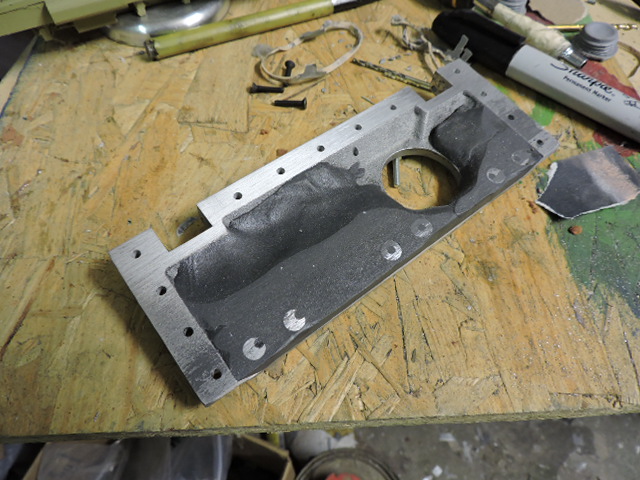
The hinges themselves were also slightly tweaked, Their shape was adjusted and had cast texture added after installation. All that needs to be added now are some weld beads... which will be added momentarily.
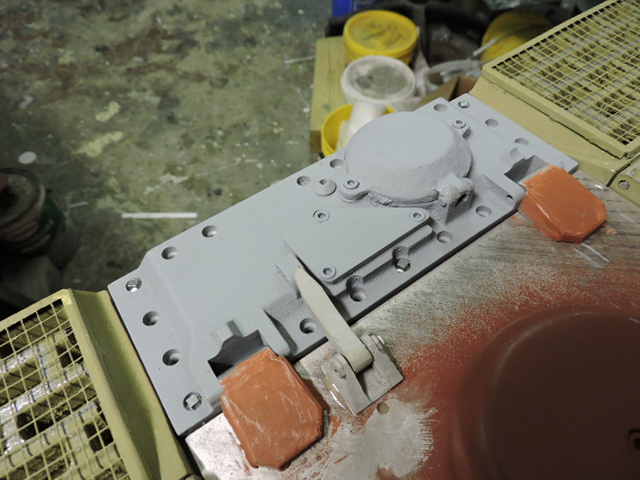
As for the Hatch because of the detailed engine compartment the interior of the engine hatch needed to be detailed. What was added to the kit the the addition of the secondary lip, and hatch locks, and new air intakes
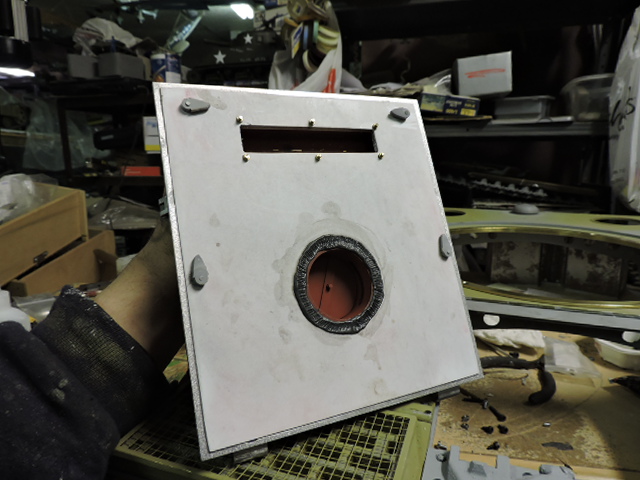
The main air intake was replaced with a Sixth Scale Icons set, Like all of Mike's work it is an amazing add on and really makes the hatch pop,
The tank's engine hatch also got a bit of a facelift, The kit supplied parts are the correct shape and make for a basic base to work from.
On the hinge plate the kit version is that of the later style with the absence of the snorkel screw cap. To polish the piece I removed the molded in cover cap plug and fabricated a new one out of turned resin. A new access plate was fabricated out of lexan and simply placed over the kit one.
The Fastener holes were counter sunk in wells as was found on the real one. and the snorkel cover cap had cast texture and fastener wells added. Normally I would replace it with a resin hollow one, but because the fording feature was dropped the caps were no longer used, so since it will stay in the closed position replacing it was unnecessary.
The hinge is also a hollow casting and the hollow back is seen when mounted to the model. To solve the problem the inside was filled with epoxy.
The hinges themselves were also slightly tweaked, Their shape was adjusted and had cast texture added after installation. All that needs to be added now are some weld beads... which will be added momentarily.
As for the Hatch because of the detailed engine compartment the interior of the engine hatch needed to be detailed. What was added to the kit the the addition of the secondary lip, and hatch locks, and new air intakes
The main air intake was replaced with a Sixth Scale Icons set, Like all of Mike's work it is an amazing add on and really makes the hatch pop,
03-18-2015, 07:47 AM
#28
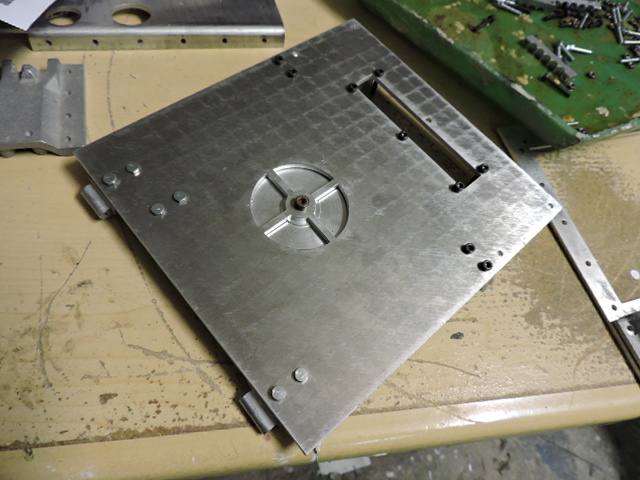
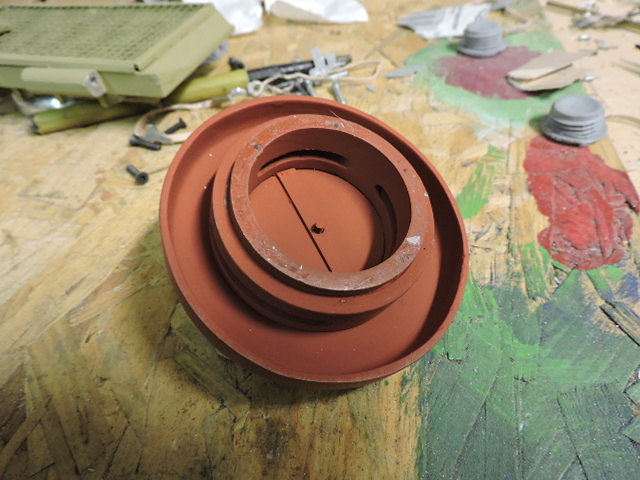
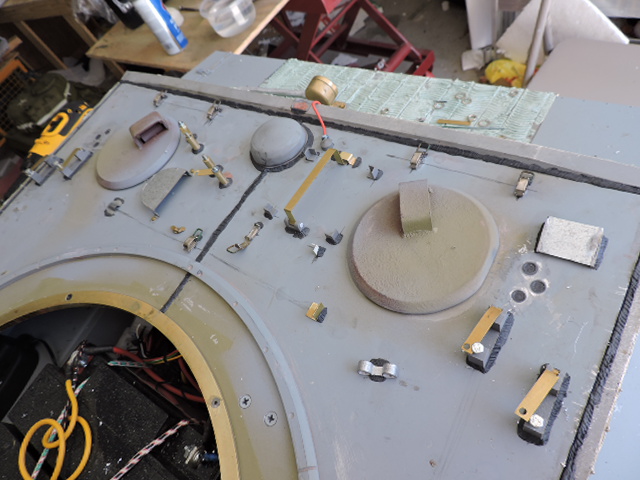
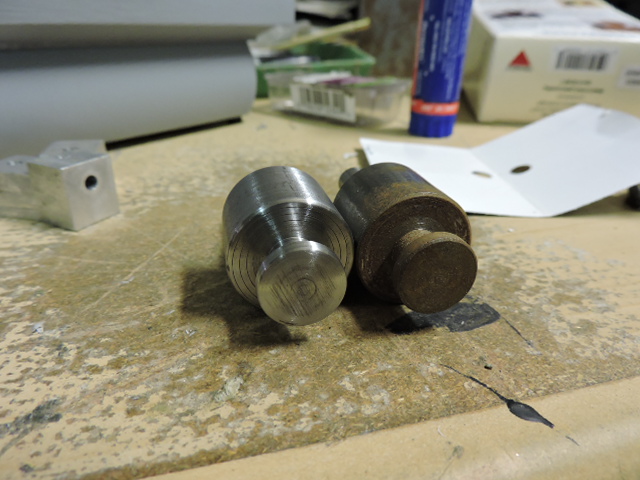
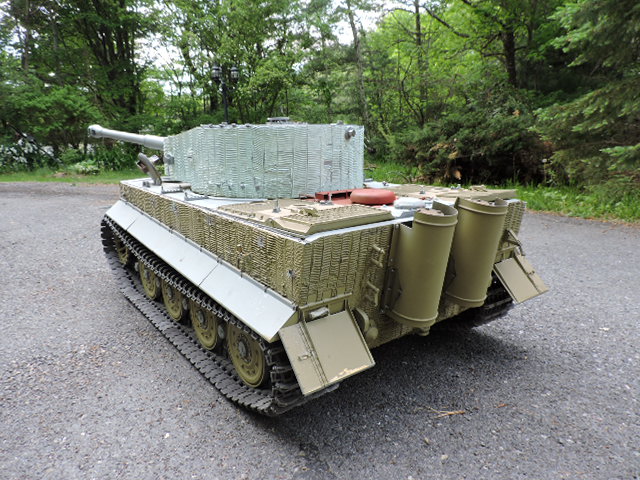
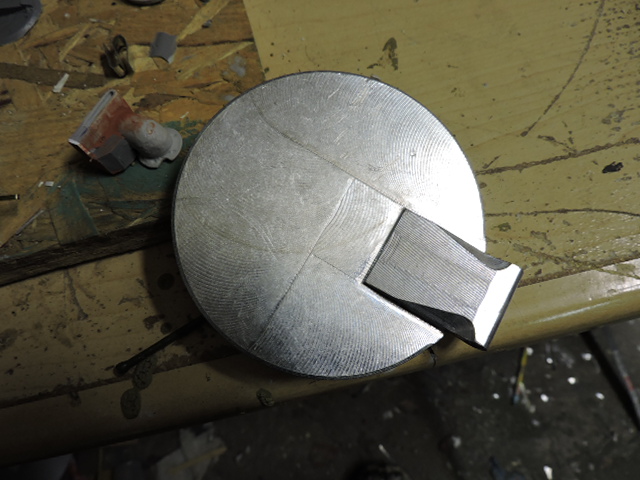
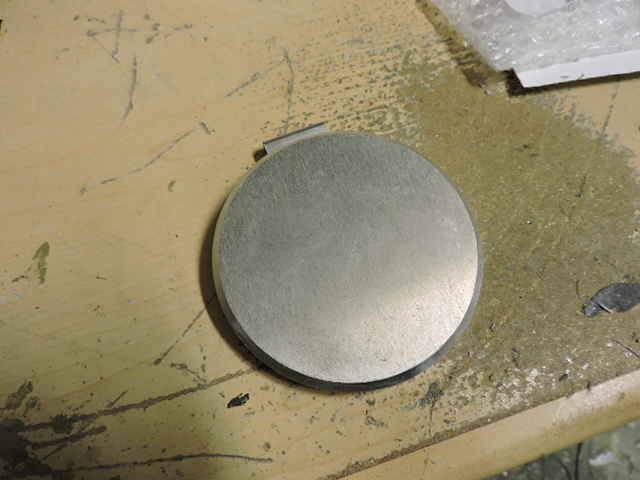
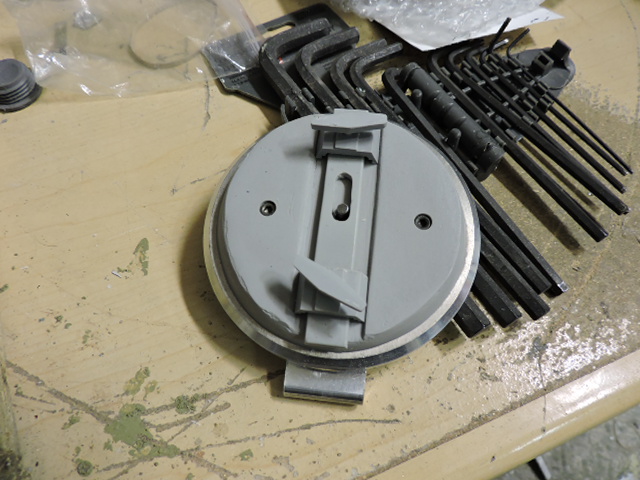
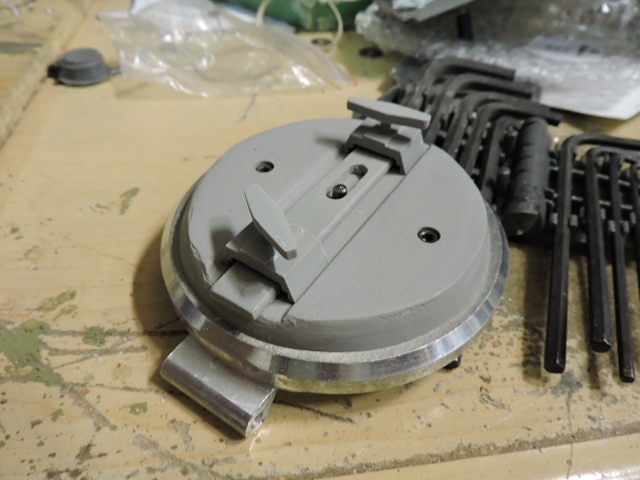
As for the dome intake this is a new part that I tooled up and added to the the ECA catalog.
http://eastcoastarmory.com/tiger.htm
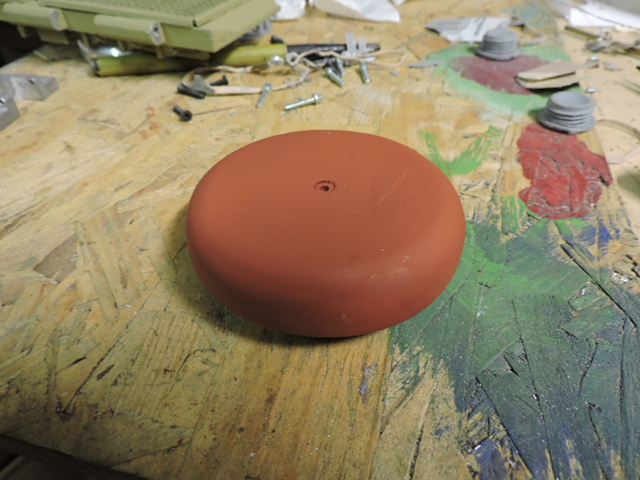
This version of the dome intake is the later style one. It differs from the earlier style that I have in that this is the style that would be seen on mid / late production tanks.
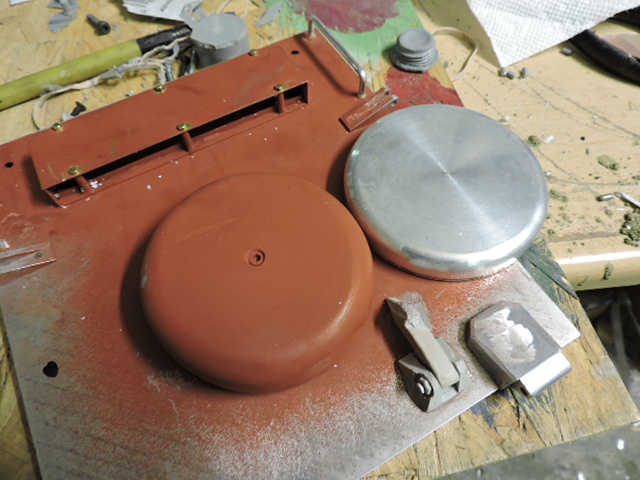
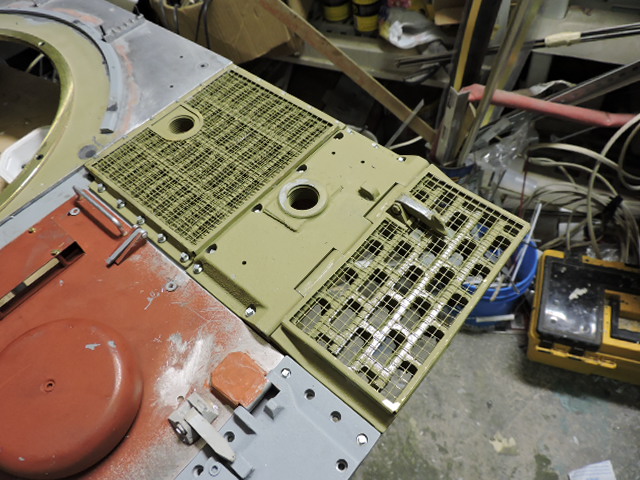
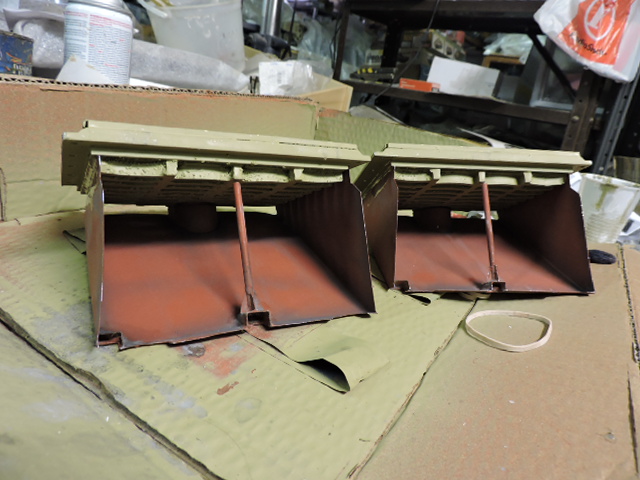
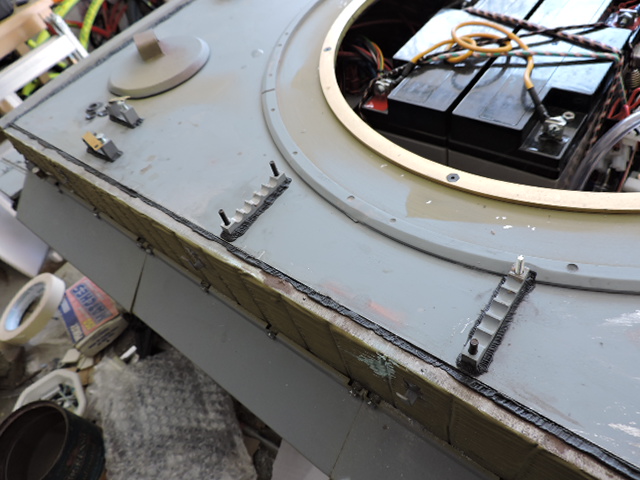
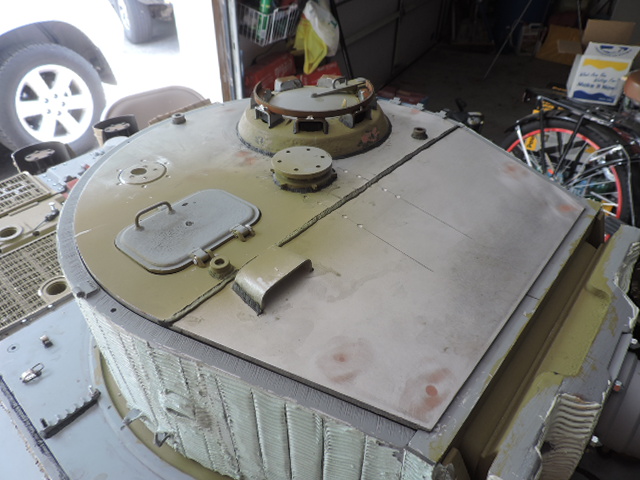
Once the hatch was completed all grill work was mounted to the rear deck.
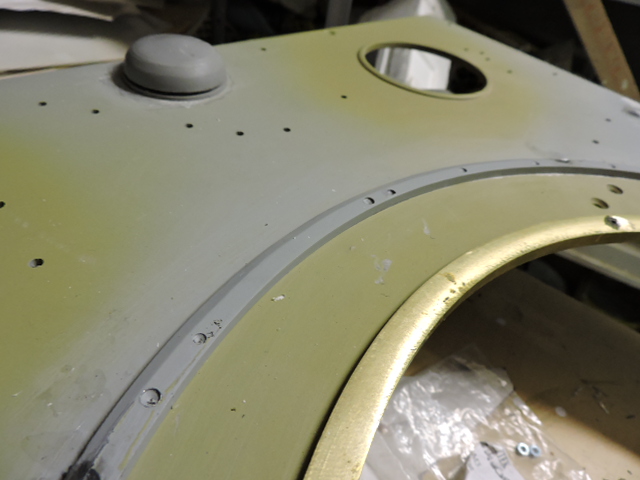
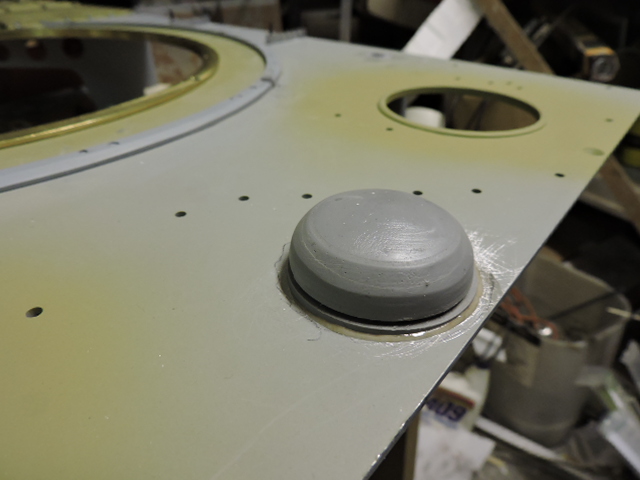
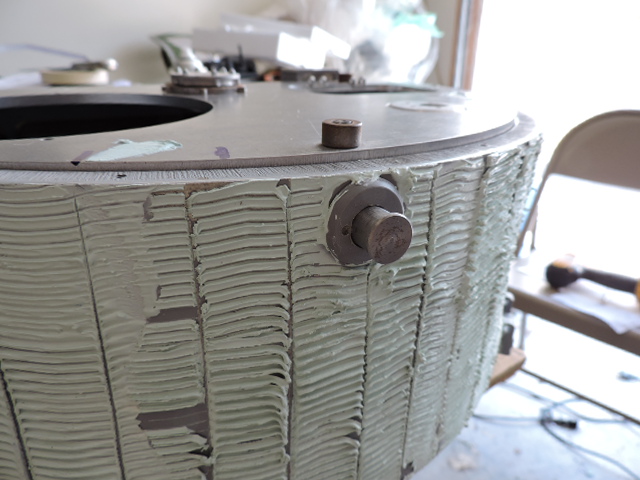
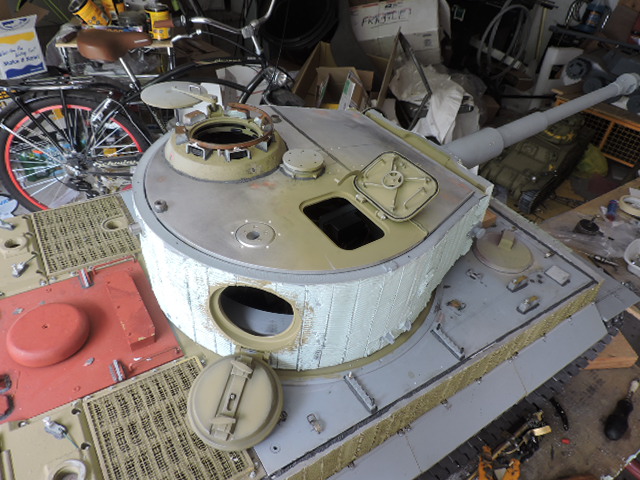
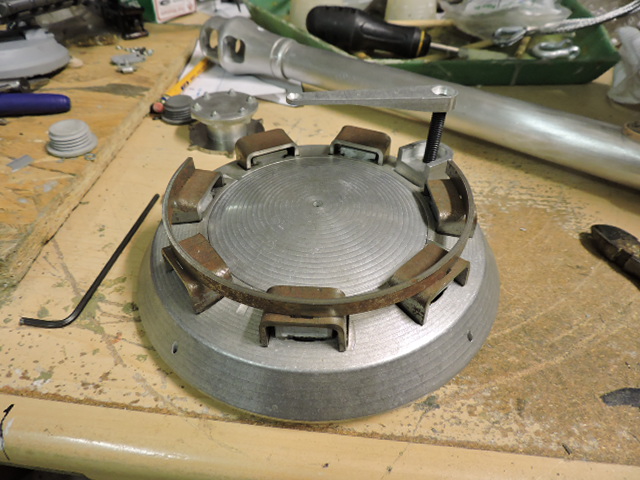
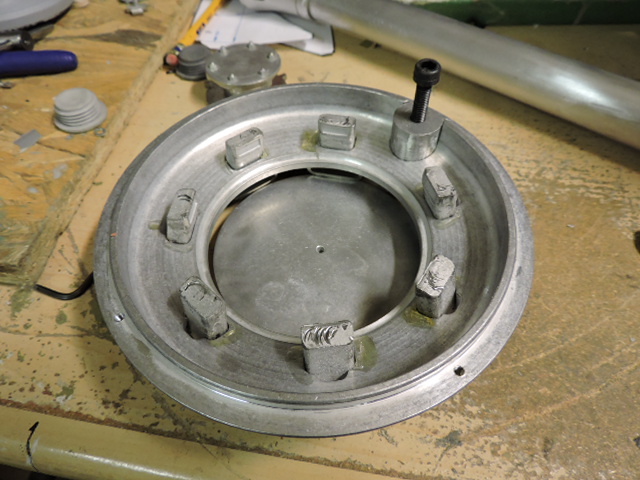
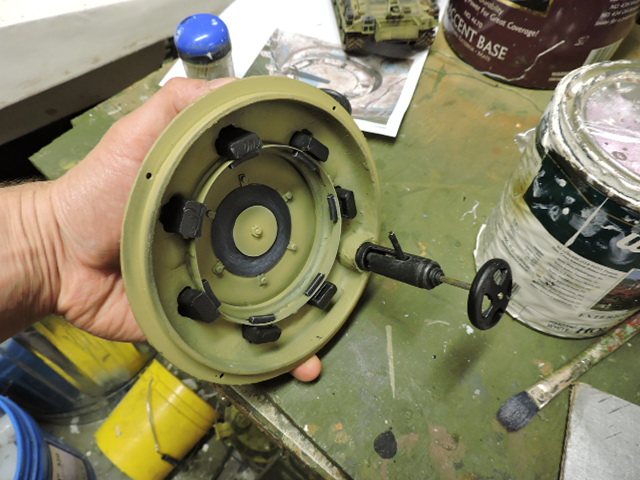
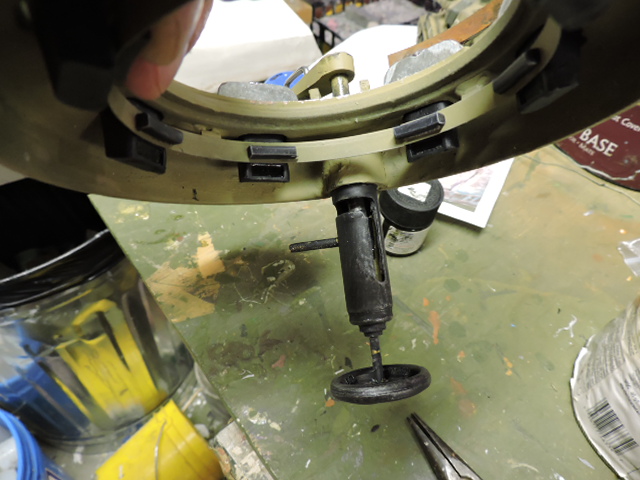
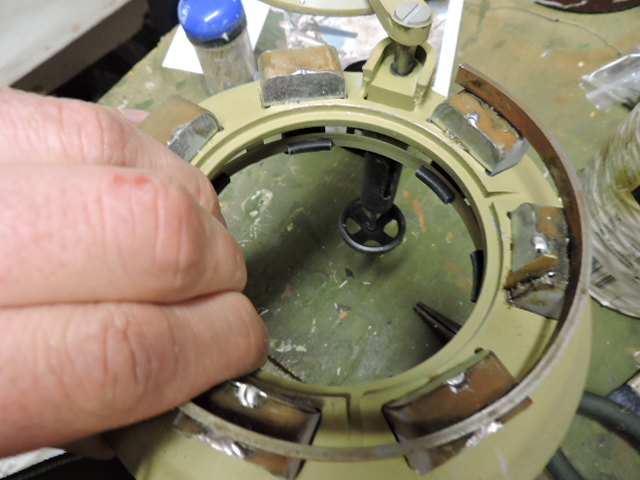
After the grillwork I turned my attention to the main deck. The Brass turret bushing was added. Like on all armortek builds I used counter Sunk fasteners to mount the ring to the deck. Also added was the late tiger turret joint guard and hatch ring bosses.
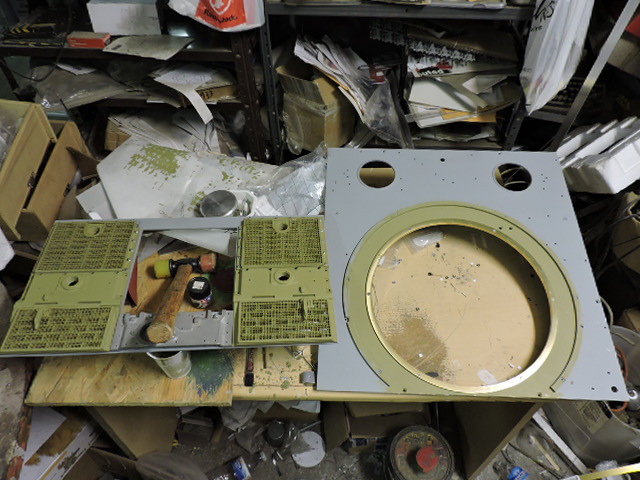
All parts were included with the kit. On the joint guard I modded the laser cut steel ring to have a bevel, segment and fastener detail. On the real tank the ring was not welded and was bolted to the tank from the inside.
On the front portion I replaced the basic kit original intake dome with one of my own resin ones. This part is not on the catalog as one is listed on Panzerwerk.
The Bow hatches were also painted / weathered. Not sure if they are the kit original, or were acquired by the previous builder, but the hatches are all white metal, and are very detailed... perhaps armorpax? Either way no mods were made and detail wise were left as is.
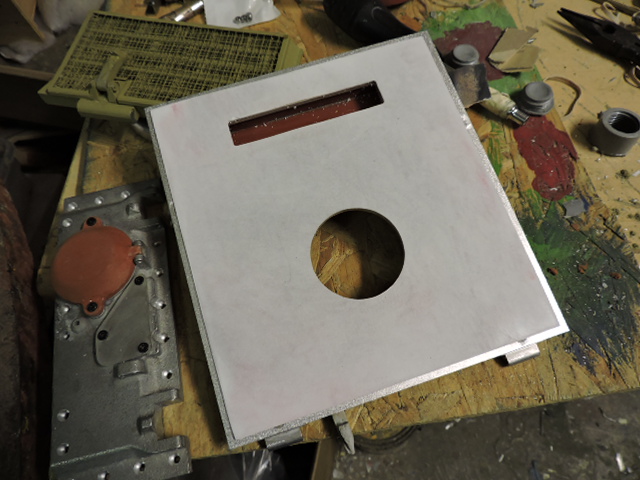
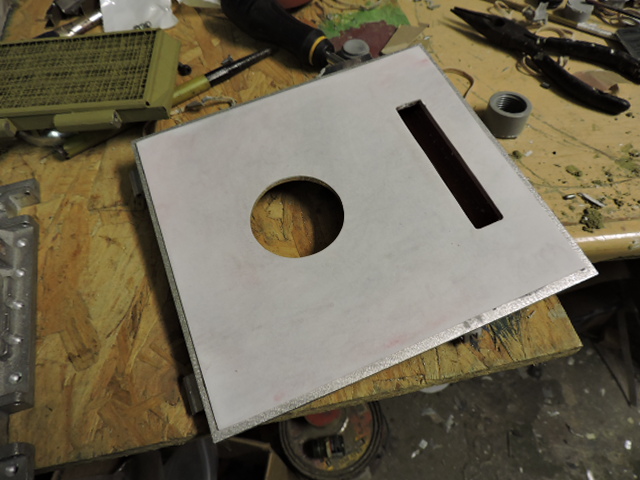
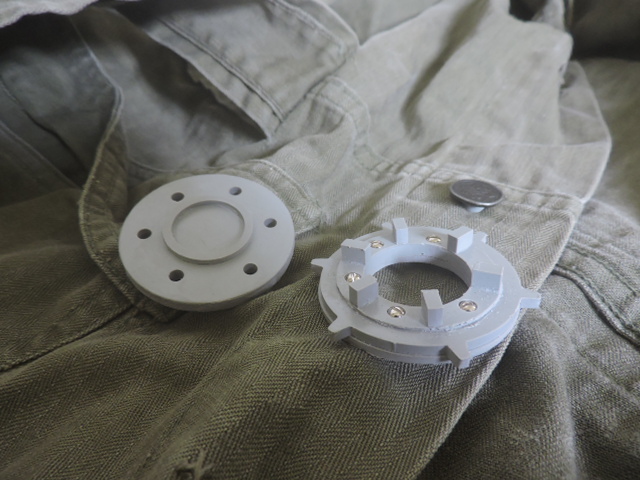
Finally the top deck mounts were fabricated. Because of the engine compartment and other RC access the top deck was modded to be removable. This was done with a combination of magnets and fasteners.
With the new setup the top deck locks on securely, but is removable in the off chance access is required.

More pics were posted on the facebook page
http://www.facebook.com/EastCoastArmory
and two videos were posted on youtube
https://youtu.be/fCYzL813tRo
https://youtu.be/XaFQxnIZ26c
Currently I'm working on the hull zemmerite and side skirts. The turret was also started and once I have more progress I'll post another update... More to come!
http://eastcoastarmory.com/tiger.htm
This version of the dome intake is the later style one. It differs from the earlier style that I have in that this is the style that would be seen on mid / late production tanks.
Once the hatch was completed all grill work was mounted to the rear deck.
After the grillwork I turned my attention to the main deck. The Brass turret bushing was added. Like on all armortek builds I used counter Sunk fasteners to mount the ring to the deck. Also added was the late tiger turret joint guard and hatch ring bosses.
All parts were included with the kit. On the joint guard I modded the laser cut steel ring to have a bevel, segment and fastener detail. On the real tank the ring was not welded and was bolted to the tank from the inside.
On the front portion I replaced the basic kit original intake dome with one of my own resin ones. This part is not on the catalog as one is listed on Panzerwerk.
The Bow hatches were also painted / weathered. Not sure if they are the kit original, or were acquired by the previous builder, but the hatches are all white metal, and are very detailed... perhaps armorpax? Either way no mods were made and detail wise were left as is.
Finally the top deck mounts were fabricated. Because of the engine compartment and other RC access the top deck was modded to be removable. This was done with a combination of magnets and fasteners.
With the new setup the top deck locks on securely, but is removable in the off chance access is required.
More pics were posted on the facebook page
http://www.facebook.com/EastCoastArmory
and two videos were posted on youtube
https://youtu.be/fCYzL813tRo
https://youtu.be/XaFQxnIZ26c
Currently I'm working on the hull zemmerite and side skirts. The turret was also started and once I have more progress I'll post another update... More to come!
04-18-2015, 06:39 PM
#29
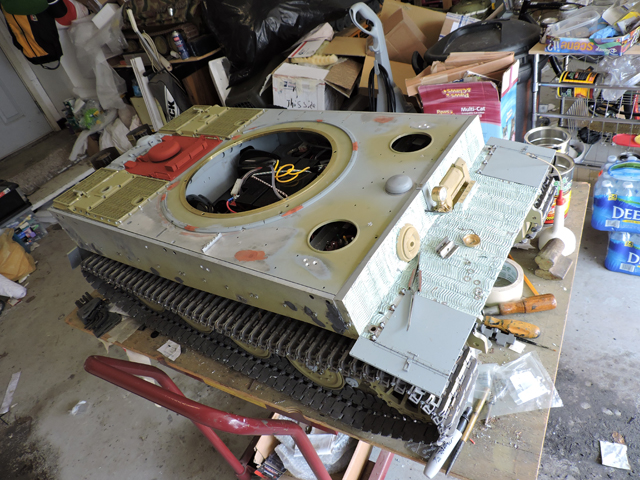
More progress has been made to the model and it is now a step closer to completion!
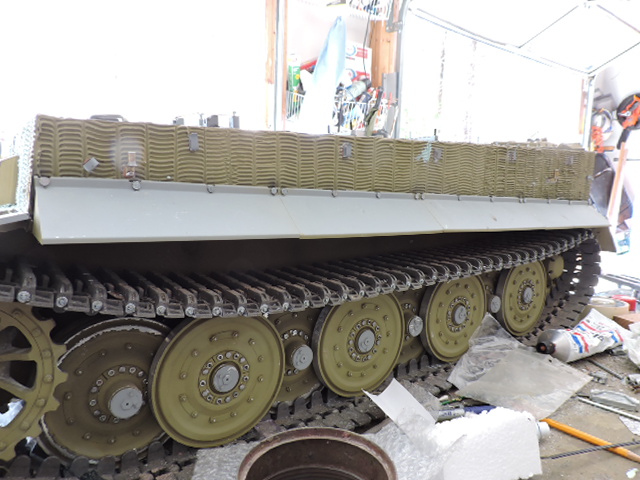
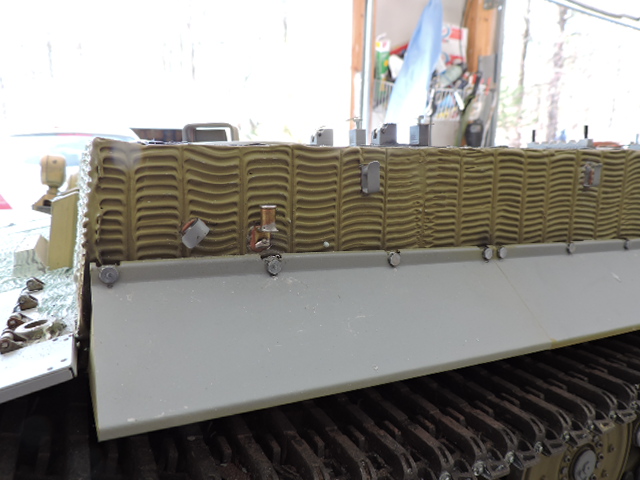
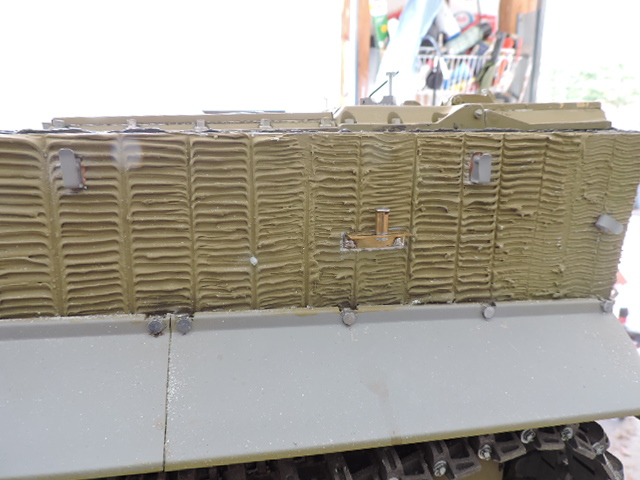
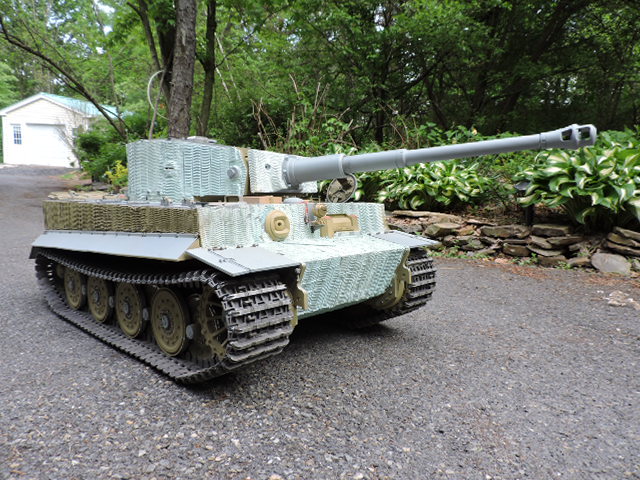
Since the last update I have focused on the upper hull detailing and in getting the hull now out of the way, first was to finish off the hull zemerite and the side skirts.

After the the zemm was sculpted the whole side plates were primed painted and weathered. This was done because of when the skirts get installed getting access to paint them will be difficult.
The skirts themselves were the armortek kit original ones. The kit always supplied very nice pre drilled and pressed steel skirt panels. Because they were left to the open air for a few years the exposed metal surface had some surface rust.
The rust was only superficial and was not an issue as it was quickly buffed away via a palm sander.

Once derusted I then was able to add the interior rib details. These reinforcement ribs are found on the real tanks, are not supplied with the kit
The ribs were all scratch built out of sheet steel and are affixed to the skirt panel via solder. The kit supplied end tips were also soldered on. The solder gives for a strong bond (stronger than adhesives) and replicate the weld which is found on the real counterpart.

Also added to the panel was the cutout notch for the mounting boss, this was added via a dremel and are also found on the real tanks.
After the ribs were affixed the panels were primed, painted and weathered. The paint and weather work was done for the same reason I mentioned above with the side hull.

The install was very smooth as the kit is well designed. One new addition that these newer gen armortek tiger kits have are the pre threaded mounting bosses.
In the past these would need to be scratch built and the skirt would be bolted to the tank via a nut. Once the tank was assembled installing the panel with the nut was very difficult. This is no longer the case with this newer style kit
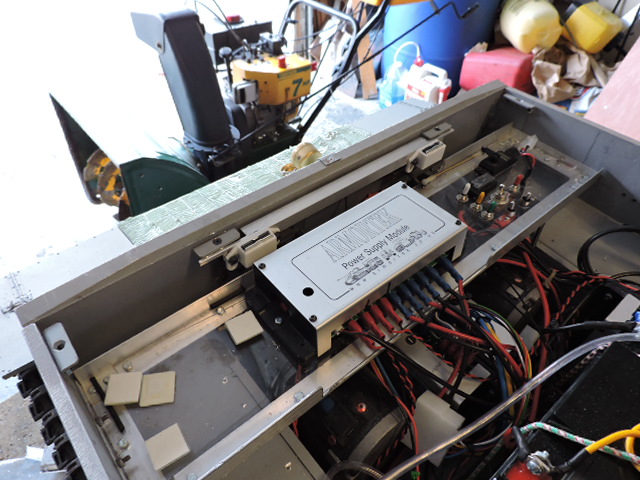
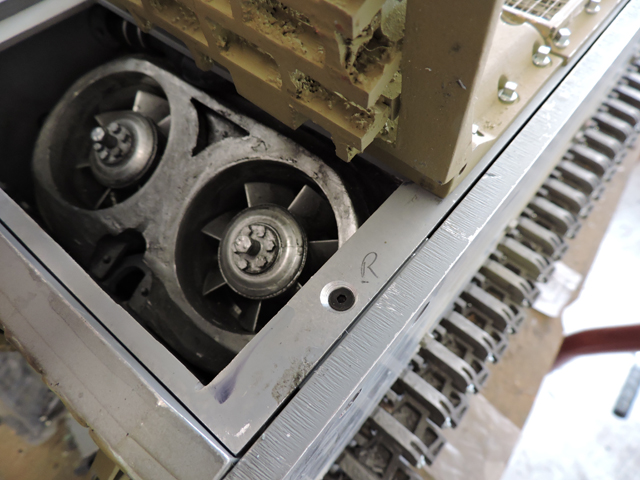
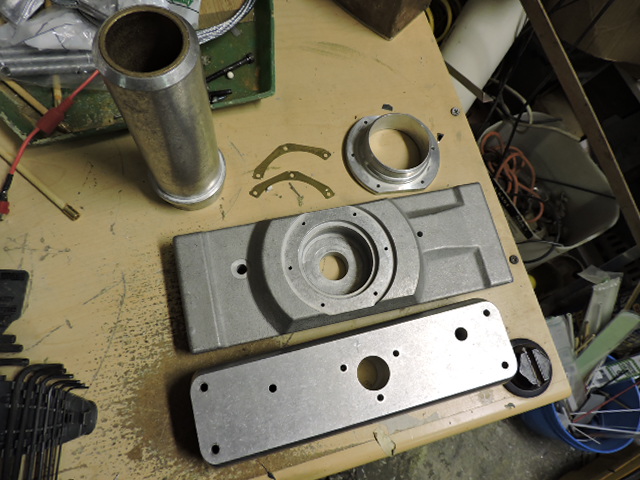
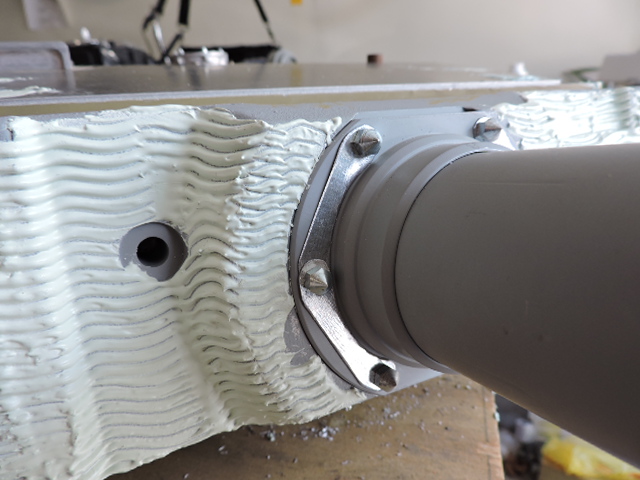
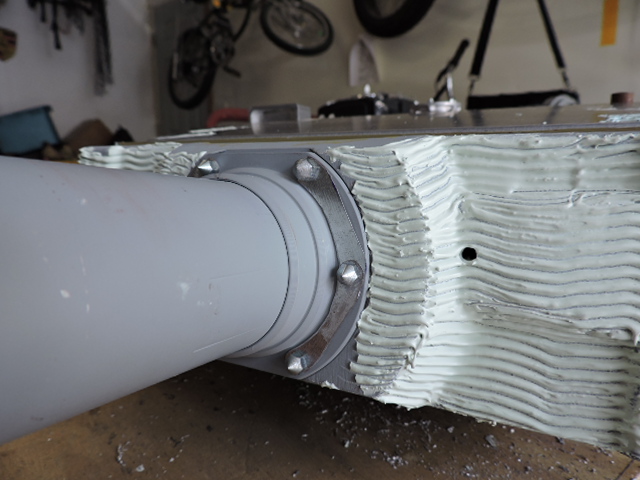
With the fenders done I was able to finish off the top deck, First was the assembly of the turret turning motor. The motor is the kit supplied unit and was assembled OOB.
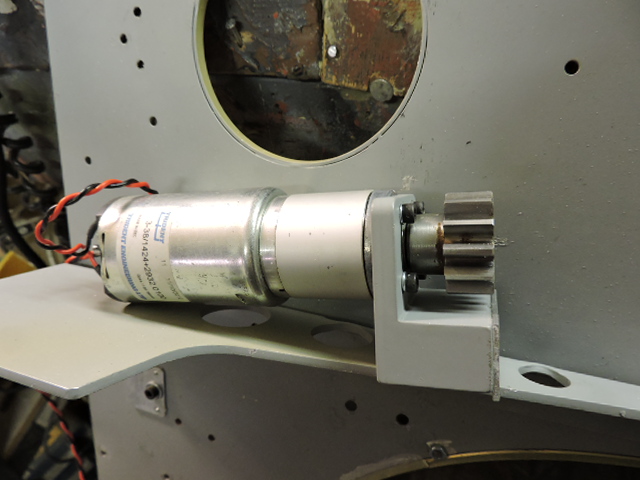
To help mount the motor to the deck I added an aluminum spacer and cut away some of the material from the brass bushing so the gear has better clearance and runs smoothly
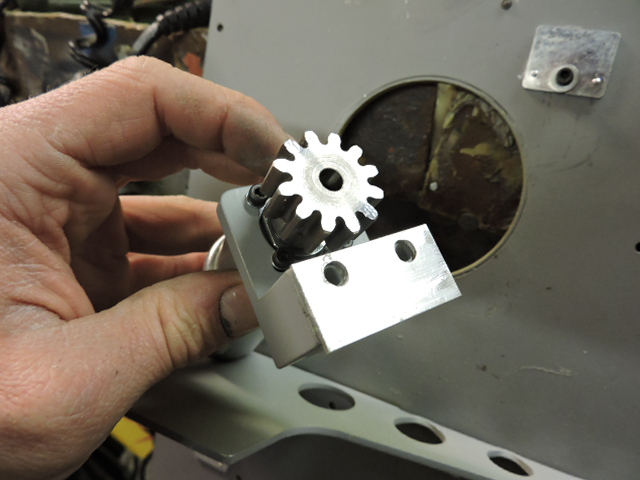

For the mounting I used my usual system of Lock washers, Locktite, and nylock fastners. This ensures that the motor is mounted rigidly and will have no play.
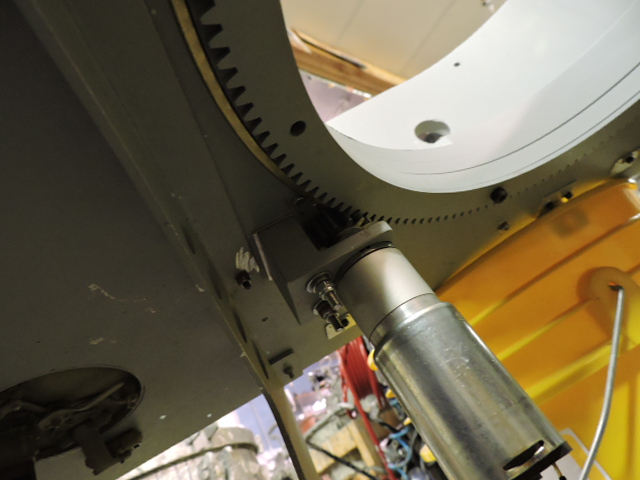
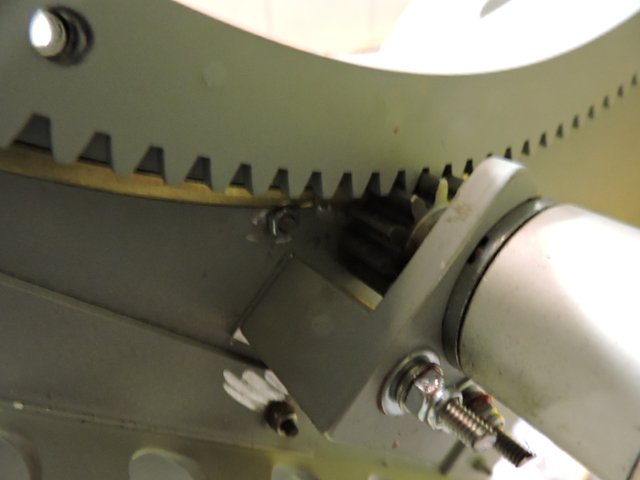
The system was tested and the turret rotation gear and gear box mesh properly.
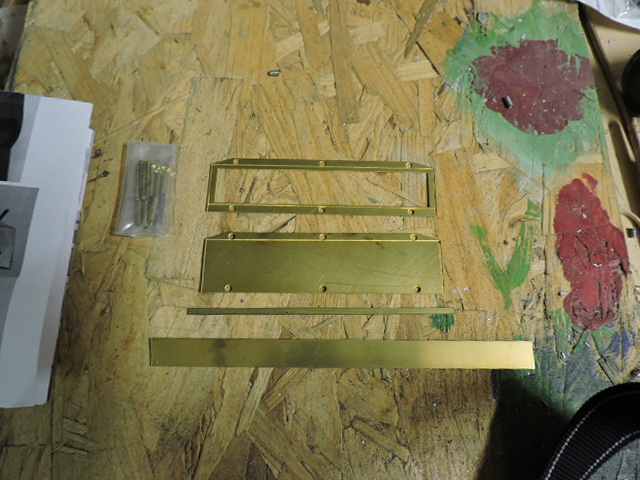
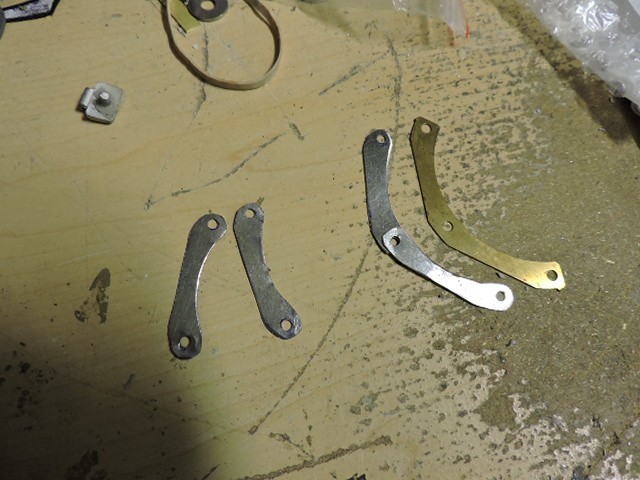
Once the motor was out of the way it was time to focus on the tank's tow cable mounts. To start I focused on the side mounted track removal cable mounts. The Kit does supply you with the cable and the mounting provisions, but the mounts are very basic and in their place I fabricated a new set out of metal
Similar to the design on the King tiger the cable is held in place via two capstands. the one in the front portion of the tank is mounted to a fixed stand,
while the one in the rear is adjustable and rides on a track.
[img]http://eastcoastarmory.com/forumpic/late_tiger/turret_rot/DSCN0773.JPG
Since the last update I have focused on the upper hull detailing and in getting the hull now out of the way, first was to finish off the hull zemerite and the side skirts.
After the the zemm was sculpted the whole side plates were primed painted and weathered. This was done because of when the skirts get installed getting access to paint them will be difficult.
The skirts themselves were the armortek kit original ones. The kit always supplied very nice pre drilled and pressed steel skirt panels. Because they were left to the open air for a few years the exposed metal surface had some surface rust.
The rust was only superficial and was not an issue as it was quickly buffed away via a palm sander.
Once derusted I then was able to add the interior rib details. These reinforcement ribs are found on the real tanks, are not supplied with the kit
The ribs were all scratch built out of sheet steel and are affixed to the skirt panel via solder. The kit supplied end tips were also soldered on. The solder gives for a strong bond (stronger than adhesives) and replicate the weld which is found on the real counterpart.
Also added to the panel was the cutout notch for the mounting boss, this was added via a dremel and are also found on the real tanks.
After the ribs were affixed the panels were primed, painted and weathered. The paint and weather work was done for the same reason I mentioned above with the side hull.
The install was very smooth as the kit is well designed. One new addition that these newer gen armortek tiger kits have are the pre threaded mounting bosses.
In the past these would need to be scratch built and the skirt would be bolted to the tank via a nut. Once the tank was assembled installing the panel with the nut was very difficult. This is no longer the case with this newer style kit
With the fenders done I was able to finish off the top deck, First was the assembly of the turret turning motor. The motor is the kit supplied unit and was assembled OOB.
To help mount the motor to the deck I added an aluminum spacer and cut away some of the material from the brass bushing so the gear has better clearance and runs smoothly
For the mounting I used my usual system of Lock washers, Locktite, and nylock fastners. This ensures that the motor is mounted rigidly and will have no play.
The system was tested and the turret rotation gear and gear box mesh properly.
Once the motor was out of the way it was time to focus on the tank's tow cable mounts. To start I focused on the side mounted track removal cable mounts. The Kit does supply you with the cable and the mounting provisions, but the mounts are very basic and in their place I fabricated a new set out of metal
Similar to the design on the King tiger the cable is held in place via two capstands. the one in the front portion of the tank is mounted to a fixed stand,
while the one in the rear is adjustable and rides on a track.
[img]http://eastcoastarmory.com/forumpic/late_tiger/turret_rot/DSCN0773.JPG
04-18-2015, 06:40 PM
#30
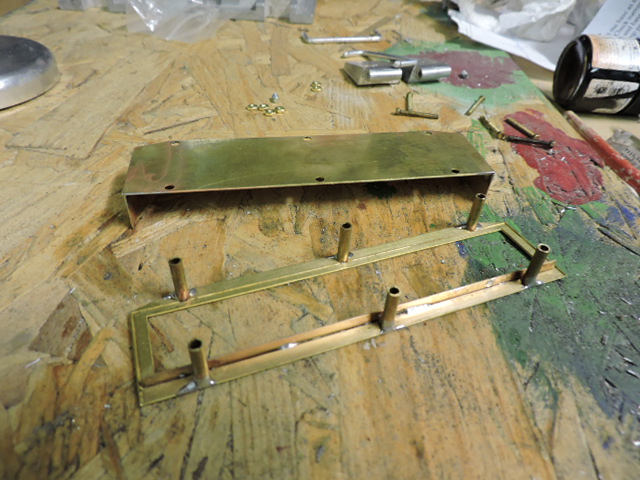
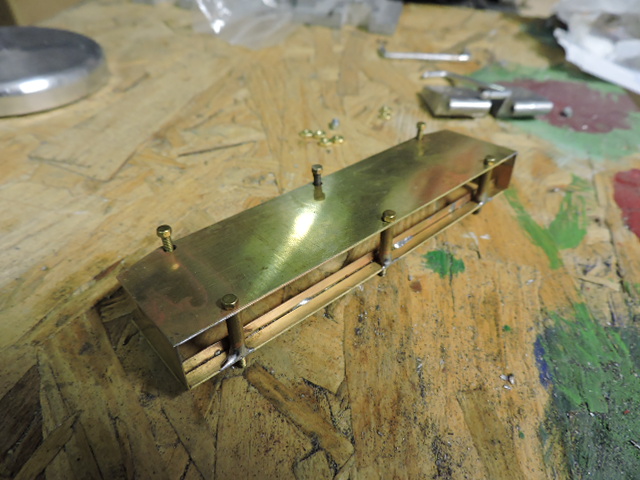
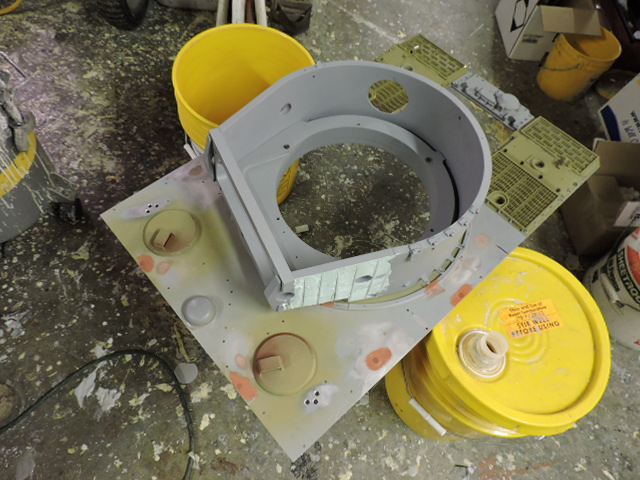
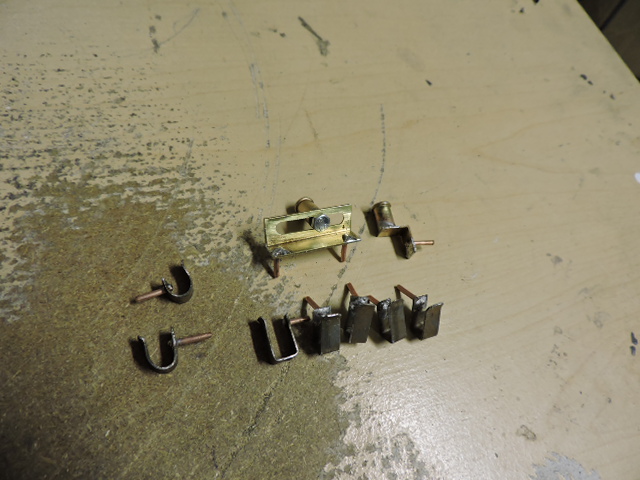
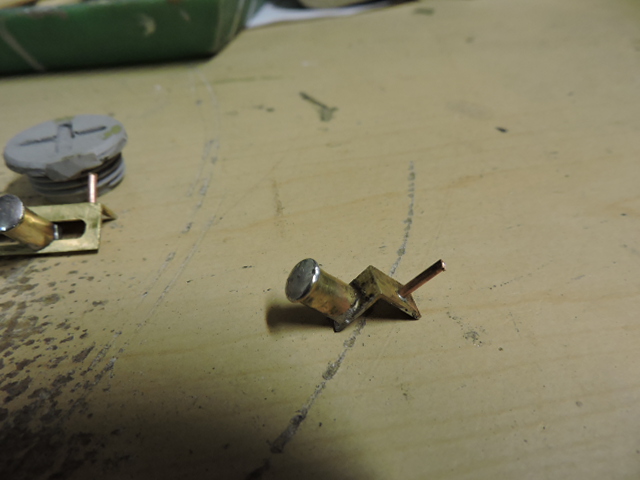
This style here is for a Late pattern tank is is much different on the early tanks. The parts are fabricated out of Brass spent .22 cal shell casings and are all soldered together
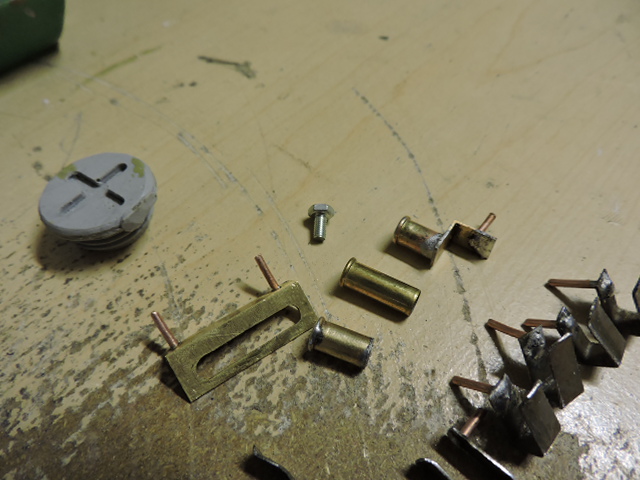
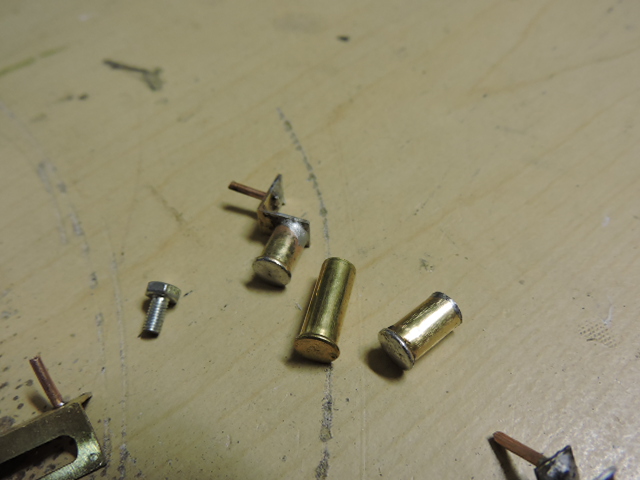
After the parts were primed they were mounted to the tank
With the side mounts out of the way I then turned towards to the top deck tow cable mounts and tool posts.
Like with the transport cable mounts the kit supplied mounts are supplied but are very basic. I did utilize the cable / gun cleaning staves mounts, as for the other mounts I used my own resin variants in their place.
As for the rest of the tool post new functional ones were fabricated and mounted to the tank along with sculpted weld beads
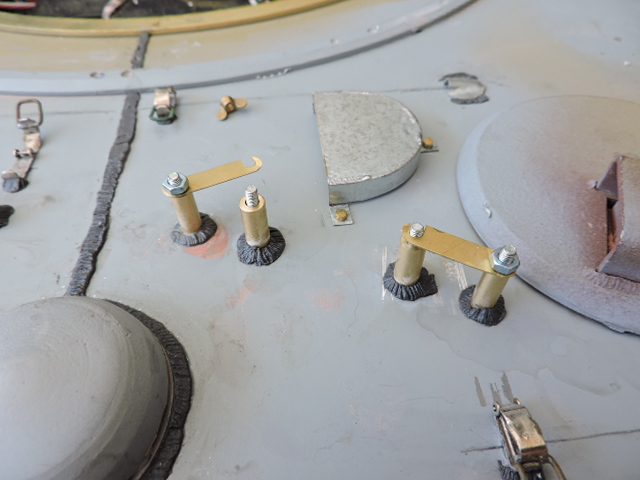
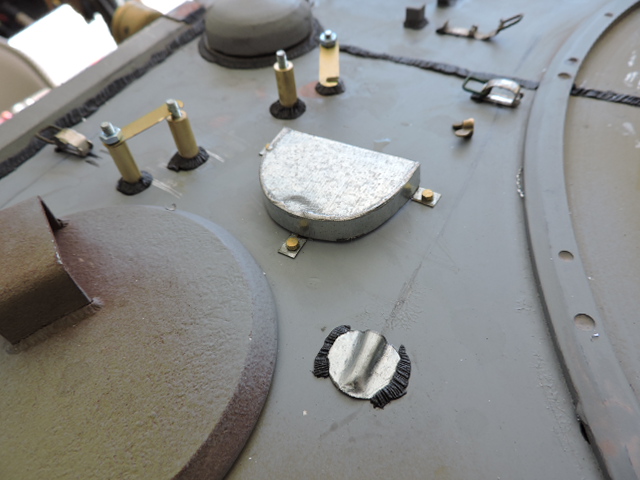
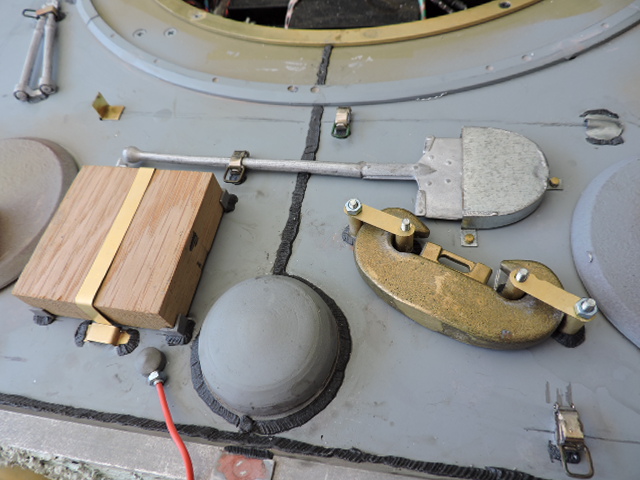
Another important weld that I added was the center seam for the top plate. The tiger top deck was made out of two plates that were welded together in the center. This bead was a simple addition but helps with the look.
As for the top deck welds they were sculpted in a way that covers up the seam, but still allows the top deck to be removed from the hull if need be, Along with the welds a similar feature was done with the head light.
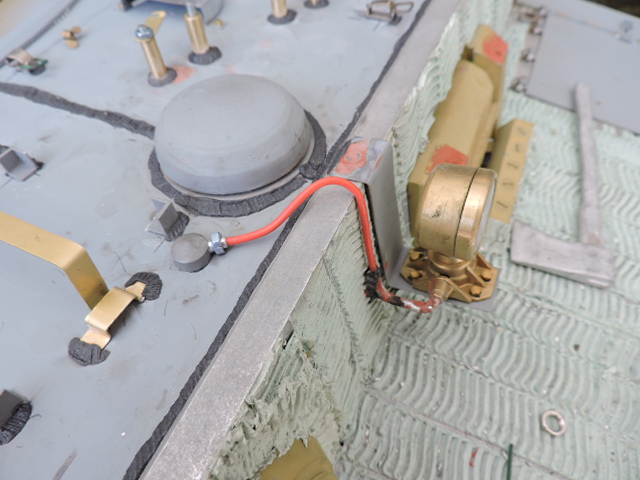
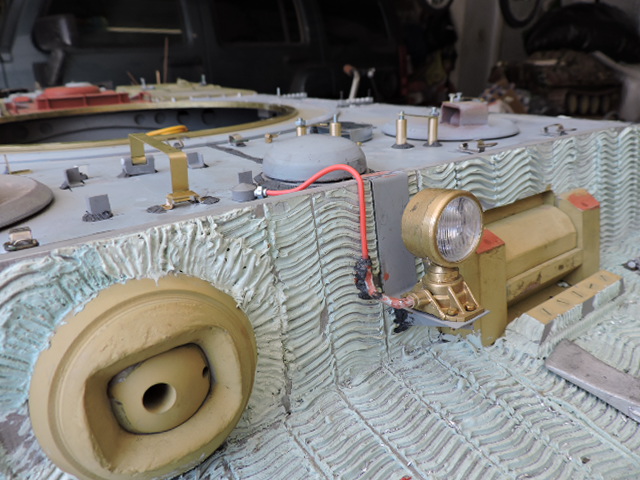
The power cable for the light enters into the tank from the front plate, and a dummy cable runs along the plate and enters into the power box on the top deck, If the top needs to be removed the wire is pulled out of the box and is kept out of the way.

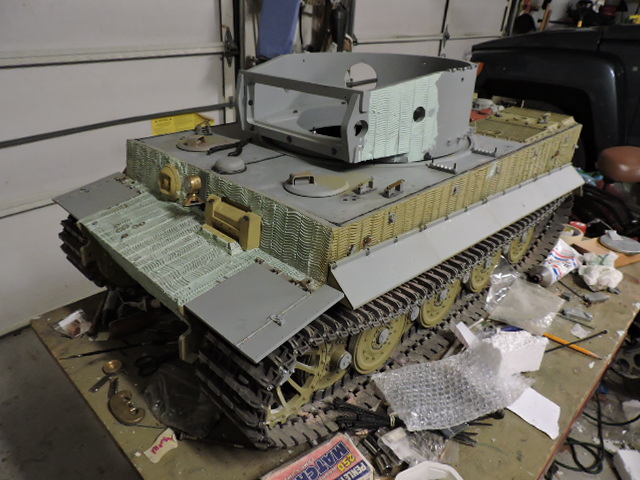
With the hull now done I have turned my attention towards the turret. Currently I have the turret primed and reassembled, and I'm now working on the mantlet and gun elevation.
Once I have more headway I will post another update,
Also more pics were posted on the facebook page,
http://www.facebook.com/EastCoastArmory
and a video update was posted on youtube,
https://youtu.be/0LZzp6Jwoqo
More to come!
After the parts were primed they were mounted to the tank
With the side mounts out of the way I then turned towards to the top deck tow cable mounts and tool posts.
Like with the transport cable mounts the kit supplied mounts are supplied but are very basic. I did utilize the cable / gun cleaning staves mounts, as for the other mounts I used my own resin variants in their place.
As for the rest of the tool post new functional ones were fabricated and mounted to the tank along with sculpted weld beads
Another important weld that I added was the center seam for the top plate. The tiger top deck was made out of two plates that were welded together in the center. This bead was a simple addition but helps with the look.
As for the top deck welds they were sculpted in a way that covers up the seam, but still allows the top deck to be removed from the hull if need be, Along with the welds a similar feature was done with the head light.
The power cable for the light enters into the tank from the front plate, and a dummy cable runs along the plate and enters into the power box on the top deck, If the top needs to be removed the wire is pulled out of the box and is kept out of the way.
With the hull now done I have turned my attention towards the turret. Currently I have the turret primed and reassembled, and I'm now working on the mantlet and gun elevation.
Once I have more headway I will post another update,
Also more pics were posted on the facebook page,
http://www.facebook.com/EastCoastArmory
and a video update was posted on youtube,
https://youtu.be/0LZzp6Jwoqo
More to come!
 04-19-2015, 02:18 AM
#32

I smiled when you mentioned the two piece top deck weld,
I had visions of everyone with a TAIGEN/TORRO/HENG LONG/TAMIYA 1/16 Tiger 1 rushing to see if these makers had included it or would we all be there with our MILLIPUT fixing their shortcomings ,
,
Beautiful detailing, in fact I would say inspirational. shaun
I had visions of everyone with a TAIGEN/TORRO/HENG LONG/TAMIYA 1/16 Tiger 1 rushing to see if these makers had included it or would we all be there with our MILLIPUT fixing their shortcomings
,Beautiful detailing, in fact I would say inspirational. shaun
06-05-2015, 07:32 AM
#33
Thanks guys, for my zemmerite I'm using this glazing putty from evercoat

It feels like forever since I posted an update, but with working on builds / and part orders free time has been very slim these days.

The turret detailing is about done with the exception of one or two components that are being installed now.
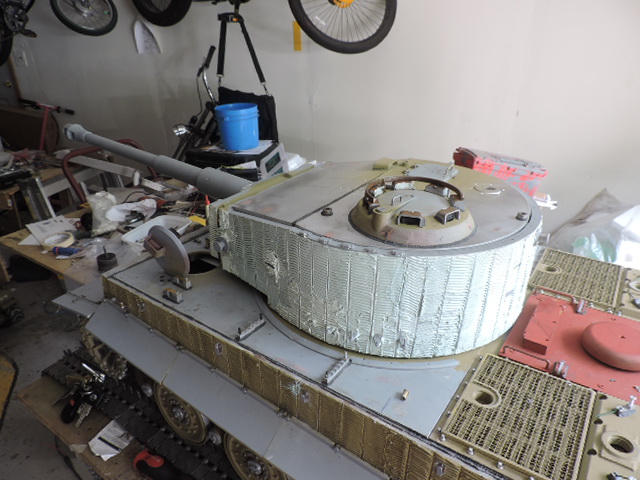
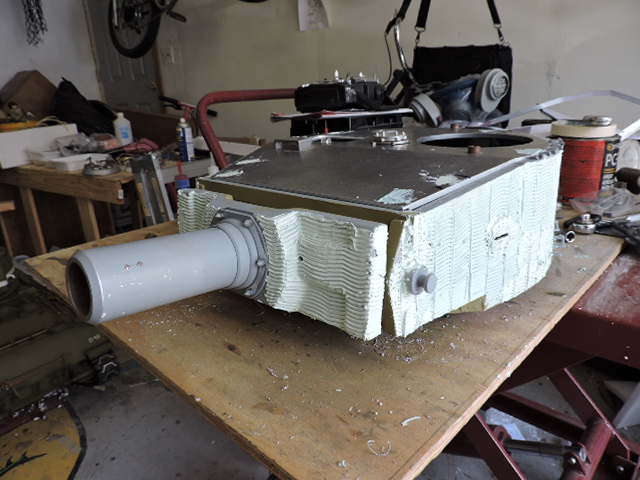
The last of the tank's zemmerite has been added, this includes the turret, mantlet and escape hatch.
Before installation the mantlet was disassembled in order to get all the parts into prime. Once primed the parts were reassembled and base color was painted to the areas which would be missed once installed.
Also like a few of the exposed bare steel parts the lift lugs had some surface rust on them, this was quickly sanded away and the parts went directly into prime, once primed they were installed to the tank.
After install the lugs had two small divots drilled into them. This was done after the install because these divots are in two specific locations and if done before the install there is a chance that they will be misaligned.
In addition to the two side lugs the rear lug was also fitted, the rear lug is kit supplied and is made out of CNC steel. The part is nice, but is missing the bottom base. For the bottom base I used one of my resin ones. The resin unit was simply fitted to the steel lug.

On the mantlet a few more more details were added, this would include the fastener straps. The kit supplies these parts as a single photo etch brass strip. They have the correct shape and are a nice addition. The real tank used four smaller straps as opposed to the kit supplied two, to make the tank more detailed I went and fabricated new straps out of steel.
Once complete they were added to the mantlet,
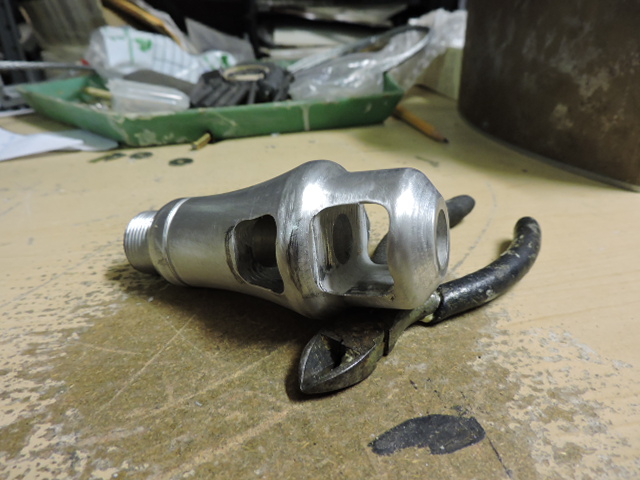
the tank's 88mm gun was also reworked, The stock gun and barrel are all CNC aluminium construction and have the correct shape, to further enhance the gun the barrel cnc marks were sanded away, and wrench slits were machined into the barrel nut.
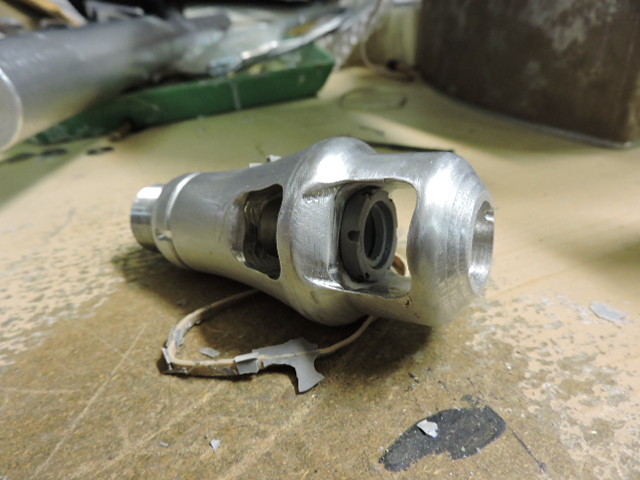
The muzzle break also got some mods, here are some pics of the break while stock before the mods were conducted,


It feels like forever since I posted an update, but with working on builds / and part orders free time has been very slim these days.
The turret detailing is about done with the exception of one or two components that are being installed now.
The last of the tank's zemmerite has been added, this includes the turret, mantlet and escape hatch.
Before installation the mantlet was disassembled in order to get all the parts into prime. Once primed the parts were reassembled and base color was painted to the areas which would be missed once installed.
Also like a few of the exposed bare steel parts the lift lugs had some surface rust on them, this was quickly sanded away and the parts went directly into prime, once primed they were installed to the tank.
After install the lugs had two small divots drilled into them. This was done after the install because these divots are in two specific locations and if done before the install there is a chance that they will be misaligned.
In addition to the two side lugs the rear lug was also fitted, the rear lug is kit supplied and is made out of CNC steel. The part is nice, but is missing the bottom base. For the bottom base I used one of my resin ones. The resin unit was simply fitted to the steel lug.
On the mantlet a few more more details were added, this would include the fastener straps. The kit supplies these parts as a single photo etch brass strip. They have the correct shape and are a nice addition. The real tank used four smaller straps as opposed to the kit supplied two, to make the tank more detailed I went and fabricated new straps out of steel.
Once complete they were added to the mantlet,
the tank's 88mm gun was also reworked, The stock gun and barrel are all CNC aluminium construction and have the correct shape, to further enhance the gun the barrel cnc marks were sanded away, and wrench slits were machined into the barrel nut.
The muzzle break also got some mods, here are some pics of the break while stock before the mods were conducted,
06-05-2015, 07:33 AM
#34
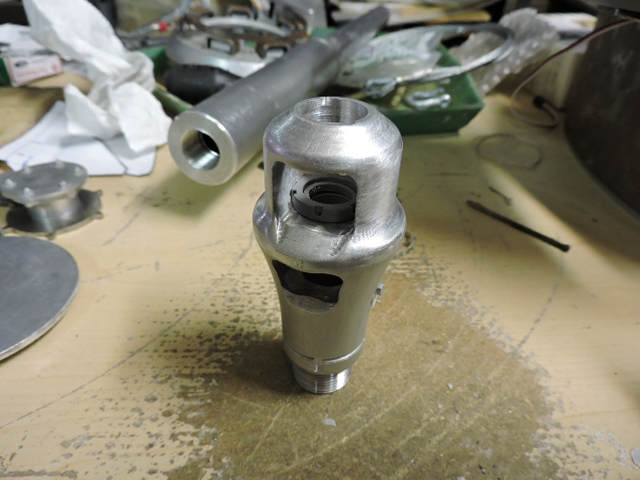
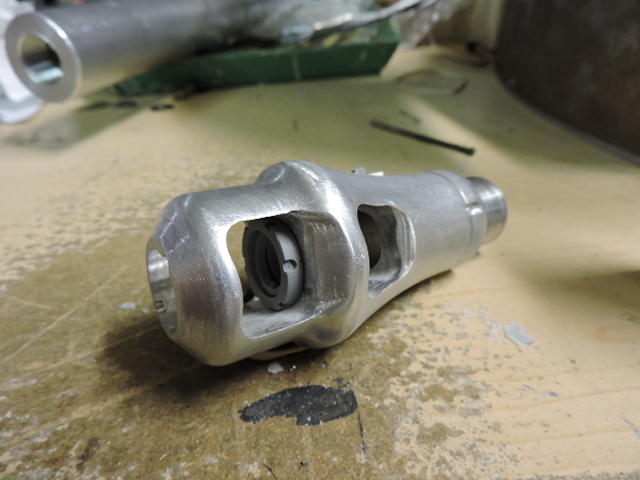
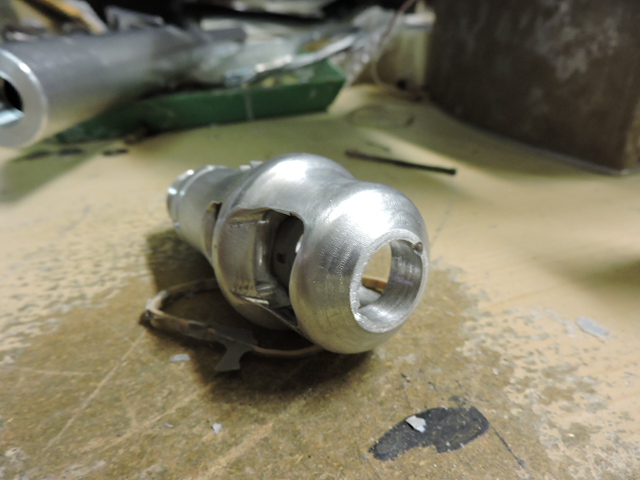
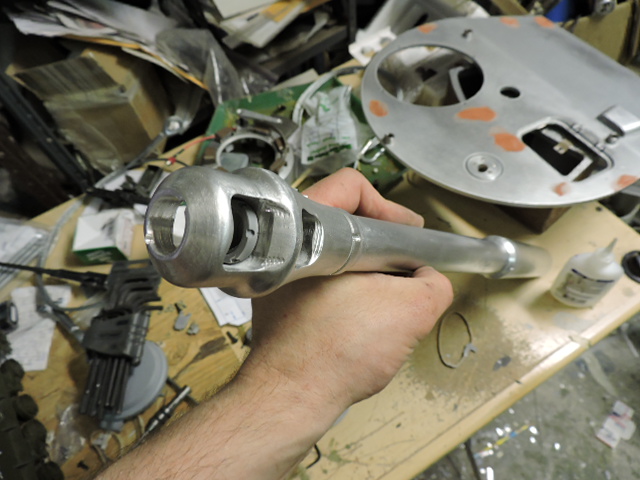
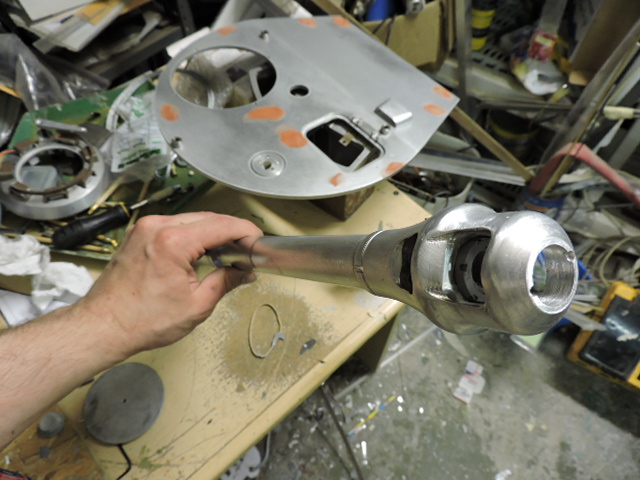
And here's the same muzzle with mods added. For the mods I added the wrench slits on retention nut, added the lock screw channel plate and fastener, cut away the baffle channels, widened the bore diameter, added the internal bushings, and milled in the front divots.
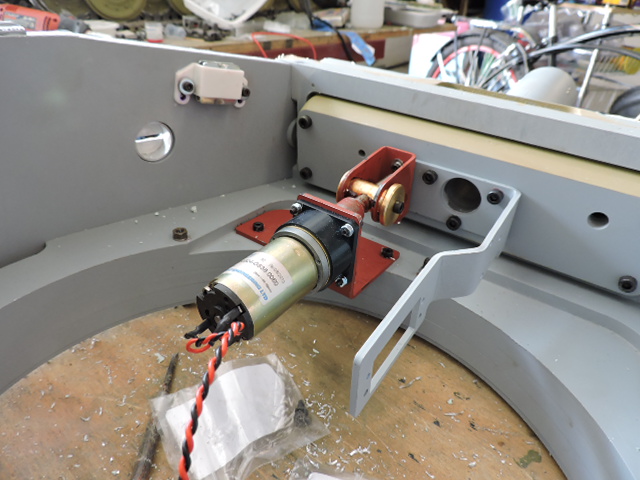
After the mantlet was mounted I installed the the elevation system, the system is all stock and was installed OOB after the metal parts were primed. The system works very well in the tiger, even with the heavy gun barrel attached. I did mod the limit switch set up, however during the build I didn't take any pics of the setup or the recoil system that has been installed :S, pics will be posted on that in the next update!
After the barrel was primed it was installed to the tank, which was then taken for a test run.
After the gun I turned my attention to the turret roof, to mount to the model the kit is designed to have the roof bolt on. It is a simple and effective way but because of the need to get access to the RC equipment I altered the design to use magnets. With the magnets the lid stays firmly on and can be removed if need be with no tools or fasteners
Once the roof mounts were completed I then began to add the roof details, starting with the loader's hatch the kit supplied armorpax hatch was installed as is, as it was an excellent part with no mods needed.
The escape hatch was also modded, the kit supplied hatch is all solid CNC aluminum. The basic hatch is absent any interior detailing,
For the hatch interior I modded one of my resin escape hatches, I casted the mold half way so only the interior portion of the hatch would be casted, I then bolted the resin detailing plug to the armortek hatch. The fasteners will prevent any chance of the resin dislodging from the metal hatch when the tank is running over time.
The fasteners were then deleted via the bodywork and were blended into the hatch seamlessly. After the hatch was primed / painted / weathered and installed to the turret.
I then turned my attention to the copula. The kit copula is a very basic set, it is full functional and does have the correct shape and some basic interior detailing.
The copula received lots of mods which would include, interior and exterior cast texture, periscope headrest ring and pads, revised opening system, interior opening mechanism detailing, bottom hatch head rest detailing, reshaped periscope guards, guard rear panels, sculpted welds, and resin fastener cover cap. Like with my other builds all MG rail and periscope rear plates are soldered together.
e welds, and then this one is off to paint!!! More to come!
06-05-2015, 07:34 AM
#35
After the copula was fitted, I decided to retool the air intake. The new intake is listed on the product line, http://eastcoastarmory.com/tiger.htm

Also added were the roof divots, close quarter support weapon, and loader's scope box
For the scope box it is the armortek supplied part, but was modded to have more rounded sides, and a deeper inlet so I can add a strip of clear plastic to replicate the periscope lens.
The close quarter defense weapon was also kit supplied, but was modded to have fastener details, and was also modded to rotate via a servo. Better images of this part are found on the project update video.
https://youtu.be/yOluSuIXjKw
More pics are also posted on the ECA facebook page,
http://www.facebook.com/EastCoastArmory
Currently I just completed the Sixth Scale Icons rear bustle bin, Once added I will add the last of th
06-18-2015, 07:31 AM
#36
Thanks guys, the project is on the fast track now and it is now in pint and is almost done,

The last bit of detailing was added, this would include the top deck welds, and the rear bustle bin.

For the rear bin the Kit supplies you with a steel and aluminum bin. The bin is overall the correct shape and size, but is basic in detailing. Rather than re detailing the supplied bin, I replaced it with one from Sixth Scale Icons

The SSI bin is all Photoetch brass construction and is a very detailed / accurate and came unassembled and is all solder assembly. This is not a set for a novice / casual builder, If the builder has no experience with metal work, or metal working tools then this set will not be for them.

Once assembled however the bin is a work of art.


The bin was primed and mounted to the turret. Because of the RC nature of the model I designed the bin to be removable in case the turret needs to be removed for maintenance. With the bin removed the turret can be removed more easily without risk of the any damage to the bin or other turret details.


In addition to the bin, I replaced the fasteners on the escape hatch. The model was built with having allen bolts to bolt the hing to the turret, on the real tank this was done with hex bolts, I simply swapped out the allens for hex heads. I also added the third lower fastener, this is absent on the stock kit and was another simple addition that improves the look.

The tank also had the kit supplied spare track clips installed to the model. The model does come with these parts and on this release of the kit they are the sets form armorpax. They are also very nicely done.

The last bit of detailing was added, this would include the top deck welds, and the rear bustle bin.
For the rear bin the Kit supplies you with a steel and aluminum bin. The bin is overall the correct shape and size, but is basic in detailing. Rather than re detailing the supplied bin, I replaced it with one from Sixth Scale Icons
The SSI bin is all Photoetch brass construction and is a very detailed / accurate and came unassembled and is all solder assembly. This is not a set for a novice / casual builder, If the builder has no experience with metal work, or metal working tools then this set will not be for them.
Once assembled however the bin is a work of art.
The bin was primed and mounted to the turret. Because of the RC nature of the model I designed the bin to be removable in case the turret needs to be removed for maintenance. With the bin removed the turret can be removed more easily without risk of the any damage to the bin or other turret details.
In addition to the bin, I replaced the fasteners on the escape hatch. The model was built with having allen bolts to bolt the hing to the turret, on the real tank this was done with hex bolts, I simply swapped out the allens for hex heads. I also added the third lower fastener, this is absent on the stock kit and was another simple addition that improves the look.
The tank also had the kit supplied spare track clips installed to the model. The model does come with these parts and on this release of the kit they are the sets form armorpax. They are also very nicely done.
06-18-2015, 07:31 AM
#37
When I acquired the tank the parts were pre installed by the first builder (who installed them very well) but some of these parts were bent and damaged. I repaired the bent portions and replaced the missing parts. Because of the material of the castings the replacement lugs were soldered directly to the castings.

The tank was taken out for one last pre paint test run, which it ran very well


After the run it went back on the lift, and into paint
[img]https://scontent.xx.fbcdn.net/hphotos-xtf1/v/t1.0-9/11407075_454711401356242_1158616146756149622_n.jpg ?oh=59252adeed64a4403f0e091861f69fc0&oe=55F50D55
Like always, first was final prime,


then dunkelgelb basecoat, which was refreshing to see after seeing the tank all spot primed for as long as I have


The tank's pattern was then applied, for the pattern the tank is for SS-PZ.Abt.102 Normandy, 1944 .


A youtube video update for the tank was uploaded in addition to a video of the test drive,
https://youtu.be/RejwewSqCSU
https://youtu.be/gIBx_-x5DMQ
Also more pics of the model were posted on the ECA facebook page,
https://www.facebook.com/EastCoastArmory
With the pattern now completed the tank will get it markings. The model will be getting some slight weathering shading, then the client will to do the rest of the weathering himself when the model is delivered. More to come!
The tank was taken out for one last pre paint test run, which it ran very well
After the run it went back on the lift, and into paint
[img]https://scontent.xx.fbcdn.net/hphotos-xtf1/v/t1.0-9/11407075_454711401356242_1158616146756149622_n.jpg ?oh=59252adeed64a4403f0e091861f69fc0&oe=55F50D55
Like always, first was final prime,
then dunkelgelb basecoat, which was refreshing to see after seeing the tank all spot primed for as long as I have
The tank's pattern was then applied, for the pattern the tank is for SS-PZ.Abt.102 Normandy, 1944 .
A youtube video update for the tank was uploaded in addition to a video of the test drive,
https://youtu.be/RejwewSqCSU
https://youtu.be/gIBx_-x5DMQ
Also more pics of the model were posted on the ECA facebook page,
https://www.facebook.com/EastCoastArmory
With the pattern now completed the tank will get it markings. The model will be getting some slight weathering shading, then the client will to do the rest of the weathering himself when the model is delivered. More to come!
06-30-2015, 05:18 PM
#39
The project is now on it's last leg,
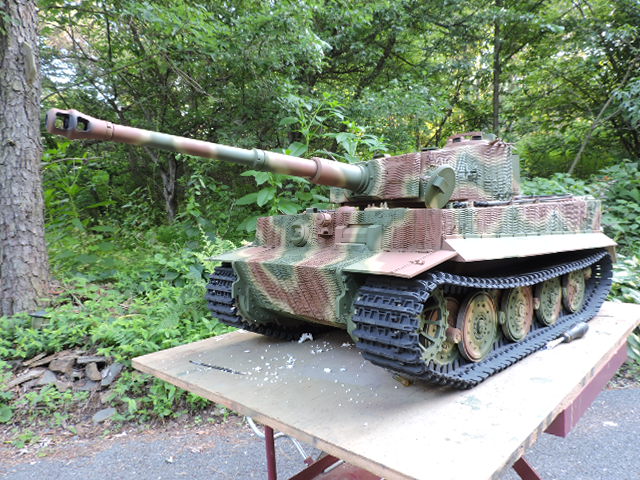
Normally on my builds this is the point where I would add the weathering, however on this build the customer opted to perform the weathering himself so I left it mostly clean. This also applies to the tools and the cables. I did however add some counter shading to the pattern along with exhaust sut / power fouling on the exhausts and barrel.

The tracks were also added, for the tracks they were pressure washed (to get any dirt or grass debris off from test drives) then they were painted and mounted to the model. Because the tracks are metal they will naturally weather themselves after the tank is driven. Unfortunately with the monsoons that we have been having here in the North East I have not had the weather to drive the tank in
More pics were posted on the facebook page,
https://www.facebook.com/EastCoastArmory
and a video update was also posted,
https://youtu.be/VTLpB7VRQrM
Currently the tank's tools and other final bits are getting installed, and the next time I post the tank will be DONE!!! More to come!!
Normally on my builds this is the point where I would add the weathering, however on this build the customer opted to perform the weathering himself so I left it mostly clean. This also applies to the tools and the cables. I did however add some counter shading to the pattern along with exhaust sut / power fouling on the exhausts and barrel.
The tracks were also added, for the tracks they were pressure washed (to get any dirt or grass debris off from test drives) then they were painted and mounted to the model. Because the tracks are metal they will naturally weather themselves after the tank is driven. Unfortunately with the monsoons that we have been having here in the North East I have not had the weather to drive the tank in
More pics were posted on the facebook page,
https://www.facebook.com/EastCoastArmory
and a video update was also posted,
https://youtu.be/VTLpB7VRQrM
Currently the tank's tools and other final bits are getting installed, and the next time I post the tank will be DONE!!! More to come!!

 07-14-2015, 08:42 PM
#43
Thanks guys, this one is more along the lines to a Barrett M82 with a scope... and a few cans of ammo
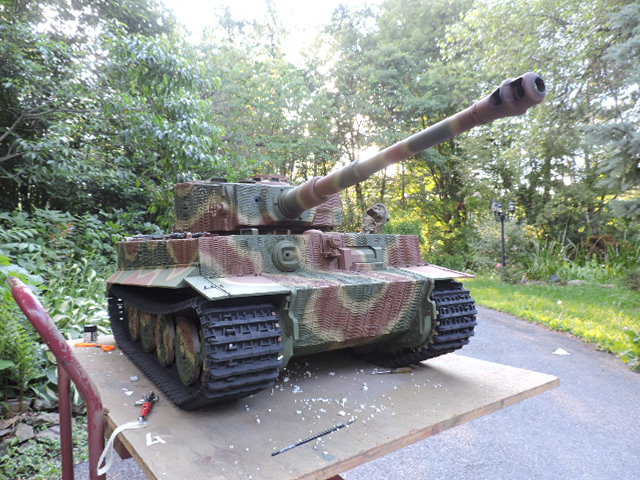
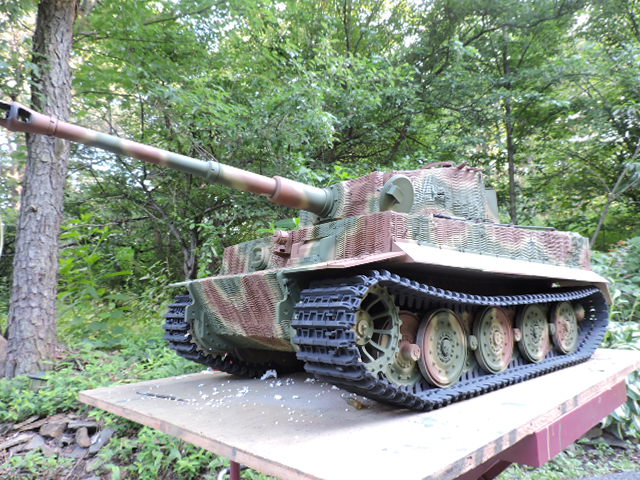
The tank is now finished!


The last of the tools, and cables were mounted. For the tools the Armorpax kit supplied units were used, for added realism I replaced the metal handles with real wood ones.


The gun cleaning staves were also added. These too were kit supplied and the only mod I made was the addition of the swab brush.


Other misc. bits were also added like the bow MG34, turret roof periscope prism, antenna base, kit supplied armorpax resin fire extinguisher and AA gun mount


The tank is now finished!
The last of the tools, and cables were mounted. For the tools the Armorpax kit supplied units were used, for added realism I replaced the metal handles with real wood ones.
The gun cleaning staves were also added. These too were kit supplied and the only mod I made was the addition of the swab brush.
Other misc. bits were also added like the bow MG34, turret roof periscope prism, antenna base, kit supplied armorpax resin fire extinguisher and AA gun mount
07-14-2015, 08:42 PM
#44
Another part that was added was the starter plate. For this model the kit supplies you with a basic plate made from CNC aluminum. Rather than upgrading the kit supplied unit I instead modded one of my early pattern plates, adding the late pattern detailing.

The new plate was molded and has been added to the catalog.
http://eastcoastarmory.com/tiger.htm

Some more markings were also added. this would include the divisional logos on the front and rear (easier seen in video), and black center on the bustle bin numbering


Once the tank was done it was taken for another final test run, which it ran well, and broke the in the track's new paint


The engine compartment was also checked and tested to see if the functions were operational, they too were working.


While filming I ran into a first when a bird laded on the tank, then flew off shortly after... guess he liked the paint job.


After he flew off the tank was driven some more then was placed into storage now awaiting delivery,


More pics were posted on the ECA facebook page, https://www.facebook.com/EastCoastArmory
and a final update video was posted on youtube, https://youtu.be/qSZ3pey_fZg
in addition to the new video, the entire project playlist has been rearranged in chronological order so watching the build from start to finish is now much more easier.
With the tank now officially completed, I have turned my attention back to my static 222 armored car, which I can now finally focus on and get it out of the way.
I will also be starting another 1/6 commission build project that I will also post in the coming weeks, and more will follow. stay tuned!!
The new plate was molded and has been added to the catalog.
http://eastcoastarmory.com/tiger.htm
Some more markings were also added. this would include the divisional logos on the front and rear (easier seen in video), and black center on the bustle bin numbering
Once the tank was done it was taken for another final test run, which it ran well, and broke the in the track's new paint
The engine compartment was also checked and tested to see if the functions were operational, they too were working.
While filming I ran into a first when a bird laded on the tank, then flew off shortly after... guess he liked the paint job
. After he flew off the tank was driven some more then was placed into storage now awaiting delivery,
More pics were posted on the ECA facebook page, https://www.facebook.com/EastCoastArmory
and a final update video was posted on youtube, https://youtu.be/qSZ3pey_fZg
in addition to the new video, the entire project playlist has been rearranged in chronological order so watching the build from start to finish is now much more easier.
With the tank now officially completed, I have turned my attention back to my static 222 armored car, which I can now finally focus on and get it out of the way.
I will also be starting another 1/6 commission build project that I will also post in the coming weeks, and more will follow. stay tuned!!
Last edited by armourguy; 07-14-2015 at 08:46 PM.
07-14-2015, 10:33 PM
#45
Senior Member

Join Date: Dec 2006
Location: Lee\'s Summit, MO
Posts: 201
Likes: 0
Received 0 Likes
on
0 Posts
The level of detail you have attained on this one is incredible, being new to the rc tanking world and never having known about the 1.6th scales before this I am just blown away!
07-16-2015, 04:59 AM
#47
Yeah, I figured this one would be up there in price. I have never even seen 1/6th scales for sale, what kind of price range do basic kits start at anyways?
The level of detail you have attained on this one is incredible, being new to the rc tanking world and never having known about the 1.6th scales before this I am just blown away!
The level of detail you have attained on this one is incredible, being new to the rc tanking world and never having known about the 1.6th scales before this I am just blown away!

