


My HL Leopard 2A6 build and thoughts.
 10-22-2013, 06:08 PM
#1
Member
Thread Starter
Join Date: Jan 2013
Location: , AUSTRALIA
Posts: 30
Likes: 0
Received 0 Likes
on
0 Posts
Hi everybody,
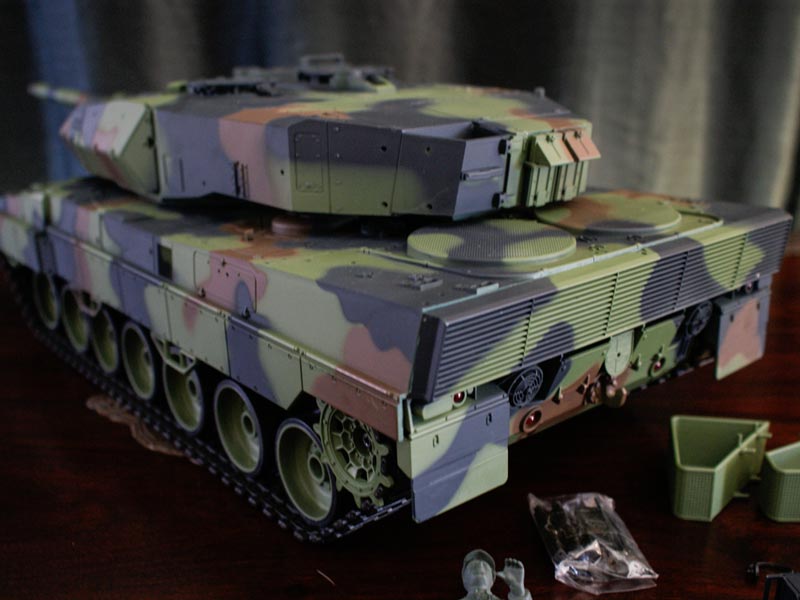
So I recently decided I would start a Leopard 2A6 build using the new Heng Long model as a basis. Being a relatively new model, I thought that it might be worth sharing my journey.
My plan is to keep the model relatively lightweight and lower cost. Luckily, HL seems to have improved their game a little recently, and their Leopard has enough detail that I'll be able to use minimal upgrade detail parts. In an effort to keep the weight down I will also be trying to sticking with the plastic tracks (they're simplified and single pinned unlike the double pinned full scale ones) and I will probably make use of the basic the nylon gearboxes initially. We'll see how that goes, I may need to change them out later but I'll cross that bridge when I get to it. I'll also be ditching HL's 2.4 ghz RX18 in favour of a Clark TK22 and using my existing 9X transmitter.
So, on with some pictures of what arrived in the box, and my thoughts during its subsequent dissassembly...


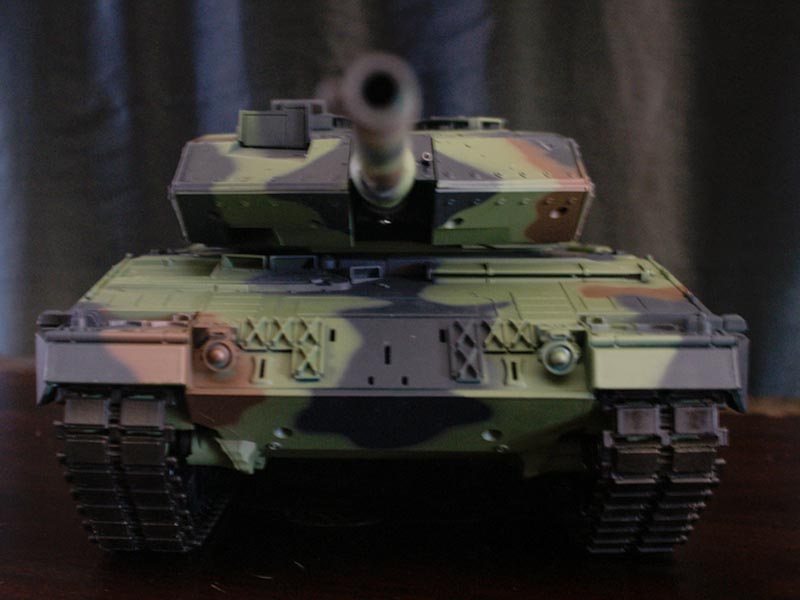
As it turns out, a 1/16 leopard 2 isn't a small kitty. Even knowing this, I was still surprised when I opened the box. After loading some batteries into it and trundling around the floor briefly, it feels a little slow out of the box. As others have pointed out, the large turret race also means that the turret traverse is quite slow. The suspension however was surprisingly nice, however if you are making more of a heavy build, it might turn out to be a little soft. To start with I'll stick with the stock gearing as I dont want the speed to drop, and as I don't plan to add a lot of metal aftermarket parts I don't imagine a need for increased torque will arise. If I find later that I need to further tune the speed, I will try swapping out the pinion gears.
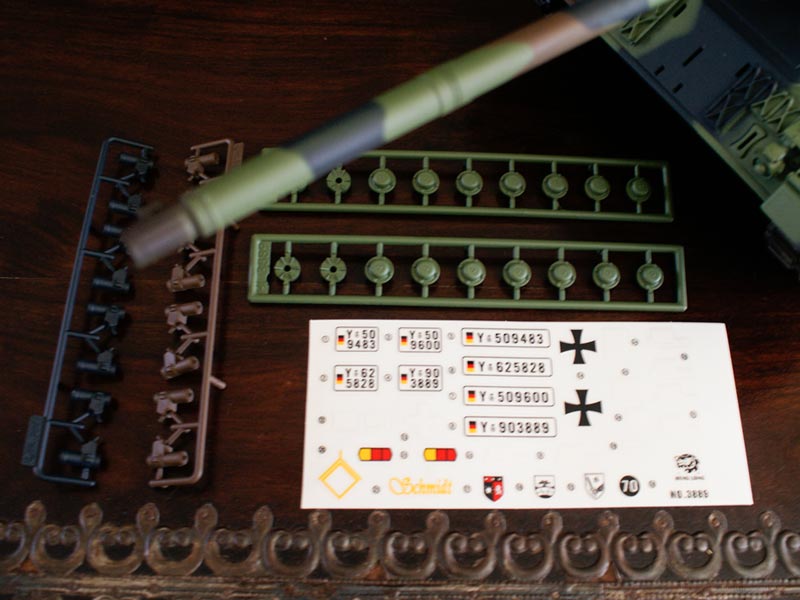
Theres a load of extra sprues included providing a lot of extra detail parts...wheel hubs, smoke dischargers, tow hooks, grab handles, spare track links etc. The included tow cables are somewhat flexible which is nice as they need to bend around the rear hull. Also made from a flexible type plastic are a pair of small antennas. Unfortunately lacking from the included accessories is a pintle mounted MG3. At the moment I am still undecided about whether or not I want to address that though.
The transfers have several options for number plates and without doing a bit of research they do look relatively accurate, however I am not sure that I will use them or just use regular waterslide decals instead. I haven't used Heng Longs transfers before and I am unsure of their finish quality. Just looking at them they appear quite thick, so I doubt they're great.
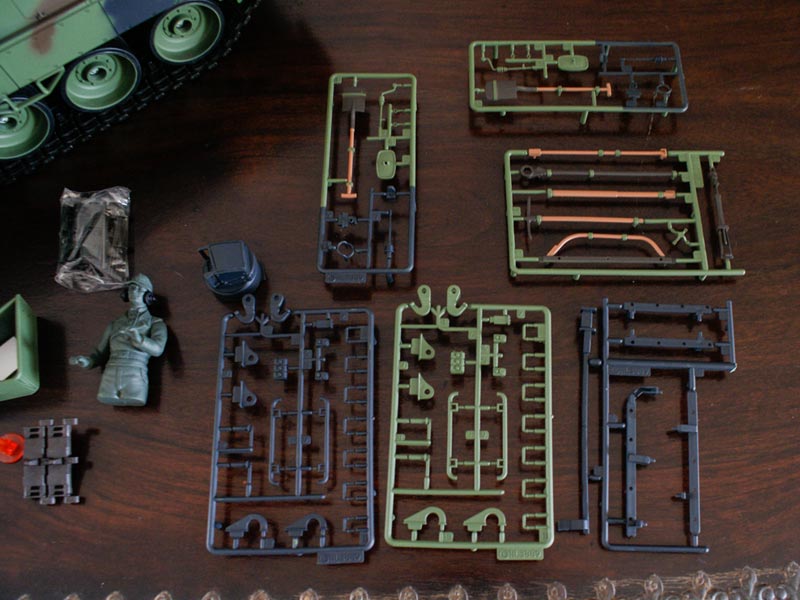
The figure is unfortunately the regular german panzer commander from their earlier releases, however as with my German M41 build, I'll probably enjoy sculpting a new figure from scratch anyway, so thats not a problem. Alternatively there is a 1/16 bundeswehr crew figure available from Tamiya which some might find is a good starting place if it can be found at a reasonable price.
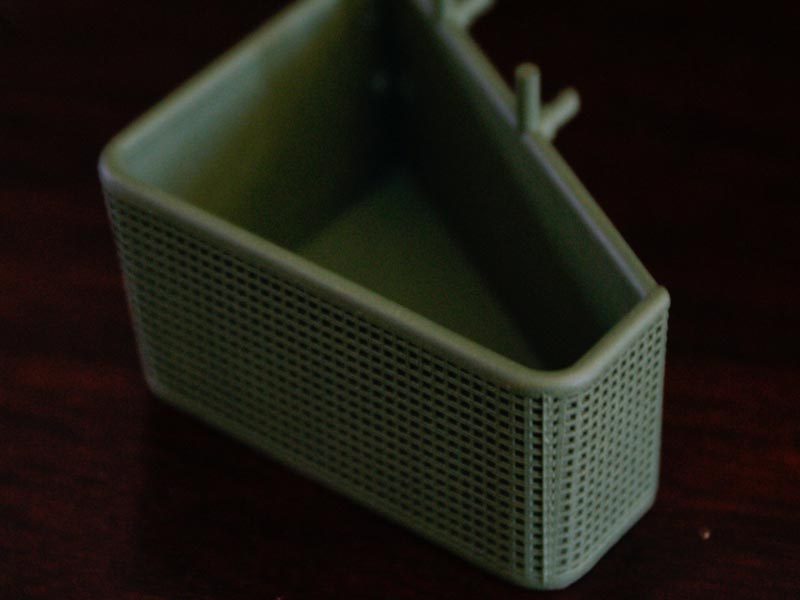
One area I can see that shows a lot of room for improvement is the rear bustle stowage baskets. Being just molded plastic, the mesh sides are just molded surface detail. I will probably adapt some photo-etch baskets for the Tamiya Leopard to replace them.
Like the stowage baskets, the mesh detail on the grills over the power pack are also just molded surface detail, however it is less noticable here and can probably be left as is. According to the included documentation, HL will be releasing a set of photo-etch engine grills at some stage, which may be useful for anyone who is bothered by the appearance of the molded stock grills.
HL's rear LED lights need to go. I will replace those with reflectors. I plan to scratch build functional tail lights to replace the non-functional molded ones on the model (they are just outboard of the upper LED tail lights). I will also replace the front LED headlights with tiny SMD LEDs and transparent plastic lenses.
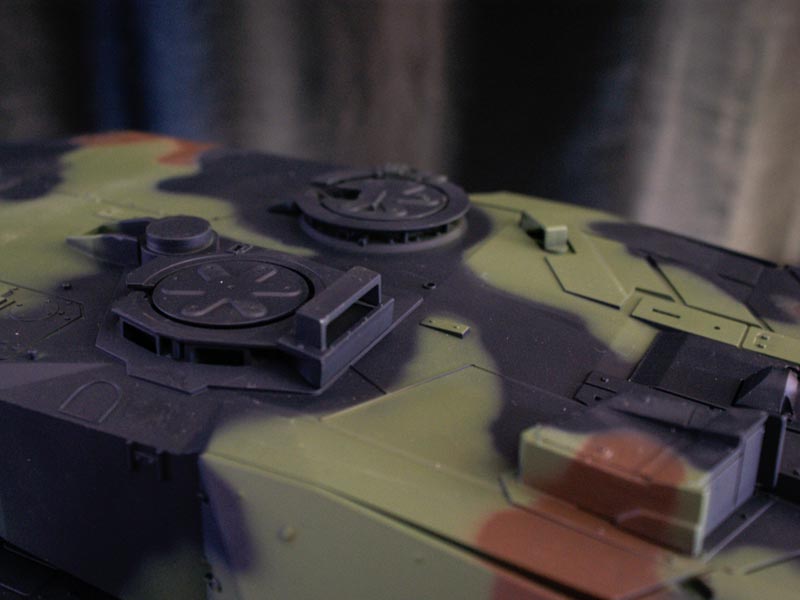
All the periscopes around the various hatches appear to be open, with no molded plastic in place of the glass. I consider this as a bit of a win as it'll save me the effort of cutting them out when I go to add transparent plastic lenses to them.
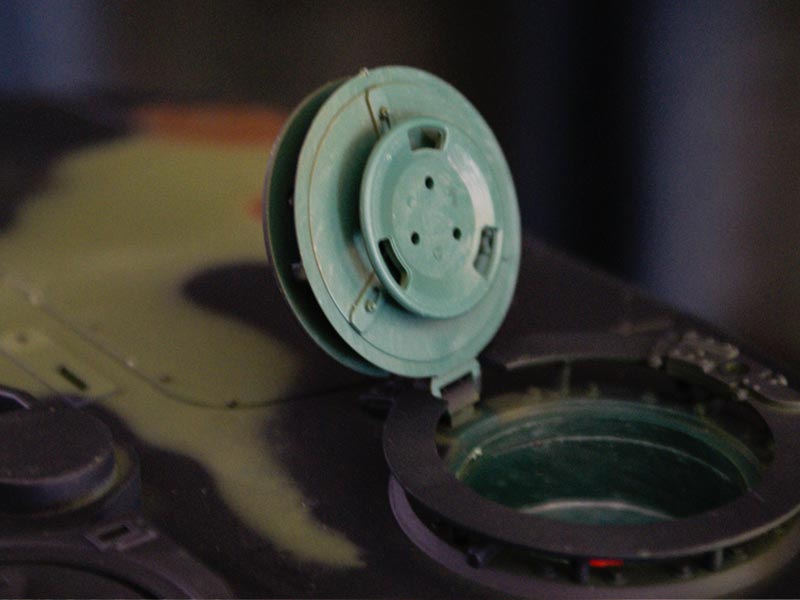
There's also a little detail on the hatch undersides, which is a nice surprise.
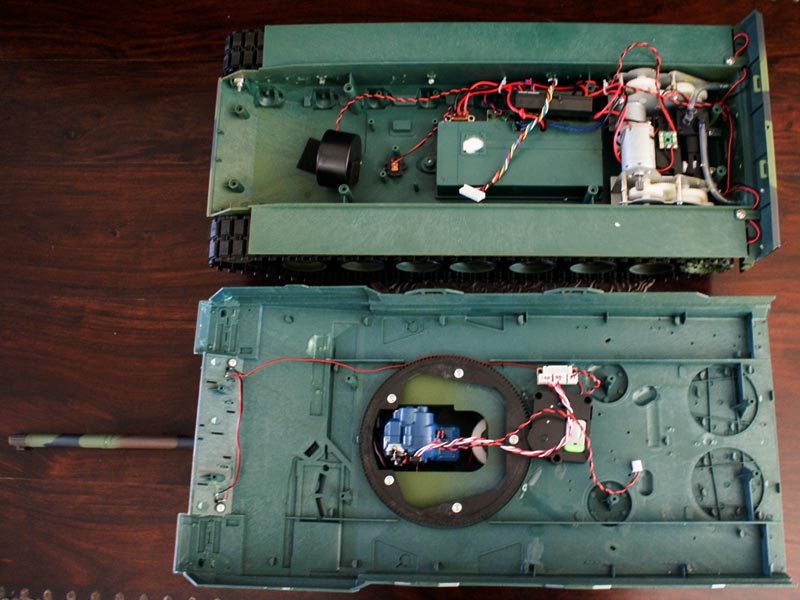
Once the top is off, there are the standard HL offerings inside. The new style speaker sounds a bit louder than the older style perhaps, and its a little smaller by the look of it. If I dont have a spare Visaton speaker somewhere I'll probably keep that as is for the time being. The upper hull connector also appears to be a new type, and it seems the lights plug into it rather than being soldered on. Again, I think thats a nice thing. As mentioned earlier, I'll try keeping the stock nylon gears and just replacing the stock motors with some Speed 400s to gain some speed.
From the inside it looks like the headlights are attached with screws from the inside, which might also be a good change. Later on I guess I'll find out if the usual HL glue monsters also worked their magic there.
There is a tensioning system incorporated for the tracks as stock, but it appears to be adjustable only in set increments. I imagine that will be fine, again, if it needs further work I will address the issue later.
Seperating the turret halves was interesting...11 screws. I guess it's not coming apart by accident any time soon.
The turret contains the standard barrel elevation setup as well as the usual HL BB unit, which I will be replacing with servo recoil driven by the TK22...just as soon as I disassemble the barrel and decide on how to go about doing it. While doing this I might experiment with repurposing the black capped motor from the airsoft unit to replace the green capped one from the turret traverse unit to see if this changes the speed of the traverse, as some have stated that the different motor colours have different specs.
The underside of the mantlet will require a little remodelling with some styrene to close the area in and properly duplicate the shape of the real vehicle, but it doesn't look too major. The gun mantlet also contains an aluminium barrel for the co-axial machine gun mount with a red 3mm LED inside. The main gun barrel is machined from a single piece of aluminium, with a plastic tip on the muzzle and plastic bore extractor fitted around the barrel. Compared to the little 76mm HV barrel on my M41, the 120mm L55 is enormous, hehe.

There's a few other small items I plan to scratch build and add, such as the shutter doors on the sighting system, and possibly the addition of the rotating beacon light to the turret. All in all I am quite impressed with Heng Longs Leopard2, and I think that it will be possible to get a rather nice result without adding a lot of work or expense.
Once I complete the disassembly I'll be back with more pictures and thoughts on it all.
Jan
So I recently decided I would start a Leopard 2A6 build using the new Heng Long model as a basis. Being a relatively new model, I thought that it might be worth sharing my journey.
My plan is to keep the model relatively lightweight and lower cost. Luckily, HL seems to have improved their game a little recently, and their Leopard has enough detail that I'll be able to use minimal upgrade detail parts. In an effort to keep the weight down I will also be trying to sticking with the plastic tracks (they're simplified and single pinned unlike the double pinned full scale ones) and I will probably make use of the basic the nylon gearboxes initially. We'll see how that goes, I may need to change them out later but I'll cross that bridge when I get to it. I'll also be ditching HL's 2.4 ghz RX18 in favour of a Clark TK22 and using my existing 9X transmitter.
So, on with some pictures of what arrived in the box, and my thoughts during its subsequent dissassembly...
As it turns out, a 1/16 leopard 2 isn't a small kitty. Even knowing this, I was still surprised when I opened the box. After loading some batteries into it and trundling around the floor briefly, it feels a little slow out of the box. As others have pointed out, the large turret race also means that the turret traverse is quite slow. The suspension however was surprisingly nice, however if you are making more of a heavy build, it might turn out to be a little soft. To start with I'll stick with the stock gearing as I dont want the speed to drop, and as I don't plan to add a lot of metal aftermarket parts I don't imagine a need for increased torque will arise. If I find later that I need to further tune the speed, I will try swapping out the pinion gears.
Theres a load of extra sprues included providing a lot of extra detail parts...wheel hubs, smoke dischargers, tow hooks, grab handles, spare track links etc. The included tow cables are somewhat flexible which is nice as they need to bend around the rear hull. Also made from a flexible type plastic are a pair of small antennas. Unfortunately lacking from the included accessories is a pintle mounted MG3. At the moment I am still undecided about whether or not I want to address that though.
The transfers have several options for number plates and without doing a bit of research they do look relatively accurate, however I am not sure that I will use them or just use regular waterslide decals instead. I haven't used Heng Longs transfers before and I am unsure of their finish quality. Just looking at them they appear quite thick, so I doubt they're great.
The figure is unfortunately the regular german panzer commander from their earlier releases, however as with my German M41 build, I'll probably enjoy sculpting a new figure from scratch anyway, so thats not a problem. Alternatively there is a 1/16 bundeswehr crew figure available from Tamiya which some might find is a good starting place if it can be found at a reasonable price.
One area I can see that shows a lot of room for improvement is the rear bustle stowage baskets. Being just molded plastic, the mesh sides are just molded surface detail. I will probably adapt some photo-etch baskets for the Tamiya Leopard to replace them.
Like the stowage baskets, the mesh detail on the grills over the power pack are also just molded surface detail, however it is less noticable here and can probably be left as is. According to the included documentation, HL will be releasing a set of photo-etch engine grills at some stage, which may be useful for anyone who is bothered by the appearance of the molded stock grills.
HL's rear LED lights need to go. I will replace those with reflectors. I plan to scratch build functional tail lights to replace the non-functional molded ones on the model (they are just outboard of the upper LED tail lights). I will also replace the front LED headlights with tiny SMD LEDs and transparent plastic lenses.
All the periscopes around the various hatches appear to be open, with no molded plastic in place of the glass. I consider this as a bit of a win as it'll save me the effort of cutting them out when I go to add transparent plastic lenses to them.
There's also a little detail on the hatch undersides, which is a nice surprise.
Once the top is off, there are the standard HL offerings inside. The new style speaker sounds a bit louder than the older style perhaps, and its a little smaller by the look of it. If I dont have a spare Visaton speaker somewhere I'll probably keep that as is for the time being. The upper hull connector also appears to be a new type, and it seems the lights plug into it rather than being soldered on. Again, I think thats a nice thing. As mentioned earlier, I'll try keeping the stock nylon gears and just replacing the stock motors with some Speed 400s to gain some speed.
From the inside it looks like the headlights are attached with screws from the inside, which might also be a good change. Later on I guess I'll find out if the usual HL glue monsters also worked their magic there.
There is a tensioning system incorporated for the tracks as stock, but it appears to be adjustable only in set increments. I imagine that will be fine, again, if it needs further work I will address the issue later.
Seperating the turret halves was interesting...11 screws. I guess it's not coming apart by accident any time soon.
The turret contains the standard barrel elevation setup as well as the usual HL BB unit, which I will be replacing with servo recoil driven by the TK22...just as soon as I disassemble the barrel and decide on how to go about doing it. While doing this I might experiment with repurposing the black capped motor from the airsoft unit to replace the green capped one from the turret traverse unit to see if this changes the speed of the traverse, as some have stated that the different motor colours have different specs.
The underside of the mantlet will require a little remodelling with some styrene to close the area in and properly duplicate the shape of the real vehicle, but it doesn't look too major. The gun mantlet also contains an aluminium barrel for the co-axial machine gun mount with a red 3mm LED inside. The main gun barrel is machined from a single piece of aluminium, with a plastic tip on the muzzle and plastic bore extractor fitted around the barrel. Compared to the little 76mm HV barrel on my M41, the 120mm L55 is enormous, hehe.
There's a few other small items I plan to scratch build and add, such as the shutter doors on the sighting system, and possibly the addition of the rotating beacon light to the turret. All in all I am quite impressed with Heng Longs Leopard2, and I think that it will be possible to get a rather nice result without adding a lot of work or expense.
Once I complete the disassembly I'll be back with more pictures and thoughts on it all.
Jan
 10-23-2013, 12:31 PM
#3

I've mostly kept my HL electronics and that plug system looks like it is definitely worth investigating for re-wiring my older HLs to make servicing them simpler.
Thanks.
10-23-2013, 03:50 PM
#4
Member
Thread Starter
Join Date: Jan 2013
Location: , AUSTRALIA
Posts: 30
Likes: 0
Received 0 Likes
on
0 Posts
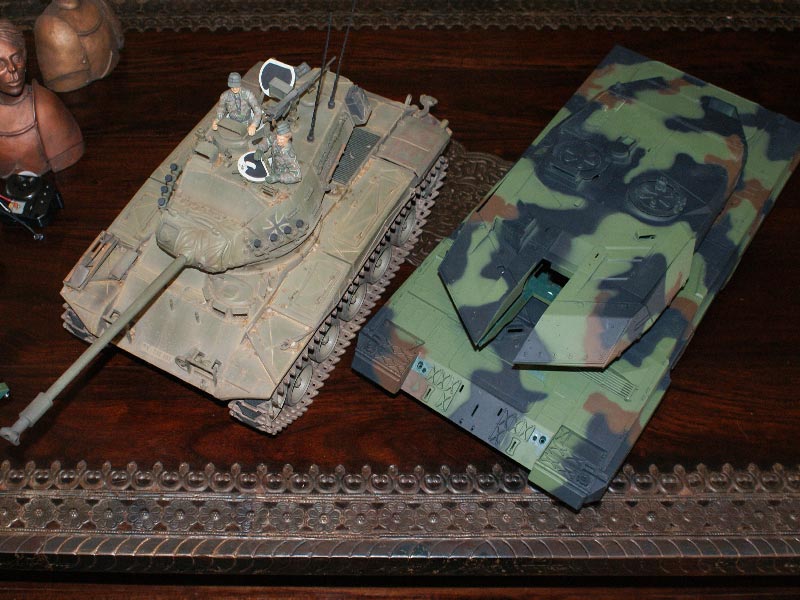
Hehe its always exciting when starting on a new tank. For a comparison of size, here is the leopard sitting next to the body of my M41.
Philipat, I snapped some a few more photos of that connector for you. For the most part all the components still have the same wiring as usual by the looks of it. Its just that upper hull connector thats different. I understand what you mean about it though, I thought the same thing when I first saw it.
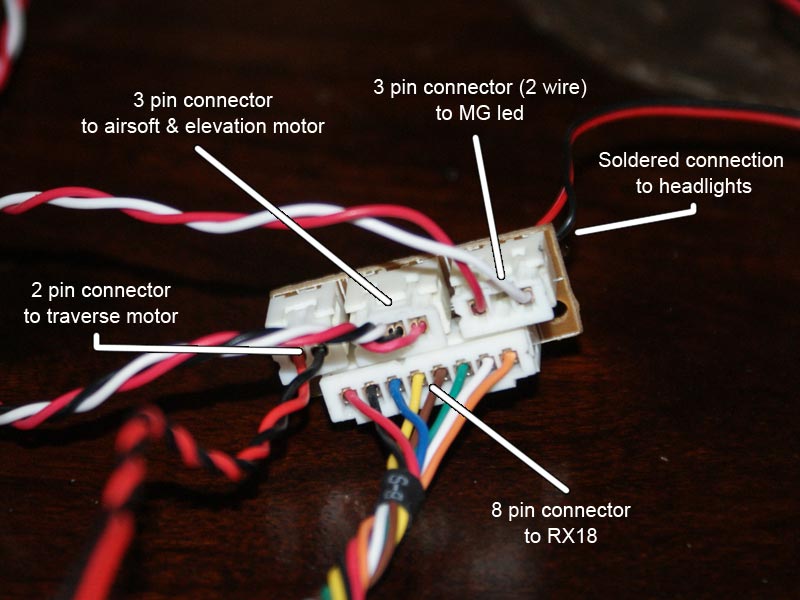
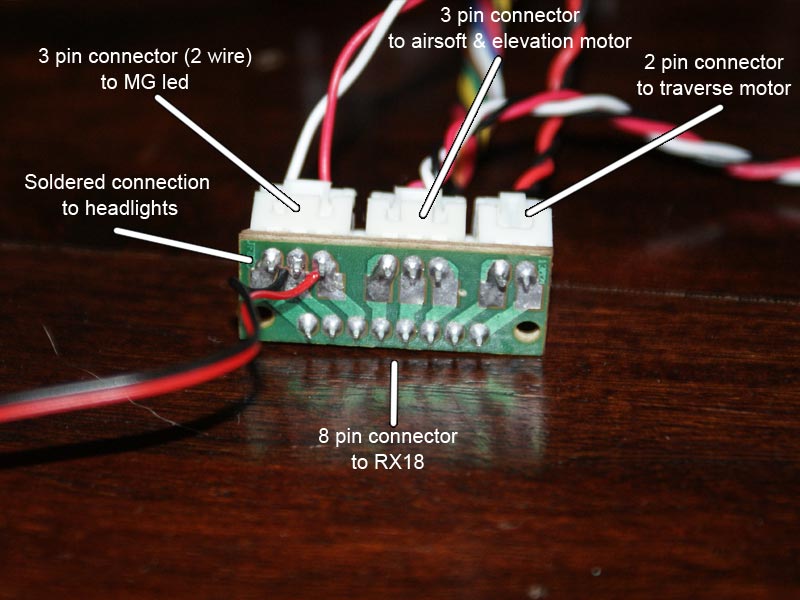
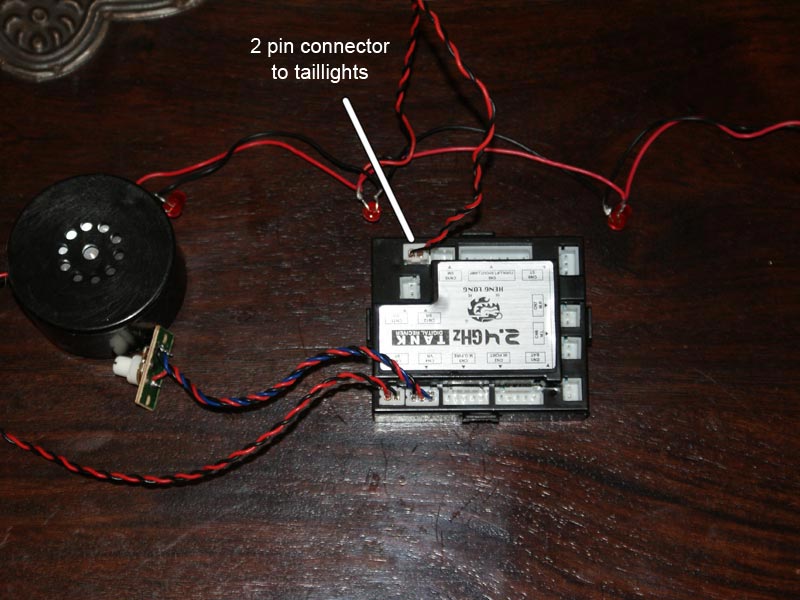
Interestingly on the 2.4 ghz boards there is now a 2 pin connector added for plugging in the tail lights.
The rest of the disassembly took place without a hitch. I was initially worried that the wheels were attached with screws and that the screw threading would drastically shorten their lifespan, but the axle is plastic so the wheel isnt rotating on the threading. They come off a lot easier than on the M41 or M26 where the screw is hidden away inside the 2 glued halves of the wheels. It has been pointed out that the leopard has supports in place for the drive axle, however I have my doubts about its usefulness as they dont sit snug up against the shaft. There's probably about 2 to 3mm of space around the drive shaft, which would allow for a fair amount of play if things get out of shape.
I was correct about the headlights... just screwed on and no glue thankfully. After removing the headlights, I took a thin blade and levered away the front rim of the lights, allowing me to simply pull the LED out through the front. I'll bore out the plastic of the molded lens, fit an SMD led, and then create some new lenses from transparent plastic.
From this stage I'll probably spend the next few days cleaning up mold lines and flash before beginning to start adding details.
Jan
Philipat, I snapped some a few more photos of that connector for you. For the most part all the components still have the same wiring as usual by the looks of it. Its just that upper hull connector thats different. I understand what you mean about it though, I thought the same thing when I first saw it.
Interestingly on the 2.4 ghz boards there is now a 2 pin connector added for plugging in the tail lights.
The rest of the disassembly took place without a hitch. I was initially worried that the wheels were attached with screws and that the screw threading would drastically shorten their lifespan, but the axle is plastic so the wheel isnt rotating on the threading. They come off a lot easier than on the M41 or M26 where the screw is hidden away inside the 2 glued halves of the wheels. It has been pointed out that the leopard has supports in place for the drive axle, however I have my doubts about its usefulness as they dont sit snug up against the shaft. There's probably about 2 to 3mm of space around the drive shaft, which would allow for a fair amount of play if things get out of shape.
I was correct about the headlights... just screwed on and no glue thankfully. After removing the headlights, I took a thin blade and levered away the front rim of the lights, allowing me to simply pull the LED out through the front. I'll bore out the plastic of the molded lens, fit an SMD led, and then create some new lenses from transparent plastic.
From this stage I'll probably spend the next few days cleaning up mold lines and flash before beginning to start adding details.
Jan
Last edited by Jannicke; 10-23-2013 at 03:59 PM. Reason: typos
10-27-2013, 07:19 AM
#6
Join Date: Jul 2013
Location: sayreville, NJ
Posts: 378
Likes: 0
Received 0 Likes
on
0 Posts
10-27-2013, 03:14 PM
#7
Member
Thread Starter
Join Date: Jan 2013
Location: , AUSTRALIA
Posts: 30
Likes: 0
Received 0 Likes
on
0 Posts
Hmm I can't recall seeing a thread on how to do it, but it isn't really much different from adding servo recoil to any other tank. You just need to remove a little material from the mantlet, behind the barrel, to allow the barrel to move freely back and forth, and then devise a way of extending the barel back and linking it to the servo arm. I will post pics when i I get that far.
This morning my fingers are so sore, I spend a bit of time over the weekend cutting out and sanding to shape all the little pieces of plastic for the periscope lenses. Tedious, hehe.
This morning my fingers are so sore, I spend a bit of time over the weekend cutting out and sanding to shape all the little pieces of plastic for the periscope lenses. Tedious, hehe.
10-28-2013, 01:27 AM
#8
Member
Thread Starter
Join Date: Jan 2013
Location: , AUSTRALIA
Posts: 30
Likes: 0
Received 0 Likes
on
0 Posts
Ok. Looking a little further into how to create a servo recoil for the leopard, this is what I have done so far.
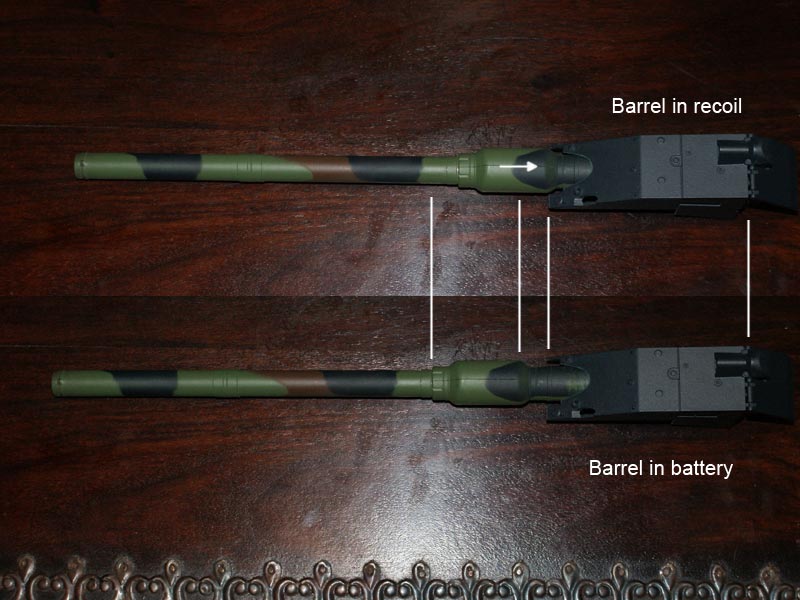
First I measured the distance from the front of the mantlet to the bore extractor. This will be the amount of travel I allow for the barrel to recoil.
After disassembling the barrel and mantlet from the turret you are left with the metal barrel which slides into the mantlet quite snugly. There is a small flat machined into the top of the barrel which fits into a notch molded inside the mantlet which keeps the barrel oriented properly and stops it from being able to rotate when mounted. I then took a file and extended the flat along the barrel the same distance as previously measured.
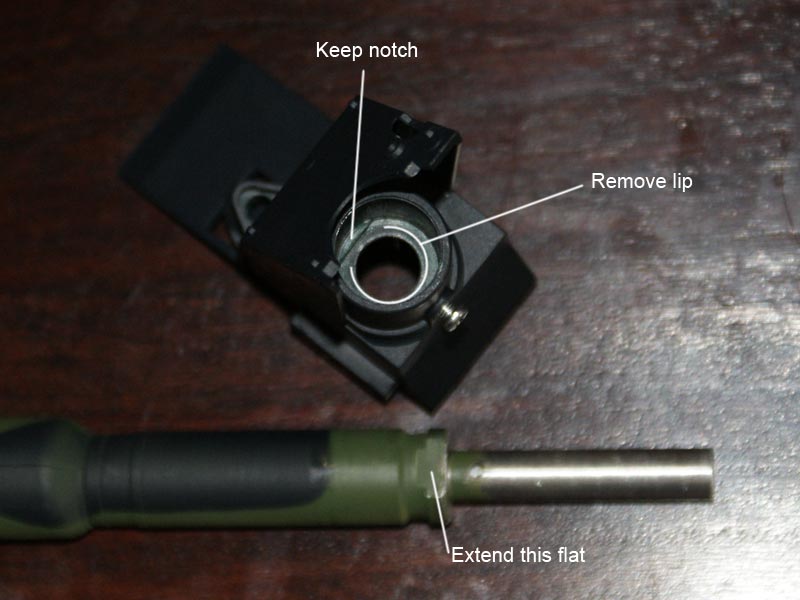
Next I used a dremel and some hand files to bore out the lip from inside the mantlet. I was careful to leave the notch inside the mantlet in place, as this will provide the stop for the barrel and again, make sure its remails oriented correctly. On the other side of the lip there are some fins which I also removed some material from to allow the barrel to slide into recoil position freely.

The rest of the servo recoil shouldnt be any different from any other tank, simply consisting of mountin a servo to the rear of the gun and connecting it to the barrel.
I have also filled the hollow bases of the smoke dischargers with milliput, but thats pretty boring so no need for a photo there.
First I measured the distance from the front of the mantlet to the bore extractor. This will be the amount of travel I allow for the barrel to recoil.
After disassembling the barrel and mantlet from the turret you are left with the metal barrel which slides into the mantlet quite snugly. There is a small flat machined into the top of the barrel which fits into a notch molded inside the mantlet which keeps the barrel oriented properly and stops it from being able to rotate when mounted. I then took a file and extended the flat along the barrel the same distance as previously measured.
Next I used a dremel and some hand files to bore out the lip from inside the mantlet. I was careful to leave the notch inside the mantlet in place, as this will provide the stop for the barrel and again, make sure its remails oriented correctly. On the other side of the lip there are some fins which I also removed some material from to allow the barrel to slide into recoil position freely.
The rest of the servo recoil shouldnt be any different from any other tank, simply consisting of mountin a servo to the rear of the gun and connecting it to the barrel.
I have also filled the hollow bases of the smoke dischargers with milliput, but thats pretty boring so no need for a photo there.
10-28-2013, 03:12 PM
#10
Member
Thread Starter
Join Date: Jan 2013
Location: , AUSTRALIA
Posts: 30
Likes: 0
Received 0 Likes
on
0 Posts
Doing the barrel recoil this way will eliminate the airsoft function. That's fine for me as I will be switching to IR and adding an LED flash to the barrel.
As to adding barrel recoil while retaining the airsoft system, I can't think of a way to do it, but I am sure it would be possible with a little ingenuity.
As to adding barrel recoil while retaining the airsoft system, I can't think of a way to do it, but I am sure it would be possible with a little ingenuity.
10-28-2013, 03:31 PM
#11
Join Date: Jul 2013
Location: sayreville, NJ
Posts: 378
Likes: 0
Received 0 Likes
on
0 Posts
Yea, It is possible. I took apart my Tiger to see if it can be done. The entire airsoft/barrel assembly would have to be made into one piece that can recoil as one unit. Some kind of frame work would need to be fabbed around the airsoft/ barrel unit that a servo can be mounted to perform the recoil function. It would have to be some kind of rail system that the barrel/ airsoft unit can slide on. Then servo elevation would need to be fabbed and connected to the framework so it don't interfere with the recoil action. The question being... Is there enough room to get this done...
Doing the barrel recoil this way will eliminate the airsoft function. That's fine for me as I will be switching to IR and adding an LED flash to the barrel.
As to adding barrel recoil while retaining the airsoft system, I can't think of a way to do it, but I am sure it would be possible with a little ingenuity.
As to adding barrel recoil while retaining the airsoft system, I can't think of a way to do it, but I am sure it would be possible with a little ingenuity.
10-30-2013, 05:04 AM
#14
Member

Join Date: Feb 2010
Location: Milano, ITALY
Posts: 32
Likes: 0
Received 0 Likes
on
0 Posts
10-30-2013, 03:58 PM
#15
Member
Thread Starter
Join Date: Jan 2013
Location: , AUSTRALIA
Posts: 30
Likes: 0
Received 0 Likes
on
0 Posts
No problem at all Hl524.
Thanks for adding the link tooCapitanAmerica69, thats exactly how I was going to finish up the recoil system.
Work continues on my leopard. Those battery boxed always just seem to be frustratingly tight when fitting batteries and I find them inconvenient to use. I prefer to just remove them entirely, along with replacing the screws used to attach the upper hull with small rare earth magnets. This creates much more space inside the hull, and eliminated all the messing around under the tank with a screwdriver, making it a much simpler process whenever you want to change the battery.
With the battery box gone I glued the battery box cover in place, I used a soft modelling clay to temporarily seal the openings in the hull left by the suspension components and switches. Next I poured a little resin into the bottom of the hull, being careful to fill it only as far as the top of the mounting points for the gearboxes. I like doing this as it lends a huge amount of stiffness to the hull as well as providing a perfectly flat base in the hull that you can then use to mount whatever else you want in there.
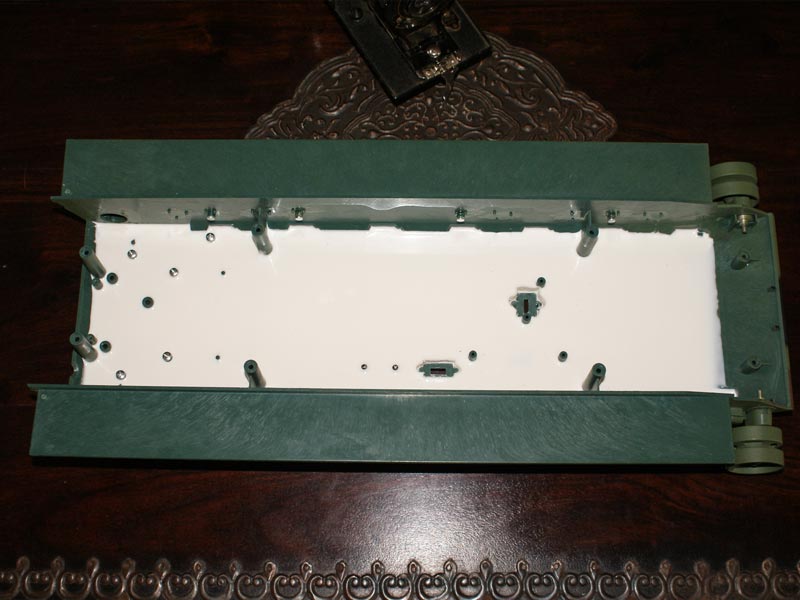
One thing to watch out for when doing this to a larger hull like the leopards is that as the resin cures it generates a bit of heat, and can contract a little, causing the hull to warp and making it unable to marry up to the upper hull properly afterwards. To avoid this I cut some blocks of wood to the width of the hull and squeezed them inside before I poured the resin in. Once everything was set I took the wood braces back out.
The lower hull is now rock solid and I have a nice clean surface I can use to drill mounting holes into whenever / wherever I need.
Thanks for adding the link tooCapitanAmerica69, thats exactly how I was going to finish up the recoil system.
Work continues on my leopard. Those battery boxed always just seem to be frustratingly tight when fitting batteries and I find them inconvenient to use. I prefer to just remove them entirely, along with replacing the screws used to attach the upper hull with small rare earth magnets. This creates much more space inside the hull, and eliminated all the messing around under the tank with a screwdriver, making it a much simpler process whenever you want to change the battery.
With the battery box gone I glued the battery box cover in place, I used a soft modelling clay to temporarily seal the openings in the hull left by the suspension components and switches. Next I poured a little resin into the bottom of the hull, being careful to fill it only as far as the top of the mounting points for the gearboxes. I like doing this as it lends a huge amount of stiffness to the hull as well as providing a perfectly flat base in the hull that you can then use to mount whatever else you want in there.
One thing to watch out for when doing this to a larger hull like the leopards is that as the resin cures it generates a bit of heat, and can contract a little, causing the hull to warp and making it unable to marry up to the upper hull properly afterwards. To avoid this I cut some blocks of wood to the width of the hull and squeezed them inside before I poured the resin in. Once everything was set I took the wood braces back out.
The lower hull is now rock solid and I have a nice clean surface I can use to drill mounting holes into whenever / wherever I need.
11-01-2013, 02:16 AM
#16
Member

Join Date: Oct 2013
Location: London, Ontario
Posts: 39
Likes: 0
Received 0 Likes
on
0 Posts
Jan
Will you be able to post a more detailed direction on your lights? (Headlights, rear lights assy). Are you looking at making the front markers (yellow) functional as well? I have the kit and would like to do some basic mods to upgrade the look and the final touches to make it the Canadian version. I can PM you if it makes it easier to provide the (handholding) details. Looking forward to watching this thread.
Gary
 11-01-2013, 08:18 PM
#18
Member
Thread Starter
Join Date: Jan 2013
Location: , AUSTRALIA
Posts: 30
Likes: 0
Received 0 Likes
on
0 Posts
Hi Gary,
Yep, I'll post details of everything I do as I do it. Im undecided at this stage if I will make the yellow fron markers functional, though with the tiny size of my SMD LEDs it would be easy enough to do I imagine. If I do make them function, I will probably start by drilling out the bulb area from below being careful to keep the gill intact ( or just remove the whole things and facricate new guards) and then fabricate the light from transparent plastic and mount the SMD LED below it. I havent measures, but it could also be possible to use a standard 3mm LED instead of the SMD and transparent plastic too.
YHR, yeah that slat armor would be great, very time consuming to make though and I can just see it getting hooked up on stuff and being torn off the tank. Could be a bit tricky making it able to stand up to the rigors of RC life. Of course, once you go as far as adding the slat armor, then you start wanting to add the Barracuda thermal blankets and stuff, which is also easily done. My last attempt at Barracuda mesh was with punching the pattern into lacqured florists tissue paper. It worked reasonable well, but the time involved made me quickly give the idea up as a bad joke, hehe.
11-04-2013, 08:05 PM
#19
Member
Thread Starter
Join Date: Jan 2013
Location: , AUSTRALIA
Posts: 30
Likes: 0
Received 0 Likes
on
0 Posts
So today I continued along with the kitty, this time doing a little work on the rear light assembly. I used a similar process to this on my M41G and it worked fantastically.
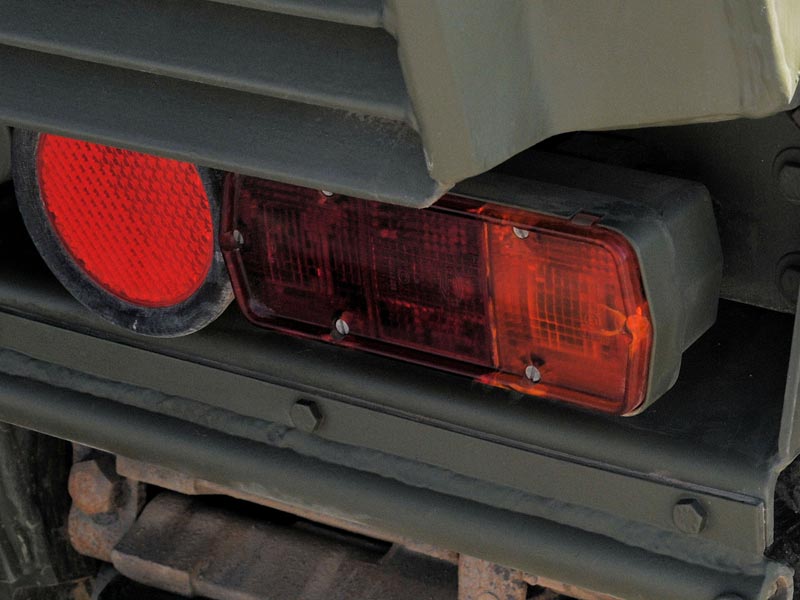
Here's is a close up of the rear light assembly on a spanish Leopard 2E, and it pretty much shows what I want to achieve. That being the outer light assembly having functional tail lights (not going to bother with the indicators), and the four inner and lower mounts where the stock lights are placed being replaced with reflectors. Im not sure on the real tank if those last four are actually lights or simply reflectors...either way, in most photos they don't appear to be lit and just look to be reflective lenses so that is good enough for me.
First I drilled and filed out the light molding on the rear bulkhead just large enough to accomodate a 3mm LED. I then filled the gap behind the indicator with milliput. I also filled the area behind the red portion of the assembly with a thinner layer of milliput, leaving a hole just large enough to fit the LED through. This will hold the LED securly in place. The thinner layer of milliput here leaves the space above the LED empty and allows the light to bounce around and illuminate the whole of the red portion.
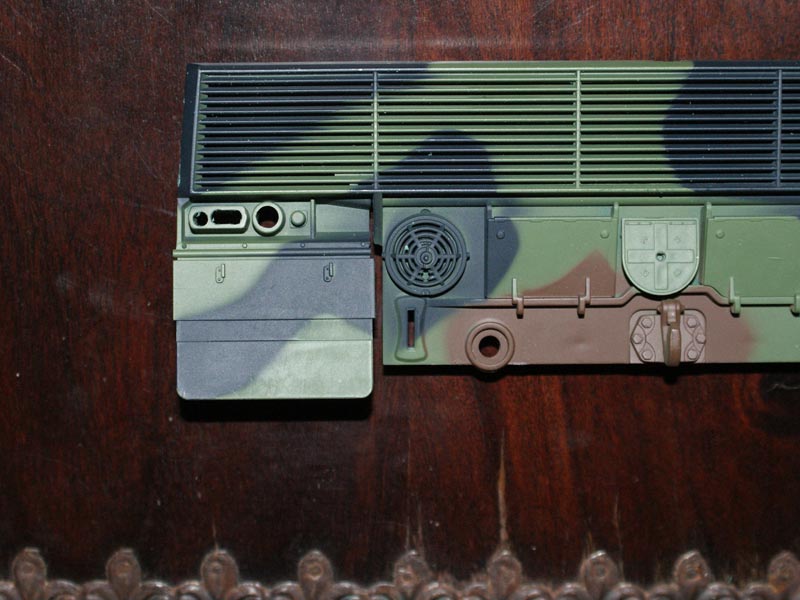
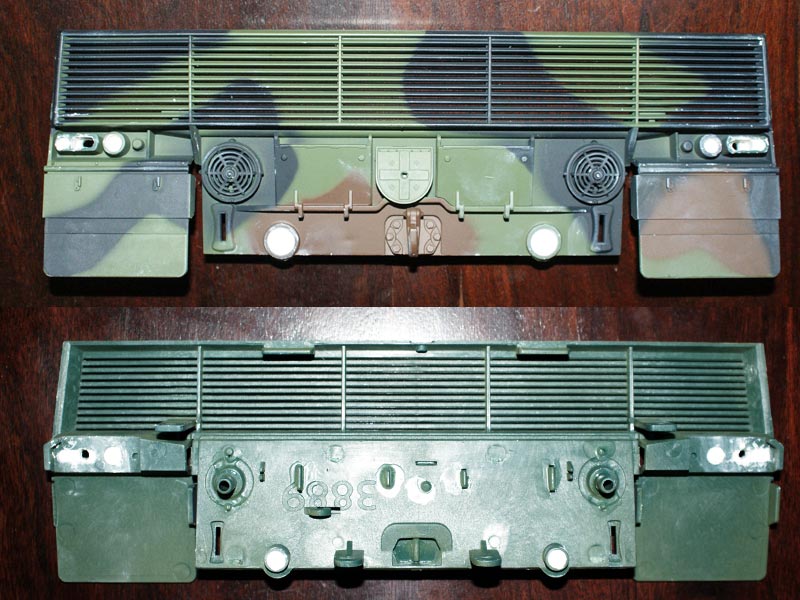
Also I filled the holes for the stock lighting with milliput to provide a surface to mount some red reflective material to later in the build.
Now, on to the lenses...Always on the lookout for things I can use on my tanks, I have a habit of scouring busy road interections for the remains of broken car tail lights. Where I live everyone drives terribly so there is never a shortage of the stuff.

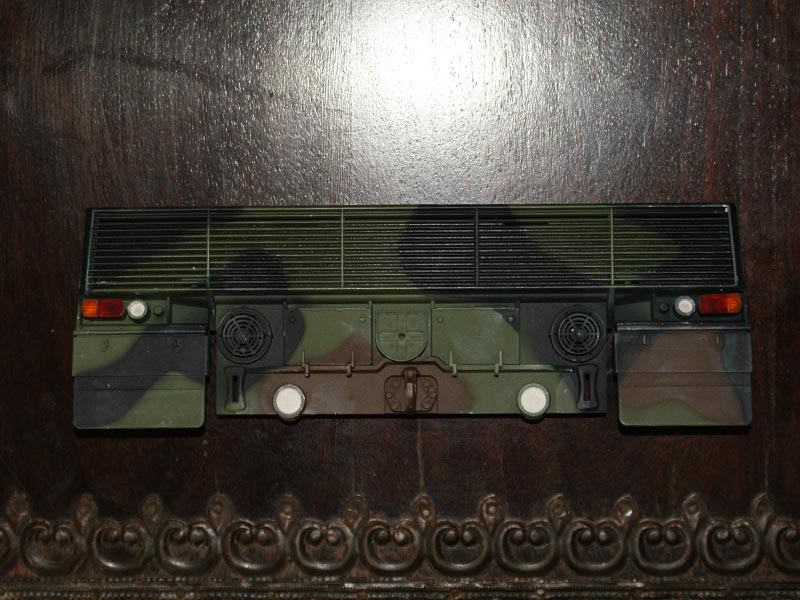
I cut some of these transparent plastic chips down to size using the dremel, glued a red and an orange piece together for each light, and then shaped and pollished it with fine sandpaper. I'll be able to glue these into place over the LED later and with a little paint around the edge it should do a fine job of replicating the full scale lights. Here are the lenses sitting in place on the rear bulkead...
For the reflectors, in the past I have used pieces red foil confetti cut down to size and glued into place with good results, I'll probably do the same here.
Cheers, Jan
Here's is a close up of the rear light assembly on a spanish Leopard 2E, and it pretty much shows what I want to achieve. That being the outer light assembly having functional tail lights (not going to bother with the indicators), and the four inner and lower mounts where the stock lights are placed being replaced with reflectors. Im not sure on the real tank if those last four are actually lights or simply reflectors...either way, in most photos they don't appear to be lit and just look to be reflective lenses so that is good enough for me.
First I drilled and filed out the light molding on the rear bulkhead just large enough to accomodate a 3mm LED. I then filled the gap behind the indicator with milliput. I also filled the area behind the red portion of the assembly with a thinner layer of milliput, leaving a hole just large enough to fit the LED through. This will hold the LED securly in place. The thinner layer of milliput here leaves the space above the LED empty and allows the light to bounce around and illuminate the whole of the red portion.
Also I filled the holes for the stock lighting with milliput to provide a surface to mount some red reflective material to later in the build.
Now, on to the lenses...Always on the lookout for things I can use on my tanks, I have a habit of scouring busy road interections for the remains of broken car tail lights. Where I live everyone drives terribly so there is never a shortage of the stuff.
I cut some of these transparent plastic chips down to size using the dremel, glued a red and an orange piece together for each light, and then shaped and pollished it with fine sandpaper. I'll be able to glue these into place over the LED later and with a little paint around the edge it should do a fine job of replicating the full scale lights. Here are the lenses sitting in place on the rear bulkead...
For the reflectors, in the past I have used pieces red foil confetti cut down to size and glued into place with good results, I'll probably do the same here.
Cheers, Jan
11-11-2013, 12:24 AM
#22
Member
Join Date: Oct 2013
Location: London, Ontario
Posts: 39
Likes: 0
Received 0 Likes
on
0 Posts
Notes already in progress to emulate what you have done for my cat. I can't wait for the next installment.Really nice work on the rear lights. Now noob question SMD LED? (smd=......)
11-11-2013, 02:43 AM
#23
Member
Thread Starter
Join Date: Jan 2013
Location: , AUSTRALIA
Posts: 30
Likes: 0
Received 0 Likes
on
0 Posts
Thanks for the compliments on the tail lights guys.
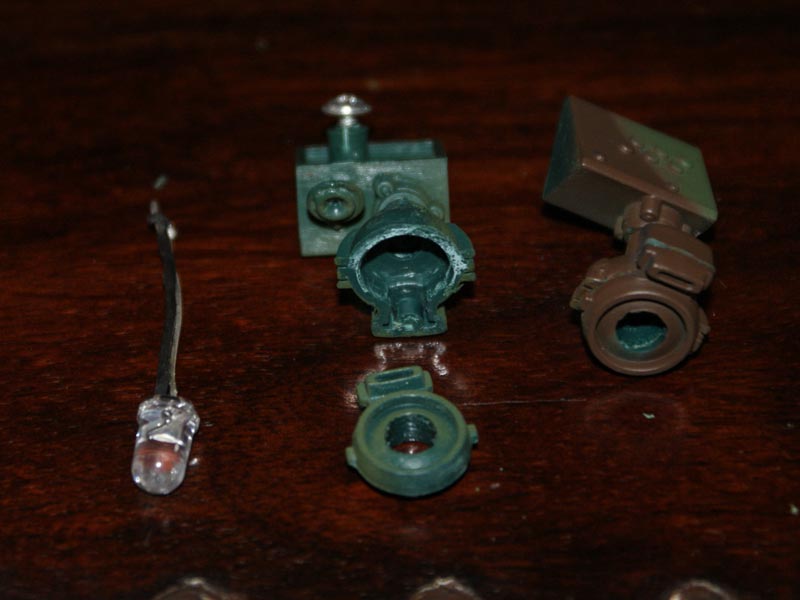
SMD or Surface mount LEDs are much like a tiny, really tiny, version of regular LED lights. Here's a picture to illustrate just how rediculously small they are...
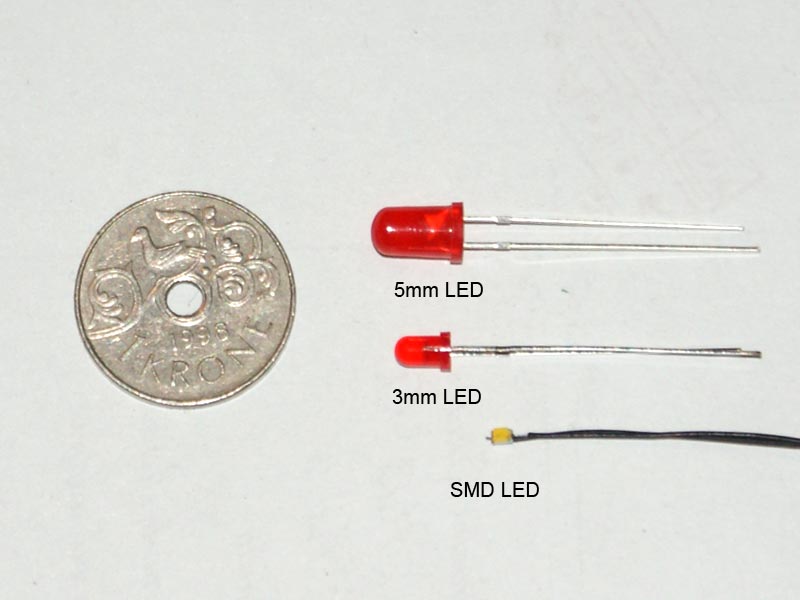
You can buy them with wires and resistor already soldered in place which is quite handy, as soldering something that tiny really isn't much fun. For their size they are quite bright, easily as bright as regular LEDs, and their size allows you to put them just about anywhere.
I don't have many pics of my recent progress as I have mostly been just cleaning parts up, sanding off mold lines and so forth, and getting a coat of primer on. That's all pretty boring and I am sure there's nothing new in there to be of much interest or help to anyone.
I have also started sculpting up a crew member, but more on that later.
edit: Oh yeah, I did also get around to switching out the Heng Long turret baskets for a set from Tamiya's Leopard, That was straight-forward and simple. The mounting pins on the tamiya basket even matched up with the position of the holes for the HL ones on the turret. I'll get a photo of that at some stage too.
SMD or Surface mount LEDs are much like a tiny, really tiny, version of regular LED lights. Here's a picture to illustrate just how rediculously small they are...
You can buy them with wires and resistor already soldered in place which is quite handy, as soldering something that tiny really isn't much fun. For their size they are quite bright, easily as bright as regular LEDs, and their size allows you to put them just about anywhere.
I don't have many pics of my recent progress as I have mostly been just cleaning parts up, sanding off mold lines and so forth, and getting a coat of primer on. That's all pretty boring and I am sure there's nothing new in there to be of much interest or help to anyone.
I have also started sculpting up a crew member, but more on that later.
edit: Oh yeah, I did also get around to switching out the Heng Long turret baskets for a set from Tamiya's Leopard, That was straight-forward and simple. The mounting pins on the tamiya basket even matched up with the position of the holes for the HL ones on the turret. I'll get a photo of that at some stage too.
Last edited by Jannicke; 11-11-2013 at 02:51 AM.
11-20-2013, 07:20 PM
#24
Member
Thread Starter
Join Date: Jan 2013
Location: , AUSTRALIA
Posts: 30
Likes: 0
Received 0 Likes
on
0 Posts
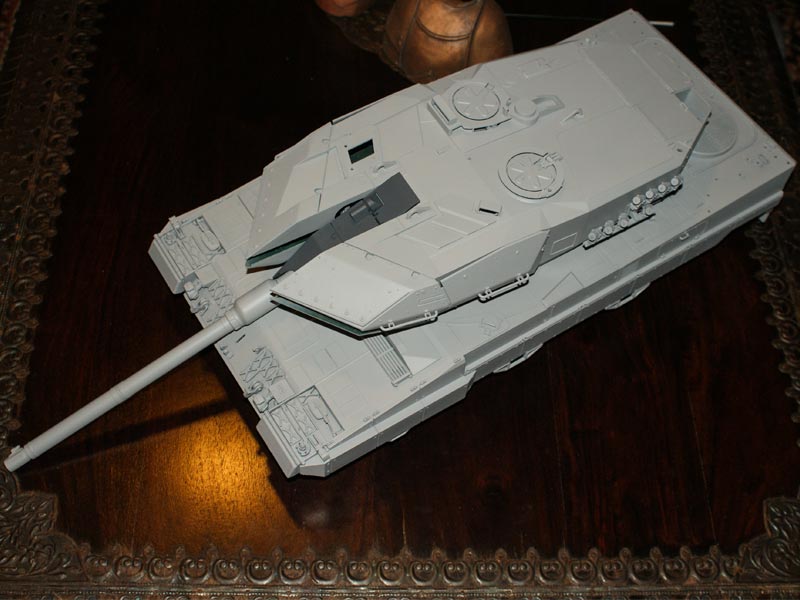
Well, just to show things are still moving along (albeit somewhat slowly) here is the leopard with its base colour coats back on. Im using Tamiya's NATO colours as they seemed a pretty good match. Next step is painting the accessories and then its on to the weathering.

The figure I will show a bit closer later on, but its sculpted from milliput over armature I bent up from twisted wire. Once the Sculpting was done I coated it with a diluted coat of tamiya putty just to remove any residual tool marks from places that were too difficult to get to as I was sculpting. Also in the above picture you can see the Tamiya turret baskets ready to go on.
I also got the news yesterday from Mark at OzArmour that a TK22 is on its way to me too. Yay!
11-21-2013, 04:25 PM
#25
Senior Member
Join Date: Sep 2011
Location: perthWA, AUSTRALIA
Posts: 115
Likes: 0
Received 0 Likes
on
0 Posts
Hi Jannicke, Nice paintjob. Will apply weathering effect soon?
Good to know Tamiya basket fit nicely on HL. Did you buy it from AFV Models? also if you dont mind me asking, what figurines is that? Tamiya?
Good to know Tamiya basket fit nicely on HL. Did you buy it from AFV Models? also if you dont mind me asking, what figurines is that? Tamiya?