


Projects within a project
 08-24-2014, 05:59 PM
#1

Thread Starter
I thought I'd post a few photos of my JagdPanther project.
First I want to say the basis of this is a Pracht 1/10 scale JagdPanther I originally purchased in the early 1990s. For those of you unfamiliar with Pracht's work
he based his on what Jochen Maier did, originally as close 'reproductions' then his own original work which is where this JP comes in. I have to say none of these
early 1/10 scale models from Maier, Pracht and others were NOT terribly to scale; dimensionally they're close but the track pitch is off as well as a number of other
things. I have long since accepted this but I enjoy this scale and Maier's original Panther is what got me started. What was acceptable from a detail standpoint
when these models first saw the light of day in the mid 1970s into the early 1990s doesn't really pass muster today. With every rivet, wood grain and casting mark
under close scrutiny these models are woefully lacking. The current crop of 1/10 from Federov and others are outstanding but their prices show it also.
My goal isn;t to correct things I can't fix but to add a bit more detail where I'm able so these won't be laughed off the scene. The work for me is slow going as
for few exceptions I must make everything. The recent boon of photo etched tool clamps was a godsend. A good portion of the details seen were fabricated
and I'm solely responsible for them good or bad.
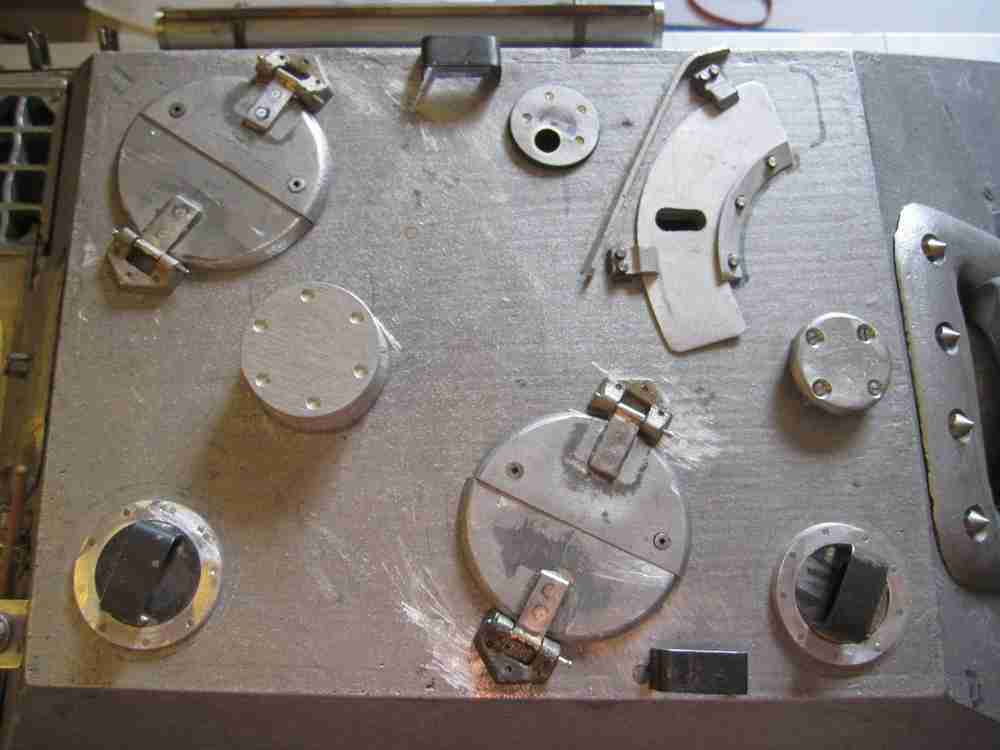
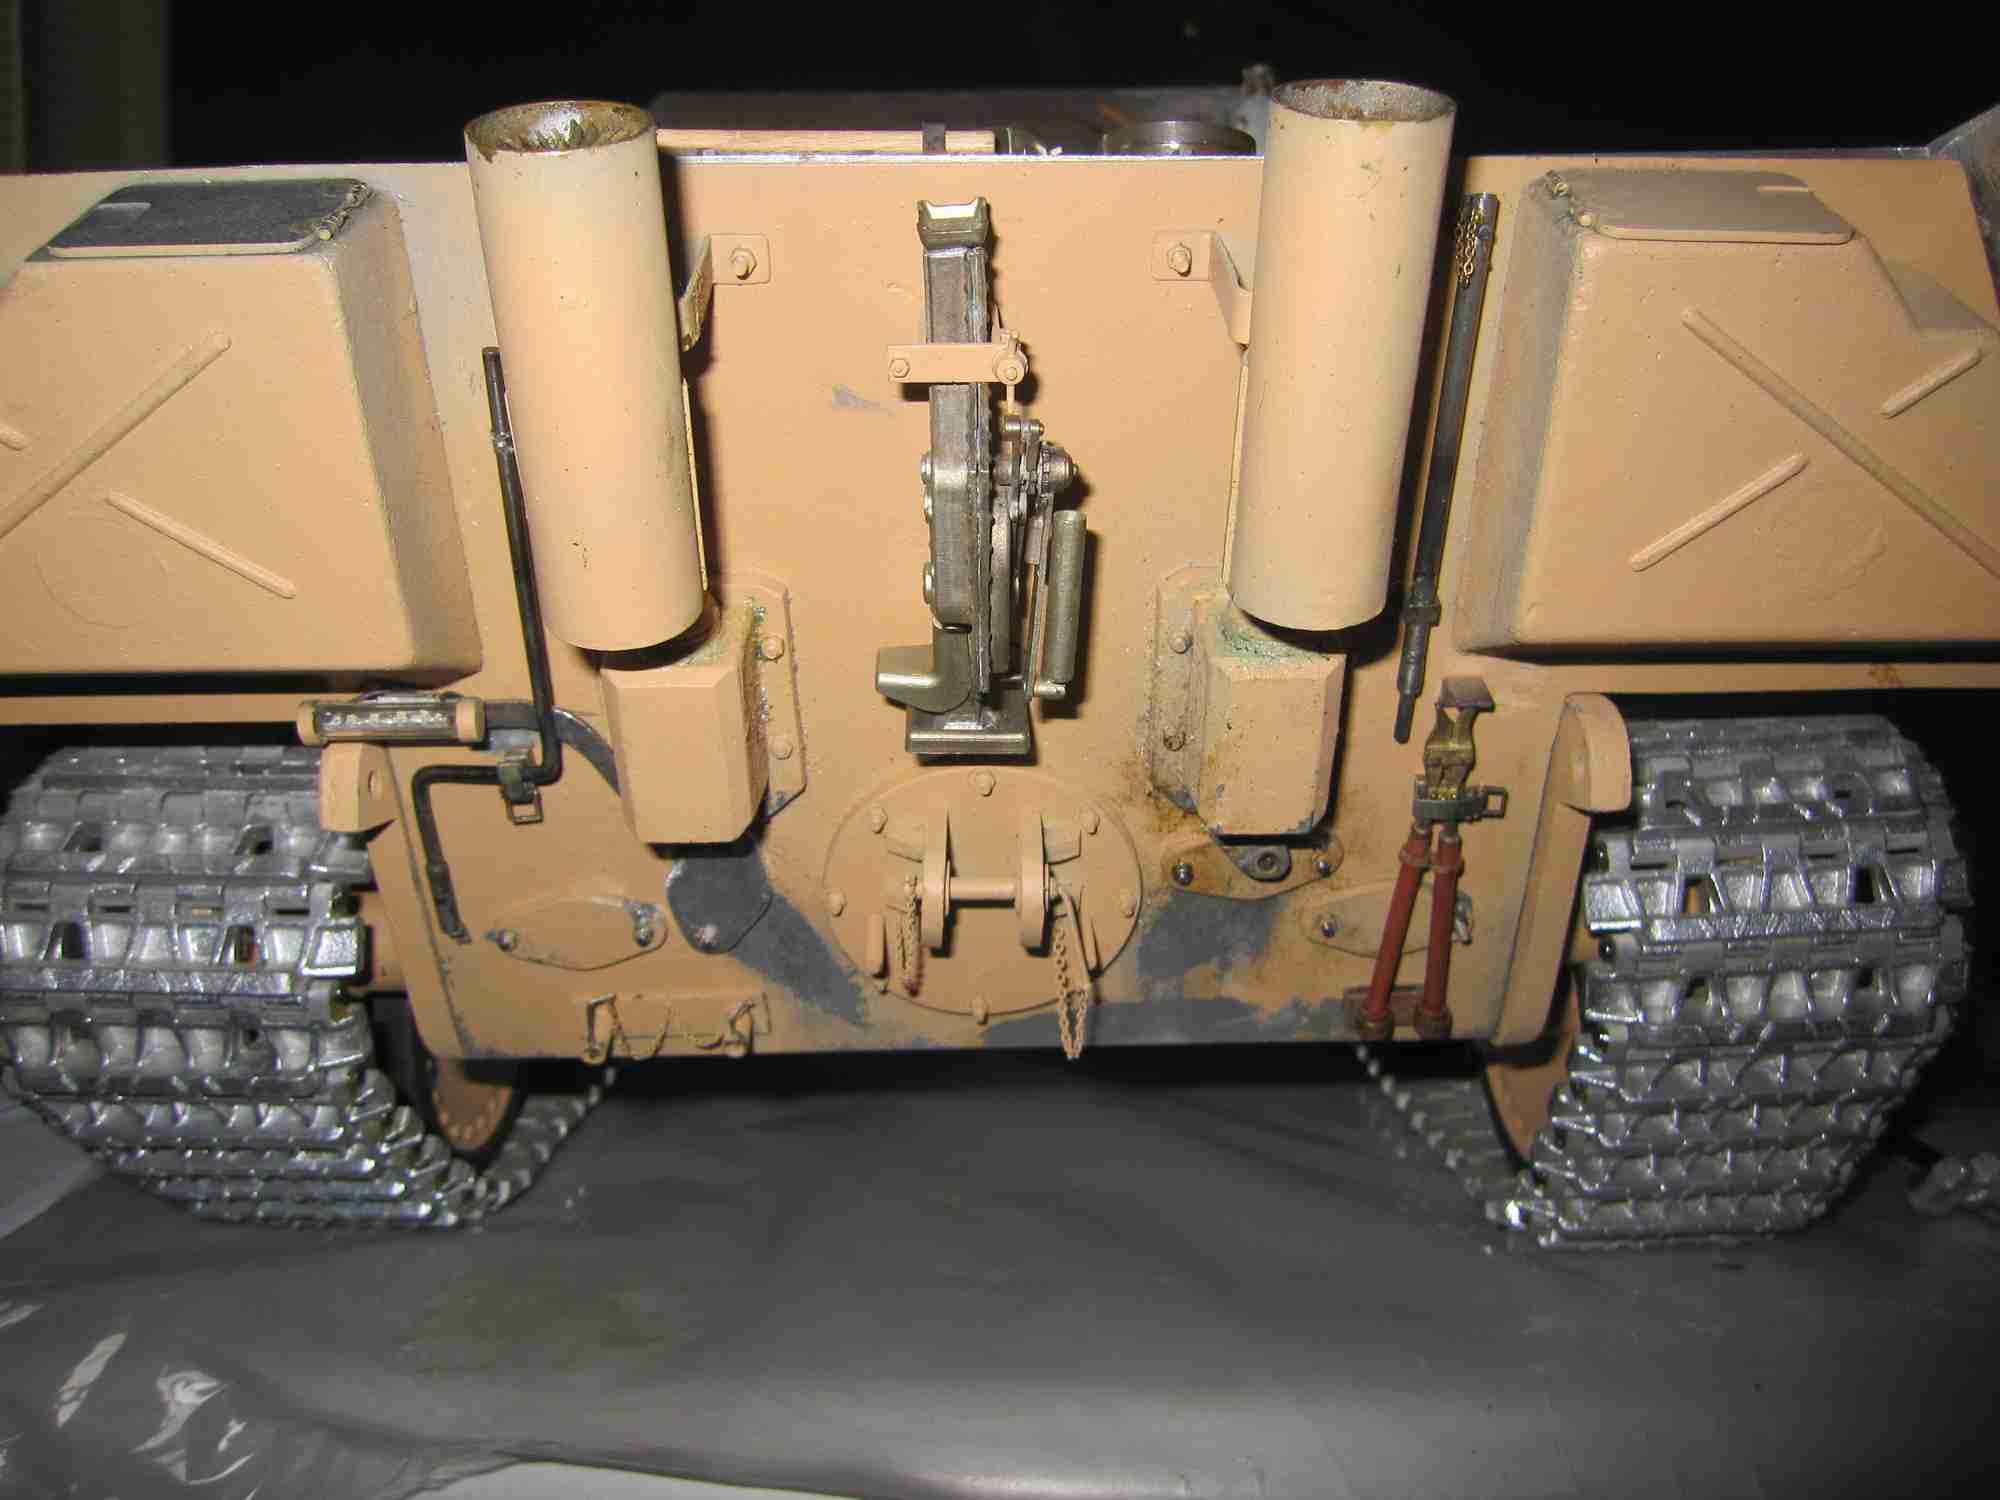
So the photos that follow are of my progress. I have a few things to do to satisfy me, some cleanup ( I'd run the model a couple of times to proove the engine and transmission - hence the messy rear end plate ); filing down some spot filler here and there then it's to the paint table. I only wish I had painting and weathering skills although I'm a big proponent of naturally occurring scale dust, dirt and scrapes.
The model is powered as are most of mine by a Webra .40 blackhead with power going through a 3+1 speed transmission. The model weighs about
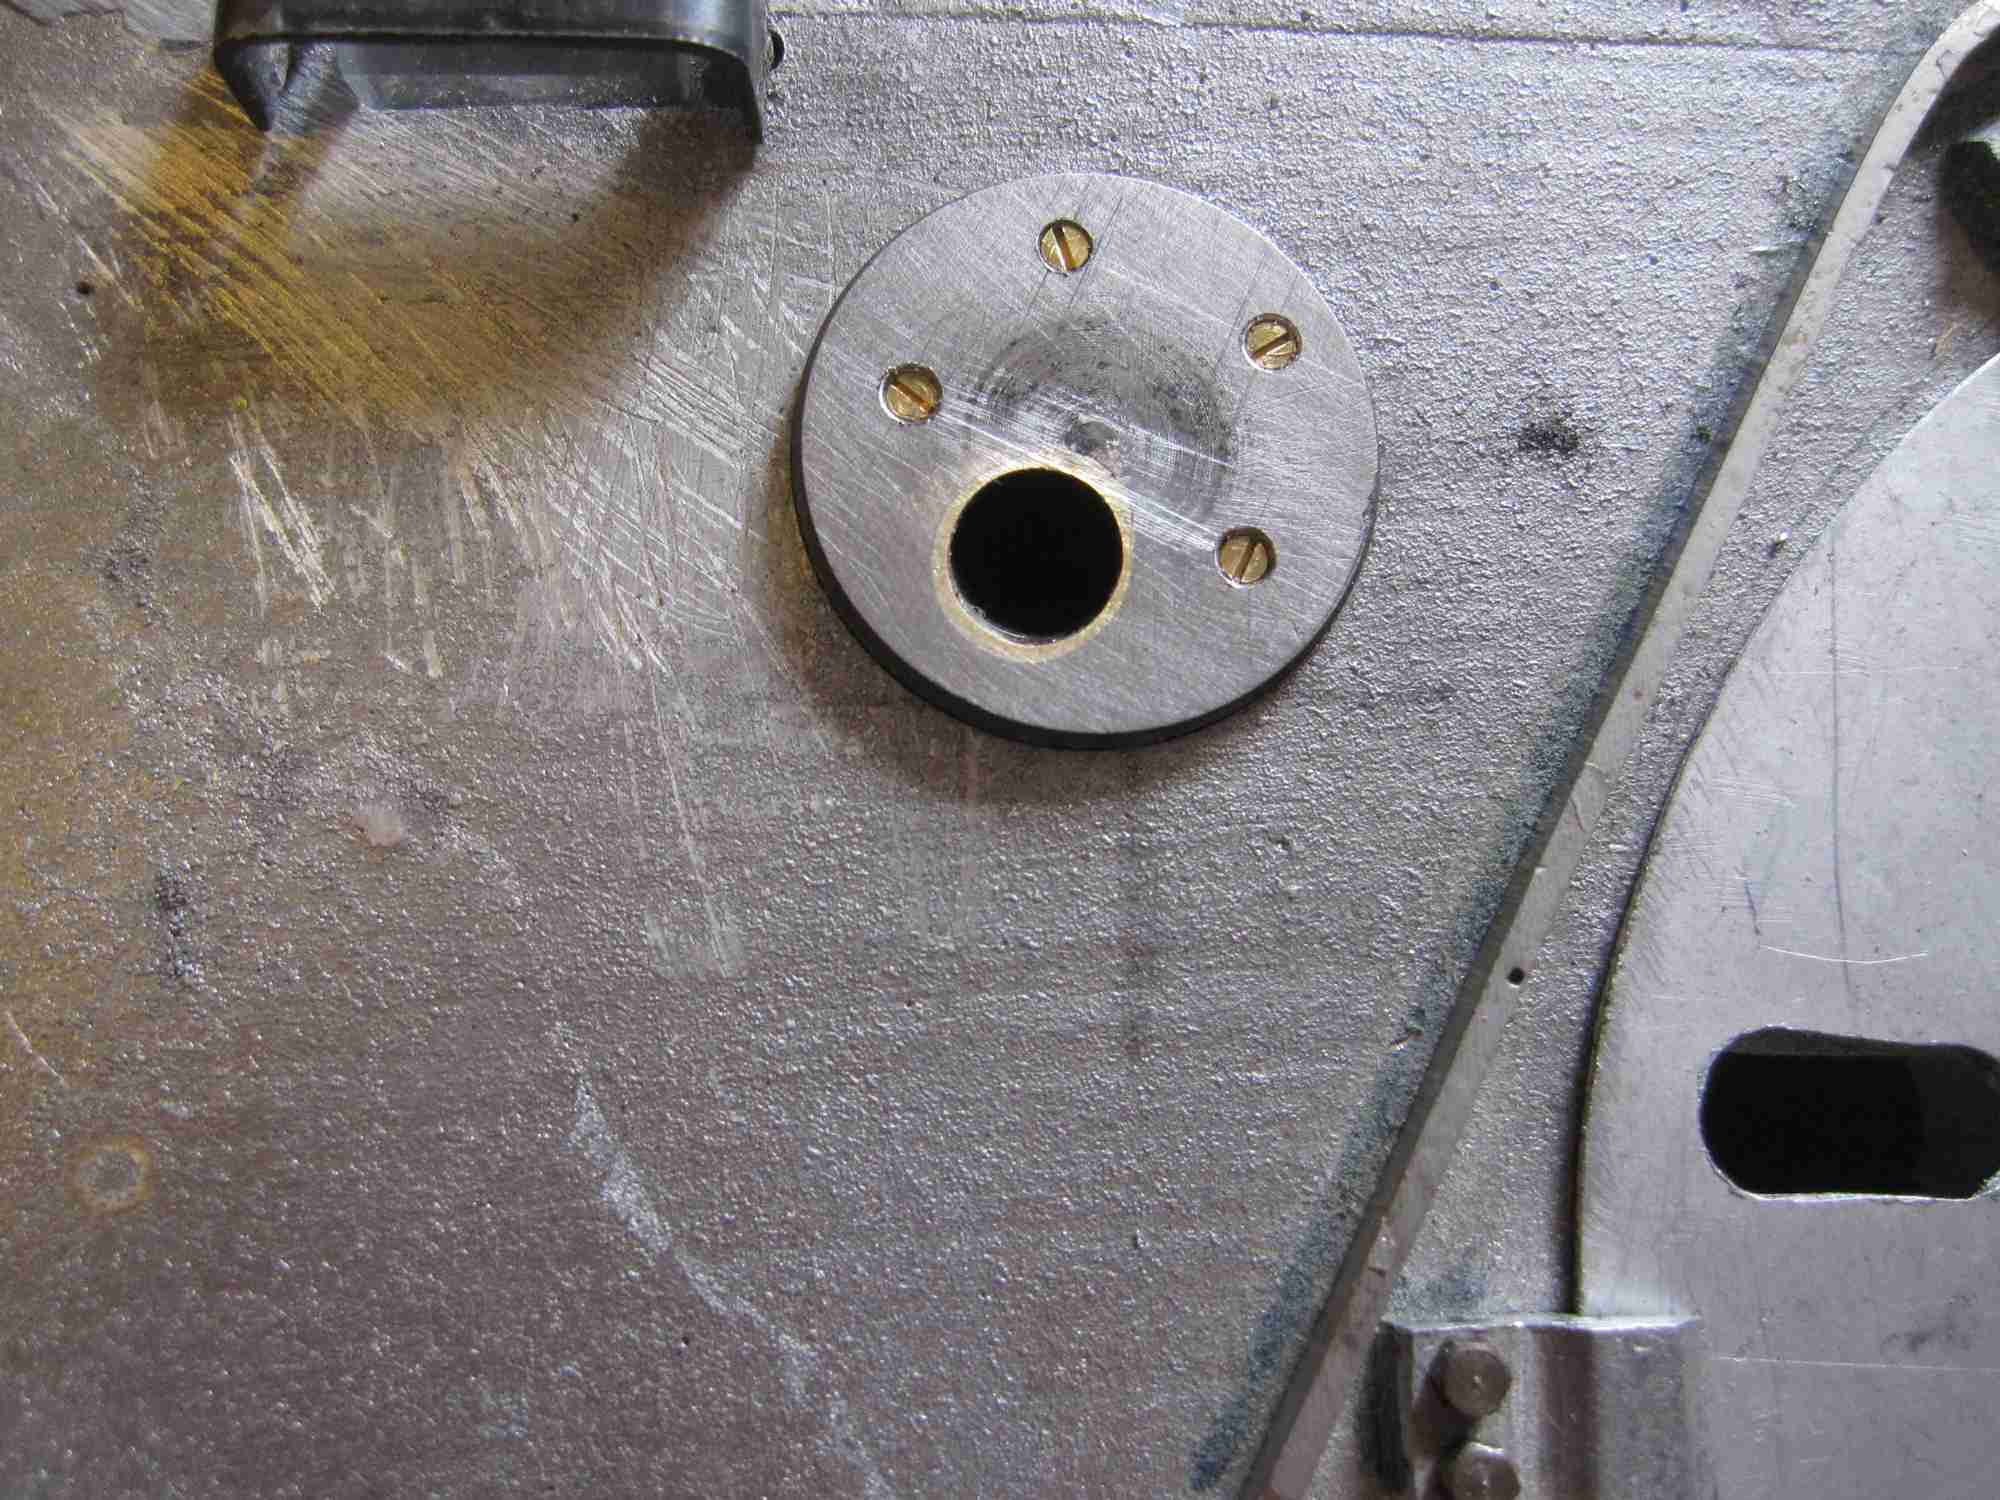
70 pounds. The one photo of the rear deck with the left hand filler cap off is where I intend to allow fueling using a DuBro kwik fill adapter. I believe in real life the left
hand station was for coolant; I chose the left hand filler as it's closer to the actual fuel tank.
Jerry

First I want to say the basis of this is a Pracht 1/10 scale JagdPanther I originally purchased in the early 1990s. For those of you unfamiliar with Pracht's work
he based his on what Jochen Maier did, originally as close 'reproductions' then his own original work which is where this JP comes in. I have to say none of these
early 1/10 scale models from Maier, Pracht and others were NOT terribly to scale; dimensionally they're close but the track pitch is off as well as a number of other
things. I have long since accepted this but I enjoy this scale and Maier's original Panther is what got me started. What was acceptable from a detail standpoint
when these models first saw the light of day in the mid 1970s into the early 1990s doesn't really pass muster today. With every rivet, wood grain and casting mark
under close scrutiny these models are woefully lacking. The current crop of 1/10 from Federov and others are outstanding but their prices show it also.
My goal isn;t to correct things I can't fix but to add a bit more detail where I'm able so these won't be laughed off the scene. The work for me is slow going as
for few exceptions I must make everything. The recent boon of photo etched tool clamps was a godsend. A good portion of the details seen were fabricated
and I'm solely responsible for them good or bad.
So the photos that follow are of my progress. I have a few things to do to satisfy me, some cleanup ( I'd run the model a couple of times to proove the engine and transmission - hence the messy rear end plate ); filing down some spot filler here and there then it's to the paint table. I only wish I had painting and weathering skills although I'm a big proponent of naturally occurring scale dust, dirt and scrapes.
The model is powered as are most of mine by a Webra .40 blackhead with power going through a 3+1 speed transmission. The model weighs about
70 pounds. The one photo of the rear deck with the left hand filler cap off is where I intend to allow fueling using a DuBro kwik fill adapter. I believe in real life the left
hand station was for coolant; I chose the left hand filler as it's closer to the actual fuel tank.
Jerry
Last edited by Tanque; 08-25-2014 at 07:13 AM.
 08-25-2014, 05:44 AM
#2
Looks good Jerry!!! Did you add the Bosch to the Headlight? Serious heavy metal. 
08-25-2014, 07:12 AM
#3
Thread Starter
assembly while I modified it, is one of Geisswerk's parts ( http://www.giesswerk.de/deutsch/prod...e-2-weltkrieg/)
Jerry
08-25-2014, 07:26 AM
#4
I can't believe what you can produce in metal and the engines to run them. I can't even begin to come close. If the guys on this hobby forum ever get together for a big awards dinner, I will be happy to be allowed to sit at the Kiddy Table and quietly play with my plastic toys while the big guys get their trophies.
08-25-2014, 08:37 AM
#5
Thread Starter
I can't believe what you can produce in metal and the engines to run them. I can't even begin to come close. If the guys on this hobby forum ever get together for a big awards dinner, I will be happy to be allowed to sit at the Kiddy Table and quietly play with my plastic toys while the big guys get their trophies.
clever people in this hobby that I know. Many thanks for the kind words.
I have a dark secret regarding these models: if I work on any particular one for too long I OD on it and I won't touch it for long, long periods of time. My King Tiger is an example.
To be fair to myself work continues to exact a toll and by the time I'm done at the end of the day it's all I can do to do chores eat and maybe spend 1/2 hour late at night in my
shop doing something. Lately I'm trying to discipline myself to do something every evening even if it is just finding a piece of material or cutting it for the next night. Right now I'm trying
to work out how to make the handles and latches for the end caps of the stowage tube. I'm hoping to form .010" steel shim steel I have. Just trying to cut a piece from the tightly wound coil without it killing me is a challenge.
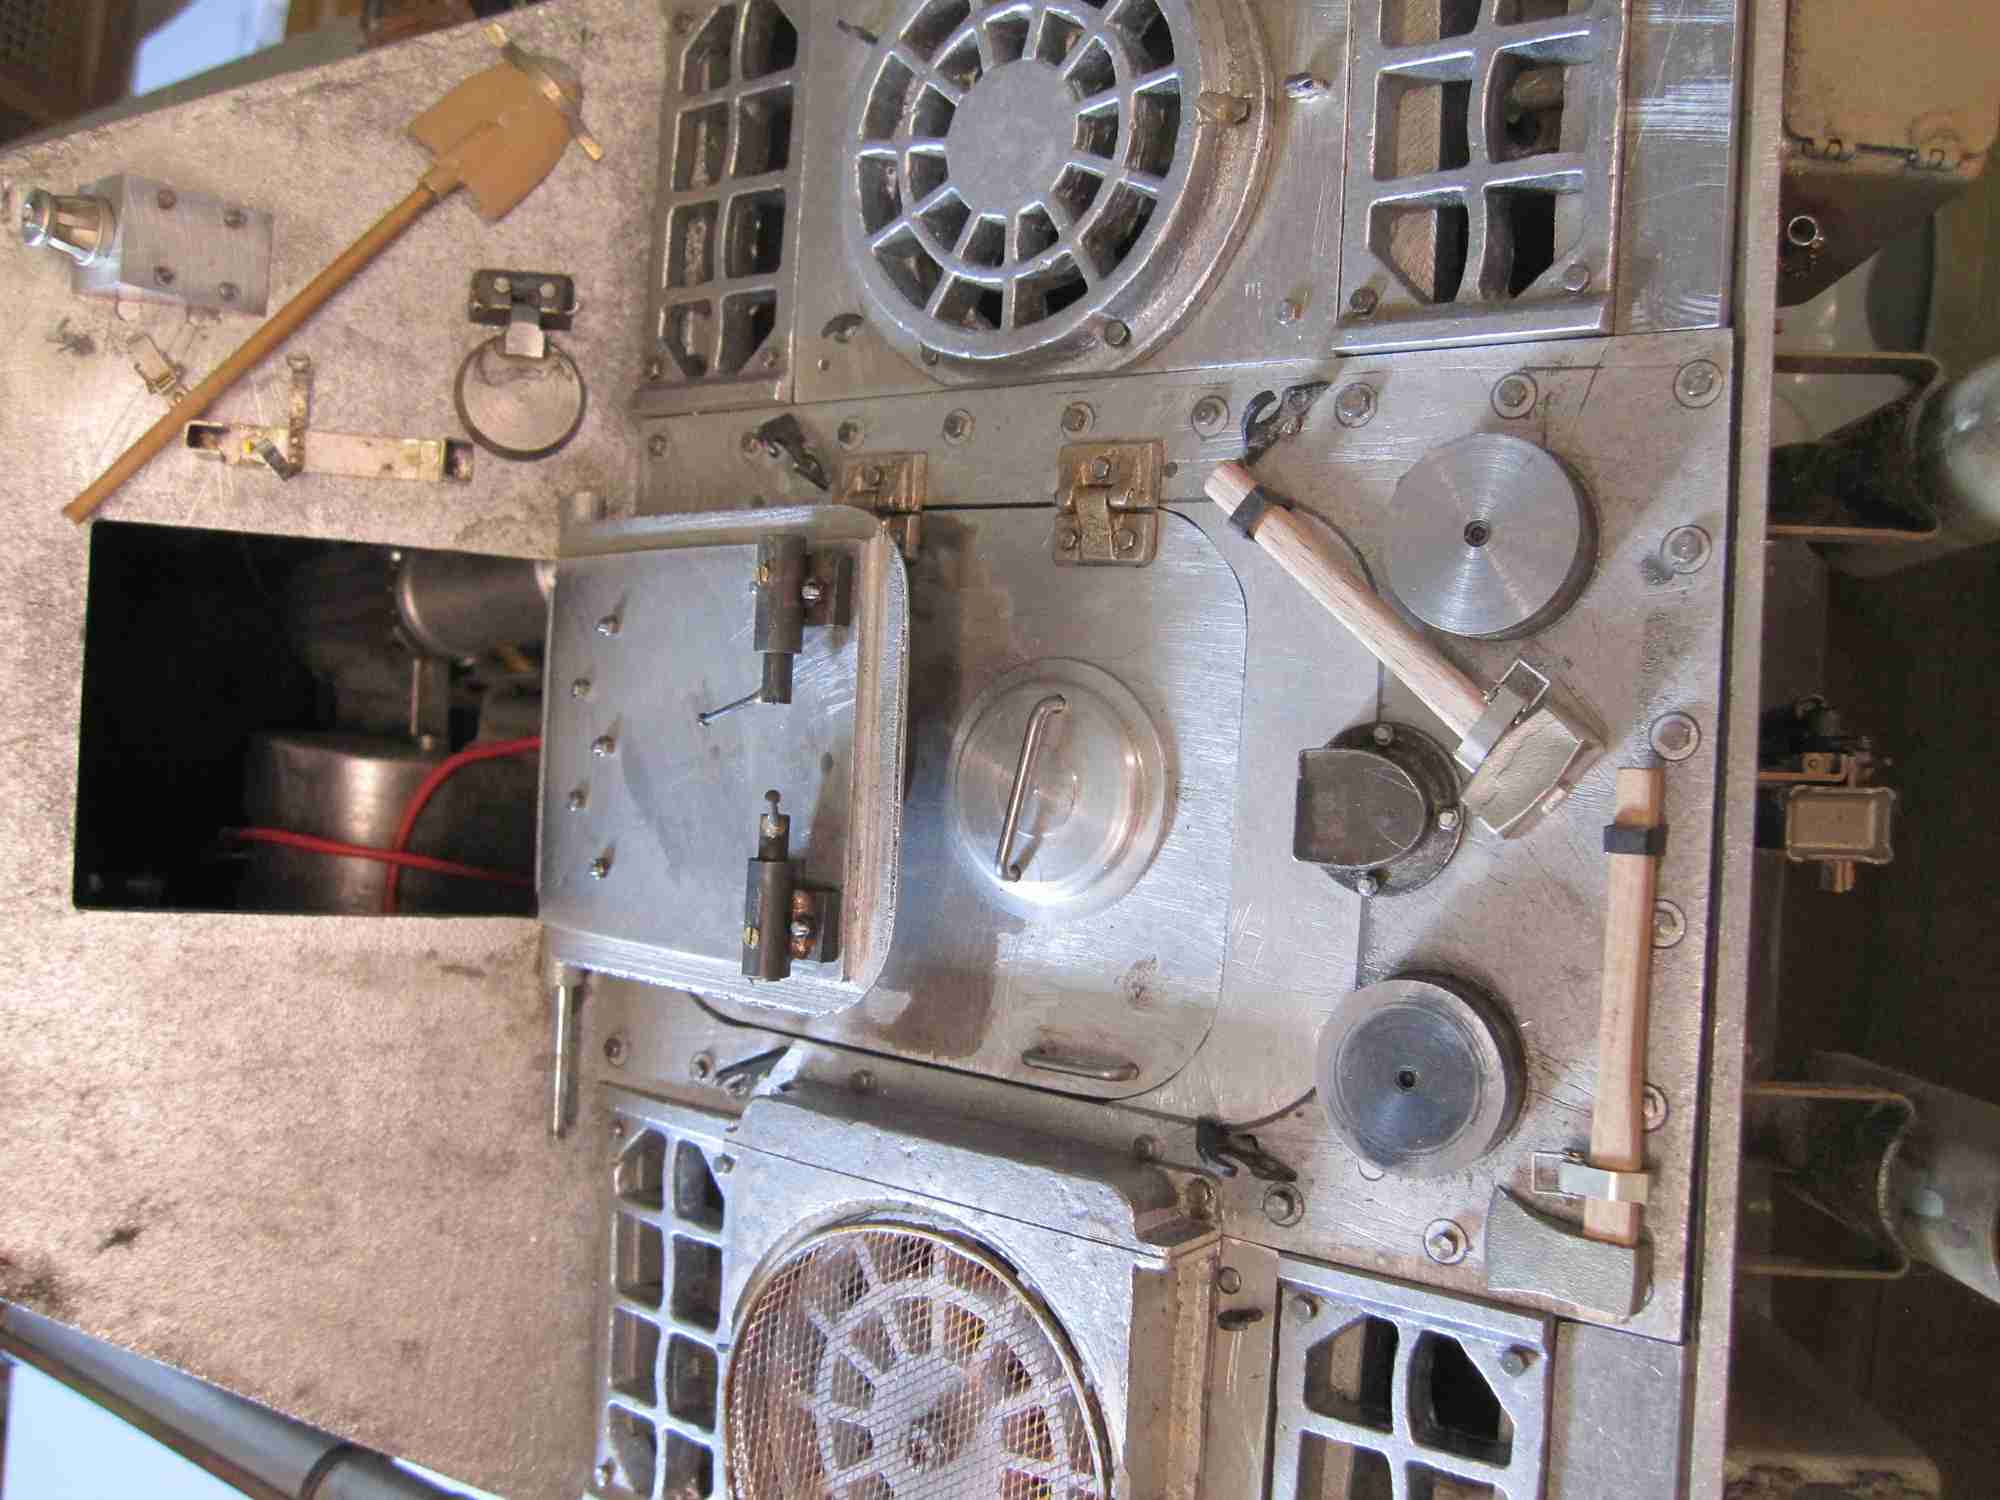
I only have a few more things to do to this model before I can paint it and consider it done enough. I need to make the safety clips for the nuts on the inner part of the rear hatch, the inner handle for that hatch; the locking parts for the split hatches on the roof( I believe these also require a inner handle on one side); revise the antenna mount block; inner locking handle for the spent case hatch. If you look closely you'll see the ultra high tech nails I'm using for hinge pins everywhere - these will be replaced with proper pins. There are other things to do but this is the bulk of them.
I cast several parts in bronze or fabricated some from brass - most of these I electro plated with nickle to hide the brassy look - I need to finish a few more including the fire extinguisher ( not mounted in these photos) but have to research whether or not that is appropriate. I believe some of the originals were brass but not late war versions - I've seen examples that
looked pretty rusty.
The bow machine gun is another one of Geisswerk's parts, I plated it, and is articulated. I plan to mount a micro servo to allow movement.
One of these days I want to reproduce something I saw in a German model video- simulate firing the main gun and have a spent casing thrown out the rear hatch. It's one of those
'someday' sorts of things.
Jerry
08-25-2014, 08:44 AM
#6
If I had to make a choice between doing what you are capable of and doing something easier ...... I would make peace in the world and find a cure for cancer .....and build a Dragon Wagon 
 08-25-2014, 04:41 PM
#8
Member
Join Date: Jul 2014
Location: Bay Area, CA
Posts: 86
Likes: 0
Received 0 Likes
on
0 Posts
I can't believe what you can produce in metal and the engines to run them. I can't even begin to come close. If the guys on this hobby forum ever get together for a big awards dinner, I will be happy to be allowed to sit at the Kiddy Table and quietly play with my plastic toys while the big guys get their trophies.

Did you guys make it to the car show?
08-26-2014, 09:11 AM
#9
Giesswerk's Stuff is absoluly beautiful. I know you had to be glad to find them. Saved you some time I am sure!!!
08-29-2014, 07:05 AM
#11
Thread Starter
Trying to make the darn clamps for the stowage tube. From .010" steel.
They aren't finished, shaped or mounted. I just made one to prove out the process so far.
My large old fingers are challenged by these...
Jerry
They aren't finished, shaped or mounted. I just made one to prove out the process so far.
My large old fingers are challenged by these...
Jerry
 09-01-2014, 10:30 PM
#13
Thread Starter
I have his 1/10 Hetzer track and I've no regrets. I would regret it if I waited he quit and then I'd never have the chance.
It's the choices we make.
jerry
09-07-2014, 11:38 PM
#14
Thread Starter
I've been trying to make the side stowage tube look a little better on my JagdPanther. I spent some while making and mounting the clamps as well as the end caps with thin steel( .010" )
handles. The clasps are made from the same steel material as the handles. I made a series of tools to shape the parts and as small as they are the steel thickness becomes significant.
Quite sturdy for their size; the lower portion was riveted to tghe tube body although I'm fairly certain the originals would have been welded. My tube is aluminum which makes this impossible.
Now about the clasps. They are not true to life. I know and have fairly good photos of the originals. After a few attempts to make them I realized I could not easily duplicate them in 1:10 scale.
The movable part of the clasp is riveted or fastened in some way on both sides instead of having a single pin capture both sides. Being separately fastened opens the internal axis of the clasp which is where the
actual engagement component is. So I'll claim to all those who see my rendition and recognize the variation from the original: " I chose to model the very rare late war model of the stowage tube clasp -
made for just one day by a new last- ditch sub-contractor's facility before it was caught in a bombing run and was unable to resume production before the war ended..."
Jerry
09-08-2014, 09:00 AM
#15
Jerry ....
I like the way you explain why your build is only 99.9999% perfect. The differences between the real thing and your efforts to build 1/10 scale reproductions in metal is shocking. I was stunned. How could you possibly think no one would notice???? However, I plan to use your statement to explain why everything I build is only 49.9999% perfect. Hey .... you make me feel like an amateur (so does everyone else on this forum).
"So I'll claim to all those who see my rendition and recognize the variation from the original: " I chose to model the very rare late war model of the stowage tube clasp -
made for just one day by a new last- ditch sub-contractor's facility before it was caught in a bombing run and was unable to resume production before the war ended..."
rex
P.S. In a previous post you made reference to the MBT 70. Ya got me thinkin' and doing Google searches for it..... I think I'm gonna give it a try ......


