


Converting an HL Panther "G" into a late "A"


 12-18-2014, 09:10 PM
#78

Thanks so much Gus, you are going to love the next couple of installments! LOL!
So scratch built my rear hatch. The plan is to have a crew hanging out of it even in battle and yes, will probably have him doing some rude gesture to my enemies as usual or maybe I will female crew again, a companion for Greta on my L70. Let me know what you'd like to see boys!
Oh, and I didn't forget the center hatch keyhole just forgot to take a pic... Also yes, will be cleaning up my hinge on the inside and shortening the copper pin and adding some bolt fixtures...
 Panther A 227.jpg (64.09 KiB) Not viewed yet
 Panther A 228.jpg (58.17 KiB) Not viewed yet
 Panther A 229.jpg (70.08 KiB) Not viewed yet
 Panther A 230.jpg (53.88 KiB) Not viewed yet
 Panther A 231.jpg (47.35 KiB) Not viewed yet
 Panther A 232.jpg (60.1 KiB) Not viewed yet
So scratch built my rear hatch. The plan is to have a crew hanging out of it even in battle and yes, will probably have him doing some rude gesture to my enemies as usual or maybe I will female crew again, a companion for Greta on my L70. Let me know what you'd like to see boys!
Oh, and I didn't forget the center hatch keyhole just forgot to take a pic... Also yes, will be cleaning up my hinge on the inside and shortening the copper pin and adding some bolt fixtures...
12-18-2014, 09:26 PM
#79
A compliment from you Chris means a lot. The stuff you fabricate blows me away. Someday I am going to do one of your kits and build the crap out of it detail wise! :-)
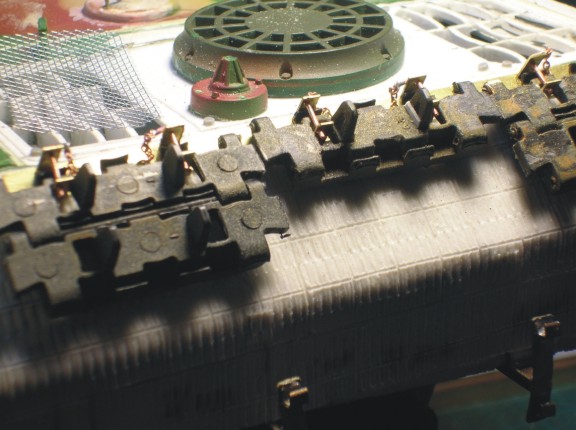
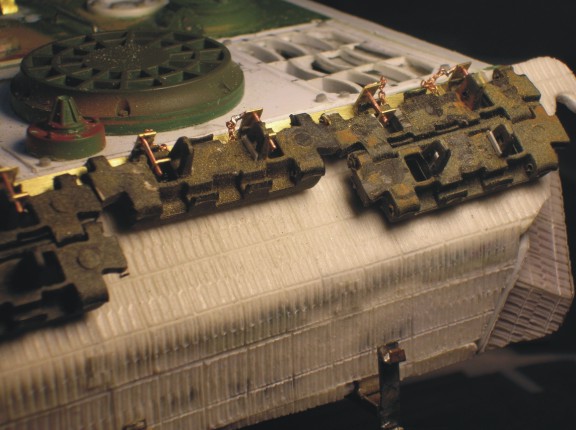
...and the next phase all the tool and track racks. This is for sure the most complicated detail on this vehicle. The Panther "A"s have a different configuration than the "G"s so this required some fill ins on the zim since the Atak kit is made for the Tamiya G. I used a different pattern that I had a sheet of for the bottom hull which left me with plenty of extra to do these fill ins and touch ups. you won't really see the fixes once paint is on. Suffice is to say it is taking a LOT of time to create these from scratch. Reference, measuring, fabricating the frames and small extras and then my favourite thing in the world to do PE!!! also basically rebuilding tools to make them look better whether from scratch like the pry bar or just trimming and filing like the axe, or in between where I took the Pantiger shovel and modified it to a different look just to be different. I find most of the HL tools are just slightly over scale so "thinning them down" makes them look better I think.
Having said that I think the effort will be worthwhile as it adds so much to a model. I am waiting for some scale chain to finish up this first bracket but thought I would post the picks of the frame empty and then with the tools on. The PE will be operational I think. I did an extra 10 clamps for when I inevitably loose one or 2!
Attachments Panther A 233.jpg (61.74 KiB) Not viewed yet
 Panther A 234.jpg (53.88 KiB) Not viewed yet
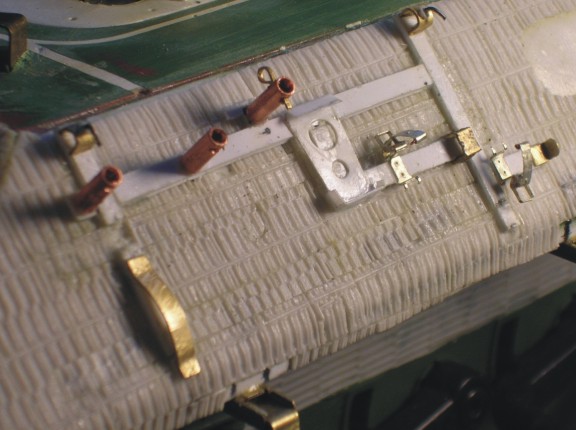 Panther A 235.jpg (57.54 KiB) Not viewed yet
 Panther A 236.jpg (52.33 KiB) Not viewed yet
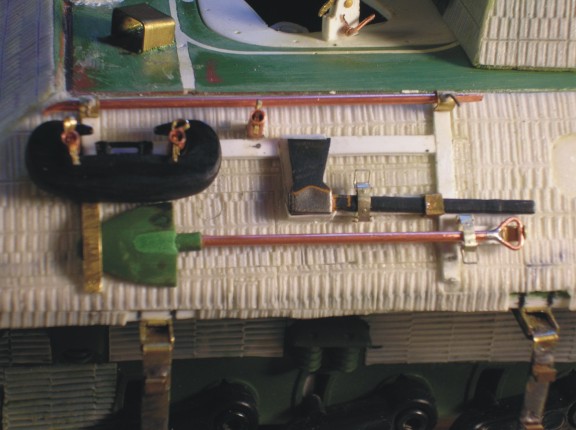 Panther A 237.jpg (57.29 KiB) Not viewed yet
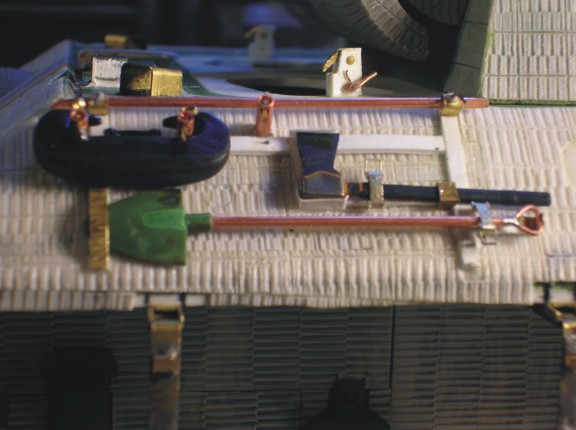 Panther A 238.jpg (51.68 KiB) Not viewed yet
 Panther A 239.jpg (63.55 KiB) Not viewed yet
 Panther A 240.jpg (52.48 KiB) Not viewed yet
...and the next phase all the tool and track racks. This is for sure the most complicated detail on this vehicle. The Panther "A"s have a different configuration than the "G"s so this required some fill ins on the zim since the Atak kit is made for the Tamiya G. I used a different pattern that I had a sheet of for the bottom hull which left me with plenty of extra to do these fill ins and touch ups. you won't really see the fixes once paint is on. Suffice is to say it is taking a LOT of time to create these from scratch. Reference, measuring, fabricating the frames and small extras and then my favourite thing in the world to do PE!!! also basically rebuilding tools to make them look better whether from scratch like the pry bar or just trimming and filing like the axe, or in between where I took the Pantiger shovel and modified it to a different look just to be different. I find most of the HL tools are just slightly over scale so "thinning them down" makes them look better I think.
Having said that I think the effort will be worthwhile as it adds so much to a model. I am waiting for some scale chain to finish up this first bracket but thought I would post the picks of the frame empty and then with the tools on. The PE will be operational I think. I did an extra 10 clamps for when I inevitably loose one or 2!
Attachments
Last edited by dgsselkirk; 12-18-2014 at 09:33 PM.
 12-28-2014, 07:38 PM
#81
Humm... could be a nice conversion...:-)
So more details...
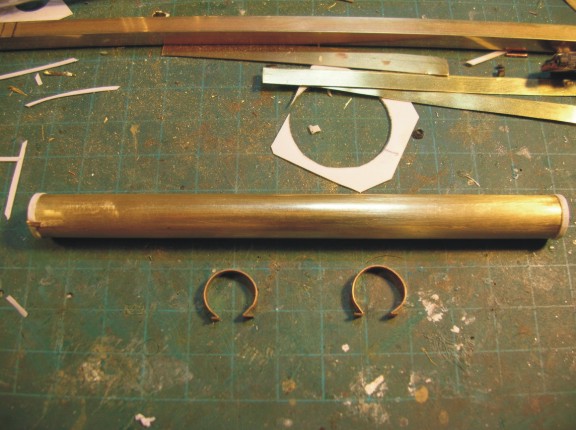
Measured out the cleaning rod and antenna storage tube and began to build the covers. I scraped one opening to make the edging sharp and punched out 2 styrene ends. did a few to make sure I had 2 that would work.
 Panther A 241.jpg (47.56 KiB) Viewed 1 time
 Panther A 242.jpg (40.85 KiB) Viewed 1 time
 Panther A 243.jpg (36.87 KiB) Viewed 1 time
I then wrapped thin styrene around the ends and made the ring mounts exactly the way they are on the real thing
 Panther A 244.jpg (66.69 KiB) Viewed 1 time
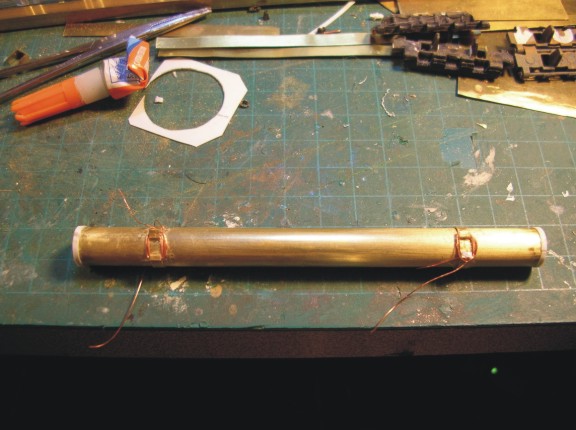
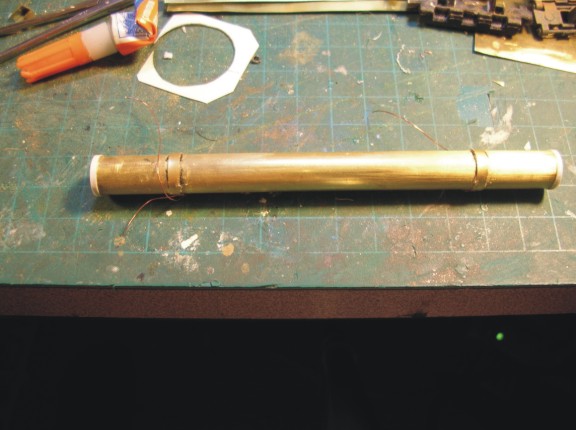
Used crazy glue and glued them on in the right position and then used thin wire to draw them in tight to the body of the tube.
 Panther A 245.jpg (59.45 KiB) Viewed 1 time
 Panther A 246.jpg (52.06 KiB) Viewed 1 time
So more details...
Measured out the cleaning rod and antenna storage tube and began to build the covers. I scraped one opening to make the edging sharp and punched out 2 styrene ends. did a few to make sure I had 2 that would work.
I then wrapped thin styrene around the ends and made the ring mounts exactly the way they are on the real thing
Used crazy glue and glued them on in the right position and then used thin wire to draw them in tight to the body of the tube.
12-28-2014, 07:43 PM
#82
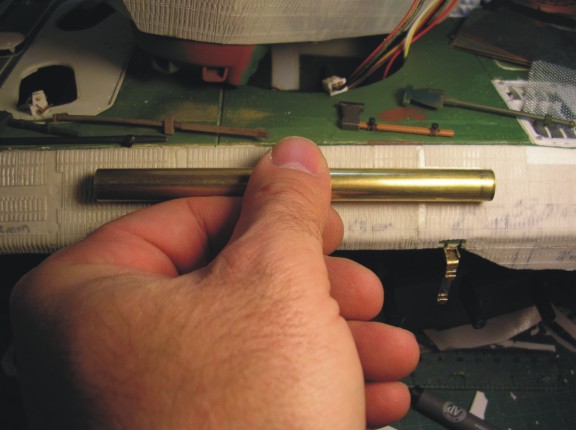
Next moved on to the spare track holders. These actually went quicker and easier than I thought! Measured out a strip for width and length then took a piece of brass rectangle tubbing and removed one side with a dremel to make a hollow square. I then cut using the dremel each independent section and smoothed them off to make uniform and drilled the holes for the locking pins. I then used my diagrams, pictures, and the spare track I am going to use to measure the spacing between each section. Made the locking pins out the appropriate size of copper wire, bent the ends and soldered small chain with a larger ring on the end.
 Panther A 247.jpg (46.74 KiB) Not viewed yet
 Panther A 248.jpg (53.46 KiB) Not viewed yet
 Panther A 249.jpg (49.35 KiB) Not viewed yet
this is alook with the main parts mounted:
 Panther A 250.jpg (54.85 KiB) Not viewed yet
I have decided since these mounts look so cool I am only going to put the spare tracks on one side and leave the other empty so here is what the one side will look like with them mounted. I should mention too that the spare track needs some detailing to make it look better and more realistic. The "teeth" need to be hollowed out and some little styrene strips added to represent the small ridges on the teeth. You can see I started on a couple of the teeth ...
 Panther A 251.jpg (54.82 KiB) Not viewed yet
 Panther A 252.jpg (63.25 KiB) Not viewed yet
 Panther A 253.jpg (61.11 KiB) Not viewed yet
Keep in mind I will be leaving or removing a lot of the really fine detail (for example the grab handles and chains that go on the cleaning rod storage tube) to do the painting and then add it back later.
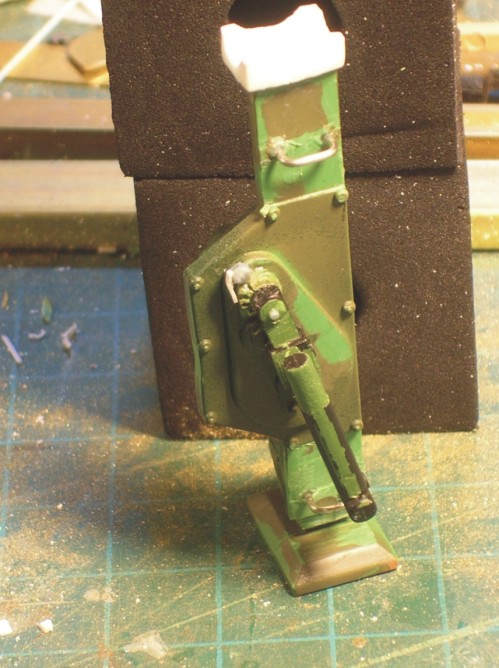
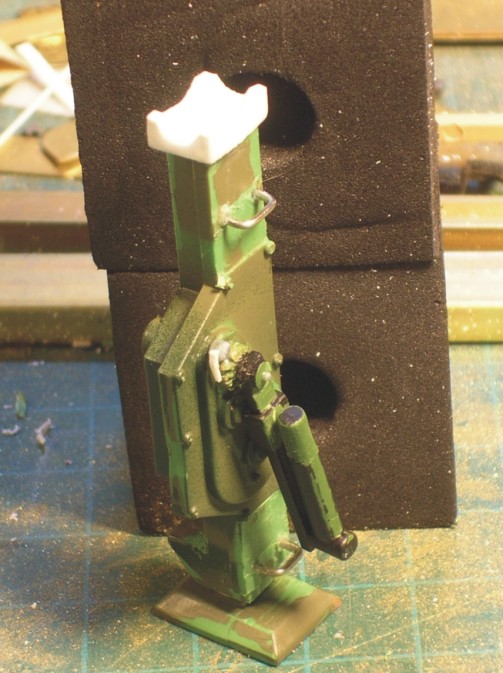
Next I wanted to finish up the jack detailing. I decided to make the early version as the jack that comes with the HL Panther most closely resembles it. Added handles, trimmed the handle to look better, added a little ratchet at the head and remade the jack crown out of styrene. I also sanded/carved/thinned different parts to look more realiatic. If the jack was to be down at the bottom of the rear hull I might not have done so much detail but it is going to be mounted between the exhausts up high and very visable to wanted to make it look better...
 Panther A 254.jpg (89.56 KiB) Not viewed yet
 Panther A 255.jpg (90.6 KiB) Not viewed yet
 Panther A 256.jpg (91.33 KiB) Not viewed yet
this is alook with the main parts mounted:
I have decided since these mounts look so cool I am only going to put the spare tracks on one side and leave the other empty so here is what the one side will look like with them mounted. I should mention too that the spare track needs some detailing to make it look better and more realistic. The "teeth" need to be hollowed out and some little styrene strips added to represent the small ridges on the teeth. You can see I started on a couple of the teeth ...
Keep in mind I will be leaving or removing a lot of the really fine detail (for example the grab handles and chains that go on the cleaning rod storage tube) to do the painting and then add it back later.
Next I wanted to finish up the jack detailing. I decided to make the early version as the jack that comes with the HL Panther most closely resembles it. Added handles, trimmed the handle to look better, added a little ratchet at the head and remade the jack crown out of styrene. I also sanded/carved/thinned different parts to look more realiatic. If the jack was to be down at the bottom of the rear hull I might not have done so much detail but it is going to be mounted between the exhausts up high and very visable to wanted to make it look better...
 12-31-2014, 04:59 PM
#84

Awesome build. I like the detail and the work.
What size chain are you using (links per inch or cm)?
What's the diameter of the wire you used for the handles on the jack?
TIA
What size chain are you using (links per inch or cm)?
What's the diameter of the wire you used for the handles on the jack?
TIA
01-01-2015, 10:56 AM
#85
Thanks guys! :-) I will measure the chain tonight when I get home. For the handles on the jack I used my favourite material for handles. paperclips! You can get them in different thicknesses so I just the thinnest I had. If I had to guess about .8mm I think....
01-01-2015, 08:13 PM
#86
there are 10-11 links per CM
Sorry, I got the chain at a hobby store. Don't know the brand or anything. I have ordered some from the U.S. that was 1/700 scale ships anchor chain. It looks very similar. I will let you know once it gets here if it is the same size...
Sorry, I got the chain at a hobby store. Don't know the brand or anything. I have ordered some from the U.S. that was 1/700 scale ships anchor chain. It looks very similar. I will let you know once it gets here if it is the same size...
01-03-2015, 02:55 AM
#87

Okay that's about 25-28 links per inch. Most hobby stores I've seen in the US give their sizing as "number of links per inch". So, that will help with getting a good scale chain. Thanks.
08-17-2015, 08:09 PM
#88
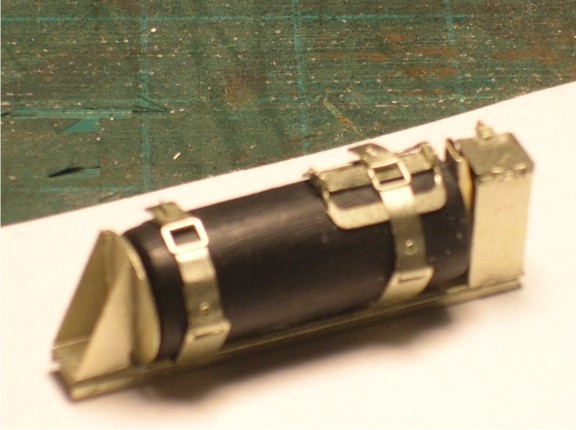
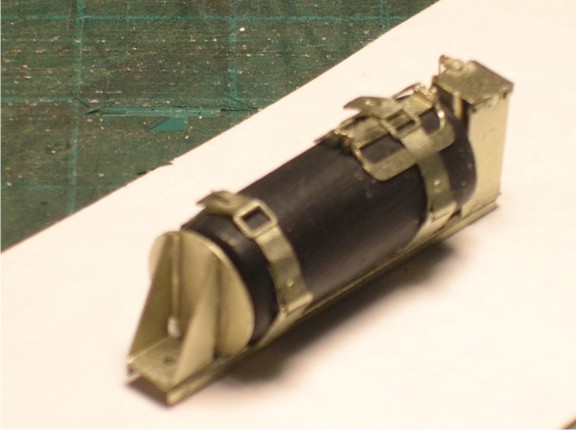
WOW! 8 months since I last worked on my Panther A project! Was very busy with other builds but now I am determined to finish this up before the snow flies! I broke down and bought some Aber stuff. My god I don't know how anyone solders this stuff! 
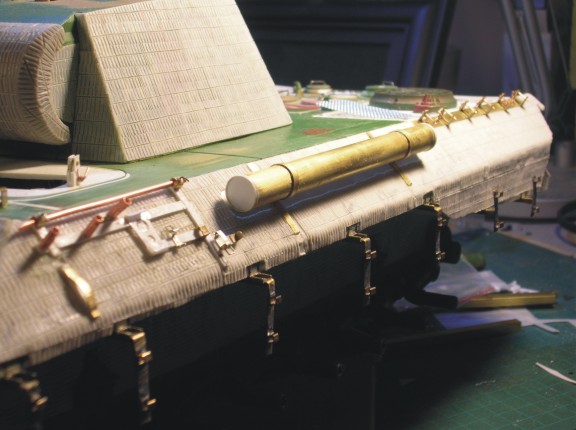
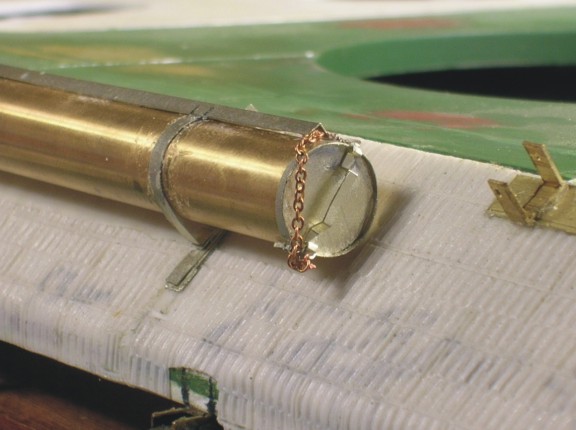
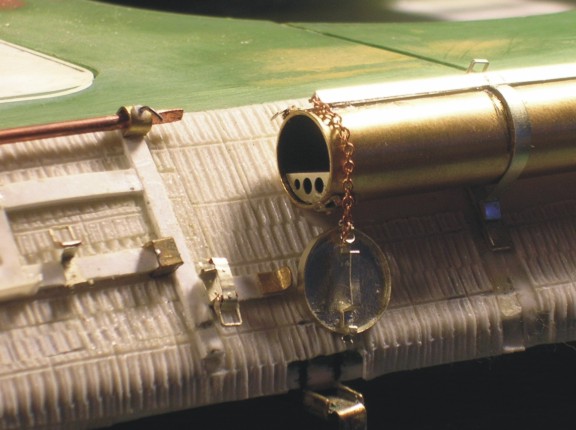
I have a hard enough time making it look 1/2 assed presentable. My hats off to the real pros out there who make it look really good. I was O.K. with the scratch built antenna/cleaning rod tube but figured why not upgrade it. So here is about 4 or 5 hours worth of work to make it just a bit fancier. . It didn't turn out too bad me thinks. I am going to leave the one end open for display but tack the cover down so that doesn't get lost running around! Still some clean up to do and a little zim fill but I like it...
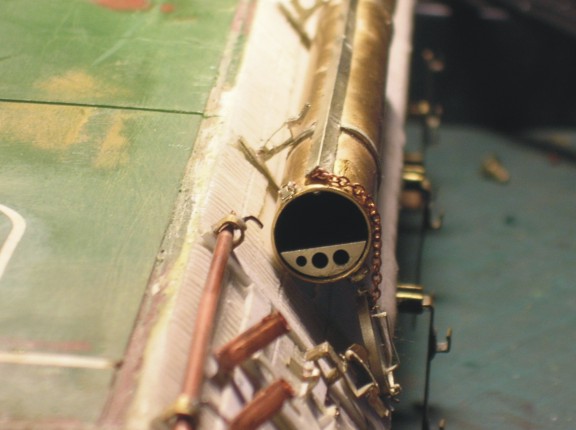 Panther A 258.jpg (45.5 KiB) Not viewed yet
 Panther A 259.jpg (49.1 KiB) Not viewed yet
 Panther A 260.jpg (54.64 KiB) Not viewed yet
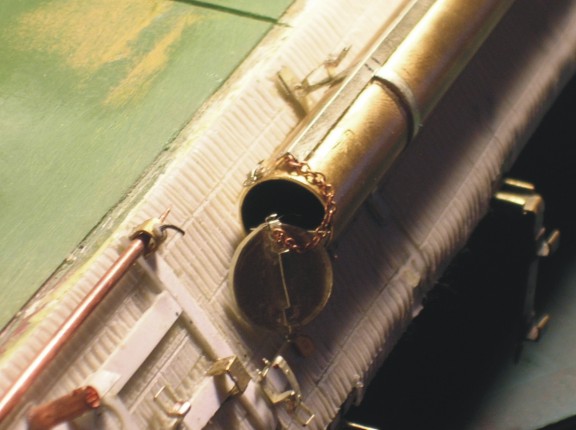
I have a hard enough time making it look 1/2 assed presentable. My hats off to the real pros out there who make it look really good. I was O.K. with the scratch built antenna/cleaning rod tube but figured why not upgrade it. So here is about 4 or 5 hours worth of work to make it just a bit fancier. . It didn't turn out too bad me thinks. I am going to leave the one end open for display but tack the cover down so that doesn't get lost running around! Still some clean up to do and a little zim fill but I like it...
08-17-2015, 08:21 PM
#89
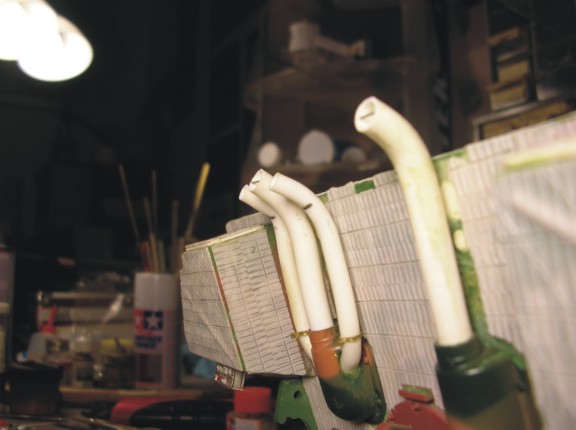
Here is the exhaust mounted. I will be putting my favourite TARR 1 smoker with mega-steam in it of course! By the way, if anyone has some tricks for bending this tubing let me know! I did a hair dryer, hot water, I tried brass with a bender. Nothing really worked well. These were the best of an entire package of styrene tubing!!! The good part is if you look at the real thing they were actually pretty crude and rarely straight very long! Brass frame over the next few days...
 Panther A 262.jpg (57.27 KiB) Not viewed yet
 Panther A 263.jpg (40.77 KiB) Not viewed yet
 Panther A 264.jpg (44.6 KiB) Not viewed yet
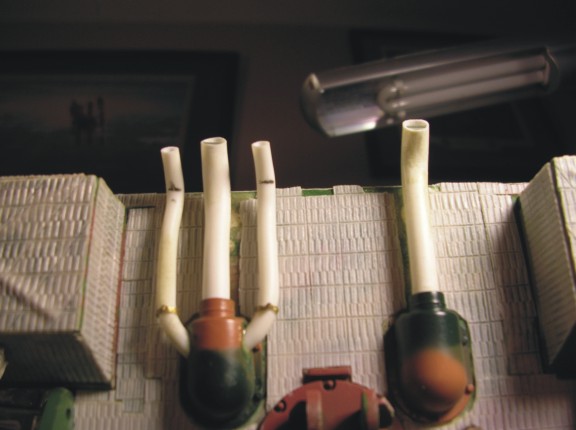
08-17-2015, 09:31 PM
#90

i plugged mine and used the fill with salt method
it still had a bit of a dent in the tube but it helped a bit then i just soldered a piece onto the brass to fill the dent


it still had a bit of a dent in the tube but it helped a bit then i just soldered a piece onto the brass to fill the dent
09-07-2015, 06:33 PM
#92
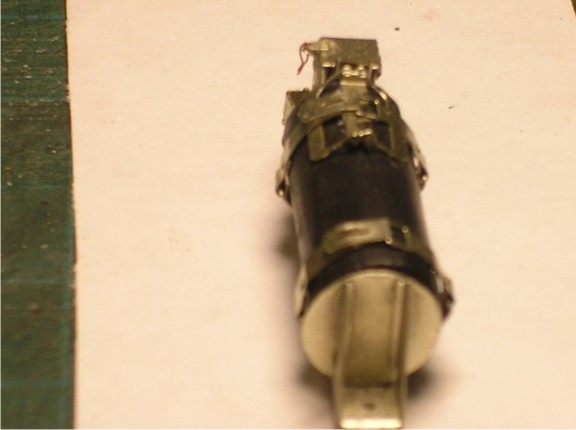
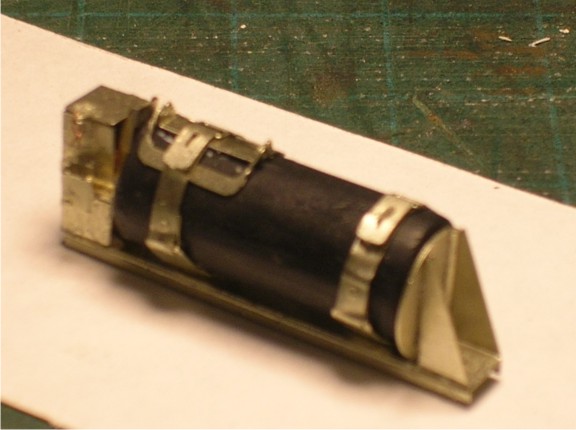
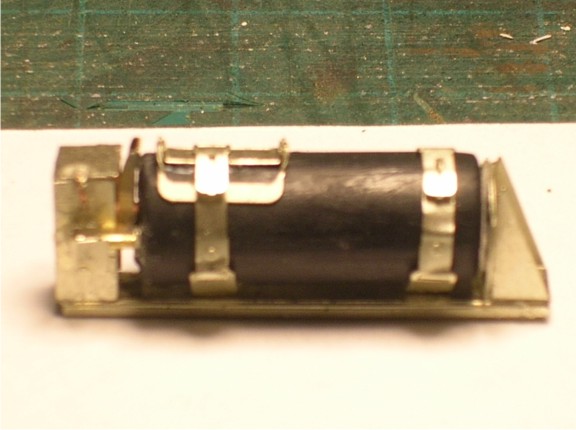
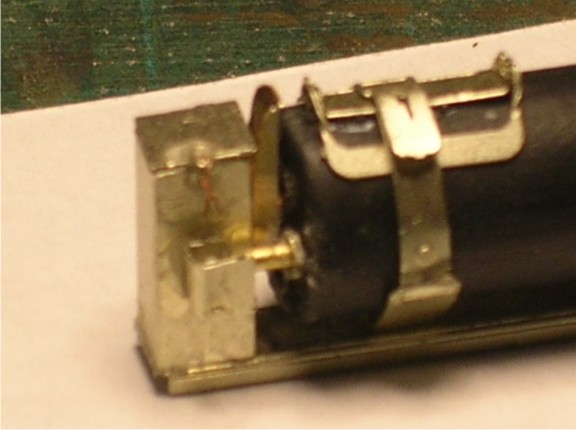
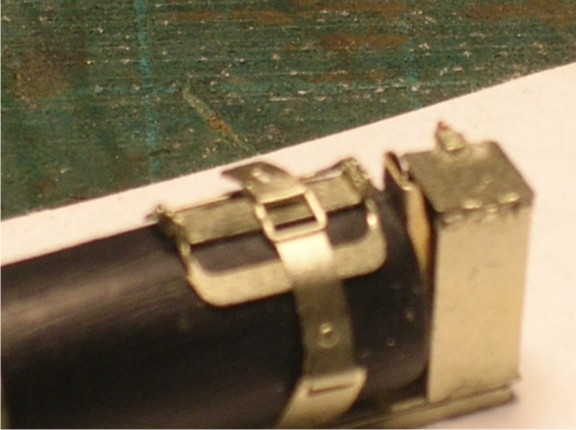
Well this certainly is taking a while! Now that summer has come to a close I hope to really get on this damn tank and finish it! did some more PE the fire extinguisher. This little ******* took over 4 hours. The little clip on the lid, yea, that thinner than a human hair! But man, compared to stock HL it is awesome.... Basically you take the stock one and sand everything off so all you really have left is a plastic tube. Then you go nuts with the PE. The only thing the kit really doesn't have is the handle so I fabricated that and also didn't use the rod that comes with the kit I use some small copper pipe I have for the main stem and used the rod for the secondary pipe. It is pretty incredible to look at. Almost a shame it's going to get paint but I am going to decal it so it catches your eye...
Sorry, the pics are a little blurry, my camera has a hard time focusing in that close...
 Panther A 266.JPG (50.29 KiB) Not viewed yet
 Panther A 267.JPG (41.22 KiB) Not viewed yet
 Panther A 268.JPG (33.33 KiB) Not viewed yet
 Panther A 269.JPG (45.77 KiB) Not viewed yet
 Panther A 270.JPG (46.26 KiB) Not viewed yet
 Panther A 271.JPG (44.04 KiB) Not viewed yet
Sorry, the pics are a little blurry, my camera has a hard time focusing in that close...
09-08-2015, 04:59 AM
#93
This has become an epic build... and I love it! 
Like this fire extinguisher. You have put more work into this small detail than most will on an RTR.
 ")
Make sure you put all of this in a build blog or on a disc for future reference or reflection. I wish I had done that on all my detailed out builds!
Jeff
Like this fire extinguisher.
You have put more work into this small detail than most will on an RTR. Make sure you put all of this in a build blog or on a disc for future reference or reflection. I wish I had done that on all my detailed out builds!
Jeff
09-09-2015, 04:02 AM
#94
Thanks Jeff, yes, I save all mine and they go on my website in condensed form but I keep the full build record on hard drive as well...:-)
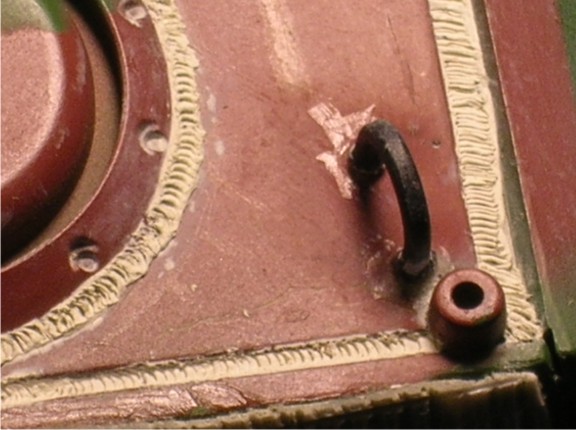
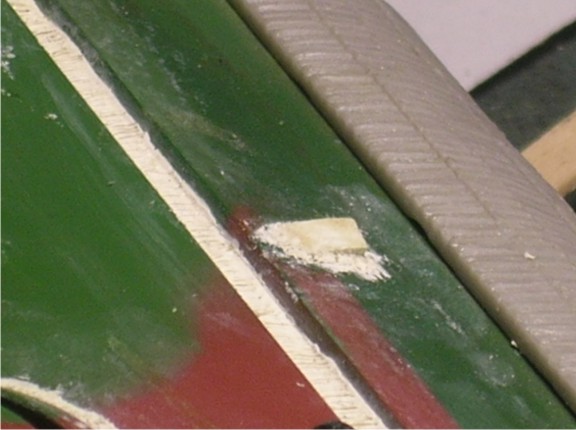
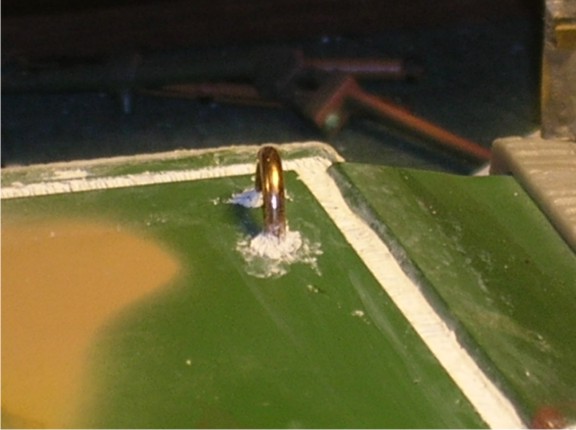
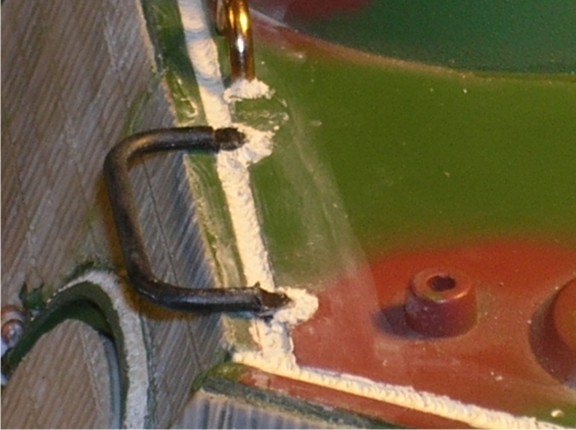
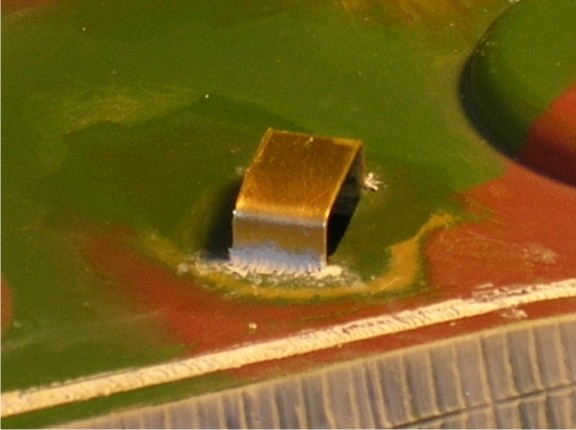
Decided to take a little break from PE and do some welding. The method I use is milliput and a flat jewelers or eyeglasses screwdriver. I tend not to do the big welds and try to keep it to scale although older eyes and shaky hands are catching up to me. Also as I did on the lower hull replace the periscope cover with brass so it is more to scale. Removed a couple of bits that are not usually on the "A"'s and sanded smooth. To do a final smoothing I just brush Tamiya thin regular model glue over the area and it gives it a nice finish...
 Panther A 277.JPG (61.88 KiB) Viewed 1 time
 Panther A 278.JPG (62.45 KiB) Viewed 1 time
 Panther A 279.JPG (44.47 KiB) Viewed 1 time
 Panther A 273.JPG (50.5 KiB) Viewed 1 time
 Panther A 274.JPG (42.5 KiB) Viewed 1 time
 Panther A 275.JPG (53.28 KiB) Viewed 1 time
 Panther A 276.JPG (46.55 KiB) Viewed 1 time
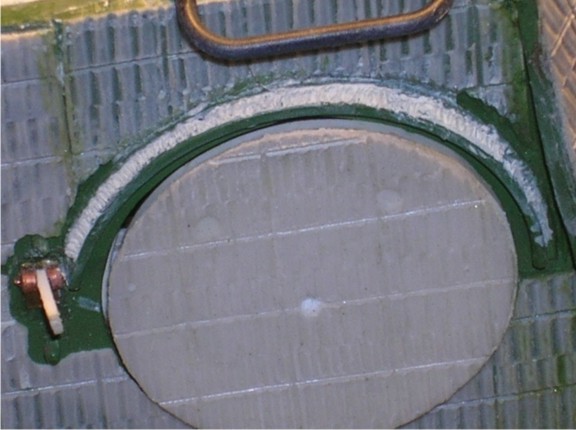
Decided to take a little break from PE and do some welding. The method I use is milliput and a flat jewelers or eyeglasses screwdriver. I tend not to do the big welds and try to keep it to scale although older eyes and shaky hands are catching up to me. Also as I did on the lower hull replace the periscope cover with brass so it is more to scale. Removed a couple of bits that are not usually on the "A"'s and sanded smooth. To do a final smoothing I just brush Tamiya thin regular model glue over the area and it gives it a nice finish...
09-09-2015, 04:53 AM
#95
Join Date: Nov 2011
Location: Barboursville , VA
Posts: 268
Likes: 0
Received 0 Likes
on
0 Posts
I am in he middle of a very slow 3 Panther G build at the moment... I agree the lower front plate is one of the worst HL features on what is a relatively acceptable Base... most all other issues are easily handled... why doesn't HL just fix the problem.. and save us all that laborous, horrible
fix..?
Good job on the conversion!...
fix..?
Good job on the conversion!...
09-09-2015, 04:59 AM
#96
Join Date: Nov 2011
Location: Barboursville , VA
Posts: 268
Likes: 0
Received 0 Likes
on
0 Posts
Superb work!!!!
Now that I have looked through all the posts.. I am frankly amazed... It kind of puts my work to shame.... it's not that I can't mimic these mods.. it's the time involved.. is way more than I have the patience for... when I was a young man maybe.. but as I am now.. I don't think I have it in me,,,
But you have defined the bar.. and it is up to us to match it or surpass it....
Well I guess I lose as I most likely will not be fixing the lower front plates... well maybe I'll take a look at it once more.. : )
Last edited by Jhdumas; 09-09-2015 at 05:25 AM.
09-09-2015, 05:03 AM
#97
I am in he middle of a very slow 3 Panther G build at the moment... I agree the lower front plate is one of the worst HL features on what is a relatively acceptable Base... most all other issues are easily handled... why doesn't HL just fix the problem.. and save us all that laborous, horrible
fix..?
Good job on the conversion!...
fix..?
Good job on the conversion!...
I think that metal lower hull addresses this problem as well as offering metal suspension arms.
I am seriously thinking about going that route and not put all that work into fixing the front glacis.
Jeff
09-09-2015, 05:16 AM
#98
Join Date: Nov 2011
Location: Barboursville , VA
Posts: 268
Likes: 0
Received 0 Likes
on
0 Posts
I agree... it is a bit too much work... especially since all the work already put in.... that really is the rub... I saw that straight away and decided I could live with it... but really does bother the hell out me... you say there is a metal version? where?
09-09-2015, 05:23 AM
#99
I don't know off the top of my head but I'm sure there are many here that know the answer.
Jeff
Jeff
09-09-2015, 10:48 AM
#100
Join Date: Nov 2011
Location: Barboursville , VA
Posts: 268
Likes: 0
Received 0 Likes
on
0 Posts
Ok they are made by Taigen exclusively for a German company... The Company is called RC Tanks http://www.rctank.de/UPPER-/-LOWER-HULLS I've emailed them to see if they fit the Heng Long panther G Plastic Hull.. I'll let you know when I get an answer....


