


Strato50's M26A1 Pershing
 09-28-2014, 02:10 PM
#1

Thread Starter

Join Date: Jan 2006
Location: Hamilton,
ON, CANADA
Posts: 1,422
Likes: 0
Received 7 Likes
on
7 Posts
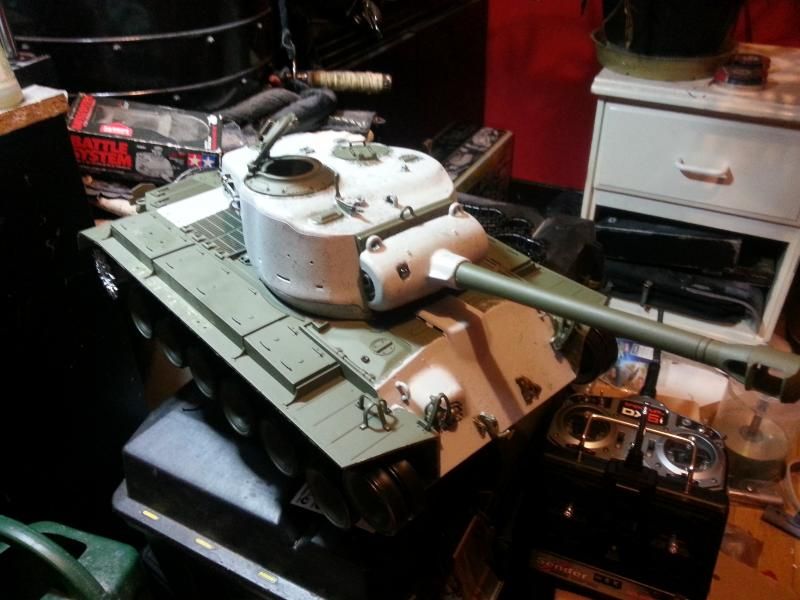
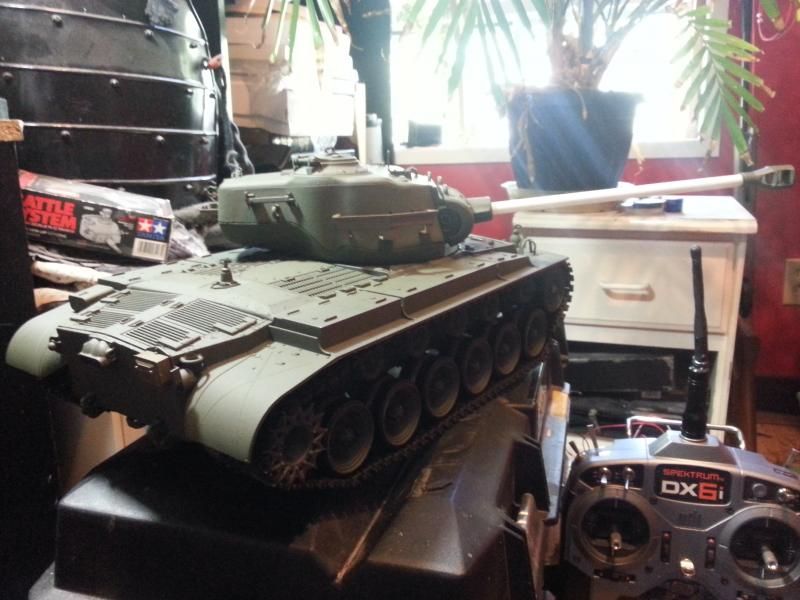
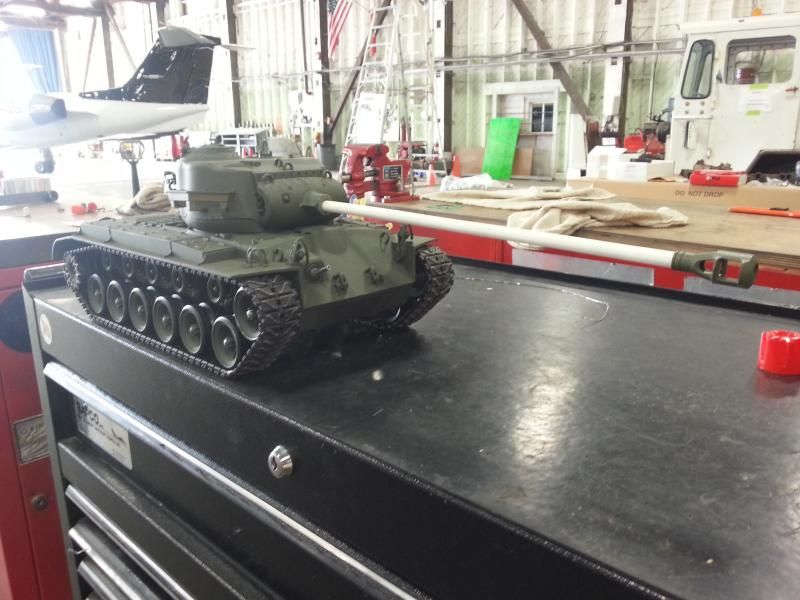
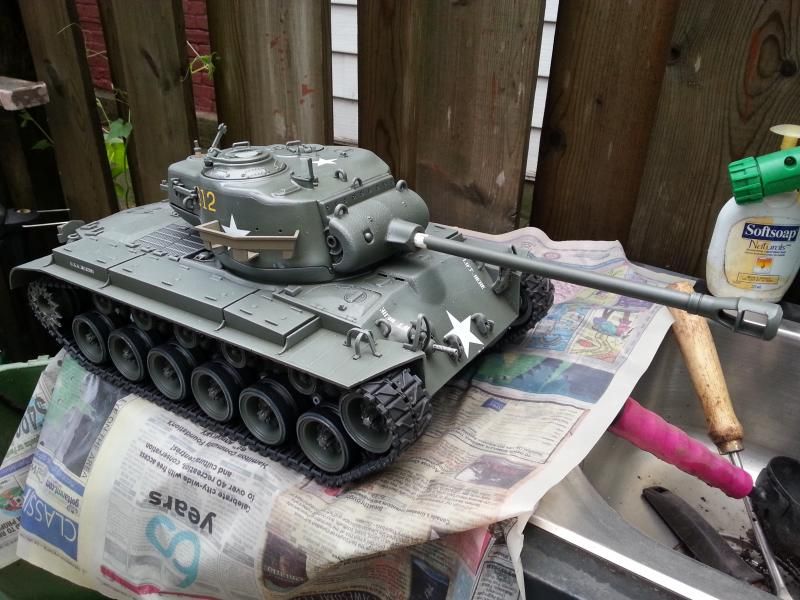
Pulled the trigger on a Pershing, now bringing my Axis vs Allied count to a happy even number!
I brought this up on RCU and with some discussion it turns out I have a mix of "new" and original HL pershing parts with this tank.
New:
Original:
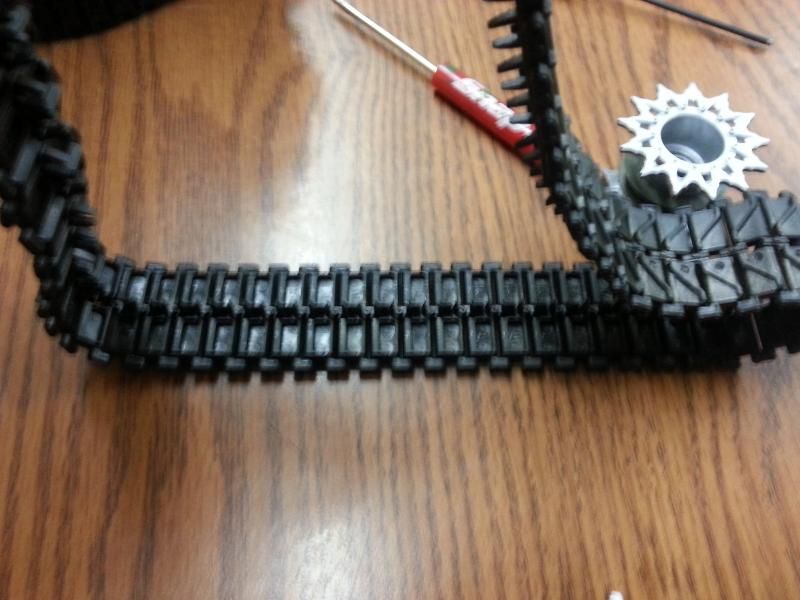
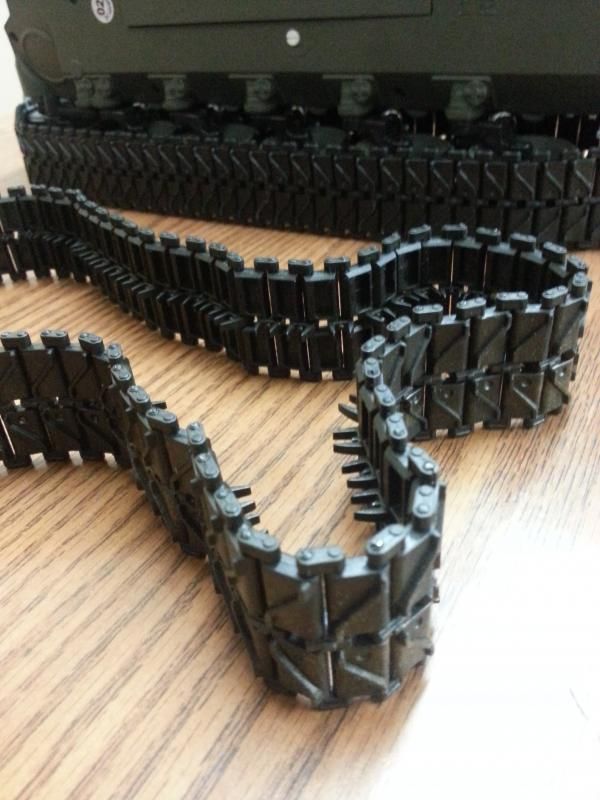
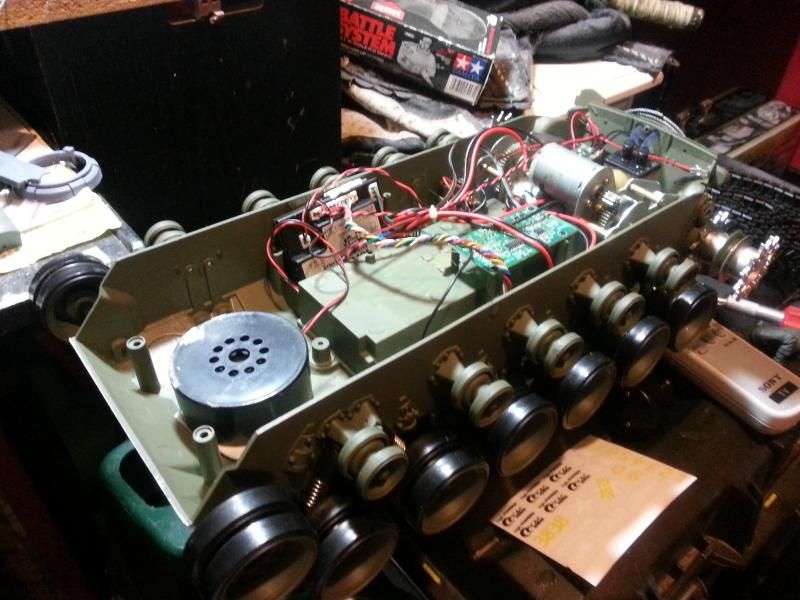
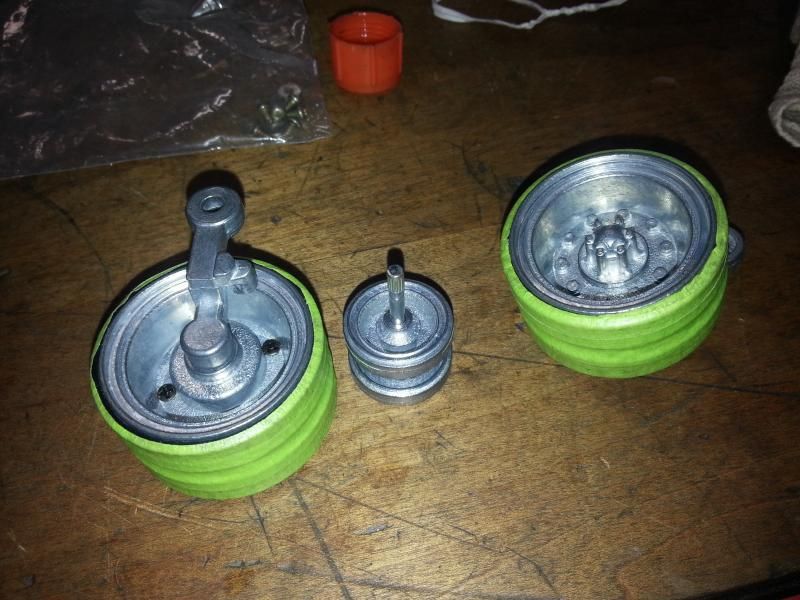
I started by removing the tracks and roadwheels. I drilled out the solid centre caps on the wheels to allow a screwdriver inside and unfastened from the suspension arms. Once removed I split each wheel (14 of them) on a band saw slowly, then drilled out the rest of the hull with a drill press. Now I can use the new centre hubs that were included and the plastic wheels as necessary for replacements or as deck cargo.
Upgrades planned for this tank include closed-pin metal tracks, 4:1 Taigen steel gears, metal suspension & roadwheels with bearings from TankArmy.com, return rollers and the usual Clark board setup.
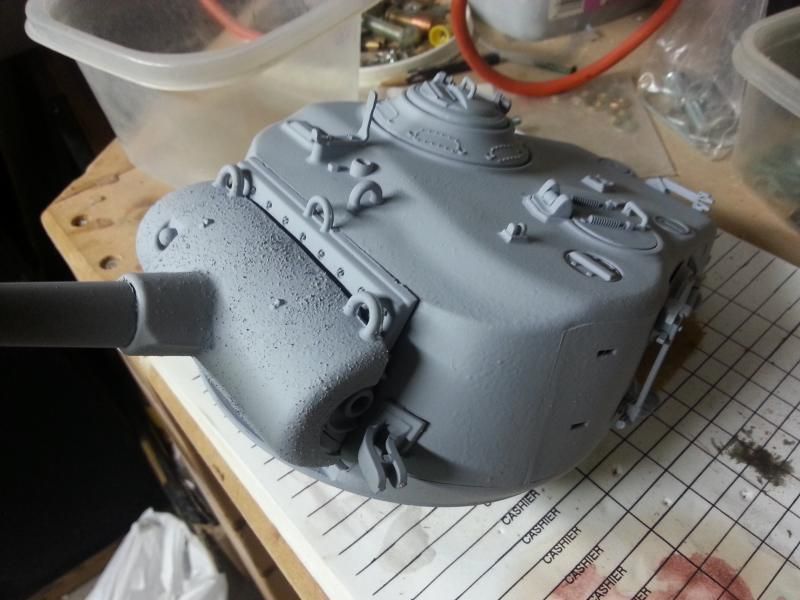
This evening I attacked the most obvious parts of the tank that were made with cast steel with Mr Surfacer 500. This stuff is great, is easy to work with and once you really get the hang of it things move along quickly. Thank you again Stince for giving me this bottle
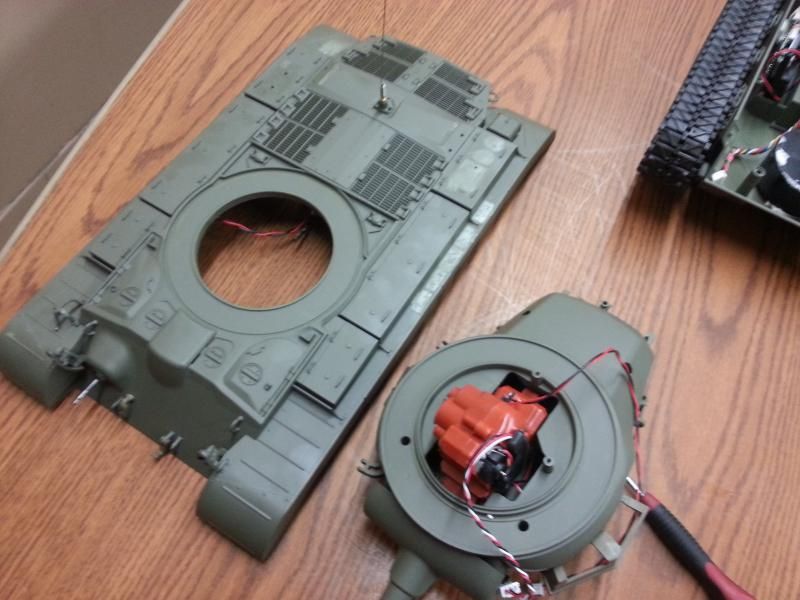
I brought this up on RCU and with some discussion it turns out I have a mix of "new" and original HL pershing parts with this tank.
New:
- hollow single-pin tracks (boo)
- New mantlet design (yay)
- New speaker
- Tons of extra parts on sprue
Original:
- Solid-hub wheels (boo)
- RX-18 electroincs
- probably upper and lower hull molds
I started by removing the tracks and roadwheels. I drilled out the solid centre caps on the wheels to allow a screwdriver inside and unfastened from the suspension arms. Once removed I split each wheel (14 of them) on a band saw slowly, then drilled out the rest of the hull with a drill press. Now I can use the new centre hubs that were included and the plastic wheels as necessary for replacements or as deck cargo.
Upgrades planned for this tank include closed-pin metal tracks, 4:1 Taigen steel gears, metal suspension & roadwheels with bearings from TankArmy.com, return rollers and the usual Clark board setup.
This evening I attacked the most obvious parts of the tank that were made with cast steel with Mr Surfacer 500. This stuff is great, is easy to work with and once you really get the hang of it things move along quickly. Thank you again Stince for giving me this bottle


 09-28-2014, 02:11 PM
#2
Thread Starter
Join Date: Jan 2006
Location: Hamilton,
ON, CANADA
Posts: 1,422
Likes: 0
Received 7 Likes
on
7 Posts
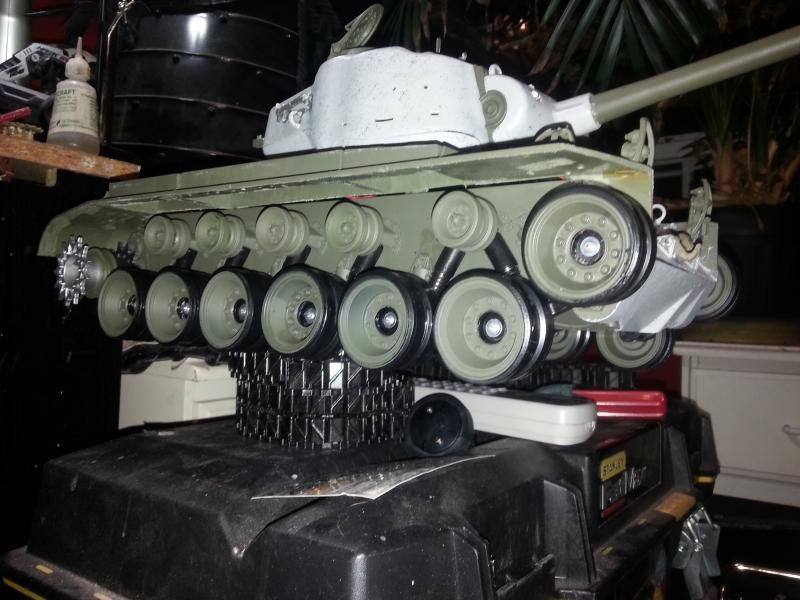
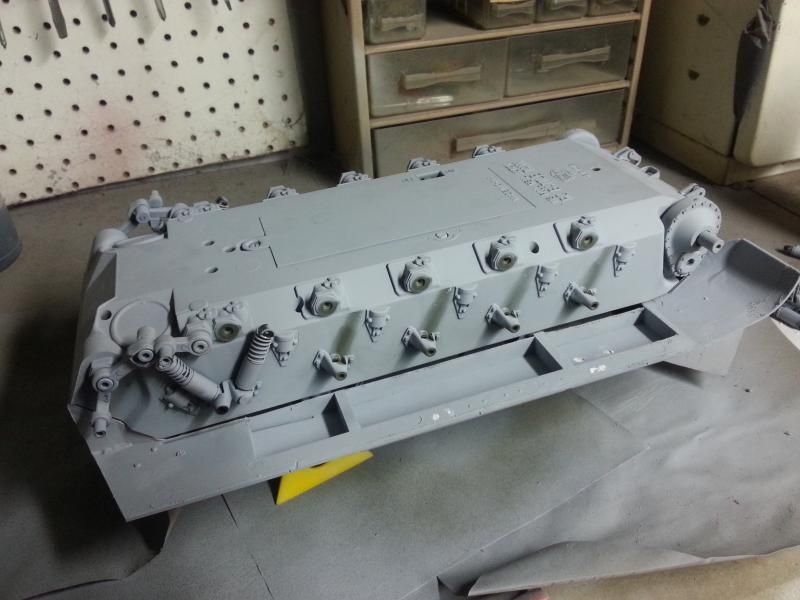
Got a bit more done in the last couple days. Finished off the Mr Surfacer texture job on the engine deck and gun mantlet. I did it a lot thicker to really show it off through the eventual coats of paint, I hope it's not too much but I like it.
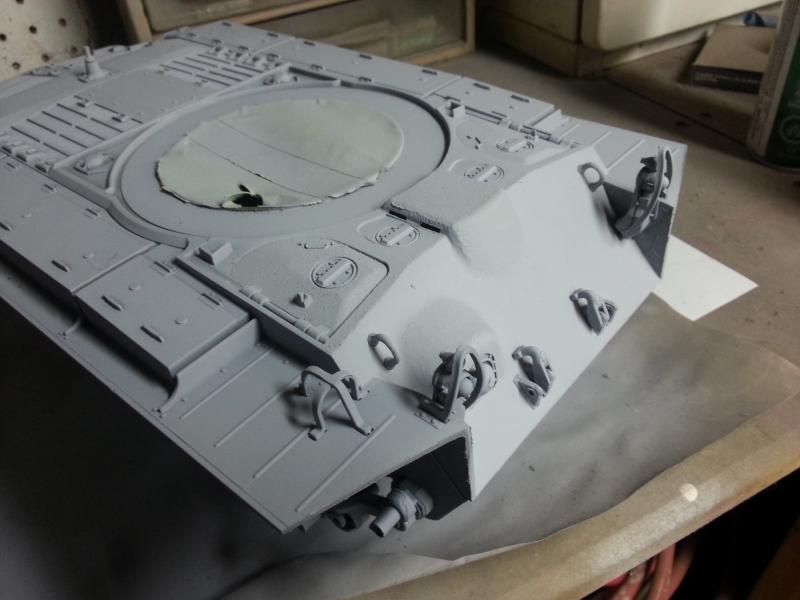
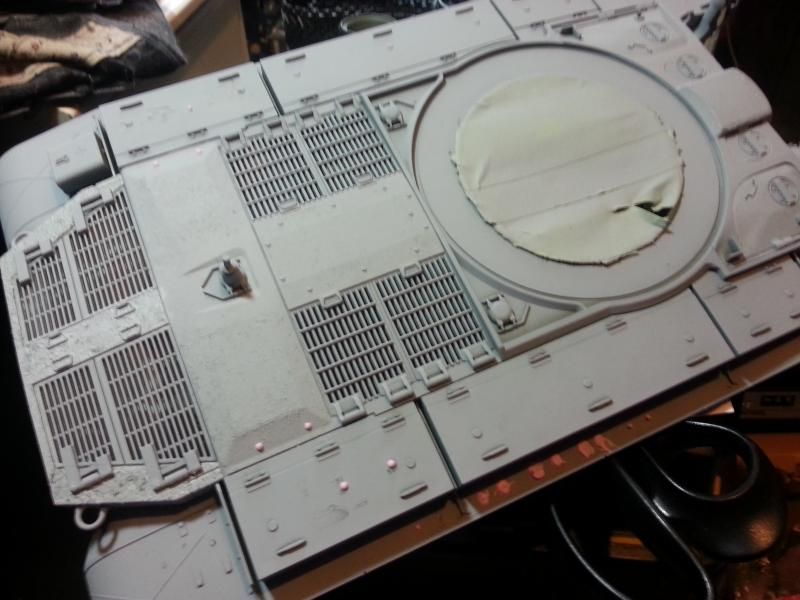
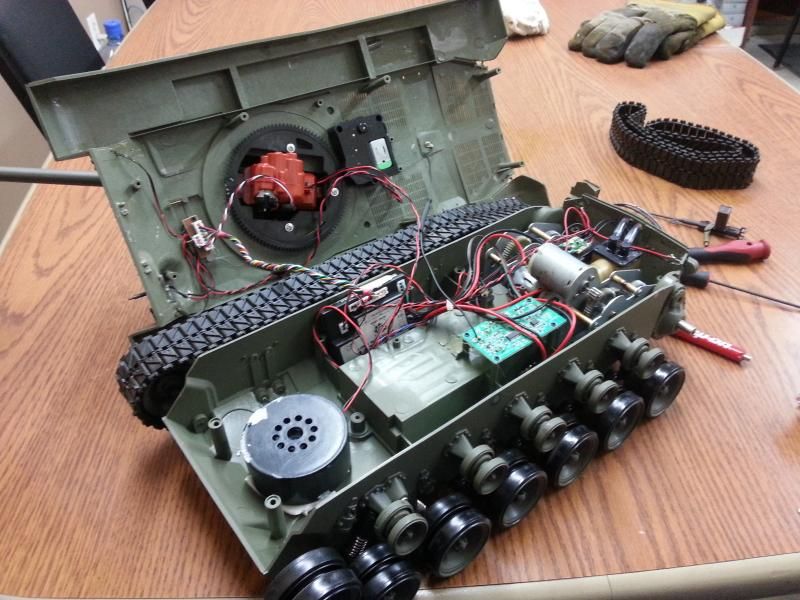
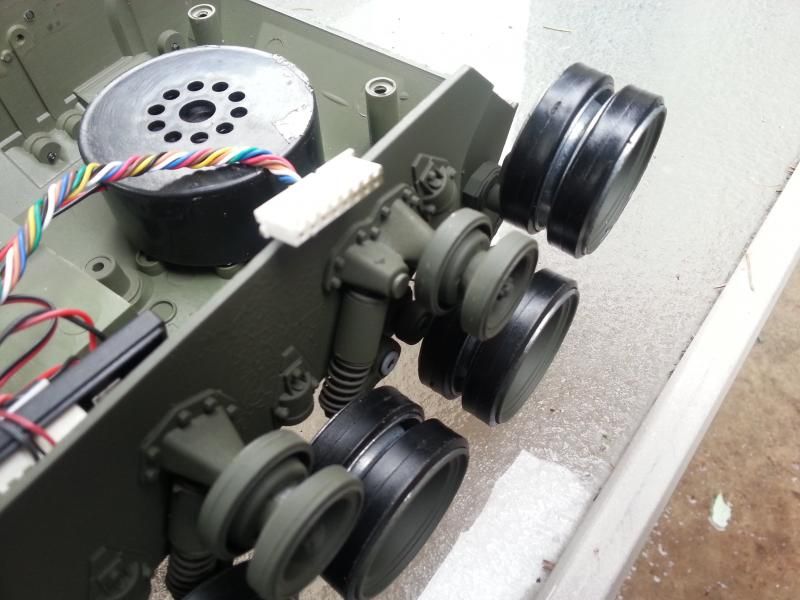
Removed the return rollers and suspension parts that don't come with the new metal set in order to paint. I already know the weakest point of this tank is going to be the front roadwheel & idler setup... the new wheels don't come with metal suspension arms for these sections & I wish they would... Henntech has an idler system similar to the Tiger's, so that's a future possibility.
Removing the return rollers was easier than I had expected. They are press-to-fit into the sides of the hull and also support the main suspension springs. I thought they were MEK'd solid into their mounting but with a bit of solid and consistence force they wiggled free without damage. Woohoo! All set to install the new metal rollers once they arrive.

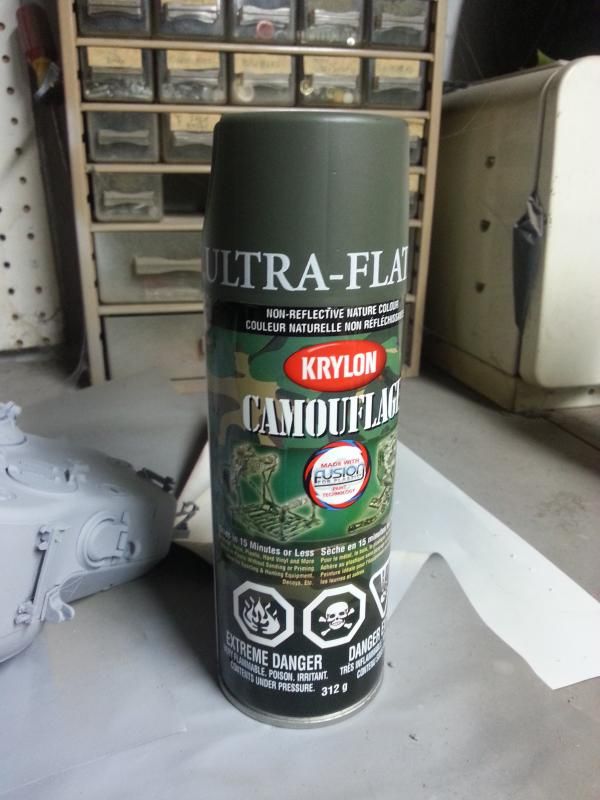
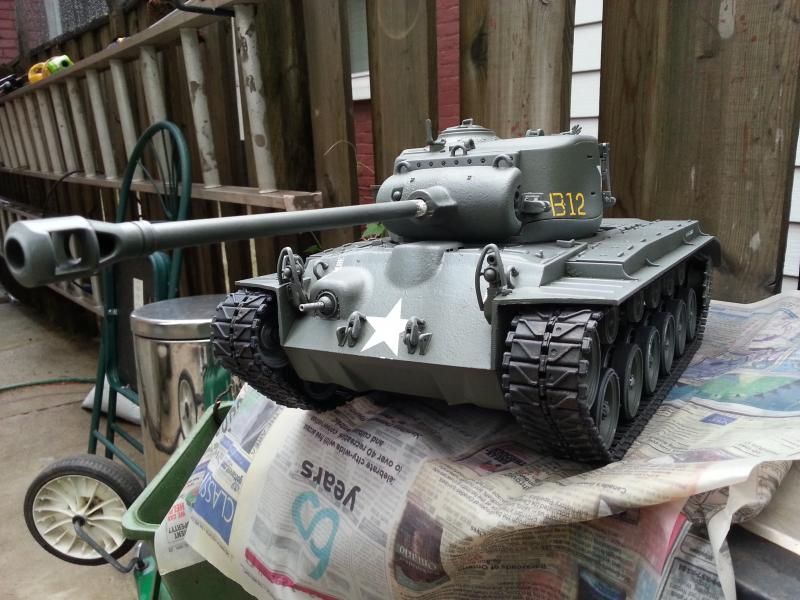
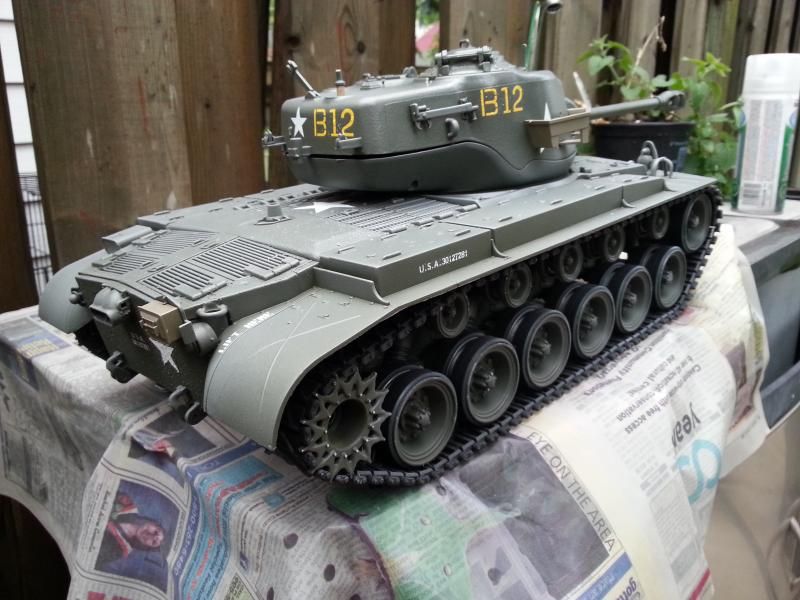
Painting with a can of Krylon Ultra-Flat camo paint, went with Olive as that matches what most Pershings were out of the factory and in the field. Considered a flat brown but decided against it.

I was scared to death briefly when the green top coat started to bubble SLIGHTLY over the primer I had used... oh I do hate when that happens, and I'm far far to lazy to ever check if it will... Lucky me it wasn't very bad & if you leave it alone it tends to dry smooth...
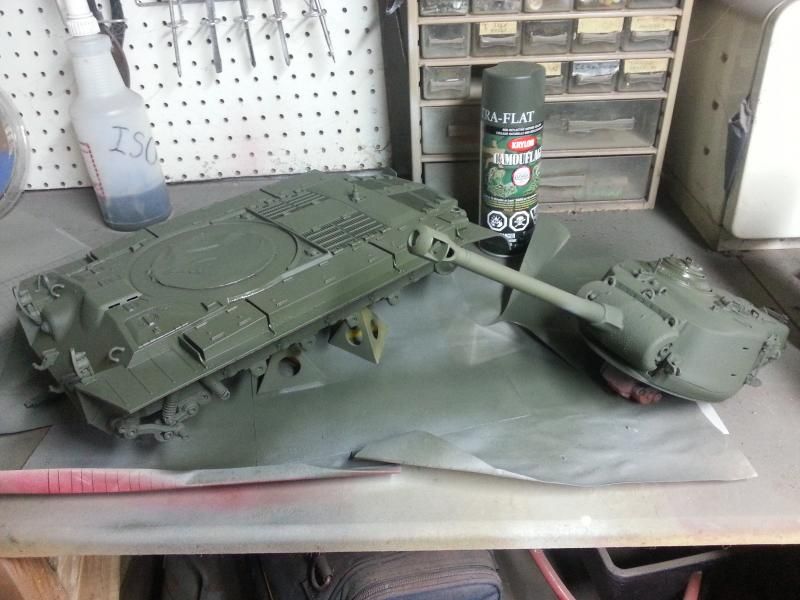
Once everything has had a few hours to cure, I'll assemble what I can and get a nice photo for you guys.


Removed the return rollers and suspension parts that don't come with the new metal set in order to paint. I already know the weakest point of this tank is going to be the front roadwheel & idler setup... the new wheels don't come with metal suspension arms for these sections & I wish they would... Henntech has an idler system similar to the Tiger's, so that's a future possibility.

Removing the return rollers was easier than I had expected. They are press-to-fit into the sides of the hull and also support the main suspension springs. I thought they were MEK'd solid into their mounting but with a bit of solid and consistence force they wiggled free without damage. Woohoo! All set to install the new metal rollers once they arrive.

Painting with a can of Krylon Ultra-Flat camo paint, went with Olive as that matches what most Pershings were out of the factory and in the field. Considered a flat brown but decided against it.


I was scared to death briefly when the green top coat started to bubble SLIGHTLY over the primer I had used... oh I do hate when that happens, and I'm far far to lazy to ever check if it will... Lucky me it wasn't very bad & if you leave it alone it tends to dry smooth...


Once everything has had a few hours to cure, I'll assemble what I can and get a nice photo for you guys.
09-28-2014, 02:12 PM
#3
Thread Starter
Join Date: Jan 2006
Location: Hamilton,
ON, CANADA
Posts: 1,422
Likes: 0
Received 7 Likes
on
7 Posts
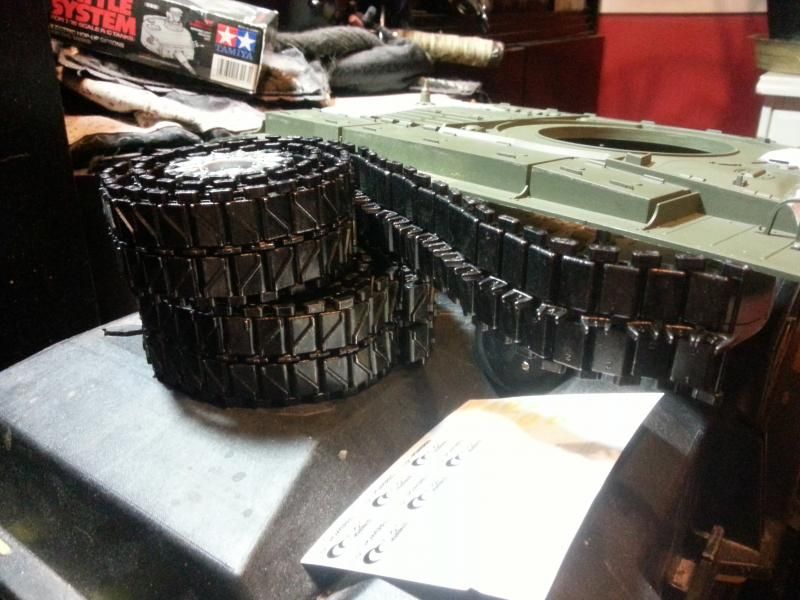
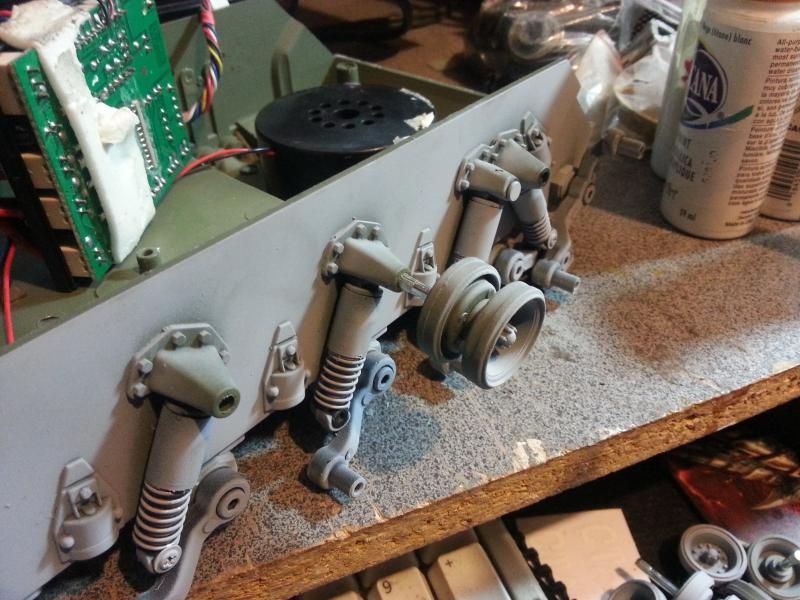
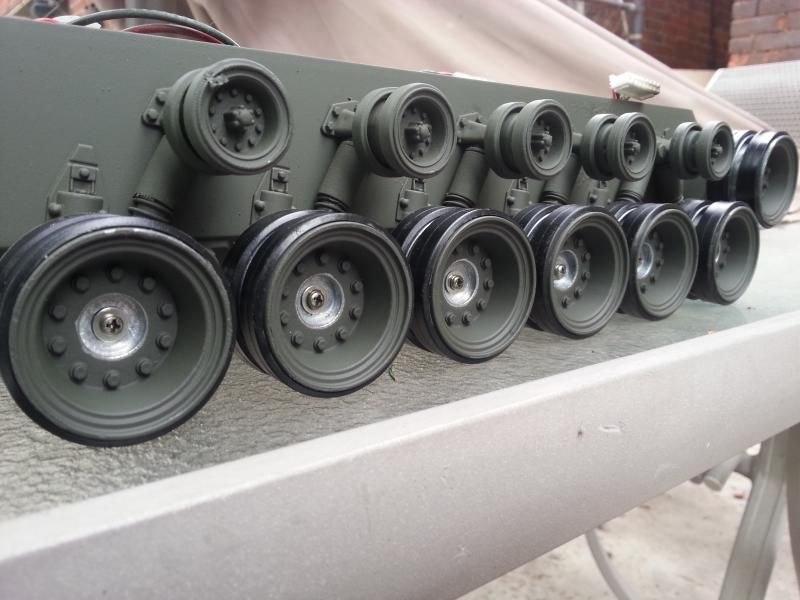
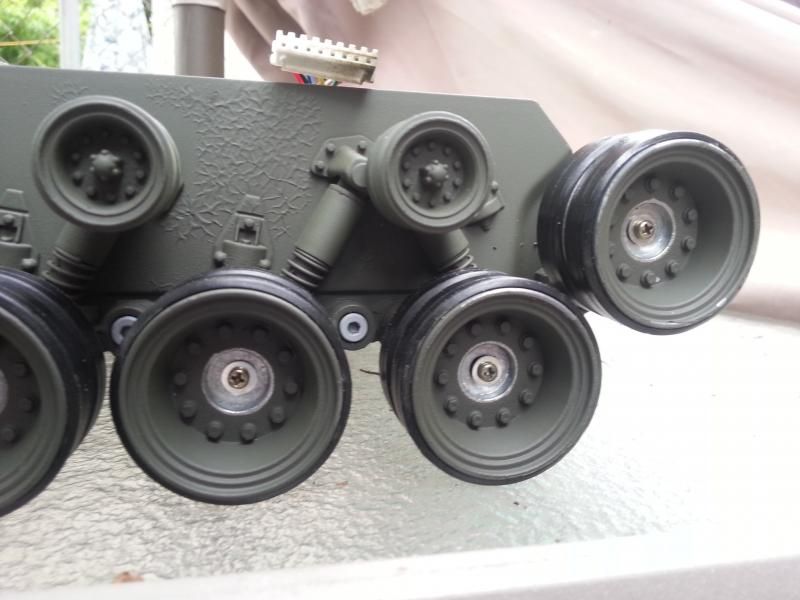
Wheels arrived and I did a bit of work on the running gear.
The wheel kit from TankArmy is actually pretty nice, better than most other 'metal upgrade' wheel packages Ive tried out. I really liked that they provided all the hardware, and every metal suspension arm was already tapped for the machine screw. I've had terrible nightmares from previous experience with metal suspension arms that broke screw heads or needed to be tapped to M3 screws.
There are really only 2 drawbacks. First the 'rubber' on the wheels is actually a fairly hard plastic. It's molded on separately and is probably removable but I didn't bother. Not that bad of a drawback.
Second there are no metal replacement arms for the 2 forward wheels, the weak spot of the Pershing. I really wish they'd make these and I'll send off an email to suggest it
The bearings in the wheels are nice and snug in their mounts and each wheel spins nicely. Impressed.
Other than that the return rollers are excellent. They all spin freely (no bearings though) and press fit right back into the holes the stock plastics ones came out of. Very nice.


 09-28-2014, 02:13 PM
#4
Thread Starter
Join Date: Jan 2006
Location: Hamilton,
ON, CANADA
Posts: 1,422
Likes: 0
Received 7 Likes
on
7 Posts
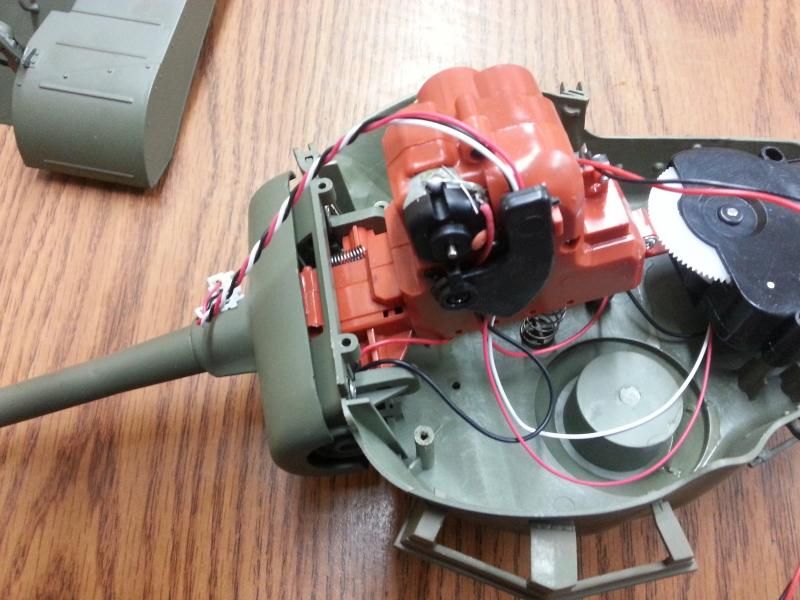
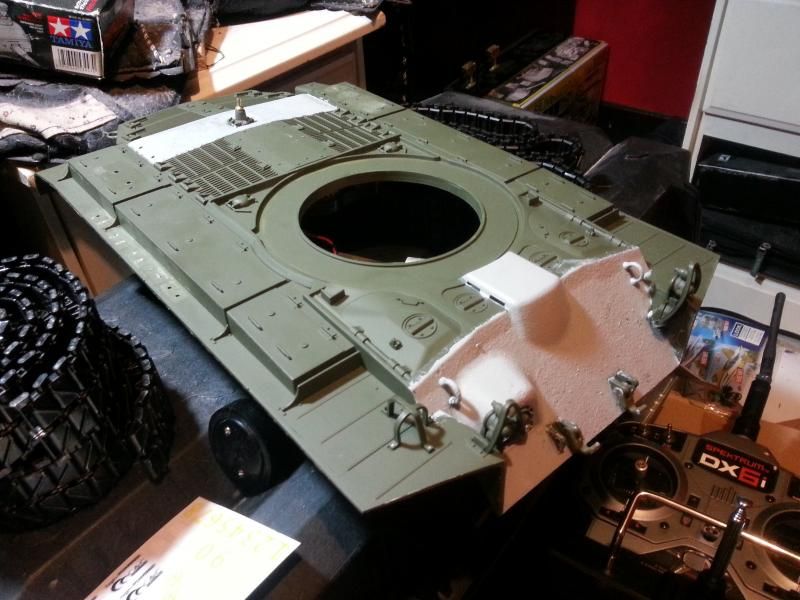
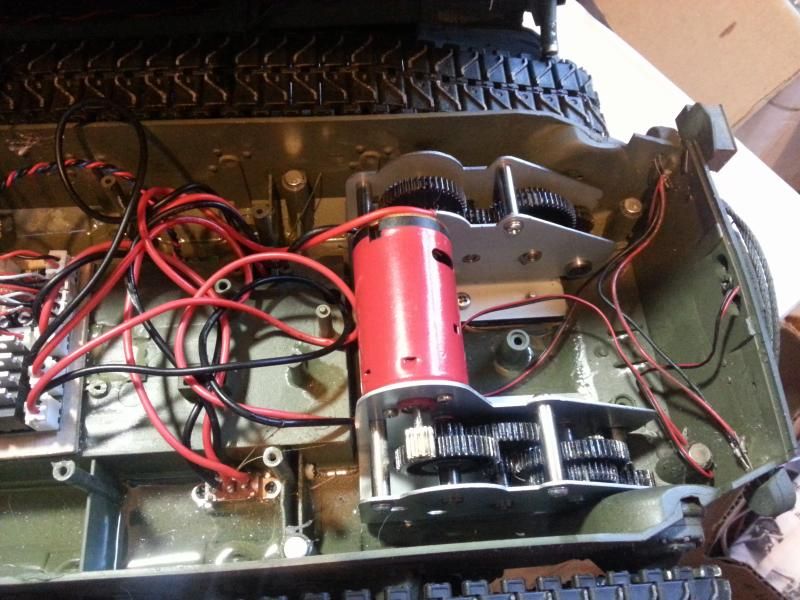
The fun package arrived yesterday and I've got a bit more done, and created a bunch of fun new problems to solve too 
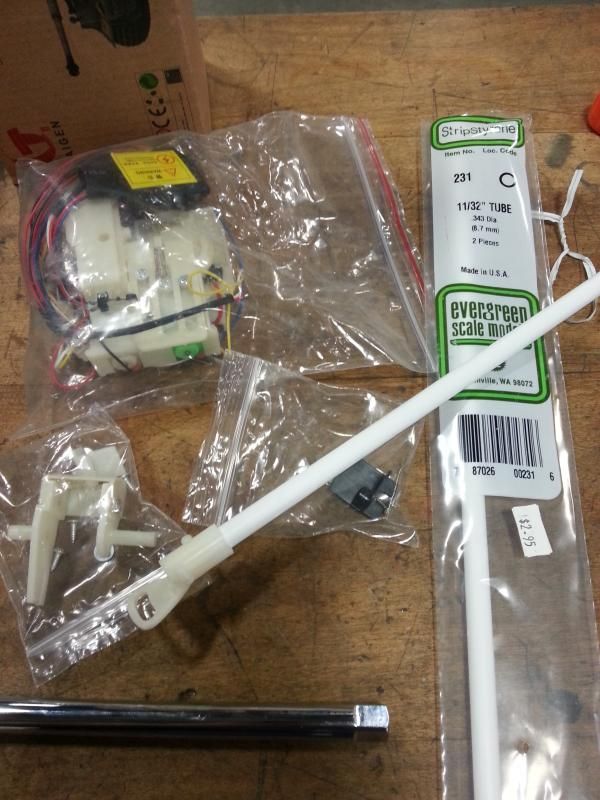
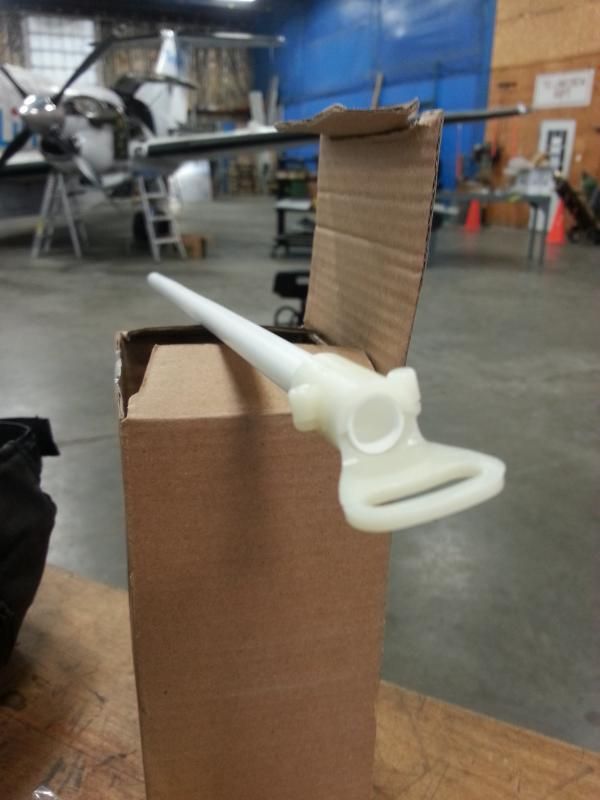
Evergreen 11/32 plastic tube that I'm going to make my own recoiling barrel with. It's actually working out nicely; the size wasn't exact to the airsoft barrel but it fits where it needs to. It's snug but slides smoothly through the mantlet. The problem now is trying to set up an Asiatam recoil unit inside a tank it wasn't meant for... oh boy.
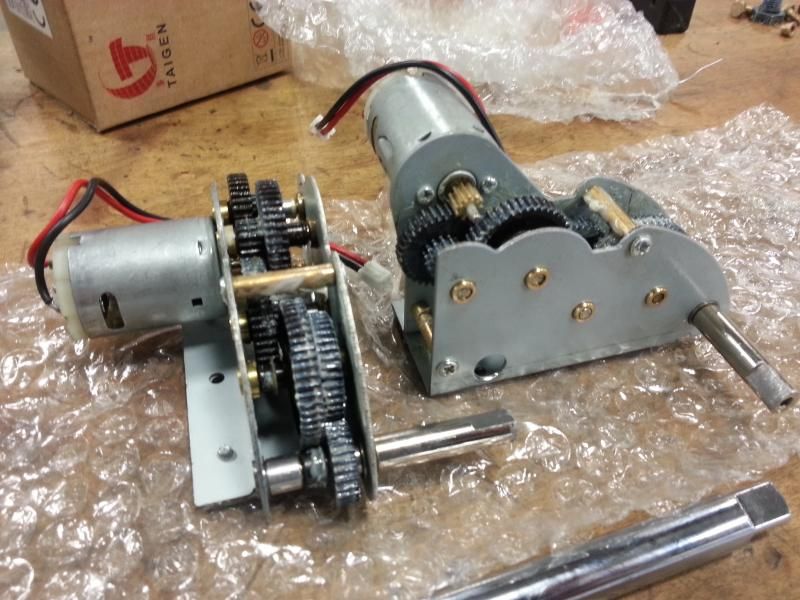
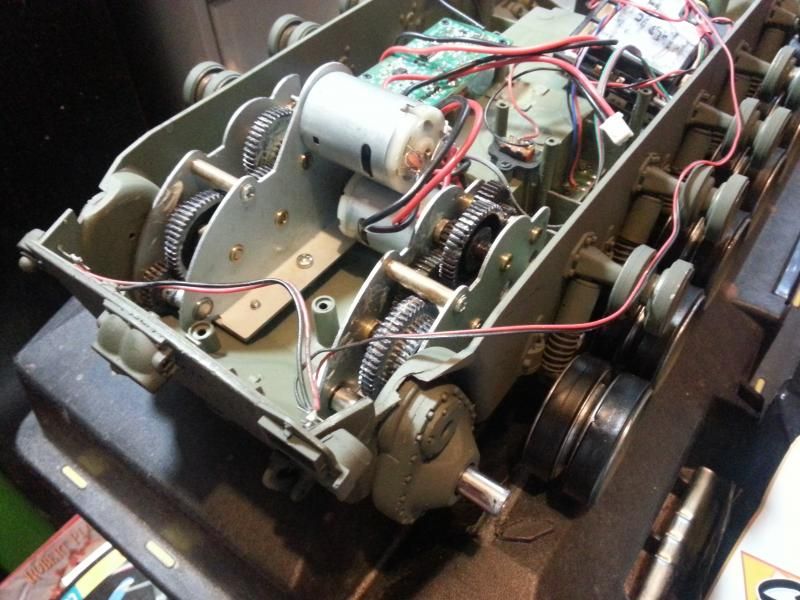
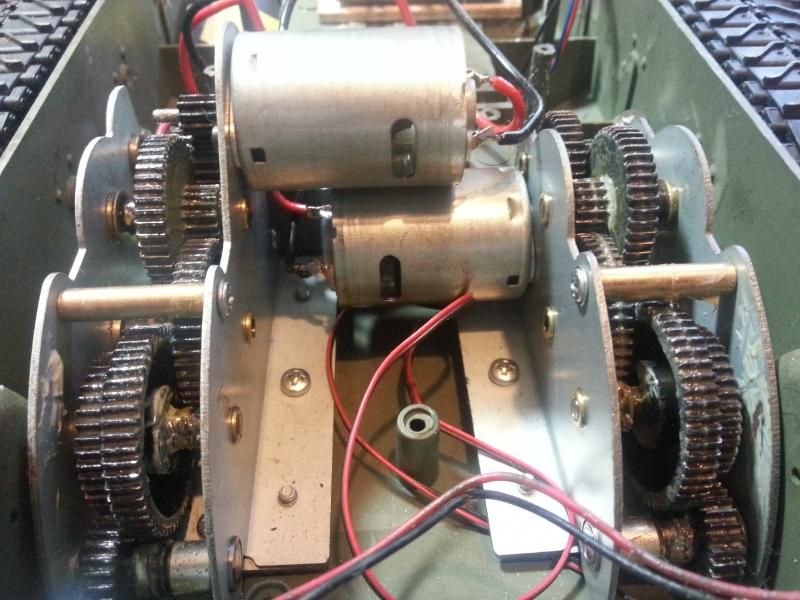
Long shaft Taigen steel gearboxes, my favourite, undergoing break-in. I've never actually broke in gears & motors before but why not?
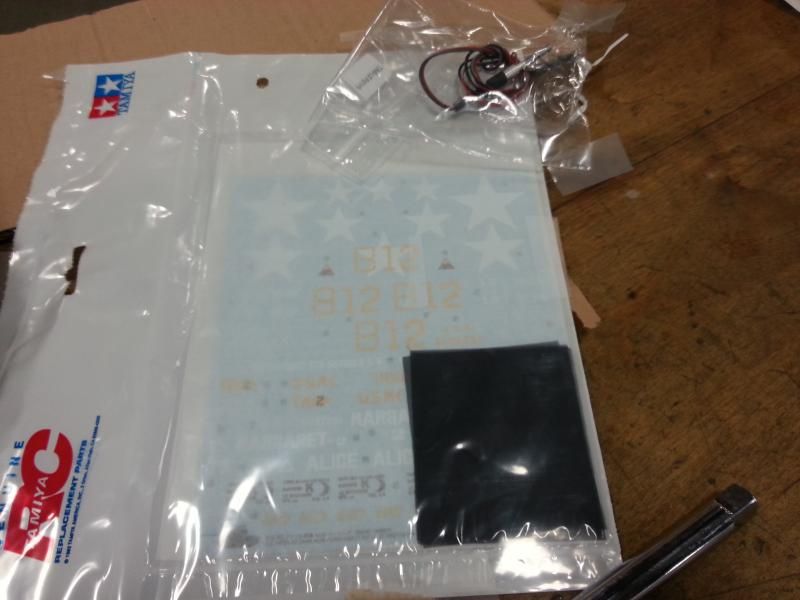
Tamiya decals, gasp!!
Installed.
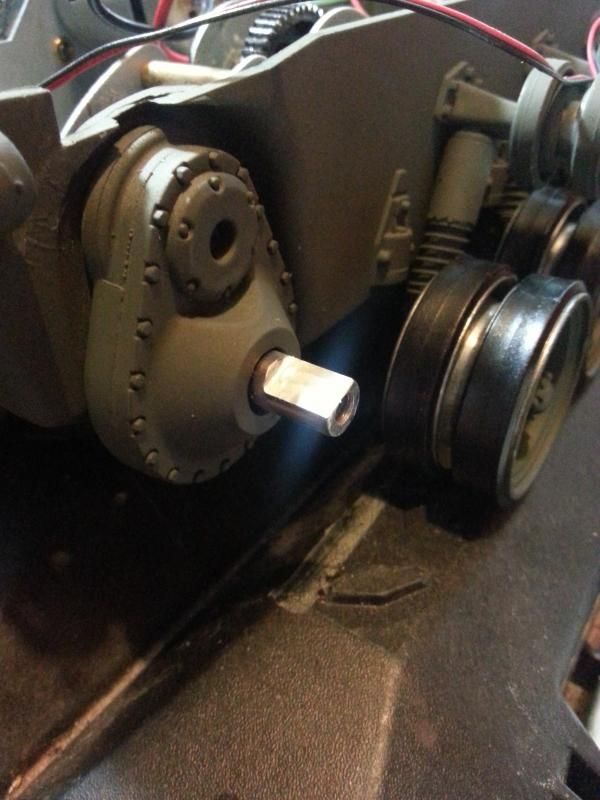
BIG REMINDER!! If you're going to use metal sprockets with these Taigen gearboxes you HAVE TO shave off a bit more of the flat spot on the drive shaft... otherwise it's too tight & the sprocket WILL get stuck on... very bad. I wish Taigen would address this... so again, HL / Asiatam metal sprockets are tight as hell on Taigen drive shafts...
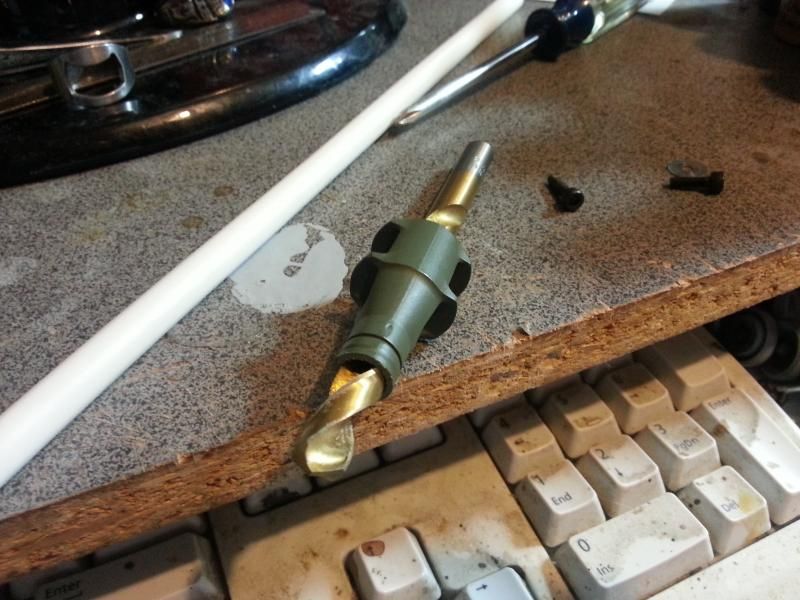
Resizing the inside of the muzzle brake to 11/32, slow and steady and you don't lose a finger
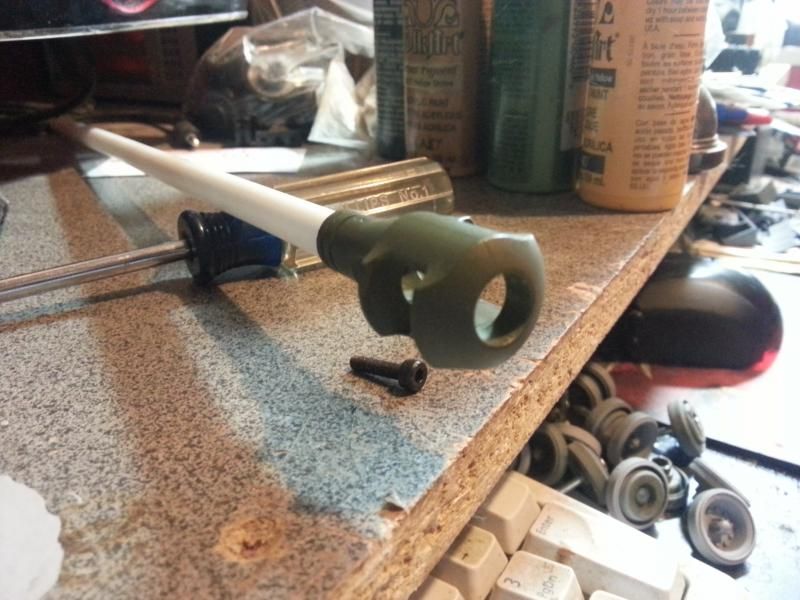


Evergreen 11/32 plastic tube that I'm going to make my own recoiling barrel with. It's actually working out nicely; the size wasn't exact to the airsoft barrel but it fits where it needs to. It's snug but slides smoothly through the mantlet. The problem now is trying to set up an Asiatam recoil unit inside a tank it wasn't meant for... oh boy.
Long shaft Taigen steel gearboxes, my favourite, undergoing break-in. I've never actually broke in gears & motors before but why not?


Tamiya decals, gasp!!

Installed.
BIG REMINDER!! If you're going to use metal sprockets with these Taigen gearboxes you HAVE TO shave off a bit more of the flat spot on the drive shaft... otherwise it's too tight & the sprocket WILL get stuck on... very bad. I wish Taigen would address this... so again, HL / Asiatam metal sprockets are tight as hell on Taigen drive shafts...


Resizing the inside of the muzzle brake to 11/32, slow and steady and you don't lose a finger

 09-28-2014, 02:13 PM
#5
Thread Starter
Join Date: Jan 2006
Location: Hamilton,
ON, CANADA
Posts: 1,422
Likes: 0
Received 7 Likes
on
7 Posts
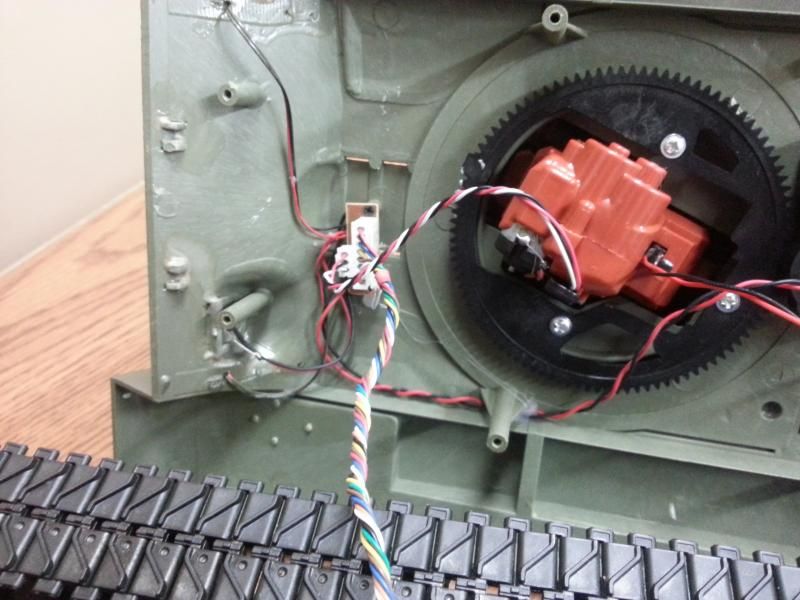
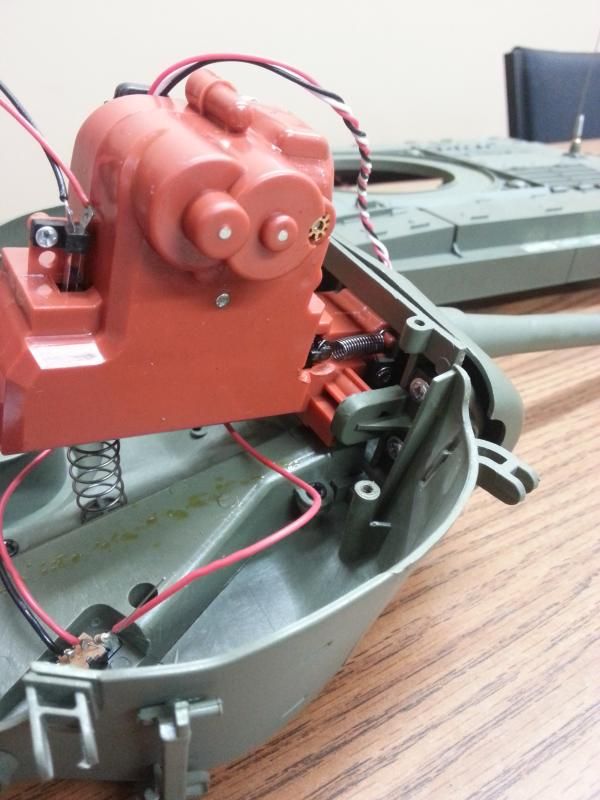
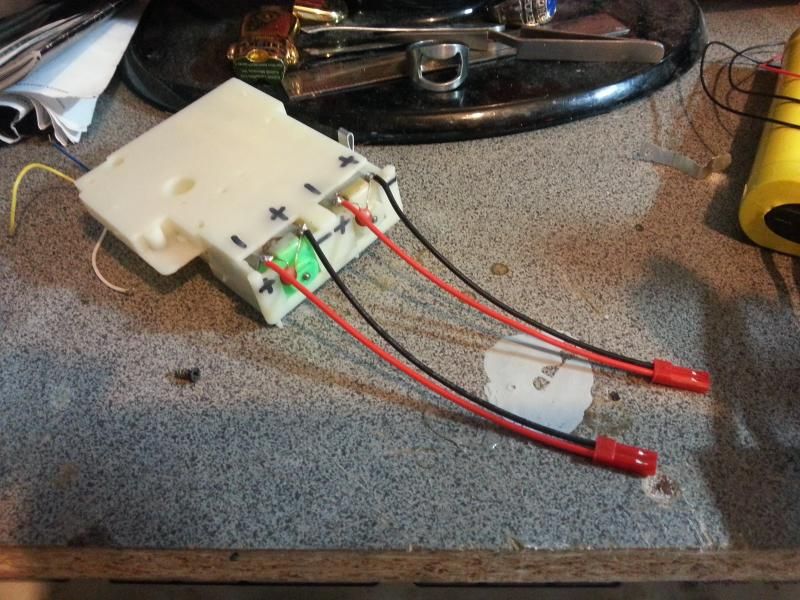
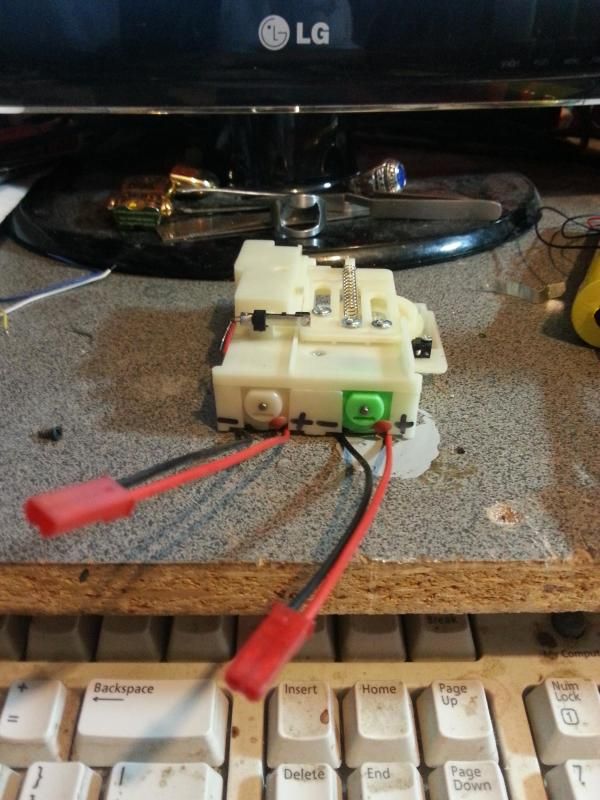
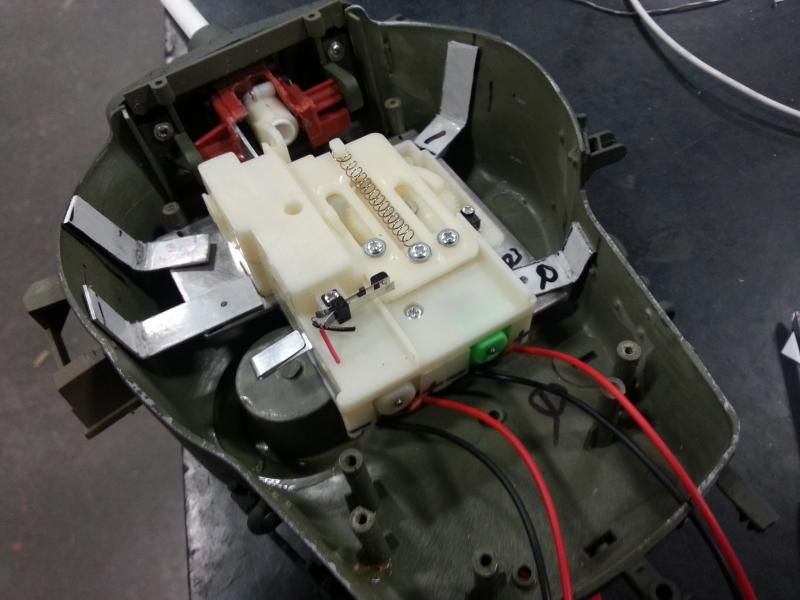
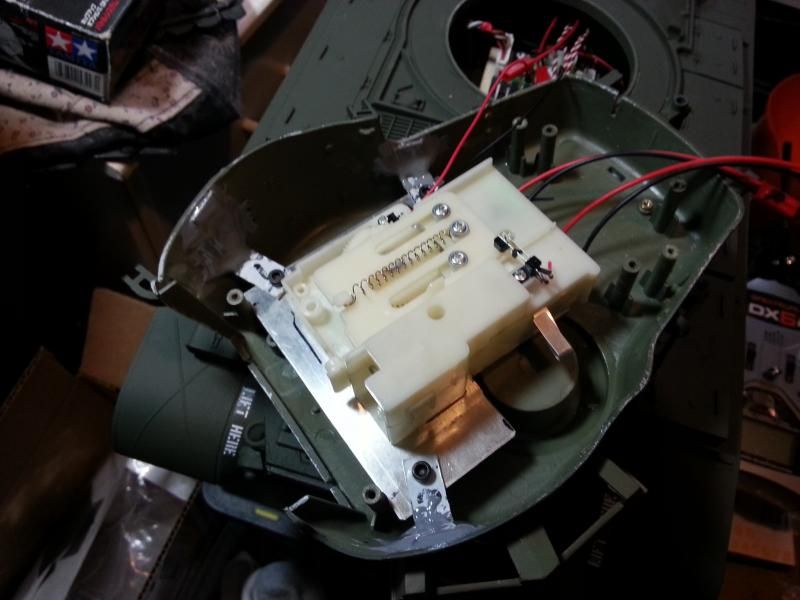
I did some more work this morning getting ready for the asiatam recoil and elevation. Soldered in the wire plugs that several of us have ordered and use to their proper pins.
If anyone's wondering, the recoil motor is + to pin 3 (which is also the + for the MG and headlights) and - to pin 4. You can see in the photo I messed up labeling the +/- but I soldered them in the proper place... Polarity matters with this recoil unit, hooking it up wrong causes bad things.
Gun elevation is pin 5 & 6 but if you think about it polarity doesn't matter, it's either going up or down and can't be messed up.
If anyone's wondering, the recoil motor is + to pin 3 (which is also the + for the MG and headlights) and - to pin 4. You can see in the photo I messed up labeling the +/- but I soldered them in the proper place...
Gun elevation is pin 5 & 6 but if you think about it polarity doesn't matter, it's either going up or down and can't be messed up.


 09-28-2014, 02:14 PM
#6
Thread Starter
Join Date: Jan 2006
Location: Hamilton,
ON, CANADA
Posts: 1,422
Likes: 0
Received 7 Likes
on
7 Posts
Well Stince is correct and the Pershing during initial test runs is slower than snot on a crisp February morning... motors to be swapped at earliest convenience hehe.
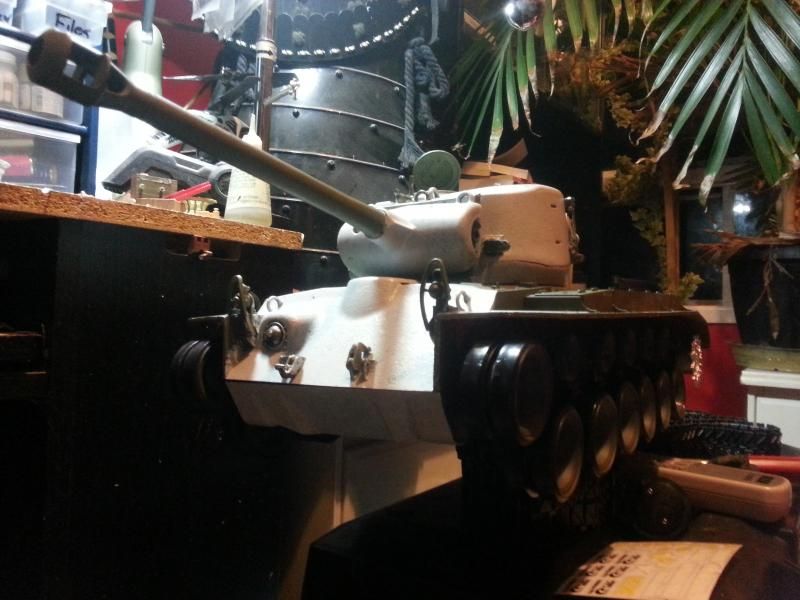
I got to work (...while at work) on the tougher issue being the installation of the recoil / elevation unit.
I made a base plate out of thick aluminum sheet that will be tapped for an M3 bolt to hold it in place.
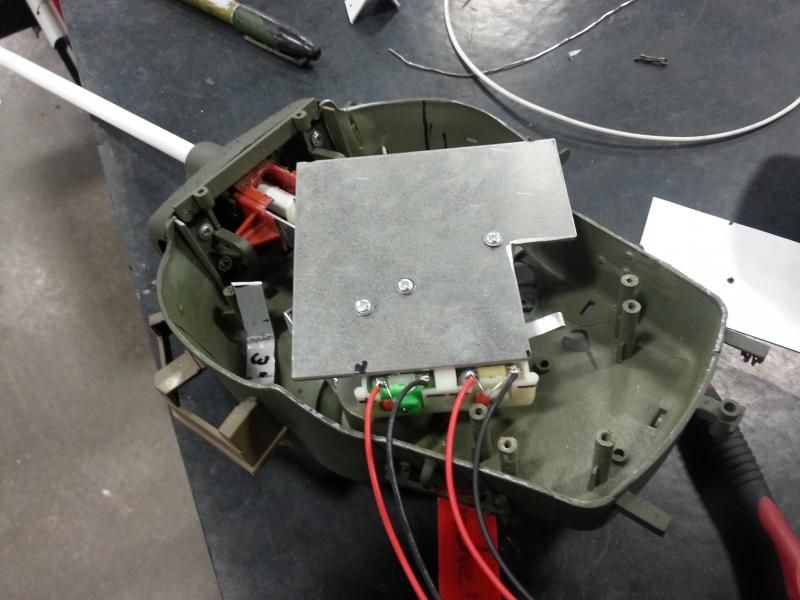
I formed some thinner aluminum into brackets that the bolts will pass through to secure the plate. I had to move the entire unit backwards a little bit to get proper recoil clearance, and won't get a lot of barrel elevation travel but it will be enough to battle with. This gun with recoil will look good.
(I think my American tankers are compensating for something...)
**CLICK FOR VIDEO!**

I got to work (...while at work) on the tougher issue being the installation of the recoil / elevation unit.

I made a base plate out of thick aluminum sheet that will be tapped for an M3 bolt to hold it in place.

I formed some thinner aluminum into brackets that the bolts will pass through to secure the plate. I had to move the entire unit backwards a little bit to get proper recoil clearance, and won't get a lot of barrel elevation travel but it will be enough to battle with. This gun with recoil will look good.


(I think my American tankers are compensating for something...)
**CLICK FOR VIDEO!**
09-28-2014, 02:16 PM
#7
Thread Starter
Join Date: Jan 2006
Location: Hamilton,
ON, CANADA
Posts: 1,422
Likes: 0
Received 7 Likes
on
7 Posts
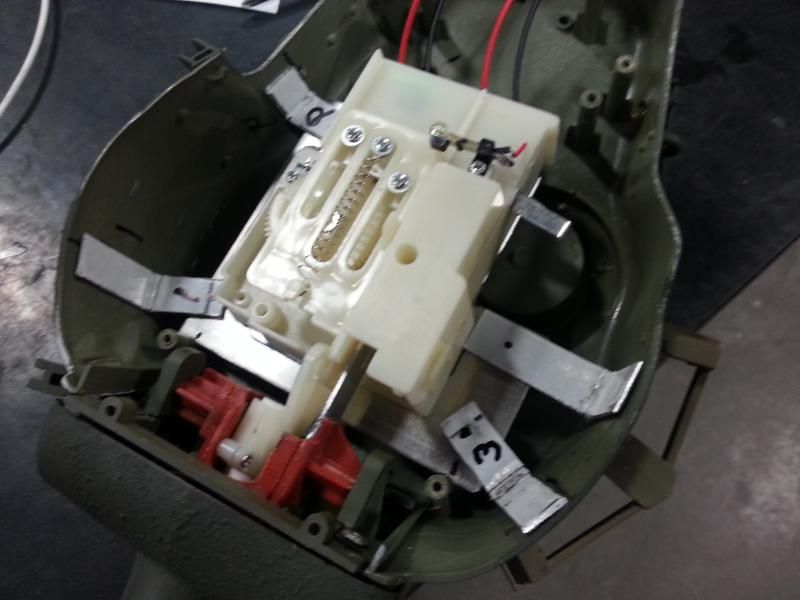
Added a coat of Frosted Glass and I think I overdid it... it's really, really frosty! I mainly wanted to seal the decals onto the hull so I'll probably give it a dark green or black wash next.
Recoil tapped and bolted in, nice and strong and it works, yay.

Recoil tapped and bolted in, nice and strong and it works, yay.


 09-28-2014, 02:17 PM
#8
Thread Starter
Join Date: Jan 2006
Location: Hamilton,
ON, CANADA
Posts: 1,422
Likes: 0
Received 7 Likes
on
7 Posts
dgsselkirkHey Jordan. What are the new motors? I am looking for some too. What were they rated and can you give me the dimensions please...
Here's where I 'discovered' the motors I use.
http://www.robotmarketplace.com/products/0-PKMOT-1009.html
...and they're identical & available here too
http://www3.towerhobbies.com/cgi-bin/wti0001p?&I=LXJSS5&P=0
[TABLE="width: 100%"]
[TR]
[TD]SPECIFICATIONS
[/TD]
[/TR]
[/TABLE]
Length: 44mm can 13mm shaft
Diameter: 29mm can 2.5mm shaft
Weight: 80.2g
Voltage: 7.2V
Current: 1.3mA
Speed: 19200 RPM
Torque: 1172 g-cm
09-28-2014, 02:18 PM
#9
Thread Starter
Join Date: Jan 2006
Location: Hamilton,
ON, CANADA
Posts: 1,422
Likes: 0
Received 7 Likes
on
7 Posts
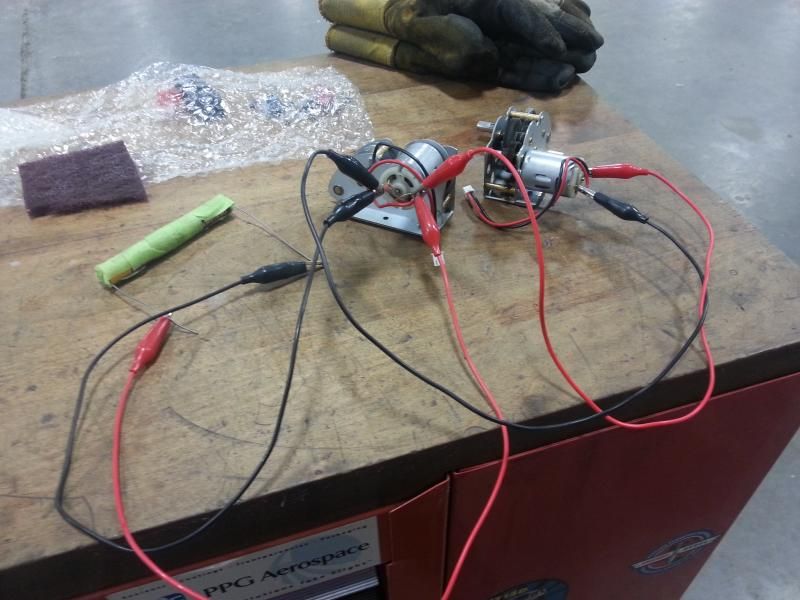
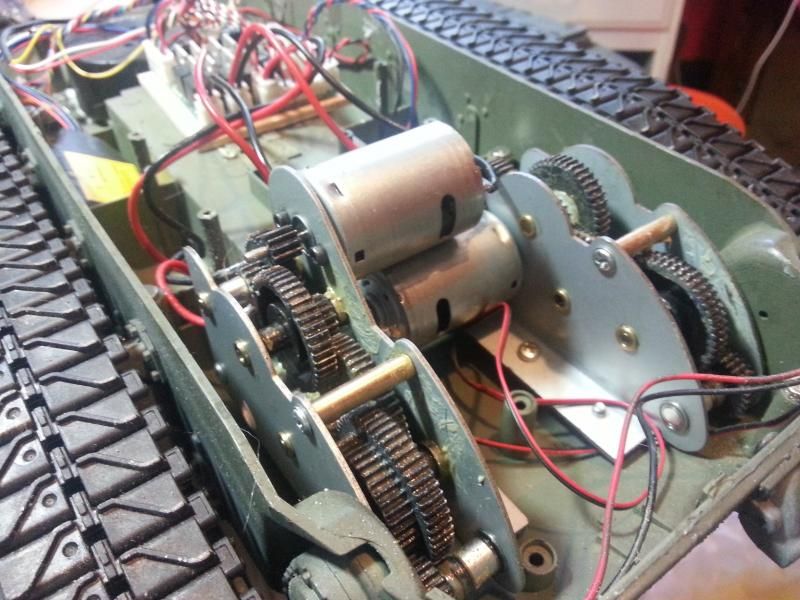
Small update... I installed my tried and tested upgrade motors & this time actually bothered doing one at a time. So I drove the tank around with 1 upgrade and 1 stock, and noticed a good difference in performance. I'd put it at about a 10-15% RPM increase under normal load. The motors have a nice torque boost too.
Learned some new things as well. The screws holding the motors to the gearbox frame are 2.5M threaded. Bought a set of hex-head bolts just to test them out, and they fit nice and snug.
Also removing and installing the stock HL pinion gear is a huge pain. I've been trying to find replacements but no luck..


 09-28-2014, 02:32 PM
#11
Thread Starter
Join Date: Jan 2006
Location: Hamilton,
ON, CANADA
Posts: 1,422
Likes: 0
Received 7 Likes
on
7 Posts
Phew! What a build! Went from an idea to running in 8 minutes! I've been doing this too long... 
I really like the Pershing, and since this build was ongoing it's cool to see that TankArmy (and whoever else) has actually released the metal idler & forward roadwheel suspension arms. Did they get the idea from me? Who knows... :P
http://tankarmy.com/heng-long-tank/p...ensions-p-1448

I really like the Pershing, and since this build was ongoing it's cool to see that TankArmy (and whoever else) has actually released the metal idler & forward roadwheel suspension arms. Did they get the idea from me? Who knows... :P
http://tankarmy.com/heng-long-tank/p...ensions-p-1448

 09-28-2014, 03:50 PM
#13
Join Date: Nov 2010
Location: HamiltonWaikato, NEW ZEALAND
Posts: 937
Likes: 0
Received 78 Likes
on
55 Posts
Hi Strato
Nice build, but looks like a standard M26 - no single baffle muzzle brake, no barrel fume extractor, nor the Gun Travel lock relocated to the middle of the engine deck? I'm presently working on an M26A1, but not very close to completion - http://hobbyhavoc.com/forum/index.php?topic=3365.0 -
Mal
Nice build, but looks like a standard M26 - no single baffle muzzle brake, no barrel fume extractor, nor the Gun Travel lock relocated to the middle of the engine deck? I'm presently working on an M26A1, but not very close to completion - http://hobbyhavoc.com/forum/index.php?topic=3365.0 -
Mal
09-28-2014, 06:23 PM
#15

Awesome build! I like the texturing job on the mantlet. Alas, not many hobby shops carry the Mr. Surfacer around where I live, so I will have to content with the stippling on some Tamiya surface primer instead. 

 I thought the recoil barrel use servo.
09-28-2014, 11:52 PM
I thought the recoil barrel use servo.
09-28-2014, 11:52 PM
#17
I'll trade ya some info...
For pinion options, I used a 14T pinion from the Duratrax Vendetta lineup on my M41 Bulldog with steel gearboxes. There are several sizes in that line up from about 9T to 16T; so, you've got some options. And, they're available at Tower Hobbies.
Question: where did you get the hex-head bolts for the motor mounts?
09-29-2014, 04:41 AM
#18
Thread Starter
Join Date: Jan 2006
Location: Hamilton,
ON, CANADA
Posts: 1,422
Likes: 0
Received 7 Likes
on
7 Posts
I'll trade ya some info...
For pinion options, I used a 14T pinion from the Duratrax Vendetta lineup on my M41 Bulldog with steel gearboxes. There are several sizes in that line up from about 9T to 16T; so, you've got some options. And, they're available at Tower Hobbies.
Question: where did you get the hex-head bolts for the motor mounts?
For pinion options, I used a 14T pinion from the Duratrax Vendetta lineup on my M41 Bulldog with steel gearboxes. There are several sizes in that line up from about 9T to 16T; so, you've got some options. And, they're available at Tower Hobbies.
Question: where did you get the hex-head bolts for the motor mounts?
I get all my hardware from https://rtlfasteners.com/ , they have an awesome selection and good prices. Hex bolts forever!
 09-29-2014, 07:57 PM
#20
Thread Starter
Join Date: Jan 2006
Location: Hamilton,
ON, CANADA
Posts: 1,422
Likes: 0
Received 7 Likes
on
7 Posts
It is, but I bought it as the generic unit without any prefab mounting plates. I got it from artistic hobbies, they're a good bunch.
It will fit a lot of tanks actually.. I have one in my KV-2, Tiger, and it'll fit the Panzer III. Not sure about a Panzer IV, but I'm sure it's been done.
The elevation is a bit slow to cycle but I really like the recoil. It snaps back with force. The tank physically moves
It will fit a lot of tanks actually.. I have one in my KV-2, Tiger, and it'll fit the Panzer III. Not sure about a Panzer IV, but I'm sure it's been done.
The elevation is a bit slow to cycle but I really like the recoil. It snaps back with force. The tank physically moves
09-30-2014, 03:05 AM
#21
Hmmm that is interesting.. does it say anywhere what pitch they are?? I'd rather be sure before shelling out the cash for those.
I get all my hardware from https://rtlfasteners.com/ , they have an awesome selection and good prices. Hex bolts forever!
I get all my hardware from https://rtlfasteners.com/ , they have an awesome selection and good prices. Hex bolts forever!
Last question: did you spray on the Mr Surfacer (with rattle can) or stipple it?
Thanks for the bolt information.
 09-30-2014, 08:06 PM
#23
Thread Starter
Join Date: Jan 2006
Location: Hamilton,
ON, CANADA
Posts: 1,422
Likes: 0
Received 7 Likes
on
7 Posts
Mr Surfacer comes in a jar and I apply it with a regular brush over a few square inches at a time. It takes about 30-45 seconds to tack up and I just keep dabbing it until it gets the texture I'm looking for. I also tend to keep a bit of lacquer thinner next to it and keep the brush wet with that, to stop the putty from gunking up the brush too much. It also makes the putty easier to spread around; it applies like a thick paint.
09-30-2014, 10:22 PM
#24
Thanks for the Mr Surfacer info.
 10-08-2014, 05:21 AM
#25
Thread Starter
Join Date: Jan 2006
Location: Hamilton,
ON, CANADA
Posts: 1,422
Likes: 0
Received 7 Likes
on
7 Posts
I just installed these bad boys... shipping from HobbyRaw didn't take too long, and was free, so.. yay!
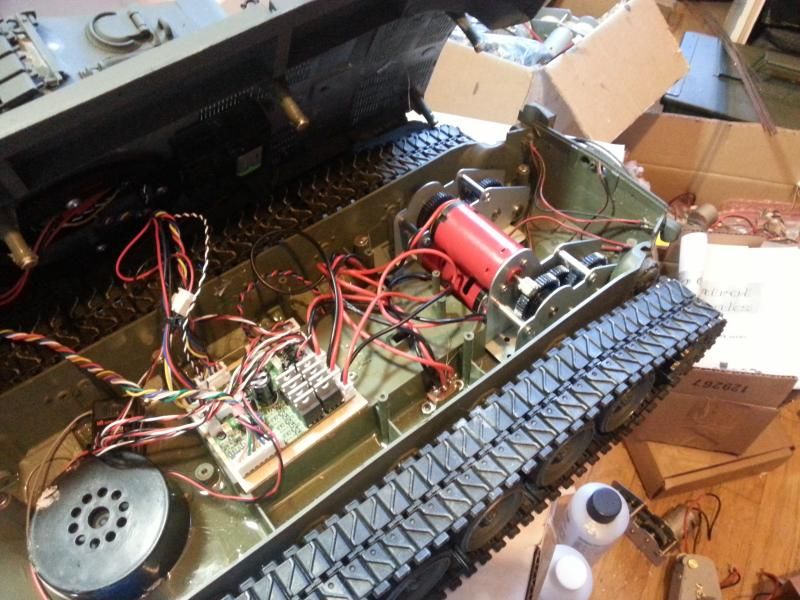
Let's just say my slow as mud Pershing suddenly became my FASTEST tank. Holy smokes.
I tuned my radio down to 45% forward and 50% reverse just to get something that approaches a reasonable speed for this tank. I'll set it up on dual-rate to demonstrate Oct 18.. you won't believe this. The torque is still there, and probably moreso than any stock setup. The motors just scream RPM and power. Like YHR said in his motor post it's difficult to say whether the increase in power and speed is strictly from the motor or the fact these gearboxes have a full set of bearings throughout. I'll take it, highly recommended especially for modern tanks.
These gearboxes on a larger sprocket like a Panzer III will be absolutely impossible to control. Whee!!
Last edited by Strato50; 10-08-2014 at 05:23 AM.

