


Lets build a tank!!! The tamiya JS-2
 03-27-2015, 02:56 PM
#26

So, English is the second language in this thread and your all are doing remarkably well, kinda, keep up the good work and study hard:
"As far as the tx/rx combo they are only for the Japan market."

"As far as the tx/rx combo they are only for the Japan market."
 03-27-2015, 05:54 PM
#27
Senior Member
Thread Starter
Join Date: Feb 2015
Location: Quakertown PA
Posts: 421
Likes: 0
Received 0 Likes
on
0 Posts
03-28-2015, 08:42 AM
#28
Senior Member
Thread Starter
Join Date: Feb 2015
Location: Quakertown PA
Posts: 421
Likes: 0
Received 0 Likes
on
0 Posts
Hey Everyone
Update 3. Let me know if you want these videos shorter, longer, or anything. I do these for you. More or less, It's up to you. Enjoy
https://www.youtube.com/watch?v=OelNBJA6bQs&feature=youtu.be Bill
Update 3. Let me know if you want these videos shorter, longer, or anything. I do these for you. More or less, It's up to you. Enjoy
https://www.youtube.com/watch?v=OelNBJA6bQs&feature=youtu.be Bill
03-28-2015, 12:25 PM
#29
Senior Member
Thread Starter
Join Date: Feb 2015
Location: Quakertown PA
Posts: 421
Likes: 0
Received 0 Likes
on
0 Posts
Ok everyone. This is not an update. this is a call for help. please watch and if you ahev any expierence with this or have a asolution please let me know.
https://www.youtube.com/watch?v=-0zcrchjOrc&feature=youtu.be
https://www.youtube.com/watch?v=-0zcrchjOrc&feature=youtu.be
03-28-2015, 12:45 PM
#31
Senior Member
Thread Starter
Join Date: Feb 2015
Location: Quakertown PA
Posts: 421
Likes: 0
Received 0 Likes
on
0 Posts
Nope no throttle lock out. I just tried it again to see if maybe that was the problem Both stick positions in case i had something reversed. No luck there. The search continues.
03-28-2015, 01:06 PM
#32
Senior Member
Thread Starter
Join Date: Feb 2015
Location: Quakertown PA
Posts: 421
Likes: 0
Received 0 Likes
on
0 Posts
OK so every one point and laugh at Bill!!!
Herman you were right. I'm just dumb. there is a throttle lockout on the tank. What i didn't realize was that to disengage the throttle lock you had to move the trim all the way down then give the tank 100% reverse to disengage it. She LIVES!!!
Thank you again Herman you just saved me from a fate worse then death. (leaving my cave and spending time with the wife ) Kidding, but seriously thank you
Herman you were right. I'm just dumb. there is a throttle lockout on the tank. What i didn't realize was that to disengage the throttle lock you had to move the trim all the way down then give the tank 100% reverse to disengage it. She LIVES!!!
Thank you again Herman you just saved me from a fate worse then death. (leaving my cave and spending time with the wife
) Kidding, but seriously thank you
03-29-2015, 03:45 AM
#35

Join Date: Jan 2009
Location: King,
NC
Posts: 1,567
Likes: 0
Received 0 Likes
on
0 Posts
There is another way to activate the tracks too. During set up, when you are to move the stick all the way down, only go 3/4 of the way down. After set up when you do go all the way it will disengage the lockout without having to mess with the trim tab.
03-29-2015, 07:00 AM
#36
Senior Member
Thread Starter
Join Date: Feb 2015
Location: Quakertown PA
Posts: 421
Likes: 0
Received 0 Likes
on
0 Posts
Good tip. I might give it a shot after I get everything in place.
ON that note got alot done last night. I will be posting another update this morning.
ON that note got alot done last night. I will be posting another update this morning.
03-29-2015, 07:25 AM
#37
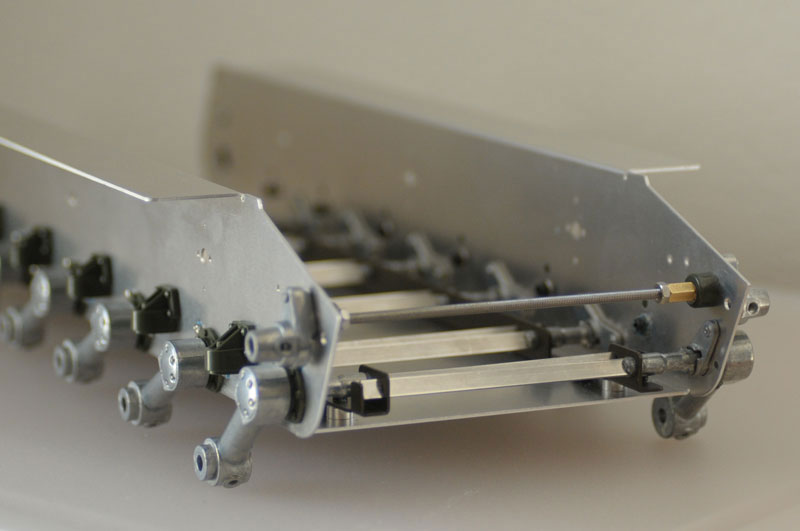
Bill, I recommend a turnbuckle or metal bar to go between the return idler mounts on both sides up front. The thickness of the hull here is no different from elsewhere, yet it has to withstand a lot more stress, carrying the track on their return run, as well as bearing the brunt of collisions with rocks and terrain. A long metric threaded shaft and a few nuts would do the trick bracing up the front by tying both sides together, kind of like the solution that Impact created for the KV-1 (you can't use this plug-and-play as the hull widths are different between the KV and the JS though), this picture I borrowed from Pcomm from a thread from another forum.
03-29-2015, 07:51 AM
#38
Senior Member
Thread Starter
Join Date: Feb 2015
Location: Quakertown PA
Posts: 421
Likes: 0
Received 0 Likes
on
0 Posts
Not a bad idea I think that what I'll end up doing is get a pice of metal and span it between the mounting posts of the lower glacious. I already have a mounting point there and it should just take a few screws. That would effectivly give the front a solid piece of metal to brace the front. Good call.
03-29-2015, 07:56 AM
#39
Senior Member
Thread Starter
Join Date: Feb 2015
Location: Quakertown PA
Posts: 421
Likes: 0
Received 0 Likes
on
0 Posts
Hey everyone.
Here you go update 4
Enjoy
https://www.youtube.com/watch?v=7dozDur-sV4&feature=youtu.be Bill
Here you go update 4
Enjoy
https://www.youtube.com/watch?v=7dozDur-sV4&feature=youtu.be Bill
03-29-2015, 08:54 AM
#40

I hear ya regarding bending back the torsion bar to set. I've done it on the JS-2, the T1 and Panther and every single time I cringe. It doesn't hurt the spring steel, but it sure feels like it should.
Just throwing one other thing out there besides adding weight to the turret back (if you haven;t closed it up yet). If you look underneath the turret overhang, you'll find a small round. I drilled that out to allow access to the TBU base screw in case you even want to pull it. You'll have a tough time reaching the rear screw once you glue the turret together. Think about it, even if you may want to do it in the future, you can organize the weights to still allow access.
Sinkers are a good idea, I usually fill the turret backs with steel BBs embedded in epoxy. It not only counters barrel weight (big on the JS-2 especially) but helps the turret sit better during rotation. The Pz IV turret is so light it rides up without it.
03-29-2015, 03:59 PM
#43
Senior Member
Thread Starter
Join Date: Feb 2015
Location: Quakertown PA
Posts: 421
Likes: 0
Received 0 Likes
on
0 Posts
ALL RIGHT EVERYONE HERE IT IS THE JS-2!!!
https://www.youtube.com/watch?v=7-MM9BlpUlA&feature=youtu.be This is completely stock. Nothing except for adding bearing to the roadwheels has been modified from the build guide. I can see changing the elevation, turret rotation out to servo. I hear it isn't to difficult and that there are a couple of guys out there that sell kits for it. So I'll probably look into that before to long. The elevation does stick a bit going up and down.
Now there are still things that need to be done.
1. clean up the wiring. it looks like a cat ate a barn of yarn then threw up inside.
2. The caps for the road wheels and return rollers haven't been put on yet as well as the cap for the sprocket.
3. The battery connection needs to be changed out to the tx-60's that I use.
4. PAINT, PAINT, PAINT. This is probably The part that i am least looking forward to honestly. I'm not the best painter, in fact I haven't painted anything in years. I'm not sure what color scheme I want and I haven't researched different ones yet either. all I can say is that when I do get the paint finished and i post it up, please be genlte it my first time. (Thats what she said).
Ok well thats it for now I hope you enjoyed.
AUSF that 's a pretty good idea about putting holes in to get to the apple electronics. Wish I had seen that before I buttoned up. Ohh well I'll get around to that soon enough.
https://www.youtube.com/watch?v=7-MM9BlpUlA&feature=youtu.be This is completely stock. Nothing except for adding bearing to the roadwheels has been modified from the build guide. I can see changing the elevation, turret rotation out to servo. I hear it isn't to difficult and that there are a couple of guys out there that sell kits for it. So I'll probably look into that before to long. The elevation does stick a bit going up and down.
Now there are still things that need to be done.
1. clean up the wiring. it looks like a cat ate a barn of yarn then threw up inside.
2. The caps for the road wheels and return rollers haven't been put on yet as well as the cap for the sprocket.
3. The battery connection needs to be changed out to the tx-60's that I use.
4. PAINT, PAINT, PAINT. This is probably The part that i am least looking forward to honestly. I'm not the best painter, in fact I haven't painted anything in years. I'm not sure what color scheme I want and I haven't researched different ones yet either. all I can say is that when I do get the paint finished and i post it up, please be genlte it my first time
. (Thats what she said).Ok well thats it for now I hope you enjoyed.
AUSF that 's a pretty good idea about putting holes in to get to the apple electronics. Wish I had seen that before I buttoned up. Ohh well I'll get around to that soon enough.
03-29-2015, 07:00 PM
#46
Bill, just a quick tip on painting. Take as much as possible back apart. Know you don't want to hear that! For sure get the barrel back out and take the road/return wheels off. As well as
sprockets. If your going to primer first, especially the metal parts I've had good luck with krylon ruddy brown. As for the more unique russian green everyone will tell you what they had success with, I've even done a base with Tamiya spray lacquer TS-9 british green and after a nice black wash it looked pretty good. Don't kill yourself on paint. After a weekend or 2 at Danille it
all disappears under the clay dust anyways. Looks like you had fun with assembly, now go reintroduce yourself to your family as they probably haven't seen you in days with the speed you
put this sucker together.
03-29-2015, 07:18 PM
#47
You could also look into some of the tamiya weathering kits. I always called it tamiya makeup. Not bad for doing stuff like exhaust, worn paint areas, etc. Just rub the included sponge wand on a color and apply to edges of surface. Works pretty good.
http://www.ebay.com/itm/New-Tamiya-W...item5b0ef35f27
http://www.ebay.com/itm/New-Tamiya-W...item5b0ef35f27
03-30-2015, 12:13 AM
#48


Great build, fun to watch and follow. I love the engine sound and possibilety to 'rev'
About Paint. Here are a few photos of my HL kv. I did it With the AK 4BO set and vallejo Russian green ( 71 017 ) .
it's ready for airbrush( I use the cheapes HK one) and it spray's on rather good. All the brands have some sort of 'set's' these day's so it bee vallejo, AK , ammo(mig) ore what ever, you'll find something
03-30-2015, 12:35 AM
#49
Senior Member

Join Date: Jan 2015
Location: Fresno, CA
Posts: 151
Likes: 0
Received 0 Likes
on
0 Posts
