


Help with Tx, receiver, and Tamiya set up
 05-03-2015, 10:09 AM
#1

Thread Starter
Join Date: Jun 2011
Location: Charlotte, NC
Posts: 558
Likes: 0
Received 0 Likes
on
0 Posts
Electronics make my head hurt.
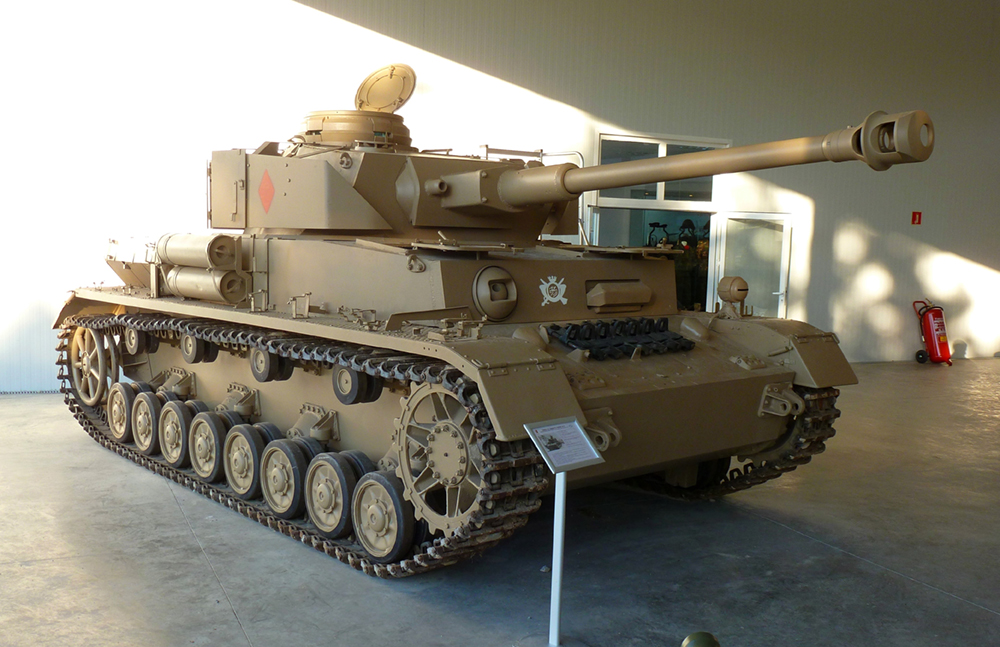
I have a used Tammy PIV and an older Spektrum Dx6 with a BR6000 receiver
The elevation has a servo installed
The previous owner unplugged the DMD from the receiver, so I am not sure what goes where
(I used a Futaba 4 channel for my other 2 tanks, so set up was easy plug and play)
The receiver has 7 open slots
Bat
Thr
Aile
Ele
Rud
Ger
Aux
The Tammy PIV Manual lists the channels as
Rudd Ch 1
Throt Ch2
M Gun Ch3
Turr Ch4
Since the order of the Spektrum receiver and the Tammy channels are in a different order, I am confused.
Where do I plug them in?
(Let's assume that they used the default set up with turret/elevation on left stick and throttle/steer on right.)
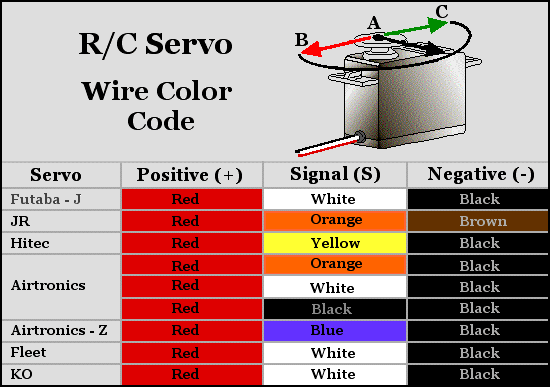
Also, this is a dumb question, but what color wire on the channel plugs are pos or neg?
The receiver does not have slots for the tabs on the channel plugs.
Originally there was a Pico Switch installed, which I have, but probably won't install.
I believe the Pico is like a kill switch?
Any help is appreciated.
I have a used Tammy PIV and an older Spektrum Dx6 with a BR6000 receiver
The elevation has a servo installed
The previous owner unplugged the DMD from the receiver, so I am not sure what goes where
(I used a Futaba 4 channel for my other 2 tanks, so set up was easy plug and play)
The receiver has 7 open slots
Bat
Thr
Aile
Ele
Rud
Ger
Aux
The Tammy PIV Manual lists the channels as
Rudd Ch 1
Throt Ch2
M Gun Ch3
Turr Ch4
Since the order of the Spektrum receiver and the Tammy channels are in a different order, I am confused.
Where do I plug them in?
(Let's assume that they used the default set up with turret/elevation on left stick and throttle/steer on right.)
Also, this is a dumb question, but what color wire on the channel plugs are pos or neg?
The receiver does not have slots for the tabs on the channel plugs.
Originally there was a Pico Switch installed, which I have, but probably won't install.
I believe the Pico is like a kill switch?
Any help is appreciated.
 05-03-2015, 10:38 AM
#2
Senior Member
Join Date: Feb 2015
Location: Quakertown PA
Posts: 421
Likes: 0
Received 0 Likes
on
0 Posts
Here's a quick video to hopefully explain the hook up to a receiver that has more than 4 channels on it. If not let me know and I'll see what I can do.
https://www.youtube.com/watch?v=ZFc2VPyFC0s&feature=youtu.be Now i got lucky and that is just how mine happened to line up. Sometimes Ch2 and Ch4 have to be swapped around.
Bill
https://www.youtube.com/watch?v=ZFc2VPyFC0s&feature=youtu.be Now i got lucky and that is just how mine happened to line up. Sometimes Ch2 and Ch4 have to be swapped around.
Bill
Last edited by sergeantseabass; 05-03-2015 at 10:44 AM.
05-03-2015, 12:29 PM
#3
Thread Starter
Join Date: Jun 2011
Location: Charlotte, NC
Posts: 558
Likes: 0
Received 0 Likes
on
0 Posts
Wow, thanks for the video Bill.
One difference between our receivers is the slots on mine are not numbered, just labeled as I said above.
Another difference is the slots are vertical, so they plug in from the top.
There are just + and – and pulse symbols indicating polarity.
So I have to go by color of the wire.
Knowing the polarity of the hi-tec wire colors is helpful also.
The elevation servo uses those colors.
I'll give it a try and let you know.
05-03-2015, 12:41 PM
#4
Senior Member
Join Date: Feb 2015
Location: Quakertown PA
Posts: 421
Likes: 0
Received 0 Likes
on
0 Posts
OK lets see if this gives you a bit of help as far as channel goes
The receiver has 7 open slots
Bat= Not used
Thr = CH1
Aile = CH2
Ele = CH3
Rud = CH4
Ger = CH5
Aux = CH6
As far as the indicators of the servos go. the diagram should have the + in the middle with the - and signal on either end. White or Yellow depending on Hitec or Futaba will be your signal. I have a futaba set like that. In that case the signal is the closest to the center of the box.
hope that helps.
Bill
05-03-2015, 05:24 PM
#5

Dave, other option is to just buy another 2.4 futaba RX and go with what you know. Servo elevation will still work with a "Y" cable out of the RX and a servo hold/rate reducer.
Just an idea if you don't want to bother or have multiple TX's.
http://dionysusdesign.com/product_in...74bc22aeea59a4
http://www.ebay.com/itm/NEW-Futaba-R...item4d21f9a5a6
Just an idea if you don't want to bother or have multiple TX's.
http://dionysusdesign.com/product_in...74bc22aeea59a4
http://www.ebay.com/itm/NEW-Futaba-R...item4d21f9a5a6
05-03-2015, 07:20 PM
#6
Thread Starter
Join Date: Jun 2011
Location: Charlotte, NC
Posts: 558
Likes: 0
Received 0 Likes
on
0 Posts
Thanks Brett.
I really struggled trying to make servo elevation work on Pershing using my Futaba 4YF.
I followed a tutorial on the HEAT site when it was active.
I used a Y connector, and even ordered the special super duper photo rate reducer thingy.
No matter what I did, either the servo always 'hopped' when I fired, or the elevation/supression sound would not stop so it would not fire.
Anyway, this PIV is James S N's old rig, so I was hoping it would all be set up and ready to go with the servo elevation.
But so far, I've run into a few snags.
Since he is kinda incognito these days, I can't go to him for answers.
1st, the elevation was not working.
I had it plugged directly into channel 5.
Does it still need a Y connector?
All the plugs were pulled from the Receiver when I got it, so I don't know how it was originally set up.
I did come with a PicoSwitch, which is some kinda relay switch, but I did not install it.
http://www.dimensionengineering.com/products/picoswitch
I have no idea what it was for.
Dana thought it was a kind of kill switch.
It is set up kinda like a Y.
It has a female lead coming off the board, and then a male to female 6 in extension with the orange wire spliced into the board.
Any thoughts?
2nd, According to Dana and Leong, the battery that came with the Tx would not hold a charge.
So, I ordered a new pack and after installing, the transmitter started beeping at me after like 5 min.
I checked the battery, and the charge was well within the safe level.
I am recharging now again anyway, to eliminate that possibility.
Also, do you know if the PIV has sound for the traverse and elevation?
Cause this was doesn't.
05-03-2015, 07:53 PM
#7

The Tamiya Pz4J does not have sound for turret traverse or elevation-depression, because both were manually operated. I believe I read that in the Tamiya kit instructions, but never researched the statement to know if it was true or not. Anyway, no sound per Tamiya.
John
John
05-03-2015, 08:16 PM
#8
No sound for elevation, traverse. I believe the pico switch is for the tank to "turn off" when you turn the TX off. I've never dealt with them but believe the idea is if the RX loses signal
or power the last functions inputted are used. So if you're full throttle and turn off the TX, tank is rolling at full speed. I now remember your problems with messing around with servo
elevation. I know what your saying on the elevation sound not ending so you can't fire, but the camera hold module stops this issue. If your just using a rate reducer to slow the servo
this doesn't solve it, just slows the servo. You have to hold the servo positon (and your input via TX) to not get the elevation input and block firing. I've used the camera postion controller on
various tanks and my bazooka dude and it holds the position of the servo just like your using a tammy. In other words, push up/down on your stick to move elevation and when you let go and stick
goes back to neutral, barrel holds at moved to positon and no sound from MF.
Last edited by TheBennyB; 05-03-2015 at 08:19 PM.
05-03-2015, 08:19 PM
#9
Thread Starter
Join Date: Jun 2011
Location: Charlotte, NC
Posts: 558
Likes: 0
Received 0 Likes
on
0 Posts
I know that the real PIV dropped the traverse motor between the H and the J.
Hence the disappearance of the exhaust looking thingy on the right side of this H below.
Hence the disappearance of the exhaust looking thingy on the right side of this H below.
05-03-2015, 08:29 PM
#10
Thread Starter
Join Date: Jun 2011
Location: Charlotte, NC
Posts: 558
Likes: 0
Received 0 Likes
on
0 Posts
Brett
Like I said at the beginning of this thread, electronics make my head hurt.
I tried the camera hold module, (as you tried to lead me through this once before) but to no avail.
I got frustrated and sold all the old delay/hold modules and servos.
Again, the Y and the hold module are only if I'm using a 4 channel right?
Shouldn't it work without them on it's own channel on the Dx6?
05-03-2015, 08:30 PM
#11
Turret traverse exhaust was on rear hull next to motor exhaust. Remember reading about those cylinders years back, something experimental (rapid refueling, compartment air scrubbers, piss distillers....can't remember.
05-03-2015, 08:49 PM
#12
Brett
Like I said at the beginning of this thread, electronics make my head hurt.
I tried the camera hold module, (as you tried to lead me through this once before) but to no avail.
I got frustrated and sold all the old delay/hold modules and servos.
Again, the Y and the hold module are only if I'm using a 4 channel right?
Shouldn't it work without them on it's own channel on the Dx6?
Like I said at the beginning of this thread, electronics make my head hurt.
I tried the camera hold module, (as you tried to lead me through this once before) but to no avail.
I got frustrated and sold all the old delay/hold modules and servos.
Again, the Y and the hold module are only if I'm using a 4 channel right?
Shouldn't it work without them on it's own channel on the Dx6?
05-04-2015, 04:12 AM
#15
Thread Starter
Join Date: Jun 2011
Location: Charlotte, NC
Posts: 558
Likes: 0
Received 0 Likes
on
0 Posts
Well, I could not sleep last night and spent some quality time with the Tx and the only manual I could find online.
I have a slightly better sense of how it works, especially what channels connect to which functions on the DMD.
They are different from what Bill had posted, and the Tammy manual.
On my Spektrum the Aileron and Elevator are on the right stick, and Throttle and Rudder are on the left.
Here's what worked:
Receiver - DMD
Bat - unused
1. Thr - M Gun Ch3 (elevation/fire) - left stick
2. Aile - Rudd Ch1 (steering) - right stick
3. Ele - Throt Ch2 (forward/reverse) - right stick
4. Rud - Turret Ch4 (traverse) - left stick
5. Ger - unused
6. Aux - unused
I went through all the settings and wrote them down.
Nothing really jumped out at me in terms of settings for the channel controlling M Gun.
After I reset them back to factory settings, I was able to get all the standard functions to work, including an old Tammy elevation unit.
However, the aftermarket fire button did not work at all, only the stock method worked. (trim down, stick down)
The only way the servo elevation worked is directly attached to the M Gun channel.
But then of course, the gun does not fire.
Which proves Brett's point that the channel needs to be split.
The mystery to me is why the fire button does not work, even in stock setup.
It could have been assigned/wired into channels 5 or 6?
I'll keep playing and give an update.
05-04-2015, 05:34 AM
#16
They are air intake filters for the engine/carbs. They saw a need for them on the long marches through the Russian stepp. Lots of dust created by tracked vehicles on the march.
05-04-2015, 05:48 AM
#17
Senior Member

Join Date: Nov 2006
Location: Grande Prairie,
AB, CANADA
Posts: 8,976
Likes: 0
Received 4 Likes
on
4 Posts
Servo Elevation
This is the main reason I push the HK T6A radio. Channels 5 and 6 are controlled by proportional rotary nobs. Just plug in your servo and you have nice smooth elevation control right from your receiver. There are now numerous systems that have this feature, and are better suited to tanks then the radios that have been traditionally built for aircraft.
This is the main reason I push the HK T6A radio. Channels 5 and 6 are controlled by proportional rotary nobs. Just plug in your servo and you have nice smooth elevation control right from your receiver. There are now numerous systems that have this feature, and are better suited to tanks then the radios that have been traditionally built for aircraft.
05-04-2015, 06:12 AM
#18
Dave, when you hit the fire button do you see any function happen? You can then isolated what channel it's wired or progammed into and can get into reassigning it to the channel being used
for elevation.
for elevation.
05-04-2015, 06:15 AM
#19
Sorry I could not help yesterday, I was having RC Universe log-in issues.
It sounds like you have a Mode 2 transmitter where throttle channel is on the left side. Mode 1 transmitters have their throttle channel on the right side stick. On some high-end radios this can be switched, but for the lower end radios this is hardwired.
If you prefer a Mode 1 configuration, you can consider doing this:
http://www.wattflyer.com/forums/show...4&postcount=16
If you have problems deciphering the menu abbreviations:
http://www.spektrumrc.com/Products/D...0#prod_manuals
Have you tried plugging in a servo to the unused channels and pressing the fire button to see if that makes the servo move?
This servo wiring diagram should be helpful:
05-04-2015, 07:25 AM
#20
Thread Starter
Join Date: Jun 2011
Location: Charlotte, NC
Posts: 558
Likes: 0
Received 0 Likes
on
0 Posts
YHR - I would not have picked this radio, it just came as a 'bonus' to sweeten the pot.
MAUS45- OK so I mixed up the filter for the turret rotation motor, but do I get partial credit for knowing that it was dropped between H and J?
Leong - Thanks for the info. There are too many disclaimers at the beginning of the thread to convert to Mode 1 for my electrophobia to consider it at this point.
I seemed to achieve the same result (drive on right stick, turret/gun on left) by rearranging the plug order of the channels on the receiver.
However, if that is the source of this issue, then I'll reconsider.
Benny- Yes and no - I will have to go back tonight to figure out where and when.
As I was trying to figure out which channel went where, I tried a few different arrangements.
I remember sometimes the servo jumped when I pressed the fire button, but that was all that happened, no sound and no flash.
Sometimes nothing happened at all.
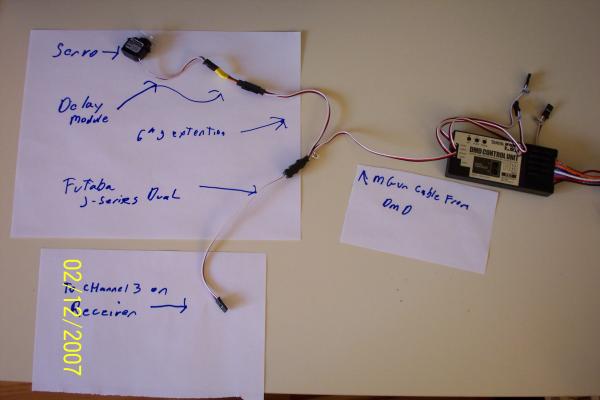
Here is the diagram I was using when I was trying to install a servo on my pershing using a 4YF.
The only difference was I used the camera hold module instead of a delay.
Would it be the same setup?
This setup refused to work for me.
The most common result was that the servo would 'jump' when I fired, sending my IR beam a sunder.
One other variable here is the Spektrum has one of Randy's VBT chips installed.
But it can be turned off independently, so the fire button functions with out them.
I also have them on my 4YF's.
MAUS45- OK so I mixed up the filter for the turret rotation motor, but do I get partial credit for knowing that it was dropped between H and J?
Leong - Thanks for the info. There are too many disclaimers at the beginning of the thread to convert to Mode 1 for my electrophobia to consider it at this point.
I seemed to achieve the same result (drive on right stick, turret/gun on left) by rearranging the plug order of the channels on the receiver.
However, if that is the source of this issue, then I'll reconsider.
Benny- Yes and no - I will have to go back tonight to figure out where and when.
As I was trying to figure out which channel went where, I tried a few different arrangements.
I remember sometimes the servo jumped when I pressed the fire button, but that was all that happened, no sound and no flash.
Sometimes nothing happened at all.
Here is the diagram I was using when I was trying to install a servo on my pershing using a 4YF.
The only difference was I used the camera hold module instead of a delay.
Would it be the same setup?
This setup refused to work for me.
The most common result was that the servo would 'jump' when I fired, sending my IR beam a sunder.
One other variable here is the Spektrum has one of Randy's VBT chips installed.
But it can be turned off independently, so the fire button functions with out them.
I also have them on my 4YF's.
05-04-2015, 09:23 AM
#21
Senior Member
Join Date: Nov 2006
Location: Grande Prairie,
AB, CANADA
Posts: 8,976
Likes: 0
Received 4 Likes
on
4 Posts
The Radios from HK, both the Hobby king brand and Turnigy, are cheap to buy but full of features. The T6A is as programmable and adaptable as any radio out there, and it cost lest the $30. The mode is a program set up change and you can make it Mode 1,2,3,or 4. For tanks the risk of a glitch causing a loss of your model is not in the cards or should it be part of the risk matrix when choosing what to buy. Mulitple featured radio's that can do everything no longer have to cost you a pile of money, and in fact are cheaper then the less desirable factory radios that come with these tanks. To many times I hear features being equated to more expensive, and that just isn't the case any more.
Sorry kind of off topic and I apologize.
Sorry kind of off topic and I apologize.
05-04-2015, 10:59 AM
#22
YHR - I would not have picked this radio, it just came as a 'bonus' to sweeten the pot.
MAUS45- OK so I mixed up the filter for the turret rotation motor, but do I get partial credit for knowing that it was dropped between H and J?
Leong - Thanks for the info. There are too many disclaimers at the beginning of the thread to convert to Mode 1 for my electrophobia to consider it at this point.
I seemed to achieve the same result (drive on right stick, turret/gun on left) by rearranging the plug order of the channels on the receiver.
However, if that is the source of this issue, then I'll reconsider.
Benny- Yes and no - I will have to go back tonight to figure out where and when.
As I was trying to figure out which channel went where, I tried a few different arrangements.
I remember sometimes the servo jumped when I pressed the fire button, but that was all that happened, no sound and no flash.
Sometimes nothing happened at all.
Here is the diagram I was using when I was trying to install a servo on my pershing using a 4YF.
The only difference was I used the camera hold module instead of a delay.
Would it be the same setup?
This setup refused to work for me.
The most common result was that the servo would 'jump' when I fired, sending my IR beam a sunder.
One other variable here is the Spektrum has one of Randy's VBT chips installed.
But it can be turned off independently, so the fire button functions with out them.
I also have them on my 4YF's.
all on a self centering stick. Before the camera hold module was out, I still used just a delay module to slow the servo, but had to essentially do an elevation sweep shot to fire. I'd bring the barrel above/below to where I wanted to shoot, then let go of the stick while firing to hopefully have my IR "fall/raise" onto my target.
Last edited by TheBennyB; 05-04-2015 at 11:03 AM.
05-04-2015, 01:43 PM
#23
Thread Starter
Join Date: Jun 2011
Location: Charlotte, NC
Posts: 558
Likes: 0
Received 0 Likes
on
0 Posts
Brett, Dude, we are both in a minefield.
We're dead.
I am trying to find a funny way of saying this, but I am too tired.
So, in my last post I wrote these exact words above the photo...
Here is the diagram I was using when I was trying to install a servo on my pershing using a 4YF.
The only difference was I used the camera hold module instead of a delay.
CAN YOU READ?!?!?
(Just pretend the underline bold italic font is a really loud and annoying computer tech voice with a lisp and a small spittle flew on your new guayabera shirt)
That photo is from 2007, and I have no idea who wrote the original post.
I got it off the HEAT site a few years ago.
This time imagine a low pitched jovial voice...
Last time when you told me about the photo delay module, I bought it, and I tried it.
I think I tried it with a self centering stick and without.
I think when I tried it without the self-centering, the elevation noise ran continuously.
I think when I tried it with a self centering, the servo/barrel jumped when I fired, like it was getting a jolt of juice.
I think I also tried it with one delay, and even maybe two delay modules in sequence with the photo delay.
I think.
I think.
I think I really don't know what I was doing wrong, or maybe I was over-thinking/over-analyzing it.
All I can really remember is that we pretty much had this same exact conversation before.
And I sold all that stuff out of frustration.
05-04-2015, 01:50 PM
#24
Thread Starter
Join Date: Jun 2011
Location: Charlotte, NC
Posts: 558
Likes: 0
Received 0 Likes
on
0 Posts
So right now, the Tx does not have a self centering stick on the left.
I will try putting the servo in unused channels (which I'm pretty sure I already did) and write down what happens.
Cause I'm too tired to remember.
I will try putting the servo in unused channels (which I'm pretty sure I already did) and write down what happens.
Cause I'm too tired to remember.
05-04-2015, 04:33 PM
#25
Senior Member
Join Date: Feb 2015
Location: Quakertown PA
Posts: 421
Likes: 0
Received 0 Likes
on
0 Posts
Well sorry I wasn't any real help on the wiring issue that your going through. Although something Leong said did strike something. If you have a Mode 1 transmitter then the fire switch might be wired up for Mode 1. So essentially it could be wired up on the right stick if that is how the previous owner used the tank. But like Brett said besides opening up the Tx and tracing the wires, the only other option is to plug in some like just a single servo and test the switch on changing out the servo after every unsucessful try until you find the channel that it is wired to. I know that isn't to much of a help but it's all I could up with.
Bill
Bill

