


3D Printed 1/16th FV101 Scorpion


 05-23-2016, 03:19 PM
#177

Join Date: Nov 2010
Location: HamiltonWaikato, NEW ZEALAND
Posts: 937
Likes: 0
Received 78 Likes
on
55 Posts
A catch up
Prepped the vehicle for painting - applied masking tape


Then noticed I had a few more parts to add - fire extinguishes, grenade boxes, turret side bins, long hull side bin, gun travel lock, filled some gaps with glue


Painting - Tamiya surface primer rattle can


Mal
Prepped the vehicle for painting - applied masking tape
Then noticed I had a few more parts to add - fire extinguishes, grenade boxes, turret side bins, long hull side bin, gun travel lock, filled some gaps with glue
Painting - Tamiya surface primer rattle can
Mal
05-23-2016, 03:26 PM
#178
Join Date: Nov 2010
Location: HamiltonWaikato, NEW ZEALAND
Posts: 937
Likes: 0
Received 78 Likes
on
55 Posts
Partially reassembled, the primer really brought out the texture 


Did a bit of sanding, however a lot of the texture is in hard to get a places


 Added the gun
  Did more work on the tracks, gluing pads, hard to contain the excitement, so no pics of that.
Mal
Did a bit of sanding, however a lot of the texture is in hard to get a places
Mal
05-23-2016, 03:27 PM
#179

Join Date: Nov 2011
Location: Fort ErieOntario, CANADA
Posts: 161
Likes: 0
Received 0 Likes
on
0 Posts
05-23-2016, 03:49 PM
#181
Thread Starter
Join Date: Mar 2009
Location: Saint Paul, MN
Posts: 288
Likes: 0
Received 0 Likes
on
0 Posts
Looking really good!
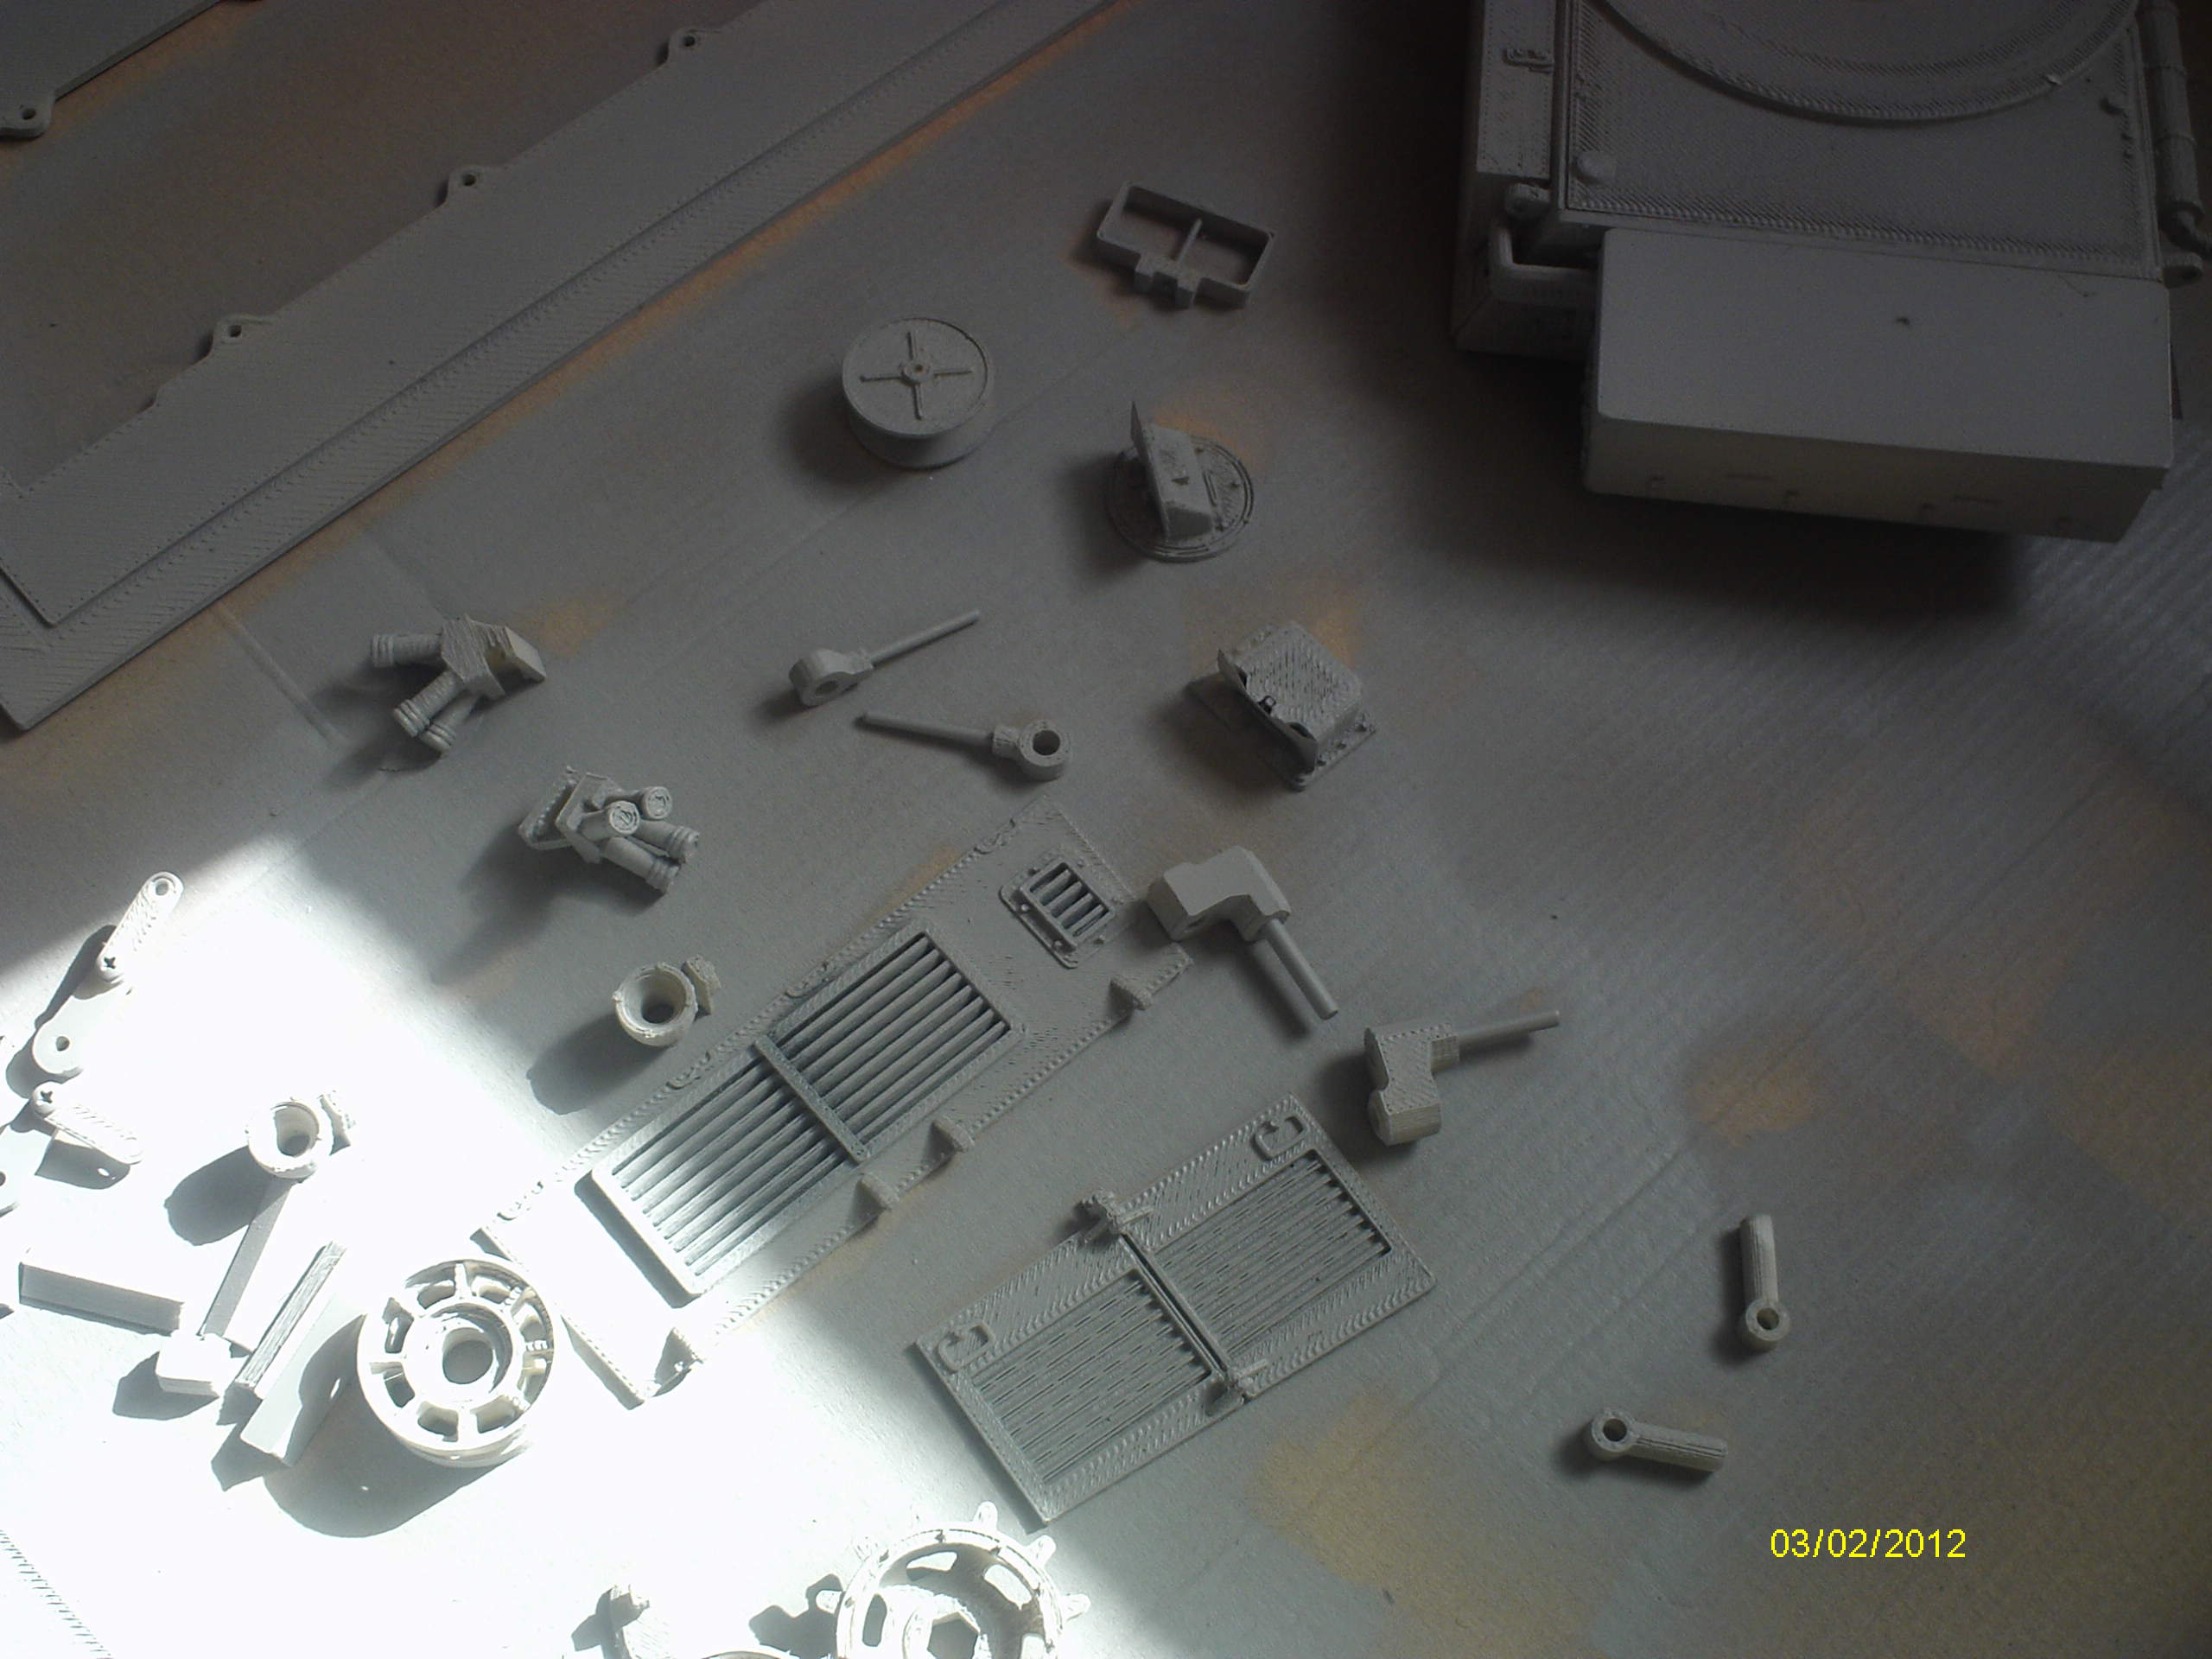
Yeah the surface finish comes out after you paint it, it looks really rough but its easy to clean up. I opted to slightly over-extrude in my printers because its easier to file/sand then it is the fill. Still looks like a few panels had some gaps to be filled though. I might think about printing the kits in another color in the future. The semi-transparent natural cream color doesn't show many of the imperfections until after you paint it. The solid opaque colors you can print in will show them up right away, might help to clean the whole model up before any paint. Maybe grey or white plastic in the future...
Yeah the surface finish comes out after you paint it, it looks really rough but its easy to clean up. I opted to slightly over-extrude in my printers because its easier to file/sand then it is the fill. Still looks like a few panels had some gaps to be filled though. I might think about printing the kits in another color in the future. The semi-transparent natural cream color doesn't show many of the imperfections until after you paint it. The solid opaque colors you can print in will show them up right away, might help to clean the whole model up before any paint. Maybe grey or white plastic in the future...
05-23-2016, 04:00 PM
#182
Join Date: Nov 2010
Location: HamiltonWaikato, NEW ZEALAND
Posts: 937
Likes: 0
Received 78 Likes
on
55 Posts
Hi Moo
What tool do you use to get in the hard to get places? I used the sander option on my multi tool, plus sanding sticks, but they're too large for a lot of the places & didn't want to erase detail- like bolts etc.
Re new materials, Shapeways have started using black HD Acrylate which looks interesting - http://www.shapeways.com/blog/archiv...0160404-Trains- -
Mal
06-05-2016, 08:20 PM
#186
Join Date: Nov 2011
Location: Fort ErieOntario, CANADA
Posts: 161
Likes: 0
Received 0 Likes
on
0 Posts
Thank You very much
Wayne
06-06-2016, 04:15 PM
#187
Join Date: Nov 2010
Location: HamiltonWaikato, NEW ZEALAND
Posts: 937
Likes: 0
Received 78 Likes
on
55 Posts
Hi Guys
Been a bit remiss, meant to post last week, but had a few days off work with a cold.
Got some more painting done - brushwork this time, Humbrol 81


 Turret bin interiors - Humbrol 159, Turret bin lid interiors - Humbrol 33
Mal
Been a bit remiss, meant to post last week, but had a few days off work with a cold.
Got some more painting done - brushwork this time, Humbrol 81
Mal
06-06-2016, 04:41 PM
#188
Join Date: Nov 2010
Location: HamiltonWaikato, NEW ZEALAND
Posts: 937
Likes: 0
Received 78 Likes
on
55 Posts
Worked on the suspension this past weekend - idlers  Screwing in the bolt was very tight, so used this set up for leverage

 Found that it's important to ID the correct bolts - M4 X 20mm for the idlers, if you use the road wheel bolts M4 X 18mm, you run out of thread to engage the track tensioner

 Fitted tyres to the road wheels, bearings to the inner road wheels & more tyres to the B sprockets (noise reduction) - not glued at this stage
 Idler fitted
 Bearings fitted to final drive, linkage to 1st & 5th wheel stations
 added tensioner to other side, but fitted it upside down
 linkages screwed in
  More road wheels fitted, had an issue with my hex driver, was stripping out due to the pressure, even though I used a tap & die set (4 X 0.7) to thread the 1st 4-5mm of each swing arm hole for the M4 X 18mm bolts
Worked on the GB
 This is the old (left) & new (right) versions, the new with separate back plates, allows for motors with different bolt spacings, it's also easier to access to fit the gears & other internal parts
 motors fitted to back plate
  complete
 Made periscopes for the main gunners & TC's sights
 Dremeled out the TC's hatch, it didn't look right just flat
 Drivers scope also glazed
 Headlight interiors painted silver.
Mal
Worked on the GB
Mal
06-06-2016, 07:15 PM
#189
Thread Starter
Join Date: Mar 2009
Location: Saint Paul, MN
Posts: 288
Likes: 0
Received 0 Likes
on
0 Posts
Mal that looks really cool so-far! Run across any major assembly issues? Will you be doing some weathering painting?
I've been working on a 3d printed conversion kit for this RC forklift: https://www.youtube.com/watch?v=s_lgaLlc4W4 I figured I should do a conversion kit for this before I actually make my own 3d printed forklift. I converted one of these forklifts a couple years ago to hobby RC stuff and it is actually a decent little machine. I'm going to make a kit to replace most of the inners with servos, mounting pieces for a steering servo, and tilting etc.
I also.... have been working with an Arduino trying to learn electronics. I want to make and sell an all-in-one circuit board that will go into the forklifts, to control all servos, lights, and even sounds. I have a working prototype pretty far along but I'm not sure when or even if I can pull it off yet, but it is exciting!
I'm kind of shocked but I still have not sold a single Scorpion kit since RCSparks uploaded that unboxing video! I still have 2 kits all ready to go on hand here if anyone is interested... That video is up to 250,000 views too!
https://www.youtube.com/watch?v=CXQbqNPCIIY
06-07-2016, 02:29 PM
#190
Join Date: Nov 2010
Location: HamiltonWaikato, NEW ZEALAND
Posts: 937
Likes: 0
Received 78 Likes
on
55 Posts
Hi Moo
No, no major issues so far, but thought that the surrounds for the swinging arms probably should have a locating lug - although I glued them in place, the pressure from screwing in the roadwheels bolts cracked the glue, so that the swingarms now have more travel.
Mal
No, no major issues so far, but thought that the surrounds for the swinging arms probably should have a locating lug - although I glued them in place, the pressure from screwing in the roadwheels bolts cracked the glue, so that the swingarms now have more travel.
Mal
06-23-2016, 02:43 AM
#191
Thread Starter
Join Date: Mar 2009
Location: Saint Paul, MN
Posts: 288
Likes: 0
Received 0 Likes
on
0 Posts
I've been hard at work trying to get the cost on the Scorpion kits down and I managed to knock another $50 off the total cost of the base kit. Anyone interested in ordering I have 1 kit in stock and ready to ship woo!
http://spykerworkshop.webs.com/scorpion-tank
http://spykerworkshop.webs.com/scorpion-tank
Last edited by TheGreatestMoo; 06-23-2016 at 02:46 AM.
06-23-2016, 01:27 PM
#193
Thread Starter
Join Date: Mar 2009
Location: Saint Paul, MN
Posts: 288
Likes: 0
Received 0 Likes
on
0 Posts
Shipping to UK is about $50 I think. My website will auto calculate it during checkout. Import fees/taxes may apply though for the UK. The electronics are sold separately on my site for $160, you still need a controller also, Clark TK22 recommended. http://spykerworkshop.webs.com/scorpion-tank
06-25-2016, 03:53 PM
#195
Thread Starter
Join Date: Mar 2009
Location: Saint Paul, MN
Posts: 288
Likes: 0
Received 0 Likes
on
0 Posts
Awesome thanks! Any future orders will be about 1-2 weeks to ship out or less.
In that RC Sparks video of the Scimitar I used the T55 sound set from Clark. I'm not sure which others would sound good only tried 2. The 38(t) sound set was almost good but the turret rotation squeek sound was SO LOUD.
If you don't get the Tamiya IR apple, you need to at least get the IR programming set from Clark to be able to set the tank settings up. You don't need that if you get the apple. You do still need the TV remote control from Clark also. This part from Clark "IR Programming Line": http://clark-model.com/chi/prod_rx20/p_kit_s.jpg

 06-26-2016, 03:50 AM
#197

Join Date: Jan 2006
Location: Hamilton,
ON, CANADA
Posts: 1,422
Likes: 0
Received 7 Likes
on
7 Posts
Awesome thanks! Any future orders will be about 1-2 weeks to ship out or less.
In that RC Sparks video of the Scimitar I used the T55 sound set from Clark. I'm not sure which others would sound good only tried 2. The 38(t) sound set was almost good but the turret rotation squeek sound was SO LOUD.
If you don't get the Tamiya IR apple, you need to at least get the IR programming set from Clark to be able to set the tank settings up. You don't need that if you get the apple. You do still need the TV remote control from Clark also. This part from Clark "IR Programming Line": http://clark-model.com/chi/prod_rx20/p_kit_s.jpg
In that RC Sparks video of the Scimitar I used the T55 sound set from Clark. I'm not sure which others would sound good only tried 2. The 38(t) sound set was almost good but the turret rotation squeek sound was SO LOUD.
If you don't get the Tamiya IR apple, you need to at least get the IR programming set from Clark to be able to set the tank settings up. You don't need that if you get the apple. You do still need the TV remote control from Clark also. This part from Clark "IR Programming Line": http://clark-model.com/chi/prod_rx20/p_kit_s.jpg
06-26-2016, 02:37 PM
#198
Join Date: Nov 2010
Location: HamiltonWaikato, NEW ZEALAND
Posts: 937
Likes: 0
Received 78 Likes
on
55 Posts
An update
Decided I wasn't too struck on the printed engine hatch handles Added wire wipers to the drivers periscope
  Ground off the printed handles & added eye bolts
 side view
 did the same on the front hatch
  made hatch handles from brass rod
  added wire mirror wing arms
  started making my own drivers fire extinguisher
 added 3 X L section stowage supports - not glued as yet (some NZ vehicles had X 5)
  added metal tape to the mirrors


Added 'canvas' to the rear hull stowage box, still need to do the tie downs
Mal
Decided I wasn't too struck on the printed engine hatch handles
Added 'canvas' to the rear hull stowage box, still need to do the tie downs
Mal
06-27-2016, 07:27 PM
#199
Join Date: Nov 2010
Location: HamiltonWaikato, NEW ZEALAND
Posts: 937
Likes: 0
Received 78 Likes
on
55 Posts
Did a little more - intended to work on the fire extinguisher, but looked at the turret hatches instead, and [ATTACH]2170034[/IMG][ATTACH]2170035[/IMG] Both of these have foam liners - the thin foam sheet that comes wrapped around TV's & monitors - the grab handles are masking tape, doubled over & cut to width.
With the foam, will have to use acrylics to paint these, don't think they'll survive enamel.
The real ones [ATTACH]2170036[/IMG] in this pic the foam surround of the TC's hatch is cracked, and in colour [/IMG]
Mal
With the foam, will have to use acrylics to paint these, don't think they'll survive enamel.
The real ones [ATTACH]2170036[/IMG] in this pic the foam surround of the TC's hatch is cracked, and in colour [/IMG]
Mal
06-28-2016, 09:55 AM
#200
Join Date: Jan 2006
Location: Hamilton,
ON, CANADA
Posts: 1,422
Likes: 0
Received 7 Likes
on
7 Posts
Did a little more - intended to work on the fire extinguisher, but looked at the turret hatches instead, and [ATTACH]2170034[/IMG][ATTACH]2170035[/IMG] Both of these have foam liners - the thin foam sheet that comes wrapped around TV's & monitors - the grab handles are masking tape, doubled over & cut to width.
With the foam, will have to use acrylics to paint these, don't think they'll survive enamel.
The real ones [ATTACH]2170036[/IMG] in this pic the foam surround of the TC's hatch is cracked, and in colour [/IMG]
Mal
With the foam, will have to use acrylics to paint these, don't think they'll survive enamel.
The real ones [ATTACH]2170036[/IMG] in this pic the foam surround of the TC's hatch is cracked, and in colour [/IMG]
Mal
You're doing great with the attention to detail, we need more builds like this & of this vehicle.