


Sturmtiger / Sturmpanzer project
 07-29-2015, 01:57 PM
#1

Thread Starter
As I was sitting there looking at my Weasel project, I realized I wasn't in the mood to paint it yet. What could I do until I was in the mood? I need to have a project going at all times. Even if it is only preliminary reference photos and drawings that I can think about and plan on doing someday (maybe). As I searched around for ideas, I looked at the website for Mato and I noticed the only tank on their tank page that I don't have is their Sturmtiger. Gee .... Why don't I have it? Why don't I complete my Mato collection today?
Well, it's no longer available at Mato. Other websites have it but they want more $$$ than I am willing to pay for a tank I really don't want, don't need and won't use. So why do I want one? Well, because I don't have one --- that's the reason why I gotta get it! That kind of reasoning and justification makes perfect sense to me.
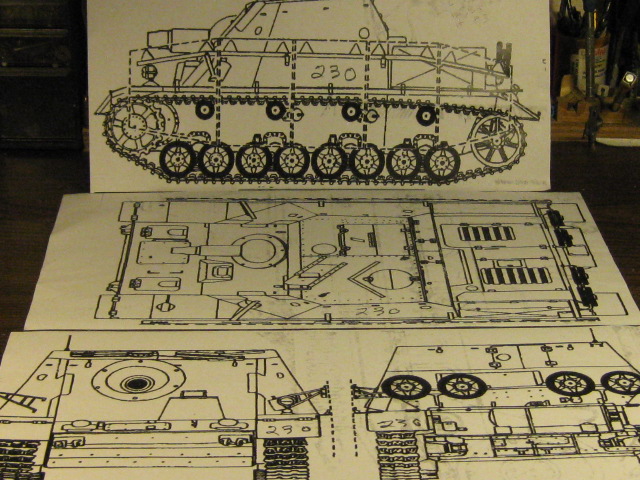
As I checked my spare parts boxes and junk boxes, I came across a basket case Tiger and a Panther that I tore up and looted the parts to use on some other project. Wow! I had the basic lower hull parts to make a Sturmtiger. I could scratch build the upper hull and could modify the Tiger engine deck to look good as well. The Tiger upper hull fits the Panther lower hull perfectly! I found some line drawings and scaled them up to 1/16. I was in business!!!!
Then I saw a photo of the Sturmpanzer. It was based on the lower hull of a Panzer IV F2, and for some reason I have two of those. One of them has happily agreed to become an organ donor for a Sturmpanzer Brummb�r project.. Great, that's just what I need ------ two projects at one time. I ordered a stripped upper hull from Mato, which can be modified to make the Brummb�r upper hull. My last parts order to Mato took over a month to get, so the Sturmpanzer project is on the back burner for now.
I'm going to try to do a decent and timely WIP on this, so here goes ......... The start of the Sturmtiger.


And the start of the Sturmpanzer ----- to be continued when the parts arrive.


rex
Well, it's no longer available at Mato. Other websites have it but they want more $$$ than I am willing to pay for a tank I really don't want, don't need and won't use. So why do I want one? Well, because I don't have one --- that's the reason why I gotta get it! That kind of reasoning and justification makes perfect sense to me.
As I checked my spare parts boxes and junk boxes, I came across a basket case Tiger and a Panther that I tore up and looted the parts to use on some other project. Wow! I had the basic lower hull parts to make a Sturmtiger. I could scratch build the upper hull and could modify the Tiger engine deck to look good as well. The Tiger upper hull fits the Panther lower hull perfectly! I found some line drawings and scaled them up to 1/16. I was in business!!!!
Then I saw a photo of the Sturmpanzer. It was based on the lower hull of a Panzer IV F2, and for some reason I have two of those. One of them has happily agreed to become an organ donor for a Sturmpanzer Brummb�r project.. Great, that's just what I need ------ two projects at one time. I ordered a stripped upper hull from Mato, which can be modified to make the Brummb�r upper hull. My last parts order to Mato took over a month to get, so the Sturmpanzer project is on the back burner for now.
I'm going to try to do a decent and timely WIP on this, so here goes ......... The start of the Sturmtiger.
And the start of the Sturmpanzer ----- to be continued when the parts arrive.
rex
 07-30-2015, 03:08 AM
#3
Both are assault vehicles used to destroy fixed fortifications... not Jagdtigers which was a tank killer. ")
You have MY attention Rex! I have a finished Tamiya Sturmtiger and a Profiline Brummb�r kit that is collecting dust. (LOL) Looking forward to this with much interest!
Jeff
You have MY attention Rex! I have a finished Tamiya Sturmtiger and a Profiline Brummb�r kit that is collecting dust. (LOL) Looking forward to this with much interest!
Jeff
07-30-2015, 08:38 AM
#4
Thread Starter
[QUOTE=Panther F;12077486]Both are assault vehicles used to destroy fixed fortifications... not Jagdtigers which was a tank killer.
You have MY attention Rex! I have a finished Tamiya Sturmtiger and a Profiline Brummb�r kit that is collecting dust. (LOL) Looking forward to this with much interest!
Jeff ----
Well you certainly got my attention with the heads up about your models. I didn't know about the Profiline Brummb�r kit and it blew me away to find out that what I was figuring on doing is exactly the way Profiline did it. Their incredible WIP photos on the internet are perfect for me to use (copy/steal) as a reference on my project. Many thanks !!
For some reason I am really motivated to see how close my skills can come to some of the reference sources I have found for this project. This is a lot more fun that sending Paypal $$$ to somebody and opening a box when the FedEx guy shows up.
rex
Last edited by Rex Ross; 07-30-2015 at 08:41 AM.
07-30-2015, 09:38 AM
#5
Senior Member

Join Date: Dec 2006
Location: Lee\'s Summit, MO
Posts: 201
Likes: 0
Received 0 Likes
on
0 Posts
Both are assault vehicles used to destroy fixed fortifications... not Jagdtigers which was a tank killer.
You have MY attention Rex! I have a finished Tamiya Sturmtiger and a Profiline Brummb�r kit that is collecting dust. (LOL) Looking forward to this with much interest!
Jeff
You have MY attention Rex! I have a finished Tamiya Sturmtiger and a Profiline Brummb�r kit that is collecting dust. (LOL) Looking forward to this with much interest!
Jeff
Lol....I meant to type Sturmtiger. I have searched so much on Jagdtigers that my fingers were on autopilot..lol.
Love both of em!
07-30-2015, 10:54 AM
#6
I found this side-by-side image of the Profiline (which is an early to mid) and the Juckenburg (which is a late) and thought I'd share it.
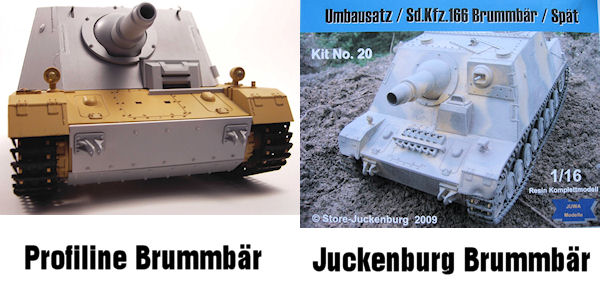
I think I like the early model the best!
~ Maybe if I can get up and start running we can do a side-by-side build (well, sort of) of each others progress? I just need some more steel wheels and most likely the metal tracks/sprockets/idler as well.
Jeff
I think I like the early model the best!
~ Maybe if I can get up and start running we can do a side-by-side build (well, sort of) of each others progress? I just need some more steel wheels and most likely the metal tracks/sprockets/idler as well.
Jeff
Last edited by Panther F; 07-30-2015 at 10:58 AM.
07-30-2015, 11:38 AM
#7
Thread Starter
[QUOTE=Panther F;12077708]I found this side-by-side image of the Profiline (which is an early to mid) and the Juckenburg (which is a late) and thought I'd share it.
I think I like the early model the best!
~ Maybe if I can get up and start running we can do a side-by-side build (well, sort of) of each others progress? I just need some more steel wheels and most likely the metal tracks/sprockets/idler as well.
~~~~~~~~
I won't be starting my Sturmpanzer until Mato ships my upper hull. Hey ---- doing a side-by-side could work ---- at least it sounds like a fun thing to try. I prefer the late model. It has a machine gun up front ----- a tank without one is an infantry target.
rex
07-30-2015, 11:53 AM
#8
Yep, I agree about the machine gun.
Got any leads on steel road wheels for the PIV besides Asiatam? I have the return rollers and an aluminum barrel... just need that extra shove off the edge.
Jeff
Got any leads on steel road wheels for the PIV besides Asiatam? I have the return rollers and an aluminum barrel... just need that extra shove off the edge.
Jeff
07-30-2015, 01:53 PM
#9
Not sure how accurate these are, but I've used them before: http://www.panzerparts.com/product_i...aufrollen.html

You keep the inner half of the road wheel pair, the metal part replaces the outer.
You keep the inner half of the road wheel pair, the metal part replaces the outer.
 07-30-2015, 03:53 PM
#11
Watcha got? I have one for the Brummb�r... the Waldemar Trojca & Markus Jaugitz (if that's any good) with lots of pics and color plates.
I'll have to look for any others if this will help Rex. (he's the one scratch building)
Jeff
Last edited by Panther F; 07-31-2015 at 01:19 AM.
07-31-2015, 06:42 PM
#12
Thread Starter
Thanks guys, I think I'm good on all of the reference stuff I have found so far.
I cut away the top part of the upper hull and cut some panels for the crew compartment and gun. Just a rough test fit to see if everything fits ok for starters. On many of my previous projects I learned that "measure twice, cut once" are wise words to live by.


I cut away the top part of the upper hull and cut some panels for the crew compartment and gun. Just a rough test fit to see if everything fits ok for starters. On many of my previous projects I learned that "measure twice, cut once" are wise words to live by.
08-01-2015, 04:51 AM
#13
Looks great Rex, nice progress pictures!
Jeff
Jeff
08-03-2015, 11:38 AM
#14
I am giving this a much deserved bump to the top. I mean, it IS more exciting than 6 pages of a HL Pershing. 
Any thoughts on how each will be finished? How about something like this for an early Brummb�r:

Or maybe the green over instead?
Jeff
Any thoughts on how each will be finished? How about something like this for an early Brummb�r:
Or maybe the green over instead?
Jeff

 08-03-2015, 12:15 PM
#17
Thread Starter
I haven't thought that far ahead yet on either one of my "sturm" projects, but I do welcome suggestions. I have a file with the photos of a lot of tanks (both models and real life 1:1 AFVs) in their camo paint jobs. My painting skills are the problem ------ I don't have any. I want to do airbrush finishes on both of them without looking like an idiot. I always do a hard edge paint job with a brush, and I really like the soft edge an airbrush can do. I gotta practice a little bit first. I have been thinking about doing the skirts and rear wheel hangers on the Brummbar. but the Sturmtiger is in progress right now.
rex
rex
08-03-2015, 12:34 PM
#18
I haven't thought that far ahead yet on either one of my "sturm" projects, but I do welcome suggestions. I have a file with the photos of a lot of tanks (both models and real life 1:1 AFVs) in their camo paint jobs. My painting skills are the problem ------ I don't have any. I want to do airbrush finishes on both of them without looking like an idiot. I always do a hard edge paint job with a brush, and I really like the soft edge an airbrush can do. I gotta practice a little bit first. I have been thinking about doing the skirts and rear wheel hangers on the Brummbar. but the Sturmtiger is in progress right now.
rex
rex
I here ya... I'm no Picasso myself and I hard edged camo painted my Sturmtiger although I wish I had placed zim on before I did as I looked at B&W photos and couldn't see the image clear enough. After that, I bought into as many reference books and material as I could for each and every project.
Of course, if you are leaving the early road wheels on from the Tiger I you're in luck as the prototype Sturmtiger I believe was just one color.
Jeff
08-07-2015, 09:39 AM
#20
Thread Starter
I hate rivets, but these were fun. Thanks to a series of photos that I got from dgsselkirk, I saw the detail needed for these big rivets on the side of the Sturmtiger. I started to make them one by one by cutting off a short piece of styrene rod, chucking it up in my drill and filing the end to the proper point ---- or at least close. Halfway through I got tired of this way of making them and used the ones I made as masters for a silicone mold. I made the rest out of resin and they turned out ok. I will drill holes in the styrene and push the rivets through from the back until they are at the proper height..


rex
rex
08-07-2015, 09:44 AM
#21

here is that PDF i tried to send you not sure if someone else could open it sorry it didn't work for you i usually use Foxit reader to open PDFs
http://api.viglink.com/api/click?for...9tH6xQowPguzcQ
http://api.viglink.com/api/click?for...9tH6xQowPguzcQ
08-08-2015, 08:08 PM
#22
Thread Starter
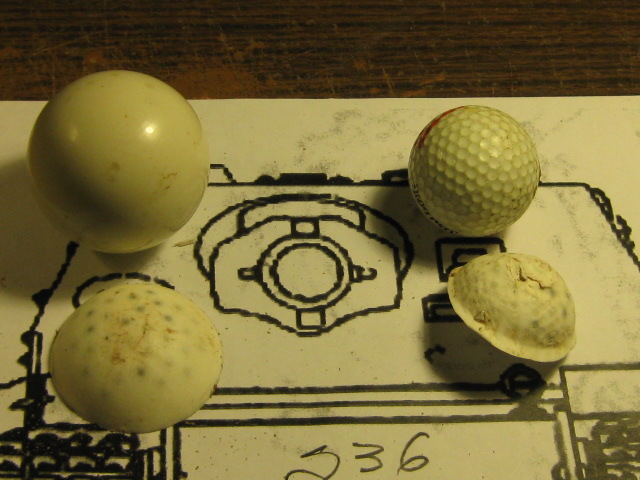
Over the years I have learned that there are some things that should be done first, like the parts that might take some time and planning. Once they are done, the rest of the project will be a piece of cake, a day at the beach, a walk in the park, or some other old saying that is traditional.
The gun and mantle on the Sturmtiger looked like something I should do first and get it out of the way before I start the "easy part", the part that is like falling off a log, or falling out of bed.
Here's a sequence of a few photos on what I did to make this part. I think I built this thing 3 times during my walk through the park to the beach and enjoying this piece of cake.


rex
The gun and mantle on the Sturmtiger looked like something I should do first and get it out of the way before I start the "easy part", the part that is like falling off a log, or falling out of bed.
Here's a sequence of a few photos on what I did to make this part. I think I built this thing 3 times during my walk through the park to the beach and enjoying this piece of cake.
rex
08-11-2015, 09:17 AM
#23
Thread Starter
I got distracted by that "12.8cm Jagd-stormtiger " project (which was fun), and now I can get back to my Sturmtiger effort again. Here's a progress photo.

rex
rex
08-12-2015, 02:35 PM
#24
Join Date: Nov 2010
Location: HamiltonWaikato, NEW ZEALAND
Posts: 937
Likes: 0
Received 78 Likes
on
55 Posts
Hi Rex
Nice work. Though that gun cries out for rifling in the barrel. This 'how to' might give you ideas - http://www.armortek.co.uk/Forum3b/vi...72a5777#p39508 -
I copied the idea but simplified it a bit - post 78 - http://hobbyhavoc.com/forum/index.php?topic=239.75 -
Mal
Nice work. Though that gun cries out for rifling in the barrel. This 'how to' might give you ideas - http://www.armortek.co.uk/Forum3b/vi...72a5777#p39508 -
I copied the idea but simplified it a bit - post 78 - http://hobbyhavoc.com/forum/index.php?topic=239.75 -
Mal
08-12-2015, 04:08 PM
#25
Join Date: Nov 2010
Location: HamiltonWaikato, NEW ZEALAND
Posts: 937
Likes: 0
Received 78 Likes
on
55 Posts
Hi Rex
Found this pic of the open breech with rifling lands displayed - http://www.reddit.com/r/CompanyOfHer...urmtiger_each/ - click on 'the breech' on the lowest post.
Mal
Found this pic of the open breech with rifling lands displayed - http://www.reddit.com/r/CompanyOfHer...urmtiger_each/ - click on 'the breech' on the lowest post.
Mal