


Centurion Tank 1:16
 07-15-2016, 09:46 PM
#126

The suspension bogies are the hardest part so far, just as I have expected. Takes some time to work the curved top with my hairdryer.
The kit is done excellent overall. Just to make sure all parts are cut correctly. After all, it is hand-cut and there can be errors. My hull sides have the grooves that join the floor cut too deep. I suspected the hull was too narrow and Freddy confirmed with me. Shimmed the gap with stryene strips.
You will use your files and sandpaper very often on this kit, but only small adjustments are ever needed. I have yet to find a use for my Dremel/Proxxon electric tools. For glue I used Tamiya Cement, but replaced it with Deluxe Plastic Magic after getting a bottle. It dries fast, eliminates seams (it melts and welds the plastic) and resulting in joins as strong as the stryene itself. If I have to redo a joint, I have to cut it like it is one piece to start with.
 07-16-2016, 01:32 AM
#127
Sure Mal:


The suspension bogies are the hardest part so far, just as I have expected. Takes some time to work the curved top with my hairdryer.
The kit is done excellent overall. Just to make sure all parts are cut correctly. After all, it is hand-cut and there can be errors. My hull sides have the grooves that join the floor cut too deep. I suspected the hull was too narrow and Freddy confirmed with me. Shimmed the gap with stryene strips.
You will use your files and sandpaper very often on this kit, but only small adjustments are ever needed. I have yet to find a use for my Dremel/Proxxon electric tools. For glue I used Tamiya Cement, but replaced it with Deluxe Plastic Magic after getting a bottle. It dries fast, eliminates seams (it melts and welds the plastic) and resulting in joins as strong as the stryene itself. If I have to redo a joint, I have to cut it like it is one piece to start with.
Isnt everything CNC cut?
07-16-2016, 11:09 AM
#129
@longsheep,
I only used a thin round pencil and bend it while moving forth and back without any heat because otherwise the heat can shrink the styrene.
@tomhugill,
all styrene parts are (CNC) milled.
Freddy
I only used a thin round pencil and bend it while moving forth and back without any heat because otherwise the heat can shrink the styrene.
@tomhugill,
all styrene parts are (CNC) milled.
Freddy
 07-17-2016, 07:14 PM
#130
Join Date: Nov 2010
Location: HamiltonWaikato, NEW ZEALAND
Posts: 937
Likes: 0
Received 78 Likes
on
55 Posts
Did a bit on mine, but haven't committed to glue yet. Used my No. 2 Dremel quite a bit - it's set up on the drill press, with the flex shaft & sanding drum more or less permanently mounted. It's good for removing those attachment point bits from the pieces 
 Comparison pics vs the Scorpion
 It's a bit of a strange build without detailed instructions, different from scratch building, where you know where you're going/ make it up as you go.
Mal
Mal
07-17-2016, 08:57 PM
#131
Did a bit on mine, but haven't committed to glue yet. Used my No. 2 Dremel quite a bit - it's set up on the drill press, with the flex shaft & sanding drum more or less permanently mounted. It's good for removing those attachment point bits from the pieces Comparison pics vs the Scorpion
It's a bit of a strange build without detailed instructions, different from scratch building, where you know where you're going/ make it up as you go.
Mal
Mal
The from and rear plates will also help to align the hull. It seems like your hull floor was cut correctly so just follow the bottom ridge line. Use MEK-base glue to "weld" the plastic plates in place!
07-17-2016, 09:08 PM
#132
At first I bent it without heating, but the sheet cracked along the 2 drilled holes at center!
07-22-2016, 05:21 AM
#133
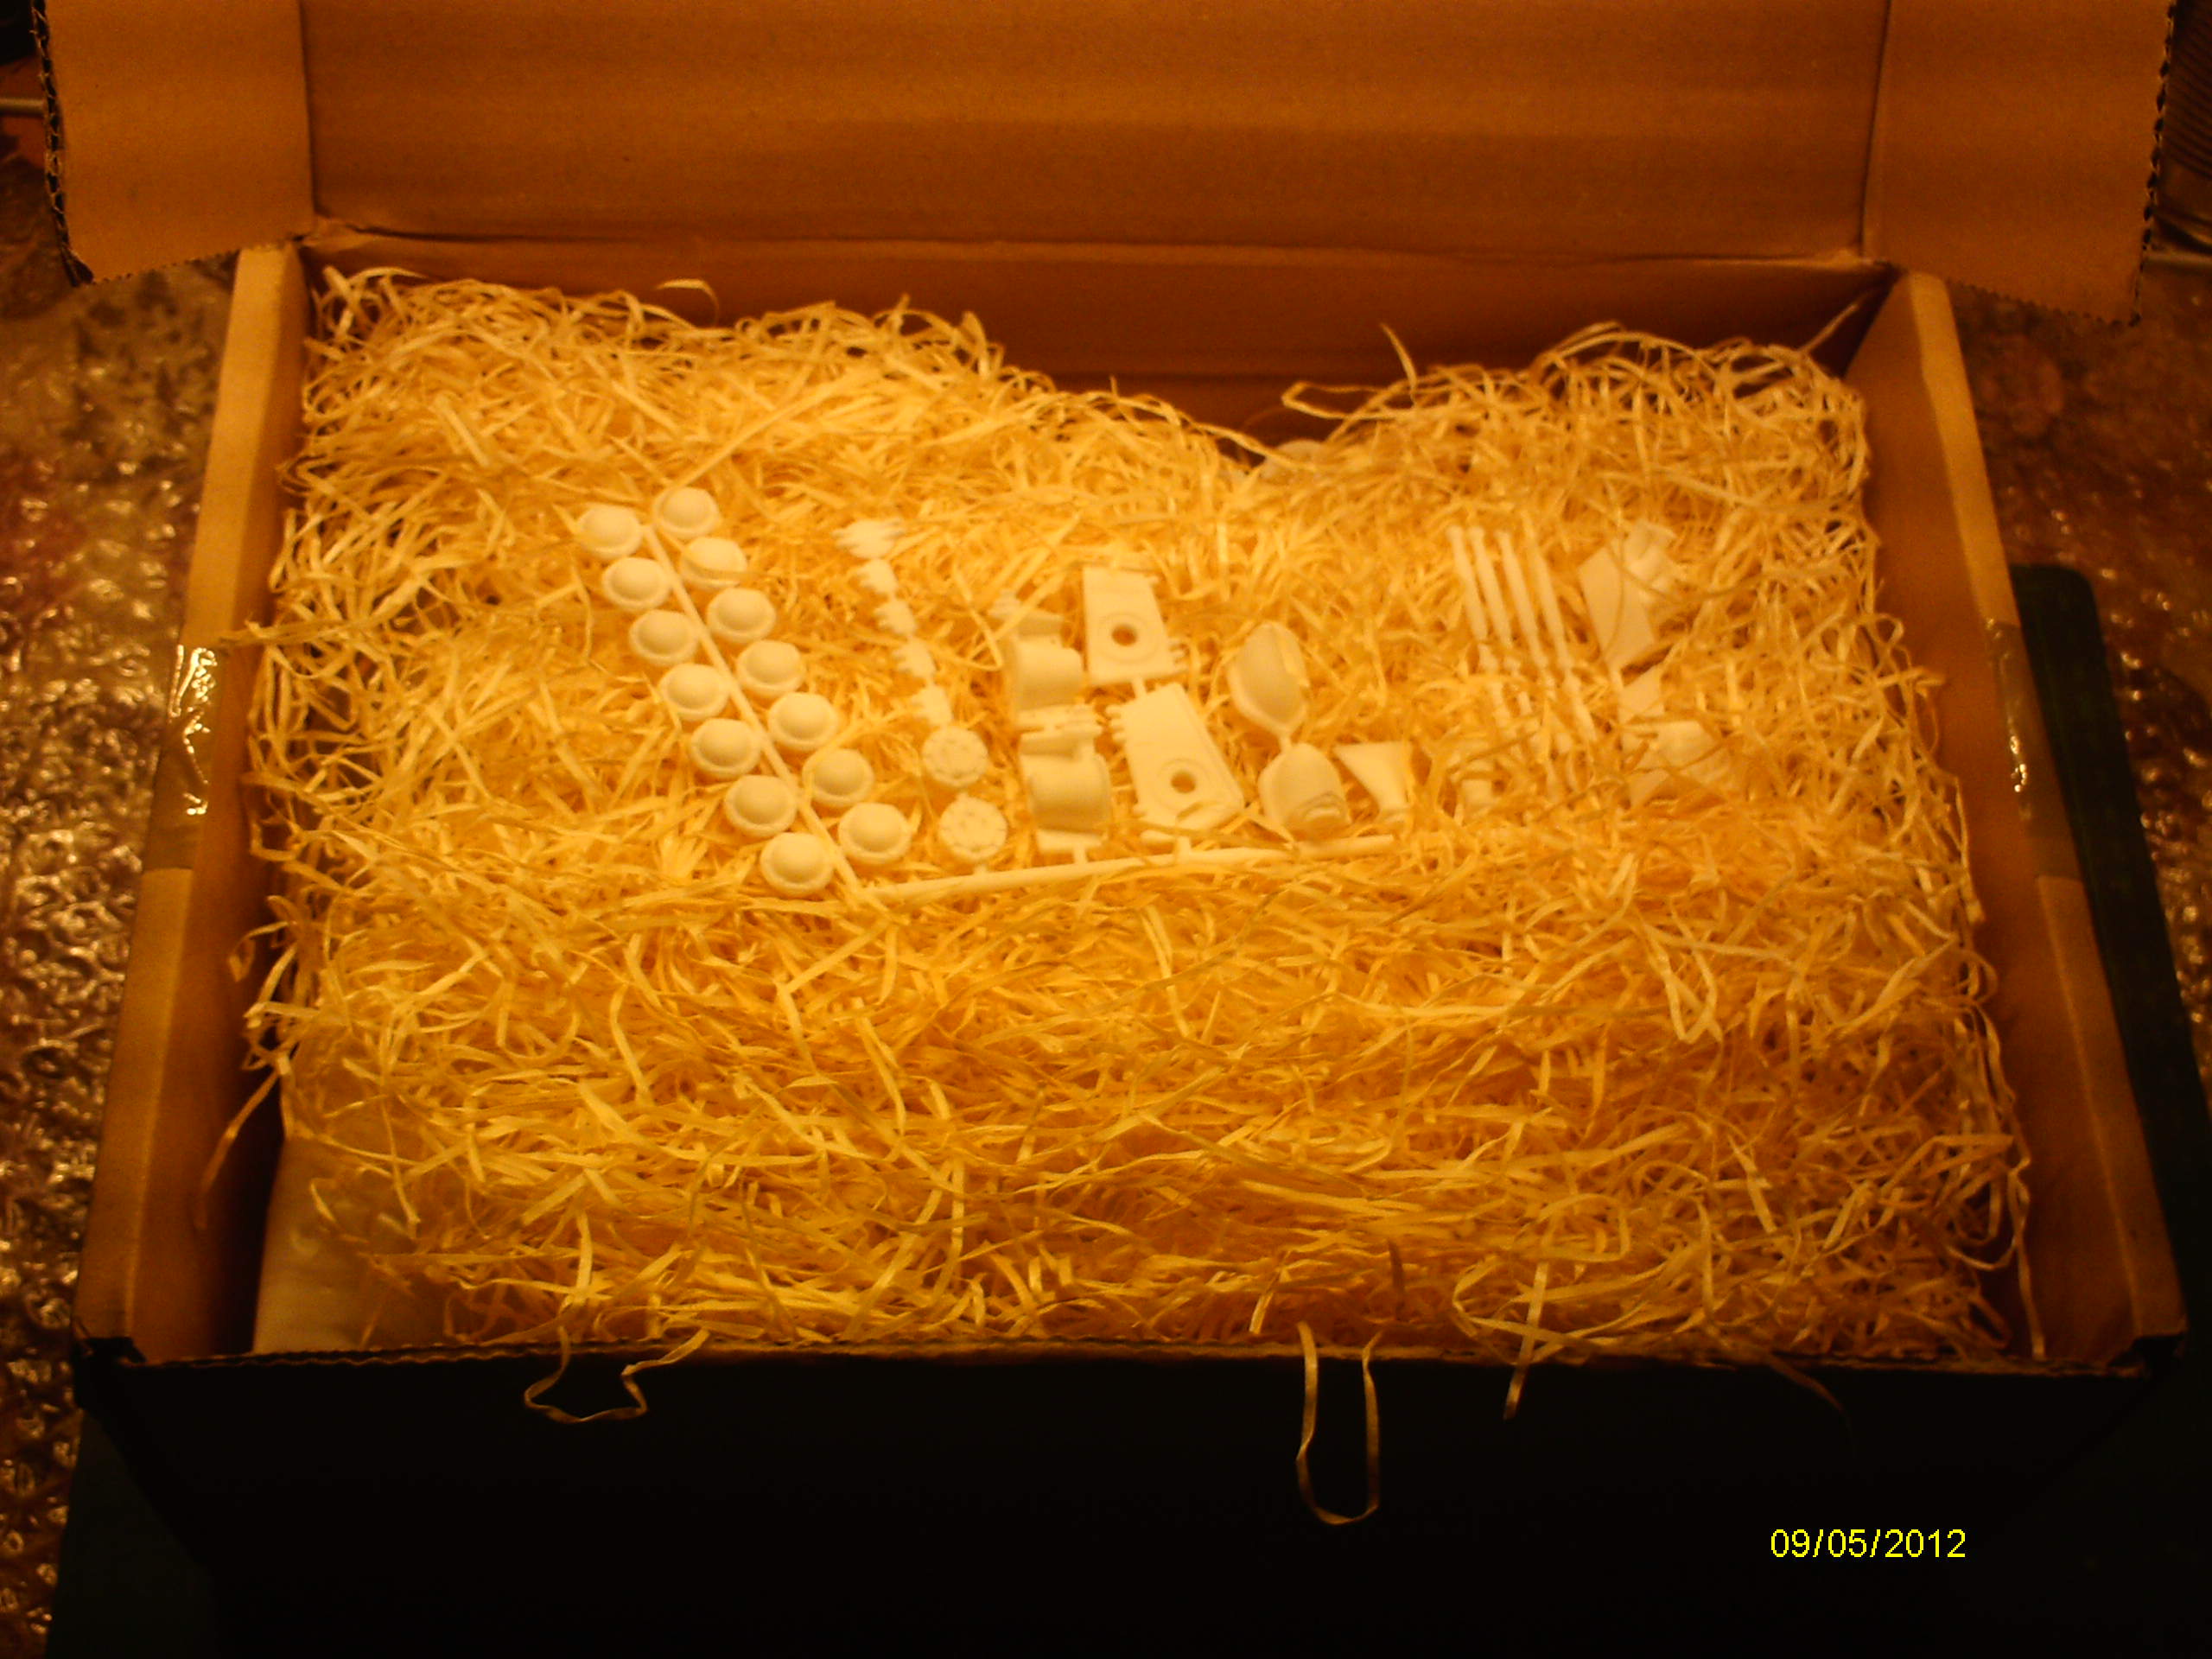
Just signed the big package from Shapeways! These ABS or UV-cure polymer printed parts can look better than resin ones if carefully sanded and painted. I have been a fan of Shapeways since 2012!
(left to right):
Essex fire extinguisher, FN FAL (to be modded into L1A1), WWII radio antenna, Browning M1919A4 with vehicle mount (moveable), Larkspur antenna, British cable reel.
07-24-2016, 02:33 PM
#134
Join Date: Nov 2010
Location: HamiltonWaikato, NEW ZEALAND
Posts: 937
Likes: 0
Received 78 Likes
on
55 Posts
Hi Longsheep
Woz will be pleased, got him to create the Larkspur bases & Cable Reel for my M41 project last year. Be careful with removing the crank handle for the cable reel, it's prone to snapping.
Haven't made any progress on my Cent as yet, still working on the Scorpion.
Mal
Woz will be pleased, got him to create the Larkspur bases & Cable Reel for my M41 project last year. Be careful with removing the crank handle for the cable reel, it's prone to snapping.
Haven't made any progress on my Cent as yet, still working on the Scorpion.
Mal
07-27-2016, 04:50 AM
#135
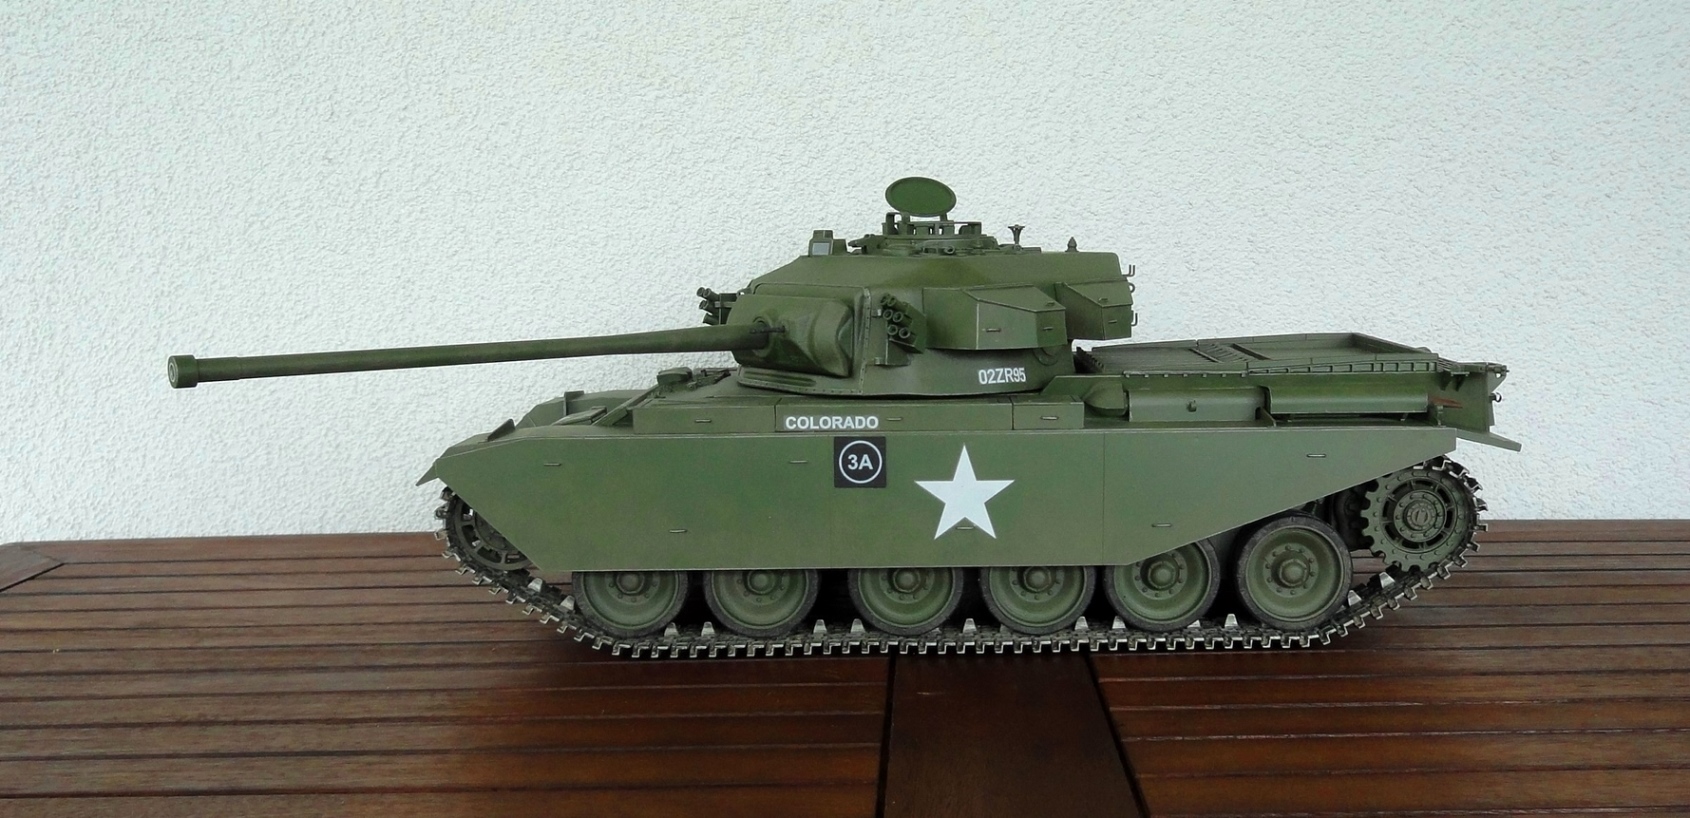
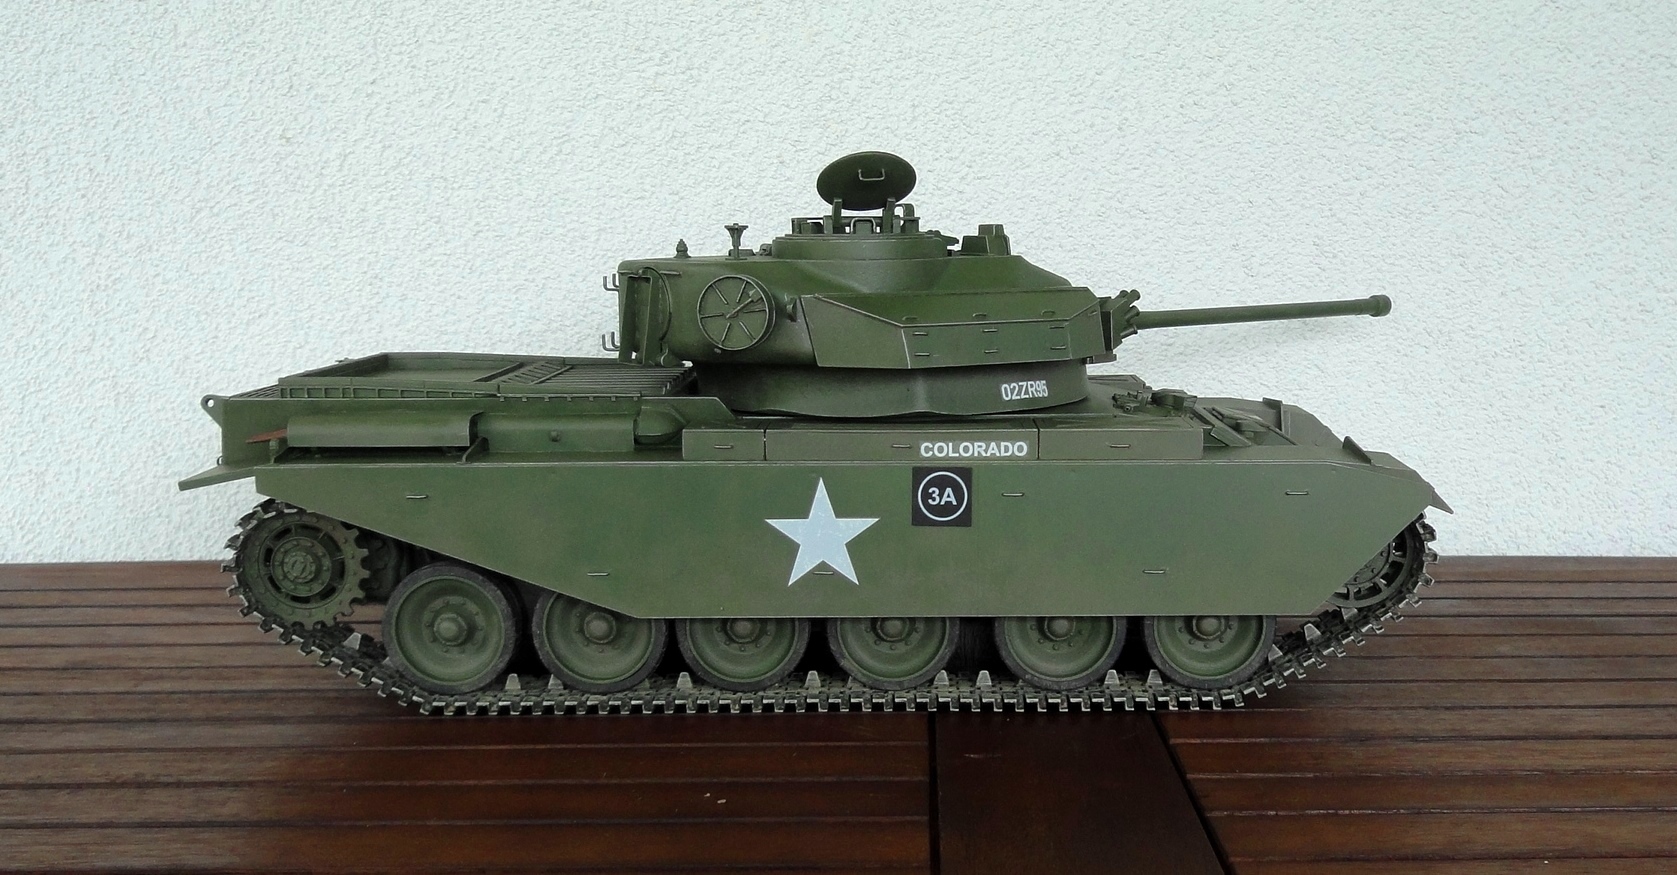
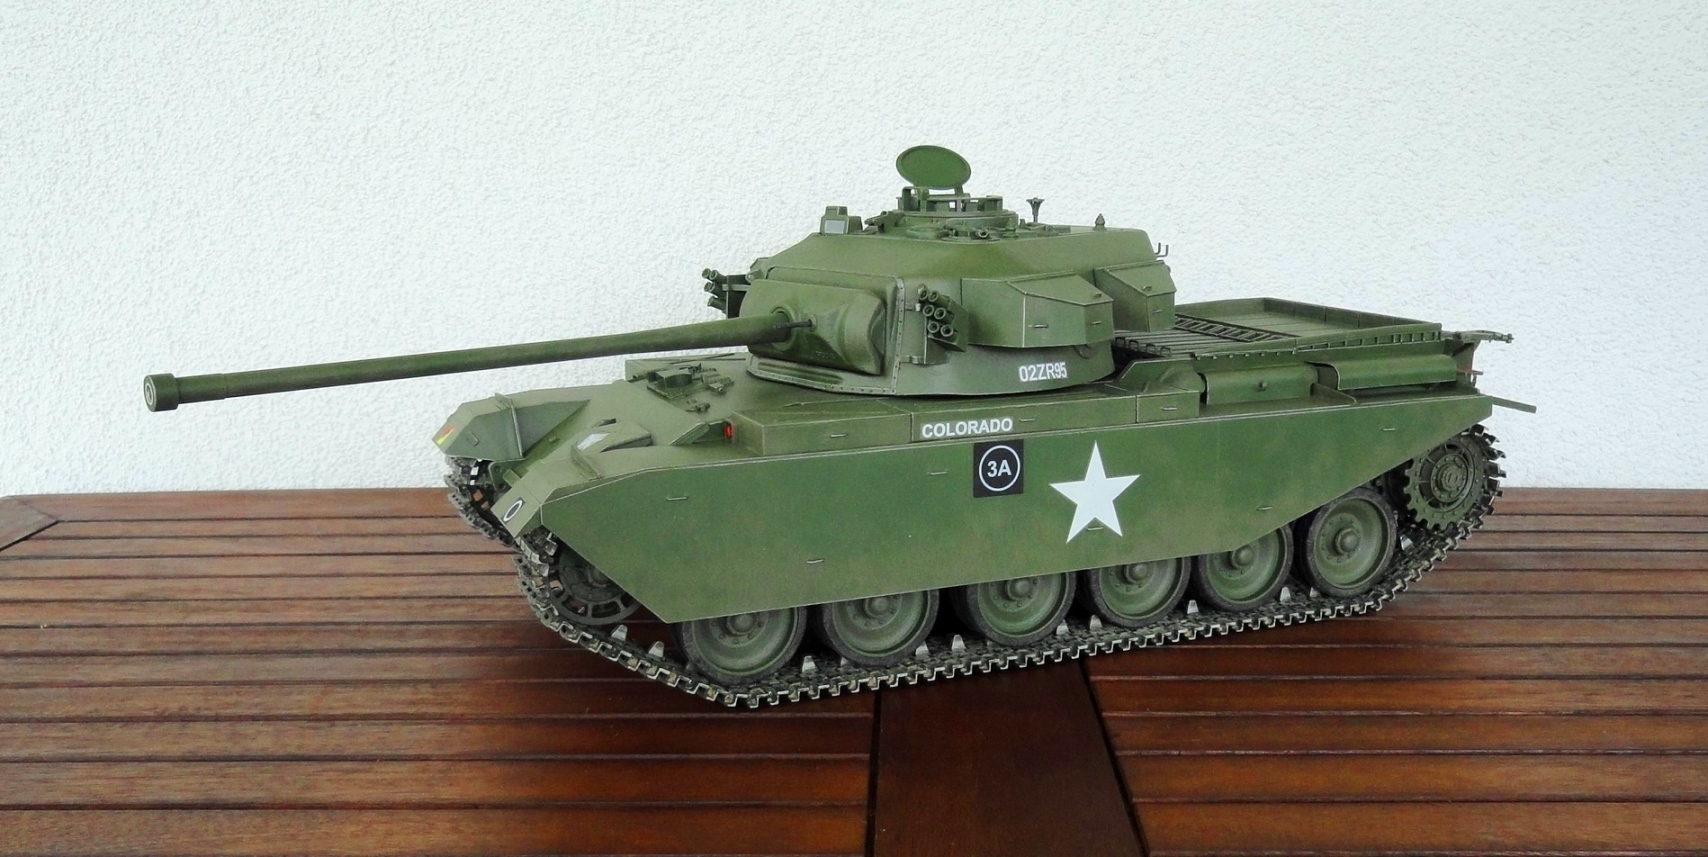
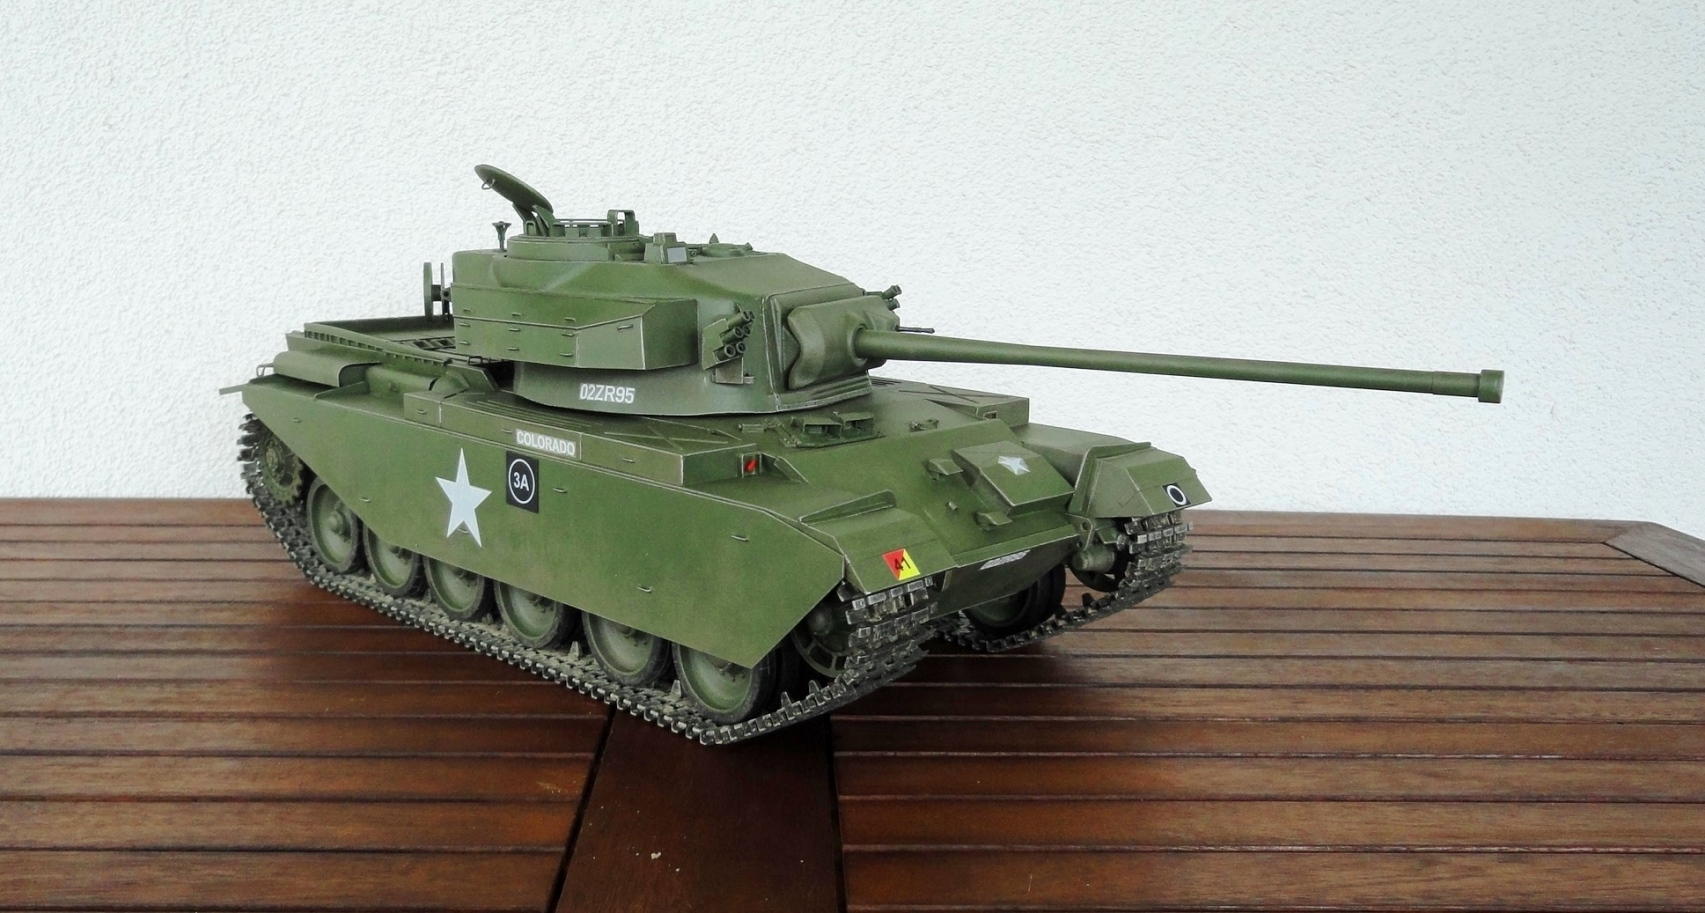
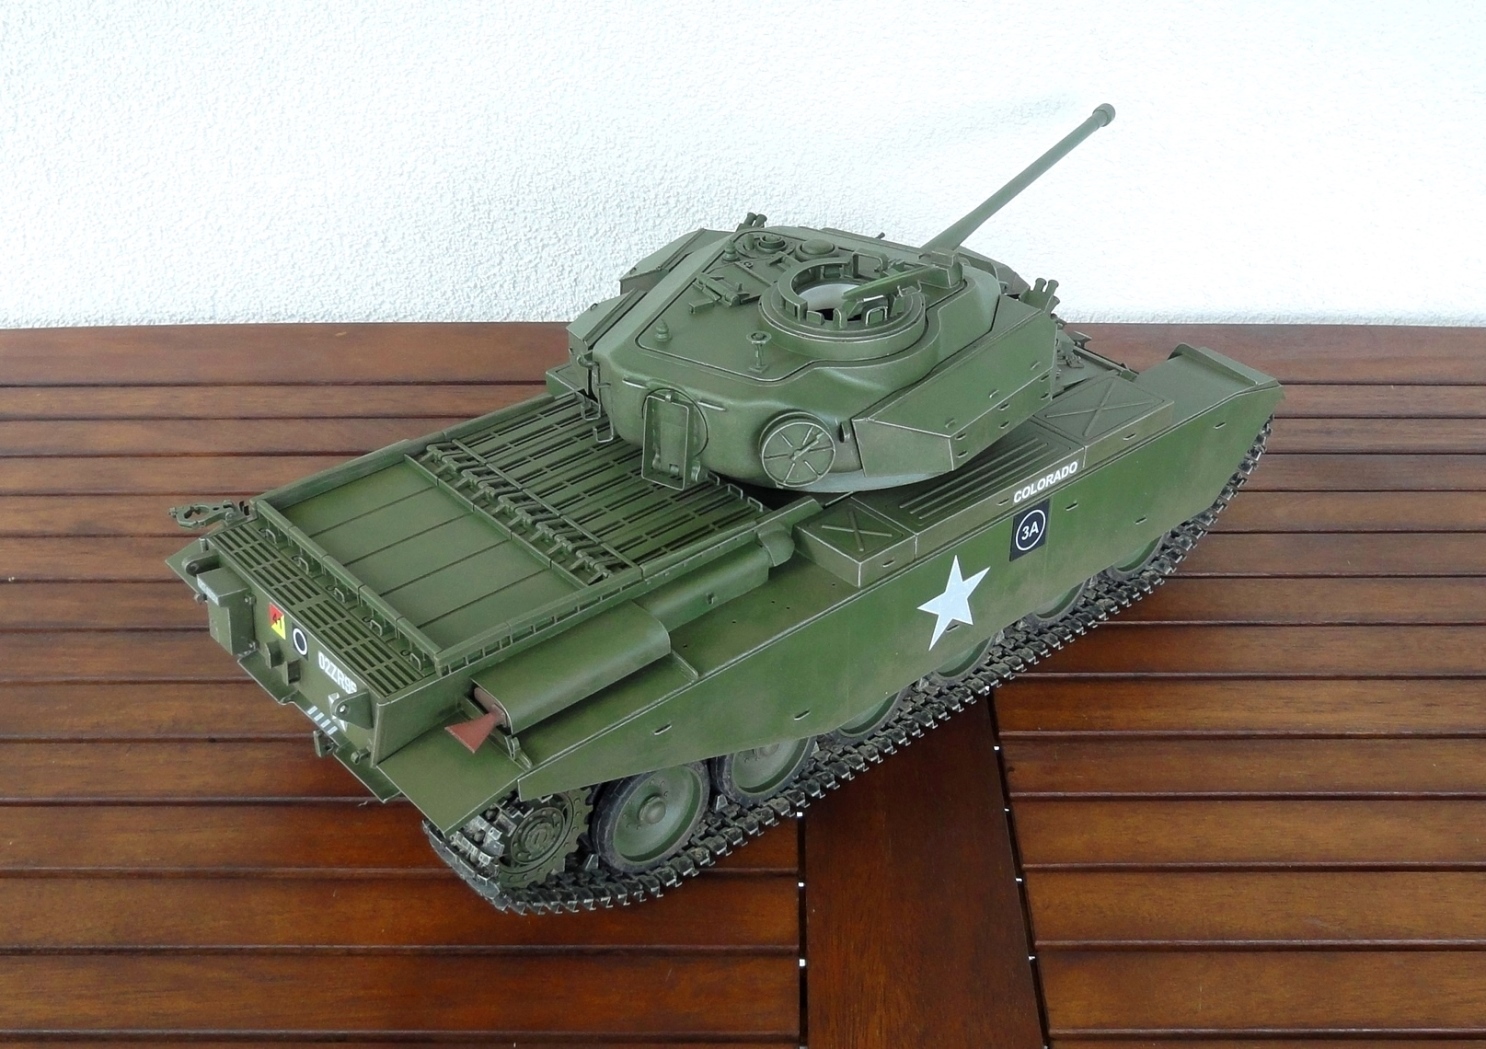
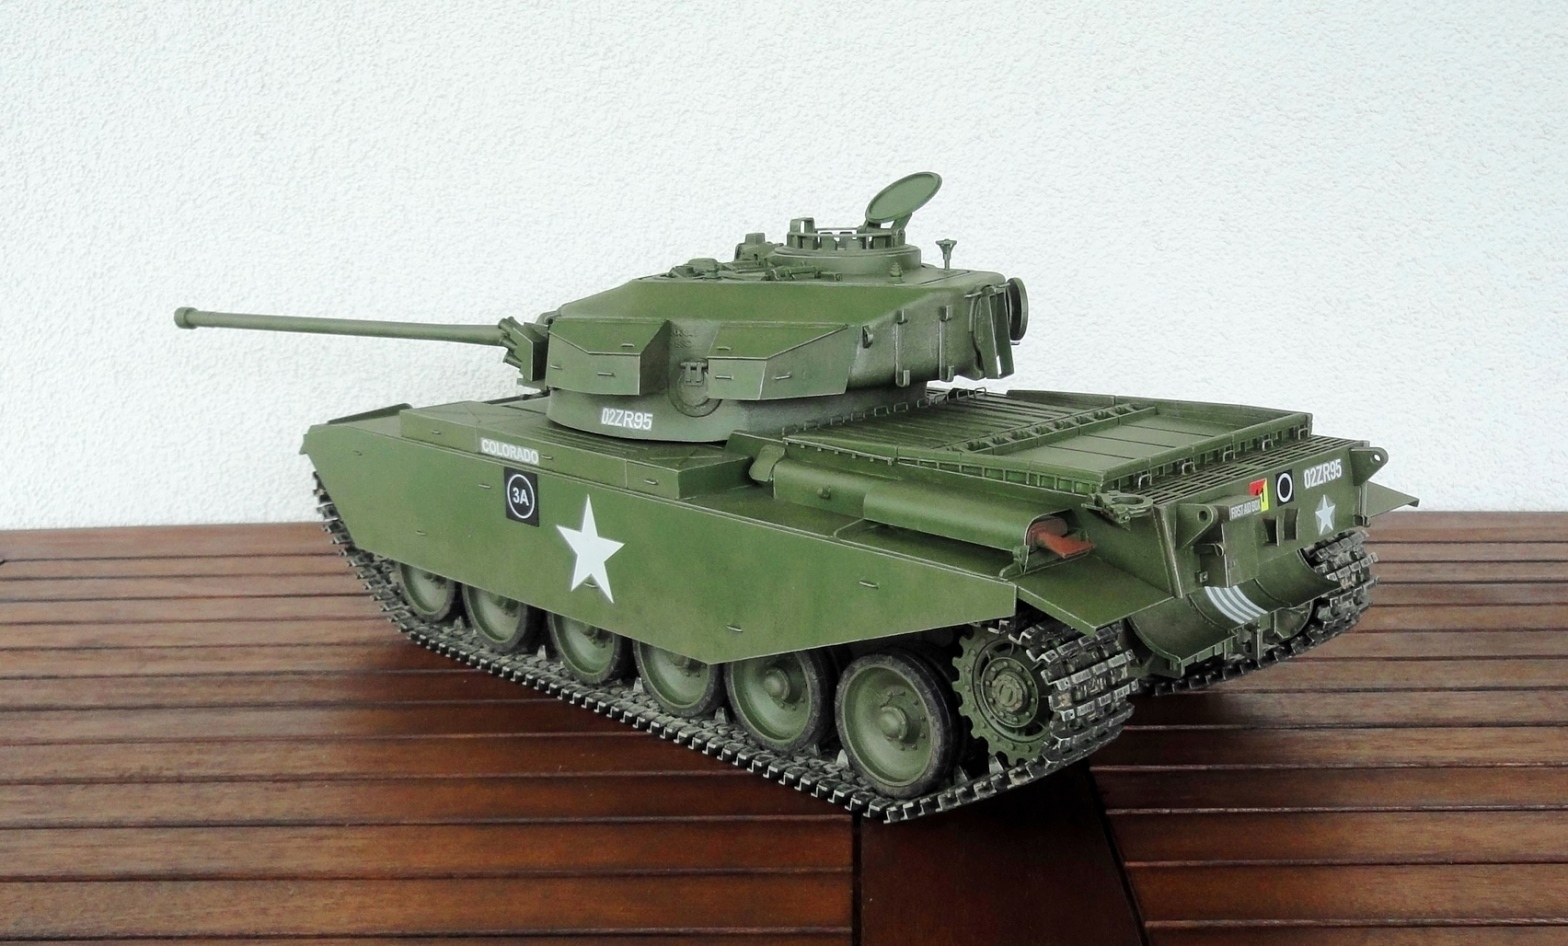
...my Centurion is almost finished; after applying th decals from �Colorado� of the 8th King�s Royal Irish Hussars, fighting in Korea 1953...


Next task will be the mounting of all technical and personally Equipment.
Freddy
Next task will be the mounting of all technical and personally Equipment.
Freddy
07-27-2016, 12:26 PM
#136
It needed a while, but my Centurion prototype is almost ready, after I aplied decals from �Colorado� of the 8th King�s Royal Irish Hussars, fighting in Korea 1953...


next tasks will be toolings an personally equipment.
Freddy
next tasks will be toolings an personally equipment.
Freddy
08-28-2016, 06:49 PM
#137
Join Date: Nov 2010
Location: HamiltonWaikato, NEW ZEALAND
Posts: 937
Likes: 0
Received 78 Likes
on
55 Posts
Been a while since I've posted, have now rec'd all 3 sets of parts
 road wheels, sprockets & tyres
  Mato Gearboxes
  Elephant tracks
  Comparison with my 1/25th Tamiya Cent

 Aluminium turned hollow barrel, 3D printed parts
 Milled plastic parts
  3D return rollers, HL Pz III roller supports
 Resin turret. The turret, being resin was warped, the roof over the mantlet hole sagged, the rear halves splayed out, the weight of the turret caused the base to sag upwards into the turret


 In order to fix this, I put in some internal bracing, so as to straighten out the sagging parts


 then placed it in a cake tin & added hot water
 the sagging pretty much disappeared


 Still a few areas to correct
Mal
Mal
08-29-2016, 12:29 AM
#139
Sure Mal,I have some progress on mine. Clark TK24-CENT boards have just arrived at my post office and the custom DKLM gearboxes will arrive tomorrow. Chris's kit is incomplete and you will need some extra screws and parts to complete it.
Size is close to the HL Leo2 - very big for a medium tank from its era!

My turret was equally if not more deformed - adjusted its shape with hand and hairdryer, then epoxy in place.
An aluminum plate was added to "forehead" to keep it straight - essential for my brass gun pivot bushing. The bottom of the turret is slightly higher at the centre (reverse "V" shape) - my AFV Club model is the same so I did not adjust it.


Red oxide as surfacer (after gray Tamiya primer), with pre-shading.
Cupola is rotatable and quite detailed.

Painted with Xtrarylic Deep Bronze Green

Also made a 3mm aluminum plate floor for the hull - recommended by Carson of DKLM.

Build tips:
1. Suspension system is incomplete. The stock springs of the MATO set are too hard and you will need softer ones. Also some M1.2 nuts and bolts for the limitation rods. Make sure to lubricate the surfaces too. You need axle extension for the return rollers too.
2. The 3D printed wheels are... inconsistent. The 8mm holes for bearings are too small on mine. I messed up 3 when drilling so ordered 3 replacements from Chris (they are expensive)! I asked Chris to mill them before shipping.
3. It is easy to mess up the bearings during installation. Better get some spares. The brass axle tubing has to be in exact length to spin free, better use high quality screws and spacers on this part.
4. Make sure to check fit/alignment before gluing parts in place. Also paint the insides first. ABS 3DP parts can be glued with cement while 3DP nylon parts (wheels) are strong but can only be glued with CA and epoxy.
5. The hull storage boxes help hold the track guides in place. Glue them well.
6. Turret roof plate should snap on the turret tightly. Tiny parts on the cupola and turret roof do not fit very well - you will need your file.
I used a nylon brushing wheel with my Proxxon (German Dremel) to smooth up the wheels.
Size is close to the HL Leo2 - very big for a medium tank from its era!
My turret was equally if not more deformed - adjusted its shape with hand and hairdryer, then epoxy in place.
An aluminum plate was added to "forehead" to keep it straight - essential for my brass gun pivot bushing. The bottom of the turret is slightly higher at the centre (reverse "V" shape) - my AFV Club model is the same so I did not adjust it.
Red oxide as surfacer (after gray Tamiya primer), with pre-shading.
Cupola is rotatable and quite detailed.
Painted with Xtrarylic Deep Bronze Green
Also made a 3mm aluminum plate floor for the hull - recommended by Carson of DKLM.
Build tips:
1. Suspension system is incomplete. The stock springs of the MATO set are too hard and you will need softer ones. Also some M1.2 nuts and bolts for the limitation rods. Make sure to lubricate the surfaces too. You need axle extension for the return rollers too.
2. The 3D printed wheels are... inconsistent. The 8mm holes for bearings are too small on mine. I messed up 3 when drilling so ordered 3 replacements from Chris (they are expensive)! I asked Chris to mill them before shipping.
3. It is easy to mess up the bearings during installation. Better get some spares. The brass axle tubing has to be in exact length to spin free, better use high quality screws and spacers on this part.
4. Make sure to check fit/alignment before gluing parts in place. Also paint the insides first. ABS 3DP parts can be glued with cement while 3DP nylon parts (wheels) are strong but can only be glued with CA and epoxy.
5. The hull storage boxes help hold the track guides in place. Glue them well.
6. Turret roof plate should snap on the turret tightly. Tiny parts on the cupola and turret roof do not fit very well - you will need your file.
I used a nylon brushing wheel with my Proxxon (German Dremel) to smooth up the wheels.
Last edited by Longsheep; 08-29-2016 at 12:45 AM.
08-30-2016, 06:39 AM
#140
3 videos on the TK24 for Centurion: (sorry for the bad sound, only have a HL speaker around.)
Firing gun with recoil
https://www.youtube.com/watch?v=pAwYJ7ygtLE
https://www.youtube.com/watch?v=eBl6rMt_65s
https://www.youtube.com/watch?v=wCMQZh5NXkk
Firing gun with recoil
https://www.youtube.com/watch?v=pAwYJ7ygtLE
https://www.youtube.com/watch?v=eBl6rMt_65s
https://www.youtube.com/watch?v=wCMQZh5NXkk
Last edited by Longsheep; 08-30-2016 at 08:43 AM.
08-31-2016, 02:35 PM
#141
Join Date: Nov 2010
Location: HamiltonWaikato, NEW ZEALAND
Posts: 937
Likes: 0
Received 78 Likes
on
55 Posts
Hi Longsheep
Your mention of the bearings got me checking my kit - didn't get any, nor the mantlet. Chris advises someone must have got 2 sets, so he's sending me some.
Will probably follow your lead & put a metal plate in the roof above the gun. Have painted the internal hull silver, but needs a 2nd coat.
Assume the 3mm Al plate is to resist warping the hull?
Vids look good
Mal
09-01-2016, 11:24 AM
#142
Hi Longsheep
Your mention of the bearings got me checking my kit - didn't get any, nor the mantlet. Chris advises someone must have got 2 sets, so he's sending me some.
Will probably follow your lead & put a metal plate in the roof above the gun. Have painted the internal hull silver, but needs a 2nd coat.
Assume the 3mm Al plate is to resist warping the hull?
Vids look good
Mal
Your mention of the bearings got me checking my kit - didn't get any, nor the mantlet. Chris advises someone must have got 2 sets, so he's sending me some.
Will probably follow your lead & put a metal plate in the roof above the gun. Have painted the internal hull silver, but needs a 2nd coat.
Assume the 3mm Al plate is to resist warping the hull?
Vids look good
Mal
3mm floor plate is to increase hull stiffness and resist scratches. I also use it as a point to mount my DKLM gearbox, which is very heavy and gives great torque.
09-01-2016, 02:34 PM
#143
Join Date: Nov 2010
Location: HamiltonWaikato, NEW ZEALAND
Posts: 937
Likes: 0
Received 78 Likes
on
55 Posts
Hi Longsheep
The one I'm planning on doing which was used as an aggressor by the RNZAC, hence the cam paint - all the others were Bronze Green. I don't have a lot of info on it as yet, hoping it's a Mk III & will proceed on that basis till I find out otherwise. Sticking with the 'issue' gearbox for now.
Mal
The one I'm planning on doing
Mal
09-05-2016, 06:04 PM
#144
Join Date: Nov 2010
Location: HamiltonWaikato, NEW ZEALAND
Posts: 937
Likes: 0
Received 78 Likes
on
55 Posts
Did more work on the turret, added a couple of bolt on metal plates internally, have added a further one on the roof at the back of the turret, but no pics. Intend to add another on the floor of the turret behind the mantlet 


Longsheep - are you building a Mk 5, or later? If so, you might have to change the loaders hatch - http://www.mheaust.com.au/Aust/Resea...turretinfo.htm -
Mal
Longsheep - are you building a Mk 5, or later? If so, you might have to change the loaders hatch - http://www.mheaust.com.au/Aust/Resea...turretinfo.htm -
Mal
09-11-2016, 07:42 PM
#145
Join Date: Nov 2010
Location: HamiltonWaikato, NEW ZEALAND
Posts: 937
Likes: 0
Received 78 Likes
on
55 Posts
Added a couple more metal plates - rear roof & front floor 
 then applied a coat of What a Job, which I use as a surfacer & filler - still wet in these pics

 Then painted the interior silver, applied a 2nd coat of WAJ & then a stipple coat

 While waiting for it to dry, detached some of the cupola & roof parts & cleaned them up
 Parts sitting on the mostly dry turret - no glue as yet.
A question The long thin piece at the top of this shot Is it supposed to be curved into a tall ring & ringed with the pre-cut rings?
Mal
A question The long thin piece at the top of this shot
Mal
09-11-2016, 07:58 PM
#147
A question The long thin piece at the top of this shot Is it supposed to be curved into a tall ring & ringed with the pre-cut rings?
Mal
Mal
You may already know but the cupola periscopes need a little filing to get that slanted shape on the backside. The periscope guards also need to be bent out from strips.
The casting effect on my Cent is pretty subtle, especially on the "forehead" plate. But some prototypes seem rougher.
Mal, in return I would like to ask what colour is the inside of the cupola hatch? I have seen both silver and light(primer) green. Thanks.
Last edited by Longsheep; 09-11-2016 at 08:02 PM.
09-11-2016, 08:24 PM
#148
Join Date: Nov 2010
Location: HamiltonWaikato, NEW ZEALAND
Posts: 937
Likes: 0
Received 78 Likes
on
55 Posts
Hi Longsheep
Thanks for clearing that up. Haven't started on the scopes yet. Not sure if you familiar with Col Filtness's site - http://centurion-mbt-two.synthasite.com/ - it's got lots of close up Cent shots, mostly Oz ones.
Re the Cupola hatch, I think it's more usual for the interior to be the same colour as the exterior paint, but remember that in service they're mostly fitted with the rubber pad which obscures the paint finish
Mal
09-12-2016, 12:59 AM
#149
Hi Longsheep
Thanks for clearing that up. Haven't started on the scopes yet. Not sure if you familiar with Col Filtness's site - http://centurion-mbt-two.synthasite.com/ - it's got lots of close up Cent shots, mostly Oz ones.
Re the Cupola hatch, I think it's more usual for the interior to be the same colour as the exterior paint, but remember that in service they're mostly fitted with the rubber pad which obscures the paint finish
Mal
Thanks for clearing that up. Haven't started on the scopes yet. Not sure if you familiar with Col Filtness's site - http://centurion-mbt-two.synthasite.com/ - it's got lots of close up Cent shots, mostly Oz ones.
Re the Cupola hatch, I think it's more usual for the interior to be the same colour as the exterior paint, but remember that in service they're mostly fitted with the rubber pad which obscures the paint finish
Mal
Sure I have used Filtness's site for reference! I also own a reference book - WWP Photo manual for modelers - Centurion part one (MK.3-6).
I would recommend anyone building the Centurion to order this book. It is very handy and the photos are in very high definition. It also shows the difference between different production batches, even if they are the same Mark.
The gunner's sight box and vane sight are far more complicated in real life than on Chris's kit.
09-12-2016, 02:47 PM
#150
Join Date: Nov 2010
Location: HamiltonWaikato, NEW ZEALAND
Posts: 937
Likes: 0
Received 78 Likes
on
55 Posts
Hi Longsheep
Worked on the ring last nite, used hot water to help with the bending, overlap of the ends 1-2mm
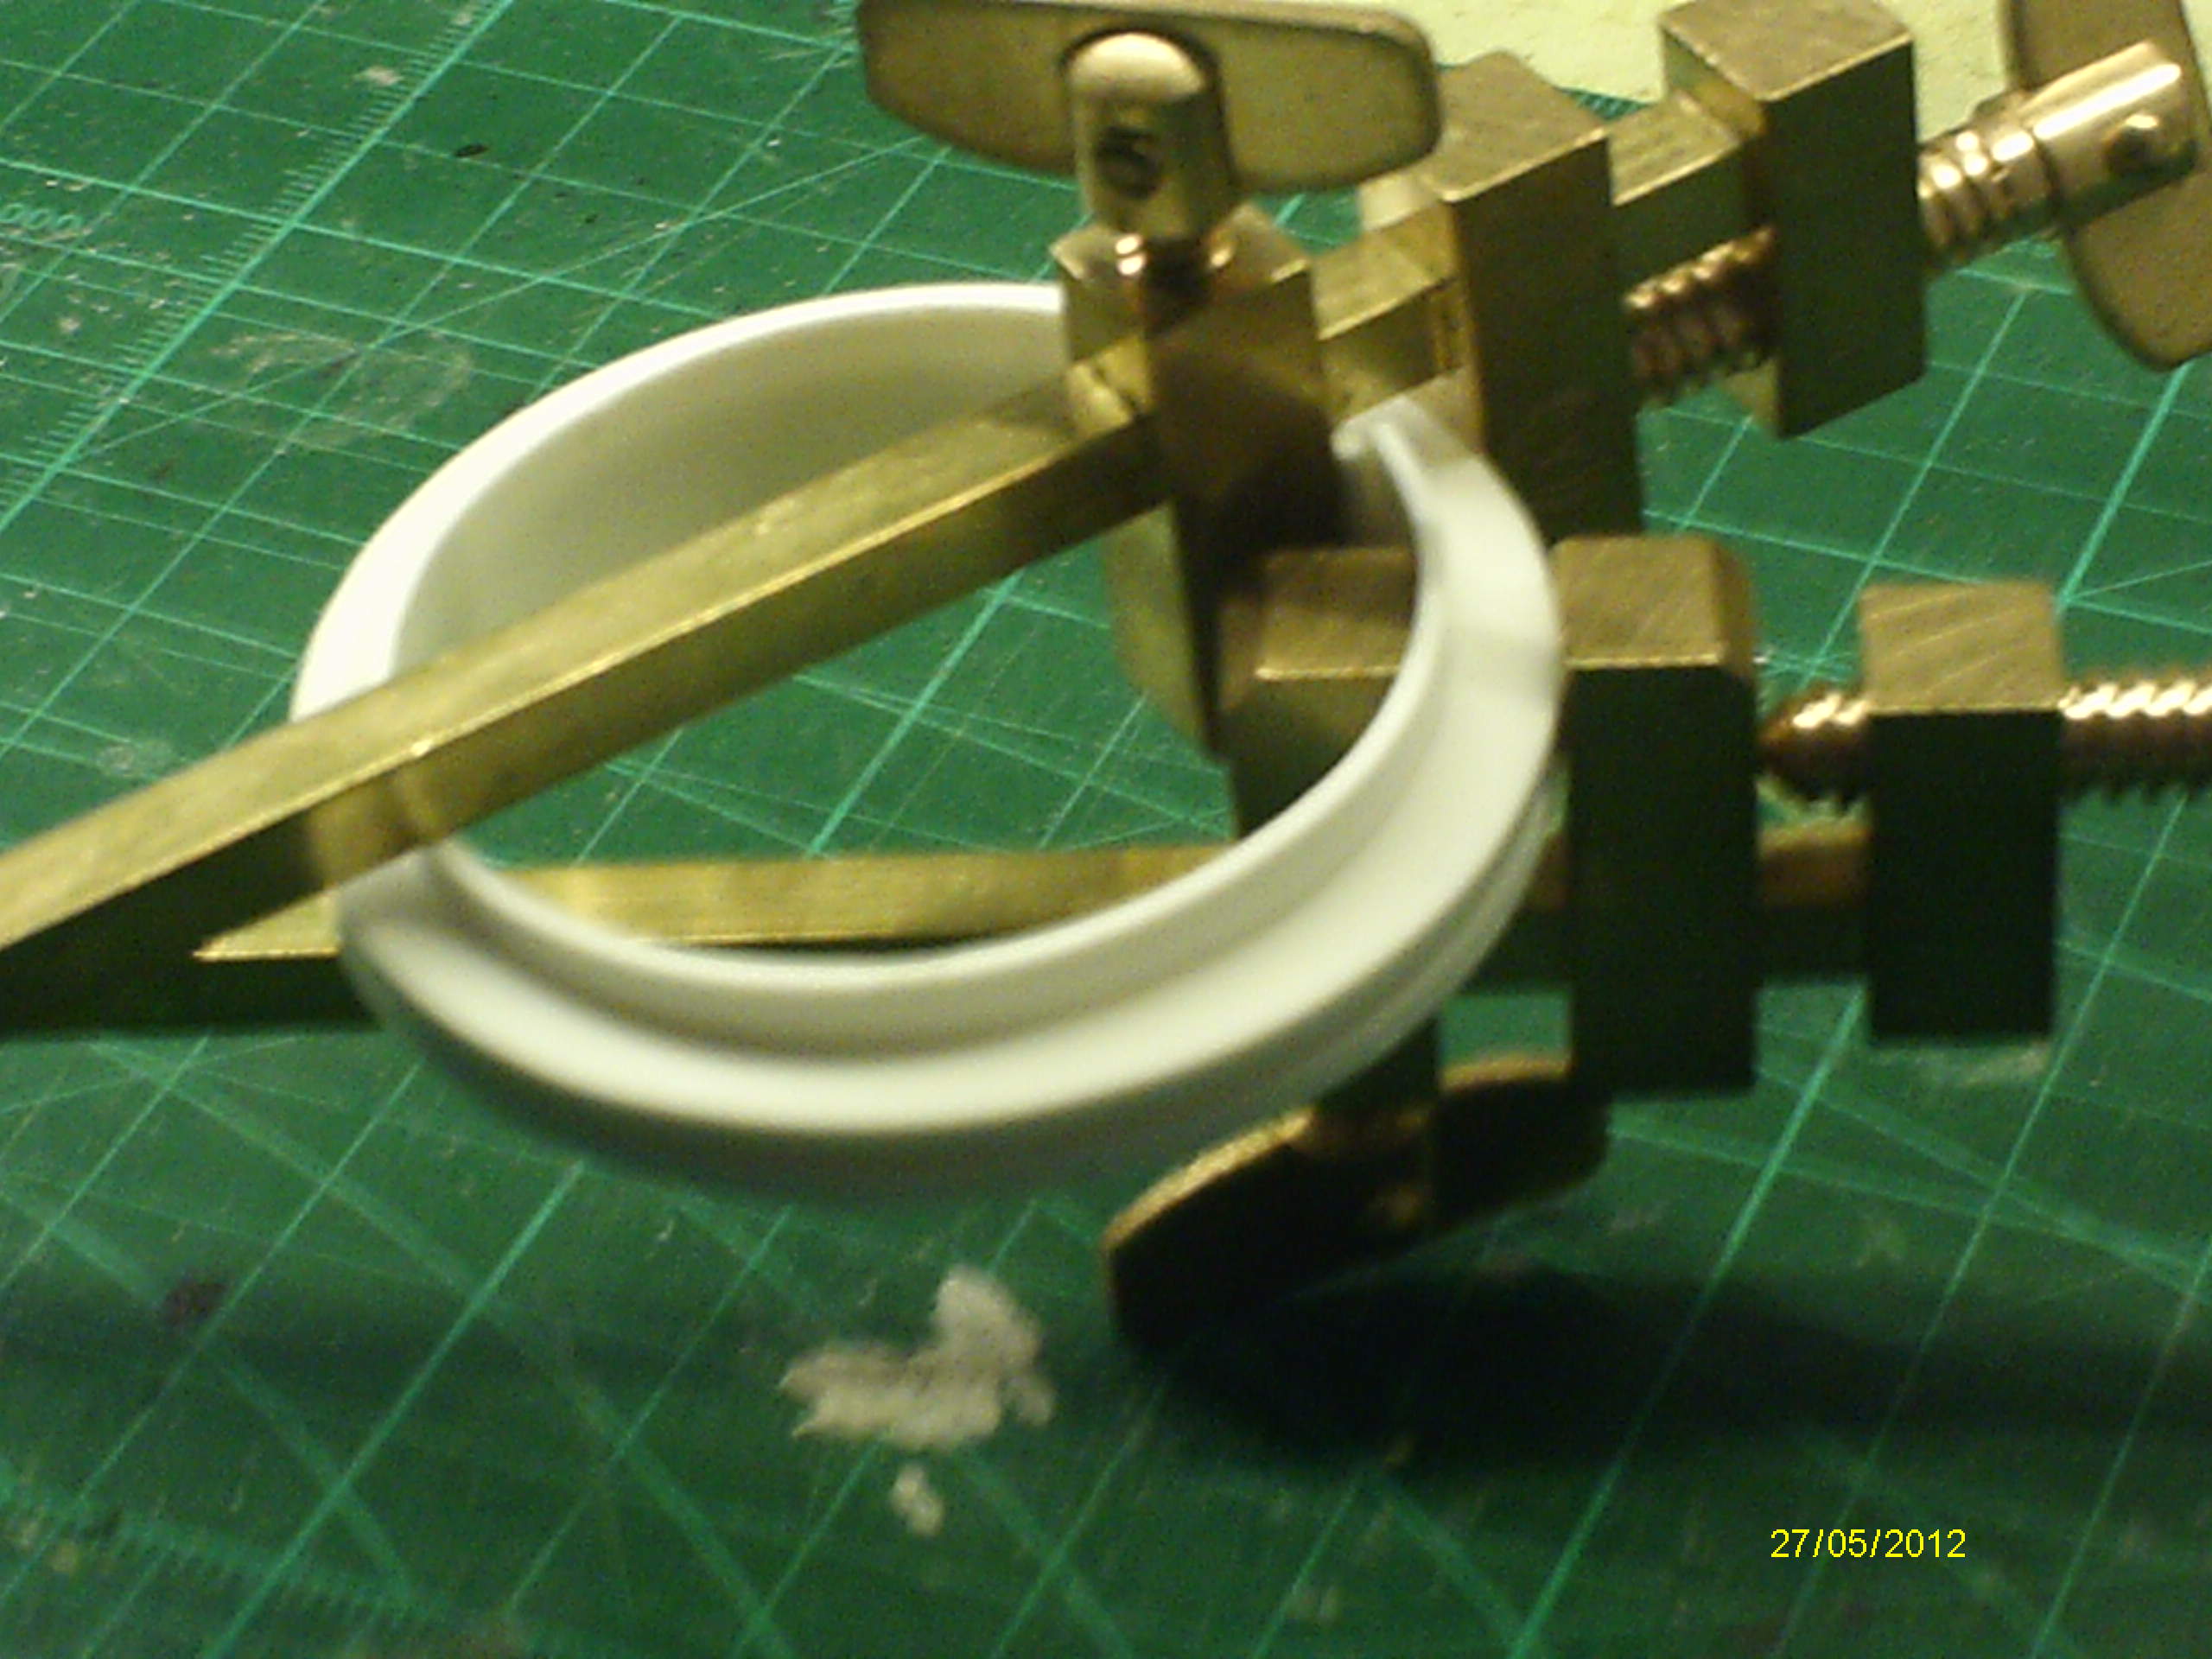
 Still have to trim the excess.
Do you have a source for that book - couldn't find anything on google?
Was aware that some of the parts are simplified - the final drives are essentially Tamiya part copies, the real thing is more like these, from Stephen Whites Armortek build
 The shot deflector in front of the Cupola should be heavily sloped
 rather than the squared block supplied in the kit
 but I guess that's what a file is for. Don't think I'll bother with the final drives, as they're well hidden, though could be a 3D print project for someone. No doubt there will be more simplified parts to deal with - if there weren't I suspect the cost would be way higher.
Mal
Worked on the ring last nite, used hot water to help with the bending, overlap of the ends 1-2mm
Do you have a source for that book - couldn't find anything on google?
Was aware that some of the parts are simplified - the final drives
Mal

