


Jagdpanzer IV Vomag L/70
 10-05-2015, 08:43 PM
#1

Thread Starter
Join Date: Dec 2009
Location: Flint, MI
Posts: 241
Likes: 0
Received 0 Likes
on
0 Posts
It's been a while since I've done anything new so here goes nuttin!
I've been collecting parts for this one for 4 years and finally the last part of the puzzle was released a few months ago,
that and the dollars to get it.
This is going to be a Jagdpanzer IV Vomag L/70.
Hen Long lower hull
Profiline JP IV upper
Asiatam gear boxes, return rollers, Steel front wheels, track tensioner, metal suspension
Aluminum L/70 barrel
And the recently released EL MOD Fusion PRO electronics
The fusion board has the drive, sound and battle system all combined into 1 board. No more 3 separate boards. The footprint
of the new fusion board is about the same as a Tami DMD unit.
Plus they have also released an adapter to use the Tamiya battle apple and emitter, so I'll be on equal footing with Tamiya
tanks!
The EL MOD system also is fully programmable for speed sound and servo use, more on that later.
I started with the Profiline resin kit and a Hen Long Panzer IV.
I first disassembled the PZ IV and removed the gears, turret, and electronics. Then cut most of the superstructure away
except for the front transmission cover. I left this on for now to keep some rigidity in the upper hull after cutting out the
engine deck. Being as I'm mating plastic to resin I had to use 2 part epoxy to glue these together
Here's some picys so enjoy
Mike
 10-05-2015, 09:20 PM
#2
Senior Member
Good luck Mike. I still haven't finished my JP IV...LOL. I look forward to your build and can't wait to see it in action. It will be very low and hard to hit. BTW...I've never used the stove to cut an upper hull. How exactly does that work?
10-06-2015, 06:08 AM
#3
Looks great! 
Wish I had never sold my kit but my advice is to not cook and build at the same time!
Jeff
Wish I had never sold my kit but my advice is to not cook and build at the same time!
Jeff
10-06-2015, 06:36 AM
#4

Join Date: Jan 2009
Location: King,
NC
Posts: 1,567
Likes: 0
Received 0 Likes
on
0 Posts
When using the stove as a primary work surface, you only use the burners on the lowest heat setting so you can control the cutting edge of the primary removal doomaflatcher without to much collateral damage to the removed parts. The rest of the hull however is toast! LOL. It is looking good mike.
Herman
Herman
10-06-2015, 10:54 PM
#6
Thread Starter
Join Date: Dec 2009
Location: Flint, MI
Posts: 241
Likes: 0
Received 0 Likes
on
0 Posts
You guys crack me up  . The early stages of the build were done in 2012 and the actual work surface was the kitchen table behind the photographer. Some times being single has its advantages.
Anyway here's some more pics as I progressed back then. It took a lot of trial and error figuring to get things line up and looking right. I also decided early on the I wanted traverse in this little monster so surgery was required on the gun mount, as in total removal of it. One hole drilled in the top of the casting and bend up a brass sheet trunion and it has traverse.
The resin kit parts require a lot of filing to get them right so beware of this if you have this kit, or obtain one as the case may be, since profiline is no longer in business.
As far as the deck angle goes I'm going to leave it flat and the fender tread pattern won't matter. you we see why later......hint hint
Mike
. The early stages of the build were done in 2012 and the actual work surface was the kitchen table behind the photographer. Some times being single has its advantages. Anyway here's some more pics as I progressed back then. It took a lot of trial and error figuring to get things line up and looking right. I also decided early on the I wanted traverse in this little monster so surgery was required on the gun mount, as in total removal of it. One hole drilled in the top of the casting and bend up a brass sheet trunion and it has traverse.
The resin kit parts require a lot of filing to get them right so beware of this if you have this kit, or obtain one as the case may be, since profiline is no longer in business.
As far as the deck angle goes I'm going to leave it flat and the fender tread pattern won't matter. you we see why later......hint hint
Mike
10-07-2015, 05:53 AM
#7
You can use whatever background you want, I was only having a little fun. More likely I'm jealous. 
I sold mine off because I thought the length of the barrel would be a problem in battling. I don't really battle so much now and I wish I still had it.
BUT... it will be cool to see yours built right here!
Jeff
I sold mine off because I thought the length of the barrel would be a problem in battling. I don't really battle so much now and I wish I still had it.
BUT... it will be cool to see yours built right here!
Jeff
Last edited by Panther F; 10-07-2015 at 10:47 AM. Reason: grammar nazi
10-07-2015, 09:55 AM
#8
I have one I am working on. Profiline JagdPanzer IV L/70 as well. Jeff you could have made your's an JagdPanzer IV L/48?
10-07-2015, 10:50 AM
#9
") 10-08-2015, 11:42 PM
10-08-2015, 11:42 PM
#10
Thread Starter
Join Date: Dec 2009
Location: Flint, MI
Posts: 241
Likes: 0
Received 0 Likes
on
0 Posts
Jeff,
No offense was taken, I thought all the ribbing from You, Bob and Herman was funny. My thought process got side tracked writing the reply. What I didn't include was that a short time ago my daughter talked (conned) me into moving her upstairs. So with an open room on the main floor I moved all my train and tank modeling stuff into it. Now I have my models, parts, tools and computer all in one place.
OK, onward with the build....
After carefully measuring and fitting the wedge shaped nose I cut off the front of the PZIV, then glued the new front on with 2 part epoxy. I also fit the metal suspension onto the hull along with metal return rollers. I have a book on German closed top tank destroyer that gives the phases and rough dates for changes so this one will have 4 steel return rollers, regular PZIV muffler, front 2 rubber saver wheels on the front along with the fix all of bad body work- zimmerit!
I used the HL rubber wheels in the other 6 positions and a word about the asiatam metal suspension. It comes with self tapping screws that are useless, they break too easily. I ash canned them and tapped the holes, unfortunately in my advanced age I don't remember what size I used . OOPS. Maybe I should write these things down, but then I'd lose the note somewhere, life's dilemmas. More pictures below.
Mike
No offense was taken, I thought all the ribbing from You, Bob and Herman was funny. My thought process got side tracked writing the reply. What I didn't include was that a short time ago my daughter talked (conned) me into moving her upstairs. So with an open room on the main floor I moved all my train and tank modeling stuff into it. Now I have my models, parts, tools and computer all in one place
.OK, onward with the build....
After carefully measuring and fitting the wedge shaped nose I cut off the front of the PZIV, then glued the new front on with 2 part epoxy. I also fit the metal suspension onto the hull along with metal return rollers. I have a book on German closed top tank destroyer that gives the phases and rough dates for changes so this one will have 4 steel return rollers, regular PZIV muffler, front 2 rubber saver wheels on the front along with the fix all of bad body work- zimmerit!
I used the HL rubber wheels in the other 6 positions and a word about the asiatam metal suspension. It comes with self tapping screws that are useless, they break too easily. I ash canned them and tapped the holes, unfortunately in my advanced age I don't remember what size I used
. OOPS. Maybe I should write these things down, but then I'd lose the note somewhere, life's dilemmas. More pictures below. Mike
10-09-2015, 08:47 AM
#11
I assume the self-tapping screws are the ones on the axles. An option you could consider is to send the boggies and the wheels to HennTec. He cuts off the axles, replaces them with a steel shaft, and adds brass bushings to the wheels. The wheels are then held in place with C-clips. It's a bit pricey, but he does great work. I had those done on mine.
There is someone else in Germany that will do the same work but install bearings instead of bushings. But, for the life of me, I can't find where I stored the link. Edit: Found it...MK Modellbau (http://mk-modellbau.de/main_bigware_...y-ww2-panzer-4).
There is someone else in Germany that will do the same work but install bearings instead of bushings. But, for the life of me, I can't find where I stored the link. Edit: Found it...MK Modellbau (http://mk-modellbau.de/main_bigware_...y-ww2-panzer-4).
Last edited by philipat; 10-09-2015 at 10:38 AM.
10-10-2015, 10:15 AM
#13
10-10-2015, 06:57 PM
#14
Thread Starter
Join Date: Dec 2009
Location: Flint, MI
Posts: 241
Likes: 0
Received 0 Likes
on
0 Posts
Actualy ExPattanker ordered it a few years ago for me(thanks, Mart). I'm pretty sure it came from tank modellbau.
Here's the link
http://tank-modellbau.de/eng_207/7_5cm_KwK_42_L_70
Mike
Here's the link
http://tank-modellbau.de/eng_207/7_5cm_KwK_42_L_70
Mike
10-10-2015, 07:07 PM
#15
Thread Starter
Join Date: Dec 2009
Location: Flint, MI
Posts: 241
Likes: 0
Received 0 Likes
on
0 Posts
[QUOTE=Panther F;12111316]That looks really great and my hats off to you guys who can do zimm!!!
BTW... what do you use for it?
Jeff,
I use 2 part Milliput and an exacto #16 blade held at an angle. It's tedious and time consuming but comes out good.
Mike
BTW... what do you use for it?
Jeff,
I use 2 part Milliput and an exacto #16 blade held at an angle. It's tedious and time consuming but comes out good.
Mike
10-18-2015, 09:45 PM
#20
Thread Starter
Join Date: Dec 2009
Location: Flint, MI
Posts: 241
Likes: 0
Received 0 Likes
on
0 Posts
11-01-2015, 09:45 PM
#23
Thread Starter
Join Date: Dec 2009
Location: Flint, MI
Posts: 241
Likes: 0
Received 0 Likes
on
0 Posts
Right you are Martin, but this one is being built as an early mid production model which according to the chart in The modeler's Guide to Jagdpanzer book I have came so equipped. 4 return rollers, steel front wheels, standard PZIV muffler and Zimmerit.
Mike
Mike
11-01-2015, 09:55 PM
#24
Thread Starter
Join Date: Dec 2009
Location: Flint, MI
Posts: 241
Likes: 0
Received 0 Likes
on
0 Posts
As I said earlier I've had this for a while and after a while I resigned myself to using Tamiya electronics for a PZIV. Nothing wrong with this except the main gun sound wouldn't be correct (wimpy sounding!). Here are some pics of the original elevation/ traverse set up I made.
It turned out the base was too flimsy and then ElMod came up with the new boards so this was reworked later.
Mike
It turned out the base was too flimsy and then ElMod came up with the new boards so this was reworked later.
Mike
11-01-2015, 10:23 PM
#25
Thread Starter
Join Date: Dec 2009
Location: Flint, MI
Posts: 241
Likes: 0
Received 0 Likes
on
0 Posts
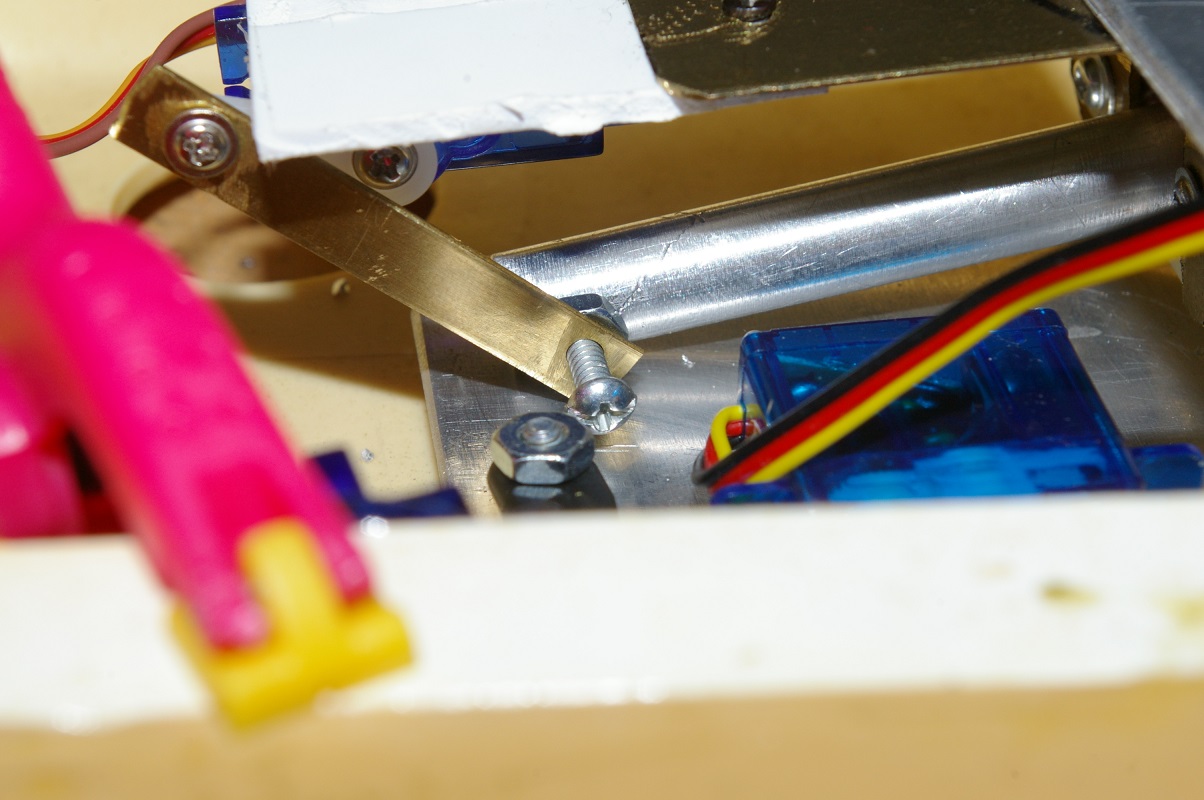
When ELMOD came out with the fusion boards they came in 2 versions, ECO and PRO. The Pro version allows for more lights and options and the use of 3 servos. The ECO version only has provisions for 1 servo. Seeing as how I wanted the proper engine and main gun sound and servo recoil, elevation and traverse using the PRO board became a no brainer for me.
The first pics show what comes with the pro board kit, including the Tamiya adapter that allows the use of the Tamiya battle apple and IR emitter.
The second set shows the reworked elevation, traverse and recoil set up with a thicker base plate, thus less flex of the pieces.
Mike


The first pics show what comes with the pro board kit, including the Tamiya adapter that allows the use of the Tamiya battle apple and IR emitter.
The second set shows the reworked elevation, traverse and recoil set up with a thicker base plate, thus less flex of the pieces.
Mike

