


Painting tips for Jagdpanther?
 04-05-2016, 05:10 PM
#1
So I picked up a Heng Long Jagdpanther with metal wheels, tracks, and transmission for $170.
I have the photo-etch grill kit.
I need help painting the tracks. I guess flat black and then what for some light weathering?
I could try and color match the HL green for the drive and idler wheels, but since I have to paint the photo-etched grills anyway, I guess I'll paint the whole tank. Any suggestions on which Jagdpanther to paint and some picture sources?
Thanks,
Steve

 04-05-2016, 06:51 PM
#3
Cool picture! What is the source of it? I'd like to see it larger. Are there any good Osprey books or similar on the Jagdpanther?
I'm pretty much locked into a "late" version I guess because I'm not doing Zimmerit and I think the engine deck is different on early ones.
Steve
I'm pretty much locked into a "late" version I guess because I'm not doing Zimmerit and I think the engine deck is different on early ones.
Steve

The following users liked this post:
herrmill (10-02-2021)
04-06-2016, 06:51 AM
#6
Rear deck, exhaust, gun mantlet, drivers vision slots, some early versions had the one piece gun barrel... etc. There were many differences between "Early and Late".
Just do a color plate or paint scheme search on google or yahoo and just look closely for examples that DO have the raised fan on the rear deck and the late version exhaust and you should get some pretty good results.
Jeff
04-06-2016, 11:15 AM
#7
I've used missing-lynx.com in the past for inspiration. At least a start to then research a certain pattern I liked. Just scroll down to the Jagdpanthers.
http://missing-lynx.com/gallery/gallery_german.htm
http://missing-lynx.com/gallery/gallery_german.htm

 04-06-2016, 06:36 PM
#11
I've used missing-lynx.com in the past for inspiration. At least a start to then research a certain pattern I liked. Just scroll down to the Jagdpanthers.
http://missing-lynx.com/gallery/gallery_german.htm
http://missing-lynx.com/gallery/gallery_german.htm
That's a great site, thanks!
Here is how I did mine
Any tips for painting tracks?
Thanks,
Steve
The following users liked this post:
herrmill (10-02-2021)
The following users liked this post:
herrmill (10-02-2021)
The following users liked this post:
herrmill (10-02-2021)
04-09-2016, 08:44 PM
#15
Senior Member
Join Date: May 2009
Location: Evans, GA
Posts: 1,506
Likes: 0
Received 0 Likes
on
0 Posts
For the tracks, I had good luck with simple vinegar. If your tracks are already black from Mato, just soak them each for an hour in vinegar. Use fresh vinegar for each soak. Then rinse them well and use a small wire brush to scrub them to remove any scale. As was mentioned earlier, just run them in the dirt after and they'll pick up a nice used appearance.
If the tracks are steel colored, Use the same soak, but after rinsing and the scrub, let them dry and then use gun bluing on them.
I have used both techniques and they came out great. I'll try and post some pics tomorrow.
Jim
If the tracks are steel colored, Use the same soak, but after rinsing and the scrub, let them dry and then use gun bluing on them.
I have used both techniques and they came out great. I'll try and post some pics tomorrow.
Jim
04-16-2016, 02:31 PM
#16
Here is the latest.
I have re-painted the hull. I scratch built hangers for the spare tracks. Started to drill them out and add pins but it was too fiddly. Since I suspect my hard work will get broken off anyway, I decided not to bother.


I've also painted the metal tracks. I painted then flat black, and then lightly dusted them with Burnt Sienna. Also painted the spare tracks. They blend so well, you can't tell the plastic ones from the metal ones! I like the subtle rust effect - it is so good when I pick them up I am subconsciously rubbing my hands on my pants to get the "rust" off!
Steve
I have re-painted the hull. I scratch built hangers for the spare tracks. Started to drill them out and add pins but it was too fiddly. Since I suspect my hard work will get broken off anyway, I decided not to bother.
I've also painted the metal tracks. I painted then flat black, and then lightly dusted them with Burnt Sienna. Also painted the spare tracks. They blend so well, you can't tell the plastic ones from the metal ones! I like the subtle rust effect - it is so good when I pick them up I am subconsciously rubbing my hands on my pants to get the "rust" off!
Steve
04-17-2016, 07:40 AM
#17
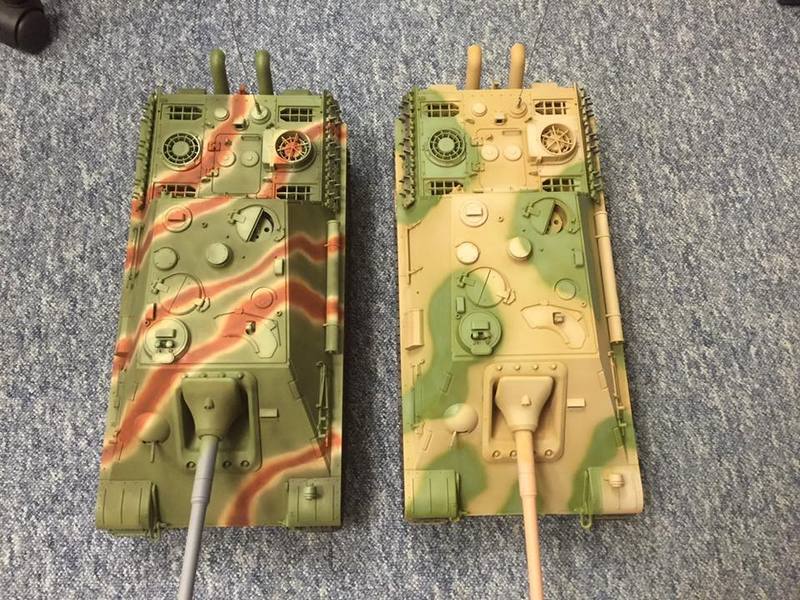
Well, my skills are a bit rusty after 20 years away from model building, but here are my stripes so far:


Now I'm waiting for my decal set to come in, and I'll shoot some Future Floor Polish for some gloss where the decals are going and then do some light weathering.
Steve
Now I'm waiting for my decal set to come in, and I'll shoot some Future Floor Polish for some gloss where the decals are going and then do some light weathering.
Steve
04-17-2016, 07:47 AM
#18
You're much better than you led us to believe there Steve.  Doesn't even resemble that plain old Heng Long tank anymore.
Congrats on the results!
Jeff
Doesn't even resemble that plain old Heng Long tank anymore. Congrats on the results!
Jeff
04-17-2016, 10:51 AM
#20

That is a paint job I am going to try someday ----- your paint scheme is going to be a reference for me. You won't be able to see that critter when it's out in the bushes !!!
rex
rex
04-18-2016, 01:46 PM
#21
Nice Camo Steve!!!
04-19-2016, 06:26 PM
#22
Senior Member
Well, my skills are a bit rusty after 20 years away from model building, but here are my stripes so far:
Now I'm waiting for my decal set to come in, and I'll shoot some Future Floor Polish for some gloss where the decals are going and then do some light weathering.
Steve
Now I'm waiting for my decal set to come in, and I'll shoot some Future Floor Polish for some gloss where the decals are going and then do some light weathering.
Steve
") It looks great.
It looks great. How will you do the wheels..... solid colors or camo?
04-19-2016, 06:46 PM
#23
Your funny Steve....It must have been a light coating of surface rust. It looks great.
How will you do the wheels..... solid colors or camo?
It looks great. How will you do the wheels..... solid colors or camo?
I was just looking at the wheels tonight deciding if the stock green on the wheels was a close enough match to the Tamiya Field Grey to not bother painting them. Especially since I'm going to weather them with pastels. But I have designed up a masking template that I am going to have 3D printed and so I will probably paint them. If I go to the trouble of painting them, I will probably paint them in Field Grey and Brown, with the Brown lining up with the stripes as needed. I have heard that the wheels were always painted solid so that movement of the wheels/tank would not be obvious by the spinning stripes, but I have seen models done with stripes on the wheels. I will probably go for all one color on any one wheel.
Steve
04-27-2016, 06:23 PM
#24
Here is some more progress. I applied future and then the decals. Got a little silvering under one of the decals that I'm not happy with, but I'll live with it.
I've applied some light weathering using pastel chalks. Tomorrow I'll seal it with dull coat.


Steve
I've applied some light weathering using pastel chalks. Tomorrow I'll seal it with dull coat.
Steve
04-28-2016, 04:31 AM
#25
Well, this morning the silvering is all gone.
It might have gone away on its own, but here is what I did:
When the silvering started showing up under the deals, I took a syringe and lightly tapped the decal dozens and dozens of times all over the silvering. This *****ed the decal with hundreds of tiny, tiny holes. Then I carefully brushed Future floor polish over/into the decal. This penetrated the holes and, it seems, eliminated the silvering.
LOL the auto sensor edit the word "pri.cked".
Steve
Last edited by maillemaker; 04-28-2016 at 04:43 AM.