


My Tiger 1 from Mark 1 Tanks
 03-30-2017, 07:59 PM
#26
Member
Thread Starter

Join Date: Jul 2015
Location: Iowa
Posts: 77
Likes: 0
Received 0 Likes
on
0 Posts
Here is the first mod I did.
Mark's instructions for removing the turret are "push back from the front and lift from the front". The turret is held in place by three "pulleys" the back one is spring loaded. Considering that you have to remove the turret to fill the smoke tube, that puts the turret opening on the body in great risk of being damaged after time. ( I plan on shifting the smoke tube to the rear engine deck anyway) I find it easier to reach inside the loaders hatch and pull the spring pulley, then lift. So I added a bolt to the swing bar.


Also toying with track color. I wanted something believable, but easy. I think I found it. Rustoleum Auto Primer Dark Gray. I spray the links and then quickly dab it with a sponge. Sponge dipped in alcohol removes more.
Still working on technique... Top is plain. Middle with sponged gray only. Bottom with some rust. Have to work on the rusting.

I'm working on the inside body electrics first. Swapping power switches to drivers hatch, adding volt meter and volume control. adding fuses. Tring to chase down all the wiring so I can understand and make a diagram for future.
Mark's instructions for removing the turret are "push back from the front and lift from the front". The turret is held in place by three "pulleys" the back one is spring loaded. Considering that you have to remove the turret to fill the smoke tube, that puts the turret opening on the body in great risk of being damaged after time. ( I plan on shifting the smoke tube to the rear engine deck anyway) I find it easier to reach inside the loaders hatch and pull the spring pulley, then lift. So I added a bolt to the swing bar.
Also toying with track color. I wanted something believable, but easy. I think I found it. Rustoleum Auto Primer Dark Gray. I spray the links and then quickly dab it with a sponge. Sponge dipped in alcohol removes more.
Still working on technique... Top is plain. Middle with sponged gray only. Bottom with some rust. Have to work on the rusting.
I'm working on the inside body electrics first. Swapping power switches to drivers hatch, adding volt meter and volume control. adding fuses. Tring to chase down all the wiring so I can understand and make a diagram for future.
 04-03-2017, 05:23 PM
#27
Member
Thread Starter
Join Date: Jul 2015
Location: Iowa
Posts: 77
Likes: 0
Received 0 Likes
on
0 Posts
Working on the back I found this problem...

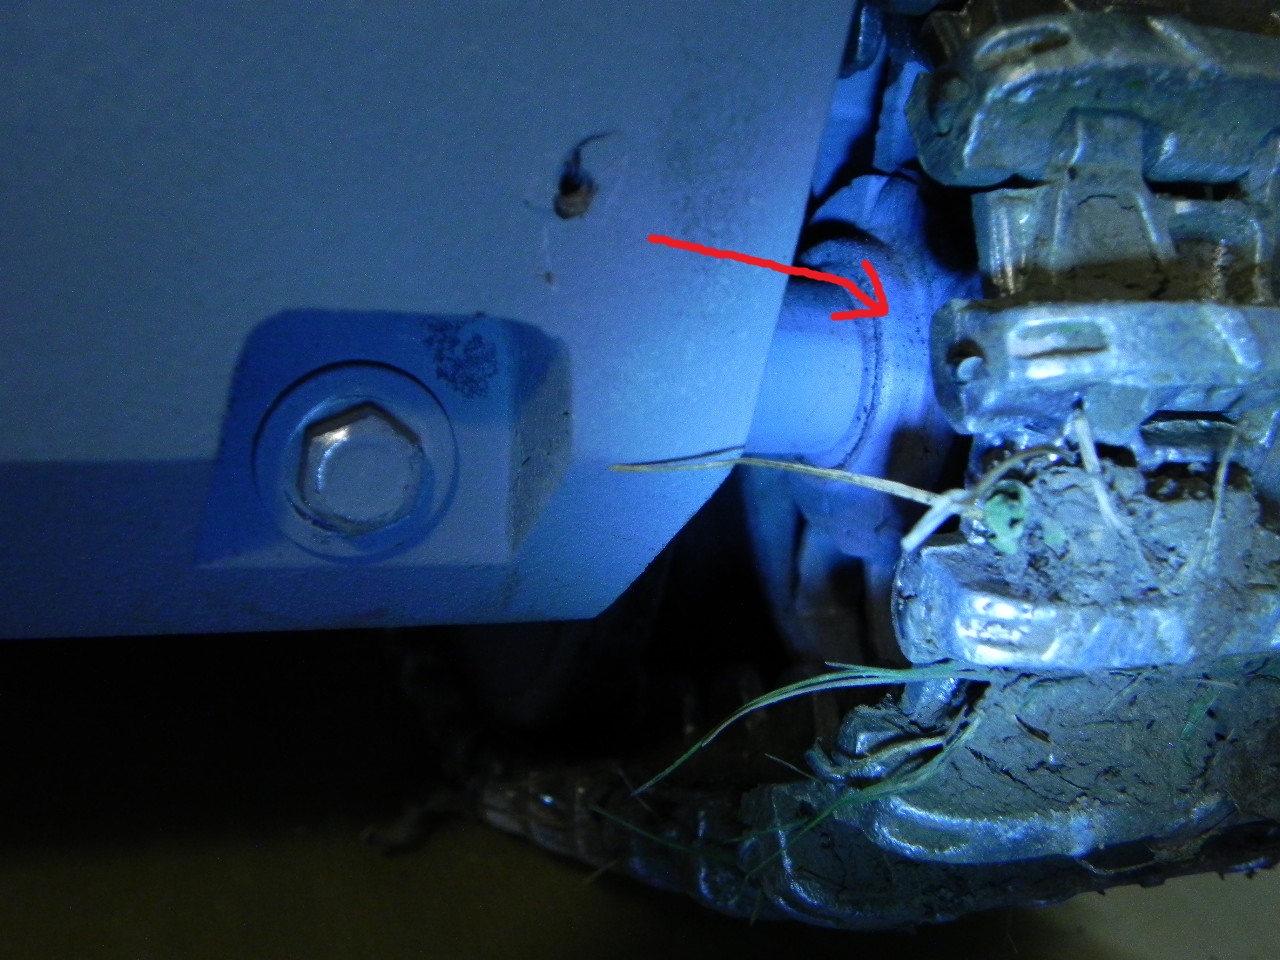
Color me.... A LITTLE WORRIED. I took the track off and hoped it would move with a couple taps from the rubber mallet. nope. Next, I moved the tank to a doorway. Got a car jack and some wood. Put a piece of wood between the idler and door frame. Put the other wood on the other idler and braced with the jack against the other frame. I was slowly cranking, watching, listening... and sweating. I had a lot of pressure on it, but no movement.
Last idea... I cut a slot in some 2" angle iron for the axle. Put this piece on the back, put another on the outside of the idler and squeezed them with 2 "C" clamps. The whole time thinking this could go horribly wrong. I just about to give up, when there was a snap. First thought... But no, the idler had moved back about 2mm. Squeeze more, another snap and 2mm. A little more and another snap and 2mm. I chickened out after that.
It's still a little off, but WAY better.
04-04-2017, 01:35 AM
#28


When these models are built the idler simply has a hole for the bearing that goes all the way through the idler there are no machined lips or stops for the bearings, the bearings are simply banged onto the idler shaft and a few centre punch indentations are made to stop the bearing from coming off the shaft then the idler wheel is tapped into place and secured with hot glue, when it comes to aligning the rear idlers simply heat the idler then gently tap with a raw hide hammer once aligned let the idler cool and it should stay in place, however it looks as though yours is moving on the bearings for some reason and that half the bearings are outside the idler wheel as witnessed by the primer.
04-04-2017, 04:39 PM
#29
Member
Thread Starter
Join Date: Jul 2015
Location: Iowa
Posts: 77
Likes: 0
Received 0 Likes
on
0 Posts
It looks like the bearing was staying on the shaft. The idler was sliding off. The shaft is not adjusted parallel. sighting from the back, the idler did not line up with the spacing in the road wheels. It's better now. I will try to make sure it rides well when I put the tracks back on.
Patchcon... I found the right links for the drive chain, at Menards. I think I'll leave mine as they are, and keep an eye on them.


Patchcon... I found the right links for the drive chain, at Menards. I think I'll leave mine as they are, and keep an eye on them.
04-09-2017, 06:44 PM
#31
Member
Thread Starter
Join Date: Jul 2015
Location: Iowa
Posts: 77
Likes: 0
Received 0 Likes
on
0 Posts
Patch, That's a few too many. 
I just looked, and I'm sorry, I thought Menards was a little more nation wide. I thought you would have a store close.
Patch, PM me your address. I'll send you a couple.
I just looked, and I'm sorry, I thought Menards was a little more nation wide. I thought you would have a store close.
Patch, PM me your address. I'll send you a couple.
Last edited by Scratchwerk; 04-09-2017 at 07:46 PM.
04-30-2017, 04:53 PM
#33
Member
Thread Starter
Join Date: Jul 2015
Location: Iowa
Posts: 77
Likes: 0
Received 0 Likes
on
0 Posts
OK, I finally finished most of the work on the chassis. Just a few things to do after I refit the body.
I also finished my "secret" project. I haven't mentioned this to anyone yet, incase it was a waste of time. I've been watching the smoker on other peoples T1, and have not been satisfied with the way the smoke acts after it leaves the pipe. It has a tendency to fall quickly. Kings and panthers aren't to bad.
Here is the plan. I've added another fan to make a blower. This will blow out into the exhaust shroud. Between the muffler and the shroud. I'll place a baffle around the outside of the muffler to close off he bottom of the shroud. This will keep air flow going up and help keep the smoke from falling right back down.
05-21-2017, 07:43 PM
#34
Member
Thread Starter
Join Date: Jul 2015
Location: Iowa
Posts: 77
Likes: 0
Received 0 Likes
on
0 Posts
Sorry to have been away so long. I finally had today and yesterday to do some work.
I'm working on the body now. Starting at the front. I'm changing the body/chassis separation line. Got the nose plate raised. And the glacis cut back.
I'm also installing "transmission guards?". While that was drying, I started working on the rear engine deck/snorkel plate. I bought one from East Coast Armory. There are quite a few things on it that need fixing. Still, better than adapting the original.
06-11-2017, 05:03 PM
#36
Member
Thread Starter
Join Date: Jul 2015
Location: Iowa
Posts: 77
Likes: 0
Received 0 Likes
on
0 Posts
Here is the latest. The first is the rear engine deck, MG Kugelblende from East Coast Armory. The MG mount needed some help. The rear deck needed to have the snorkel cover base moved, and a lot of rough areas smoothed. The MG mount is still not perfect, but a lot better.
I've been working on a few details on the body. I thought this area looked OK. Then I started making the welded areas and realized there was more missing. With the edge build up and curve, it looks much better.
I've been working on a few details on the body. I thought this area looked OK. Then I started making the welded areas and realized there was more missing. With the edge build up and curve, it looks much better.
08-06-2017, 06:31 PM
#40
Member
Thread Starter
Join Date: Jul 2015
Location: Iowa
Posts: 77
Likes: 0
Received 0 Likes
on
0 Posts
No doubt about it... I'm going to have to retire to find time to work on this tank!
Here's what I've been doing so far.... I have the kugelblende functional. Not to hard. I'll put it on the 7th channel. I detailed the MG a little. Removed the turret guard ring. Also added some magnets to help hold the flaps down. I thought about adding prototype holds. But would probably forget about them the first time I took the body off.
Other problem.. I went to test the servo for the MG, and when I powered up, my 10 amp 12v fuse fried. Put in another, same thing. Tracked the problem down to the barrel elevation ESC. It's shot. Dead short. I talked to Mark about this, he says he has had a couple go bad before. Now what to do. I don't want to spend $30 on another. Found a 30 amp one on Hobby King. Also ordered a 360 servo incase. The ESC came in. Has no reverse, so useless. Looking on YouTube I found a way to turn a servo into a ESC. Wired one up and tested. works Great! Plug and play.
08-07-2017, 03:54 AM
#41
The Tiger I project is coming along rather well. The hinge work will be worth the effort!
But don't quit your job! I've heard that retiring doesn't always equate into more spare time.
But don't quit your job! I've heard that retiring doesn't always equate into more spare time.
08-27-2017, 04:22 PM
#42
Member
Thread Starter
Join Date: Jul 2015
Location: Iowa
Posts: 77
Likes: 0
Received 0 Likes
on
0 Posts
Panther.. I think my wife would hold up that theory.
Here is what has been happening over the last weeks. I finally have the turret guard ring and all the tool holds off. I've also been working on headlight mounts. I've taken some liberties with details so it will hold up to wear.
Here is what has been happening over the last weeks. I finally have the turret guard ring and all the tool holds off. I've also been working on headlight mounts. I've taken some liberties with details so it will hold up to wear.
08-27-2017, 04:44 PM
#43
Member
Thread Starter
Join Date: Jul 2015
Location: Iowa
Posts: 77
Likes: 0
Received 0 Likes
on
0 Posts
Old MSgt sent me some nice extra parts he had. Very Kind of him. There are some I plan on using. One was a armortek headlight. After a long debate, I decided to use the Mark1 original. It was much easier to modify. I cut the front off, added foil to the back and reinforcement to the bottom. I've added a warm white led with a little orange marker on the front, gives a nice incandescent glow. I don't know if I will light it. Best to do it now than later. Cleaned up rather nice.
Last edited by Scratchwerk; 08-27-2017 at 04:53 PM.
09-04-2017, 03:39 PM
#45
Member
Thread Starter
Join Date: Jul 2015
Location: Iowa
Posts: 77
Likes: 0
Received 0 Likes
on
0 Posts
Working on the pioneer tools. The axe and the sledge are ok as is. The shovel needed work. I made a new blade, then chucked the handle in a drill and turned it down.
New shovel blade on top. Original on bottom.
New shovel blade on top. Original on bottom.
09-20-2017, 11:12 AM
#48