


How to attach wheels to Hennetec axle?
 01-03-2018, 05:10 AM
#1
The metal idlers on my Heng Long Jagdpanther simply screw in place. As a result they wobble around and throw tracks frequently.
I have bought a Hennetec track adjuster:
https://www.forgebeartanks.com/store...Art__NR15.html
How do the wheels attach to it? My wheels don't have bushings. Will I need new idlers?
Steve
I have bought a Hennetec track adjuster:
https://www.forgebeartanks.com/store...Art__NR15.html
How do the wheels attach to it? My wheels don't have bushings. Will I need new idlers?
Steve

 01-03-2018, 02:57 PM
#7

Dave is showing the Idlers for a Jagdpanther (Taigen) as out of stock these are on the same page as the "Henntek" Adjuster, If you go to ----
www.rctank.de
they are selling the Taigen Idlers as a set with sprockets, All metal with bearings for 24.95 Euros,
Be aware that Dom at rc tank will include VAT at 19% unless you clearly tell him you are not liable because you are in the USA.
I have not checked if Erik at IMEX has them in his Store in Florida it might be worth while talking with him.
Shaun.
01-03-2018, 06:09 PM
#8
That's for a Tamiya. I don't know if it works with a heng long tank. You better email Dave (Forgebear).
https://www.forgebeartanks.com/store...Heng_Long.html
Steve
01-03-2018, 09:48 PM
#9
Hello Steve,
please send me your adress by mail or PM, I will send you 4mm axles.
Could you attach photo from your idler wheels here?
You do not have wrong idler wheels, but a plastic tub where only self-tapping screws hold.
regards,Guido
please send me your adress by mail or PM, I will send you 4mm axles.
Could you attach photo from your idler wheels here?
You do not have wrong idler wheels, but a plastic tub where only self-tapping screws hold.
regards,Guido
01-09-2018, 05:54 PM
#10
Pulled my idler on my Heng Long metal upgrade tank today. Here you can see what I have to work with:
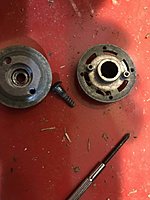
The screw evidently is a shoulder screw which is intended to provide a shaft for the wheel to ride on. But it is not a close fit and there is substantial play in the wheel which allows the tracks to jump on the idler.
So I assume this wheel will not do with the Hennetec axle?
Here is the Taigen "Jagdpanther" wheel, but it does not look correct in the picture - it has "3" stacked wheels not two:
PANTHER G & JAGDPANTHER METAL DRIVE WHEELS AND IDLER WHEELS SET
Maybe this one is what I need?
PANTHER G/F AUSF G METAL DRIVE & IDLER WHEEL SET
The latter appears to have some kind of bearing.
Also I assume I will be cutting away the plastic boss on the Heng Long hull?
Steve
01-09-2018, 09:07 PM
#11
You need to buy the idler set for the metal lower hull. They ise an axle with set screw like Tamiya does. The stock Heng Long junk uses a sheet metal screw to hold the in place LOL. The ones in the link appear to be right. Make sure they are for the metal lower hull and you are good.
 01-12-2018, 02:54 PM
#16
I received my Hennetec axle.
The instructions are in German. Does anyone have instructions in English?
I used Google Translate and it looks decent but I'd prefer clear instructions if they are available. I emailed forgebear we'll see if they have some, too.
einbauhilfe fur das kettenspannsystem art.nr.014 (neue ausf.)
wichtig:die Spannbuchsen konnen mit eingebauter ruckwand verbaut werden!
benotigte werkzeuge:
bohrmashine, dremel, rundfeile, 4mm und 10mm bohrer, schraubendreher, 1.55mm / 2mm
imbusschlussel, wichtig: schraubensicherung fur die einstellschrauben verwenden.
schritt 1.
leitrad entfernen, danach den anguss an der u-wanne entfernen
schritt 2.
ermitteln der bohrlocher, anzeichnen und bohren. die vorhandene aufnhame des leitrades auf 4mm aufbohren, extender einfuhren und auf ca. 11:00 uhr drehen, den ermittelten punkt auf 10mm aufbohren, darin sizt spater die spannbuchse. auf der linken seite auf ca 13:00 uhr (seitenverkehrt).
Schritt 3.
Ermitteln der Befestigungsbohrungen, die spannbuchsen konnen als bohrschablone genutzt werden. einbauen unc verschrauben der spannbuchsen (links/rechts beacthen).
Schritt 4.
Einfuhren der exenter und der messingwelle, stellring gegen eine seite drucken und verschrauben.
Schritt 5.
Leitrader und ketten aufziehen, fluchten dann verschrauben.
Der achsstift der Leitrader mub gekurzt werden.
Wichtig: die beiliegenden beilagscheiben sind zum fluchten vorgesehen, die scheiben werden zwischen spannbuschse und exenter gesetzt.installation aid for the chain tensioning system art.nr.014 (new version)
---------------------------
important: the clamping bushes can be installed with built-in back wall!
needed tools:
Drilling machine, dremel, circular file, 4mm and 10mm drill, screwdriver, 1.55mm / 2mm
Allen key, important: use screw lock for the adjusting screws.
Step 1.
Remove the diffuser, then remove the sprue on the u-pan
step 2.
detecting boreholes, drawing and drilling. Drill the existing hub of the guide wheel to 4mm, insert extender and turn it to about 11:00 o'clock, drill the determined point to 10mm, in it later the tension bush sits. on the left side at about 13:00 o'clock (reversed).
Step 3.
Determining the fixing holes, the clamping bushes can be used as a drilling template. Install and screw in the bushings (left / right beacthen).
Step 4.
Imports of the eccentric and brass shafts, press the collar against one side and screw it tight.
Step 5.
Draw up the cogwheels and chains, then align them.
The achsstift of the Leitrader must be shortened.
Important: the enclosed washers are intended for alignment, the discs are placed between the bush and the exenter.
01-12-2018, 03:22 PM
#17
I found this thread here:
http://www.rcuniverse.com/forum/rc-t...r-install.html
With a translation.
It looks like to find the location of the main axle hole, after you grind away the original plastic mounting boss you position the main axle of the Henntec unit over the original hole location, and then rotate the swing arm to the 11 o'clock position. The hole from the swing arm thus becomes the drill point for the main Henntec axle unit.
Is this right?
Steve
01-12-2018, 04:04 PM
#19
In this thread here you can see a guy doing a plastic HL Jagdpanther and see the big silver washer he had:
http://www.rcuniverse.com/forum/rc-t...l#post10077523
My kit does not have that. The instructions just show the main black housing on the outside of the tank hull, and the nuts on the inside.
Steve
http://www.rcuniverse.com/forum/rc-t...l#post10077523
My kit does not have that. The instructions just show the main black housing on the outside of the tank hull, and the nuts on the inside.
Steve
01-13-2018, 05:06 AM
#20
Hi Steve,
be happy,because you have bought the updated tensioner. The tensoiner became an update 2016,forgebear had not updated his fotos in ebay.
The installing is with the updated version much more simple and the screws are bigger and more stable.
Have a look in my shop,there you can see the actual items.
regards,Guido
01-13-2018, 07:57 AM
#21
Hi Guido,
I was examining the item last night, and noticed that with the built-in flange on the outside of the tank, the height works out exactly to the height of the original plastic mounting boss. So I can see how it works without the backing washer.
Thanks!
Steve
I was examining the item last night, and noticed that with the built-in flange on the outside of the tank, the height works out exactly to the height of the original plastic mounting boss. So I can see how it works without the backing washer.
Thanks!
Steve
01-17-2018, 07:00 AM
#22
I received my Taigen Jagdpanther G drive and idler wheel sets from Imex. The idlers are very nice with bearings and shaft pre-installed and they are nice and tight.
The drive wheels seem to match exactly. The idler wheels are slightly larger than the Heng Long originals. Did I get the right ones?
I suppose the slight size difference won't matter especially with the tension adjustment.

The drive wheels seem to match exactly. The idler wheels are slightly larger than the Heng Long originals. Did I get the right ones?
I suppose the slight size difference won't matter especially with the tension adjustment.
01-20-2018, 08:04 PM
#25
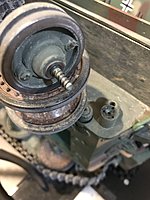
So my installation of the Henntec tensioner is progressing along. I will make a full English write-up with pictures when I'm done. It is important to note that there are left and right main bushings. You want to install them so that their set screw is facing rearward so that it can be manipulated when the assembly is finished.
I can tell already that there is far less slop in the idler wheels than with the stock idler.
Two questions:
Does anyone know what size Allen wrench I need for the tiny set screw that holds the wheel and collar in place?
Also, does someone make a tiny nut driver for the screws that go through the hull? It's hard to get them tight with pliers. I know they do not have to be very tight but I don't want the nuts coming loose. I will probably put a drop of super glue on the shafts when done so they can't come off.
Steve

