


tamiya super pershing.
 08-06-2018, 12:20 AM
#1

Thread Starter
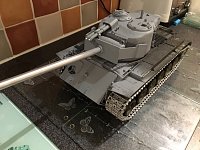
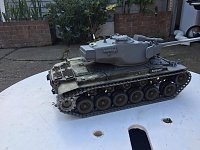
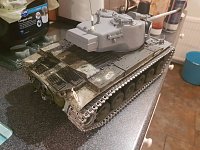
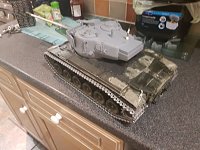
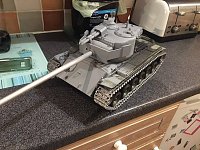
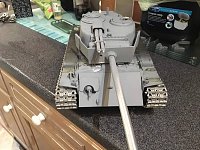
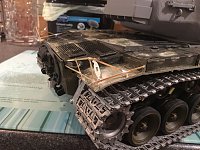
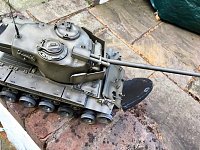
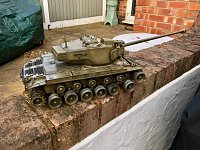
My super p has returned, big thanks to Frank for the conversion! I've fitted the correct impact tracks now (although they're backwards so need to swap them), next I need to fit a battle system. The pershing presents a tricky prospect for hiding one. The plan is to try short orifice tubes with the sensors behind them. Hopefully this will still allow a full range of hits whilst hiding the sensors in the turret. Also got a fair bit of detailing to add such as the turnbuckles, stowage baskets, storage bin handles, antenna and 50cal. 


Sent from my iPhone using Tapatalk
Sent from my iPhone using Tapatalk
 08-08-2018, 10:28 AM
#3
Looks great!!!
 08-15-2018, 05:13 AM
#5
Tom, Are those Impact Tracks?
Thanks,
Rudy
Thanks,
Rudy
08-17-2018, 06:46 PM
#7
Those are still available as of right now. Very nice indeed.
08-17-2018, 11:17 PM
#8
Thread Starter
 08-18-2018, 11:04 AM
#10
Thread Starter
09-01-2018, 11:34 PM
#11
Thread Starter
A little update for you good people.
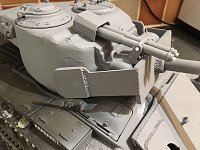
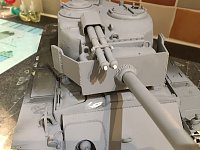
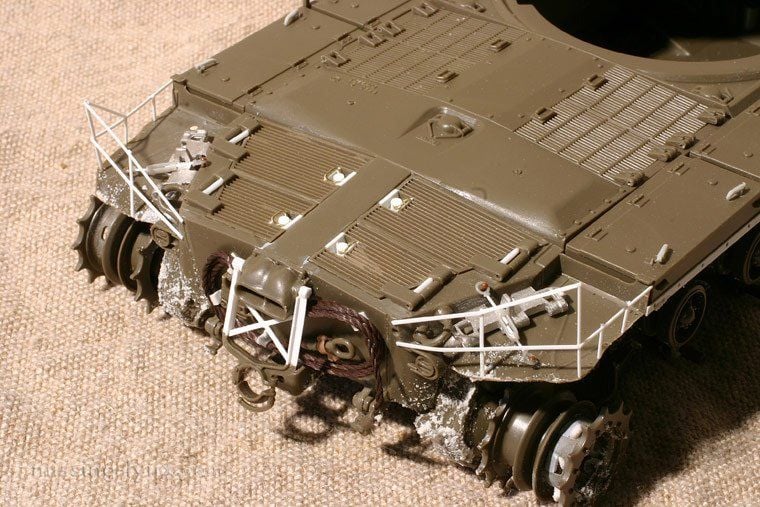
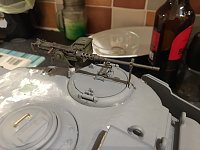
I've done a fair bit of work since last time, first up was fitting the emitter in the mantlet so I could reattach the whole think to the trunion as it had been damaged in the post. 6mm hole straight through and job done.
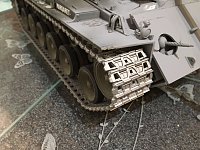
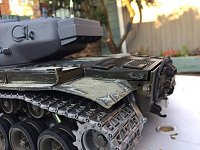
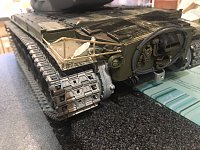
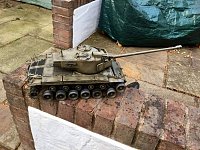
Next I cut down the fenders at the rear to match the real ones, I also swapped her onto a brand new Pershing chassis at this point and refitted the tracks correctly. I added the Schumo scope guards at this point too. I also had to clean off the uhu type glue which was all over the rear
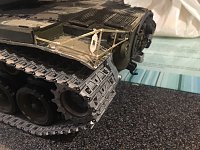
Next up thanks to some keen eyes on Facebook I realised the side fenders needed cutting back to match the real one, mr.dremmel made short work here. I really makes a big difference to the overall look of the thing, much meaner. Lastly I fitted the turnbuckles. I asked woz about these and he very kindly printed some in resin for me. They're very very grateful but thankfully he sent some spares, when on the tank they're much more robust.
I'm still trying to work out if a hidden battle systems viable which will be the next stage. Still after a tamiya 50cal if anyone can help!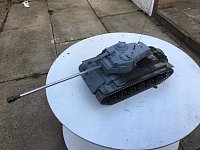


Sent from my SM-G950F using Tapatalk
I've done a fair bit of work since last time, first up was fitting the emitter in the mantlet so I could reattach the whole think to the trunion as it had been damaged in the post. 6mm hole straight through and job done.
Next I cut down the fenders at the rear to match the real ones, I also swapped her onto a brand new Pershing chassis at this point and refitted the tracks correctly. I added the Schumo scope guards at this point too. I also had to clean off the uhu type glue which was all over the rear
Next up thanks to some keen eyes on Facebook I realised the side fenders needed cutting back to match the real one, mr.dremmel made short work here. I really makes a big difference to the overall look of the thing, much meaner. Lastly I fitted the turnbuckles. I asked woz about these and he very kindly printed some in resin for me. They're very very grateful but thankfully he sent some spares, when on the tank they're much more robust.
I'm still trying to work out if a hidden battle systems viable which will be the next stage. Still after a tamiya 50cal if anyone can help!
Sent from my SM-G950F using Tapatalk
09-04-2018, 07:30 AM
#12
Looks great. Those fender turnbuckles look nice.
09-06-2018, 12:11 PM
#15
Thread Starter
 09-06-2018, 01:37 PM
#18
Thread Starter
I see, I could take the fenders back a couple mm. The strip shouldn't be necessary as the plastic thicknesses looks pretty close to the pictures I have of it
10-02-2018, 11:31 AM
#19
Thread Starter
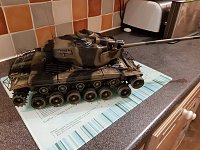
What's this, a post from me that's not a sale!?
Pulling my finger out and bought a ruck of brass so I can get things squared away. First up the stowage on the super p. Unfortunately I underestimated the amount needed but more is on order so watch this space.


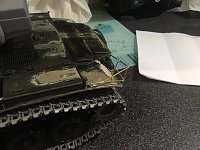

Sent from my iPhone using Tapatalk
Pulling my finger out and bought a ruck of brass so I can get things squared away. First up the stowage on the super p. Unfortunately I underestimated the amount needed but more is on order so watch this space.
Sent from my iPhone using Tapatalk
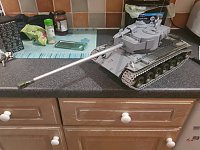
10-03-2018, 05:08 AM
#20
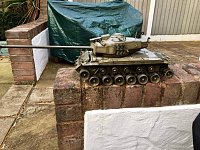
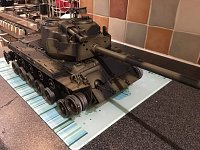
Looks good. Now that is a long barrel on that main gun!!!
10-07-2018, 11:09 PM
#21
Thread Starter
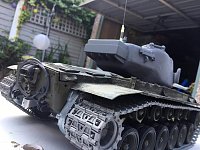
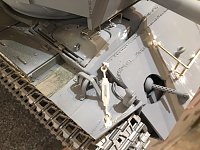
Managed to snatch a couple hours last night on the super Pershing. Finished up the stowage brass work and added the spare track holders (the retaining plates are intentionally wonky 😉 ). Next up I need to fit a tbu base and get into the fine details like the stowage handles and other small bits.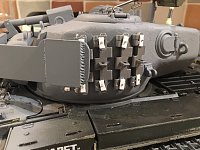


10-14-2018, 12:44 AM
#22
Thread Starter
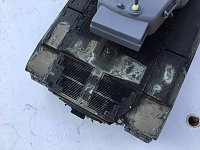
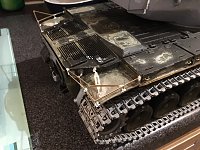
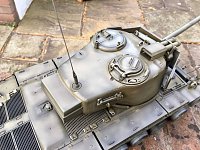
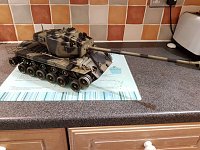
More done on the super p, slowly getting there. First order of business was to back date her to the example that was sent to Europe (and stop Nick Tattersall from moaning at me 😉 . To that end the loaders hatch was removed as was the telescoping mg mount. The mg was relocated to the loaders split hatch. Next was to add the small plates that can be seen on the real one where the fenders have been cut down. 4mm brass sheet cut to size. Grab handles have been added to the stowage bins, references I have aren't 100% clear as you can only see the rear bin in the pictures of her at Kassel, and the one before she got the elephant ears is a long shot with them hard to make out. Next was the slow process of adding welds. I've started using Vallejo plastic putty for the first time and it's amazing for welds, just have to be patient for it to start to cure before making the indents as it's quite runny out the tube. Next up will be more welds, amending the engine deck locks and some more fine detail.


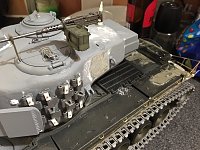


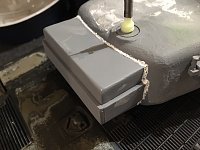


. To that end the loaders hatch was removed as was the telescoping mg mount. The mg was relocated to the loaders split hatch. Next was to add the small plates that can be seen on the real one where the fenders have been cut down. 4mm brass sheet cut to size. Grab handles have been added to the stowage bins, references I have aren't 100% clear as you can only see the rear bin in the pictures of her at Kassel, and the one before she got the elephant ears is a long shot with them hard to make out. Next was the slow process of adding welds. I've started using Vallejo plastic putty for the first time and it's amazing for welds, just have to be patient for it to start to cure before making the indents as it's quite runny out the tube. Next up will be more welds, amending the engine deck locks and some more fine detail.
11-19-2018, 12:35 PM
#23
Thread Starter
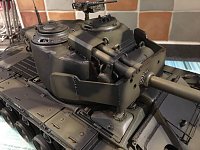
Some more done on the super P. I've replaced the shock absorber with one for shape ways but it needed a fair bit of snipping and reshaping and added the brackets on the rain cover. First coat of primer on, I love this as it's the first time it's all tied together in one colour.
I'm also experimenting with covers for the sensors, they look a bit rubbish exposed. So I've tried using exposed 35mm film as a glass substitute. Not only does it look like glass but also it acts as a visible light filter and only let's through IR.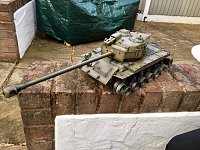


Sent from my SM-G950F using Tapatalk
I'm also experimenting with covers for the sensors, they look a bit rubbish exposed. So I've tried using exposed 35mm film as a glass substitute. Not only does it look like glass but also it acts as a visible light filter and only let's through IR.
Sent from my SM-G950F using Tapatalk
11-19-2018, 12:36 PM
#24
Thread Starter
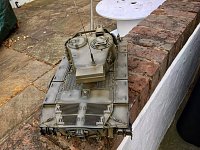
Some more done! 3AD black camo added, I'm not sure if I will modulate the black but it's starting to look the part.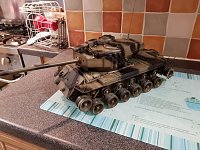


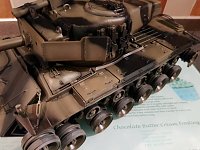

Sent from my SM-G950F using Tapatalk
Sent from my SM-G950F using Tapatalk
11-23-2018, 12:46 PM
#25
Thread Starter
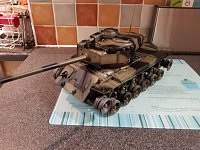
Filter and first round of pin washes on, wanted to darken things down a little and tone down the black. Also added some decals. The references I have of her before the scrapyard show a USA and what looks like a two digit number on the side (numbers illegible so I had to guess). Lighting in the kitchens a little funky but I'm pleased so far. 


Sent from my SM-G950F using Tapatalk
Sent from my SM-G950F using Tapatalk