


1/6 Scale Sherman T48 Tracks - Delrin Injection Molded - Spyker Workshop
 08-30-2018, 07:46 PM
#26

Join Date: Nov 2010
Location: HamiltonWaikato, NEW ZEALAND
Posts: 937
Likes: 0
Received 78 Likes
on
55 Posts
Hi Ryan
All this talk about Delrin - would a Delrin washer between turret & hull be easier & more effective than a bearing?
Or for that matter a Delrin washer either side of the mantlet, and as a liner to assist gun recoil?
Mal
All this talk about Delrin - would a Delrin washer between turret & hull be easier & more effective than a bearing?
Or for that matter a Delrin washer either side of the mantlet, and as a liner to assist gun recoil?
Mal
Last edited by afv aficionado; 08-30-2018 at 07:47 PM. Reason: Additional query
 08-30-2018, 08:20 PM
#27
Thread Starter
Join Date: Mar 2009
Location: Saint Paul, MN
Posts: 288
Likes: 0
Received 0 Likes
on
0 Posts
afv aficionado - To replace like small roller bearings in the turret, or like a giant ring the whole turret sits on top of? I'm not really sure on that.
I'm close to getting the tracks and suspension upgrades out for sale, I came up with prices for them. (still working on idler and drive-train upgrades)
3D Printed Suspension Upgrade: $250
Delrin Tracks KIT (requires assembly): $645
Delrin Tracks RTR (assembled & ready to install): $1155
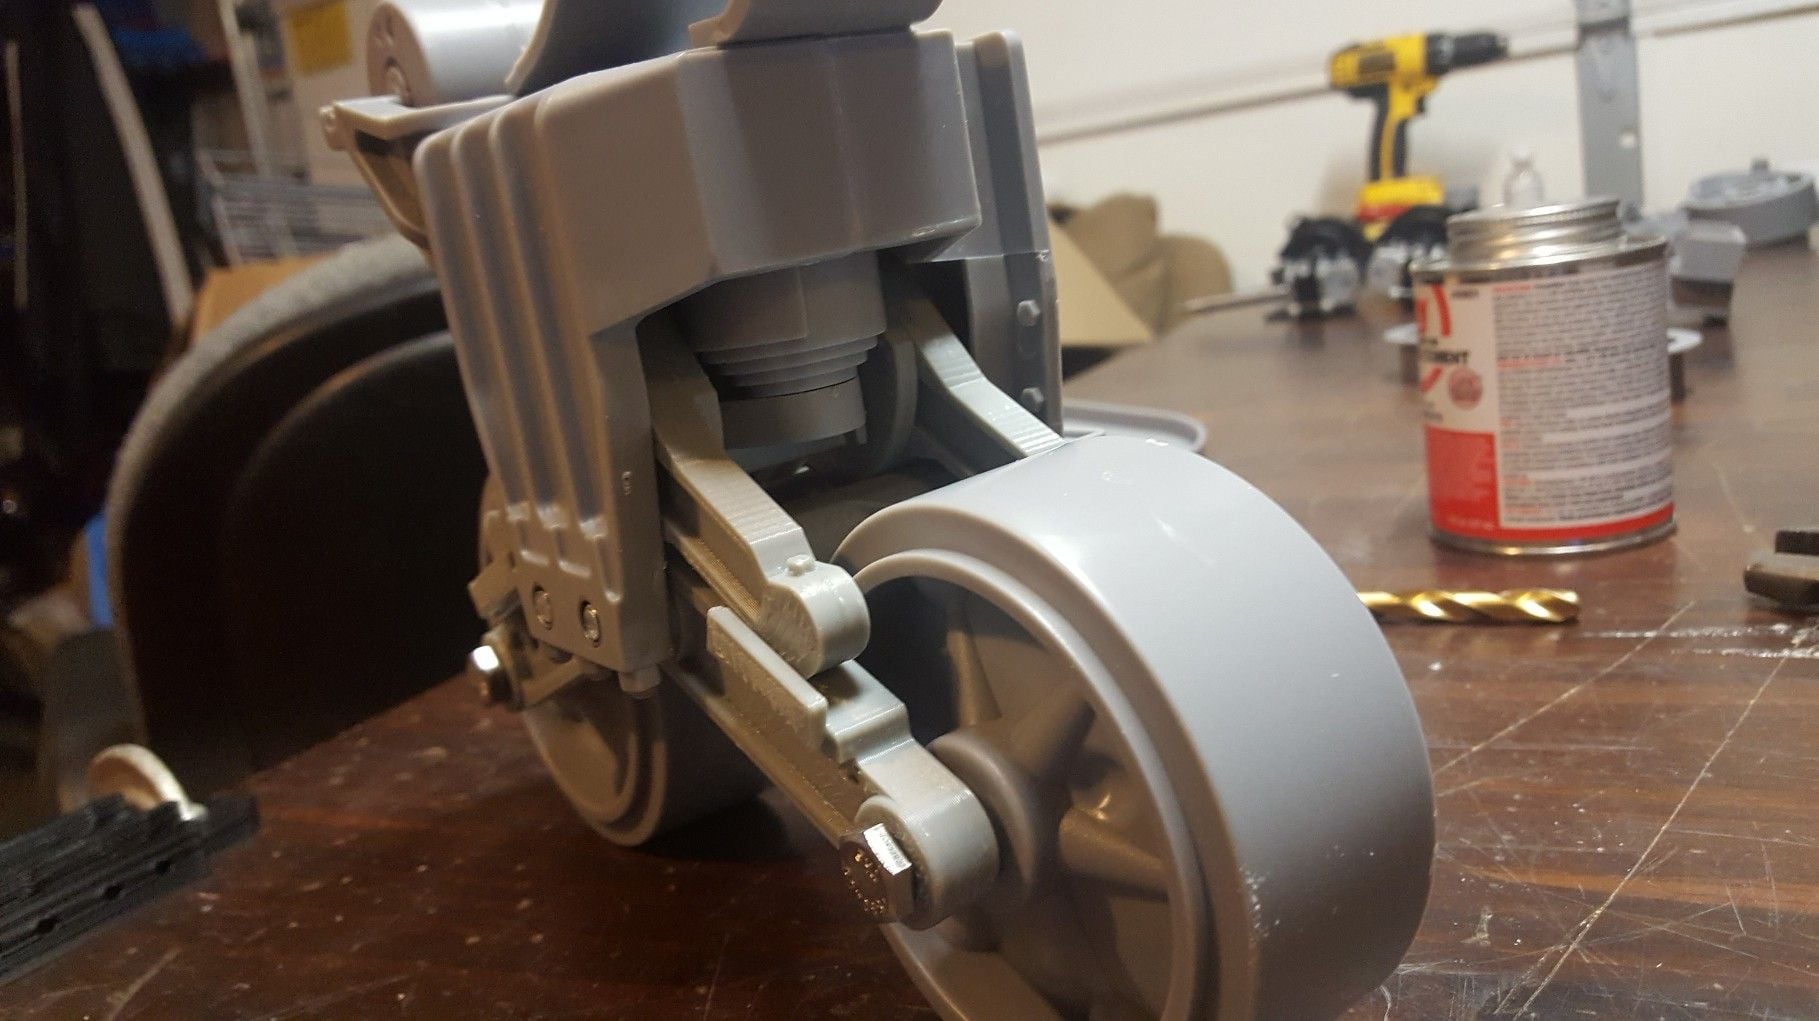
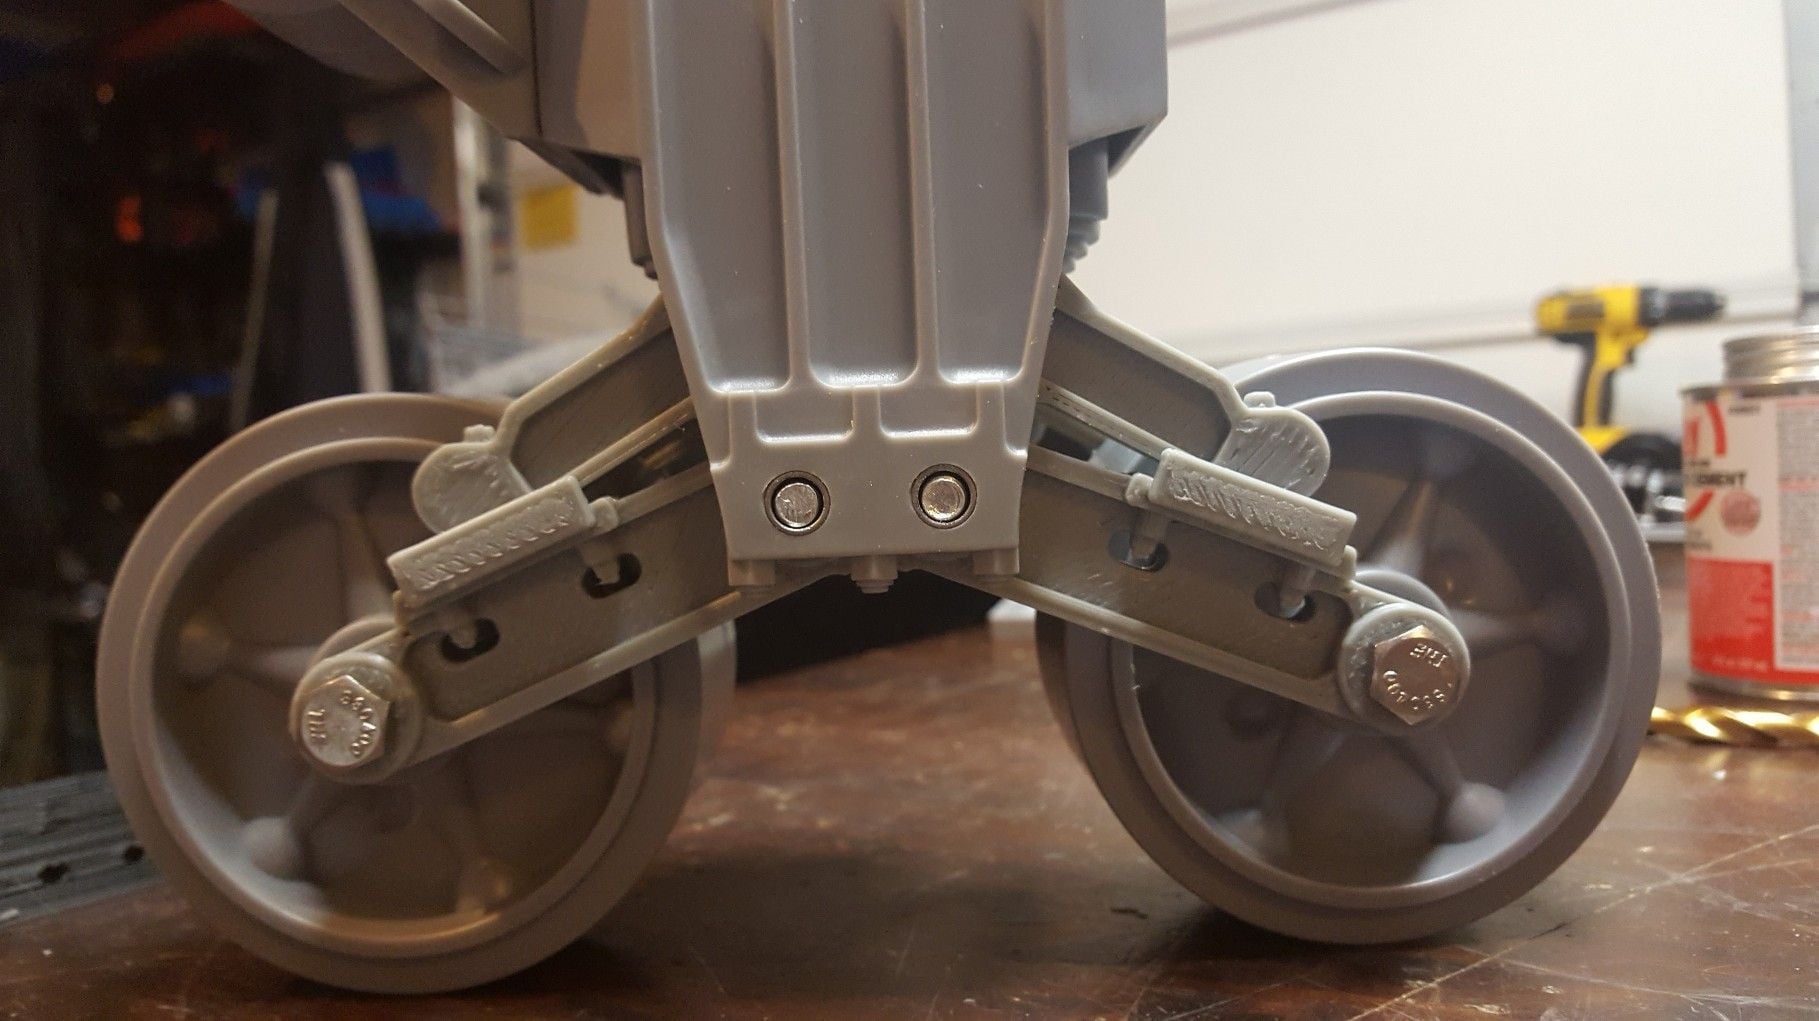
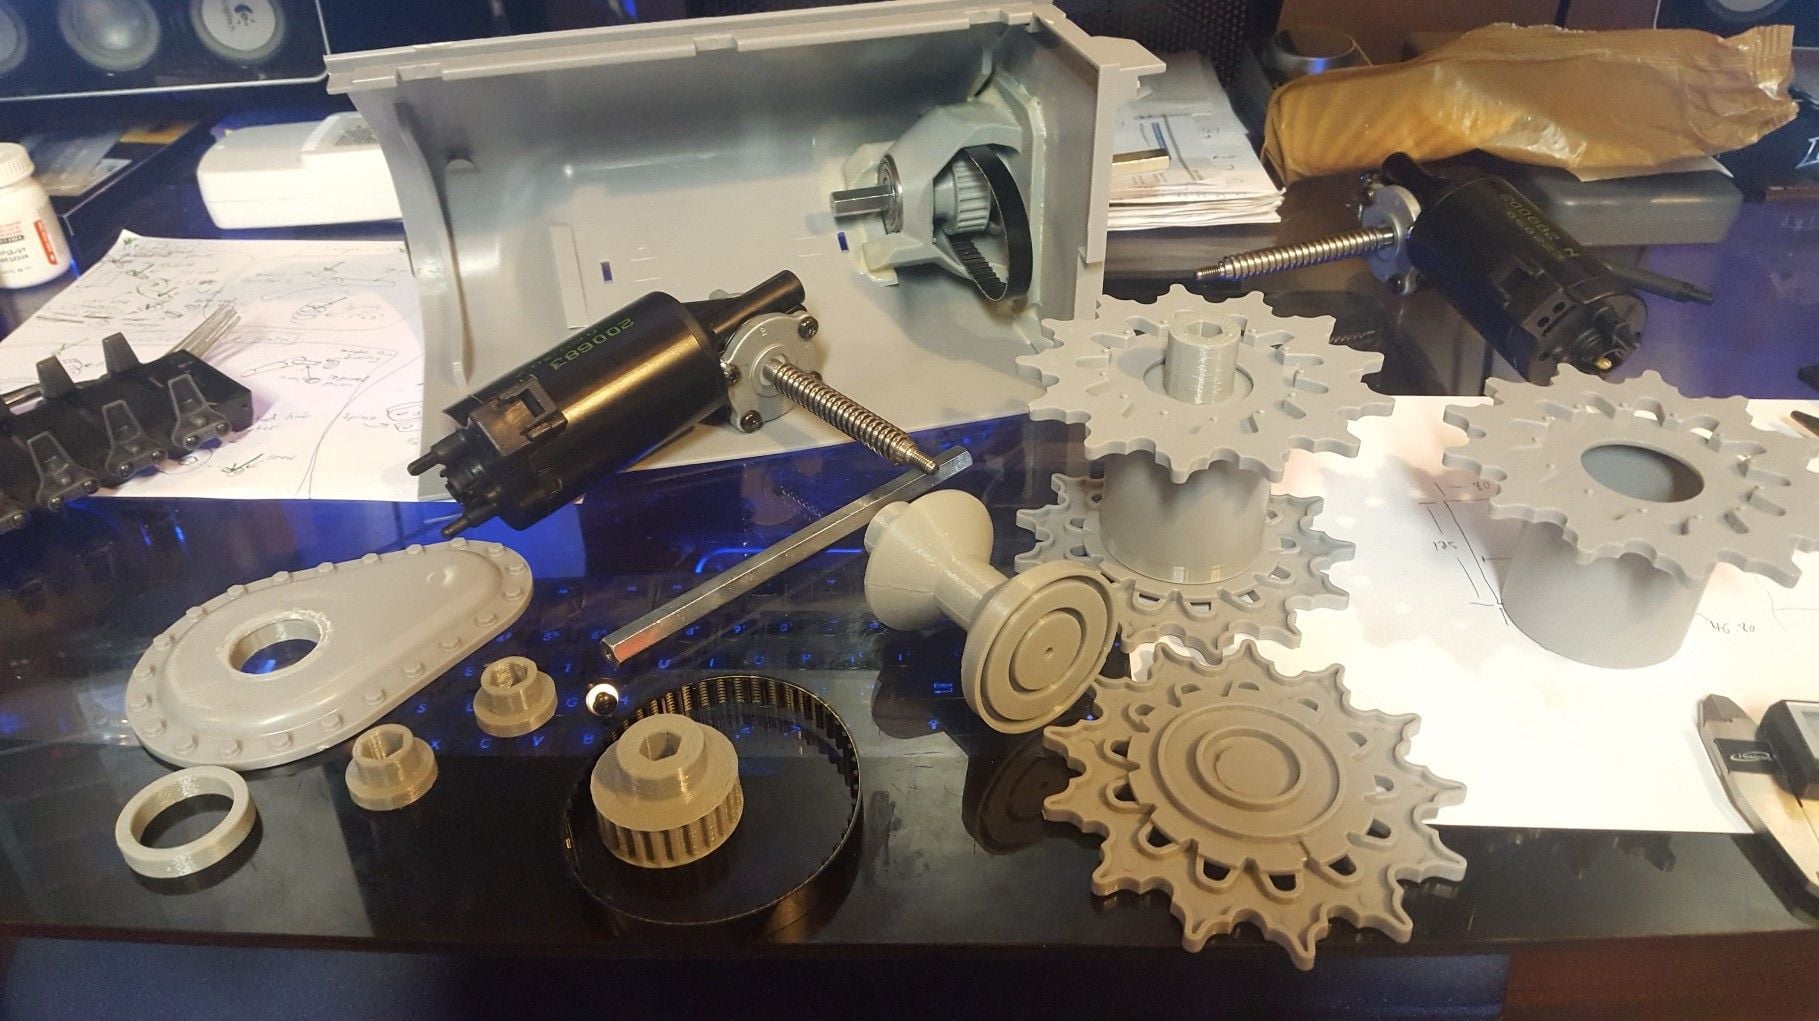
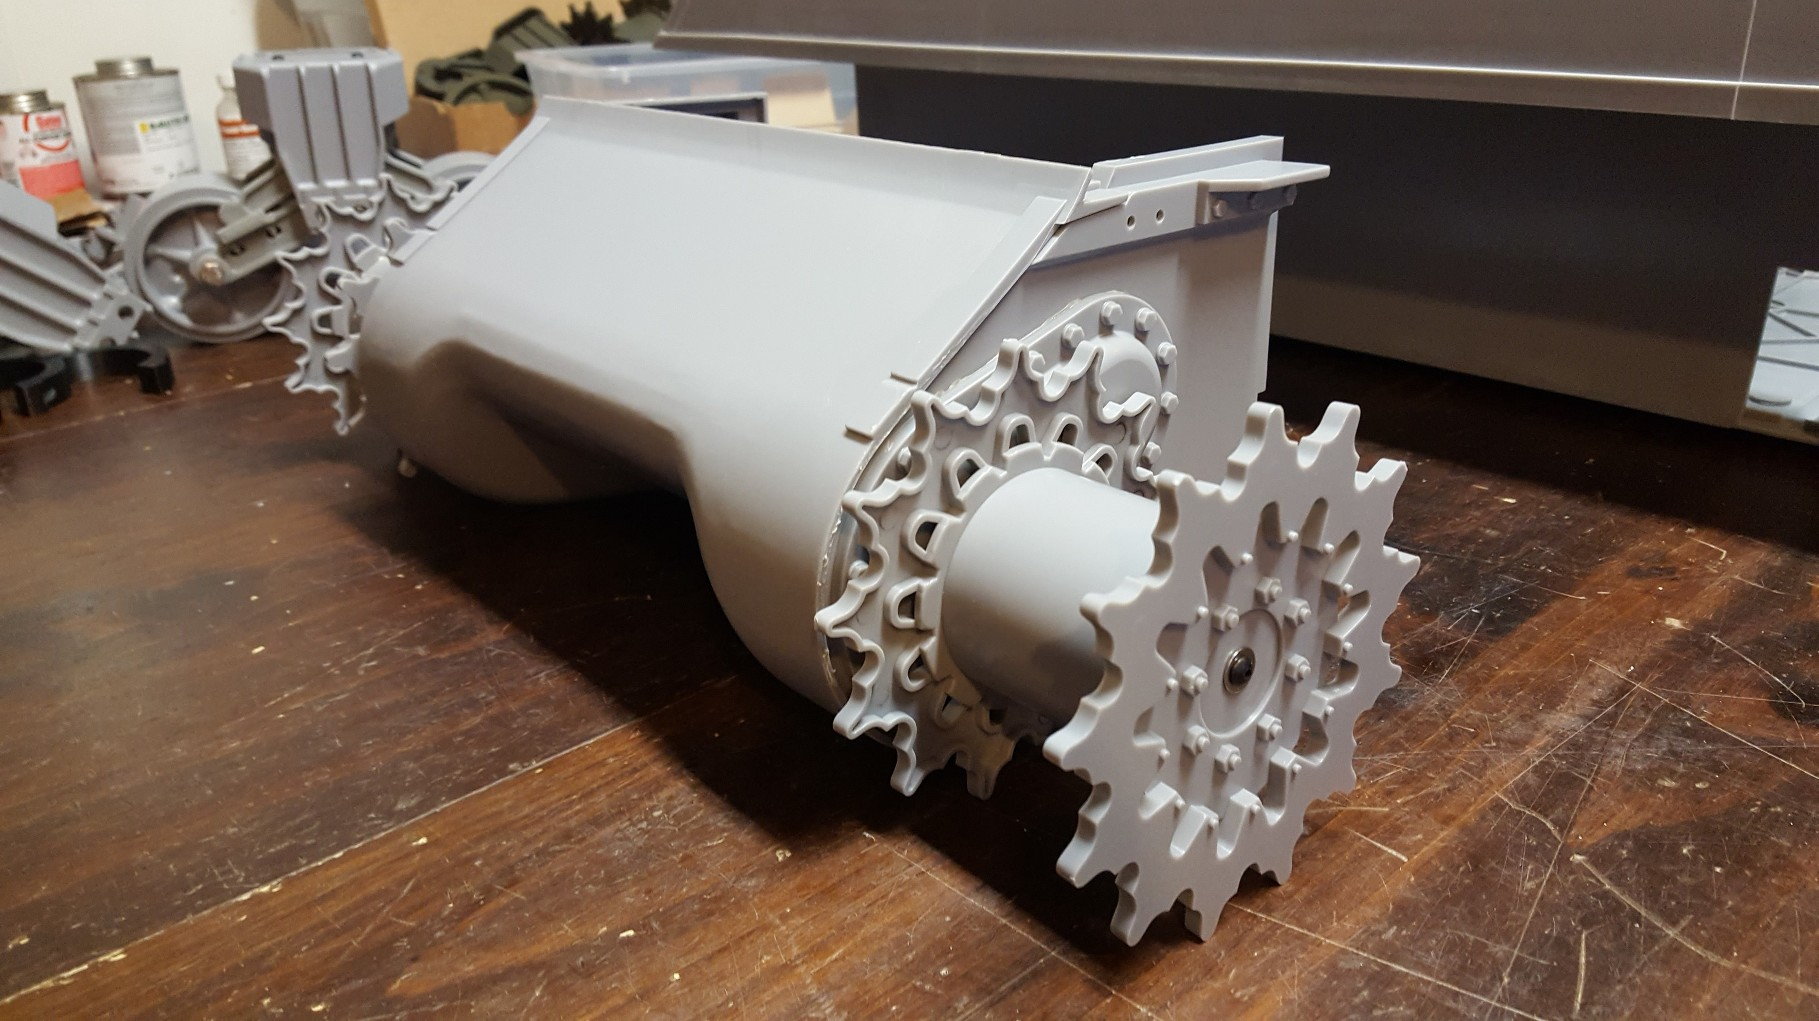
I got a suspension unit fully operational and man is it NICE! Every moving part has a bushing on it which makes is super smooth. I used 3d printed parts and tried to make them as scale as possible while still making them as strong as possible. All the visible stuff looks realistic but hidden behind I added lots of extra material and thickness to make them stronger. Everything is printed in ABS and easily sanded and painted. I didn't do any sanding to these parts. The inside uses 1" diameter springs that rest inside the stock spring so you can't even tell it has springs inside it. It is a pretty hard spring so if you want softer suspension you can simply cut a few turns off. Each suspension set (2 wheels) takes about 16lbs to start moving, and bottoms out at about 30lbs (the arms straight across) My scale only goes up to 110lbs and I was able to put them much force on these without them breaking or anything happening, so with stronger springs you could go with even more weight. This means with the stock springs it can hold up a 100lb tank. Would take around 180lbs to fully compress all the suspension. This is all only using ABS printed parts and some hardware. Also put bushing in the wheels. I will be making a video tomorrow on them!
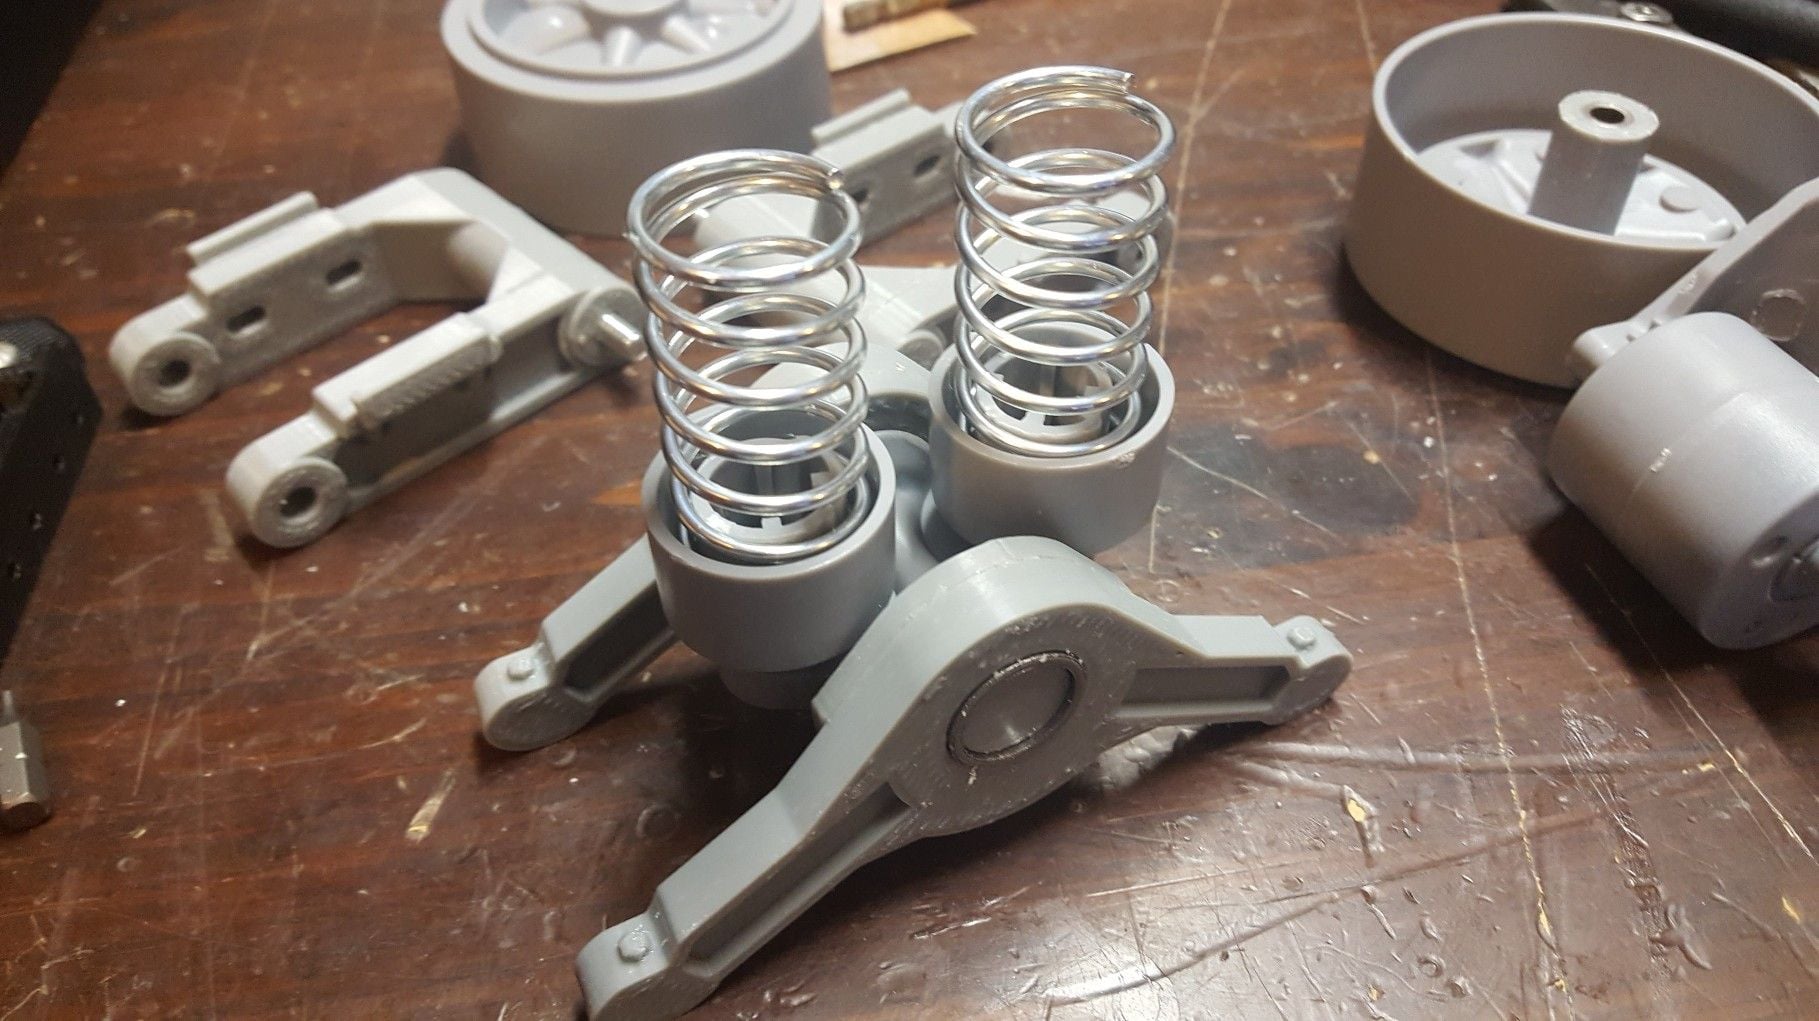
The springs are 100% hidden from view, SO COOL!
These posts help guide the springs so they don't twist inside when the wheels are taking un-even travel


I'm close to getting the tracks and suspension upgrades out for sale, I came up with prices for them. (still working on idler and drive-train upgrades)
3D Printed Suspension Upgrade: $250
Delrin Tracks KIT (requires assembly): $645
Delrin Tracks RTR (assembled & ready to install): $1155
I got a suspension unit fully operational and man is it NICE! Every moving part has a bushing on it which makes is super smooth. I used 3d printed parts and tried to make them as scale as possible while still making them as strong as possible. All the visible stuff looks realistic but hidden behind I added lots of extra material and thickness to make them stronger. Everything is printed in ABS and easily sanded and painted. I didn't do any sanding to these parts. The inside uses 1" diameter springs that rest inside the stock spring so you can't even tell it has springs inside it. It is a pretty hard spring so if you want softer suspension you can simply cut a few turns off. Each suspension set (2 wheels) takes about 16lbs to start moving, and bottoms out at about 30lbs (the arms straight across) My scale only goes up to 110lbs and I was able to put them much force on these without them breaking or anything happening, so with stronger springs you could go with even more weight. This means with the stock springs it can hold up a 100lb tank. Would take around 180lbs to fully compress all the suspension. This is all only using ABS printed parts and some hardware. Also put bushing in the wheels. I will be making a video tomorrow on them!
The springs are 100% hidden from view, SO COOL!
These posts help guide the springs so they don't twist inside when the wheels are taking un-even travel
Last edited by TheGreatestMoo; 08-30-2018 at 08:23 PM.
08-31-2018, 02:07 AM
#28
Thread Starter
Join Date: Mar 2009
Location: Saint Paul, MN
Posts: 288
Likes: 0
Received 0 Likes
on
0 Posts
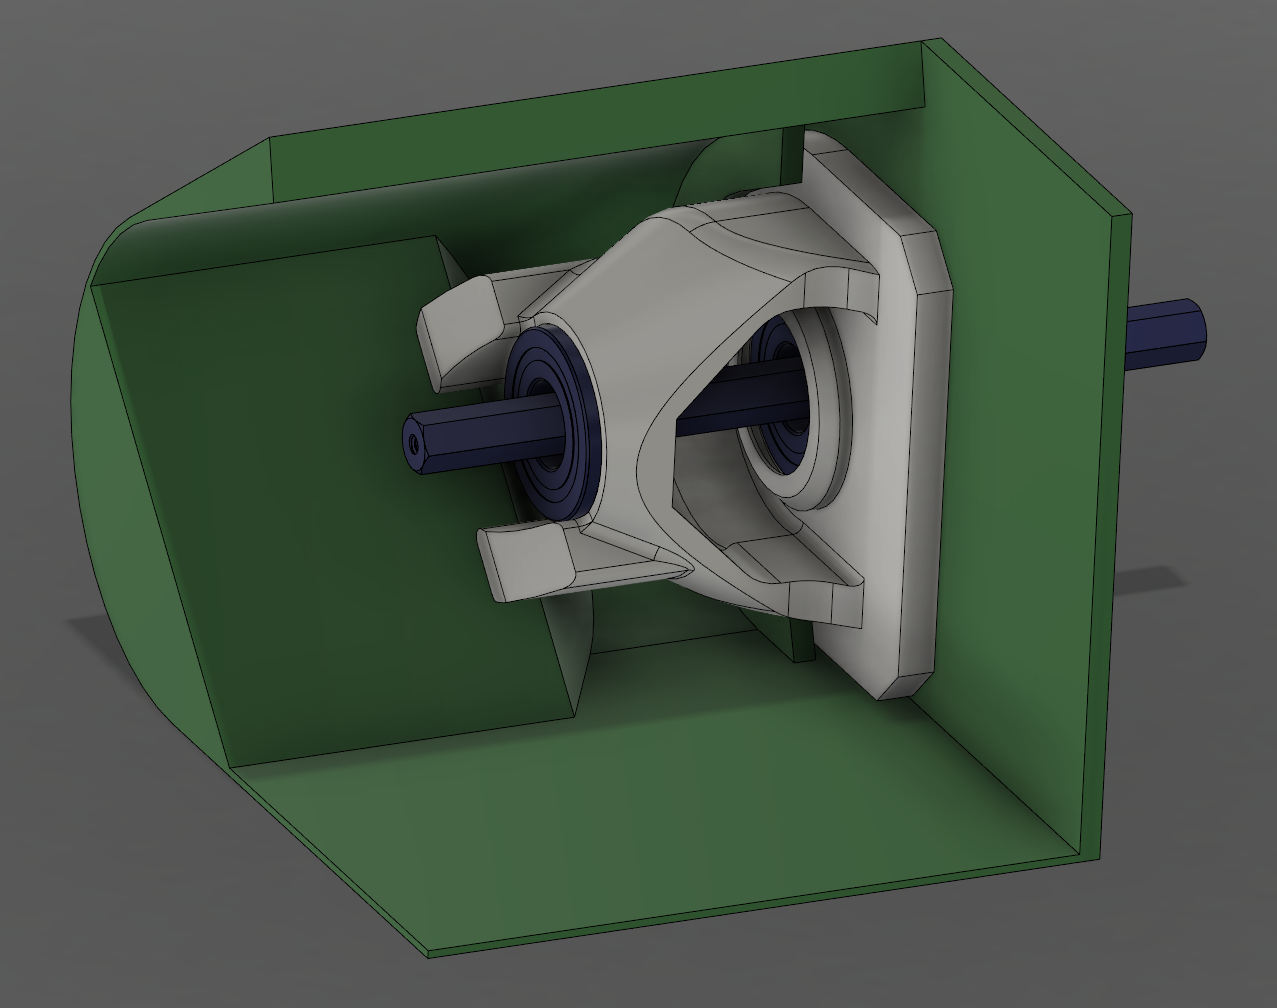
Some CAD on the drive shaft upgrade, one big printed part glued into the hull. Inside there will be mounted a printed pulley and a belt that comes out to a motor that is mounted on a different part of the tank. Using a 3/8" hex shaft the sprocket will be locked in place very solidly since the ends of the hex shaft are tapped and use a screw to pull the whole assembly together. I used this same setup on a smaller scale in my Spyker KAT and 1/16th Scorpion tank. The shaft is extra long and will have some spacers you can move around to make the sprocket stick out from the hull the exact amount you need. More pics to come soon...
Last edited by TheGreatestMoo; 08-31-2018 at 02:10 AM.
08-31-2018, 08:19 AM
#29
Are those bearings or just bushings? In the photos it looks like they are bearings.
08-31-2018, 11:43 AM
#30
Thread Starter
Join Date: Mar 2009
Location: Saint Paul, MN
Posts: 288
Likes: 0
Received 0 Likes
on
0 Posts
The suspension just uses bushings, but the transmission will use bearings. I could make the wheels use bearings, there is enough space in there but its alot of extra cost, I think bushings will work just fine, they are self-oiling, and the sherman drives at pretty low speeds.
08-31-2018, 01:12 PM
#31

Loving the work my friend! Just a question on the ABS, have you tried doing some acetone vapor bathing to the parts? When I need my ABS to look like injection molded parts I do some vapor bathing and it only takes about 15-30 seconds per part. I kinda wish I had a 1/6th tank so I could get a set myself! GREAT job! One of these days I might have to steal you for some IMEX/Taigen work 
09-01-2018, 10:06 AM
#33
Ryan
Excellent work on the bogeys. I overhauled mine in a similar manner you did to make them functional. Those should work great. Are you going to use a flat tooth belt or chain for the main sprocket? I think for this type of vehicle a toothed belt would be fine.
Great job - enjoying your progress. This will be a fine vehicle when finished.
Couple ideas on the turret rotation. There are a number of very inexpensive lazy susan type bearings - available from VXB. Like these.
https://www.vxb.com/120mm-Lazy-Susan...p/kit12876.htm
Or you can use 4X small rollers, turned on end - so the roller rides on the turret base. The rollers would be fixed to the hull. Tamiya does this on a number of 1/16 tanks and eliminates the need for a large bearing.
Bob
Last edited by RC_BobM; 09-01-2018 at 10:12 AM.
09-01-2018, 12:32 PM
#34
Thread Starter
Join Date: Mar 2009
Location: Saint Paul, MN
Posts: 288
Likes: 0
Received 0 Likes
on
0 Posts
Imex-Erik - I have not tried that vapor bath stuff to smooth printed parts yet, for me I just sand the parts I want to look nicer. I will leave it up to the customers to try that out.
Jarhead2005 - Yeah I will be selling a whole transmission upgrade also. More on that coming soon.
RC_BobM - I will be using a timing belt and printed pulleys for the transmission, I almost have it done to show. I will do some stuff for the turret also but not for a while, until I actually build my tank and get the other stuff out for sale.
New vid of how to assemble the suspension and their performance towards the end:
09-02-2018, 09:25 AM
#35
Great video. Those are excellent improvements to the stock bogeys. I would add the wheel backs to the bogey wheels - they look much better. You could also just fill each wheel with about 0.3" of resin to add a little weight to the wheels (vs completely filling). But the wheels, esp with bushings will be plenty strong.
It will be great to see the hull under RC power. Fantastic job.
Bob
It will be great to see the hull under RC power. Fantastic job.
Bob
 09-02-2018, 11:24 AM
#37

Join Date: Jul 2018
Posts: 62
Likes: 0
Received 0 Likes
on
0 Posts
Looks fantastic! The only thing I will wanna do different, rather add to, is to attach them. I'm presuming they slide into the hull and glue in place. I will prolly attach the housings first, and after placing an internal support in the hull, I will add two screws or bolts thru the back the housing into the hull. Possibly even Rivers so there is no head protruding into the suspension housing. Then assemble them on the tank. This way, when isit being driven, during turns and possibly slides on loose soil, the stress of the tank making the turn won't cause the suspension from breaking free of the hull.
09-02-2018, 12:23 PM
#38
cconeill Great looking Sherman. I assume you will RC it?
Jarheard2005 Good point the suspension attachment is a bit weak. It could be bolted by removing the plastic bolt heads and drilling them into holes. They will need reinforcement for RC use..
The hull will need to be reinforced as well to take the weight of batteries etc. All easily done with sheet styrene.
Here is a link to mine Sherman on SAG. I put ball bearing on Sprocket and Idler and reinforced the suspension to make it functional. Although mine is not intended to be RC'd - the tracks are too flimsy. Ryan has solved that problem. It would be a major job to tear it down and rebuild it for RC.
Sherman (Dragon) M4A3 - Sixth Army Group
I'd like to build one RC after I see how this project works out (excellent so far). Perhaps build a RC lower hull and re-use the upper hull and turret ?
Cool stuff...
Bob
Last edited by RC_BobM; 09-02-2018 at 12:28 PM.
09-02-2018, 02:47 PM
#39
Thread Starter
Join Date: Mar 2009
Location: Saint Paul, MN
Posts: 288
Likes: 0
Received 0 Likes
on
0 Posts
I will be doing a whole structural support kit also for inside the hull, with giant 3d printed "ribs" on my big 24x24" printer. Most likely be screwed in place up from under the tank and walls. Starting those soon. Those same ribs should be able to reinforce the suspension also.
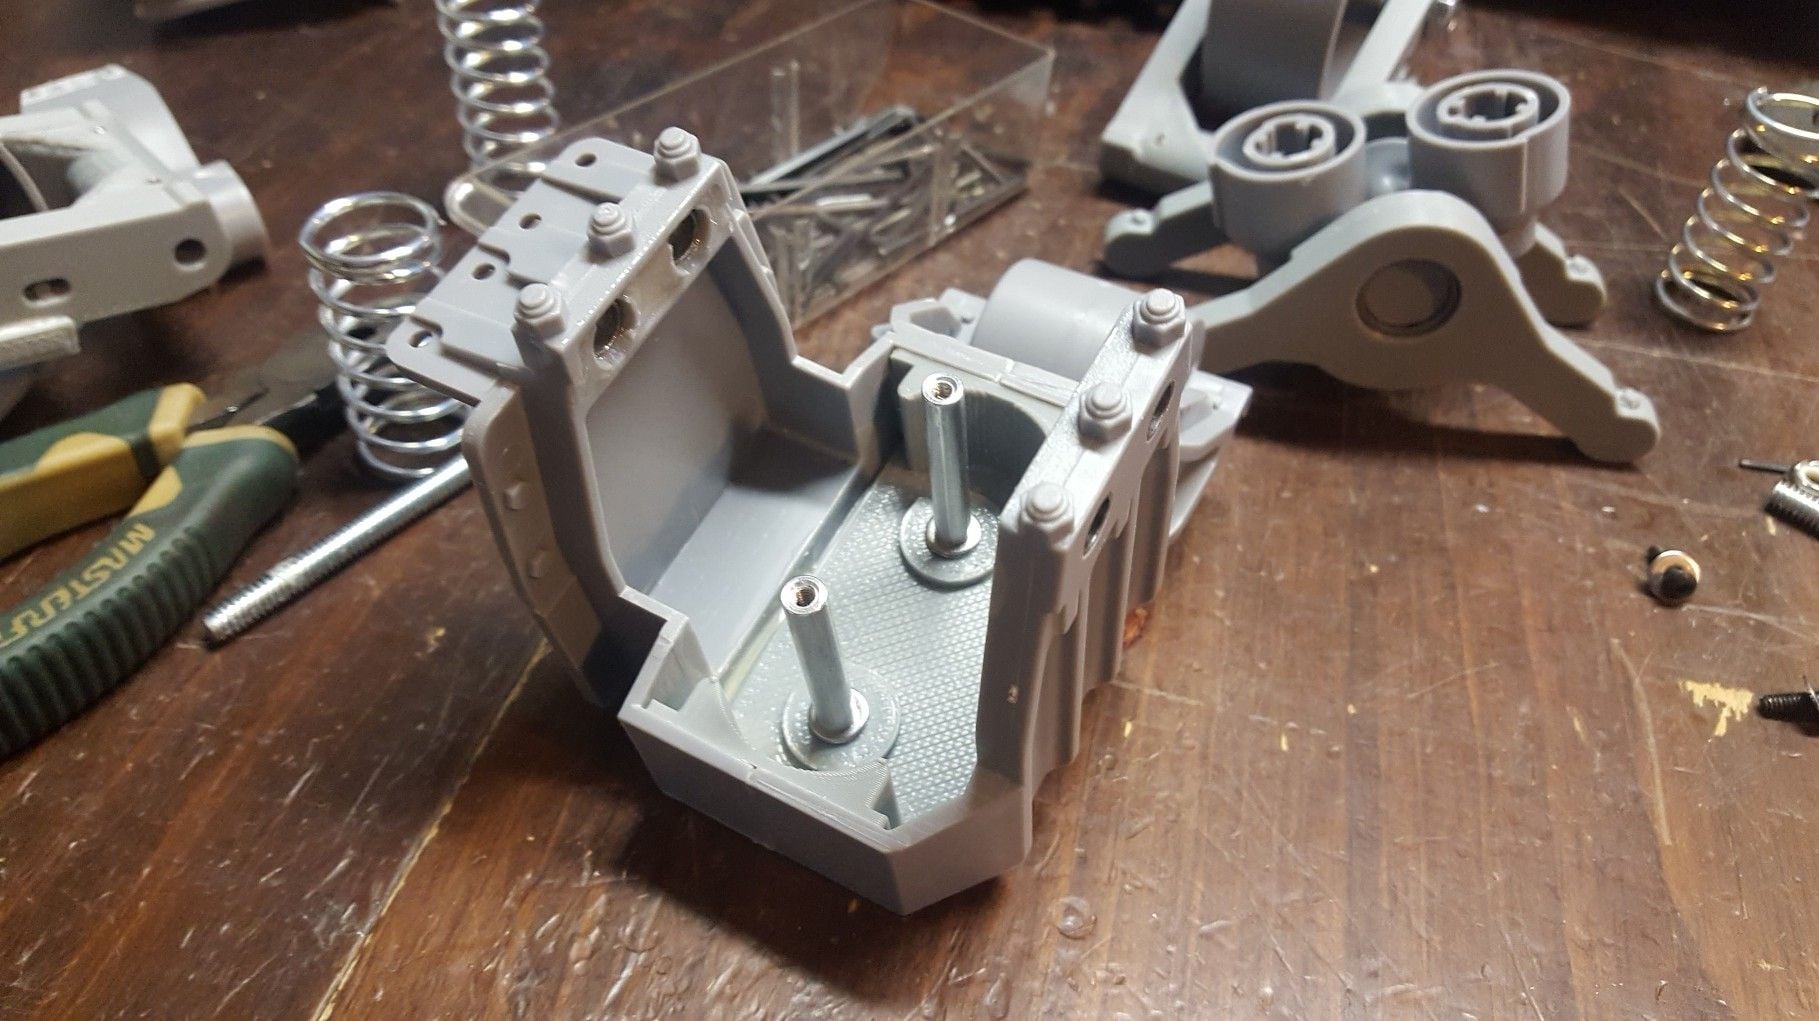
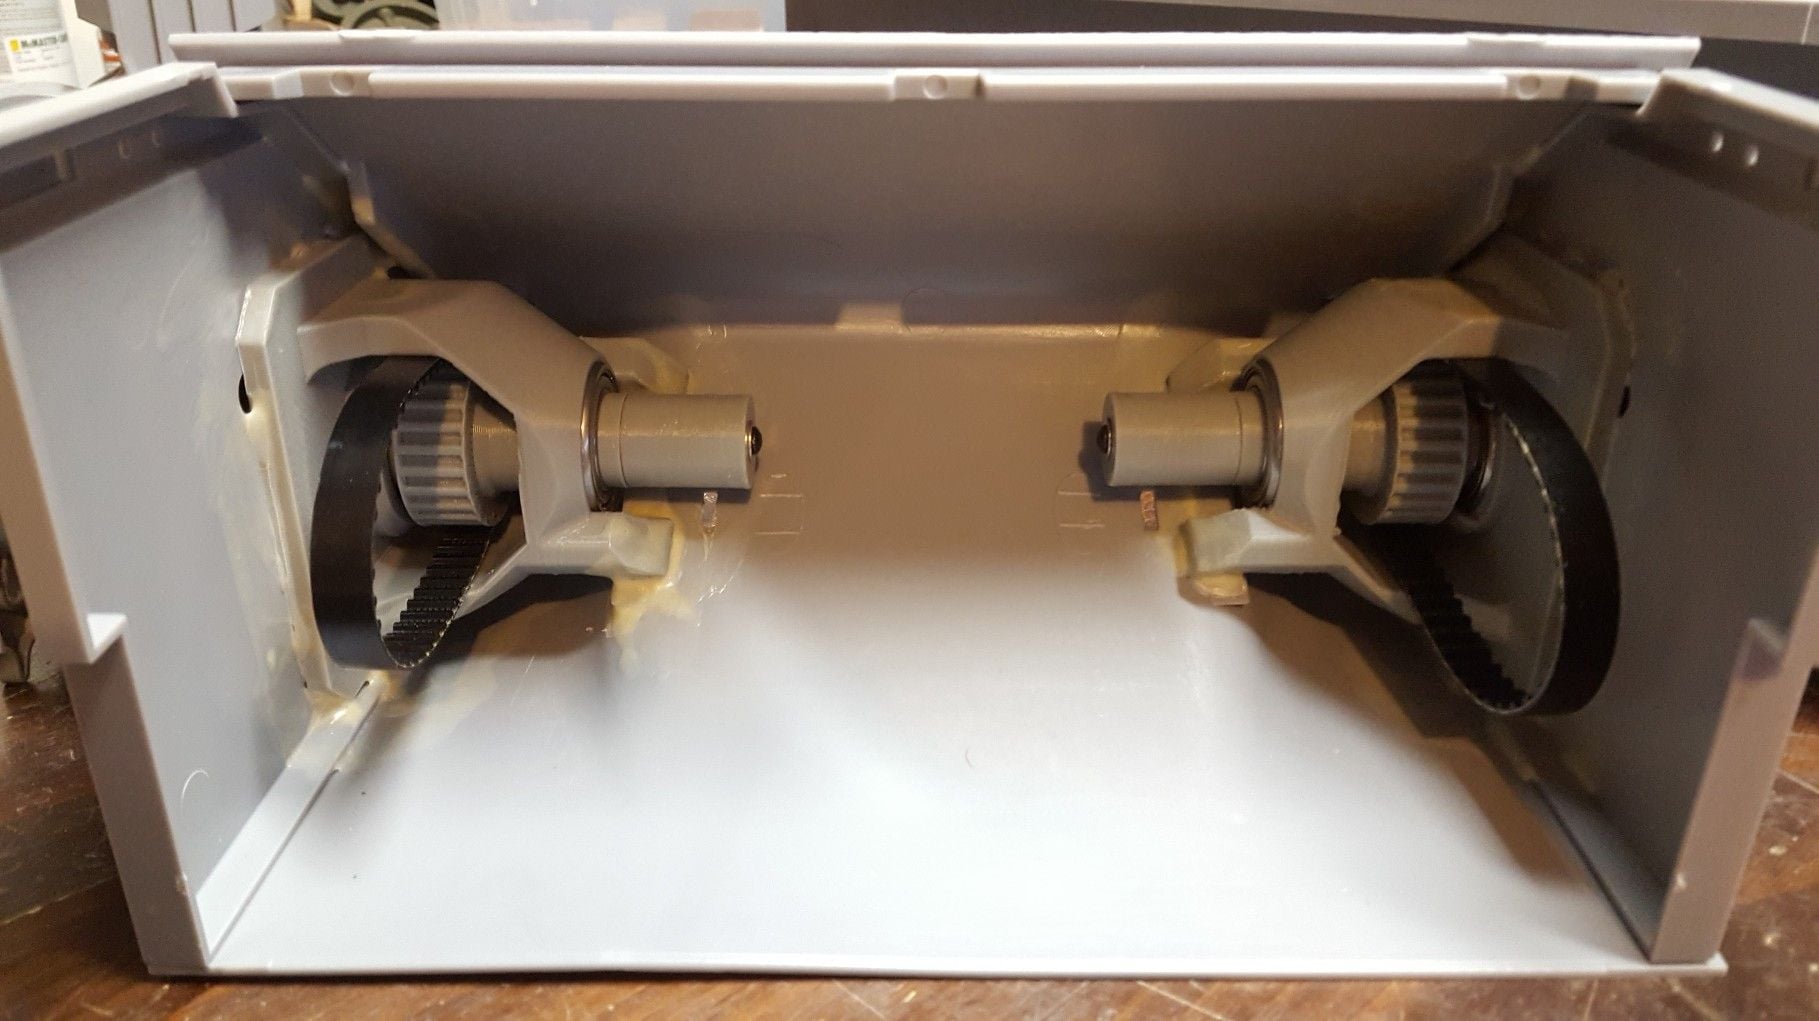
I got the driveshafts mounted in the hull, they are so SMOOTH and strong. one printed part holds both bearings so its easier to install without having to line up as much stuff. Still working on the motor mounts, those will probably be integrated into one of the structural ribs, or maybe just glued onto the floor not sure yet.
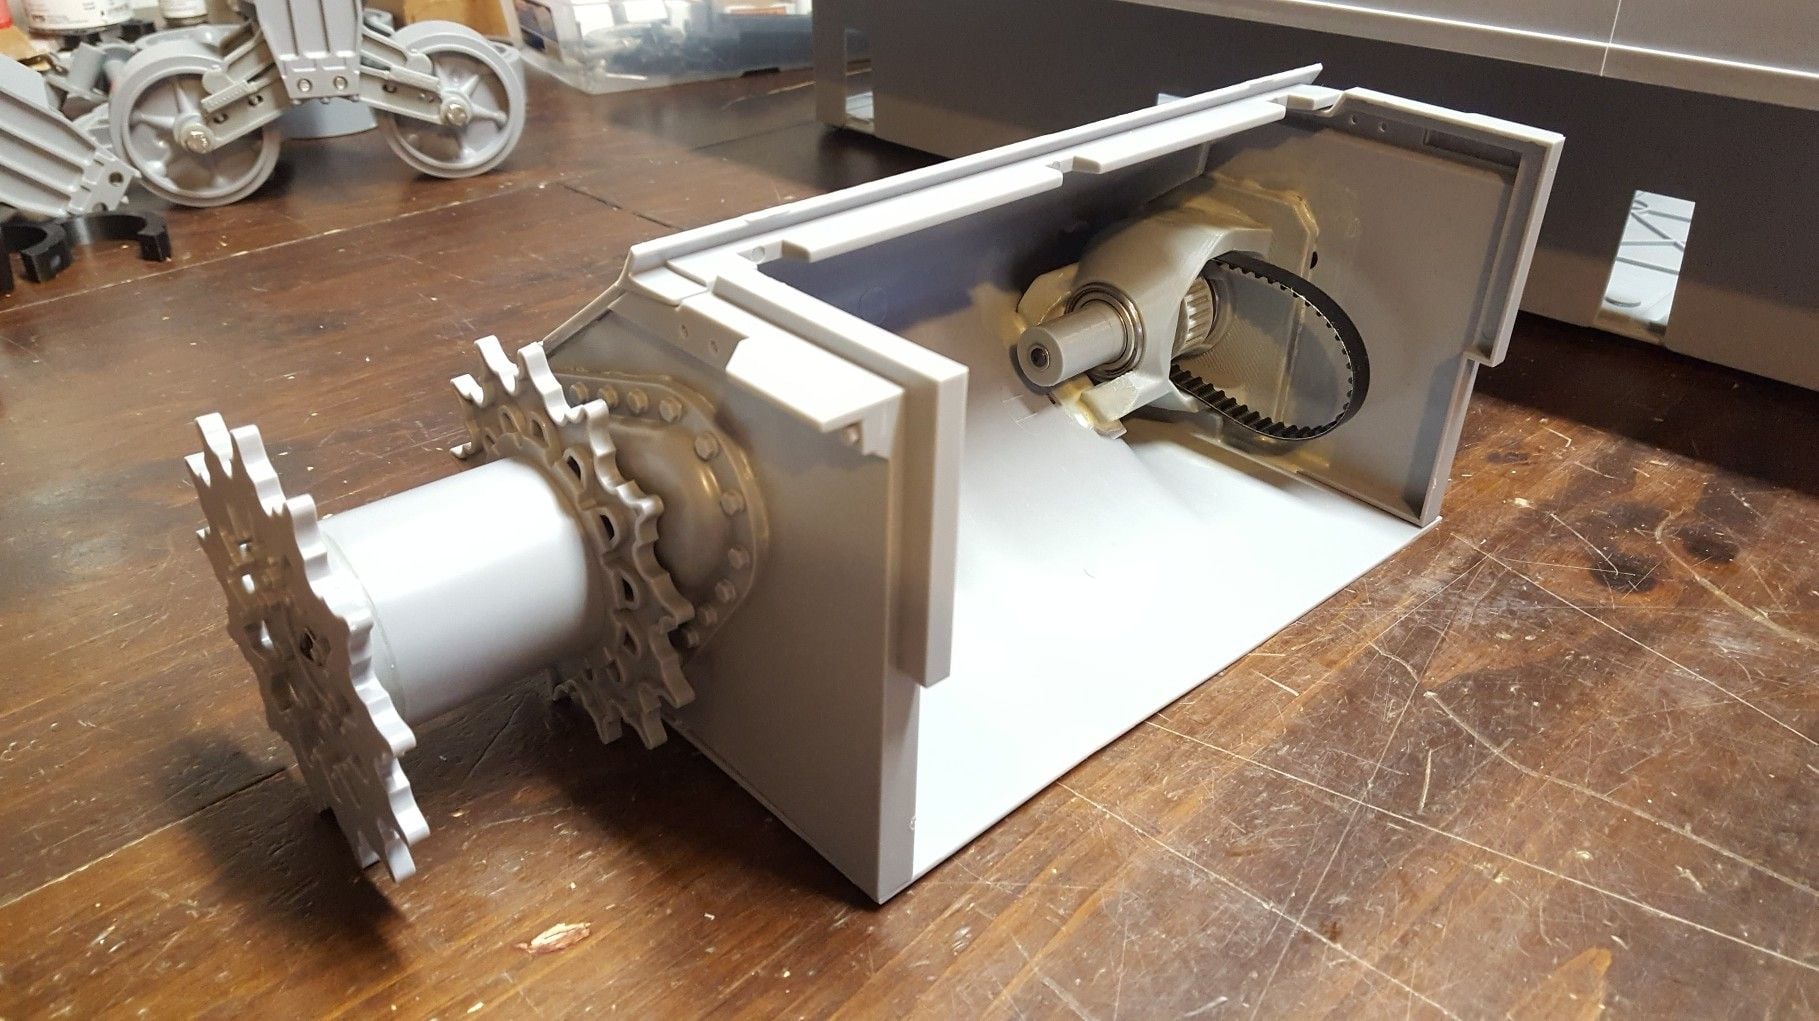
This uses the stock sprockets with a printed hub in the middle (to fix the error in width in the kit) I don't find it necessary at all to have the sprockets metal, just like timing pulleys there are so many teeth engaged you would have to break like 12 teeth at once for it to fail, the only part that I see needs to have strength is the shaft connection point to transmit the power. The shafts are 3/8" hex standoffs that are threaded on both ends, the printed parts have the hex shape printed into them and when each end is screwed together everything gets sandwiched together, it makes a ridiculously strong connection.
I use the exact same setup on my Spyker KAT and Scorpion. My Spyker KAT uses a smaller 1/4" hex shaft and has a 3d printed sprocket and I've never had the teeth on that fail even after all this abuse:
I got the driveshafts mounted in the hull, they are so SMOOTH and strong. one printed part holds both bearings so its easier to install without having to line up as much stuff. Still working on the motor mounts, those will probably be integrated into one of the structural ribs, or maybe just glued onto the floor not sure yet.
This uses the stock sprockets with a printed hub in the middle (to fix the error in width in the kit) I don't find it necessary at all to have the sprockets metal, just like timing pulleys there are so many teeth engaged you would have to break like 12 teeth at once for it to fail, the only part that I see needs to have strength is the shaft connection point to transmit the power. The shafts are 3/8" hex standoffs that are threaded on both ends, the printed parts have the hex shape printed into them and when each end is screwed together everything gets sandwiched together, it makes a ridiculously strong connection.
I use the exact same setup on my Spyker KAT and Scorpion. My Spyker KAT uses a smaller 1/4" hex shaft and has a 3d printed sprocket and I've never had the teeth on that fail even after all this abuse:
Last edited by TheGreatestMoo; 09-02-2018 at 03:00 PM.
09-02-2018, 03:35 PM
#40
cconeill Great looking Sherman. I assume you will RC it?
Jarheard2005 Good point the suspension attachment is a bit weak. It could be bolted by removing the plastic bolt heads and drilling them into holes. They will need reinforcement for RC use..
The hull will need to be reinforced as well to take the weight of batteries etc. All easily done with sheet styrene.
Here is a link to mine Sherman on SAG. I put ball bearing on Sprocket and Idler and reinforced the suspension to make it functional. Although mine is not intended to be RC'd - the tracks are too flimsy. Ryan has solved that problem. It would be a major job to tear it down and rebuild it for RC.
Sherman (Dragon) M4A3 - Sixth Army Group
I'd like to build one RC after I see how this project works out (excellent so far). Perhaps build a RC lower hull and re-use the upper hull and turret ?
Cool stuff...
Bob
Jarheard2005 Good point the suspension attachment is a bit weak. It could be bolted by removing the plastic bolt heads and drilling them into holes. They will need reinforcement for RC use..
The hull will need to be reinforced as well to take the weight of batteries etc. All easily done with sheet styrene.
Here is a link to mine Sherman on SAG. I put ball bearing on Sprocket and Idler and reinforced the suspension to make it functional. Although mine is not intended to be RC'd - the tracks are too flimsy. Ryan has solved that problem. It would be a major job to tear it down and rebuild it for RC.
Sherman (Dragon) M4A3 - Sixth Army Group
I'd like to build one RC after I see how this project works out (excellent so far). Perhaps build a RC lower hull and re-use the upper hull and turret ?
Cool stuff...
Bob
09-02-2018, 04:10 PM
#41
cconeill - Agree Ryan is bringing some very amazing skills to the table with his projects. Can't wait to see what he does for electronics/lights/sounds on this model. Ps -When I said build an RC hull I meant I already glued the one I have together, I'd have to do some cutting to fit Ryans parts for the Sprocket and suspension etc. Not out of the question, but I kinda hate sawing up a completed model. Would be nice to have new raw hull parts to start with perhaps. That means buying another kit.. I don't think the steel reinforced suspension/hull Idea is so bad - but its a lot of modification and has some scale looks compromises. I really like the idea of a light/medium RC duty version of this kit - which is what is happening in this thread..
That sprocket drive design is too cool for words! Ryan do you think you can reduce the speed enough? Don't want the Sherman rippin around like the Spyker KAT! It appears the design is plenty robust.
Ryan can I ask what kind of printer do you use? That is some crazy build size! Looks like very nice resolution as well.
I misspoke earlier when I said use the wheel backs on the bogey wheels. I had forgotten the kit comes with the hoop like wheel backs. I used the bogey wheel inserts from East Coast Armory. A very worthy addition, but being resin cast they needed some minor trueing on a lathe to fit properly (& concentrically) in the wheels - esp if used for RC. East Coast Armory -- 1/6th Scale M4 Sherman Detail Upgrades
Very cool project - keep the wheels turning!
B
Last edited by RC_BobM; 09-02-2018 at 04:20 PM.
09-02-2018, 05:07 PM
#42
cconeill - Agree Ryan is bringing some very amazing skills to the table with his projects. Can't wait to see what he does for electronics/lights/sounds on this model. Ps -When I said build an RC hull I meant I already glued the one I have together, I'd have to do some cutting to fit Ryans parts for the Sprocket and suspension etc. Not out of the question, but I kinda hate sawing up a completed model. Would be nice to have new raw hull parts to start with perhaps. That means buying another kit.. I don't think the steel reinforced suspension/hull Idea is so bad - but its a lot of modification and has some scale looks compromises. I really like the idea of a light/medium RC duty version of this kit - which is what is happening in this thread..
That sprocket drive design is too cool for words! Ryan do you think you can reduce the speed enough? Don't want the Sherman rippin around like the Spyker KAT! It appears the design is plenty robust.
Ryan can I ask what kind of printer do you use? That is some crazy build size! Looks like very nice resolution as well.
I misspoke earlier when I said use the wheel backs on the bogey wheels. I had forgotten the kit comes with the hoop like wheel backs. I used the bogey wheel inserts from East Coast Armory. A very worthy addition, but being resin cast they needed some minor trueing on a lathe to fit properly (& concentrically) in the wheels - esp if used for RC. East Coast Armory -- 1/6th Scale M4 Sherman Detail Upgrades
Very cool project - keep the wheels turning!
B
That sprocket drive design is too cool for words! Ryan do you think you can reduce the speed enough? Don't want the Sherman rippin around like the Spyker KAT! It appears the design is plenty robust.
Ryan can I ask what kind of printer do you use? That is some crazy build size! Looks like very nice resolution as well.
I misspoke earlier when I said use the wheel backs on the bogey wheels. I had forgotten the kit comes with the hoop like wheel backs. I used the bogey wheel inserts from East Coast Armory. A very worthy addition, but being resin cast they needed some minor trueing on a lathe to fit properly (& concentrically) in the wheels - esp if used for RC. East Coast Armory -- 1/6th Scale M4 Sherman Detail Upgrades
Very cool project - keep the wheels turning!
B
09-03-2018, 10:30 AM
#43
cconeil - I like FOA too, they have brought a lot to the table for 1/6 scale. I like the idea of using their new cast hull and 76mm turret with Ryans drive train and suspension! Would be a cool project.
An RC conversion for the Dragon jeep would be very cool. I'd especially like one for the schwimmwagon - both for prop and 4WD drive train. All doable with printed parts for sure.
Sorry to highjack Spykers thread....
An RC conversion for the Dragon jeep would be very cool. I'd especially like one for the schwimmwagon - both for prop and 4WD drive train. All doable with printed parts for sure.
Sorry to highjack Spykers thread....
09-03-2018, 02:26 PM
#44
Thread Starter
Join Date: Mar 2009
Location: Saint Paul, MN
Posts: 288
Likes: 0
Received 0 Likes
on
0 Posts
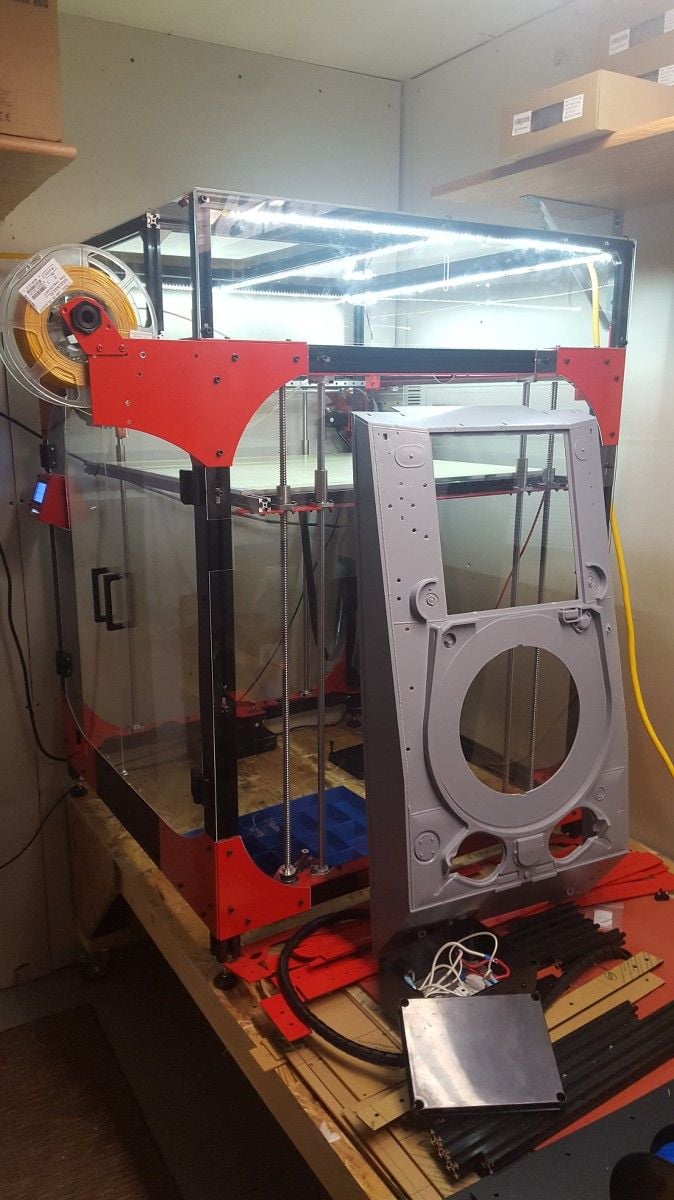
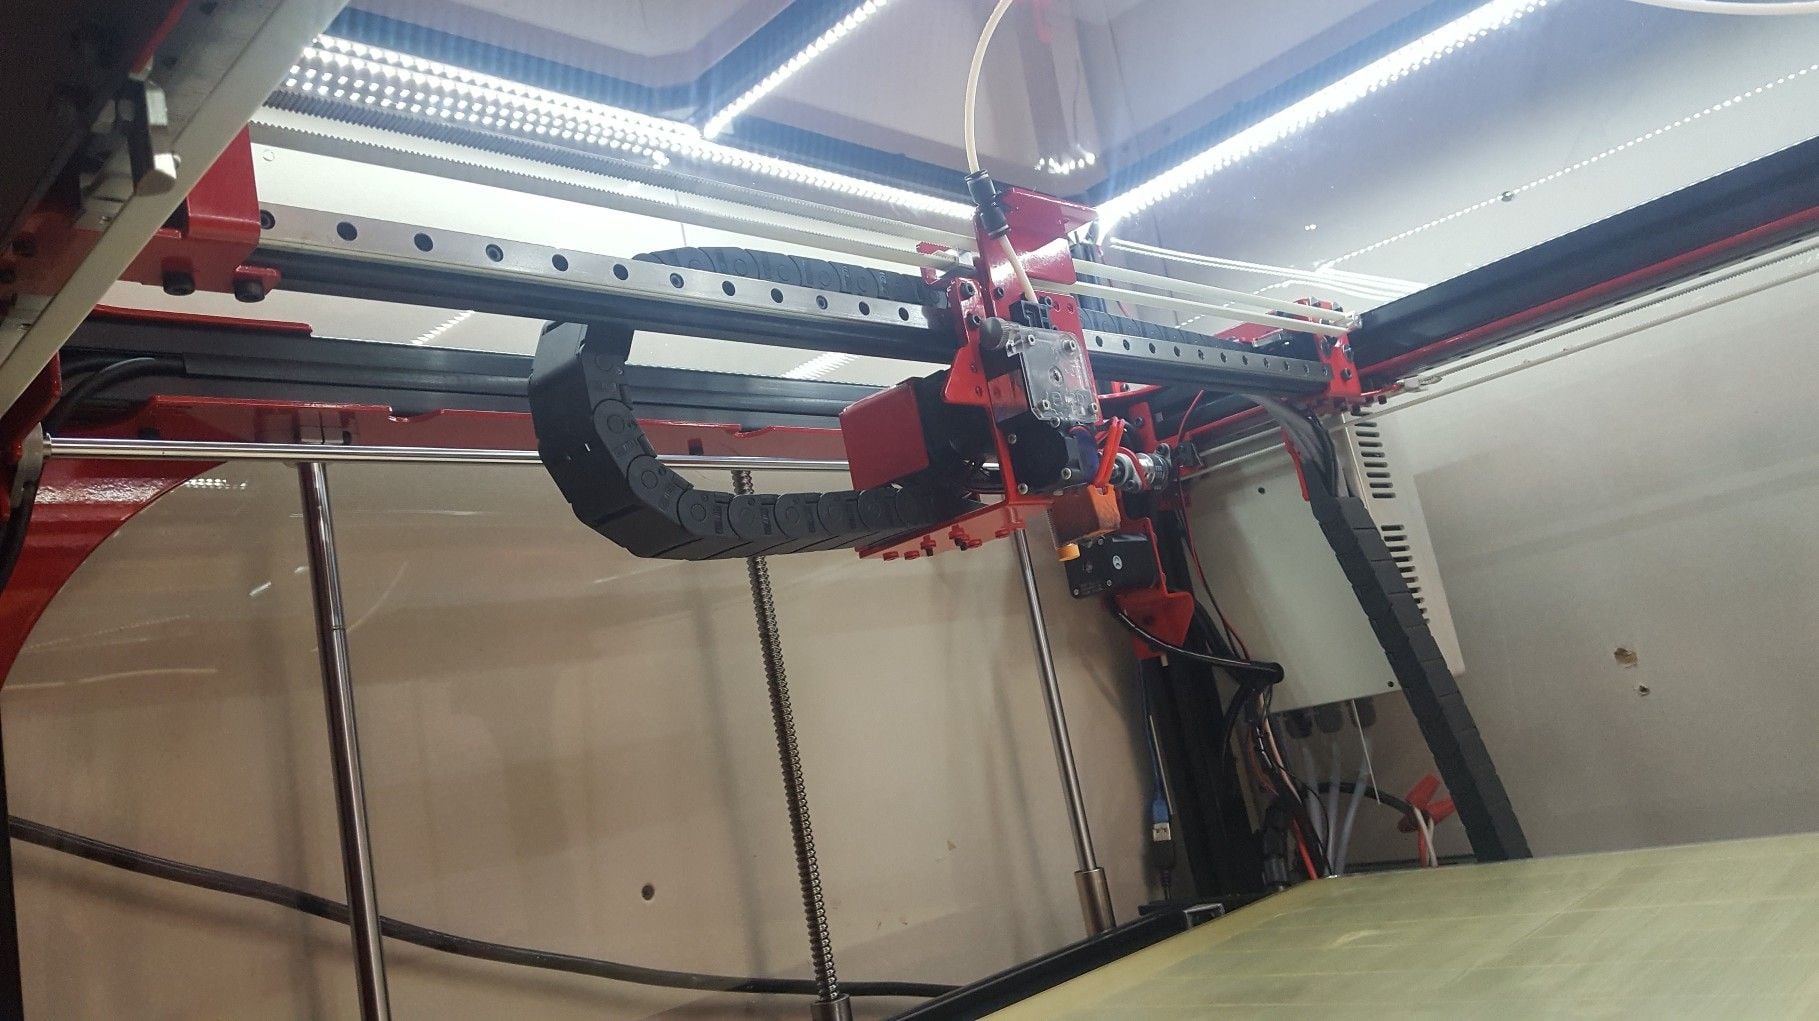
I print most of my stuff on my own custom "Spyker Workshop" printers, they are 12x12 and have been through MANY re-designs, they are working pretty good now.

Over the summer I bought 2 Modix 3D printers and built one of them sofar, they are massive 24x24x24" printers. I haven't used them for too much yet, they will only be used to print very large items. I have no plans to really print full tank kits on this thing mainly because print times are crazy on something this big. Although I MAY think about my Scorpion tank in 1/6 someday. I plan to make my Spyker KAT and Snow Blower in 2x size for the up coming winter on this machine. I use a 1.2mm nozzle in this but even then its long print times because the machine itself isn't as fast as my 12x12's. The yellow support brackets in the pics below took 5 hours each to print. Something like a entire tanks hull would be like 40 hours+.
So I got a couple ribs made to strengthen up the hull, you drill out those 4 holes each suspension unit has on the very bottom of the hull, and use those holes to screw and align all these ribs on. I'm printing out a flat plate also that will span between the ribs to use for a battery tray or electronics mounting spot, will be super strong. Also the very front rib will have a motor mount designed into it.
These ribs I will be printing in random colors just to use up plastic I never use. Could easily paint them.
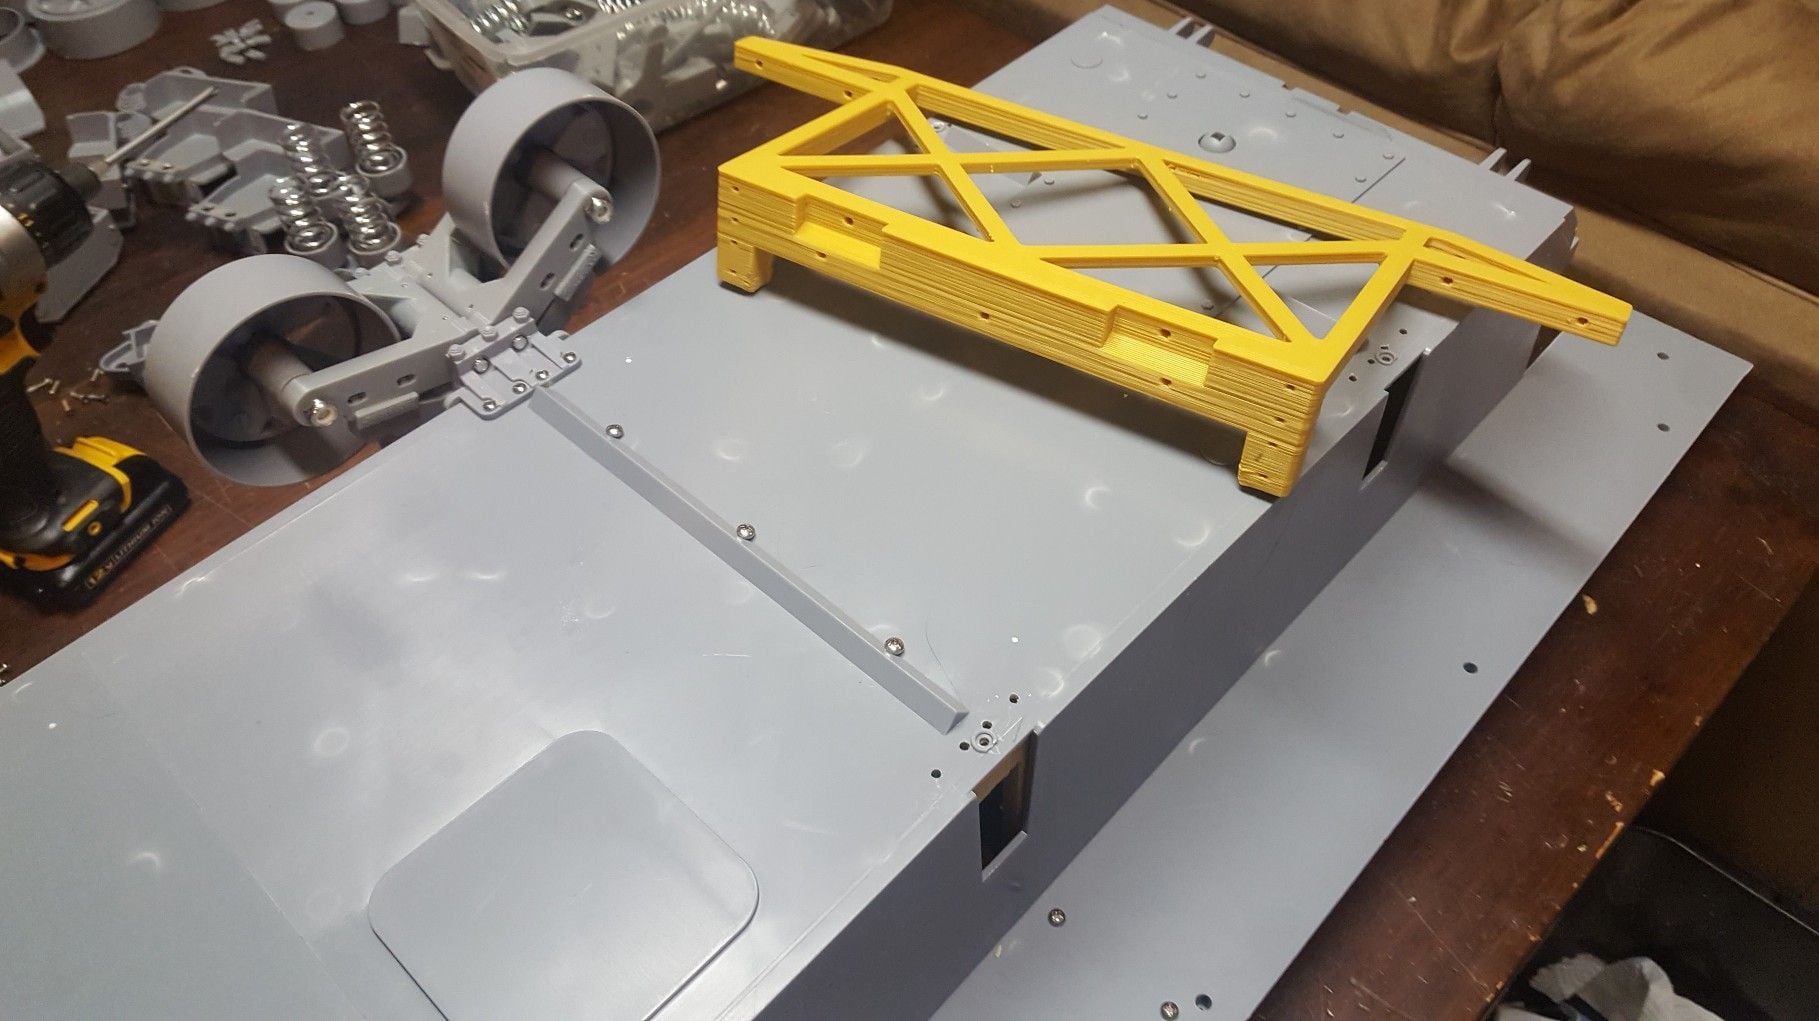
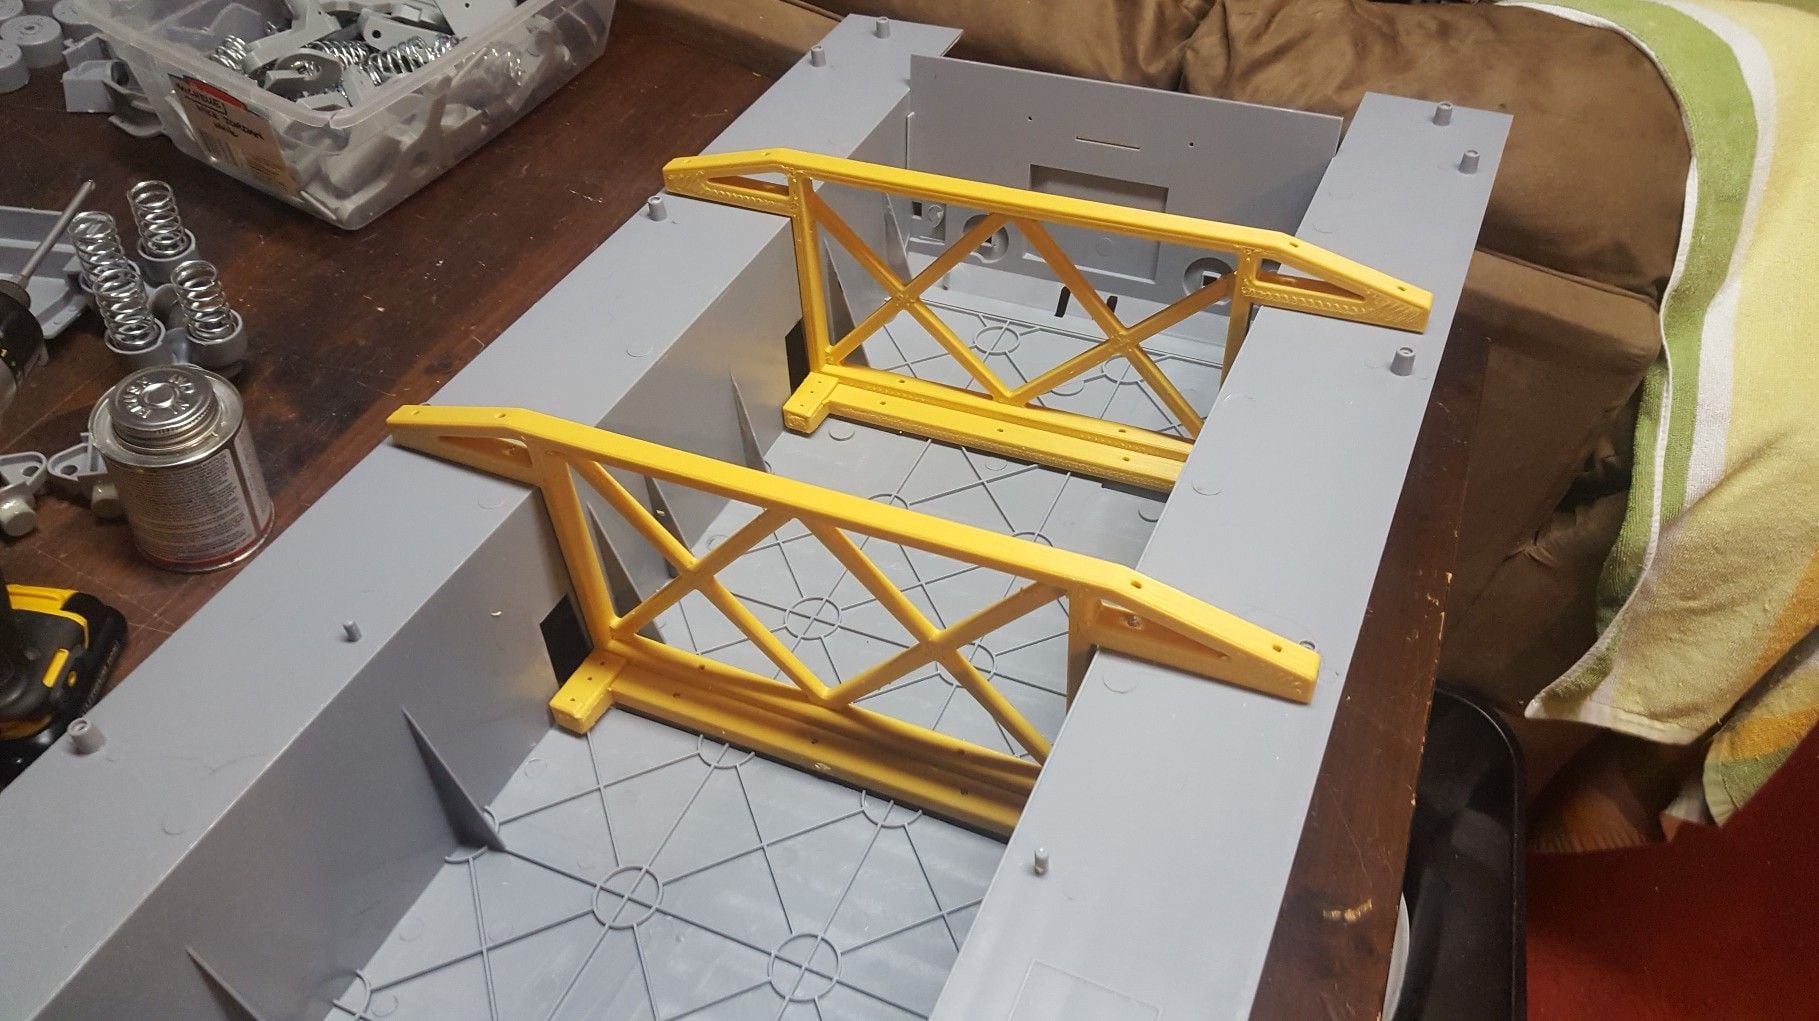
09-03-2018, 02:45 PM
#45
Ryan
That is a massive machine. Way cool. You have a whole printing factory there. I wouldn't print tank hulls - the resolution is still a bit grainy, and as you say print times would be horrific. But its great to be able to print big parts.
Another option on strengthening frames may be to CNC machine them in ABS or Styrene and glue them together, depending on the size/capacity of your CNC machine. Also laser cutting works well for both of these plastics. You do need to be careful laser cutting ABS as the fumes are toxic. You could make the parts from cheap styrene/ABS and the builder can glue them together. This would save printing time.
https://www.mcmaster.com/#polystyrene-sheets/=1efz6ra
https://www.mcmaster.com/#abs-sheets/=1efz7in
09-04-2018, 02:22 PM
#47
Thread Starter
Join Date: Mar 2009
Location: Saint Paul, MN
Posts: 288
Likes: 0
Received 0 Likes
on
0 Posts
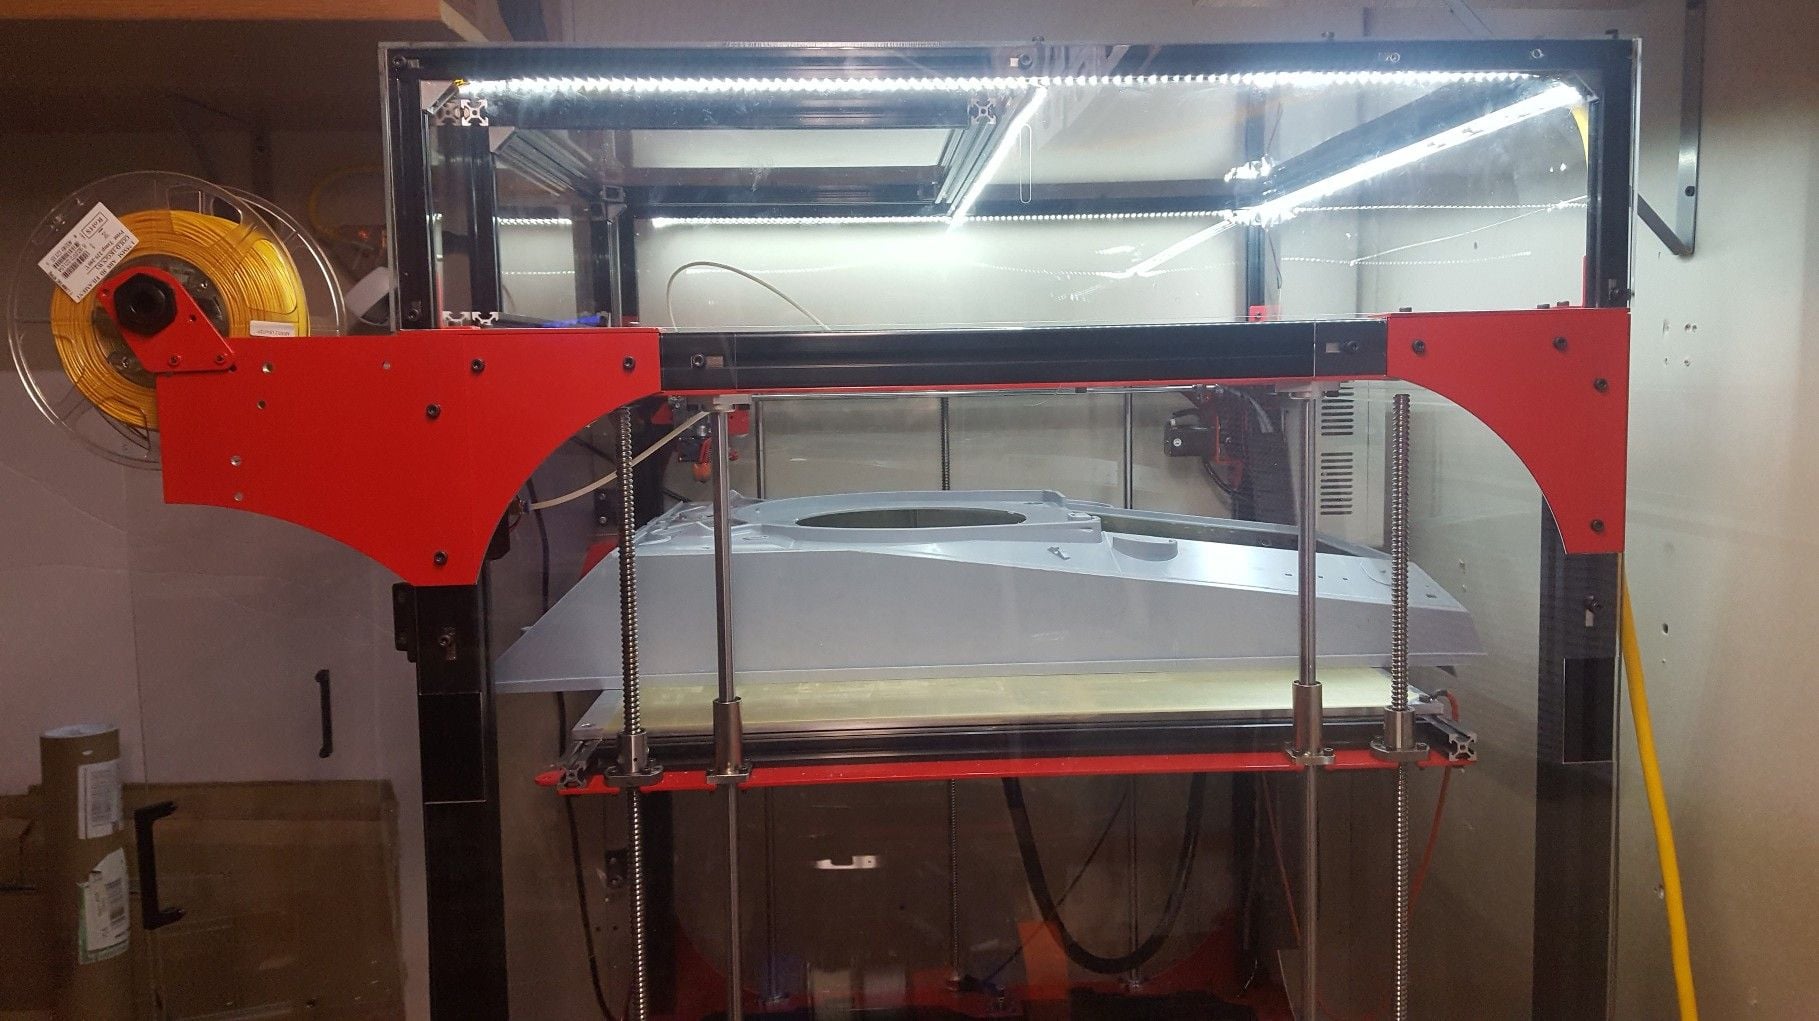
I actually managed to tweak the print settings to make them look alot nicer and reduced the print time down to 2.5 hours each bracket, pretty good now! CNCing sheet stuff like ABS would work but its alot of extra labor involved in changing bits, mounting stock, etc. Printers are simply much easier even if its not the most efficient thing ever. I spent a lot of time on my printers start up procedure to make it fully automatic. The printer primes and cleans the nozzle before a print, I even added a 3rd temperature sensor for the chamber to make sure a print doesn't start if the inside air is too cool so it auto warms everything up too. They all use induction probes to use a mesh leveling system to keep the print surface perfectly in plane with the extruder, they are pretty reliable. I clean the bed off, select a file to print, and leave the room lol. The big printers lots of electric cost though the heater for 24x24 is around 1400 watts, I measured around 8kw every 5 hours of print time.
I also print EVERYTHING 100% solid infill, I never do a hollow grid in any single print I do. A big advantage of 3d printing has over injection molding is the ability to print really thick plastic parts. The bottom section of these yellow braces are 16mm thick. All these yellow parts took a full spool of plastic to print ~1kg of weight
The transmission came out SO GOOD, I still won't know its exact performance until I get my tank fully built and driving outside (main reason I have not listed anything for sale on my store yet). I use these really cheap car wiper motors, they use a wormgear box and are pretty low RPM. With my setup I will be able to tweak the printed pulley ratios to make it an exact speed.
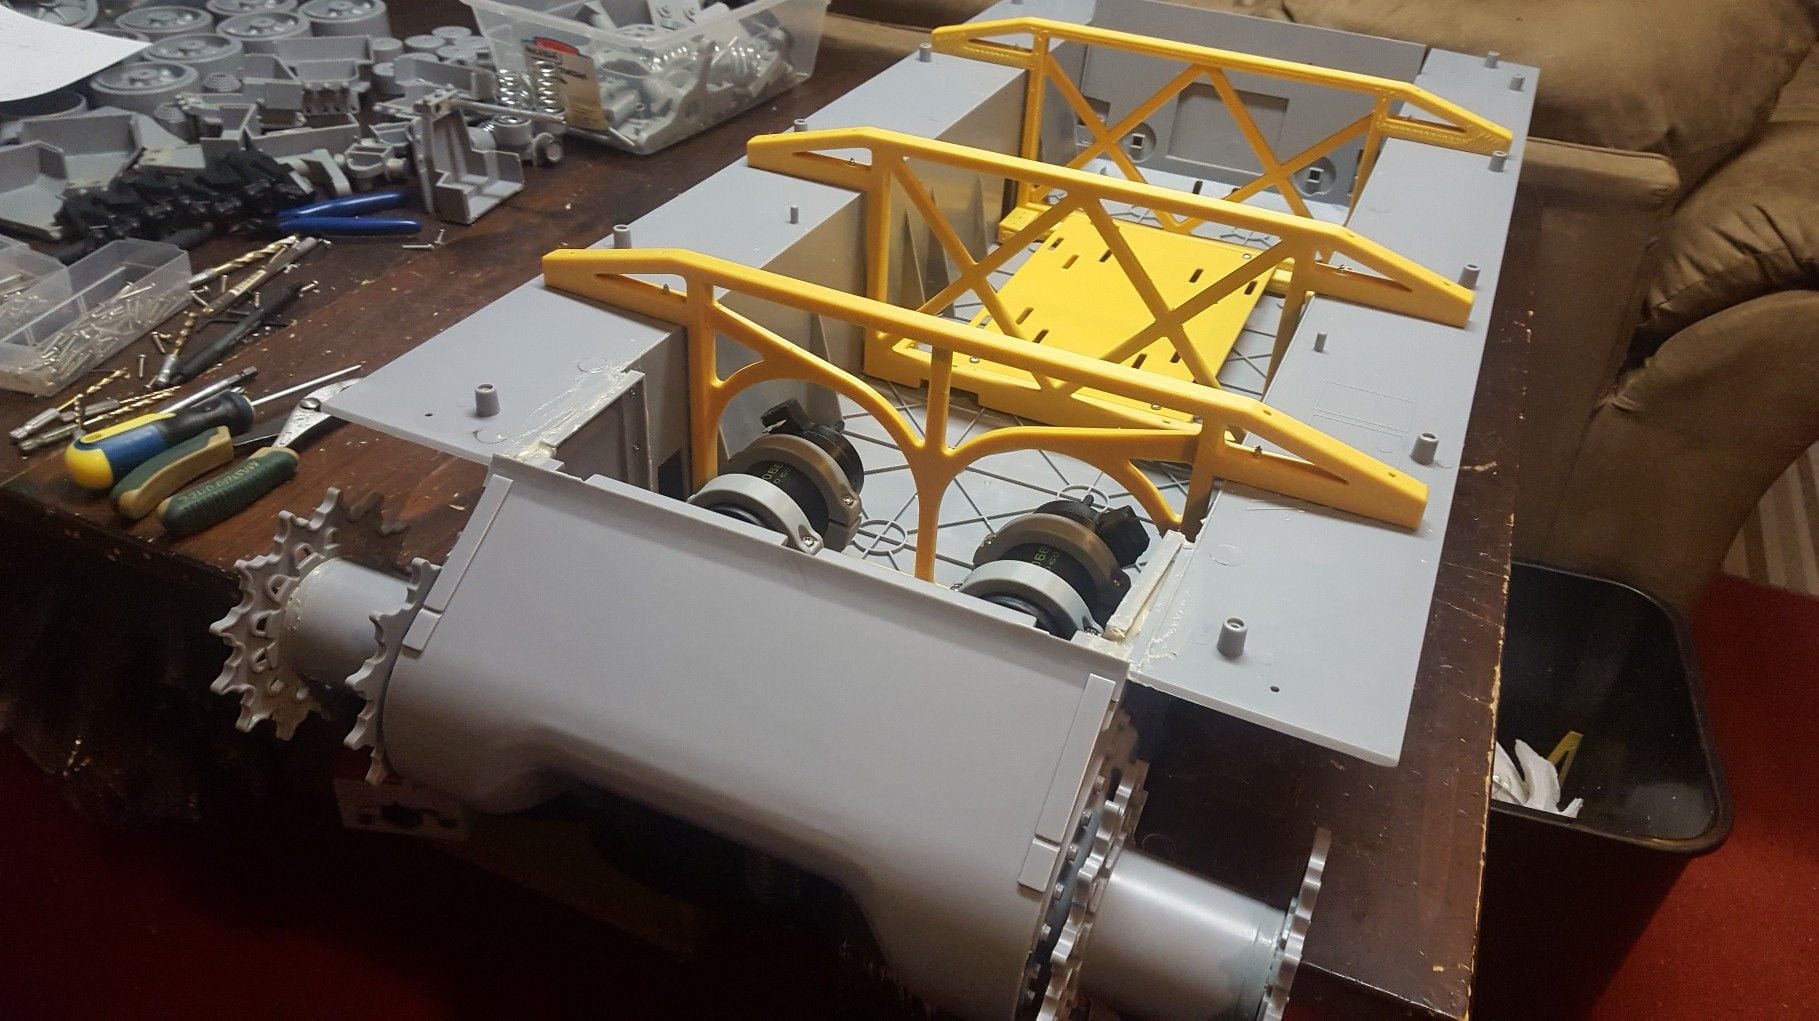
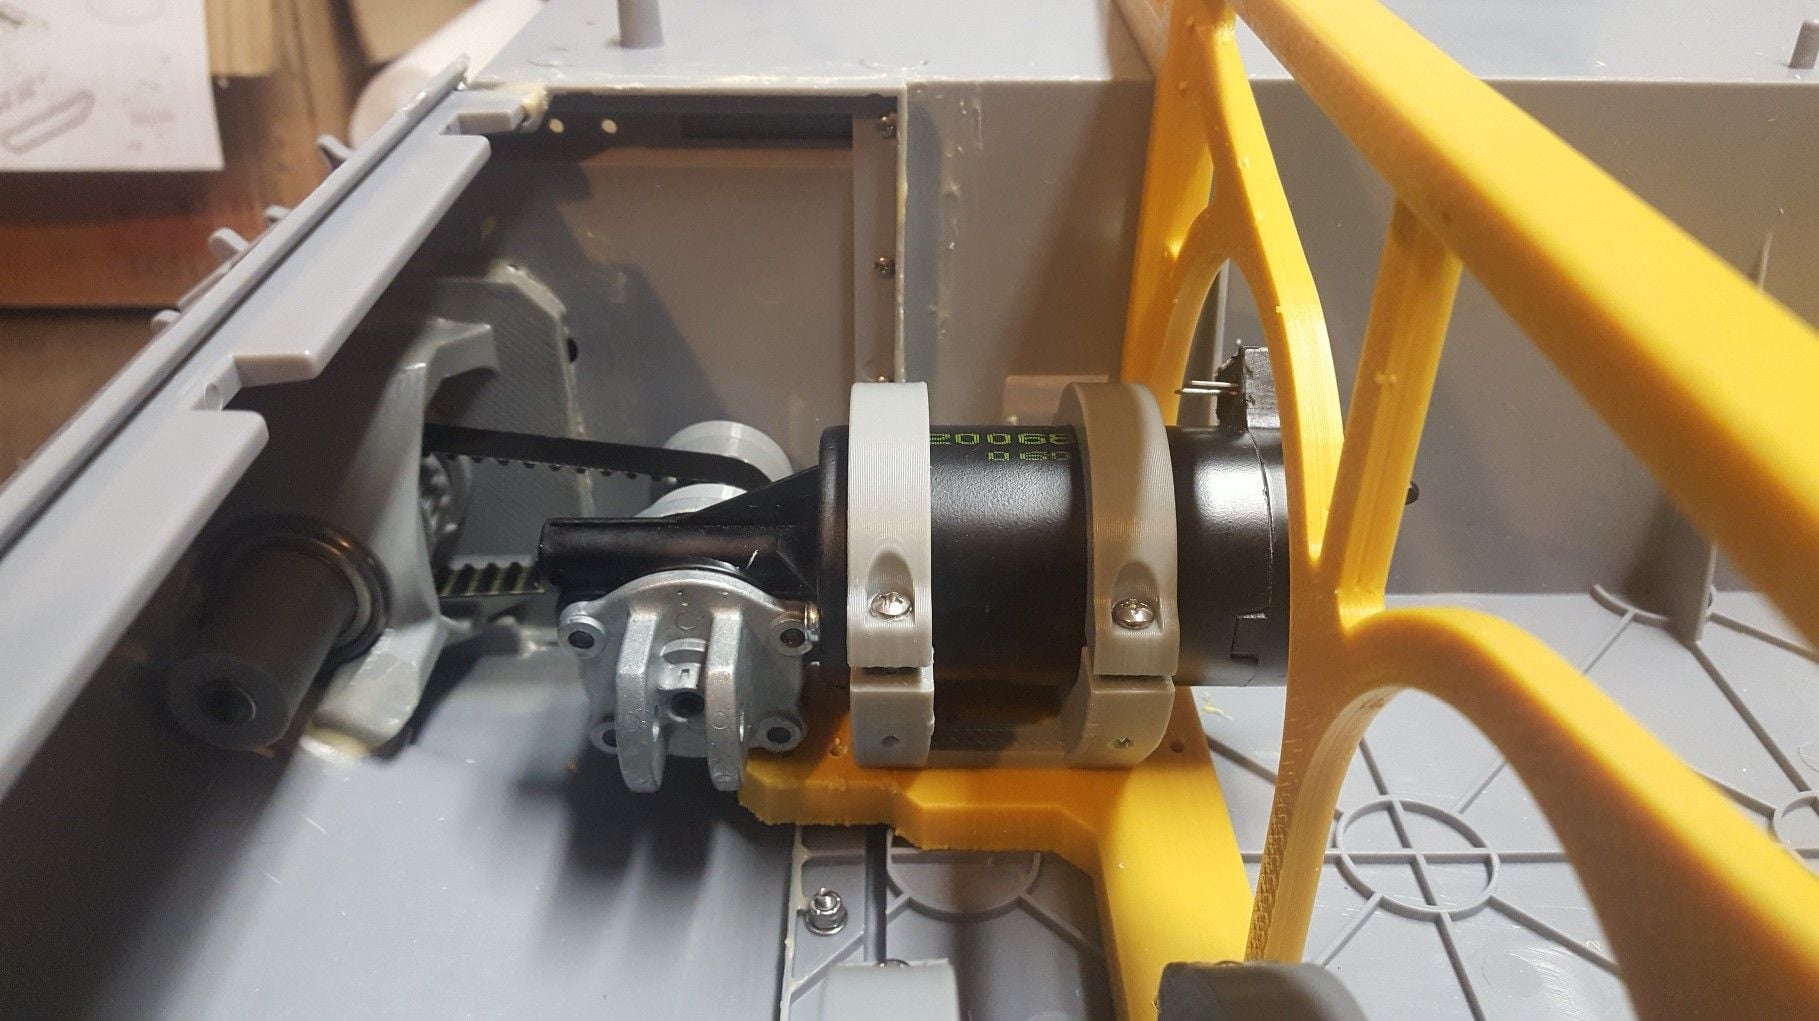
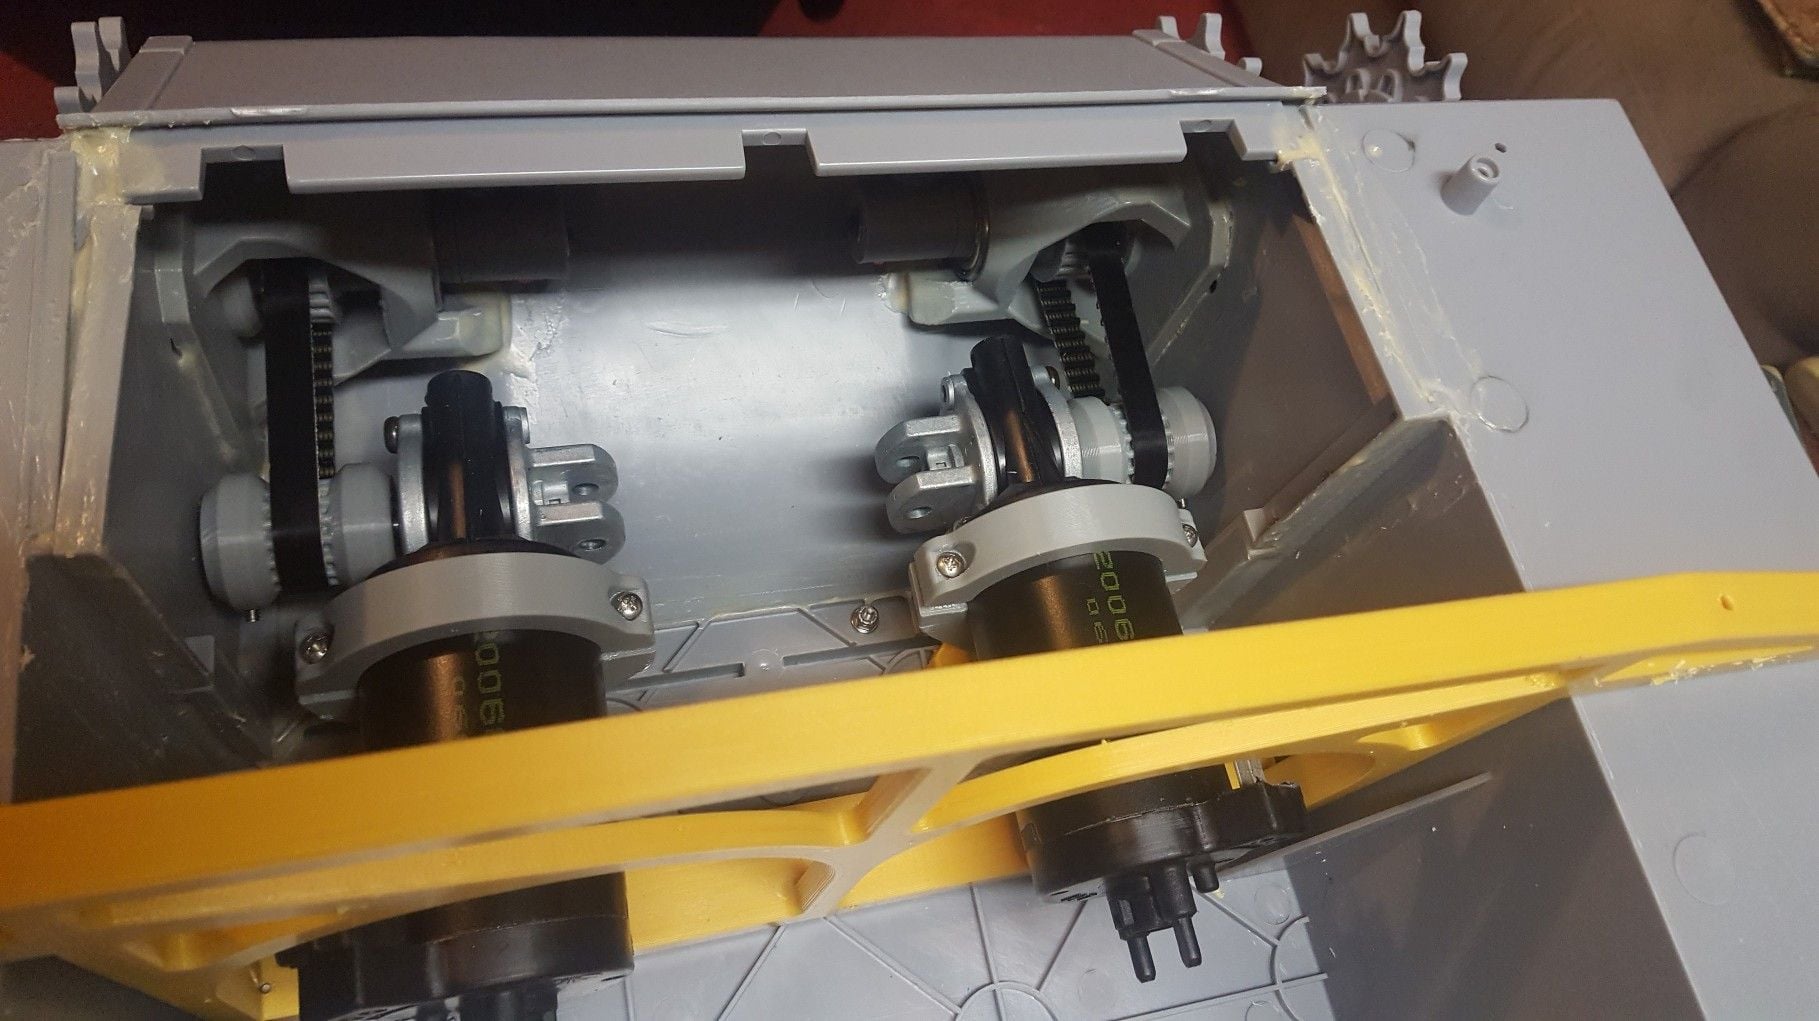
Last edited by TheGreatestMoo; 09-04-2018 at 02:26 PM.
09-04-2018, 03:13 PM
#48
WOW!!!! that is such a cool setup Ryan. it looks so professionally done. from start to finish BEAUTIFUL work. jeep will ship Saturday. there really cool. 4x4 willies would be amazing. keep printing my friend. luv it.
09-04-2018, 08:35 PM
#49
I'm kinda diggen the Caterpillar yellow hull braces - LOL. Gives it that "Construction Equipment" kinda look.
That drive train does look fantastic. One thing that would cool would be a way to easily tension or loosen the flat belt. Like too easily freewheel the tracks etc. Perhaps you already thought of that?
Supercool.
Bob
That drive train does look fantastic. One thing that would cool would be a way to easily tension or loosen the flat belt. Like too easily freewheel the tracks etc. Perhaps you already thought of that?
Supercool.
Bob
09-04-2018, 09:12 PM
#50
Thread Starter
Join Date: Mar 2009
Location: Saint Paul, MN
Posts: 288
Likes: 0
Received 0 Likes
on
0 Posts
Yeah the yellow color is sweet, but this hull kit will be 100% random colors. Its a good item to use up colors I never use since its inside. Plus its ABS so it paints easily.
You can simply loosen 2 screws on each motor, and the motor will move forwards. Probably will not make a system to do that.
Made a vid of the hull upgrade here: (transmission vid coming soon)
You can simply loosen 2 screws on each motor, and the motor will move forwards. Probably will not make a system to do that.
Made a vid of the hull upgrade here: (transmission vid coming soon)