


Tamiya Leopard 2A6 build videos


 08-20-2019, 08:43 PM
#27
Member
Inspired by Pah Co, when you do the turret, to prevent turret sag, cut a hole into the back of the top hull, and add a shim to make it align. You'll cover the hole in the back when you add on the plate for the rear track stoppers, so you can go full out on cutting the slot. Just make sure that the lower bit on the top is thick enough to support holding the lower sag up.
What I did was to cut off 2 Tamiya tabs (to dive the shim some height, and make sure the top half has enough material to support the shim), file one of them flat on both sides to maximise contact surface, and flat on one side of the second. Stick the first tab flush, but with the second tab sticking out. reinforce the shim with putty. Then I cut a tab into the top half by drilling about 20 or so holes pre-measured in a straight line, and cutting out the material in the middle. Cut slightly higher, as you can always file down if the shim is too high, but you cannot add on material to make it higher. After that, once you glue on the rear plate, the cut out bit is completely covered, so its fine.
Much better to do this before you glue on the rear plate.
Pictures here, as its hard to describe.
[img] [/img]

What I did was to cut off 2 Tamiya tabs (to dive the shim some height, and make sure the top half has enough material to support the shim), file one of them flat on both sides to maximise contact surface, and flat on one side of the second. Stick the first tab flush, but with the second tab sticking out. reinforce the shim with putty. Then I cut a tab into the top half by drilling about 20 or so holes pre-measured in a straight line, and cutting out the material in the middle. Cut slightly higher, as you can always file down if the shim is too high, but you cannot add on material to make it higher. After that, once you glue on the rear plate, the cut out bit is completely covered, so its fine.
Much better to do this before you glue on the rear plate.
Pictures here, as its hard to describe.
[img]
Last edited by dingobattler; 08-20-2019 at 08:50 PM.
08-20-2019, 09:27 PM
#28
Member
Also, with regards to your broken FO, what I would do is to strip it out. Check the back of the top plate - the reason it flexes so much is the fiber optic goes almost 90 degrees up. Screw their 90 degrees up, and drill a hole through the damn thing, such that it goes straight out. Instead, flex it 90 degrees to the side. That'll fix that issue, without the FO pushing out against the tail lights.
FO is not expensive online, and you can buy heaps for next to nothing on ebay.
If you can't be stuffed changing it, you can test by connecting the DMD and seeing if it works.
How do you do tanks so quickly? I've only just started painting the turret, and I started 3 months ago, while working religiously on it every night, and almost every single weekend.
08-20-2019, 10:13 PM
#29


Join Date: Mar 2019
Location: Northern Illinois
Posts: 15
Likes: 0
Received 0 Likes
on
0 Posts
Ion, There is a right up on one of the forums (maybe here) where you make shim. I think I might of made 2 to get the right thickness I was comfortable with because you'll see it is really close to rubbing in the rear and gets worse with the battery installed. No cutting of the tank, just make a shim or two with the notches which lock it in place so no spin slip. Shim made out of styrene. It's much cleaner and easier to do. Run a search for turret clearance issue of leopard. I used a compass cutter to cut a nice circle. It is in the right up. It's been many years since I built mine so don't remember what site.
Didn't have time to watch video yet, so I hope this is all relevant. There is just an easier way.
Didn't have time to watch video yet, so I hope this is all relevant. There is just an easier way.
08-21-2019, 10:05 AM
#30
Dingo,
That's my plan to make the tab and slot like you show.
I'll connect the DMD and see if it lights up and if not will try your idea on the fiber optic.
I guess I just work kinda fast because I am filming for YouTube, and have a very understanding wife.
Tamiya Fan,
Thanks for the tip, I am aware of making ring shims for under the turret but that alone does not stop the physical sag of the lower turret so I want to nip that in the bud with the slot and tab method.
08-22-2019, 07:12 AM
#31
So I drilled out and replaced the broken fiber, all good there.
then while preparing to paint the lower..."Houston we have a problem!"
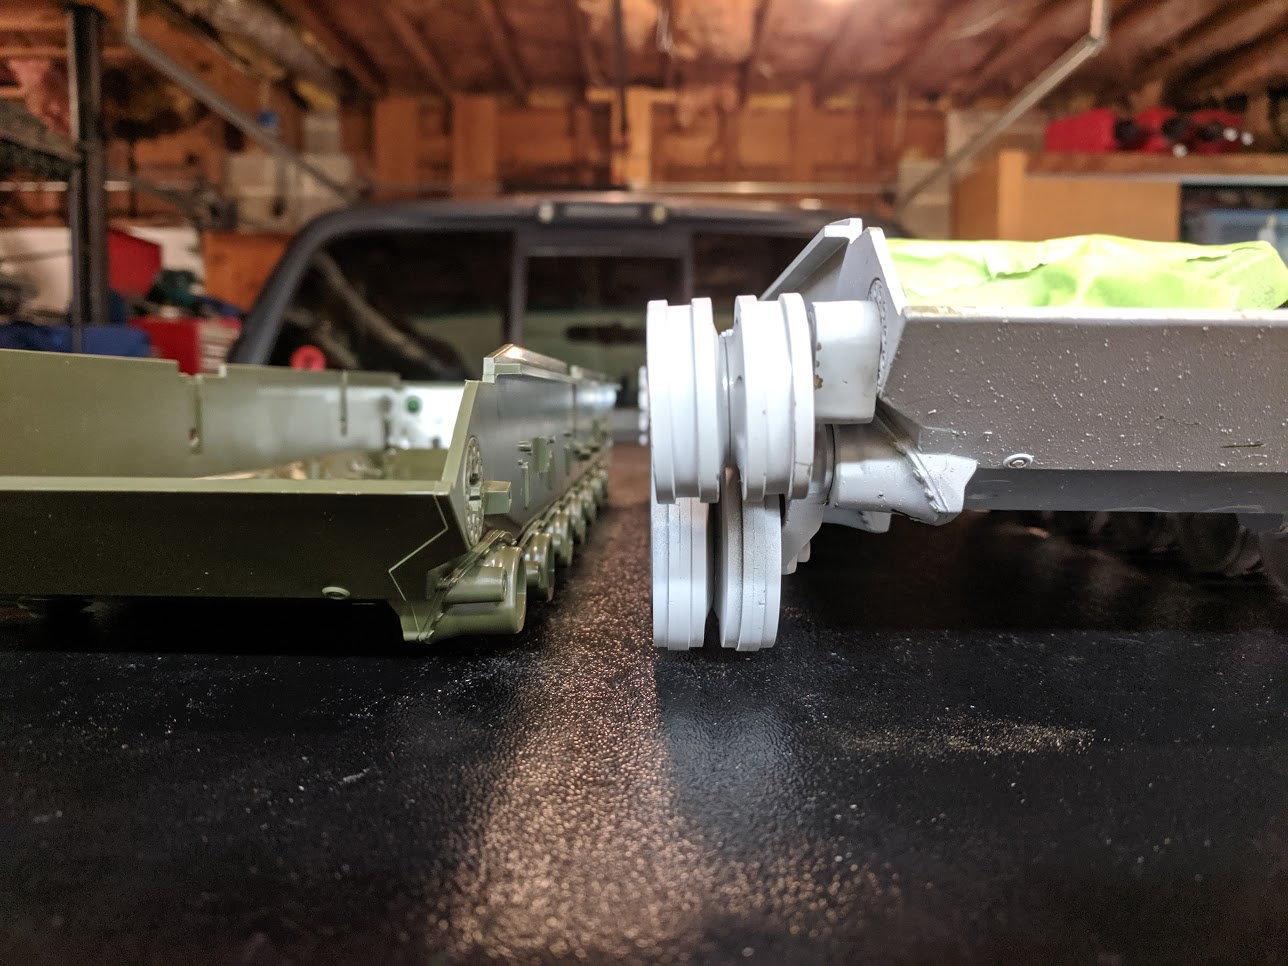
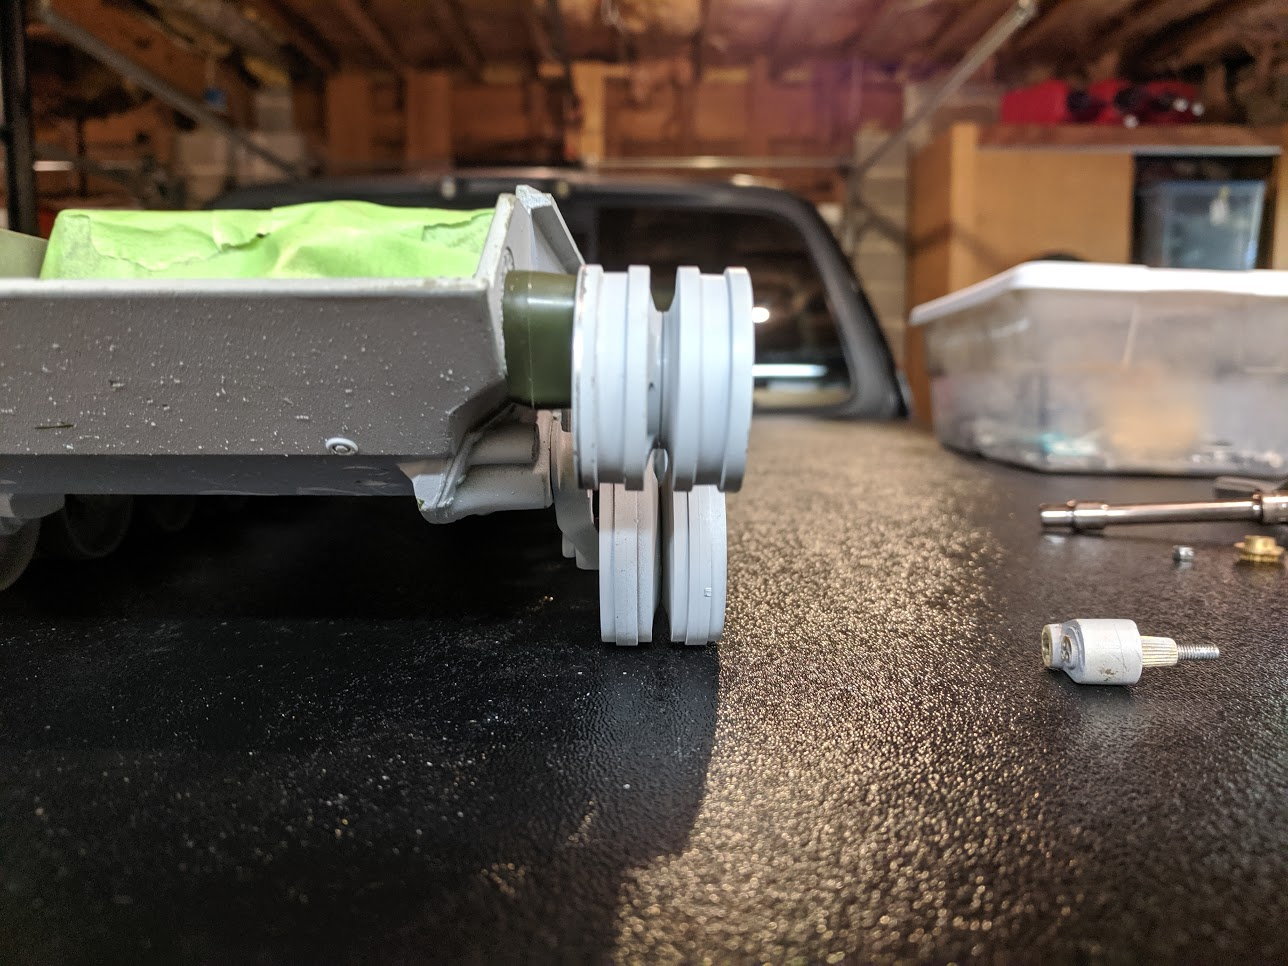
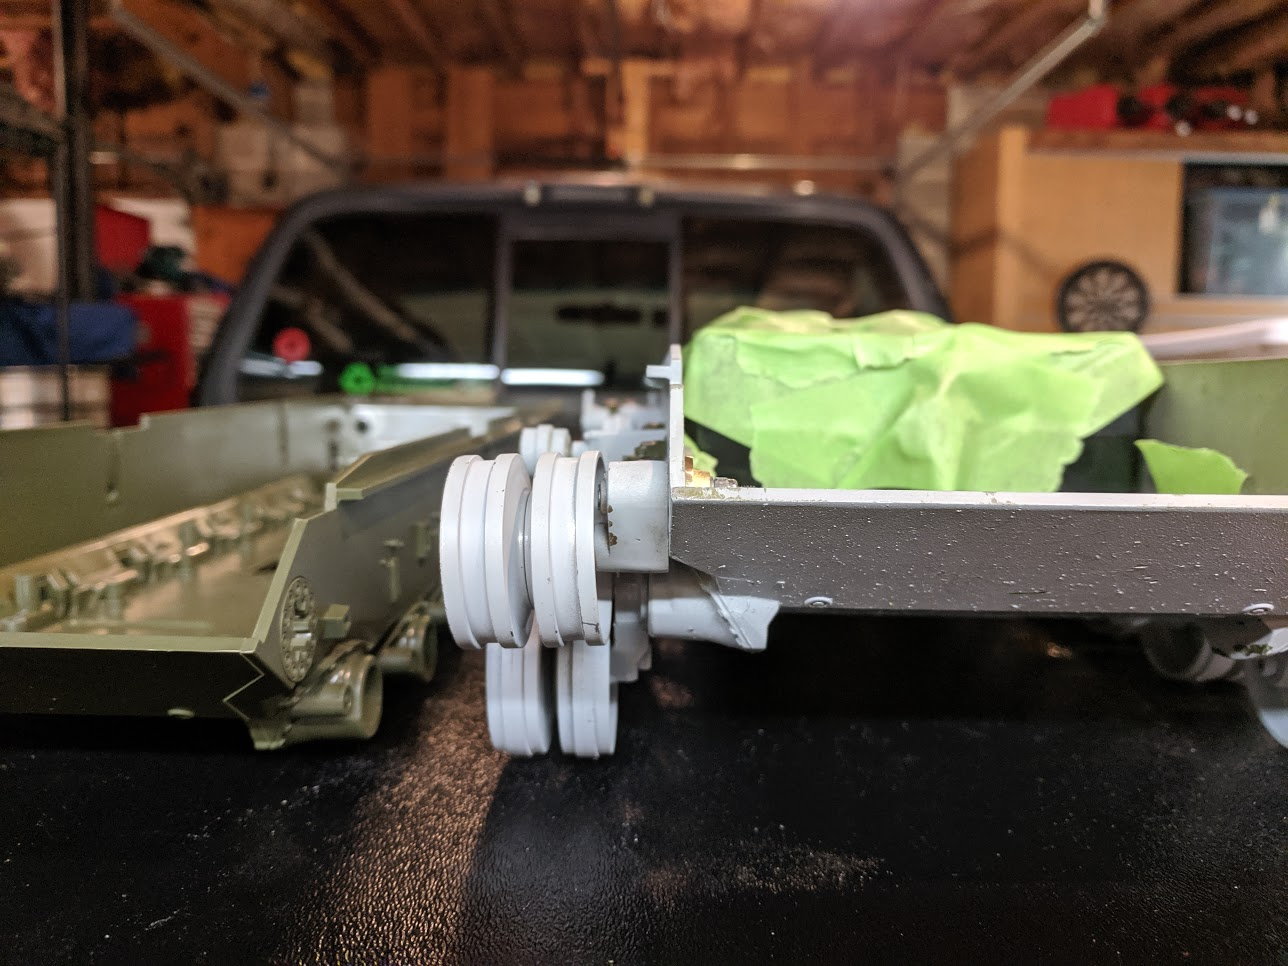
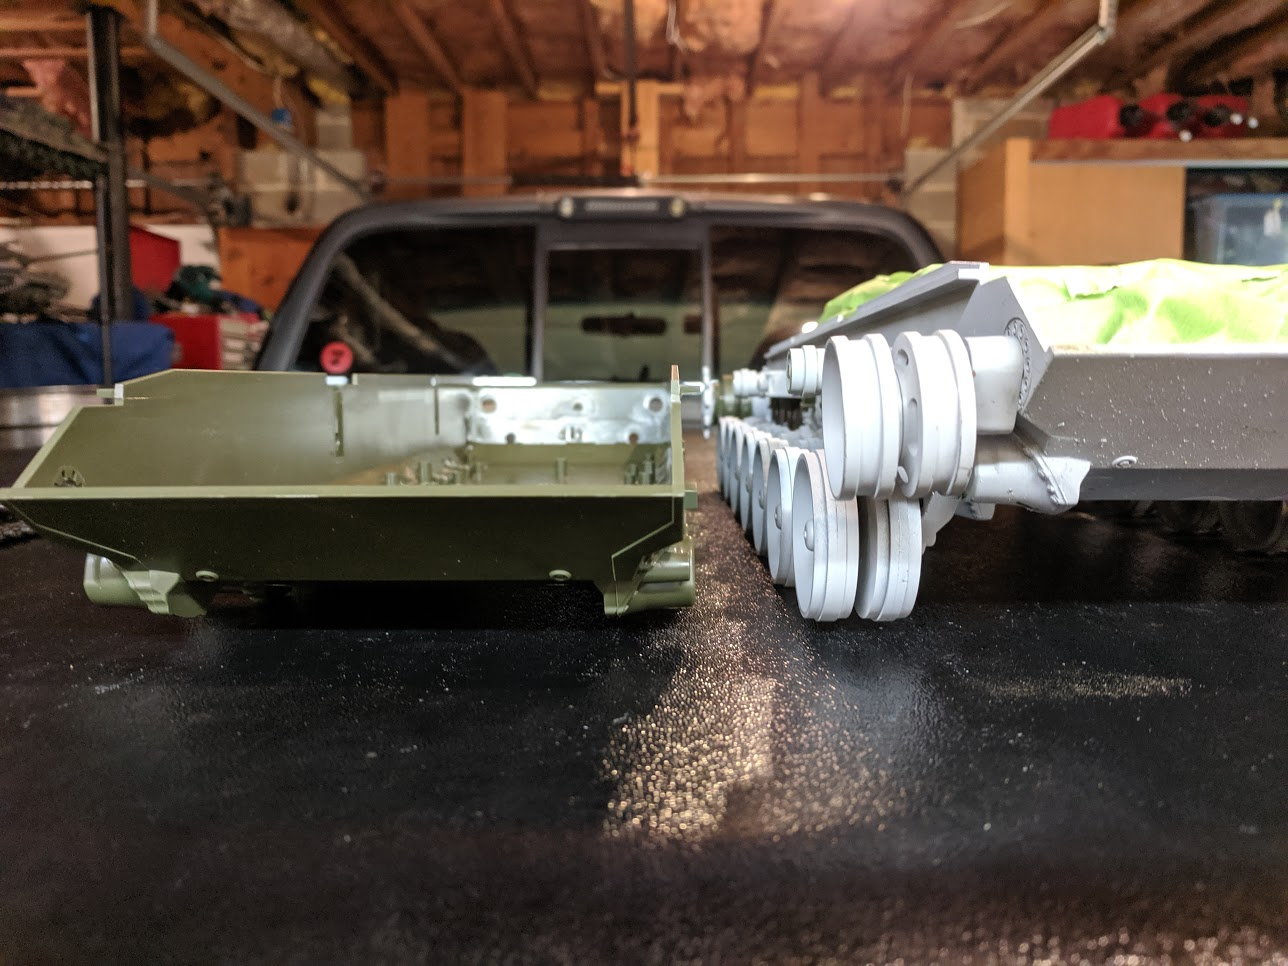
REALLY crooked idler wheels!!
Turns out the Tamiya stock ABS lower has a bit of an inward slope where the idler arms attach but the King Kong is dead straight up and down, so the Schumo as well as Stock (to a slightly lesser extent) Idler arms are expecting that slope end up being super off kilter once tightened down. I just ordered the Henntec idler system from Robert at ETOArmor as that system will keep the idler wheels level since it is a straight tube running side to side, I will grind down or fill in as needed for final cosmetic satisfaction.
did the best I could with pictures.
then while preparing to paint the lower..."Houston we have a problem!"
REALLY crooked idler wheels!!
Turns out the Tamiya stock ABS lower has a bit of an inward slope where the idler arms attach but the King Kong is dead straight up and down, so the Schumo as well as Stock (to a slightly lesser extent) Idler arms are expecting that slope end up being super off kilter once tightened down. I just ordered the Henntec idler system from Robert at ETOArmor as that system will keep the idler wheels level since it is a straight tube running side to side, I will grind down or fill in as needed for final cosmetic satisfaction.
did the best I could with pictures.
08-23-2019, 11:06 AM
#34
08-26-2019, 11:51 AM
#37
This cast hull is cool and I am a glutton for punishment, and the fact I didn't detect all the problems until I was well into the build and have a strong feeling King Kong RC would be a nightmare to get a refund from.
Once I have the Henntec idler on there it will be perfect and the other benefits of more realism and toughness.
Once I have the Henntec idler on there it will be perfect and the other benefits of more realism and toughness.
08-26-2019, 03:26 PM
#38
This cast hull is cool and I am a glutton for punishment, and the fact I didn't detect all the problems until I was well into the build and have a strong feeling King Kong RC would be a nightmare to get a refund from.
Once I have the Henntec idler on there it will be perfect and the other benefits of more realism and toughness.
Once I have the Henntec idler on there it will be perfect and the other benefits of more realism and toughness.
I tested two Henntec idlers on two different HL Abrams builds. Both heavy, with equal power to your Leopard 2 and running metal/rubber padded tracks. One thing is for sure the Henntec are not as tough as I expect especially as weight, power curves and track grip go up (rubber padded tracks+higher overall weights=a lot of ground friction and thus far more force being applied to the idler). Henntec tend to slip and loose tension (flat end on screw against a round shaft) unless you add a flat spot to the idler shaft for the locking screw to tighten against. But in doing so you will render the Henntec all but useless for future tightening/tensioning as the track "stretches".
From what I have seen here in your videos and photos there is no reason to run the Henntec from a reliable track functioning point of view. I have several "modern" tanks my Tamiya Abrams being one, that I run REALLY HARD with idlers that look "angled" such as yours and none have any issues. I suggest to wait on installing the Henntec until you see if the angle causes issues under your running conditions. Now I understand if the angle bothers you cosmetically, then you have to follow your heart to make it look the way you desire.
08-26-2019, 05:29 PM
#39
Member
Upgrades are a matter of preference, but personally, I would not do it for Tamiyas, given how much they already cost, and this is excluding radio, battery, paint, etc.
Reading online, pretty much, all the Tamiyas, bar the King Tiger, pretty much runs optimally on stock, and they have a reputation for high quality too. They have very few issues, which is impressive, given both the size, the number of moving parts, and the age of many of the kits.
My worry with upgrading Tamiyas is that they're usually pretty well tested for QC, and everything fits in a certain way. If you add too much metal parts, it increases the weight, which might require stronger motor, which might necessitate a metal gearbox, which might need to be modified to get the correct speed, and will drain the battery quicker, etc. etc. Plus, most of the sizes of parts are either measured fromt he actual tank itself IRL, or have a lot of research done behind them, and made in a certain way, with very strict tolerances, so you get issues like the idler wheel one here if you go 3rd party.
If its modifying a HL tanks, I'm all for it, as they usually much cheaper, much simpler, dimensions are more of an estimate, and the OEM builds official metal upgrades for the tanks.
Last edited by dingobattler; 08-26-2019 at 05:38 PM.
08-27-2019, 05:59 AM
#40
Upgrades are a matter of preference, but personally, I would not do it for Tamiyas, given how much they already cost, and this is excluding radio, battery, paint, etc.
Reading online, pretty much, all the Tamiyas, bar the King Tiger, pretty much runs optimally on stock, and they have a reputation for high quality too. They have very few issues, which is impressive, given both the size, the number of moving parts, and the age of many of the kits.
My worry with upgrading Tamiyas is that they're usually pretty well tested for QC, and everything fits in a certain way. If you add too much metal parts, it increases the weight, which might require stronger motor, which might necessitate a metal gearbox, which might need to be modified to get the correct speed, and will drain the battery quicker, etc. etc. Plus, most of the sizes of parts are either measured fromt he actual tank itself IRL, or have a lot of research done behind them, and made in a certain way, with very strict tolerances, so you get issues like the idler wheel one here if you go 3rd party.
If its modifying a HL tanks, I'm all for it, as they usually much cheaper, much simpler, dimensions are more of an estimate, and the OEM builds official metal upgrades for the tanks.
Reading online, pretty much, all the Tamiyas, bar the King Tiger, pretty much runs optimally on stock, and they have a reputation for high quality too. They have very few issues, which is impressive, given both the size, the number of moving parts, and the age of many of the kits.
My worry with upgrading Tamiyas is that they're usually pretty well tested for QC, and everything fits in a certain way. If you add too much metal parts, it increases the weight, which might require stronger motor, which might necessitate a metal gearbox, which might need to be modified to get the correct speed, and will drain the battery quicker, etc. etc. Plus, most of the sizes of parts are either measured fromt he actual tank itself IRL, or have a lot of research done behind them, and made in a certain way, with very strict tolerances, so you get issues like the idler wheel one here if you go 3rd party.
If its modifying a HL tanks, I'm all for it, as they usually much cheaper, much simpler, dimensions are more of an estimate, and the OEM builds official metal upgrades for the tanks.
We all scrutinize Tamiya pretty well because they make the best stuff, that's really a compliment!
All my Tamiya reviews are really nit-pick items, whereby if I did more reviews of other brands... well usually end up reinventing the wheel to put it nicely
08-27-2019, 06:45 AM
#41
Not to bash on Henntec idlers, they have their place where they work well. But IMHO they are overrated on "built up" modern tanks and can cause more issues then they tend to solve.
I tested two Henntec idlers on two different HL Abrams builds. Both heavy, with equal power to your Leopard 2 and running metal/rubber padded tracks. One thing is for sure the Henntec are not as tough as I expect especially as weight, power curves and track grip go up (rubber padded tracks+higher overall weights=a lot of ground friction and thus far more force being applied to the idler). Henntec tend to slip and loose tension (flat end on screw against a round shaft) unless you add a flat spot to the idler shaft for the locking screw to tighten against. But in doing so you will render the Henntec all but useless for future tightening/tensioning as the track "stretches".
From what I have seen here in your videos and photos there is no reason to run the Henntec from a reliable track functioning point of view. I have several "modern" tanks my Tamiya Abrams being one, that I run REALLY HARD with idlers that look "angled" such as yours and none have any issues. I suggest to wait on installing the Henntec until you see if the angle causes issues under your running conditions. Now I understand if the angle bothers you cosmetically, then you have to follow your heart to make it look the way you desire.
Upgrades are a matter of preference, but personally, I would not do it for Tamiyas, given how much they already cost, and this is excluding radio, battery, paint, etc.
Reading online, pretty much, all the Tamiyas, bar the King Tiger, pretty much runs optimally on stock, and they have a reputation for high quality too. They have very few issues, which is impressive, given both the size, the number of moving parts, and the age of many of the kits.
My worry with upgrading Tamiyas is that they're usually pretty well tested for QC, and everything fits in a certain way. If you add too much metal parts, it increases the weight, which might require stronger motor, which might necessitate a metal gearbox, which might need to be modified to get the correct speed, and will drain the battery quicker, etc. etc. Plus, most of the sizes of parts are either measured fromt he actual tank itself IRL, or have a lot of research done behind them, and made in a certain way, with very strict tolerances, so you get issues like the idler wheel one here if you go 3rd party.
If its modifying a HL tanks, I'm all for it, as they usually much cheaper, much simpler, dimensions are more of an estimate, and the OEM builds official metal upgrades for the tanks.
Reading online, pretty much, all the Tamiyas, bar the King Tiger, pretty much runs optimally on stock, and they have a reputation for high quality too. They have very few issues, which is impressive, given both the size, the number of moving parts, and the age of many of the kits.
My worry with upgrading Tamiyas is that they're usually pretty well tested for QC, and everything fits in a certain way. If you add too much metal parts, it increases the weight, which might require stronger motor, which might necessitate a metal gearbox, which might need to be modified to get the correct speed, and will drain the battery quicker, etc. etc. Plus, most of the sizes of parts are either measured fromt he actual tank itself IRL, or have a lot of research done behind them, and made in a certain way, with very strict tolerances, so you get issues like the idler wheel one here if you go 3rd party.
If its modifying a HL tanks, I'm all for it, as they usually much cheaper, much simpler, dimensions are more of an estimate, and the OEM builds official metal upgrades for the tanks.
It is a slippery slope... when you start adding all kinds of metal upgrades that the model engineers did not fathom in the kit design
We all scrutinize Tamiya pretty well because they make the best stuff, that's really a compliment!
All my Tamiya reviews are really nit-pick items, whereby if I did more reviews of other brands... well usually end up reinventing the wheel to put it nicely
We all scrutinize Tamiya pretty well because they make the best stuff, that's really a compliment!
All my Tamiya reviews are really nit-pick items, whereby if I did more reviews of other brands... well usually end up reinventing the wheel to put it nicely
08-27-2019, 03:20 PM
#42
Member
I agree Tamiya QC and design is the best in the industry, however the 2A6 seems to have been designed and built as if it was more to meet a deadline and level of visual detail rather than meet the engineers full desire, hence the totally abnormal use ABS swing arms and POM torsion spring holders and non-reinforced chassis tub. again the Aluminum parts replacing the plastic ones are not actually much heavier, and a lot of people also add lead weight to their hulls to achieve more realistic suspension function etc.
Also, don't really see issues with a plastic hull and swing arms. Haven't seen anyone online complaining about them breaking. Throwing tracks, followed by broken tracks, loose tracks and suspension softness over time seem to be the #1 issue people generally have with tanks.
From 2006 to 2014, the 2A6 has been known as the flagship model for their RC tank line, till the Type 10 that got released, and reading most type 10 reviews compare it very unfavorably against the 2A6, despite the metal hull.
I'd say, the worst things about the 2A6 are the turret sag, the lack of space in the turret and fibre optics on the tail lights.
Last edited by dingobattler; 08-27-2019 at 03:23 PM.
08-28-2019, 05:52 PM
#43
I don't know what Tamiya's engineers really wanted, but most of the issues I see and read with RC tanks are thrown tracks from improper measurement and alignment of tracks, sprocket and wheel alignment. The fact that thrown tracks are practically unheard of in the 2A6 model says a lot about the level of care that went into it, as compared to say, the King Tiger, which was released just before the 2A6, and seems notorious for throwing and breaking tracks..
Also, don't really see issues with a plastic hull and swing arms. Haven't seen anyone online complaining about them breaking. Throwing tracks, followed by broken tracks, loose tracks and suspension softness over time seem to be the #1 issue people generally have with tanks.
From 2006 to 2014, the 2A6 has been known as the flagship model for their RC tank line, till the Type 10 that got released, and reading most type 10 reviews compare it very unfavorably against the 2A6, despite the metal hull.
I'd say, the worst things about the 2A6 are the turret sag, the lack of space in the turret and fibre optics on the tail lights.
Either way, I am having fun building this and some of the troubles I am going through is valuable info for others who may go a similar route.
 09-15-2019, 07:03 PM
#50
Nice movies, well done build. It's a great tank to drive and battle with.