


On to the next Project, 1/6 Kubelwagen, Made RC
 09-20-2021, 01:20 PM
#1

Thread Starter
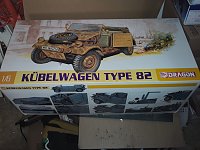
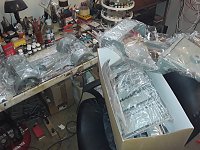
So now that the howitzer is wrapped up, it's time for what's next. I was talking to a good friend in the UK a couple months ago and I was explaining that having accumulated so many kits that are still waiting to be built it was getting just a bit overwhelming. He suggested I put everything away, pull out one project, finish it, and move on to the next. The howitzer was the first since he said that and it's turning out to be very good advice. That went smoothly and I stuck with it til the end, we'll now see how the next project goes. With the howitzer I didn't post anything until the build was pretty much complete, with this one we'll do the opposite and post as we go. I just opened the box today so we're still at the very beginning. I've already decided it will be the three color camo on the top of the box, as opposed to the field gray on the side of the box. And do click on the photos for a better look. Then the zoom is actually pretty decent, but I really wish photos would post the same way they do in the preview when you start the thread. There they cover the whole page and look really, really great. But just clicking to the next level is a huge improvement from the tiny images you see without enlarging them.
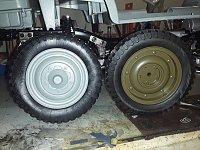
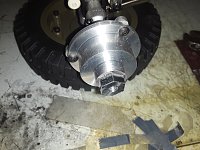
I have an axle to start with and I may try and cheat and use the ROC jeep tires since those are made for RC and would hold up much better. The wheel adapters are about 2mm too long but I can trim that down at the shop.
I know this has been done before so if anyone has a link to a good build thread that would be very cool. One guy I know duplicated the whole front suspension in brass and aluminum and I think I can pull that off as well. I now need to spend a couple days studying the instructions and the parts.")
Oh yeah, here it is next to the ROC jeep, just for size comparison.
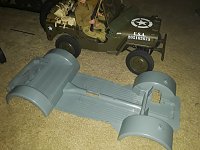
And being at the very beginning I'm open to suggestion on everything from motors to sound systems so don't be shy, let us hear from you.
I have an axle to start with and I may try and cheat and use the ROC jeep tires since those are made for RC and would hold up much better. The wheel adapters are about 2mm too long but I can trim that down at the shop.
I know this has been done before so if anyone has a link to a good build thread that would be very cool. One guy I know duplicated the whole front suspension in brass and aluminum and I think I can pull that off as well. I now need to spend a couple days studying the instructions and the parts.
Oh yeah, here it is next to the ROC jeep, just for size comparison.
And being at the very beginning I'm open to suggestion on everything from motors to sound systems so don't be shy, let us hear from you.
Last edited by Crius; 09-20-2021 at 01:26 PM.

The following 2 users liked this post by Crius:
herrmill (09-28-2021),
Will01Capri (09-20-2021)
09-27-2021, 10:44 AM
#2
Nice kit, I have the Schwimwagen! I need to get a Kubel. Like you said so many models!!!
The following users liked this post:
herrmill (09-28-2021)
09-27-2021, 02:39 PM
#3
Thread Starter
I too have the 1/6 schwimmwagen, and the 1/6 DAK with balloon tires. I've even got the 1/16 DAK and a losi crawler, but I've had them for at least five years and haven't got around to it. But I never denied being lazy. 
I have more photos and video of the project, just have to get them to youtube and post them here. I'm going the 1/10 buggy route for drive train, that will be here Friday. Or at least that's what fedex tells me, but fedex lies to me on a regular basis. Got large chunks painted with the base afrika mustard, and I'll airbrush dunkelgelb over that. I have a new brand of enamel paints out of Ohio so I need to try those out, maybe for the olivgrun and schokoladen. First I have to test for negative reaction with testors. I already know I can't use testors thinner with the new paint. I'm so POed at rustoleum for 86ing model master I could just spit.
There was talk of re-releasing the schwimm, but the the pandemic frakked up the world and that was put on hold. You can still get the DAK and the 82 on evilbay, but they get more expensive every day. Here's an example, and in today's market this is actually a decent price. I've had this kit for a while, so I got it for $88 delivered. Score of the week, that was.
https://www.ebay.com/itm/35329277438...sAAOSw5utabKbZ
Still a ways to go, but we're marching on.
The following users liked this post:
herrmill (09-28-2021)
10-01-2021, 05:44 AM
#4
I will be watching to see how you go through the process to convert it to R/C. What 1/10 Buggy get are you using as a donor? Is it 4 wheel drive?
10-03-2021, 06:01 AM
#5
Thread Starter
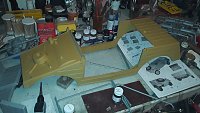
Made a bit of progress, and I thought about not posting the video of the buggy but I think it might help someone to see the process here and how we decide what parts to use in a project. First I got a bit of paint on the body, just a base coat of afrika mustard to act as a primer and later the entire thing will go under the airbrush.

And a dry fit of the larger pieces with the seats dry fit to see how it all looks so far

And now the video of the buggy arriving
but once I got the buggy outside and tried it out I learned it's just way too much for what I need here. I could probably tone it down by getting a lower rated brushless motor or installing a brushed motor or setting the end points in the TX, but the truth is this buggy is just so much fun as it is I'm going to keep it just like it is, and play with it just like it is. So here's the buggy outside
and here it is getting a bit of air. These next two videos are less than ten seconds each, but they say quite a bit
So I'm still figuring out the drive train. I may go for an axle and a screw gun motor/tranny and make the front suspension out of brass and aluminum, since the real thing was two wheel drive anyway. Even had I copied the English guy with the buggy it still ends up as two wheel drive, he just took the driveshaft out that connects front and rear. So while I'm thinking on that I can work on the upper body. I'm pretty sure I can complete the upper and then just drop it on the lower as a finished piece, and that will keep me moving forward as I figger out the rest. One thing I could use suggestions on is the canvas top. For this paint scheme I think the top should be dunkelgelb, but the top that comes with the kit is field gray. Any ideas what to do about that?
And a dry fit of the larger pieces with the seats dry fit to see how it all looks so far
And now the video of the buggy arriving
but once I got the buggy outside and tried it out I learned it's just way too much for what I need here. I could probably tone it down by getting a lower rated brushless motor or installing a brushed motor or setting the end points in the TX, but the truth is this buggy is just so much fun as it is I'm going to keep it just like it is, and play with it just like it is. So here's the buggy outside
and here it is getting a bit of air. These next two videos are less than ten seconds each, but they say quite a bit
So I'm still figuring out the drive train. I may go for an axle and a screw gun motor/tranny and make the front suspension out of brass and aluminum, since the real thing was two wheel drive anyway. Even had I copied the English guy with the buggy it still ends up as two wheel drive, he just took the driveshaft out that connects front and rear. So while I'm thinking on that I can work on the upper body. I'm pretty sure I can complete the upper and then just drop it on the lower as a finished piece, and that will keep me moving forward as I figger out the rest. One thing I could use suggestions on is the canvas top. For this paint scheme I think the top should be dunkelgelb, but the top that comes with the kit is field gray. Any ideas what to do about that?
10-03-2021, 08:07 PM
#6

I'm interested in your next choice for a drivetrain and electronics. I started a jeep conversion a while ago and used the motor, axles and transmission from an HPI King Crawler 1/10 scale (not available any longer). I got about 1/3 the way through then put it on the shelf waiting for suspension parts. Then, WOW! ROC Hobby 1/6 Jeep. I looked, decided to finish my project, got diverted with other projects and broke down and bought it. So the original conversion project sits in a box, I'm hoping your project lights a spark for me to finish it, then I'll have two Jeeps in 1/6 scale to recon for my 1/6 tanks!
10-04-2021, 02:45 PM
#7
Made a bit of progress, and I thought about not posting the video of the buggy but I think it might help someone to see the process here and how we decide what parts to use in a project. First I got a bit of paint on the body, just a base coat of afrika mustard to act as a primer and later the entire thing will go under the airbrush.
And a dry fit of the larger pieces with the seats dry fit to see how it all looks so far
And now the video of the buggy arriving
https://www.youtube.com/watch?v=63rxeIBAYt4
but once I got the buggy outside and tried it out I learned it's just way too much for what I need here. I could probably tone it down by getting a lower rated brushless motor or installing a brushed motor or setting the end points in the TX, but the truth is this buggy is just so much fun as it is I'm going to keep it just like it is, and play with it just like it is. So here's the buggy outside
https://www.youtube.com/watch?v=mrcM7SD0N1g
and here it is getting a bit of air. These next two videos are less than ten seconds each, but they say quite a bit
https://www.youtube.com/watch?v=w4iMx4_tpZ4
https://www.youtube.com/watch?v=d3qbOOErsfg
So I'm still figuring out the drive train. I may go for an axle and a screw gun motor/tranny and make the front suspension out of brass and aluminum, since the real thing was two wheel drive anyway. Even had I copied the English guy with the buggy it still ends up as two wheel drive, he just took the driveshaft out that connects front and rear. So while I'm thinking on that I can work on the upper body. I'm pretty sure I can complete the upper and then just drop it on the lower as a finished piece, and that will keep me moving forward as I figger out the rest. One thing I could use suggestions on is the canvas top. For this paint scheme I think the top should be dunkelgelb, but the top that comes with the kit is field gray. Any ideas what to do about that?
11-06-2021, 07:07 AM
#8
Thread Starter
Ok, progress had been made. First, we scrapped the buggy idea and picked up a 1/10 short course truck (SCT) at the LHS. $160, but unlike the buggy, it's RTR with radio and receiver. A stroke of luck is that I like the SCT controls and you can set them to different levels of sensitivity, 50%, 75% and 100%. I have lots to post, so I'll start with video of the SCT, just so you know what I'm starting with.
and some outdoor testing of the SCT
More SCT
and the SCT after some teardown
There's one more video in the camera that shows the beginning of the cutting on the dragon kit, I'll upload that and get it posted, and by the end of the weekend I hope to have at least the rear subframe assembly moounted and be ready to start on the front. Oh yeah, those of you that subscribe may have seen most of this already, as it's been up on my channel since I made them. I'm just a really bad dog when it comes to getting this stuff posted here.
11-06-2021, 01:29 PM
#10
My Feedback: (1)
Join Date: May 2009
Location: Pearl City, HI
Posts: 372
Likes: 0
Received 0 Likes
on
0 Posts
As far as the front suspension goes, Tamiya used to make several RC vehicles using the same VW-type suspension. Sand Scorcher, F-150 pickup, and several I never had (like the Hotshot and Grasshopper, I think?). They all had a front suspension that mimic-ed a Volkswagen, although it used a coil spring rather than actual torsion bars, (though it wasn't visually very obvious). You would just need to replace the two aluminum torsion tubes with ones that made it the correct width for your chassis, and then figure out how to adapt your front wheels to the axles on the knuckles.
Last edited by sassgrunt; 11-06-2021 at 01:30 PM. Reason: spelling
11-08-2021, 02:20 PM
#11
Wow, great thread Gary!!!
11-28-2021, 03:38 PM
#12
Thread Starter
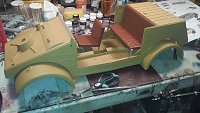
Heard ya missed me. I'm baaaack.  Got the rear all squared away, except for fine tuning once we get to final weight, and I think I have the front sorted, just more work to do. I'll try to get some stills, but here's where we're at right now. I still used the steel rod in the back, but it ended up on the bottom, which was even more convenient, and it went in smoothly. For the front mounting on the rear subframe assembly I epoxied a block of very hard wood in the space mentioned, and predrilled for regular wood screws, which worked great. It's very stiff and strong, and I think it will hold up well.
And here it is mounted, the pictures really do the talking here
And here we've got a pretty good start on the front, where I didn't get quite so lucky and actually had to think for a minute. I'm still looking for a better front end for these, so I might try something different for the DAK kubel, but I think I'll use the rear set-up from the SCT, so I'll make extra control arms to narrow the track. I got that at the LHS so I'll have to check and see if they can get just the rear axle and motor assembly. That would be very cool and would make life a lot easier, so I ain't holdin' my breath, but the worst case scenario would be dropping another $160 for another SCT. In that case I could probably still use the TX/RX from the truck, which would be convenient. That can be set for three different levels of performance and seems to be an OK system. I need to check the schwimmwagen, but that will be four wheel drive so an entirely different donor may be needed. The clone of the tammy pickup may be a candidate for that project, that's still to be investigated. Above was mention the sand scorcher but I haven't had any luck with that, and all I could find was an F350, I still have to see if parts are available, and what the front end looks like. I'm seriously considering trying to scratch build a copy of the kit parts in metal, brass and aluminum mostly. I could really use Rivetcounter's help with that one, but he hasn't been around for quite some time.
Once I finish the front end, the next project is the headlights. They will be functional.
Got the rear all squared away, except for fine tuning once we get to final weight, and I think I have the front sorted, just more work to do. I'll try to get some stills, but here's where we're at right now. I still used the steel rod in the back, but it ended up on the bottom, which was even more convenient, and it went in smoothly. For the front mounting on the rear subframe assembly I epoxied a block of very hard wood in the space mentioned, and predrilled for regular wood screws, which worked great. It's very stiff and strong, and I think it will hold up well.And here it is mounted, the pictures really do the talking here
And here we've got a pretty good start on the front, where I didn't get quite so lucky and actually had to think for a minute. I'm still looking for a better front end for these, so I might try something different for the DAK kubel, but I think I'll use the rear set-up from the SCT, so I'll make extra control arms to narrow the track. I got that at the LHS so I'll have to check and see if they can get just the rear axle and motor assembly. That would be very cool and would make life a lot easier, so I ain't holdin' my breath, but the worst case scenario would be dropping another $160 for another SCT. In that case I could probably still use the TX/RX from the truck, which would be convenient. That can be set for three different levels of performance and seems to be an OK system. I need to check the schwimmwagen, but that will be four wheel drive so an entirely different donor may be needed. The clone of the tammy pickup may be a candidate for that project, that's still to be investigated. Above was mention the sand scorcher but I haven't had any luck with that, and all I could find was an F350, I still have to see if parts are available, and what the front end looks like. I'm seriously considering trying to scratch build a copy of the kit parts in metal, brass and aluminum mostly. I could really use Rivetcounter's help with that one, but he hasn't been around for quite some time.
Once I finish the front end, the next project is the headlights. They will be functional.
The following users liked this post:
rivetcounter (01-01-2022)
01-01-2022, 01:59 PM
#13

Happy New Year all.
Sorry I have only just seen this thread, I have been missing from the forum for a few years. I started a K�belwagen and Schwimmwagen some years ago which has never been finished, give me a few day to a week and I will try and add some pictures and information on what I have done.
This is my K�belwagen and Sd.Kfz.222 on the workbench.
The following 2 users liked this post by rivetcounter:
Ex_Pat_Tanker (01-01-2022),
Will01Capri (01-14-2022)
01-04-2022, 08:54 AM
#14
Thanks for sharing "Rivetcounter"!!! Can't wait to see your update photos.
The following users liked this post:
rivetcounter (01-05-2022)
01-05-2022, 03:06 PM
#15
01-10-2022, 02:01 PM
#16
Rivetcounter where did you get your parts for the suspension and drive components? Very nice work and compact while retaining the scale appearance of the Kubel.
01-11-2022, 04:35 PM
#18
Cool mods Rivet counter!
I got it right on Amazon, got it next day after order and same price basically. Its made by FMS. Pretty nice little car actually, though small at 1/12th scale. Matches nicely to my 1/12 Hetzer I just finished scratch building.
Last edited by spinnetti; 01-11-2022 at 04:58 PM.
01-20-2022, 01:23 PM
#19
Rear end is all scratch built using torsion bar suspension.
Axles are modified Robbi parts with brass locked differentials.
01-20-2022, 05:15 PM
#20
02-17-2023, 11:17 AM
#21
Thank you Crius for starting this thread. I see it has been just over a year since the last update. Wondering if you made any more progress? Did you move on to another project? A 1/6 Kubelwagen has been on my to do list for a while. I have a Dragon kit waiting for my attention. After seeing this post I did some research and have found that the Short course truck you used (Horizon hobby ecx Torment) while not discontinued is pretty much unavailable. I took my Kubelwagen pan to my LHS and compared it to some other available RC trucks. I found that a RC-Pro 1/12 scale Shredder had the right wheel track width and seemed a suitable donor. The Shredder costs about $160 (I got one cheaper because it was open box) It is a completely ready to run model including battery and radio. It is 4wd but of course you can leave the driveline out for Rwd only.
In one evening I was able to adapt the Dragon Kubelwagen wheels to fit the Shredder chassis. The wheel track is good so won't require cutting or modification. The wheelbase is way too short of course so will need to be adapted to fit the Kubelwagen pan. I can post some pics if anyone is interested.
One thing that has held me back on doing this project is that with so many releases from Roc hobby FMS and other non-descript brands in many different scales I'm expecting that someone will release a pre-built 1/6 Kubelwagen that's cheap and ready to go at any moment. Oh well, Even if they do I won't regret putting in some effort to make one. Jason.
02-17-2023, 12:13 PM
#22
Thread Starter
Yeah, I got sidetracked on this one. Right now I'm working on the SAS jeep, and after that I promised a friend I would get to the 251 half track, and then back onto the kubelwagen. I have two other Kubel kits, the DAK version with the balloon tires, so I will definitely look for that 1/12 truck. Right now it's a kind of a rolling chassis, it will move under its own power and I have steering, but at some point I will have to make some new suspension arms since these are just a bit too long. But, I work in a machine shop and have access so it shouldn't be that big a deal, it's basically just two pieces of aluminum flat stock with a notch in each end and the holes drilled through to attach them. It's just a question of getting the time, hopefully before I die.
I hope you'll do a thread on your project, I'd really like to see it. And then, if I ever get all the rest done I also have the Dragon schwimmwagen kit which I would like to make functional. So many projects, so little time.
I hope you'll do a thread on your project, I'd really like to see it. And then, if I ever get all the rest done I also have the Dragon schwimmwagen kit which I would like to make functional. So many projects, so little time.
02-17-2023, 02:53 PM
#24
Thread Starter
This is where the kubel is now, and on the shelf. First the SAS desert raider (got boots for the driver today), then the Sd.Kfz.251 (got the track pads, need to order glue), then back to the kubel and hopefully the DAK versions. Is this the truck you got?
https://hobbyplex.com/products/rc-pr...-monster-truck
Then, if all goes well, the schwimmwagen, and for side jobs I have the M5 Stuart tank and an M3 scoutcar.
I think I might already have a donor for the M3, a tamiya bruiser clone, still need to investigate that one.
https://hobbyplex.com/products/rc-pr...-monster-truck
Then, if all goes well, the schwimmwagen, and for side jobs I have the M5 Stuart tank and an M3 scoutcar.
I think I might already have a donor for the M3, a tamiya bruiser clone, still need to investigate that one.
02-17-2023, 05:05 PM
#25
Gary, Nice work so far!!!