


1/16 222 Build "Andrew Design"
 05-02-2008, 11:21 AM
#1

Thread Starter

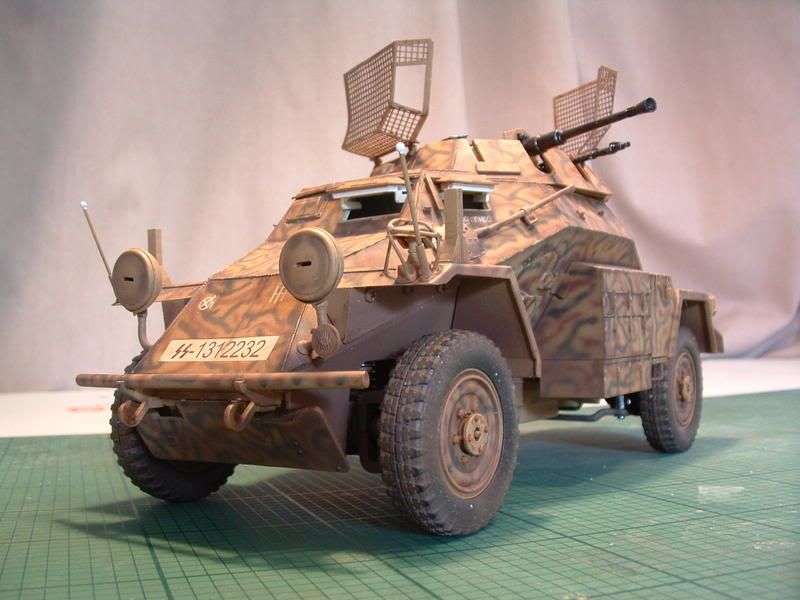
1/16 Sdkfz 222 Build
Over the next few weeks I will be building the Andrew Design 1/16 Sdkfz 222 supplied by YT International, this will be an out of the box build where I will disclose the pros and cons of the kit, latter I may add some detail.
First impressions
Box art and presentation are very good and equal Tamiya open the box inside there is a bag with two plastic frets another bag with decals, etch fret, cloth tyre cover, rubber tyres, zip tie, brass width markers a colour poster, three boxes one larger than the other containing metal and resin chassis parts and the motor the other two boxes one containing the metal lower hull and the other containing the resin upper hull, colour poster of the 222 and 223, the instructions where well laid out very clear and easy to follow.
To get either vehicle moving you will require a 7.2v battery transmitter, receiver and speed controller, the kit doesn’t have turret rotation or gun elevation/depression this I will look at latter.
Closer look at the parts
This kit will no doubt be compared to a Tamiya kit but lets not forget that Tamiya has a larger tea budget than Andrew Design /YT International has for the whole company but take on the giant they have and personally I think they have done a very good job for there first armoured vehicle just look at the rush job Tamiya have done with the long awaited Panther, lets look at the two plastic frets which where virtually flash free sink marks where mostly on the inside of parts bar the registration plates detail was almost as good as Tamiya but not on par one down side is that one of the MG34’s was removed from one fret, metal parts have some flashings which need to be removed but nothing to drastic there’s a metal gun barrel and flash reducer the barrel is not turned but Tamiya have only recently started adding these to there kits and should be fairly easy to sort, all drive shafts come pre assembled with gears and bearings which is a
nice touch as is the parts break down all the metal parts are the same size as the instructions nice and handy if you are a beginner, resin parts come in three bags along with the upper hull the advantages of resin is that a higher level of detail can be achieved and production cost’s are much lower than the dies required for injection moulding the down side is that they tend to have large pour plugs that require careful removal the castings can sometimes suffer from air bubbles that require filling I found a few small bubbles that will be easy to sort out I have had far worse with Verlinden and the Pro Models Pak40 that I built the latter suffered from warped parts I didn’t find any in the 222 kit.
There are three decal options all Whernacht would have been nice to have an SS division but with SS runes on the reg plates and European hysteria this is a no no.
Parts count all the parts where present absolutely nothing missing.
 05-02-2008, 11:22 AM
#2
Thread Starter
The Build
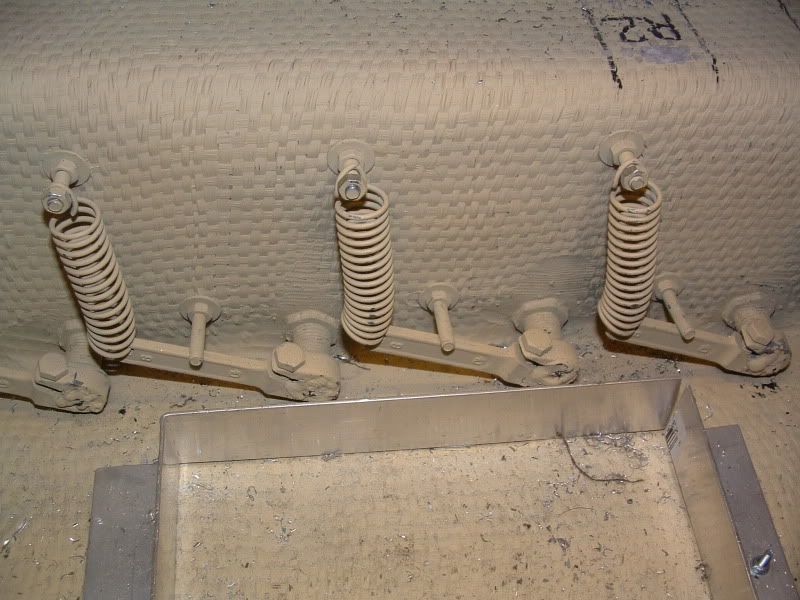
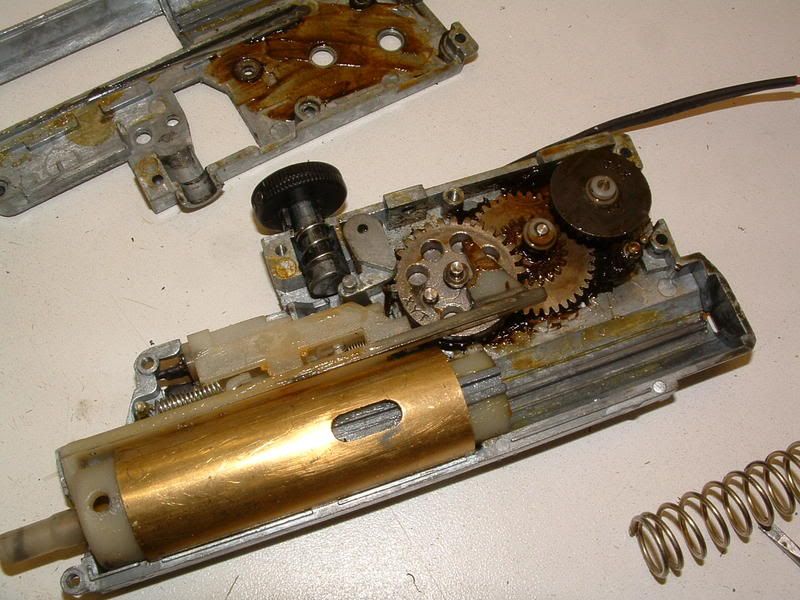
This starts on the metal lower hull first job clean up the metal parts this I did with a Dermal and hand file 40 minutes later the job’s done then it’s on to building the gear box then the axels a lot of the screws on this build are self tapping which to be honest is not the best idea so I decided to replace these with BA screw sizes are 6BA = 2.6mm 8BA = 2.mm, I bought two sets of BA taps for this job from “Proops Brothers” http://stores.ebay.co.uk/PROOPS-BROTHERS these where £2.95 per set of three not expensive, I spent the next 3 hours tapping out every hole in the kit I used a bit of “Olive Oil” to lube the taps helps cut the threads a little easier whilst I was on Evilbay I purchased the correct BA screws again these where inexpensive I think £5 covered these.


(1,2) Start on the gearbox this is all metal construction with plastic gears, the gear shafts come pre assembled just make sure that the bearings are a snug fit the casings and that shaft GA1 doesn’t have to much back and forth play as this is the out put shaft I added grease to the gears, when you have attached the drive shaft cups MA4 make sure the grub screw doesn’t catch the motor when you rotate the shaft I had to file mine a little


(3,4) next came the axles again the gear shafts come pre assembled I marked each axle set so I knew which parts came from where this will help matching parts, I paid specific attention to the gear shafts GA3 and axle half’s MA6 and MA6 first make sure the shaft bearings are a snug fit in the axle half’s you may need to move the bearings a little but don’t move them to much this will cause the bearings to run tight and where premature you will know they are tight if you can feel a rumbling when you rotate the shaft now check the gears make sure that the crown gear on GA3 meshes properly with GA4 I had to move the large crown gear in a little

now check that MA7 and MA8 move freely in the axle ends if they don’t then file them a little until they move and freely once this is done remove MA7 and MA8 add MA10 a bearing and one of the wheels tighten the screw in the wheel spin the wheel and make sure it turns freely if it doesn’t strip the assembly down and you will need to remove some bur from inside MA7 I did this with a 10mm countersink bit by hand and removed a small amount of metal rebuilt the assembly and checked again you don’t want to take to much metal away as you wont be able to put it back latter

now assemble everything with grease on the gears and drive shaft ends next is MA11 this is a ring which should turn freely on the axle if not with a small half moon file, file the inside of the ring and re check until this part turns freely repeat all tat you have just done on the other axle, next step is bolting the axles to the lower chassis for this I’m going to save you some time in the build this I found latter when testing the chassis, MA13 a half moon bracket I added a piece of 1mm plasticard to the inside

this is to lift the axle a little to stop the drive shaft’s from rubbing on the inside of the chassis assemble everything else as per instructions.
(5,6,7,8,9,10,11,12,13,14) the only problem you may come across hear is with MA17 and MA22 these are the steering arms when joined together I found mine hade some play this will affect the steering the solution is to glue a piece of 1mm plasticard inside the chassis then insert the steering parts again

If they are tight use a file or sand paper to remove some plastic making the hole slightly larger remember take you time and constantly check the fit of the parts you don’t want these parts to tight or to slack now with that little problem solved assemble all the parts in 5,6,7 as per instructions I drilled and taped the chassis to hold P44,45 in place so the don’t fall off, before you fit the motor and gearbox are you going to add turret rotation? if so and you are going to use my method grind the top of the gearbox flat like this

Again this will save you time latter if you change your mind this mod wont cause any problems now fit the motor and drive shafts this is a fiddly job and a pair of tweezers will help locate the drive shafts assemble 8-17 as per instructions for the speed controller I used “M Troniks” Viper marine 15 these have a built in on/off switch I lengthened the wires to fit in there allocated mounting positions I also used a four channel receiver two for the driving and one for the turret rotation I changed some of the connecters to fit all the electric components, now spend a little time testing your new toy this is the hardest part of the build done so it’s time for a cup of tea.
This starts on the metal lower hull first job clean up the metal parts this I did with a Dermal and hand file 40 minutes later the job’s done then it’s on to building the gear box then the axels a lot of the screws on this build are self tapping which to be honest is not the best idea so I decided to replace these with BA screw sizes are 6BA = 2.6mm 8BA = 2.mm, I bought two sets of BA taps for this job from “Proops Brothers” http://stores.ebay.co.uk/PROOPS-BROTHERS these where £2.95 per set of three not expensive, I spent the next 3 hours tapping out every hole in the kit I used a bit of “Olive Oil” to lube the taps helps cut the threads a little easier whilst I was on Evilbay I purchased the correct BA screws again these where inexpensive I think £5 covered these.
(1,2) Start on the gearbox this is all metal construction with plastic gears, the gear shafts come pre assembled just make sure that the bearings are a snug fit the casings and that shaft GA1 doesn’t have to much back and forth play as this is the out put shaft I added grease to the gears, when you have attached the drive shaft cups MA4 make sure the grub screw doesn’t catch the motor when you rotate the shaft I had to file mine a little
(3,4) next came the axles again the gear shafts come pre assembled I marked each axle set so I knew which parts came from where this will help matching parts, I paid specific attention to the gear shafts GA3 and axle half’s MA6 and MA6 first make sure the shaft bearings are a snug fit in the axle half’s you may need to move the bearings a little but don’t move them to much this will cause the bearings to run tight and where premature you will know they are tight if you can feel a rumbling when you rotate the shaft now check the gears make sure that the crown gear on GA3 meshes properly with GA4 I had to move the large crown gear in a little
now check that MA7 and MA8 move freely in the axle ends if they don’t then file them a little until they move and freely once this is done remove MA7 and MA8 add MA10 a bearing and one of the wheels tighten the screw in the wheel spin the wheel and make sure it turns freely if it doesn’t strip the assembly down and you will need to remove some bur from inside MA7 I did this with a 10mm countersink bit by hand and removed a small amount of metal rebuilt the assembly and checked again you don’t want to take to much metal away as you wont be able to put it back latter
now assemble everything with grease on the gears and drive shaft ends next is MA11 this is a ring which should turn freely on the axle if not with a small half moon file, file the inside of the ring and re check until this part turns freely repeat all tat you have just done on the other axle, next step is bolting the axles to the lower chassis for this I’m going to save you some time in the build this I found latter when testing the chassis, MA13 a half moon bracket I added a piece of 1mm plasticard to the inside
this is to lift the axle a little to stop the drive shaft’s from rubbing on the inside of the chassis assemble everything else as per instructions.
(5,6,7,8,9,10,11,12,13,14) the only problem you may come across hear is with MA17 and MA22 these are the steering arms when joined together I found mine hade some play this will affect the steering the solution is to glue a piece of 1mm plasticard inside the chassis then insert the steering parts again
If they are tight use a file or sand paper to remove some plastic making the hole slightly larger remember take you time and constantly check the fit of the parts you don’t want these parts to tight or to slack now with that little problem solved assemble all the parts in 5,6,7 as per instructions I drilled and taped the chassis to hold P44,45 in place so the don’t fall off, before you fit the motor and gearbox are you going to add turret rotation? if so and you are going to use my method grind the top of the gearbox flat like this
Again this will save you time latter if you change your mind this mod wont cause any problems now fit the motor and drive shafts this is a fiddly job and a pair of tweezers will help locate the drive shafts assemble 8-17 as per instructions for the speed controller I used “M Troniks” Viper marine 15 these have a built in on/off switch I lengthened the wires to fit in there allocated mounting positions I also used a four channel receiver two for the driving and one for the turret rotation I changed some of the connecters to fit all the electric components, now spend a little time testing your new toy this is the hardest part of the build done so it’s time for a cup of tea.
05-02-2008, 11:25 AM
#3
Thread Starter
Turret Rotation
We will fast forward to the turret so as not to damage any parts that we may attach to the upper chassis, for the turret rotation we want something small and compact this has to sit below the turret ring and on top of the motor hence why I ground the motor flat on top I found I had about 22mm for the rotation unit so what can we use??? Answer a small servo but you are going to say a servo only has about 45 degree movement but not if you modify it modifying the servo will give you a full 360 rotation further that it has it’s own built it speed controller and motor so on to evilbay and http://stores.ebay.co.uk/nilesinstall-RC what you want is 2x HXT 900 Hextronik 9g mini servo’s £6.99 the pair plus postage bargain now when you get the servo’s you have to open them what you want is the black round unit with the gears attached now if you plug you servo in turn on the radio you will notice that the motor is turning holding this little black round unit turn the gear slowly you will notice that the motor comes to a halt in the natural position now move the stick on you radio and you will see something magic the motor rotates and when you return the stick the motor stops what you want is one of these black round units to follow outside the servo and one to go back where the original came from but first remove all wires the two metal stops and on the gears remove the stop now this should fully rotate re assemble look at the pictures you will see how I attached everything.


Upper Hull
This covers 18-33anddeals mainly with the resin parts of the kit this also includes building the turret.
First ting all the resin parts have pour plugs and if you haven’t dealt with these before don’t worry about them to much on this kit they are not as substantial as other resin kits and wont require a fret saw to remove just a plain old Stanley knife will do just make sure you insert a new blade as you remove each part and clean them up now would be a good idea to number each part with a thin marker pen and put any parts that require filling due to air bubbles to one side
My upper hull had some air bubbles along the left side I zoomed along to 25 and added parts P19, 20, 21 and the 5 3mm nuts once the glue had cured I attached the lower hull to the upper hull to see what was required there wasn’t much filling required so I separated the two half’s again using Milliput I rolled a length and added it to the top half joined the two half’s making sure that all the holes where filled and once cured removed the excess to mate with the lower half


I only had a few parts that required any filling one part that did require a little filling where the four injector pin holes in the registration plates

Assemble sections 18-19 as per instructions no problems hear.
20 this section deals with the assembly of the guns the kit comes with a metal gun barrel MA25 and muzzle break MA24 the barrel is a cast item and has some seems that require removing this was a simple task requiring nothing more complicated than a drill and some emery to clean up the barrel

The only other modification I did in this section was on the MG34, A34 was to drill out all the holes in the cooling jacket this was for aesthetics only

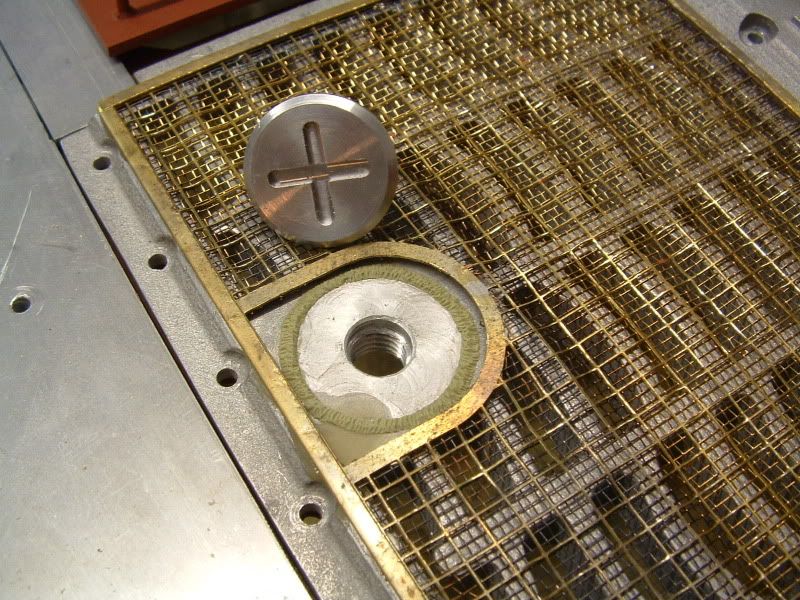
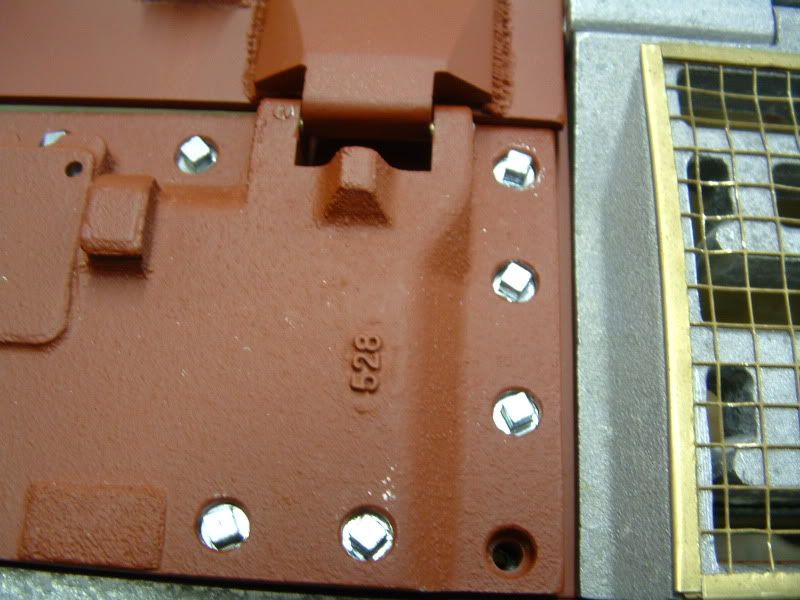
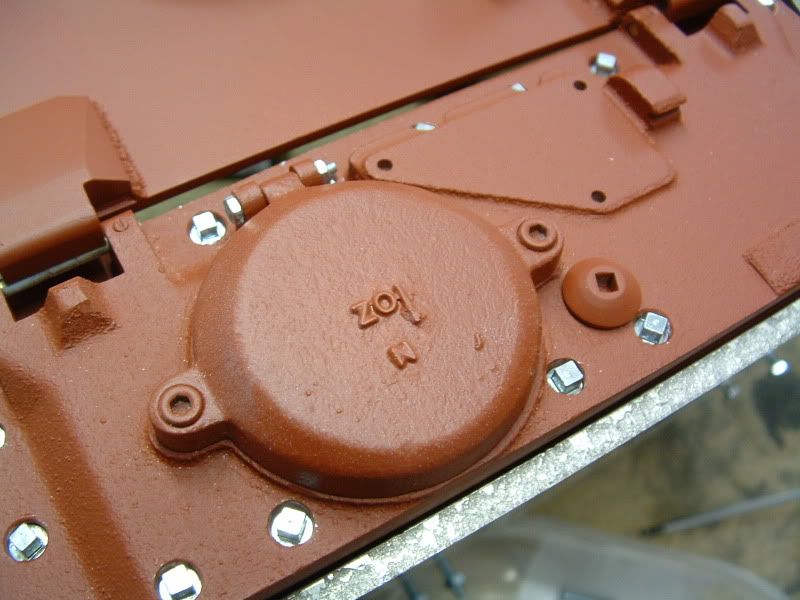
I assembled everything else as per instructions in sections 20-25 with the exception of the etched metal grenade covers I left this until the very end just before it was time to paint.
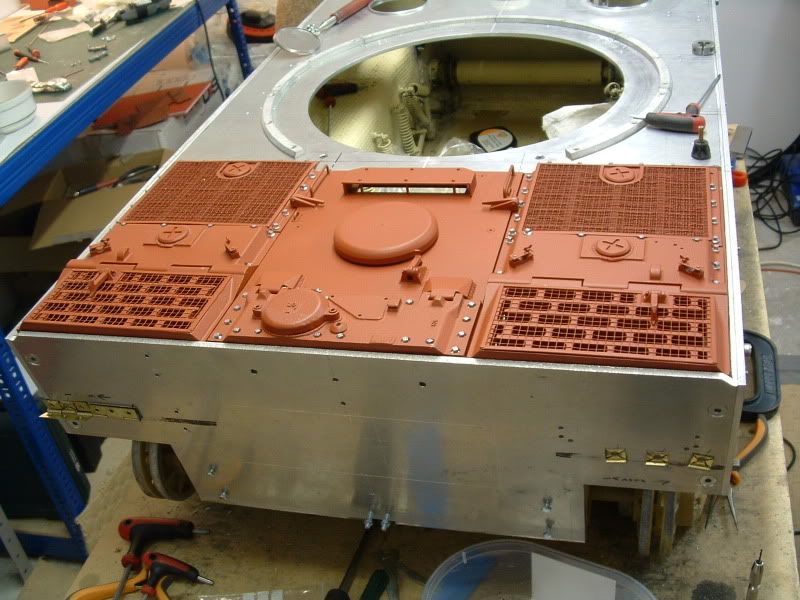
26-33 I assembled everything as per instructions as you would expect there where no problems and the kit fell together, parts P8-9 are the drivers armoured vision covers these can be glued in the open or closed positions I wanted to have P9 the drivers hatch open just to give a bit of life to the vehicle the side hatches P17 are glued in the closed position.


We will fast forward to the turret so as not to damage any parts that we may attach to the upper chassis, for the turret rotation we want something small and compact this has to sit below the turret ring and on top of the motor hence why I ground the motor flat on top I found I had about 22mm for the rotation unit so what can we use??? Answer a small servo but you are going to say a servo only has about 45 degree movement but not if you modify it modifying the servo will give you a full 360 rotation further that it has it’s own built it speed controller and motor so on to evilbay and http://stores.ebay.co.uk/nilesinstall-RC what you want is 2x HXT 900 Hextronik 9g mini servo’s £6.99 the pair plus postage bargain now when you get the servo’s you have to open them what you want is the black round unit with the gears attached now if you plug you servo in turn on the radio you will notice that the motor is turning holding this little black round unit turn the gear slowly you will notice that the motor comes to a halt in the natural position now move the stick on you radio and you will see something magic the motor rotates and when you return the stick the motor stops what you want is one of these black round units to follow outside the servo and one to go back where the original came from but first remove all wires the two metal stops and on the gears remove the stop now this should fully rotate re assemble look at the pictures you will see how I attached everything.
Upper Hull
This covers 18-33anddeals mainly with the resin parts of the kit this also includes building the turret.
First ting all the resin parts have pour plugs and if you haven’t dealt with these before don’t worry about them to much on this kit they are not as substantial as other resin kits and wont require a fret saw to remove just a plain old Stanley knife will do just make sure you insert a new blade as you remove each part and clean them up now would be a good idea to number each part with a thin marker pen and put any parts that require filling due to air bubbles to one side
My upper hull had some air bubbles along the left side I zoomed along to 25 and added parts P19, 20, 21 and the 5 3mm nuts once the glue had cured I attached the lower hull to the upper hull to see what was required there wasn’t much filling required so I separated the two half’s again using Milliput I rolled a length and added it to the top half joined the two half’s making sure that all the holes where filled and once cured removed the excess to mate with the lower half
I only had a few parts that required any filling one part that did require a little filling where the four injector pin holes in the registration plates
Assemble sections 18-19 as per instructions no problems hear.
20 this section deals with the assembly of the guns the kit comes with a metal gun barrel MA25 and muzzle break MA24 the barrel is a cast item and has some seems that require removing this was a simple task requiring nothing more complicated than a drill and some emery to clean up the barrel
The only other modification I did in this section was on the MG34, A34 was to drill out all the holes in the cooling jacket this was for aesthetics only
I assembled everything else as per instructions in sections 20-25 with the exception of the etched metal grenade covers I left this until the very end just before it was time to paint.
26-33 I assembled everything as per instructions as you would expect there where no problems and the kit fell together, parts P8-9 are the drivers armoured vision covers these can be glued in the open or closed positions I wanted to have P9 the drivers hatch open just to give a bit of life to the vehicle the side hatches P17 are glued in the closed position.
05-02-2008, 11:31 AM
#4
Thread Starter
Scratch built parts
I didn’t intend to add any extra parts to this kit but I just couldn’t control myself I started by adding some spare Dragon ammunition belt to the MG34 and a scratch built Gurtsack I may add some other bits at a latter date to the turret on to the Notek light at the front the rear convoy light and tail light I added the wire guards made from brass, on some 222/223 there is a second stowage box on the left side this I made from plasticard and some thin wire for the lid catches I also made a padlock again just for aesthetics, A19 I added the wire brake cables a wire footstep to the left rear mudguard and I opened up P17 the left drivers visor and added some detail


Paint and Decals
I wanted something a little different from what is supplied in the kit
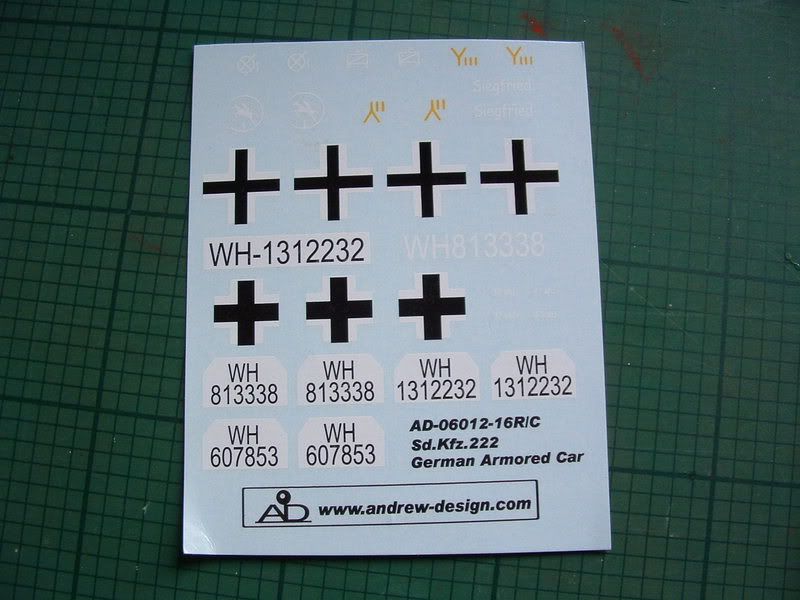
There are two paint and decal options called out on the instructions but three decal options are provided
A, 24th Panzer Division Southern Russia this must be 1942-43 as the colour option is grey, yellow was introduced in 1943
B, 10th Panzer Division Russia
C, 3rd Panzer Division Russia “not shown”
The colours for B and C should be yellow with green stripes as per instructions making them just right for the Battle of Kursk,
I wanted soothing different from all the others so I mad up my own decals of the 9th SS Panzer Division “Hohenstaufen” 1944 these vehicles were still in use with the 9th SS as late as September 1944 in Arnhem so this would have been Yellow with green and brown stripes.


Conclusion
This the first in a line of recognisance vehicles from Andrew Design A brave move that other manufactures have been to afraid to enter and concentrated on the main tanks not daring to be different I think Andrew design have done a brilliant first RC kit and things can only get better sure there are a few air bubbles in the resin but it’s nothing that cant be easily and cheaply resolved even the lack of turret rotation wasn’t really a problem and not expensive to sort, would have been nice to have a spare wheel but the dummy and cloth cover is a very nice touch the detail on this vehicle is very good for a first try with all the weld marks bolts and hinges being crisp they could teach Tamiya a thing or two about detail and what customers want I’m looking forward to the 234/2 Puma but might buy the 223 just to go with the 222 tings can only get better.
Thanks to
YT International for supplying the kit http://www.jetstreamrc.co.uk/
Andrew Design WWW.andrew-design.com
I didn’t intend to add any extra parts to this kit but I just couldn’t control myself I started by adding some spare Dragon ammunition belt to the MG34 and a scratch built Gurtsack I may add some other bits at a latter date to the turret on to the Notek light at the front the rear convoy light and tail light I added the wire guards made from brass, on some 222/223 there is a second stowage box on the left side this I made from plasticard and some thin wire for the lid catches I also made a padlock again just for aesthetics, A19 I added the wire brake cables a wire footstep to the left rear mudguard and I opened up P17 the left drivers visor and added some detail
Paint and Decals
I wanted something a little different from what is supplied in the kit
There are two paint and decal options called out on the instructions but three decal options are provided
A, 24th Panzer Division Southern Russia this must be 1942-43 as the colour option is grey, yellow was introduced in 1943
B, 10th Panzer Division Russia
C, 3rd Panzer Division Russia “not shown”
The colours for B and C should be yellow with green stripes as per instructions making them just right for the Battle of Kursk,
I wanted soothing different from all the others so I mad up my own decals of the 9th SS Panzer Division “Hohenstaufen” 1944 these vehicles were still in use with the 9th SS as late as September 1944 in Arnhem so this would have been Yellow with green and brown stripes.
Conclusion
This the first in a line of recognisance vehicles from Andrew Design A brave move that other manufactures have been to afraid to enter and concentrated on the main tanks not daring to be different I think Andrew design have done a brilliant first RC kit and things can only get better sure there are a few air bubbles in the resin but it’s nothing that cant be easily and cheaply resolved even the lack of turret rotation wasn’t really a problem and not expensive to sort, would have been nice to have a spare wheel but the dummy and cloth cover is a very nice touch the detail on this vehicle is very good for a first try with all the weld marks bolts and hinges being crisp they could teach Tamiya a thing or two about detail and what customers want I’m looking forward to the 234/2 Puma but might buy the 223 just to go with the 222 tings can only get better.
Thanks to
YT International for supplying the kit http://www.jetstreamrc.co.uk/
Andrew Design WWW.andrew-design.com
05-02-2008, 11:45 AM
#5
Senior Member
Join Date: Feb 2008
Location: NorwichNorfolk, UNITED KINGDOM
Posts: 715
Likes: 0
Received 0 Likes
on
0 Posts
Awesome! How does it drive?
Also you mention the 232 'Puma' - I've always wanted one of those (I've got a small one, I think it's about 1/30 or something).
Also you mention the 232 'Puma' - I've always wanted one of those (I've got a small one, I think it's about 1/30 or something).
05-02-2008, 12:02 PM
#7
Thread Starter
Panzerfaust, the 222/223 is a little on the fast side and could do with slowing down I haven't had chance to test off road nor will I before I get back to England in July but the first show that I go to the 222 will be there with my other 1/16 tanks.
The 234/1, 234/2 Puma two version's of the Hotch a Pak and Flak gun will be available around August there is also a Kettenkrad which will be available not long after, Will post some linke when I get some spare time.
The 234/1, 234/2 Puma two version's of the Hotch a Pak and Flak gun will be available around August there is also a Kettenkrad which will be available not long after, Will post some linke when I get some spare time.

 05-02-2008, 01:43 PM
#10

Nice! I was so afraid that these new-comers would be like the Tamiya Kubelwagen, good form but poor function. I'm pleased to see not only all of the great detail, but it looks like a hearty kit, as well!
Any chance of an indoor video....in a safe place? I want to see the functions in action.
Great Work!
Jason
Any chance of an indoor video....in a safe place?
I want to see the functions in action.Great Work!
Jason
05-02-2008, 01:59 PM
#11
Senior Member

Join Date: Jan 2008
Location: Abbotsford,
BC, CANADA
Posts: 342
Likes: 0
Received 3 Likes
on
3 Posts
Very Nice! I have been wondering how the quality of these stack up.
I too have been just waiting for that Puma, something I've wanted to see in a larger scale.
Here are some links with pics
http://rctankhq.com/Gallery/index.php?cat=14
http://xion-shop.de/english/new-prod...8/default.aspx
I too have been just waiting for that Puma, something I've wanted to see in a larger scale.
Here are some links with pics
http://rctankhq.com/Gallery/index.php?cat=14
http://xion-shop.de/english/new-prod...8/default.aspx
05-02-2008, 09:30 PM
#12
Member
Join Date: Apr 2008
Location: Albany, NY
Posts: 67
Likes: 0
Received 0 Likes
on
0 Posts
Fantastic write-up! I've been looking for more info on this kit since I saw the teaser pic on Backyard Armor with the broken link... how much did this kit en up costing, and do you know if it will be available long-term? This is definitely something I'd like to get and build down the road once I have more experience, along with the Puma... very interesting subjects, and really good looking models.
05-02-2008, 10:36 PM
#13


Join Date: Nov 2006
Location: APO
Posts: 761
Likes: 0
Received 0 Likes
on
0 Posts
Is there a reliable US distributor for this model? BYA i dont want to deal with. The Andrew design page doesnt want to load either. Would ETO be carrying this parhaps?
05-03-2008, 02:29 AM
#15
Senior Member

Join Date: Dec 2007
Location: Newcastle upon Tyne, UNITED KINGDOM
Posts: 124
Likes: 0
Received 0 Likes
on
0 Posts
Brilliant write up. Like others, I've been wondering what these kits are really like.
Thanks for sharing.
Chris
Thanks for sharing.
Chris
05-04-2008, 01:38 PM
#16
Thread Starter
Bill at ETO http://www.etoarmour.com/products.php?ViewCategory=26 will be supplying them and from what Ive heard he likes to please his customers as he wants to do business with them again.
Sorry not got a video hear in Belgium but as soon as I get home in July I will post some footage
Quality of this kit is very high the Puma will be better there are also upgrade being done to the kit so you wont have to tap any of the holes there is also a set of metal upgrade gears coming and a speed controller with lighting options

 05-04-2008, 11:31 PM
#20
Senior Member

Join Date: Apr 2007
Location: Escondido,
CA
Posts: 2,841
Likes: 0
Received 0 Likes
on
0 Posts
This kit looks like a fine little machine,,, EL Mod unit with the correct sounds and drive,,, coming need to know interest level,, may get a few to do a demo!?
What do you think,, one good cannon blast on this little baja gunner and its out of the game???
The Blitz
What do you think,, one good cannon blast on this little baja gunner and its out of the game???
The Blitz
