


1/6 Tiger I build
 02-03-2010, 05:01 PM
#51
Member
Join Date: Jan 2010
Location: Chieti, ITALY
Posts: 68
Likes: 0
Received 0 Likes
on
0 Posts
Well done, beautiful work

I posted some pictures of my WIP in another topic here, so it is simpler than reading 43 pages in italian
BTW:
Again GREAT JOB on your tank!
And it's a very nice feature the moving MG ball.
I cannot do it because I have no free radio channels, but will try in future!
I posted some pictures of my WIP in another topic here, so it is simpler than reading 43 pages in italian
BTW:
Again GREAT JOB on your tank!
And it's a very nice feature the moving MG ball.
I cannot do it because I have no free radio channels, but will try in future!
 02-04-2010, 10:48 AM
#54

Thread Starter

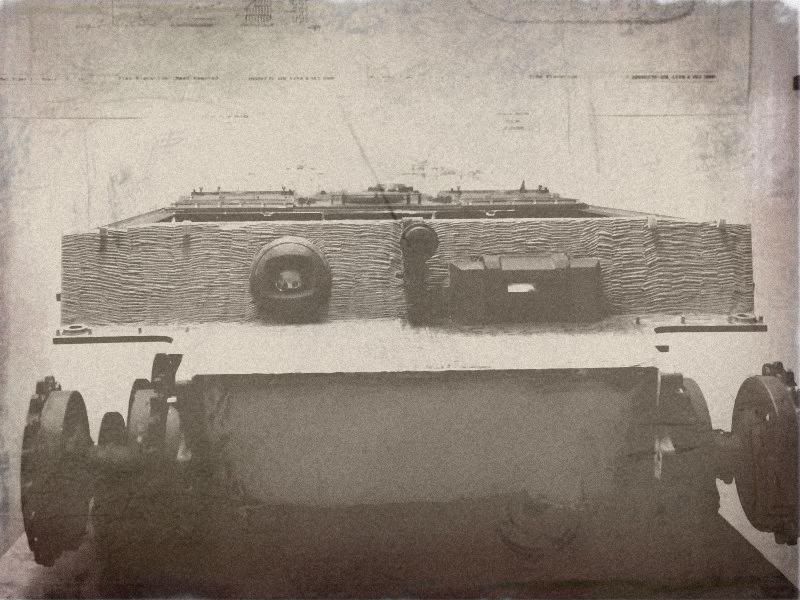
As I suspected I knew I hadn’t read anything anywhere about paint other than red oxide.
This picture must be of a Jagdpanther
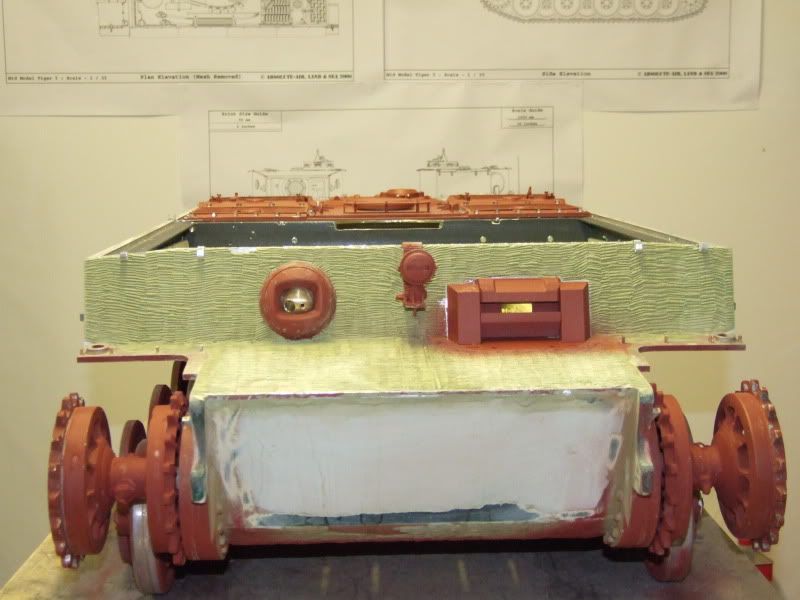
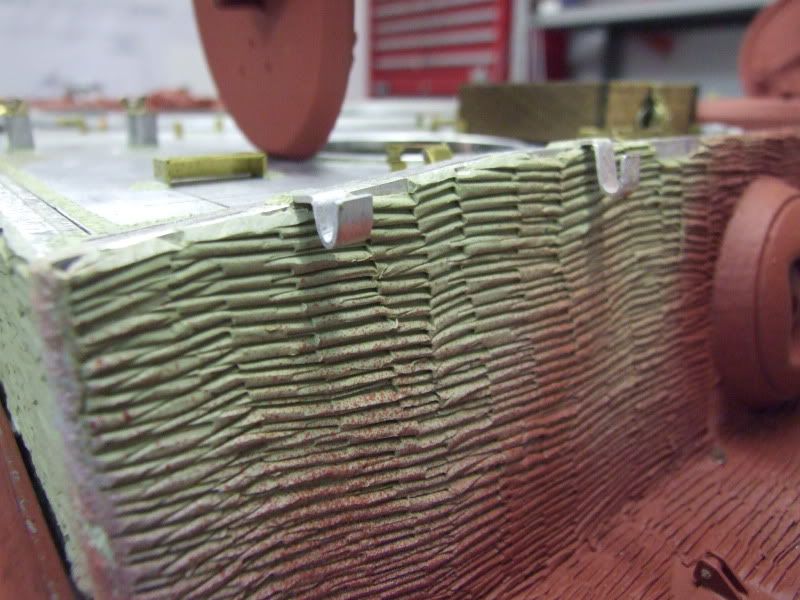
Hear are some pictures of my attempt at zimmerit I have ran out of milliput so will have to get more tomorrow,
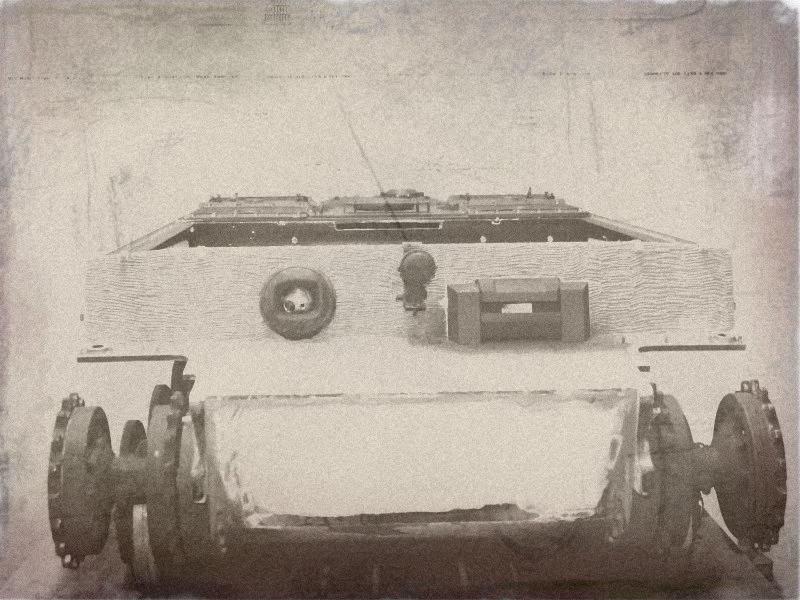
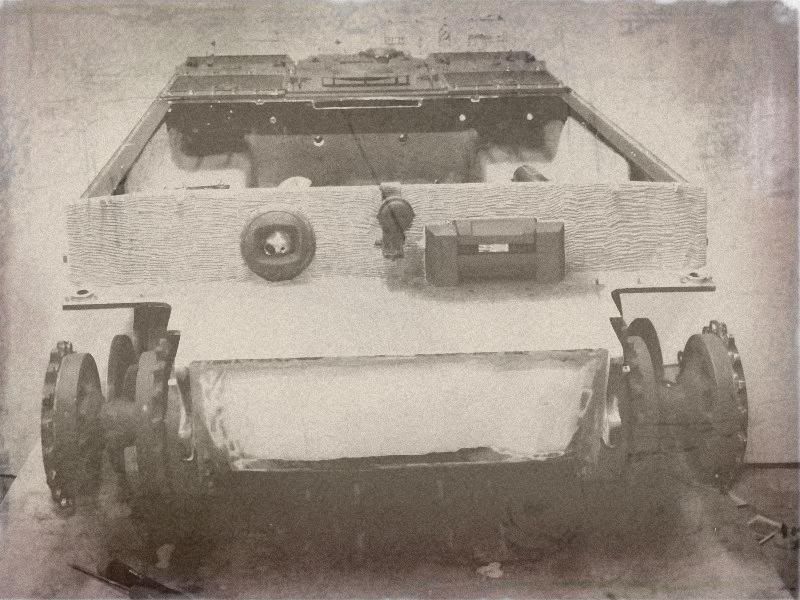
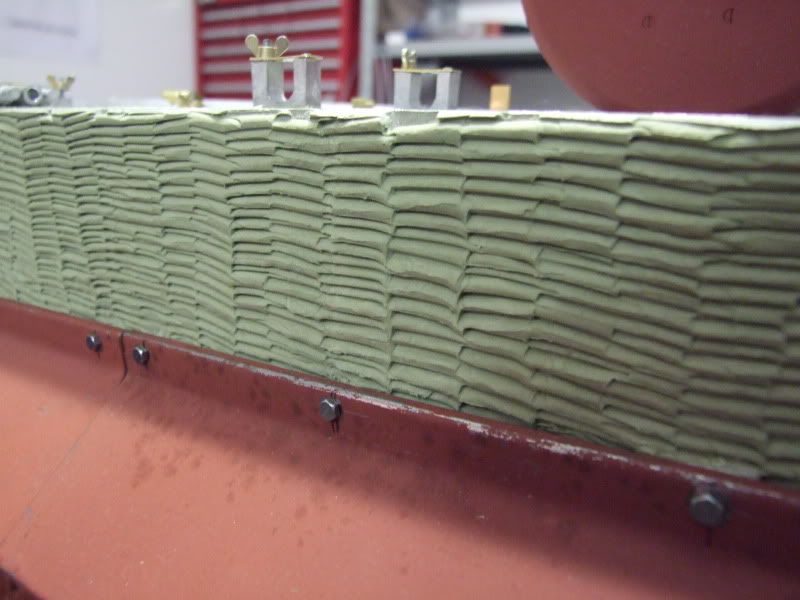
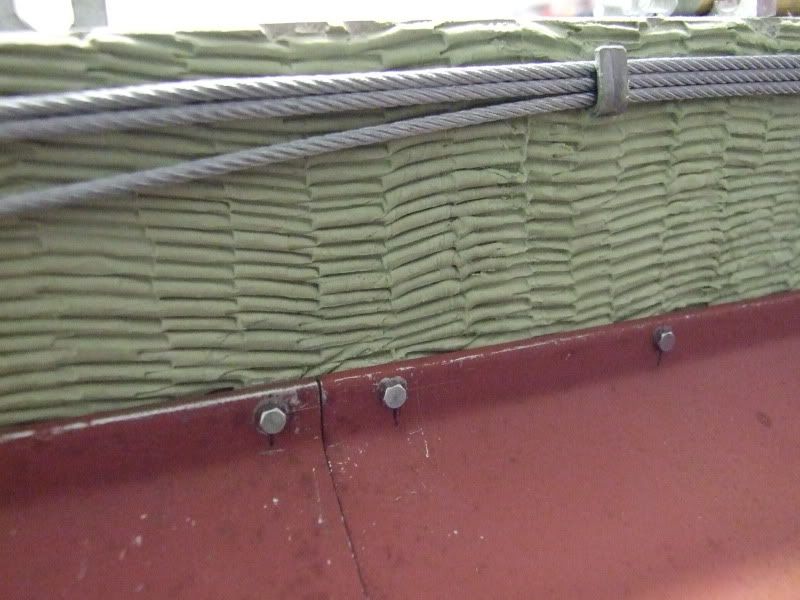
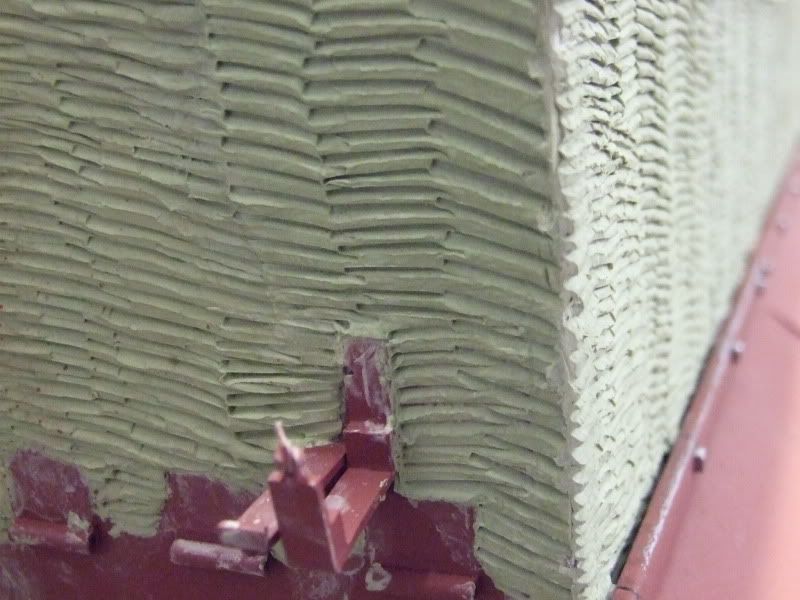
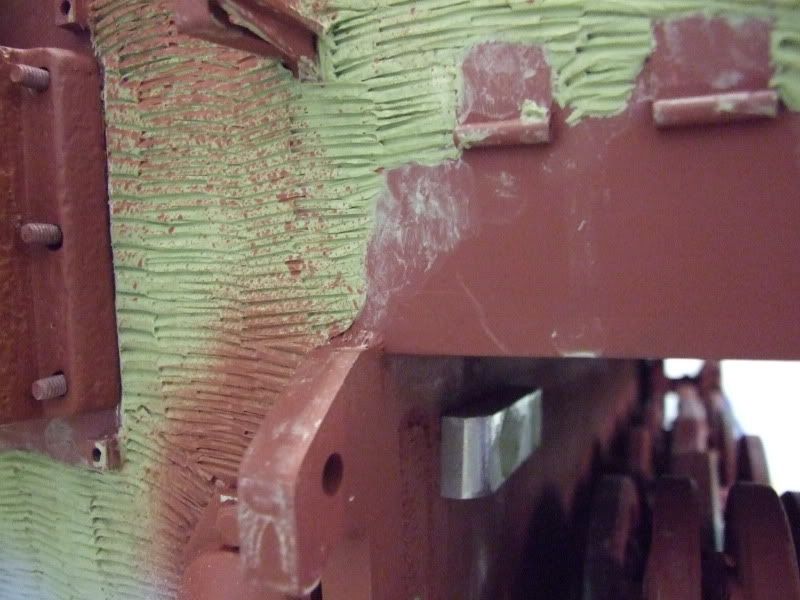
This is the front covered with zimmerit along with the all important ladder marks that is so often missed by builders, the authors of a few Tiger books claim that this front horizontal plate was rarely covered with zimmerit but after studying hundreds of pictures it became apparent that that all mid and late Tigers had this covered though clear pictures are rare the angle that pictures where taken is one of the reasons why there are few pictures showing this detail.
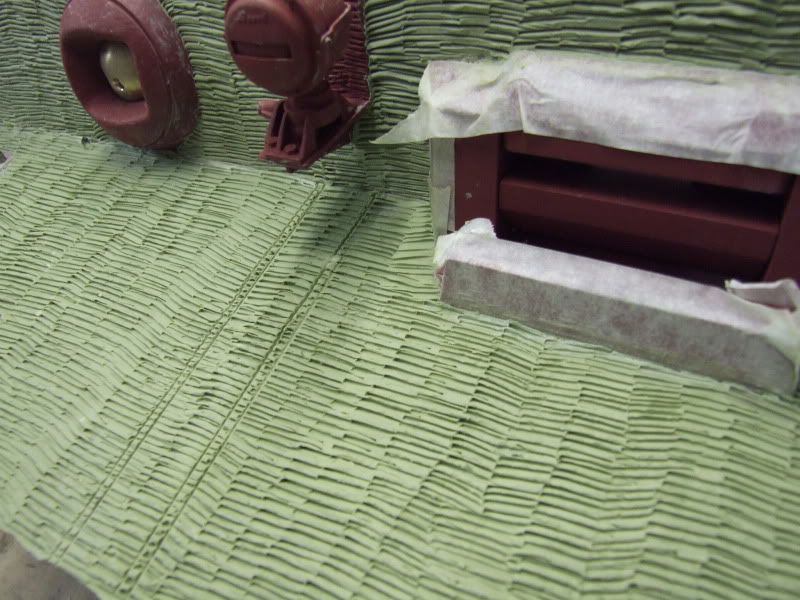
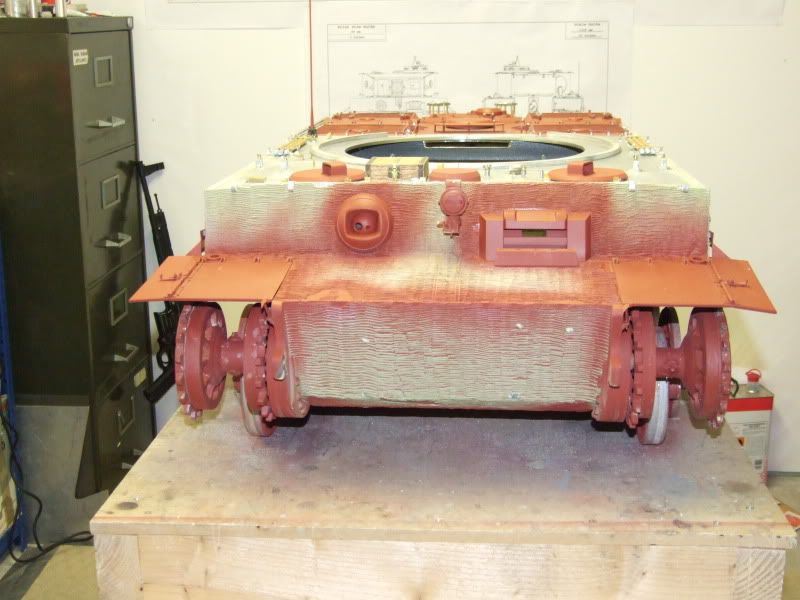
The rear plate under the mudguards was void of zimmerit though pictures showing this are rare as the back is usually covered in mud so becomes very difficult to see
This picture must be of a Jagdpanther
Hear are some pictures of my attempt at zimmerit I have ran out of milliput so will have to get more tomorrow,
This is the front covered with zimmerit along with the all important ladder marks that is so often missed by builders, the authors of a few Tiger books claim that this front horizontal plate was rarely covered with zimmerit but after studying hundreds of pictures it became apparent that that all mid and late Tigers had this covered though clear pictures are rare the angle that pictures where taken is one of the reasons why there are few pictures showing this detail.
The rear plate under the mudguards was void of zimmerit though pictures showing this are rare as the back is usually covered in mud so becomes very difficult to see
02-04-2010, 11:57 AM
#55
Senior Member
Join Date: Dec 2007
Location: Westchester,
CA
Posts: 361
Likes: 0
Received 0 Likes
on
0 Posts
rivetcounter; some excellent work there. You have made my mind up. I was going to get another 1/16 tank, but now after seeing yours I am going to save that money to buy a 1/6 scale. Don't know which one yet though.
Richard
Richard
02-04-2010, 12:15 PM
#56
Member
Join Date: Jan 2010
Location: Chieti, ITALY
Posts: 68
Likes: 0
Received 0 Likes
on
0 Posts
I'll search on my books as I saw pictures with zimmerit on glacis, but there are however a lot of pictures (I used the pz.abt.508 pictures to make my tank) showing the glacis without zimmerit. Yes, mostly are unclear also for the sun, but I'm almost sure that on pzabt 508 tanks (basically all mid of end '43/beginning '44) have no zimmerit on glacis.
I will search better, but I think that it can be a unit/crew modification to keep or to make it.
I will search better, but I think that it can be a unit/crew modification to keep or to make it.
02-04-2010, 03:25 PM
#57
Thread Starter
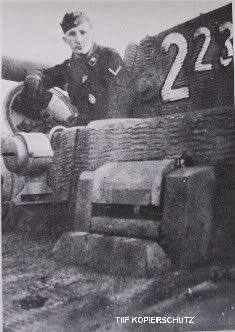
Andrew, this is a well known picture of a 508 Tiger in Italy you will notice the zimmerit and the lines that I have replicated
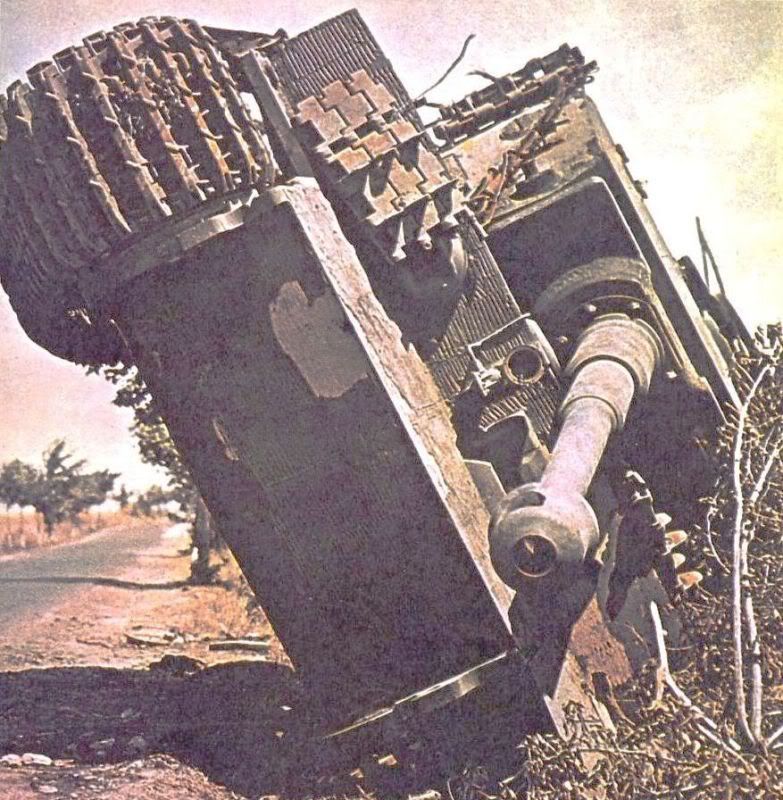
And hear are a few more 508 Tigers some are late models
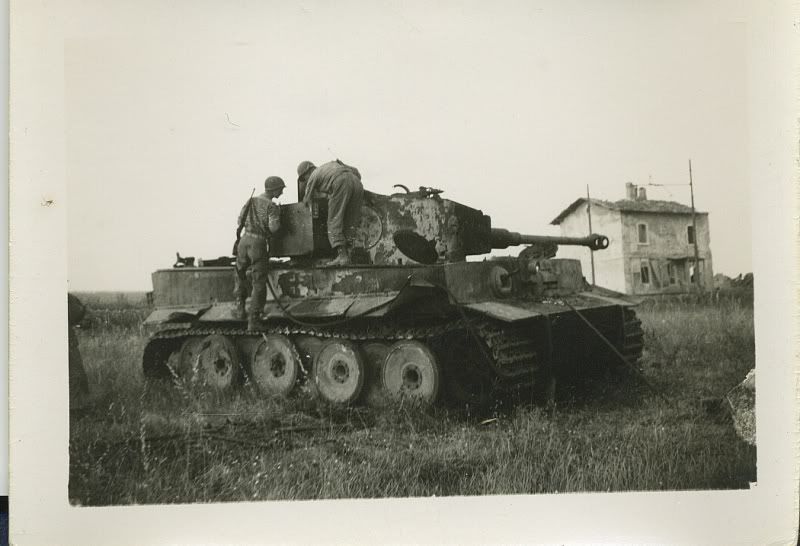
And hear are a few more 508 Tigers some are late models
02-04-2010, 04:07 PM
#58
Member
Join Date: Jan 2010
Location: Chieti, ITALY
Posts: 68
Likes: 0
Received 0 Likes
on
0 Posts
I'll check better, yes, you're right, but (except for the unclear mid glacis) all the others seems to be late models (also the 508's one)
When I was searching for snow shovel supports I found some differences between tanks, it is possible that the tanks with support for snow shovel (dropped at the the beginning of 44) did not have it. I know, you have a huge quantity of documents, so, your research are obviously better than mine, I will search again when I have time, and then post pictures if I find something.
When I was searching for snow shovel supports I found some differences between tanks, it is possible that the tanks with support for snow shovel (dropped at the the beginning of 44) did not have it. I know, you have a huge quantity of documents, so, your research are obviously better than mine, I will search again when I have time, and then post pictures if I find something.
02-04-2010, 05:50 PM
#59
Thread Starter
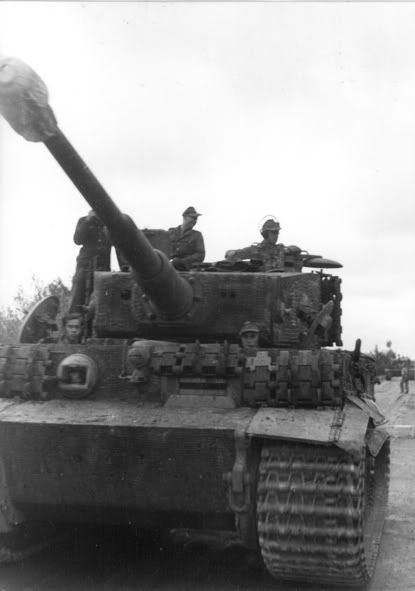
Andrew, have another look at this mid Tiger picture, pay particular attention to the front horizontal plate the thing that gives the zimmerit away is light notice how both mudguards seem to be a lighter colour and the plate a darker colour yet both mudguards and plates are on the same angle and have exactly the same paint applied the mudguards are reflecting more light hence why the appear to be lighter and the plate being covered in zimmerit absorbs more light so appears to be darker now start studying pictures of Tigers apart from the early variants you will notice that this appears on mid and late Tigers only,
Tail end Charlie, sorry forgot to reply earlier, larger scale tanks are addictive consume a lot of time and money they are not easy to transport, for the cost of about 6 Tamiya Tigers you could have a 1/6 tank and a lot of fun, build time can be anything from 6 month’s to several years
Tail end Charlie, sorry forgot to reply earlier, larger scale tanks are addictive consume a lot of time and money they are not easy to transport, for the cost of about 6 Tamiya Tigers you could have a 1/6 tank and a lot of fun, build time can be anything from 6 month’s to several years
02-05-2010, 04:52 PM
#60
Member
Join Date: Jan 2010
Location: Chieti, ITALY
Posts: 68
Likes: 0
Received 0 Likes
on
0 Posts
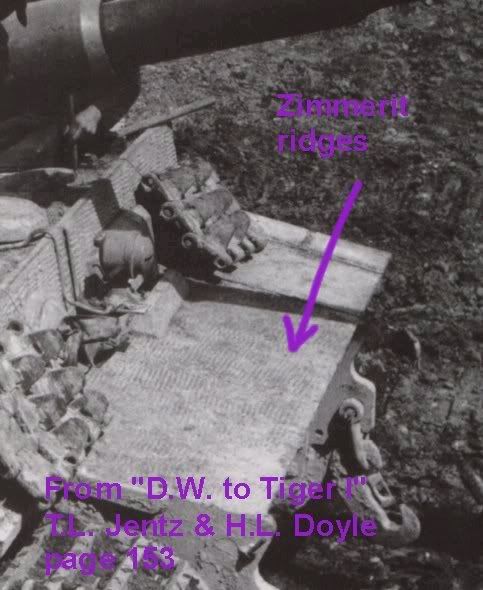
Hi, look at tigers on western front, page 69, the glacis seems to have the same mudguard colors, the same on page 82, on page 84 there is a wreck with no zimmerit on glacis, but it can be removed or been damaged, page 88, page 92 shows an exact shadow of the cannon on the glacis, and it is regular, mudguard and glacis have same colours on page 94, same on page 96, the clearest picture I found is on page 99, with a late tiger, no difference between glacis and mudguard, on page 100 there is another photo of the same tank (232) made from the side front, again it seems that there are no zimmerit, there are other very uncertain pictures and some that confirm zimmerit on glacis, so, as we know, there wasn't a real standard for german tanks, also for the turrett zimmerit pattern or few tigers with a squared zimmerit pattern, same on tanks themselves, it was possible to find late tigers with drum cupola or late turrett on early hull, and other things like those.
I think that zimmerit on this place is a bit "useless" and also a bit dangerous, magnetic mines will not attach on the surface, but the glacis slope was too small to let a mine to go away. And zimmerit can hold the mine on it (and also normal grenades) istead of a smooth surface.
So, I'll search for other clear pictures, but I'm pretty sure that there are some differences between the same tanks, maybe also a difference in factories standards. So there are many with, and many without.
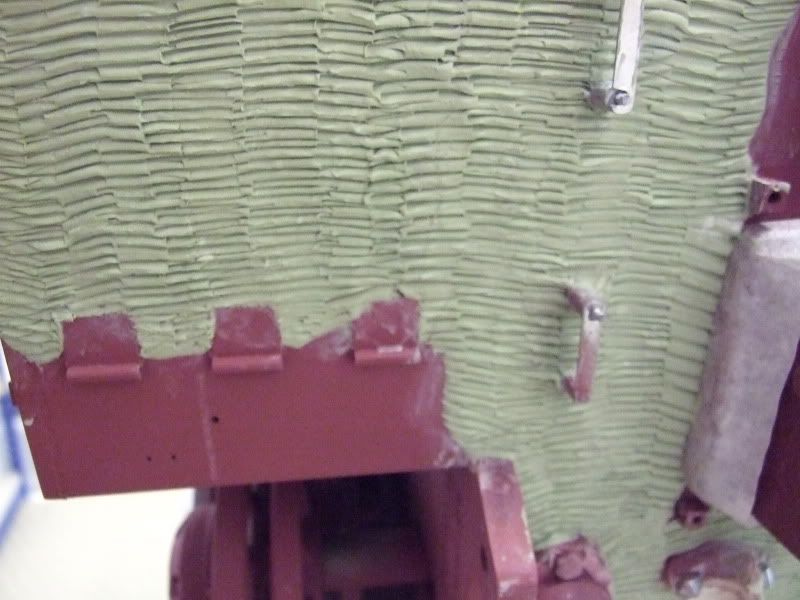
About the rear mudguard you are right, and I made the error to make zimmerit in that area.
I think that zimmerit on this place is a bit "useless" and also a bit dangerous, magnetic mines will not attach on the surface, but the glacis slope was too small to let a mine to go away. And zimmerit can hold the mine on it (and also normal grenades) istead of a smooth surface.
So, I'll search for other clear pictures, but I'm pretty sure that there are some differences between the same tanks, maybe also a difference in factories standards. So there are many with, and many without.
About the rear mudguard you are right, and I made the error to make zimmerit in that area.
02-06-2010, 02:59 AM
#61
Senior Member
Join Date: Dec 2008
Location: Charleston, SC
Posts: 1,842
Likes: 0
Received 0 Likes
on
0 Posts
Hey Riviet,
Once again your skills are beyond terrific! If I may Ineed some info from the last post. I noted you went to great trouble to create the small raised numbers on the engine covers of the TIGER. What were these numbers? Were they the same for all Tigers?
Thanks for the help.
Don
Once again your skills are beyond terrific! If I may Ineed some info from the last post. I noted you went to great trouble to create the small raised numbers on the engine covers of the TIGER. What were these numbers? Were they the same for all Tigers?
Thanks for the help.
Don
02-06-2010, 03:15 AM
#62
Member
Join Date: Jan 2010
Location: Chieti, ITALY
Posts: 68
Likes: 0
Received 0 Likes
on
0 Posts
Tigers as almost all other tanks (i think) have part numbers casted on most casted pieces, there are also stamped numbers for the serials or other to identify the parts and the tank (hull or turret number for example plus the manufacturer)
So, the numbering changes from manufacturer and are subject to modifications, (as the rear plate that is different for early and late) so different numbering are used. In some places you can or cannot find numbering (example the engine grill on munster sturmtiger have a casting number, the saumur one doesn't have it) and so on...
There are a lot of numbers on a tiger
02-06-2010, 01:02 PM
#63
Thread Starter
Today I have conducted an experiment I have been meaning to do for some time and with recent posts have been spurred on to act all I have done is take some pictures from different heights showing the front of my Tiger some have slightly different light which makes a difference the other thing to note is I have sanded the surface a little to represent wear caused by the crew as Germans of the time wore hobnail boots which would cause heavy wear on paint and zimmerit, this is the site I used to age the pictures http://labs.wanokoto.jp/olds

Andrew, to be honest I have spent my time researching late Tigers and have neglected the mid Tigers mostly, having looked at the pictures you suggest it does appear to have no zimmerit but if you look at late models some appear to have none either, Tiger 323 on page 92 is a very early mid Tiger, the other pictures are as you have said what I’m going to do is repeat this exercise when the Tiger is completed in various light and angle shots, as for the different types of zimmerit used on Tigers we will leave that to a latter date .
Don, Andrew is a fellow rivet counter and seeks to build the best possible Tiger he can he has spent many hours researching his project to a very high standard as he has said casting numbers where on various parts though not all and things like “dkr” where the manufacture of the individual parts take the armoured exhaust covers not all had numbers and the ones that did varied from batch to batch the Munster Sturmtiger has numbers in different places on each armoured cover, there is also a large amount of stampings on German tanks sometimes several in the same place this link will explain a little more
http://www.panzerbasics.com/index_fi...ta/serials.htm
Andrew, Henschel was the only factory to assemble Tiger’s
02-06-2010, 01:20 PM
#64
Member
Join Date: Jan 2010
Location: Chieti, ITALY
Posts: 68
Likes: 0
Received 0 Likes
on
0 Posts
Yes, Henshel was the assembly factory, but pieces went from Krupp, wegmann, bosch, DHH, porsche, maybach and so on...
About zimmerit on glacis, it's not your problem, it was used on tigers, but it is my problem with a mid tiger, I'm now painting it again, and if I find that all the tigers mid had zimmerit in this place, I must fix it.
I probably will fix also the zimmerit under the mudguards, but it is not important in that place, is sufficiently hidden.
03-11-2010, 06:02 PM
#65
Thread Starter
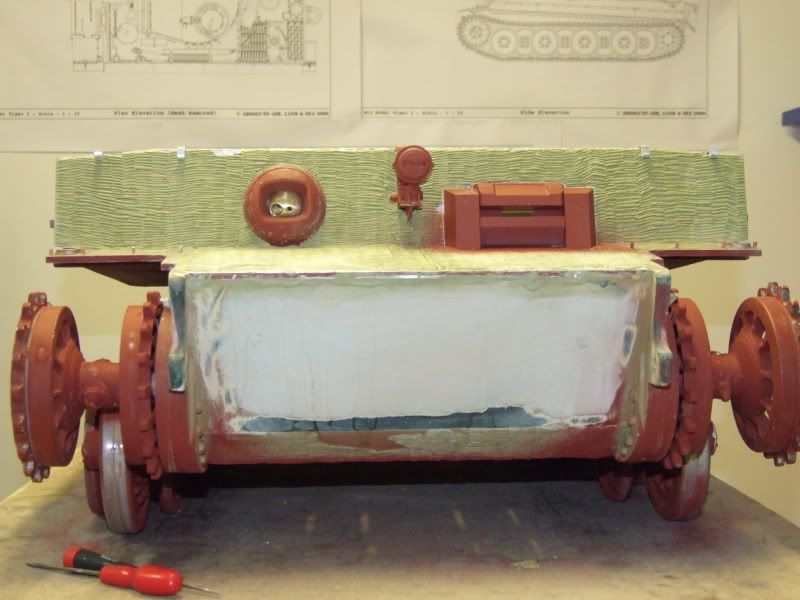
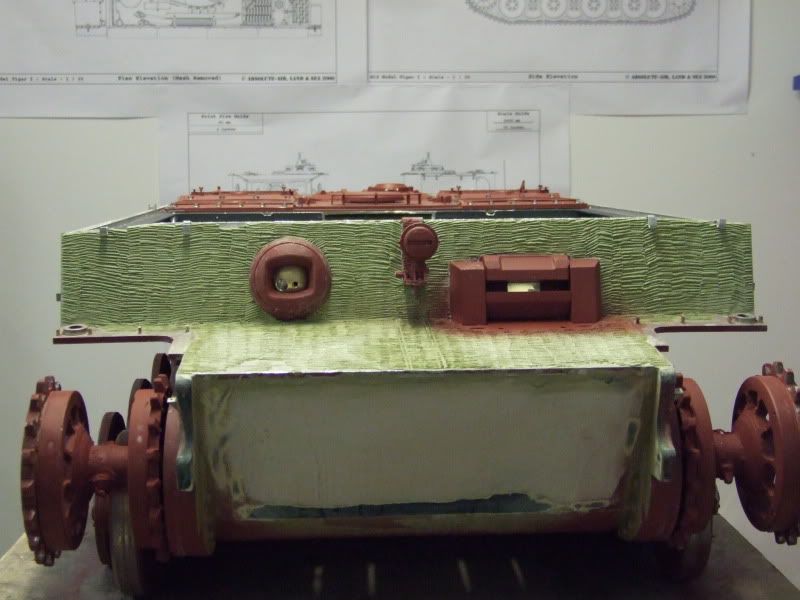
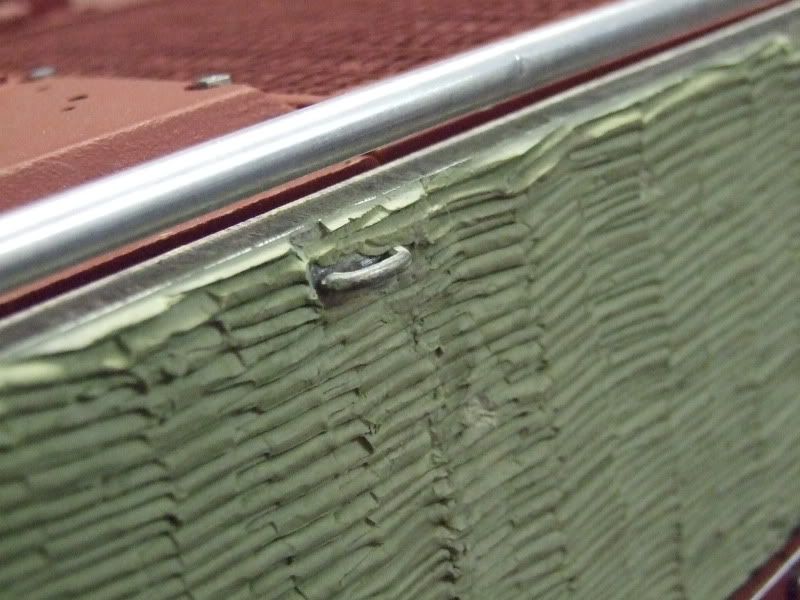
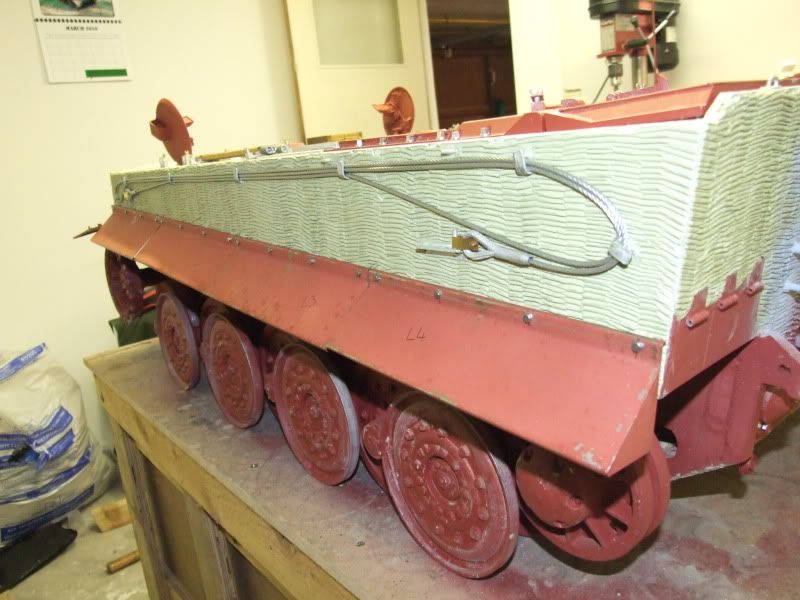
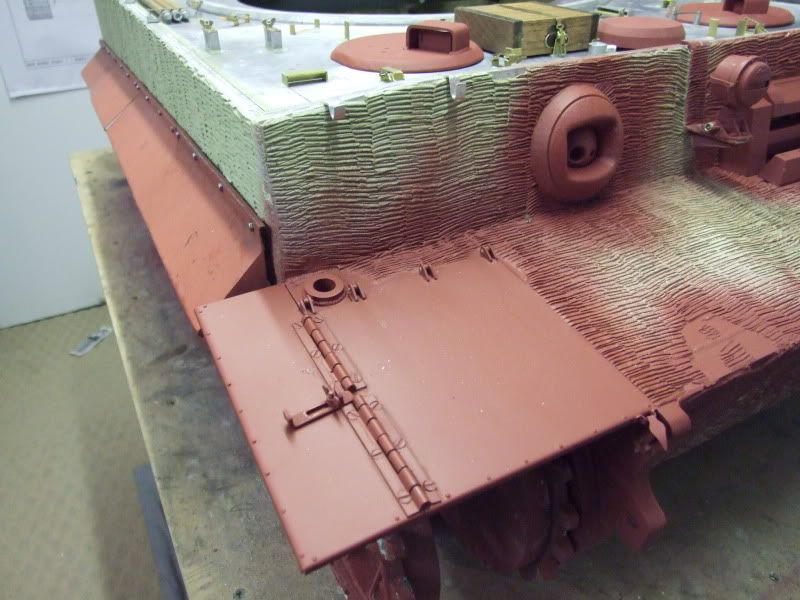
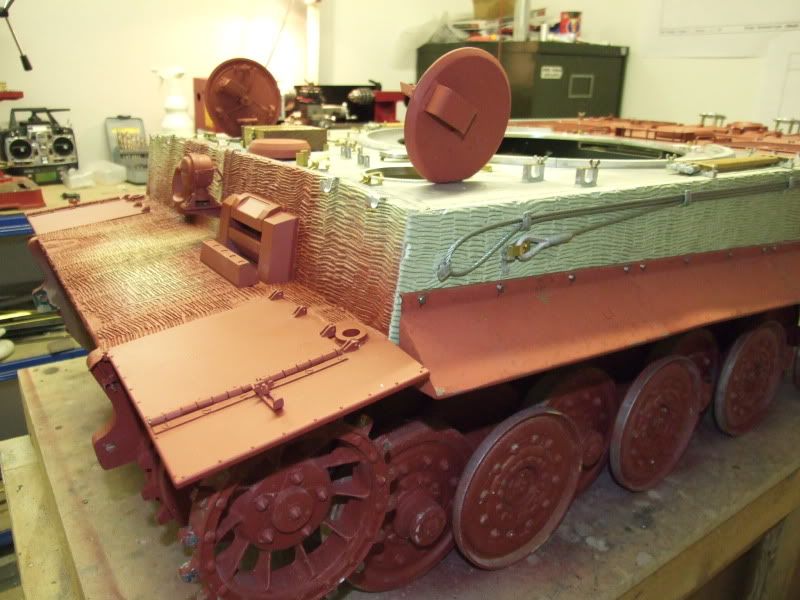
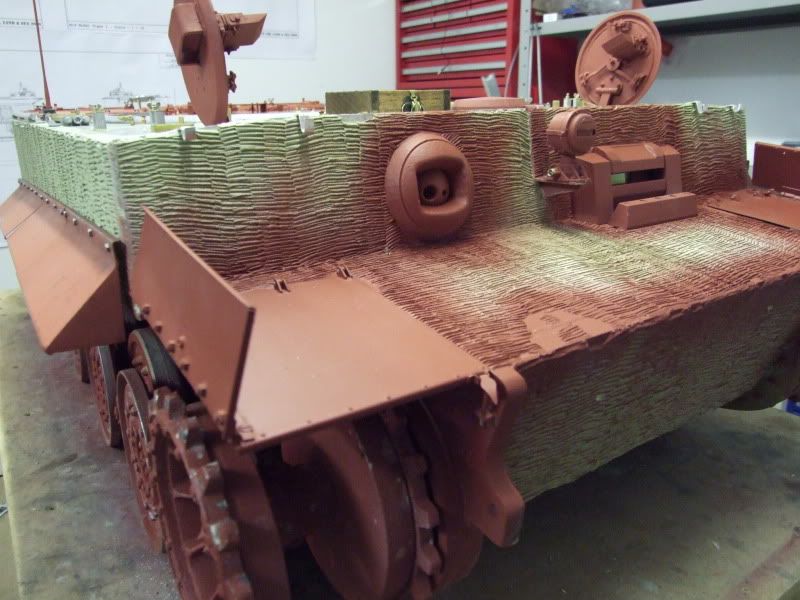
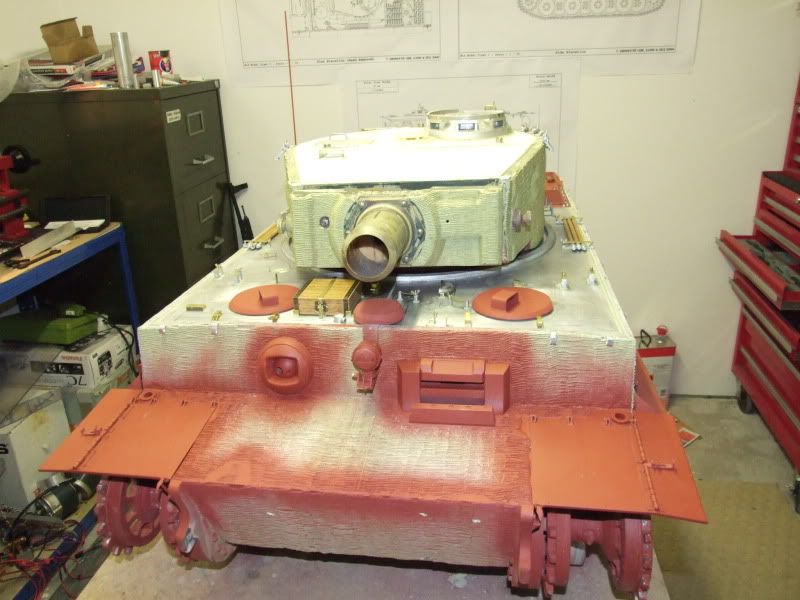
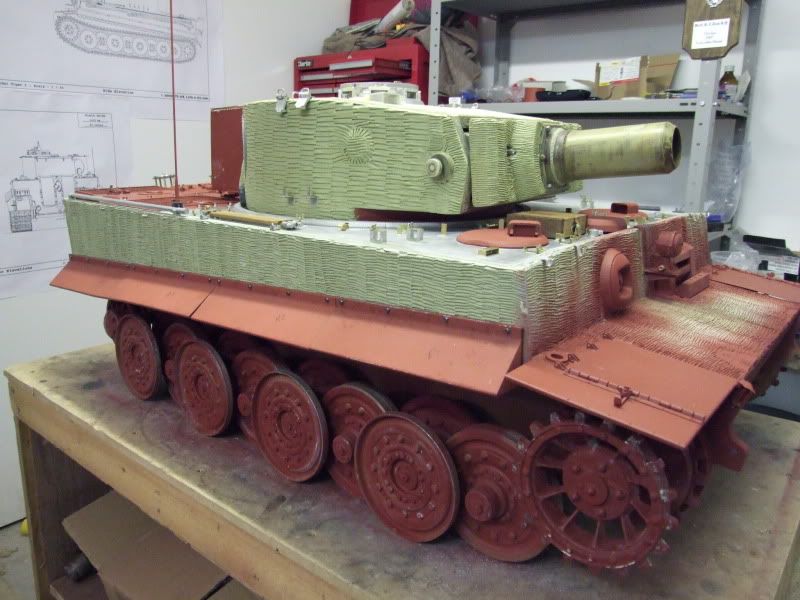
I have now completed all the Zimmerit on the Tiger, this I’m hoping is a reasonable reproduction what I did to make things as realistic as possible was to attach all the stand offs, cable/tool brackets etc then apply the milliput around the parts just like the real thing this takes a little more time but is well worth the effort I have also studied hundreds of pictures of zimmerit on Tigers and have tried to reproduce some of the effects used along with the irregular pattern

SS102 Tigers had on a number of Tigers spare track brackets fitted but as there are no known pictures of 134 then I have to use a little artistic licence and luckily enough there is a picture of 132 with these brackets fitted these where welded to the front driver’s plate each set of brackets will hold 3 spare track links there is also a picture of 131 without so it would seam to be hit and miss.
SS102 Tigers had on a number of Tigers spare track brackets fitted but as there are no known pictures of 134 then I have to use a little artistic licence and luckily enough there is a picture of 132 with these brackets fitted these where welded to the front driver’s plate each set of brackets will hold 3 spare track links there is also a picture of 131 without so it would seam to be hit and miss.
03-12-2010, 08:28 AM
#67
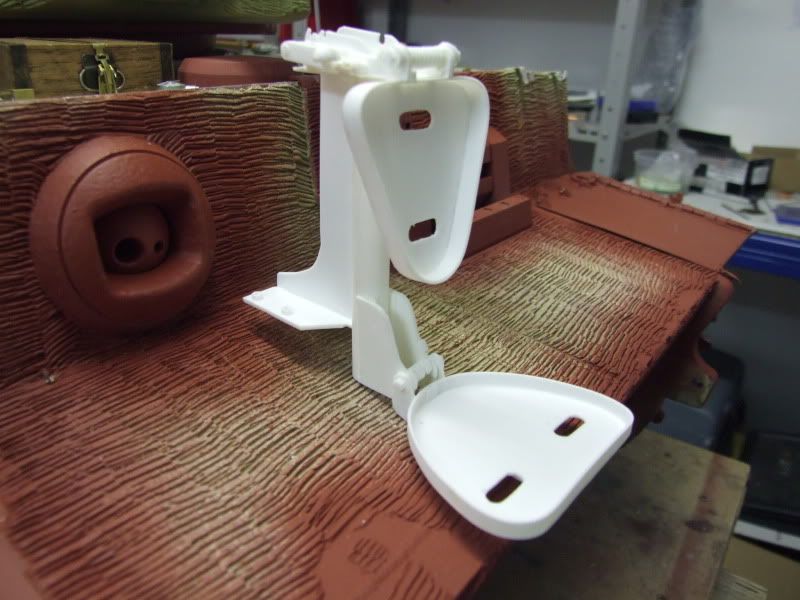
Thread Starter
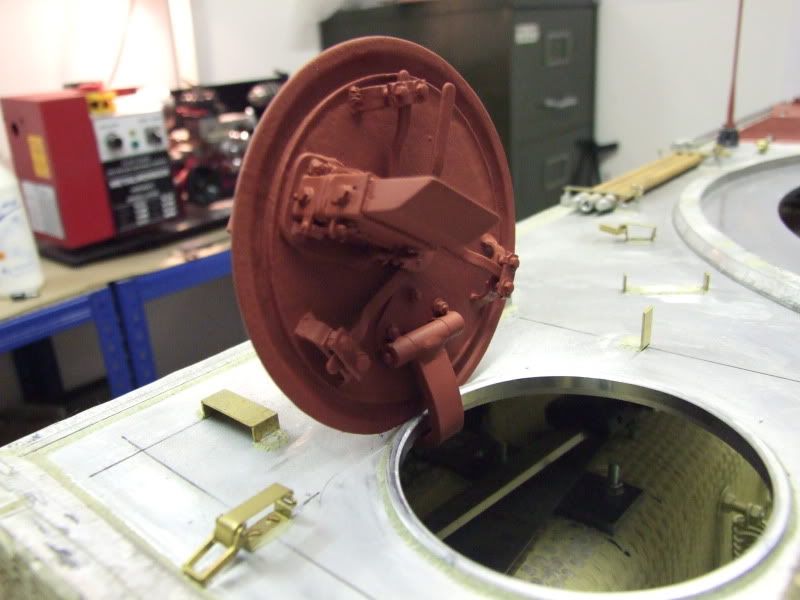
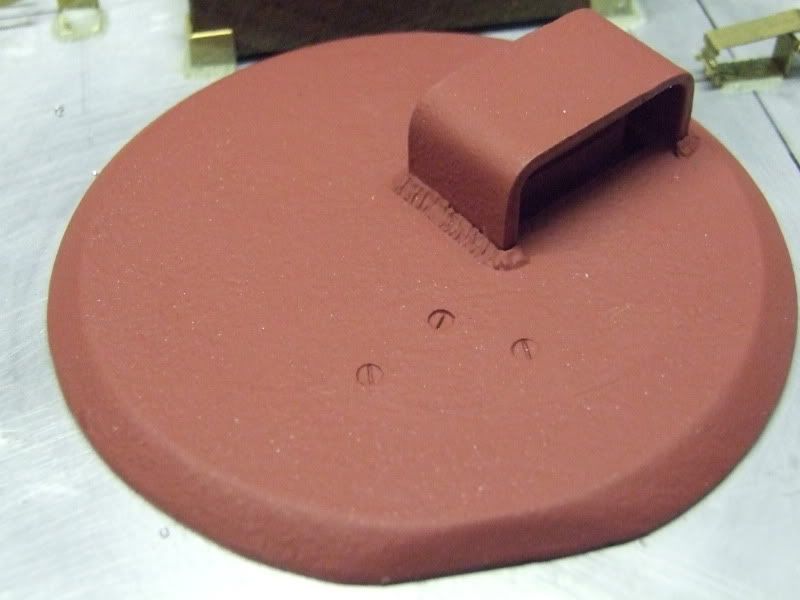
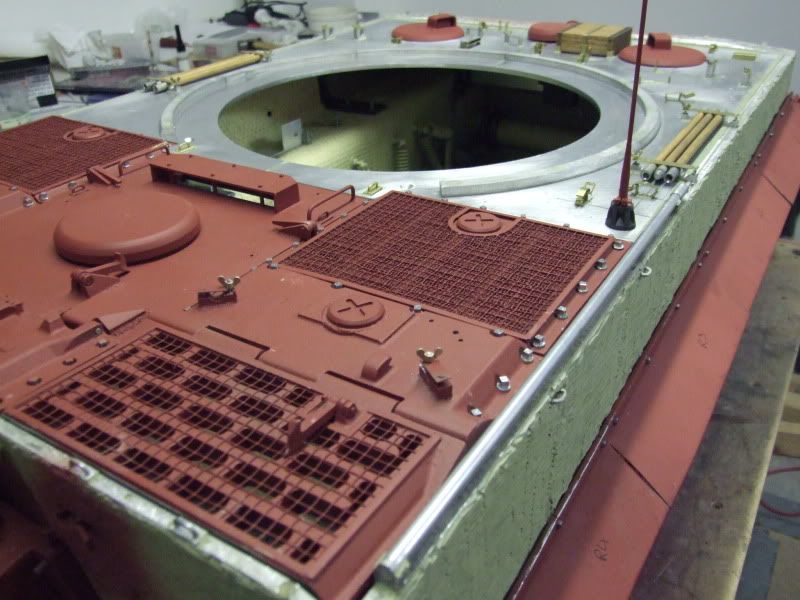
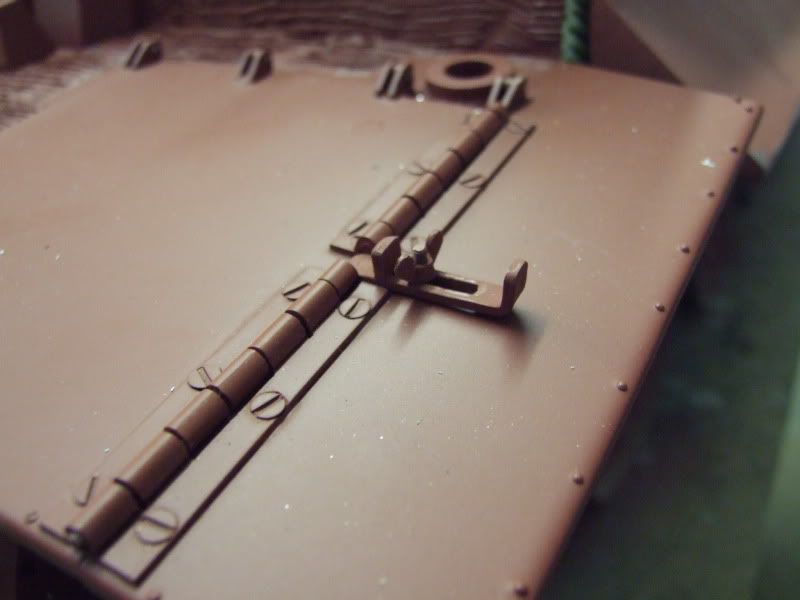
I have used Armourpax driver/radio operator hatches as I believe they offer the highest level of detail available the only upgrade I have done is to add screws and nuts along with new hinges made of brass and steel this is due to me using a thicker than scale deck, the hatches come in kit form and require a small amount of cleaning up and assembling with resin I used 10BA screws and nuts to attach the hinges one small modification I have done is to cut a channel around the hatch where the moulded seal is this will have a rubber seal glued in after painting to further add with the detail, the rings that the hatches rest on are scratch built to the correct dimensions
03-12-2010, 08:37 AM
#68
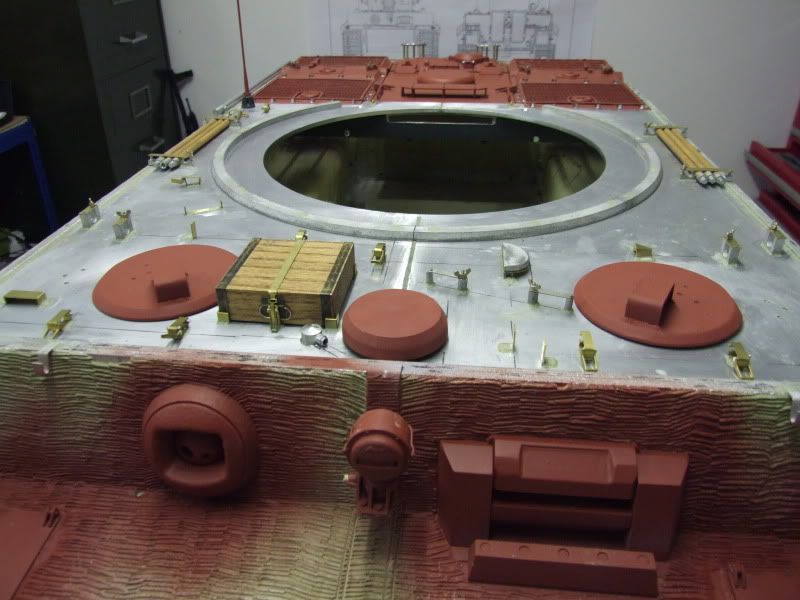
Thread Starter
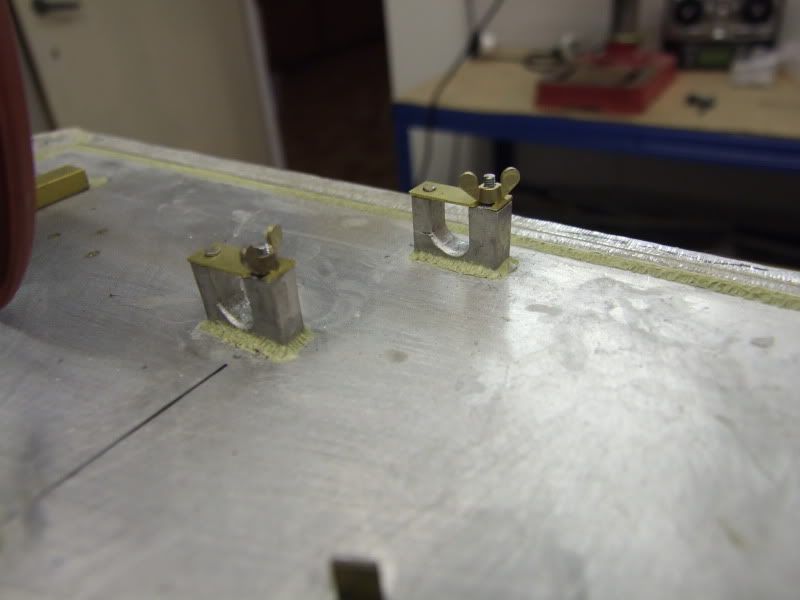
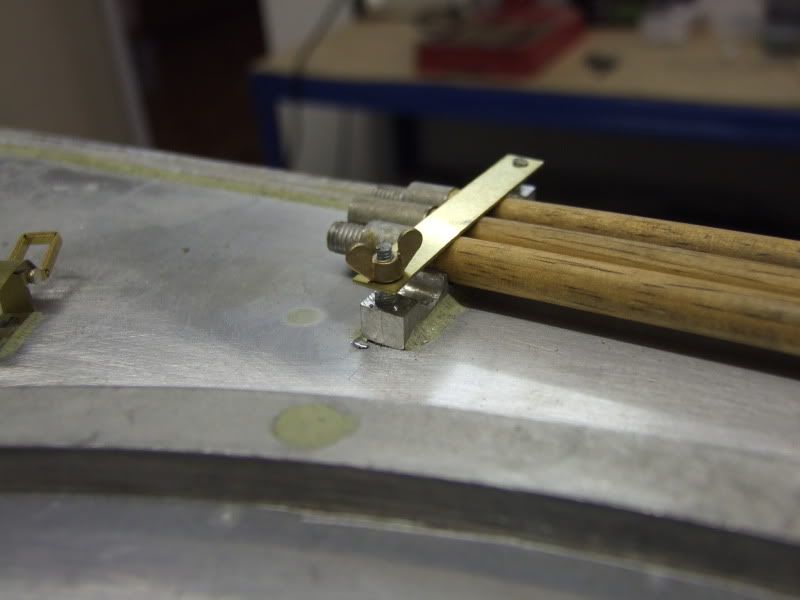
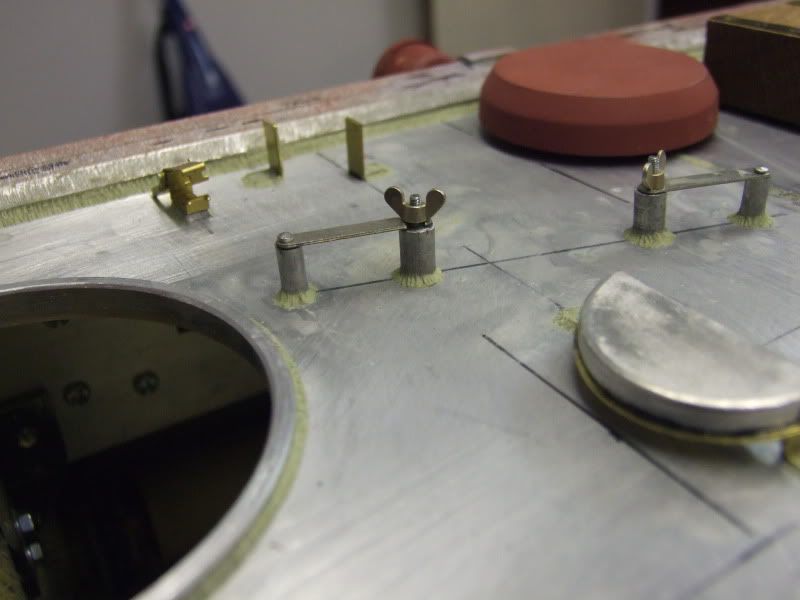
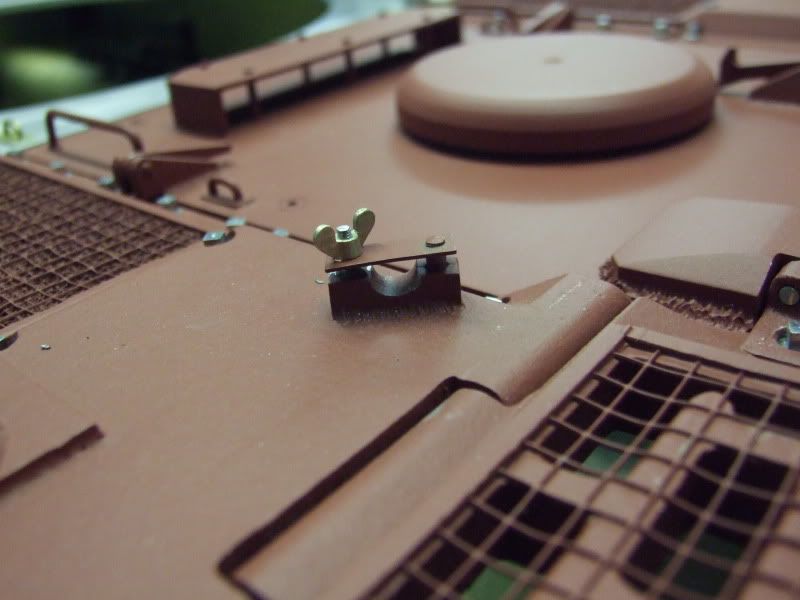
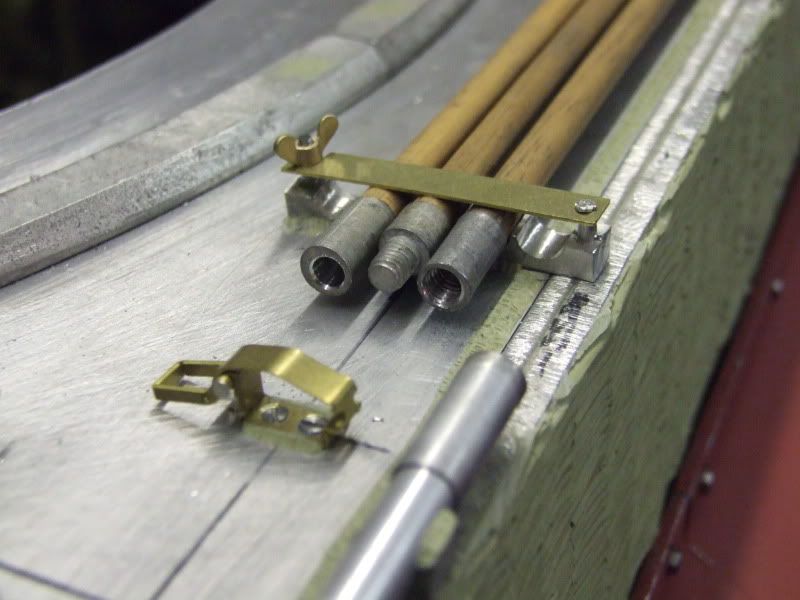
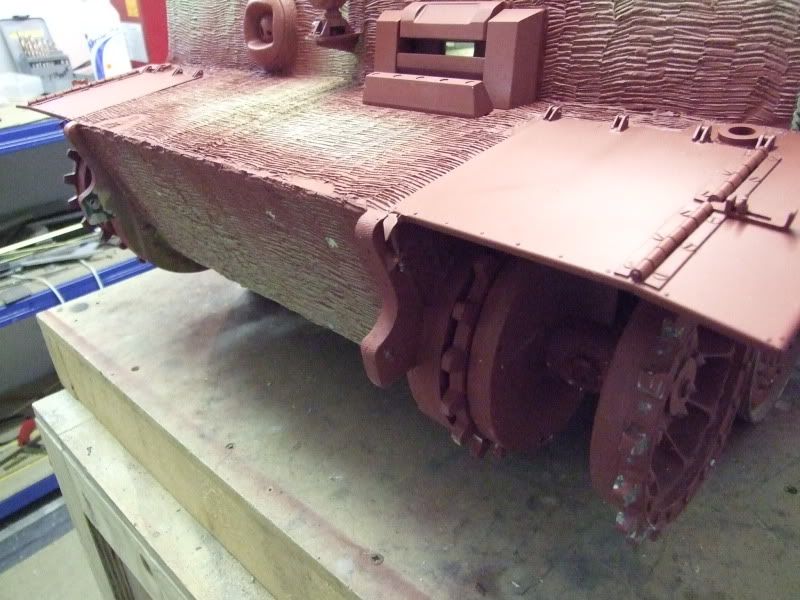
All the tool brackets are from Mike Stannard I purchased these around 3 years ago and since then he has upgraded a few of these parts using brass as opposed to white metal one thing that will be updated at a further date is the ends of the gun cleaning rods these are cast from white metal I will replace these with brass turned ends when I get the time to make them, one modification I have done is to replace all the cast wing nuts with working brass items
The side mudguards are from Mark 1 Tanks and are steel these will have a small amount of damage dome before painting, I have also attached a set of scratch built track pin deflector plates
The side mudguards are from Mark 1 Tanks and are steel these will have a small amount of damage dome before painting, I have also attached a set of scratch built track pin deflector plates
03-12-2010, 10:54 PM
#69
Senior Member

Join Date: Dec 2009
Location: Fort Walton Beach, FL
Posts: 2,647
Likes: 0
Received 0 Likes
on
0 Posts
Absolutely magnificent work! If I ever have the opportunity to get a 1/6th scale tiger, I know where to look for a my references!
I ran into this site earlier today looking for references on tank jacks and found this site. Doubt if it would be of use to you since it appears your going full on metal or maybe you've already seen this site. But just in case....
http://eastcoastarmory.com/germanparts.htm
I ran into this site earlier today looking for references on tank jacks and found this site. Doubt if it would be of use to you since it appears your going full on metal or maybe you've already seen this site. But just in case....
http://eastcoastarmory.com/germanparts.htm
 03-13-2010, 02:32 PM
#71
Thread Starter
Dedmonwakin, I have recently been informed about this site but haven’t used any parts if I had known about this site last year then there would have been some parts ordered, this build is far from all metal the turret and pat of the chassis are GRP some detail parts are resin I have tried to use the parts I want in whatever material is available as opposed to shying away just because it’s not metal.
More pictures on the way soon as this build is nearing the end paint should be coming soon
More pictures on the way soon as this build is nearing the end paint should be coming soon
03-14-2010, 01:46 PM
#72
Thread Starter
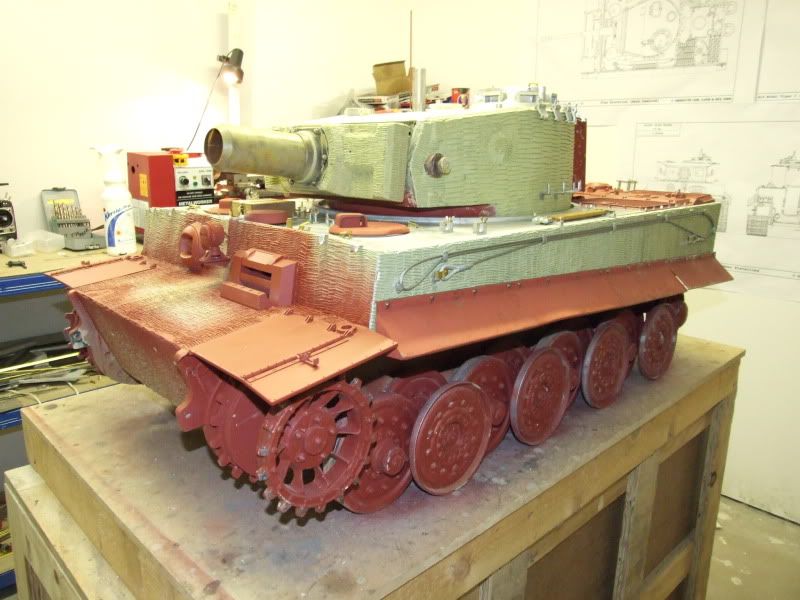
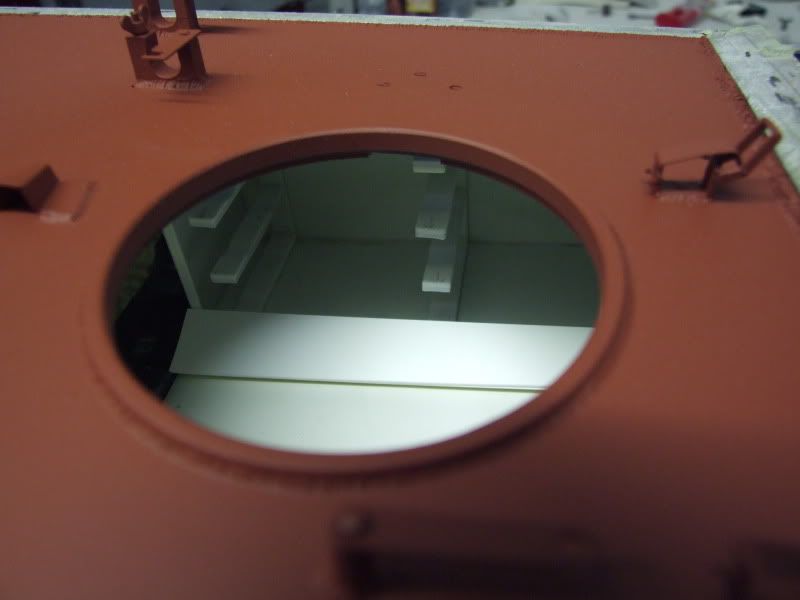
Hear are a few pictures of the tank with the turret attached for the first time in a few years this still needs a lot of work before it will finally be ready for painting.
This is a new part from Panzer works, made from resin and just needs the seat pads making from milliput.
This is a new part from Panzer works, made from resin and just needs the seat pads making from milliput.
03-15-2010, 12:05 PM
#73
Senior Member
Join Date: Dec 2009
Location: Fort Walton Beach, FL
Posts: 2,647
Likes: 0
Received 0 Likes
on
0 Posts
Rivet, when ever you take photos next, would you mind snapping a couple shots of the jack brackets from a side profile and vertical? I'm having to use some of your photos as references for my 16th scale! Hope you don't mind!
04-05-2010, 03:46 PM
#75
Thread Starter
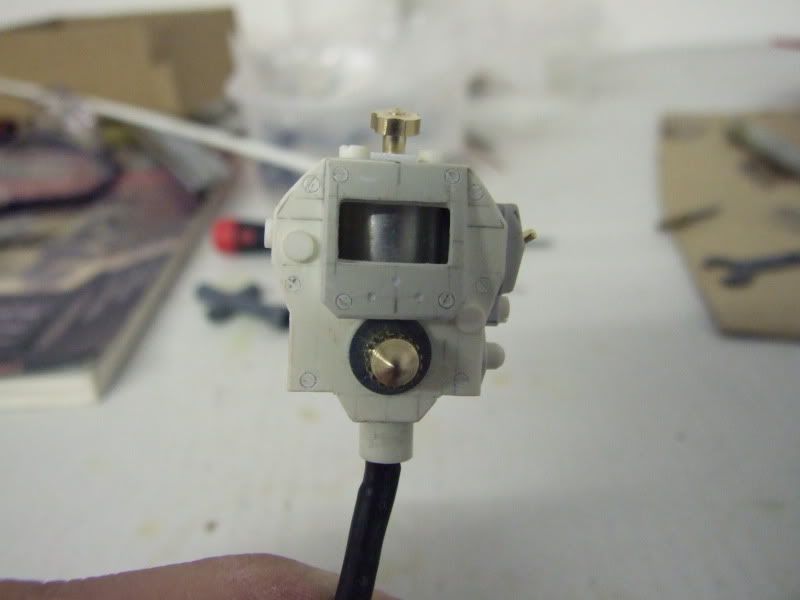
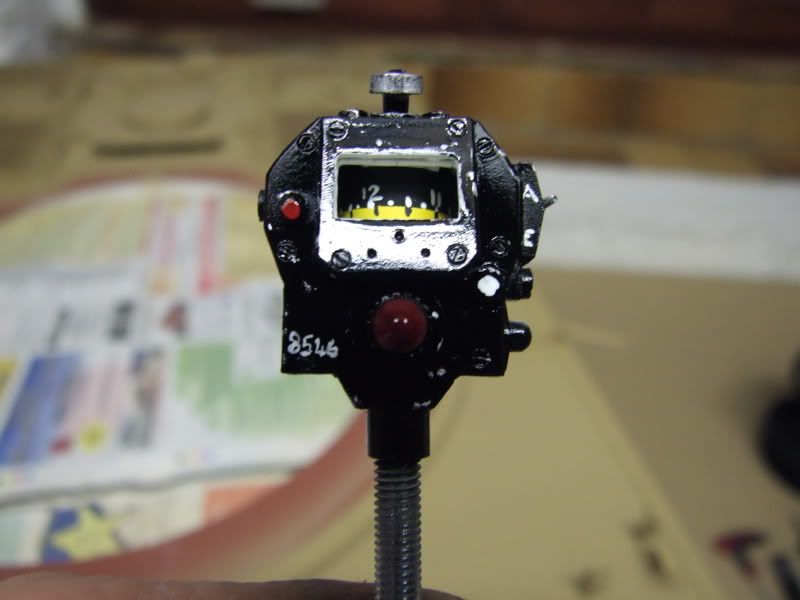
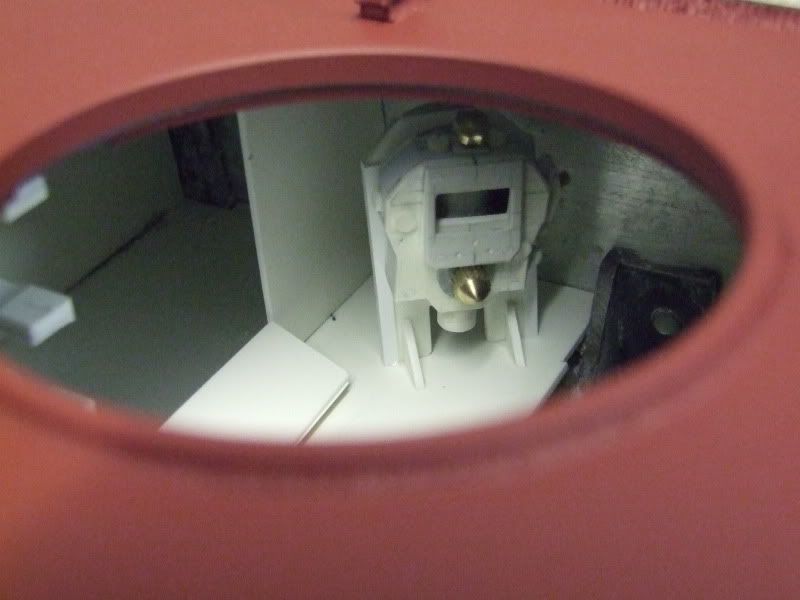
Gyro Compass
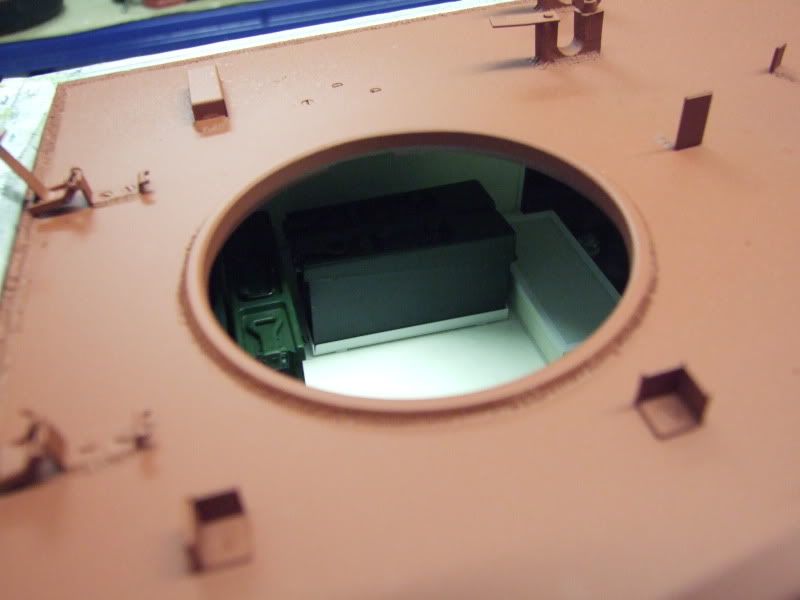
This has totally been scratch built using a scale drawing of the real thing http://www.theresearchsquad.com/drawings.html using alloy, brass and plasticard I have even built the bracket that holds this in place the idea is to give the Tiger a certain amount of through the hatch detail things like the ammunition racks and the stowage for MG ammunition have already been built though the engine compartment detail will come latter probably after the tank is fully painted and running, as you can see from the pictures the compass will have a light fitted this will be connected to the main switch so when the tank is turned on the compass illuminates
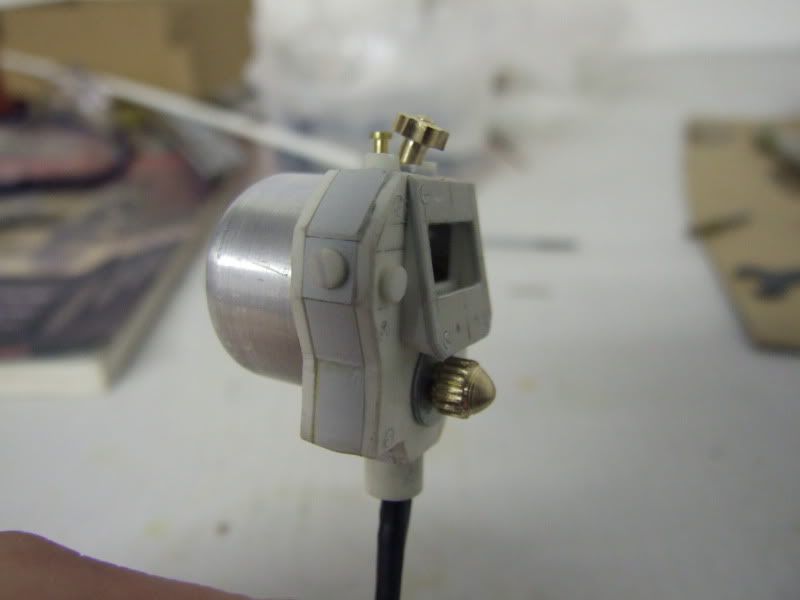
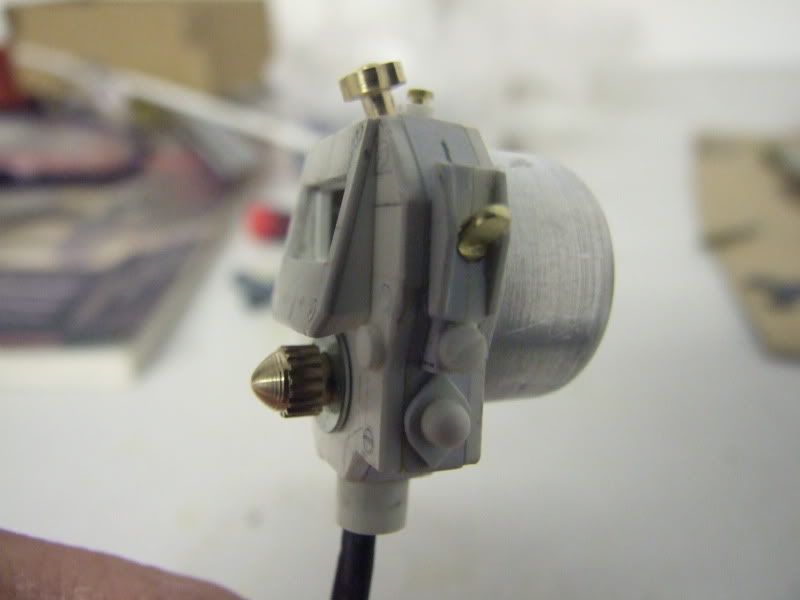
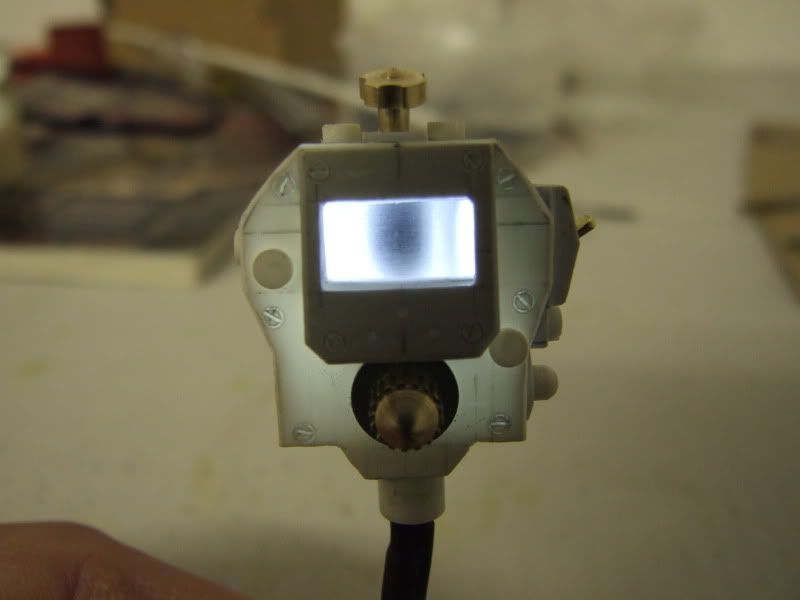
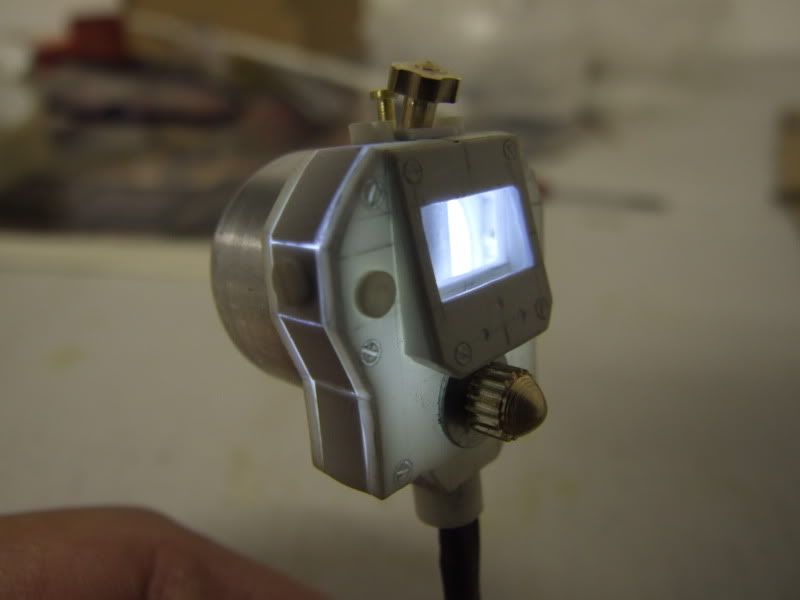
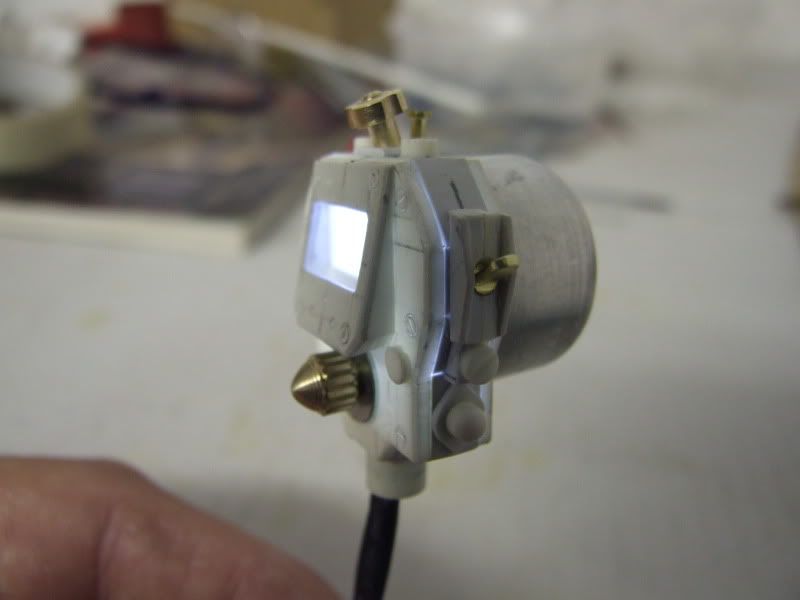
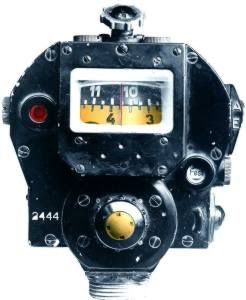
And here is the completed item ready to install once the LED has been fitted, I’m sure you will agree I have gone to some trouble just to have a different on/off light instead of the usual car dash light below the grills, first picture is of the Bovington Tiger compass and before any smart arse says the centre of the dials are different colours have a look at the link above
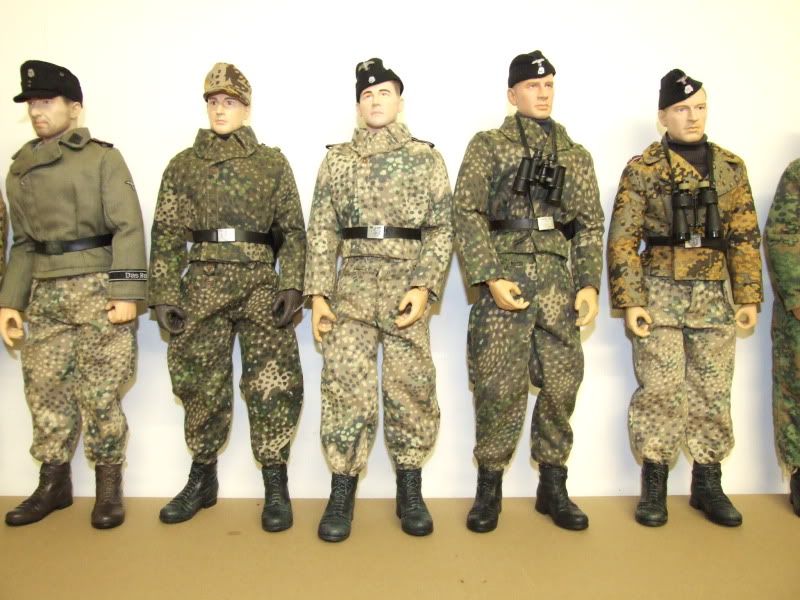
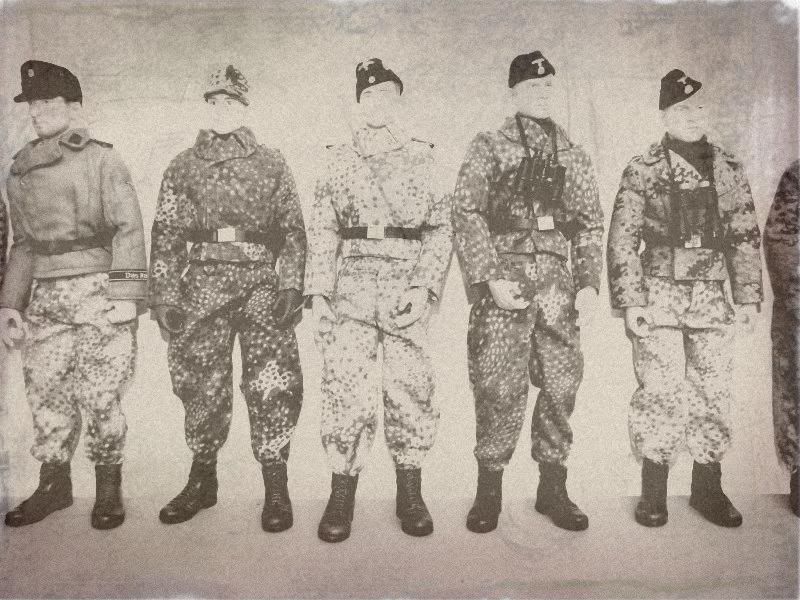
The Crew
Here is a line up of the crew Fey in the autumn oak leaf M44 panzer wrap is on the far right and his gunner is next to him with the binoculars
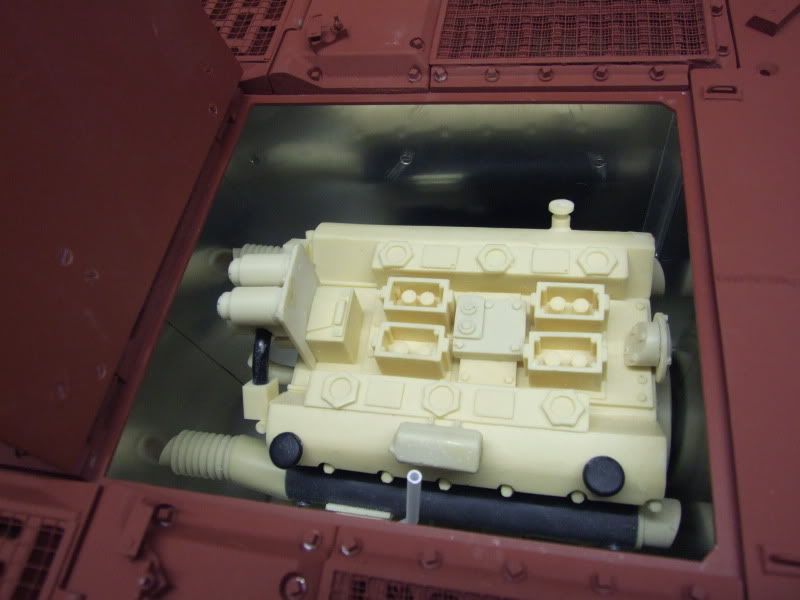
Here are a few more shots of the through the hatch detail just so you can see what I mean
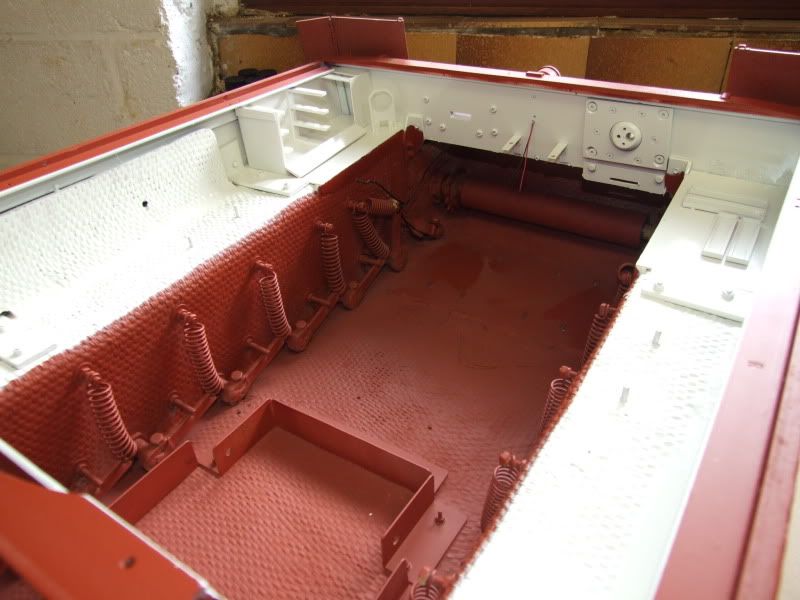
Wanne ready for paint
Now that the Wanne is ready for paint after painting the inside the correct colours and installing the ammo racks it’s time to buy the paint
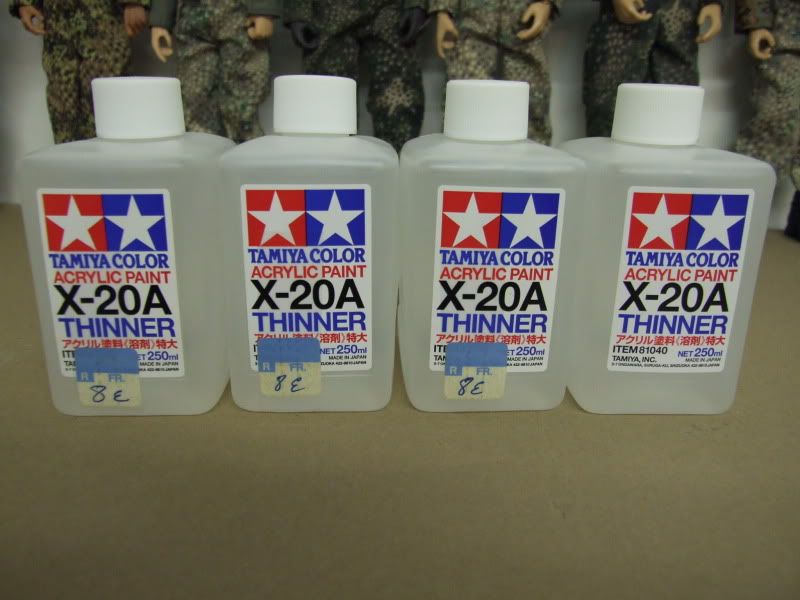
A quick trip to the model shops reminded me that the cost of paint here is a little expensive as is thinners to paint the hull I will need around 18 pots of Tamiya paint costing €3.70 £3.30 or $4.94 each, Rip off Brittan springs to mind so using this company https://www.modelhobbies.co.uk/shop/index.php the yellow was ordered costing £1.14 €1.27 $1.70 each plus postage of £6 to Belgium you can work that cost out yourself, I saved a hell of a lot of cash but had to source the thinners here in Belgium which for a 250ml bottle is €8 or £8.94 each comes a little expensive
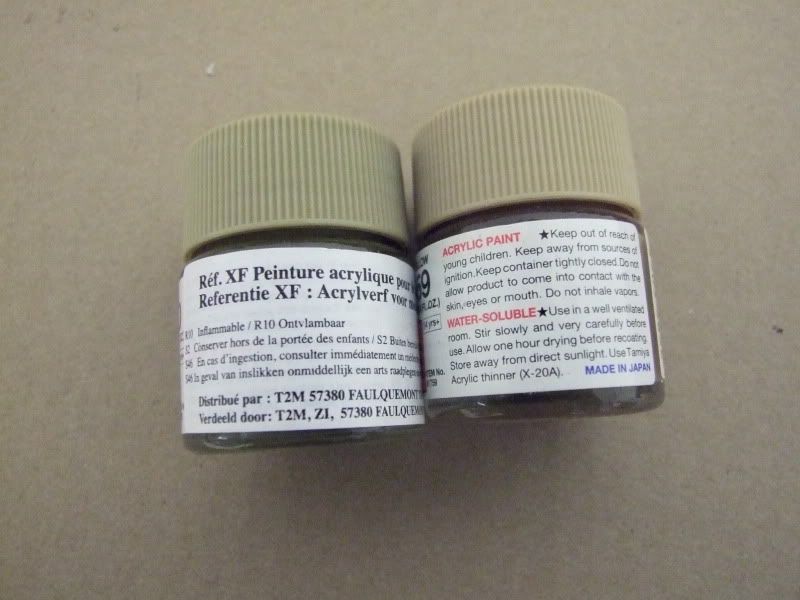
As I don’t like the shade of XF59 sand being too brown or XF60 being too green I mixed the two together to give a nice shade of yellow
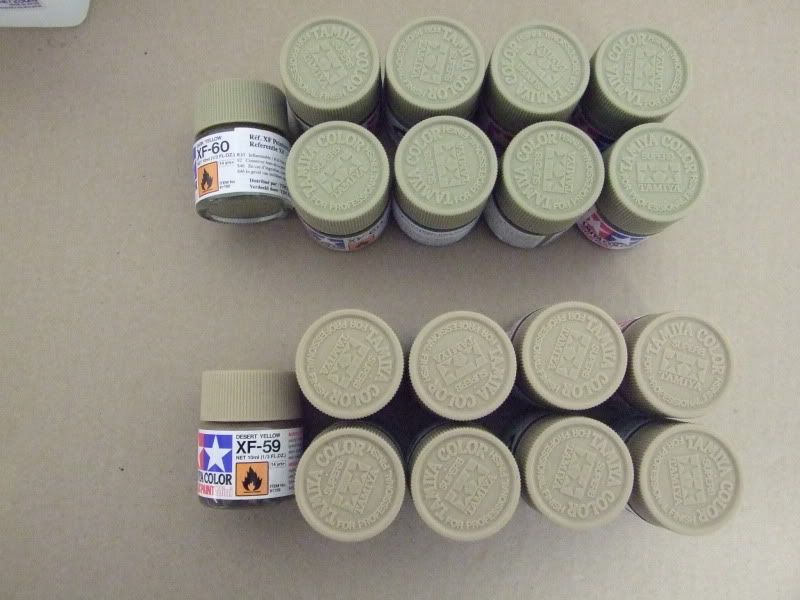
this is a simple mix one bottle each remembering to stir well and add 50% thinners in each pot shake well for 15 minutes then add that to the mix and shake again, painting 1/6 is completely different to 1/35 or 1/16, for people who have been finding it hard to obtain Tamiya paint, thinners and rattle cans in England and have been told various reasons by the reps all it is is the wording on the jar/can over here it’s simple just add a sticker in 1 of 3 languages Dutch, French or German but in England the leftie liberals wont have that and you don’t get your paint.
This has totally been scratch built using a scale drawing of the real thing http://www.theresearchsquad.com/drawings.html using alloy, brass and plasticard I have even built the bracket that holds this in place the idea is to give the Tiger a certain amount of through the hatch detail things like the ammunition racks and the stowage for MG ammunition have already been built though the engine compartment detail will come latter probably after the tank is fully painted and running, as you can see from the pictures the compass will have a light fitted this will be connected to the main switch so when the tank is turned on the compass illuminates
And here is the completed item ready to install once the LED has been fitted, I’m sure you will agree I have gone to some trouble just to have a different on/off light instead of the usual car dash light below the grills, first picture is of the Bovington Tiger compass and before any smart arse says the centre of the dials are different colours have a look at the link above
The Crew
Here is a line up of the crew Fey in the autumn oak leaf M44 panzer wrap is on the far right and his gunner is next to him with the binoculars
Here are a few more shots of the through the hatch detail just so you can see what I mean
Wanne ready for paint
Now that the Wanne is ready for paint after painting the inside the correct colours and installing the ammo racks it’s time to buy the paint
A quick trip to the model shops reminded me that the cost of paint here is a little expensive as is thinners to paint the hull I will need around 18 pots of Tamiya paint costing €3.70 £3.30 or $4.94 each, Rip off Brittan springs to mind so using this company https://www.modelhobbies.co.uk/shop/index.php the yellow was ordered costing £1.14 €1.27 $1.70 each plus postage of £6 to Belgium you can work that cost out yourself, I saved a hell of a lot of cash but had to source the thinners here in Belgium which for a 250ml bottle is €8 or £8.94 each comes a little expensive
As I don’t like the shade of XF59 sand being too brown or XF60 being too green I mixed the two together to give a nice shade of yellow
this is a simple mix one bottle each remembering to stir well and add 50% thinners in each pot shake well for 15 minutes then add that to the mix and shake again, painting 1/6 is completely different to 1/35 or 1/16, for people who have been finding it hard to obtain Tamiya paint, thinners and rattle cans in England and have been told various reasons by the reps all it is is the wording on the jar/can over here it’s simple just add a sticker in 1 of 3 languages Dutch, French or German but in England the leftie liberals wont have that and you don’t get your paint.

