


Pershing Build..........Slow Roast
 07-12-2010, 10:25 AM
#1
Senior Member
Thread Starter

Join Date: Dec 2009
Location: Fort Walton Beach, FL
Posts: 2,647
Likes: 0
Received 0 Likes
on
0 Posts
Hey folks,
I've been a bit hesitant on starting the Pershing build until I get my bearings in. Well, the temptation got the best of me and decided to start. This is going to be a fairly slow process.......hence slow roast, opposed to ascorchingfast build. I haven't quite settled on which era/type it will be, (deciding between "Fireball", "Dead Eye Dick", or whatever I can find) but I've got plenty of time to decide during this build process...so for now, it'll keep the T80 tracks.
First thing that was done of course was prep the metal parts.
Since most of the metal components will be subjected to use and abuse; I needed to ensure that these parts could be put to the test and that the metal primer had an improved chance of adhesion.
What I first did was pre-wash all metalcomponentsintended for painting and lightly sanded with 100 grit. I decided that I would paint the hull lining and metal support brackets as well, but there seems to be an oxide coating. I scuffed some areas with 100 grit to prep for the next step.
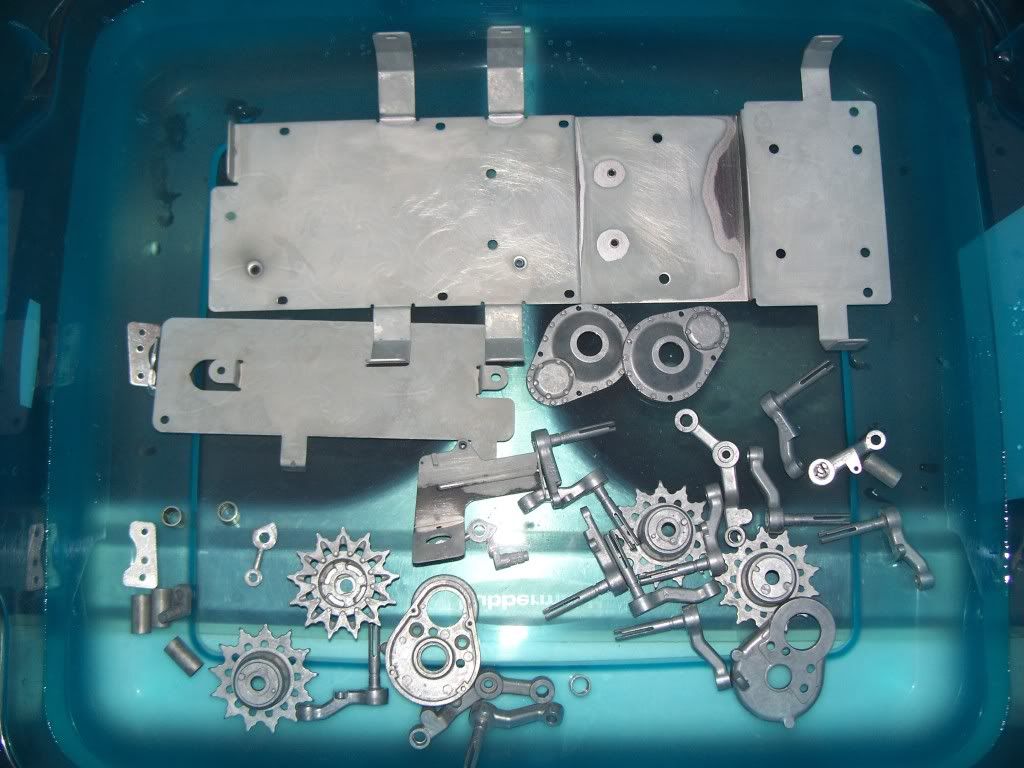
(Dangerous stuff, Dangerous reactions)
All metal parts were put into a plastic container filled with two gallons of water and then I carefully added 3 fl ounces of Sulfuric acid to remove the coating and pr-etch the surface of all metals. This was a 20 min soak for most of the metal parts. Depending on the metalcomposition, some pieces had to come out quickly. This doesn't work for the barrel or the L/R idler bracket....although it should. I'm not really sure what kind of metal the barrel is but aluminum has no problem reacting withSulfuricacid, yet I get none with the "aluminum" barrel. So, I had to resort to good old sand paper. Just put the barrel in the chuck jaws of a drill, spin it on sand paper....done. (Re-dipped insulfuricacid, justincasethere was a coating on it and still nothing.)
Why in the world is the barrel and dampener sleeves mirror polished?......Must be an inside joke among the Tamiya engineers.
After I was happy with the results (roughly 20 mins) I added baking soda until bubbling stopped to neutralize the acid. Then water rinsed and dried all pieces.
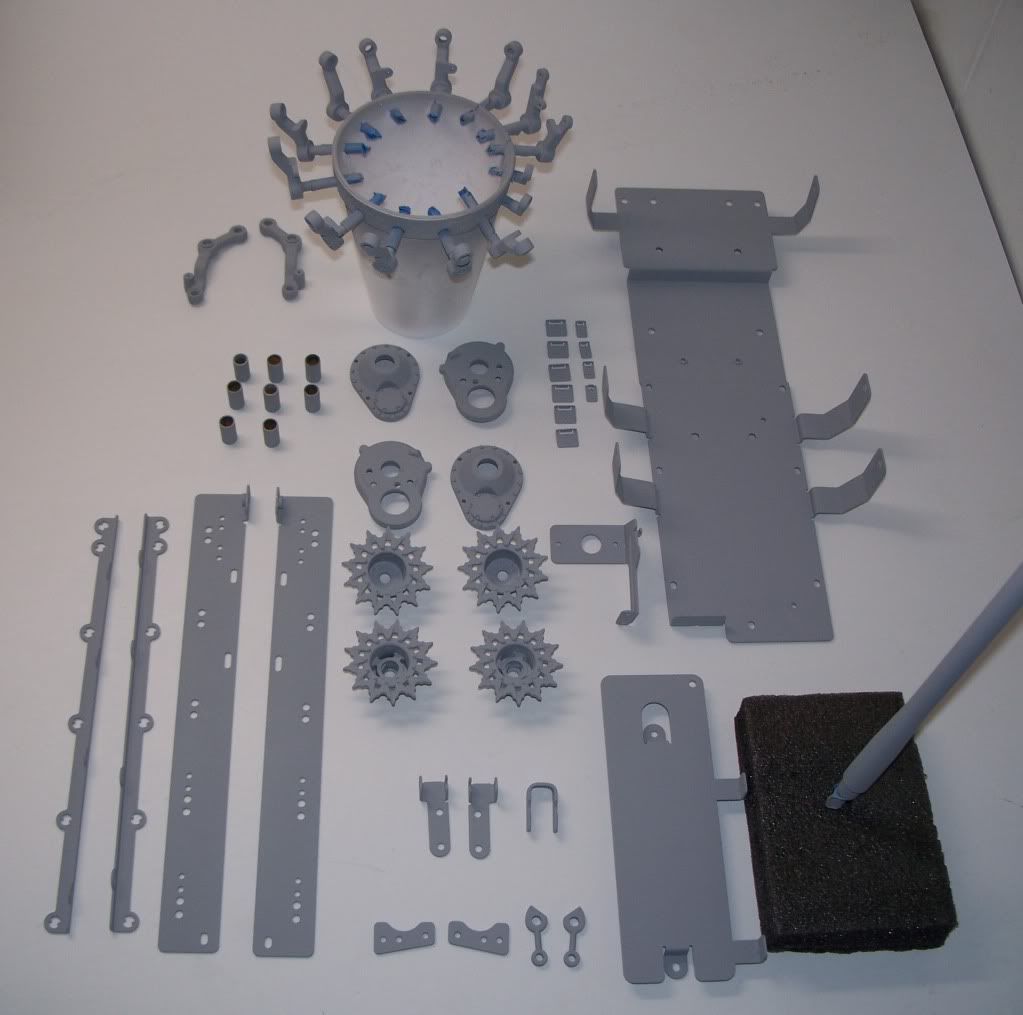
Primed and ready to rock!
I've been a bit hesitant on starting the Pershing build until I get my bearings in. Well, the temptation got the best of me and decided to start. This is going to be a fairly slow process.......hence slow roast, opposed to ascorchingfast build.
I haven't quite settled on which era/type it will be, (deciding between "Fireball", "Dead Eye Dick", or whatever I can find) but I've got plenty of time to decide during this build process...so for now, it'll keep the T80 tracks.First thing that was done of course was prep the metal parts.
Since most of the metal components will be subjected to use and abuse; I needed to ensure that these parts could be put to the test and that the metal primer had an improved chance of adhesion.
What I first did was pre-wash all metalcomponentsintended for painting and lightly sanded with 100 grit. I decided that I would paint the hull lining and metal support brackets as well, but there seems to be an oxide coating. I scuffed some areas with 100 grit to prep for the next step.
(Dangerous stuff, Dangerous reactions)
All metal parts were put into a plastic container filled with two gallons of water and then I carefully added 3 fl ounces of Sulfuric acid to remove the coating and pr-etch the surface of all metals. This was a 20 min soak for most of the metal parts. Depending on the metalcomposition, some pieces had to come out quickly. This doesn't work for the barrel or the L/R idler bracket....although it should. I'm not really sure what kind of metal the barrel is but aluminum has no problem reacting withSulfuricacid, yet I get none with the "aluminum" barrel. So, I had to resort to good old sand paper. Just put the barrel in the chuck jaws of a drill, spin it on sand paper....done. (Re-dipped insulfuricacid, justincasethere was a coating on it and still nothing.)
Why in the world is the barrel and dampener sleeves mirror polished?......Must be an inside joke among the Tamiya engineers.
After I was happy with the results (roughly 20 mins) I added baking soda until bubbling stopped to neutralize the acid. Then water rinsed and dried all pieces.
Primed and ready to rock!
 07-12-2010, 10:34 AM
#2
Member
Join Date: Sep 2008
Location: Uxbridge, UNITED KINGDOM
Posts: 67
Likes: 0
Received 0 Likes
on
0 Posts
Excellent start Tony! 
Don't worry about time, it took me a year to finish my Tiger, and 3 months for the Sherman ( The U.S. did have faster production, lol ).
).
I will follow your build with interest. I'll send you the link for my Panther build when I start it, if your interested?
Cheers,
Rik
Don't worry about time, it took me a year to finish my Tiger, and 3 months for the Sherman ( The U.S. did have faster production, lol
).I will follow your build with interest. I'll send you the link for my Panther build when I start it, if your interested?
Cheers,
Rik
07-12-2010, 10:47 AM
#3
Senior Member
Thread Starter
Join Date: Dec 2009
Location: Fort Walton Beach, FL
Posts: 2,647
Likes: 0
Received 0 Likes
on
0 Posts
ORIGINAL: grim_marmazet
Excellent start Tony!
Don't worry about time, it took me a year to finish my Tiger, and 3 months for the Sherman ( The U.S. did have faster production, lol).
I will follow your build with interest. I'll send you the link for my Panther build when I start it, if your interested?
Cheers,
Rik
Excellent start Tony!
Don't worry about time, it took me a year to finish my Tiger, and 3 months for the Sherman ( The U.S. did have faster production, lol
).I will follow your build with interest. I'll send you the link for my Panther build when I start it, if your interested?
Cheers,
Rik

 07-12-2010, 12:37 PM
#5
Member
Join Date: Sep 2008
Location: Uxbridge, UNITED KINGDOM
Posts: 67
Likes: 0
Received 0 Likes
on
0 Posts
ORIGINAL: BiggTony
Heck yeah, I'm interested Rik and thanks! I don't know if I have the tolerance of a year build....but then again, I'm not putting a deadline on it either! lol
Heck yeah, I'm interested Rik and thanks! I don't know if I have the tolerance of a year build....but then again, I'm not putting a deadline on it either! lol
Cheers,
Rik
07-12-2010, 01:01 PM
#6
Senior Member
Thread Starter
Join Date: Dec 2009
Location: Fort Walton Beach, FL
Posts: 2,647
Likes: 0
Received 0 Likes
on
0 Posts
ORIGINAL: grim_marmazet
I only took a year, because I took so long to afford the parts, and it did it in tiny sections at a time. My Sherman went much faster.
Cheers,
Rik
ORIGINAL: BiggTony
Heck yeah, I'm interested Rik and thanks! I don't know if I have the tolerance of a year build....but then again, I'm not putting a deadline on it either! lol
Heck yeah, I'm interested Rik and thanks! I don't know if I have the tolerance of a year build....but then again, I'm not putting a deadline on it either! lol
Cheers,
Rik
Rik, fortunately there isn't many after market parts for the Pershing (maybe that's a bad thing as an after thought.)I think most of the pains will be replicating the texture of the Pershing and small details that are missing or lame on the stock hull.
07-12-2010, 01:12 PM
#7


Join Date: Oct 2009
Location: ninove - outeroost vlaanderen, BELGIUM
Posts: 2,610
Likes: 0
Received 0 Likes
on
0 Posts
yes all tamiya lacks the fine details on the stock hulls, for example the KT have none on the hull compared to the HL panthers and jagdpanther hull ...
the tamiya hulls are very good workable, you must try to add welds with a small screwdriver and a candle, you will see its goes well and can be aplied by everyone, look at the pics on internet they are a great help in detailing your beast into as close as it gets to the real warmachine
the tamiya hulls are very good workable, you must try to add welds with a small screwdriver and a candle, you will see its goes well and can be aplied by everyone, look at the pics on internet they are a great help in detailing your beast into as close as it gets to the real warmachine
 07-12-2010, 06:34 PM
#10
Member
Join Date: Aug 2009
Location: calgary, AB, CANADA
Posts: 99
Likes: 0
Received 0 Likes
on
0 Posts
Okay Tony dude,
Here is what you should do ask your wife for some nailpolish revoer or Acetone buty don't tell her what you need it for. lol
then just brush some one with a brush or q-tip and let it do its thing. what you should end up with is a pebbly type of surfaceetched into the plasticthat you just paint over normally. Try this out on a scrap piece of plastic first.
Or you can use the stippling effect with paint and a foam brush. You just dab the paint on randommly. With either method just remember what scale your working in and that not everthing will need to show up as you see it in a picture.
07-12-2010, 07:36 PM
#12

Nice 'Cup Holder'! Need to make a note of that.
Interested to find out how the paint job holds up. What type of primer did you use?
The stock Tamiyia finish on the interiors chassis has held up well, but a painted interior could look cool. Are you going to paint the interior Green or White - as Servoblast has done in the past?
Interested to find out how the paint job holds up. What type of primer did you use?
The stock Tamiyia finish on the interiors chassis has held up well, but a painted interior could look cool. Are you going to paint the interior Green or White - as Servoblast has done in the past?
07-12-2010, 08:24 PM
#13
Senior Member
Thread Starter
Join Date: Dec 2009
Location: Fort Walton Beach, FL
Posts: 2,647
Likes: 0
Received 0 Likes
on
0 Posts
Thanks karel, Chris, and Don!
Four slot,
Man I'm a bitleeryusing acetone on the plastic, I was thinking more along the lines of putty for texture, lol. There's going to be some modifications needed to the hump for the blower and not to mention that the casting of the Pershing was very rough, like poured on pancake batter (in layers.) I don't think adding a rough texturesolelyby solvent will do in this scale.
phasor, I have all the screws in bead containers already. That was actually the first thing I did, then soaked all plastic parts in 409 grease cutter, and the third step was actually what I posted above. But nobody really wants to see the first two steps! lol
Ksoc,Styrofoamcups are anindispensableitem to a modeler/painter!
The primer that I used this particular time was RustOleum Automotive (sandable) primer. This primer has provided pretty good results on most projects I've done before. So it'll hold up to abuse really well. But the whole key to longevity is the overcoat. So, every thing will be clear coat satin. I'll clear coat several times as Iprogressivelyget to the end of the painting process(base/gloss or satin clear/mid tones, highlights /gloss clear/wash/flat clear/dry brush, add fine details/Golden Artist Colors Super-loaded matte clear...theflattestof the flat acrylic mediums)
As for theinteriorcolor scheme. I don't think I've seen Bob's wild color hull.....or are you talking about the red hull color? But to answer your question, Yepper!
That's why I wanted to prep the metal "tub." I figured, the guts could at least look fun....even though much of it will be covered anyways.
Three coats of Citrus Yellow/green candy lacquer paint and 4 coats gloss !
07-12-2010, 11:33 PM
#14
Senior Member
Join Date: May 2010
Location: London UK, UNITED KINGDOM
Posts: 106
Likes: 0
Received 0 Likes
on
0 Posts
ORIGINAL: phasor
Hi, I admire your patience. I started all my Tamiya tanks by opening the screw bags.
Hi, I admire your patience. I started all my Tamiya tanks by opening the screw bags.
07-13-2010, 12:03 AM
#15
Senior Member
Thread Starter
Join Date: Dec 2009
Location: Fort Walton Beach, FL
Posts: 2,647
Likes: 0
Received 0 Likes
on
0 Posts
ORIGINAL: xf62
I did that, but tipped the contents of each screw bag into a small envelope with the correct screw bags letter marked on the envelope
ORIGINAL: phasor
Hi, I admire your patience. I started all my Tamiya tanks by opening the screw bags.
Hi, I admire your patience. I started all my Tamiya tanks by opening the screw bags.
07-13-2010, 12:13 AM
#16
Member
Join Date: Aug 2009
Location: calgary, AB, CANADA
Posts: 99
Likes: 0
Received 0 Likes
on
0 Posts
Tony I understand your reluctance in using acetone....your just scared to go ask your wife dude...lol. I used to use that method when I was model building and itwas not an issue for styrene it would etch the plastic only a little. I stumbled on it when I crazy gluedmy finger to an engine block and had to use acetone to get my finger free and what do you know it etched the engine block and itlookedlike a casting. That's what I call a happyaccident.
But like I said you can also use the stippling paint effect. For example whenI built my slot car track I used a piece of latex foam to dab the paint on the track to give it an asfalt look worked quiet well. Keep in mind that that was for1/64 scale. So just experiment with that if you choose that method.
Or the same method using just a goog old regular paint brush, but use the correct size like 1 1/2" for the scale and dab it on the end of the bristles.
I personally never liked touse milli put as it was difficult to work with.Paint can be quite effective in layers. Good luck in what you decide on.
And by the way do you remember that I had askedthe forum on which tank to choose the Bulldog or thePershing . Well I decidedon the Bulldog for a first tank and then leaving the Tamiya Pershing at a later date. So I am planning on learning from your experience on your build. Thanks in advance for sharing.
Ray
07-13-2010, 12:53 AM
#17
Tony,
Great idea on the "small parts" w/magnets. I am glad I checked in here. Haven't been working on the tanks too much, in the process of converting my traxxas rustler into a "slash" short course truck, I started to feel the need for speed once again. Anyway good luck with your build it sure looks like it will be well planned. Definitely going to keep an eye on this.
Cheers,
Wade
Great idea on the "small parts" w/magnets. I am glad I checked in here. Haven't been working on the tanks too much, in the process of converting my traxxas rustler into a "slash" short course truck, I started to feel the need for speed once again
. Anyway good luck with your build it sure looks like it will be well planned. Definitely going to keep an eye on this.Cheers,
Wade
07-13-2010, 05:46 AM
#18
Senior Member
Join Date: May 2009
Location: woodbridge,
VA
Posts: 471
Likes: 0
Received 0 Likes
on
0 Posts
BiggTony i have had good luck using med. laqure thinner putting alittle at a time on the part and stippling hith a stiff brush. I built a pershing when they rirst came out (my first tamiya) and it was a great running model stone stock now i wish i had not sold it. Keep the pics coming.
07-13-2010, 05:48 AM
#19
Join Date: Oct 2009
Location: ninove - outeroost vlaanderen, BELGIUM
Posts: 2,610
Likes: 0
Received 0 Likes
on
0 Posts
hey tony i use cellulose thinner to make the rough syructure of steel on my tanks, it's easy but use it outsite and don't overdo it look at pics.
The guy's in the club were thinking am get crazy when i did this to my tamiya 650€ Sherman, but the result is immense with a hard brush. i usualy add battledamage to and then use the tinner on the plastic, that smoothen the bullet hits like the real hits on the steel
The guy's in the club were thinking am get crazy when i did this to my tamiya 650€ Sherman, but the result is immense with a hard brush. i usualy add battledamage to and then use the tinner on the plastic, that smoothen the bullet hits like the real hits on the steel
07-13-2010, 01:54 PM
#20
Senior Member
Thread Starter
Join Date: Dec 2009
Location: Fort Walton Beach, FL
Posts: 2,647
Likes: 0
Received 0 Likes
on
0 Posts
Hey thanks guys for sharing your techniques on surface texture.(Four Slot, you darn skippy I'm scared! I'm trying to talk her into the KT, lol) They'll come in handy when I get to that point for sure.
I think I still need to go more extreme. US tanks during that time were casted very rough (especially the Pershing) and had a very hammered look and some areas even looked poured on. The rolled fenders, side skirts, and rear compartments had the stippling effects that come from rolled steal. The techniques you guys mentioned would come in handy for the rolled steel portion of the US/Soviet tanks anddefinitelyGerman, since they used no casting method.
07-13-2010, 03:53 PM
#22
Senior Member
Thread Starter
Join Date: Dec 2009
Location: Fort Walton Beach, FL
Posts: 2,647
Likes: 0
Received 0 Likes
on
0 Posts
Well, today I went through the lug nuts on the road wheels. What I really wanted to do was drill out the molded nuts and insert real ones or photoetch one like Panther F did on his build, but I can't find small scale nuts that would appropriately match the size of the road wheel. So, I went the easier route. Took a brass tube that is smaller in diameter than the nuts and beveled it, stuck it in a pin vise and carefully pressed and twisted in the center of the nut. The plastic is somewhat soft, so care needs to be taken.....came out decent if you ask me!
If I eventually find the proper scale nuts and bolts, I'll add them at a later time.
Oh, and my rubber sealed bearings came in to, whooot! Only 6 days from China.....weird.
07-13-2010, 05:48 PM
#24
Senior Member
Join Date: May 2009
Location: Evans, GA
Posts: 1,506
Likes: 0
Received 0 Likes
on
0 Posts
BiggToney,
Try looking at Model Railroading supplies. They have brass and plastic nut and bolt castings in all types of sizes when you consider the different scales.
Jim
Try looking at Model Railroading supplies. They have brass and plastic nut and bolt castings in all types of sizes when you consider the different scales.
Jim
07-13-2010, 06:20 PM
#25
My Feedback: (1)

Join Date: Mar 2005
Location: Farmington,
WV
Posts: 635
Likes: 0
Received 0 Likes
on
0 Posts
BigTony,
I'm looking forward to the rest of your build! I have a Tamiya Pershing that has been setting on my shelf for over 3 years.... LOL
Were did you order the bearings from? That is one item I plan on installing during my build when I ever get around to it... :-)
Good Luck,
Ed
I'm looking forward to the rest of your build! I have a Tamiya Pershing that has been setting on my shelf for over 3 years.... LOL
Were did you order the bearings from? That is one item I plan on installing during my build when I ever get around to it... :-)
Good Luck,
Ed