


Wing and stab leading edges Questioin
 01-25-2011, 01:04 AM
#1

Thread Starter
Join Date: Sep 2007
Location: Haltom,
TX
Posts: 1,181
Likes: 0
Received 0 Likes
on
0 Posts
For those of you building Large ScaleI have a question.
1. The wing leading edges begin as a square piece of balsa. What is your method of forming the leading edge curvature?
2. Same goes for the vertical and horizontal stabs.
I am looking for new ways of doing this as I have mainly used a hand file for rough shaping then sanding and more sanding. However when I am done, when you view the leading edge from the wing tip to the fuse I see waves. My planes fly great and the waviness is not readily noticeable but I know it is there. Tips and advice welcome by all.
Help!!!
Thanks in advance
Glenn Williams
 01-25-2011, 02:37 AM
#2


I start out by using a black felt tipped marker all along the leading edge, applied liberally(hope that word doesn't get censored in this age of politcal correctness).
Goal will be to leave faint, straight line when planing and sanding is completed. Which leads to my method: small wood plane to get general shape, then sanding with sanding block, using progessively finer grit.
Goal will be to leave faint, straight line when planing and sanding is completed. Which leads to my method: small wood plane to get general shape, then sanding with sanding block, using progessively finer grit.
 01-25-2011, 04:49 AM
#4
My Feedback: (9)
Join Date: Jul 2002
Location: St. Charles, IL
Posts: 1,867
Likes: 0
Received 0 Likes
on
0 Posts
I often use the Goldberg hinge line marker to make a sanding center line; then I highlight the line with some kind of marker. Naturally you're limited in size.
Walt
Walt
01-25-2011, 05:26 AM
#5
Senior Member
My Feedback: (7)

Join Date: Jan 2005
Location: Longmont,
CO
Posts: 215
Likes: 0
Received 0 Likes
on
0 Posts
I like this for long leading edges, at least it seemed to work well for me:

I started with a razor plane to rough shape, then sanded down. I used more pressure on the top so I could sand a smaller diameter than the tool had.
Sadly I don't seem to have an actual wing LE photo, but here is a before and after on a control surface I used that tool for:
Rough shape with the plane:

and then the finished LE:

I started with a razor plane to rough shape, then sanded down. I used more pressure on the top so I could sand a smaller diameter than the tool had.
Sadly I don't seem to have an actual wing LE photo, but here is a before and after on a control surface I used that tool for:
Rough shape with the plane:
and then the finished LE:
01-25-2011, 06:39 AM
#6

Join Date: Mar 2002
Location: Smithfield,, VA
Posts: 1,013
Likes: 0
Received 0 Likes
on
0 Posts
Good question:
Assuming the leading edge has already been sheeted, lay a piece of masking tape along the leading edge of the sheet where it meets the leading edge stock. This will keep you from going into the sheeting. To shape the LE, I use a small Stanley plane that has a one inch wide blade. I like this better than the razor planes because the blade is thicker and holds an edge much better. And it can be sharpened as necessary.
NOTE: If you have one of those kits that has the leading edge sheeting goes over the leading edge stock, then the leading edge has already been shaped tangent to the top of the ribs.
The first step I preform is to plane the LE to be tangent to the edge of the sheeting, top and bottom. At this point no curveature has been created. You should be able to visualize (from looking at the end of the LE) about where the Center line of the leading edge should be. I make a mark with a fineline sharpie down the entire length of the piece. This is pretty easy if you lay the wing on a flat surface and block your marker to the correct height and just pass it down the edge. It the wing is tapered (aren't all warbird wings?) you may have to block up the wing tip to keep the point the same distance above the table. Now that you have the rough shape and an accurate centerline, use the plane to get close to the desired shape, and then go to a long sanding block. I have a two foot long aluminum one about two inches wide that is available at most good hobby shops. The sticky back 80 grit paper that comes in rolls is great for final shaping. Once you start touching the masking tape , remove it and go to a finer finishing grade sandpaper.
Hint: When removing the sandpaper from the aluminum bar, sometimes glue sticks to the bar. Laquer thinner is the best stuff I have found to remove it.
Hope this helps.
Dash
01-25-2011, 08:52 AM
#7

I like Dash7ATP post on the subject. I use almost the same procedures, although I do use the hobby type razor plane (with a good sharp blade in it) and find it to work just fine. I like how light it is and (maybe it is just me) I can "feel" the work better with it in my hands.
Definitely put the center line all the way from root to tip before you start, or you will have a mess on your hands quicker than you can say ' pile of shavings all over the floor to sweep up'.
Good question and good feedback from you builders.
Definitely put the center line all the way from root to tip before you start, or you will have a mess on your hands quicker than you can say ' pile of shavings all over the floor to sweep up'.
Good question and good feedback from you builders.
01-25-2011, 09:01 AM
#8
Senior Member
I use my Micro Lux table saw. Best $300 I ever spent! When the LE has taper just pin or tack glue the LE to a 'carrier' sheet of wood. I can cut taper and bevel at the same time. Blade angle and depth of cut can be made with multiple passes across the saw to approximate the section. Glue this to wing to finish sanding.
01-25-2011, 09:42 AM
#9
Senior Member
My Feedback: (1)

Join Date: Aug 2005
Location: Eugene, Or
Posts: 1,152
Likes: 0
Received 0 Likes
on
0 Posts
Like Dash7ATP I use a small Stanley tradesman block plane..
The little one in this pic
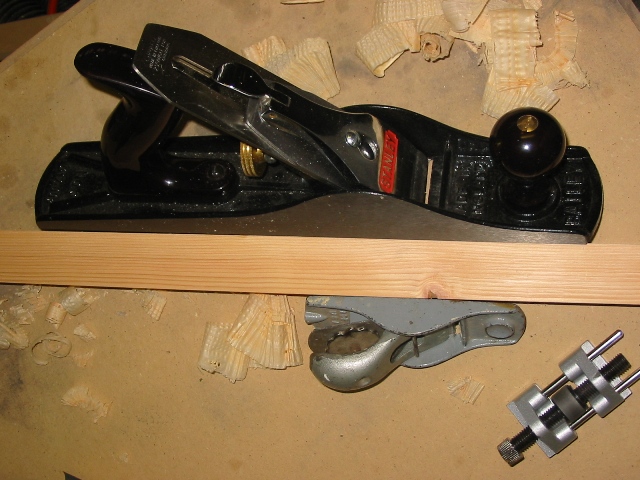
I keep the plane sharp using the "Scary Sharp" sandpaper method.
http://en.wikipedia.org/wiki/Scary_sharp
Rough shape it with the hand plane and finish with a sanding block.

The little one in this pic
I keep the plane sharp using the "Scary Sharp" sandpaper method.
http://en.wikipedia.org/wiki/Scary_sharp
Rough shape it with the hand plane and finish with a sanding block.
01-25-2011, 11:06 AM
#10
Join Date: Mar 2002
Location: Smithfield,, VA
Posts: 1,013
Likes: 0
Received 0 Likes
on
0 Posts
"I keep the plane sharp using the "Scary Sharp" sandpaper method.
http://en.wikipedia.org/wiki/Scary_sharp"
sscherin
<script></script>
I have used that above technique for years, but didn't know it had a name! I like to use 600 grit wet or dry with oil over a glass surface. It's not going to get as sharp as 2000 , but it works for me.
Dash
http://en.wikipedia.org/wiki/Scary_sharp"
sscherin
<script></script>
I have used that above technique for years, but didn't know it had a name! I like to use 600 grit wet or dry with oil over a glass surface. It's not going to get as sharp as 2000 , but it works for me.
Dash
01-25-2011, 11:21 AM
#11
Senior Member
My Feedback: (1)
Join Date: Aug 2005
Location: Eugene, Or
Posts: 1,152
Likes: 0
Received 0 Likes
on
0 Posts
ORIGINAL: Dash7ATP
''I keep the plane sharp using the ''Scary Sharp'' sandpaper method.
http://<font color=''#00265e''>http:...y_sharp</font>''
http://<b><font size=''2'' color=''#...rin</font></b>
<script></script>
I have used that above technique for years, but didn't know it had a name! I like to use 600 grit wet or dry with oil over a glass surface. It's not going to get as sharp as 2000 , but it works for me.
Dash
Yeah glass is the best but I've used a sheet of MDF in a pinch..
If the blade has a nic I'll start at 220 otherwise I go 400-600-1000 and 1500 or 2000 if I can find some.
First I sand the back of the blade flat on the paper bevel side up.
Then I mount it in the honing guide and work up through the grits.
The 1000-2000 step only takes 2-3 swipes..
last step is to make 1-2 2000 grit swipes on the back again to remove any burr.
Sounds complicated but it only takes 5 minutes or so.. maybe 10-20 if you are starting with a fresh out of the box iron.
01-25-2011, 01:45 PM
#13
Senior Member
Practice makes perfect but I do use the masking tape on the edge of the sheeting method. I have never used anything like a plane to remove balsa from my LE because I am always afraid to take to much off. I start with 80 grit then 150 then 220 and finish up with 320. Then spray Transtar Low spot finder guide black spray paint on it and it only needs a mist coat. Then sand until all the black speckles are gone. Leaving a smooth straight wing with no paint left and no low or high spots. Ready for glass or covering whichever you do. I flass all mine.
Barry
Barry
01-25-2011, 02:33 PM
#14
Senior Member
My Feedback: (1)
Join Date: Aug 2005
Location: Eugene, Or
Posts: 1,152
Likes: 0
Received 0 Likes
on
0 Posts
$12 at woodcraft..
http://www.woodcraft.com/Product/200...ing-Guide.aspx
They have a store over in Norfolk if you happen to be over that way.
5900 E Virginia Beach Blvd #76
Norfolk, VA 23502
steer clear of the Proxxon mini tools aisle if you want to escape with your wallet intact.
http://www.woodcraft.com/Product/200...ing-Guide.aspx
They have a store over in Norfolk if you happen to be over that way.
5900 E Virginia Beach Blvd #76
Norfolk, VA 23502
steer clear of the Proxxon mini tools aisle if you want to escape with your wallet intact.
01-25-2011, 04:32 PM
#15
Join Date: Mar 2002
Location: Smithfield,, VA
Posts: 1,013
Likes: 0
Received 0 Likes
on
0 Posts
Thanks for the Woodcraft link. Did you read the comments section for that guide... Very mixed reviews.
I'll have to try to get over there and check out the store. It sounds like it could be interesting. Is it anything like a Micro Mark?
Dash
I'll have to try to get over there and check out the store. It sounds like it could be interesting. Is it anything like a Micro Mark?
Dash
01-25-2011, 04:41 PM
#16
Join Date: Mar 2002
Location: Smithfield,, VA
Posts: 1,013
Likes: 0
Received 0 Likes
on
0 Posts
ORIGINAL: NCIS
Practice makes perfect but I do use the masking tape on the edge of the sheeting method. I have never used anything like a plane to remove balsa from my LE because I am always afraid to take to much off. I start with 80 grit then 150 then 220 and finish up with 320. Then spray Transtar Low spot finder guide black spray paint on it and it only needs a mist coat. Then sand until all the black speckles are gone. Leaving a smooth straight wing with no paint left and no low or high spots. Ready for glass or covering whichever you do. I flass all mine.
Barry
Ihave heard of doing something similar once you begin priming. Put on alight colored first coat and a darker colored second coat before sanding. It's easy to see the high and low spotsas you sand through the darker outer coat.
Dash
 01-25-2011, 05:34 PM
#18
Thread Starter
Join Date: Sep 2007
Location: Haltom,
TX
Posts: 1,181
Likes: 0
Received 0 Likes
on
0 Posts
Thanks all:
After posting this same question on another site the general consensus is the block or razor plane method and also drawing a line down the center of the leading edge. Block form the leading edge then sand to final shape.
I appreciate your responses and I will surely do this on my next build. I have been building for years and you would think I would have been doing this by now. I dont know why I did not ask sooner.
You guys are awesome.
Glenn Williams
01-25-2011, 05:58 PM
#19
ORIGINAL: willig10
Thanks all:
After posting this same question on another site the general consensus is the block or razor plane method and also drawing a line down the center of the leading edge. Block form the leading edge then sand to final shape.
I appreciate your responses and I will surely do this on my next build. I have been building for years and you would think I would have been doing this by now. I dont know why I did not ask sooner.
You guys are awesome.
Glenn Williams
01-25-2011, 10:26 PM
#20
Senior Member
Join Date: Dec 2008
Location: pine bluffs,
WY
Posts: 485
Likes: 0
Received 0 Likes
on
0 Posts
Glenn.try www.specialized balsa.com.they are in loveland colorado,they have leading & trailing edges all shapes and sizes and they are not out priced.970-461-9663,I get alot of my wood from them.George.
01-26-2011, 09:14 AM
#21
Senior Member
ORIGINAL: Dash7ATP
I have not heard of the Transtar Low spot finder. That sounds like a very useful product. Where do you find it? I do something similiar. When I'm getting close to my final shape, I'll mark up the curves with a sharpie so I know where I'm sanding . It sounds like one could do about the same thing by using thinned ink in an airbrush. You would have to let it dry well before beginning your sanding.
I have heard of doing something similar once you begin priming. Put on a light colored first coat and a darker colored second coat before sanding. It's easy to see the high and low spots as you sand through the darker outer coat.
Dash
ORIGINAL: NCIS
Practice makes perfect but I do use the masking tape on the edge of the sheeting method. I have never used anything like a plane to remove balsa from my LE because I am always afraid to take to much off. I start with 80 grit then 150 then 220 and finish up with 320. Then spray Transtar Low spot finder guide black spray paint on it and it only needs a mist coat. Then sand until all the black speckles are gone. Leaving a smooth straight wing with no paint left and no low or high spots. Ready for glass or covering whichever you do. I flass all mine.
Barry
Practice makes perfect but I do use the masking tape on the edge of the sheeting method. I have never used anything like a plane to remove balsa from my LE because I am always afraid to take to much off. I start with 80 grit then 150 then 220 and finish up with 320. Then spray Transtar Low spot finder guide black spray paint on it and it only needs a mist coat. Then sand until all the black speckles are gone. Leaving a smooth straight wing with no paint left and no low or high spots. Ready for glass or covering whichever you do. I flass all mine.
Barry
I have heard of doing something similar once you begin priming. Put on a light colored first coat and a darker colored second coat before sanding. It's easy to see the high and low spots as you sand through the darker outer coat.
Dash
Dash,
I buy it at my local Auto Body Supply Store that sells to body shops. It comes in very handy for all surfaces like the fuse and wing after it is sheeted. It helps sand it smooth without making more low and high spots before I glass my warbirds. Then after I prime I continue to use it to get is baby butt smooth for the detailing and final coat of primer and topcoats. Here is a picture of the product.
Barry

