


CARF-Models P-47 Thunderbolt
 03-18-2017, 01:33 AM
#876

Hi Tanguy,
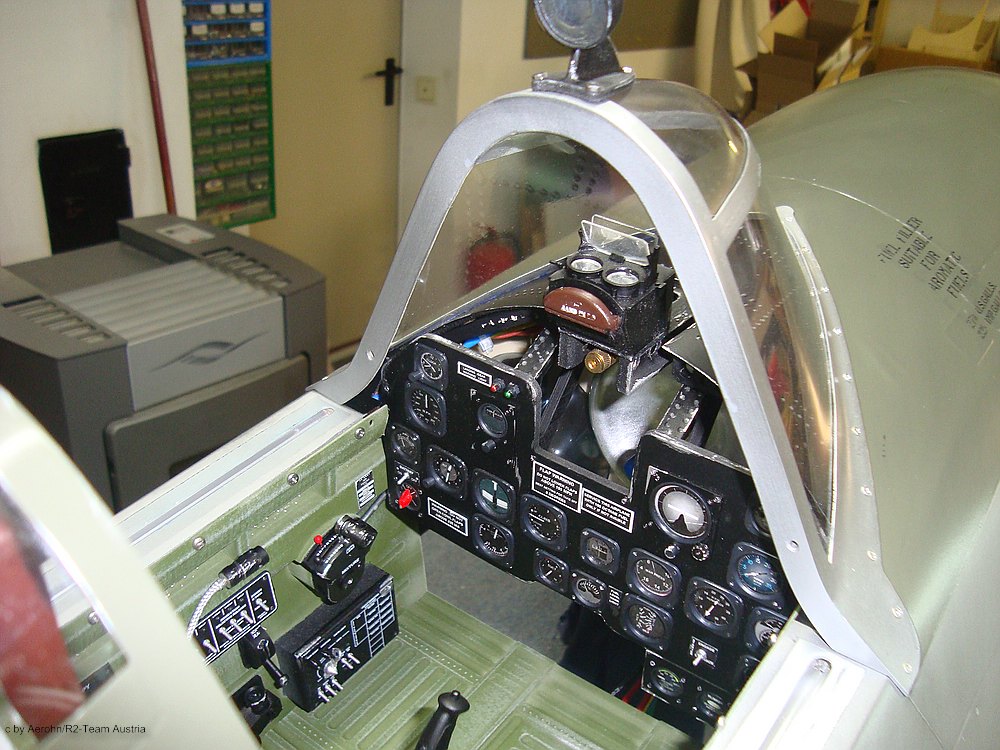
I also built a CARF P-47 and I took the cockpit 1:5 from Aerocockpit. It fits perfect in that plane. Many parts of my cockpit are 3d printed.
Have a look at the photos on my hp http://www.r2-team.de/bauberichte/ca...ack-baubericht
I also built a CARF P-47 and I took the cockpit 1:5 from Aerocockpit. It fits perfect in that plane. Many parts of my cockpit are 3d printed.
Have a look at the photos on my hp http://www.r2-team.de/bauberichte/ca...ack-baubericht
Very good job , I see and tell you later .
Cheers
 03-21-2017, 08:00 AM
#878

Guys,
Just installed the Moki 250 in the CARF P47 yesterday. Placed the cowling on the plane to see how things are lining up and found a slight problem that I am not too sure how to correct. The motor seems to have slightly too much right thrust angle. The crank of the motor is about 1/8" too far right and a 2 blade prop hits the cowl on the right side. Seems like I need to shim the motor back left just a bit. Have done this with smaller planes & motors but never dealt with a composite more mount dome like this. Not sure if it's better to try to shim the motor mount dome at the firewall or to shim the motor mount where it bolts onto the dome.
Hoping someone of you have dealt with this issue and could give me some guidance here.
Thanks in advance for your help!!!
Tom
03-22-2017, 03:29 AM
#879

That is not an issue. It is normal on this plane. The prop will never be perfectly centered in the cowl.If you tried to shim it that would just be deleting the right thrust and would push the motor to far over to were the valves would hit the inside of the cowl. Do not shim it at all. All you need to do is contact Gotz Vogelsang, he sells a 1/4 inch thick washer to help push the prop out just enough for clearance. You'll also have to get some longer bolts to go all the way thru the prop and wash to bolt it on. I would post a picture of mine so you can see it. But RCU won't allow me to do this for some reason..
Last edited by Greg Wright; 03-22-2017 at 03:39 AM.
03-22-2017, 07:21 AM
#880
Hi Tom,
I found exactly the same problem as you and I did not like the way the prop hub was not centred. I mounted a 6mm ply spacer on the front of the dome and shifted the entire dome to the left slightly to get everything centred. My prop hub is now dead in the centre but this did create an issue with clearance with one of the valves almost hitting the cowl on the left side of the engine. I fixed this by cutting a relief hole in the cowl and covering it with a shallow blister. Should look ok when it is done.
I did not know about the prop spacer when I did mine and did not like the off centre hub in any case. Each to his own. I am sure my approach will be criticised but it was the best compromise for me. Here is a pic of mine in the painting stage.....
03-22-2017, 07:24 AM
#881
Ps, I agree with Greg....don't do anything to change the thrust angle. I would just get the prop hub spacer and shift your dome to the left if you want to, but be prepared to deal with the valve clearance issue. Hope this helps.
03-22-2017, 08:05 AM
#882
Thanks guys I really appreciate your help!!!!
I bought the 4 blade Solo prop so I put the blades on and trial fitted it last night. It fits perfectly because of the adapter plate that moves the prop forward about 0.25". My long term hope is to fly the plane with that prop but wanted to break it in with a 2 blade. I will just turn a new spacer to push the 2 blade prop forward and get longer bolts as recommended. I can live with 0.125" off center on the crank especially since I learned about the potential for valve train to cowl clearance issues.
Thanks again!!!!
03-22-2017, 07:55 PM
#885
Hi Guys,
here a photo I did it. Works good. It is a 3mm GFK plate.
More photos on my hp.
http://r2-team.de/images/CARF-Thunderbolt_Baubericht/comp_DSC04537.jpg
here a photo I did it. Works good. It is a 3mm GFK plate.
More photos on my hp.
http://r2-team.de/images/CARF-Thunderbolt_Baubericht/comp_DSC04537.jpg

 06-09-2017, 08:29 AM
#895
Am at the stage of fitting the Moki and am having difficulty figuring out how to link a servo to the choke lever. Anyone done this and have some pictures?
Thanks for any help
Bob
Thanks for any help
Bob
08-15-2017, 09:14 AM
#897
Greg,
I read on this spread that you used McMaster & Carr heat resistant flex pipe for your exhaust pipes. My flexible pipes that I have are leaking exhaust inside the fuselage. What is the actual name, size that you ordered from them. Thanks for you time and information in this spread. I just love this plane/motor combination.
Mark
08-16-2017, 06:37 AM
#898
msouers,
Here is my last order for the flex pipe with all the info you need..
April 13, 2016
DeliveredHigh-Temperature/Flexible Duct Hose For Fumes
Silicone Coated, 3/4" Id, 7/8" Od, Red, 10' Long
Here is my last order for the flex pipe with all the info you need..
April 13, 2016
DeliveredHigh-Temperature/Flexible Duct Hose For Fumes
Silicone Coated, 3/4" Id, 7/8" Od, Red, 10' Long
Last edited by Greg Wright; 08-16-2017 at 06:41 AM.
08-18-2017, 04:32 AM
#900
Greg,
Thanks for the info on the exhaust pipes. I ordered them from McMaster & Carr yesterday. I put my previous pipes through a small block of wood which was epoxied to the inside of the fuselage. They both came loose in flight last weekend and exhaust was being dumped inside the plane. I am thinking of putting some kind of washer on the outside of the plane to screw to the block of wood to hold everything together. I was wondering how you attached your pipes to the outside of the plane. Thanks for your time and attention.
Mark