


CARF F4U-1 Corsair build thread


 12-13-2015, 06:43 PM
#3153
Checked with Brian. He can't identify them either. You will have parts left over when you are done. It seems that CARF sends almost every part out with a kit, even if it has already been installed at the factory. If it is not specifically referred to in the manual, it has already been installed. Now having said that, I don't see those parts pictured in the front of the manual where it shows all the parts installed on the ARF version.
I have a complete parts kit and I found those parts. 2 of the one on the left, and 4 of the one on the right. We have never installed them, even on older kits. Again, never used them.
I have a complete parts kit and I found those parts. 2 of the one on the left, and 4 of the one on the right. We have never installed them, even on older kits. Again, never used them.
Last edited by ram3500-RCU; 12-13-2015 at 06:54 PM.
12-13-2015, 06:49 PM
#3154
Senior Member
Join Date: Sep 2006
Location: LavalQuebec, CANADA
Posts: 129
Likes: 0
Received 0 Likes
on
0 Posts
Thank you Gary, I knew I can count on you. With all your connections do you have any idea if there are plans or drawing for this model. I rather work fron plans than pictures, they are no use to me.
Bill
Bill
12-20-2015, 07:25 PM
#3156
Mounting the 215 / 250 Moki radial in one of these is tedious due to the tight fit. I have done it several times and have come up with some dimensions that make it easier. Here they are, based on the lengths of our stand-offs.
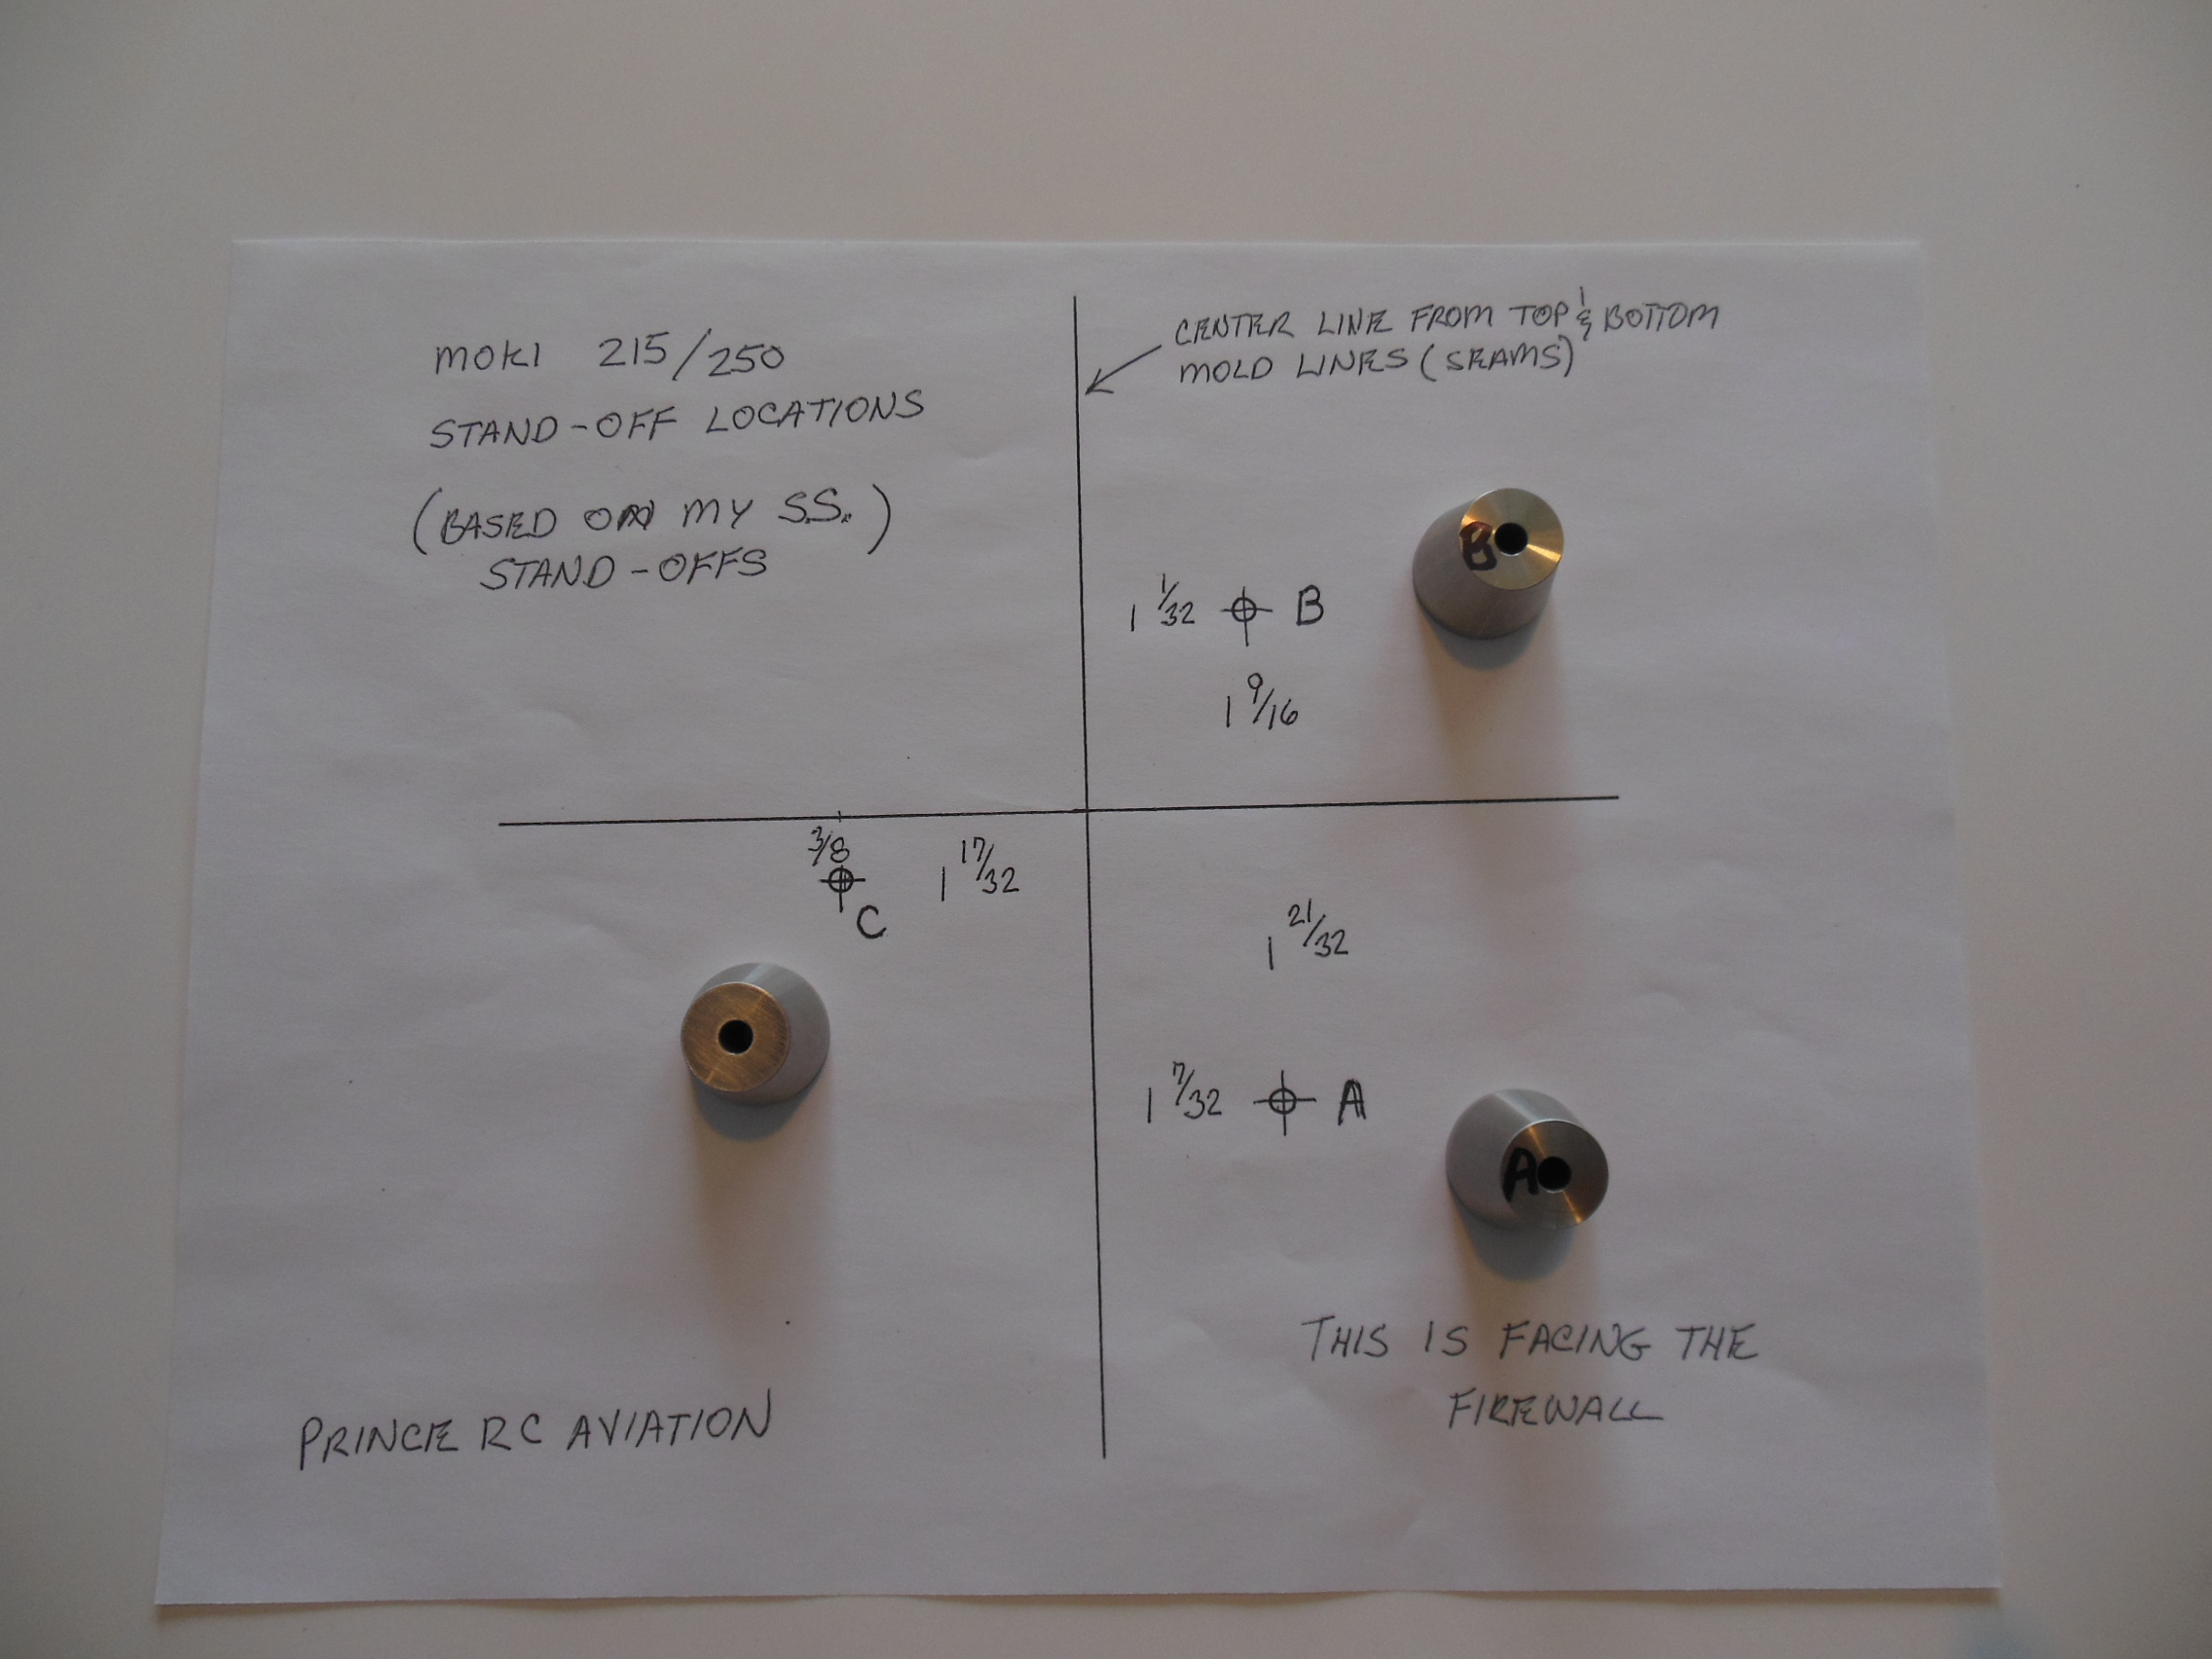

Last edited by ram3500-RCU; 12-20-2015 at 07:28 PM.
12-27-2015, 07:58 PM
#3157
Some shots of one of the wings we are working on. Shows our intakes installed and also the bottom hatch system. The flip down board will have all the controls for the systems in the wing as well as the air pressure gauge and filler for the air system that will operate the main gear doors.


 01-02-2016, 08:42 AM
#3159
Senior Member
Join Date: Sep 2006
Location: LavalQuebec, CANADA
Posts: 129
Likes: 0
Received 0 Likes
on
0 Posts
Hello Gary and Happy Holidays to you and all the members here.
I wanted to know if you encountered this problem with your kit.
I was working on the elevators and it seems that the hinge will not go it due to the fact that the slot does not line up with the brass tube.
I can insert the brass rod all the way but I can't see it cause is behind a piece of plywood.
I think they glued the tube in the elevator on the wrong spot.
I will sacrifice the pieces and cut them on the band saw and see what the problem is.
Here are a couple of photos to show you what I mean.
Cheers
Bill
PS I cut them open and I was right they don't line up. On one photo you can see the alu tube blocking the opening.
On the last photo you can see the slot is blocked all together. I don't know what to do.
Last edited by Zorba1; 01-02-2016 at 09:08 AM. Reason: added photos
01-02-2016, 09:08 AM
#3160
First let me also say happy new year to all my Corsair friends around the world. 2016 will see the custom Corsairs my brother and I are building for our friends Bruce and Dennis take to the air for the first time, along with many others around the world, so that will make this a very exciting year. I'm personally glad to see 2015 go, with all the personal challenges we had. I have accepted my invitation to this year's Top Gun and hope maybe to see some of you there.
Ok, now, the elevator issue. I have not seen this problem on a factory built ship. They do a fantastic job with all there jigs and such. In the elevator is a tube that the rod slides into. I guess it is possible that when they cut the slot, it did not reach deep enough to catch that tube. I would say to make sure that all the slots went completely through that tube and that you can if fact SEE brass in those slots. As for the bracket in the stab, those are always lined up as well and the tube should slide freely through all of them. I have had problems with them being out of line on kit built stabs like the one I'm working on right now. To fix that I filled the holes that were off and redrilled them. Easy fix. No need to cut them out and make new.
Let me know what you find and thanks for sharing Bill. Might help other builders.
Last edited by ram3500-RCU; 01-02-2016 at 09:11 AM.
01-02-2016, 01:04 PM
#3162
Really an unusual issue Bill. I can see only two options. (1) do the repairs yourself and glass the elevators back to whole, (2) forward your findings to CARF and see what they will do. Your rep should be able to help you with that. Time becomes an issue with CARF. It can take almost as long to get parts as it does from us. :-) However, they have proved to be reasonable in the past from my personal experience and you have some pretty compelling evidence there.
01-02-2016, 01:08 PM
#3163
Thanks Greg. Here are a few pictures of your set. (shipping Monday) I also send vinyl flush rivets (location can be seen in the attached pictures) and enough Aerofoil to blend the intakes with the molded openings. When sanded, painted, and then distressed, they look pretty awesome (or at least better than the crap ABS pieces CARF gives you :-).


For those waiting on these, I finally found a reliable source (for now) for the grill material and have several sets ready to go out, with more under construction. I'm having to buy little speakers to get it. I pull the grills and trash the rest. All this stuff is made in China so getting the bulk material is not easy.
For those waiting on these, I finally found a reliable source (for now) for the grill material and have several sets ready to go out, with more under construction. I'm having to buy little speakers to get it. I pull the grills and trash the rest. All this stuff is made in China so getting the bulk material is not easy.
Last edited by ram3500-RCU; 01-02-2016 at 01:52 PM.
01-14-2016, 05:57 PM
#3164
In case anyone was wondering, a friend just weighed his Corsair and it came in at 54lbs. That is with all the goodies like guns, lights, working cowl flaps, scale details, electric gear, very detailed cockpit, power canopy, and more.

Last edited by ram3500-RCU; 01-14-2016 at 06:06 PM.
01-15-2016, 11:45 AM
#3166
Is this a plug-in wing version Gary?
01-16-2016, 05:06 PM
#3168
That weight makes sense, that's roughly what the 110" CARF Jugs weigh. I'm glad I retrofitted my Corsair rebuild with the electric wing fold system because It largely cancelled out the weight gain from splicing that snapped in half fuselage back together. I'll report back with my final weight once I complete it. I know in its original hydro wing system configuration mine weighed 65 lb dry.
01-17-2016, 08:49 AM
#3170
Because of the concern raised this week about our heavier aircraft, I would like to post something I received today. This was sent to Frank Tiano (Mr. Top Gun) and then passed along to all those of us on his on his mailing list. Here it is:
"Hi Frank.
� AMA met with the FAA in DC Friday. One of the issues on the agenda was to get clarification on the email sent out yesterday to the giant scale community concerning registration of model aircraft that fall within the AMA's Large Model Aircraft Program. The FAA stated this was an oversight and indicated there was no intent to subject AMA members who fly large model aircraft over 55 pounds in compliance with AMA guidelines to a stricter registration process such as described in that email. Also, it was not intended for model aircraft flown within AMA programming to register under the Part 47 process and obtain an N-number. The FAA UAS Integration Office� is currently looking into this issue and said they'll respond back to us when they have further information. We are working to document this in writing and should be issuing a statement to our membership soon.
I should add that the author of the email was simply relaying what he was told by another department within the agency and unfortunately that� information was incorrect.
Dave"
Franks comments on the message were as follows:
"Good morning Brothers,
Here is something to make you feel better on a Sunday morning!
I received this from David Mathewson, basically says to �€œhang loose�€�.
From what I can tell, it is NOT unusual for FAA to release a statement and then go back and see if it makes sense!
That is basically what is happening now. We all may be able to celebrate in a few days. Let�€™s give them a chance.
See Below:"
Will any of us ever forget the now infamous statement from a well known politician a few years back, "we need to pass this bill to see and understand what is in it"!!!!!!!!! Never, ever, a good idea.
As we can see, communication being what it is within the government, and with the culture being what it is in reporting these days, facts are often secondary to "breaking the story". We may still have some important issues to deal with, but pushing the panic button on all this right now would seem to be a little premature. Personally, I am going to continue to enjoy the building and equipping of the 'heavy metal' scale aircraft for ourselves and others for the time being.
I have a little different idea of how this could go for us. I would like to see FAA involvement and encouragement in the building and formal certification of even larger aircraft from the 125lb to the 254lb range which is the currant maximum weight limit for Ultra Lights. Much like in Europe, where their version of the FAA inspects and certifies large model aircraft during construction for safety reasons, this would allow the US to regain some of the cutting edge that has been lost because of our restrictions. Much of what you see on YouTube in giant scale models is just not possible in this country right now, under the currant restrictions. These giants are built and flown safely everyday in other parts of the world. Lets get out from behind archaic thinking and regulatory restrictions so we can overtake the rest of the world the way we have proven over and over again we are capable of doing. We should be showing them how it is done, not watching them on You Tube succeed at things we are not even given a chance to do. We know how to do this just as safely and impressively as our peers over the pond. Here are a few examples of the sort of thing I would like to see possible in this country. Even worse, is some cases they are modeling US aircraft in sizes we can't in the US!!!!!!!
www.youtube.com/watch?v=NvoitneS1io
www.youtube.com/watch?v=D7-lUBm-Guw
www.youtube.com/watch?v=0QBASNFgCTo
Last edited by ram3500-RCU; 01-17-2016 at 09:42 AM.
 01-17-2016, 10:23 AM
#3172
I have been asked for the location of specific things in the thread like the canopy sliding system. It can be hard to find things in a large tread such as this.
In the past I took the time to periodically make indexes for this reason. Very time consuming. One, I don't have the time, two, the stupid way RCU numbers their pages now, they keep changing. Post numbers don't change, but page numbers do. How stupid is that!!!!
Here is a tip for finding things easier. At the top of each page you will see a blue bar with, among other things, these words; THREAD TOOLS. Click this and drop down the box. Click on the last option which is; DISPLAY ALL IMAGES. Depending on your connection and system, it can take a little bit to load, but when loaded, you can easily file through them to find what you are looking for. Then note the page number for easy referral.
Hope this helps. I can still take pictures of specific things as time permits, so don't hesitate to ask if you just can't find something.
Last edited by ram3500-RCU; 01-17-2016 at 10:26 AM.

