


Another Fliteskin ME 109 build thread


 05-14-2015, 08:56 PM
#628

Thread Starter
w1nd6urfa - Yes, there was quite a bit of damage. The fuselage twisted with the heavy engine spinning it while the tail was touching the ground.
Jose - We are very close now, all major work is completed with the exception of re-installing the rudder.
So today, still with the horizontal stabilizer work, it was time to fix the damage at the bottom where it contacts the fin.
There was a crack to the sheeting for the length of the stabilizer, requiring to fibre-glass the whole length.
Eran
05-15-2015, 12:42 AM
#629
Thread Starter
Back at home, I pulled the wing out to try and figure out why the retracts loosing air when radio is ON and gear is out.
After reading the Jet Tronic manual, I made a re-set and problem gone... Another obstacle removed.
Eran

After reading the Jet Tronic manual, I made a re-set and problem gone... Another obstacle removed.
Eran
05-18-2015, 03:31 AM
#630
Thread Starter
With David's shed lacking climate control (as in heating / air-conditioning), the cool temperatures today slowed us up due to the Epoxy glue takes longer to cure.
David fixed the cockpit during the weekend (cockpit floor in place in the first photo), so I got cracking today working on the rudder. I re-glued a new rudder "post" and glued the hinges to the rudder. With no confidence that the 30 minutes epoxy is actually dry after 2 hours, the rudder will have to wait to be connected.
I had to strengthen the hole for the wing dowel which was damaged when the wing got torn off. As I was struggling with clamping solution for the plywood piece I tried to glue to the back, David made a clump from two pieces of plywood pooling each other with a screw. He is a clever man...
Tomorrow is a day off, as we are going to the airfield to fly :-)
Eran
 05-19-2015, 05:05 AM
#632
Thread Starter
Last night, while the wing was at my home, I fixed the fibreglass attachment at the top front of the wing back into place.
The weather at the airfield today was awful, cold and windy. So, after one flight, I packed up and went to David's shed.
I glued the rudder hinges into the post in the fin and worked on the engine cowl (which I botched the previous day, cutting the wrong way a relief for the spark plug cable).
I didn't have the camera with me, so photos of this shed work will be posted hopefully tomorrow.
Eran
05-20-2015, 12:05 AM
#633
Thread Starter
A very productive day in the shed today.
Rudder - re-fitted, pull-pull connected and functions;
Wing Dowel hole - fixed;
Fuel Tank - re-connected and secured in place;
Cowl fitting - assembly now do not require to pull the spark plug off. The cowl require some cosmetic work on the section cut in error;
Receiver - re-fitted, function checked;
Full assembly checked, everything fit into place (wing, cowl, receiver leads routed out of harm).
Next will be balance re-check and I then off to the airfield for taxi tests.
Eran
 05-27-2015, 12:05 AM
#636
Thread Starter
I was busy this week, so I made no real progress until today.
I realised that I got it wrong, setting the CG with the wheels retracted last week, so I was back in David's shed today to rectify.
With some lack I will have it taxi tested on Sunday.
Eran

I realised that I got it wrong, setting the CG with the wheels retracted last week, so I was back in David's shed today to rectify.
With some lack I will have it taxi tested on Sunday.
Eran
05-27-2015, 03:38 PM
#638
Thread Starter
Hi Jose
On "page 24" of this thread, reply #592 you commented that "The CG location in the plan is with the wheels down and retracted changes the CG slightly aft but not significantly."
Therefore I balanced the aeroplane yesterday with the wheels down on the CG point as per the plans.
Can you please confirm that this is correct?
Regards,
Eran
05-27-2015, 08:13 PM
#639


Wheels down and empty means its balanced or neutral should you run out of fuel BUT with wheels up it will be slightly tail heavy.
Better to balance it wheels up and empty so when the gear is down the plane is positive, nose heavy, not neutral or sensitive.
Double check your work by cycling the gear and watching the CG shift. Then you will know for certain which condition is best.
For example on the YA P-38 all three gear cycle backwards for flight. So its balanced with gear up because I know when the gear drop the CG shift is forward nose heavy. You can see when it's suspended and the gear cycles the nose drops and it takes 6oz of weight on the stab to level it again.
Last edited by Chris Nicastro; 05-27-2015 at 08:20 PM.
05-31-2015, 02:25 AM
#642
Thread Starter
All went perfect today. The pre-flight tests are now complete and the aeroplane taxi well (with the re-configured landing gear).
I contacted the a heavy model inspector and I hope we will manage to tee-up an inspection within the next couple of weeks.
Eran


I contacted the a heavy model inspector and I hope we will manage to tee-up an inspection within the next couple of weeks.
Eran
05-31-2015, 05:30 AM
#643
My Feedback: (19)

Join Date: Mar 2002
Location: joliet, IL
Posts: 1,596
Likes: 0
Received 0 Likes
on
0 Posts
Good luck Eran. Nice to see you stick to it. Nice bird you have there. I have learned a few things about how the 109 can treat a pilot in certain situations (particularly in take offs), but they sure do fly and land great once free of the turf. Not saying you are over-motored, but with a healthy size fan up front I can understand and empathize with the consequences the 109 is capable of delivering. That little tail fin and rudder don't do much until the plane is really carrying some speed up on the step. I think you will get her airborne and realize how worth the hours dedicated have been. Good work.
Mike
06-05-2015, 01:27 AM
#644
Thread Starter
On a perfect day, with pre-flight inspection completed satisfactory to the heavy model Inspector requirements, it was time to try again to test fly the ME-109.
This time, we decided to take off from the grass strip, which I inspected before the flight for rabbit holes, and it was in good condition (In the photo of the airfield it is in front of the pit area, about 90 degrees to the runway visible in the photo).
The take off plan was executed to the letter, holding the tail on the ground with up elevator until speed built up, and then releasing slowly having to hold almost full rudder to keep the aeroplane in alignment.
There is no question that the "not towed out" wheels made the aeroplane behaving much better on the take off roll.
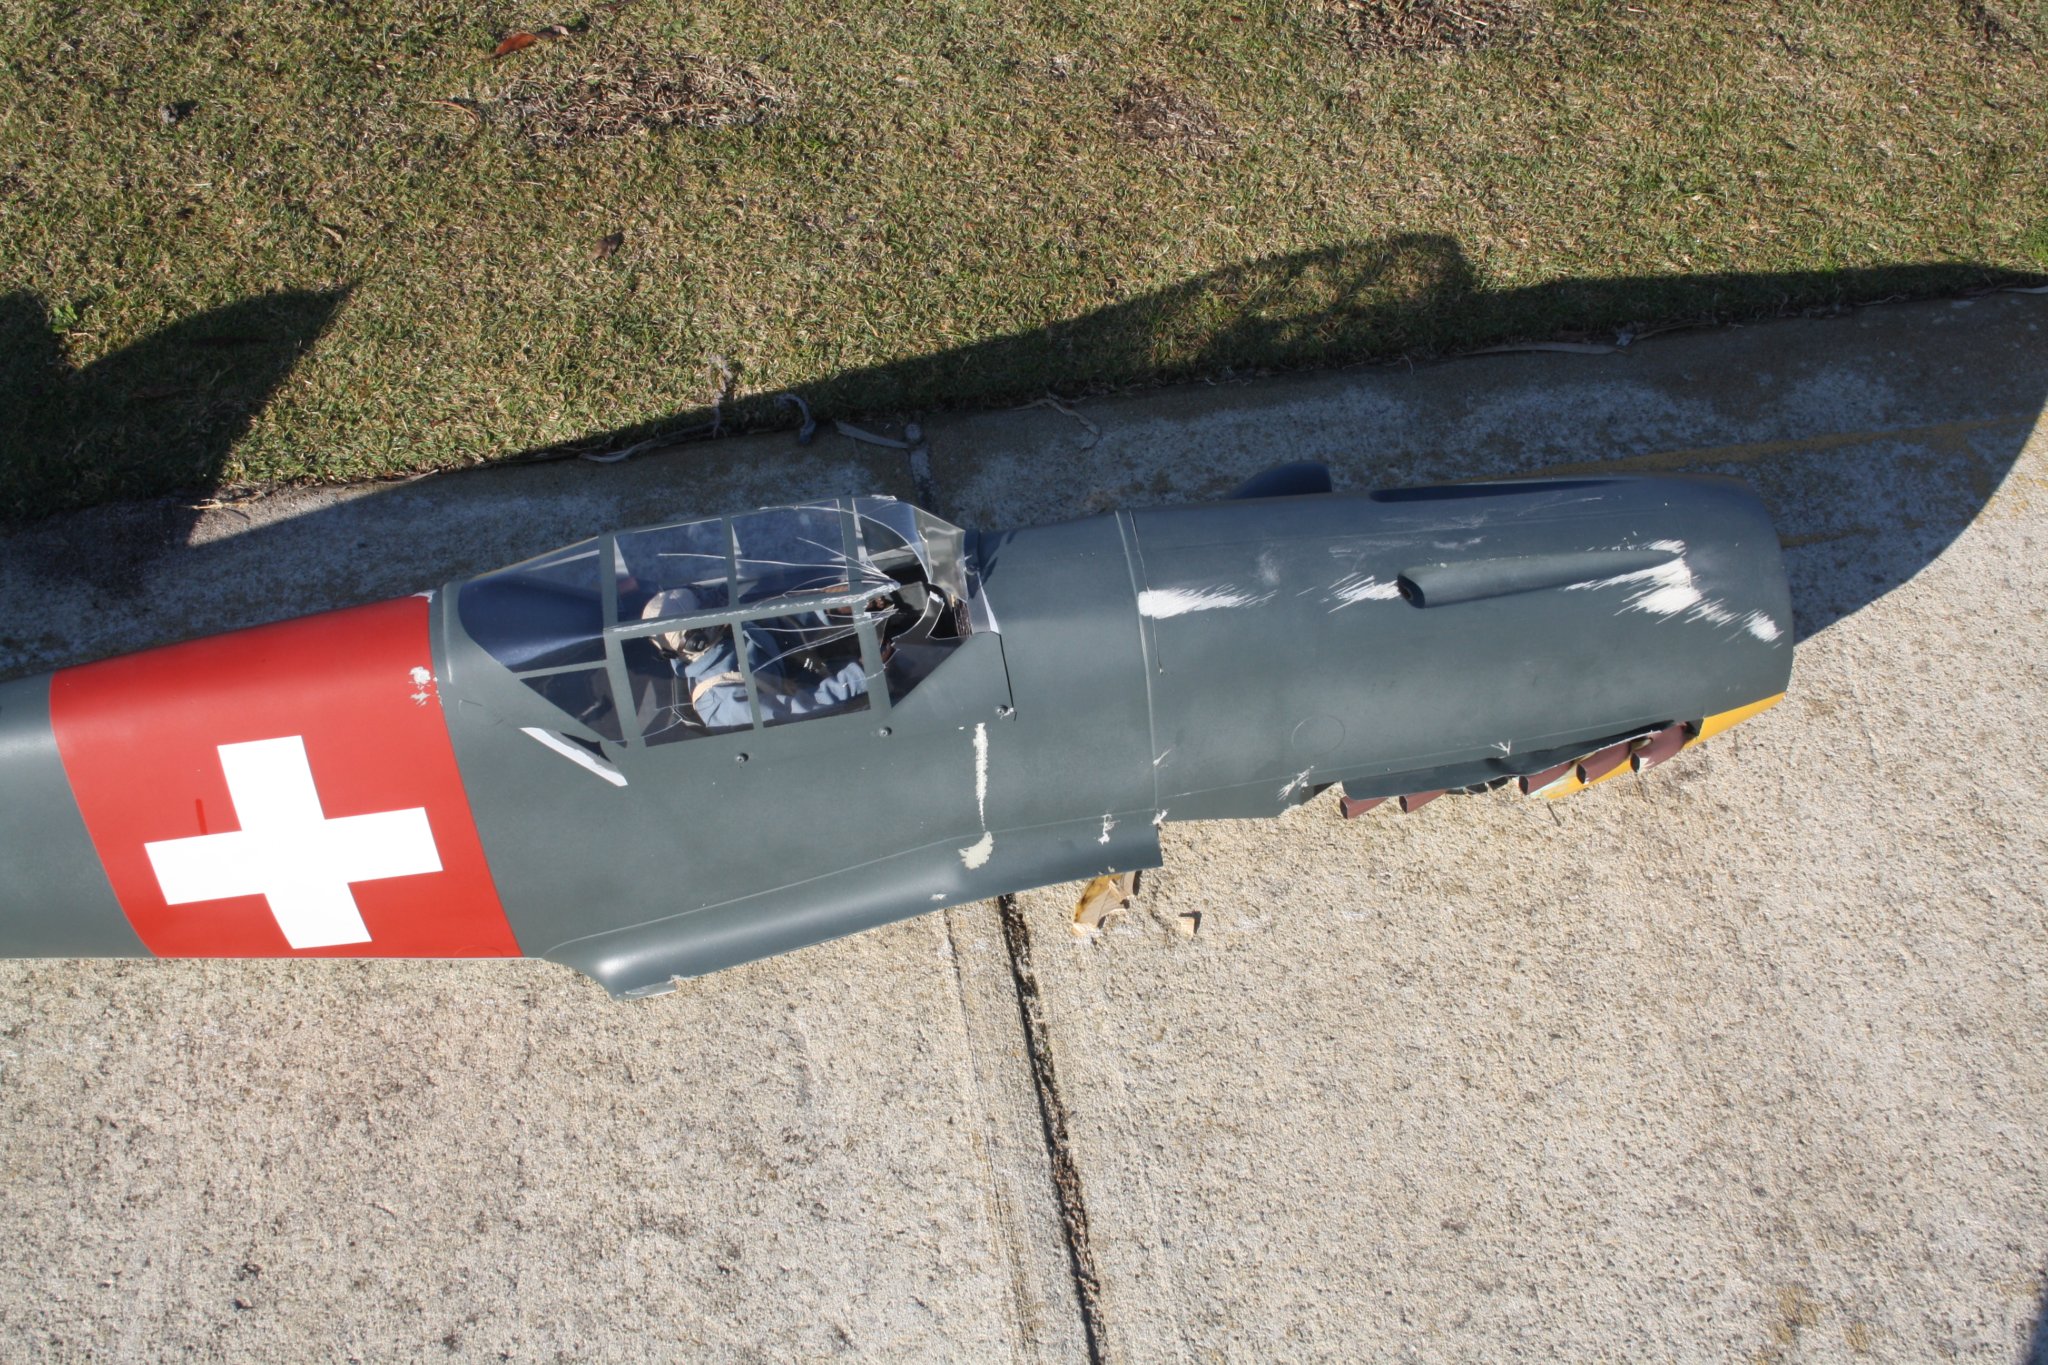
HOWEVER, the moment it got light on the wheels, in absolute identical trajectory to the previous ground roll, it went into the tarmac of the paved runway (which run parallel) and sustained heavy damage.
What we do know for a fact from this attempt is that it was not the landing gear tow out fault, as was suspected to be the reason for the first ground roll (also I have no doubt in my mind that it contributed to the first ground roll now that I saw how much well behaved the aeroplane was without it).
Jose - I was wondering if by chance you have close up photos of the spinner, as complete assembly and without the "dome" (only prop and backplate, preferably side photo) on your ME-109? I try and understand something I did with my own assembly.
Cheers,
Eran


This time, we decided to take off from the grass strip, which I inspected before the flight for rabbit holes, and it was in good condition (In the photo of the airfield it is in front of the pit area, about 90 degrees to the runway visible in the photo).
The take off plan was executed to the letter, holding the tail on the ground with up elevator until speed built up, and then releasing slowly having to hold almost full rudder to keep the aeroplane in alignment.
There is no question that the "not towed out" wheels made the aeroplane behaving much better on the take off roll.
HOWEVER, the moment it got light on the wheels, in absolute identical trajectory to the previous ground roll, it went into the tarmac of the paved runway (which run parallel) and sustained heavy damage.
What we do know for a fact from this attempt is that it was not the landing gear tow out fault, as was suspected to be the reason for the first ground roll (also I have no doubt in my mind that it contributed to the first ground roll now that I saw how much well behaved the aeroplane was without it).
Jose - I was wondering if by chance you have close up photos of the spinner, as complete assembly and without the "dome" (only prop and backplate, preferably side photo) on your ME-109? I try and understand something I did with my own assembly.
Cheers,
Eran
06-05-2015, 07:26 AM
#645
Erans,
I'm really sad your airplane was damaged in this attempt, and I keep thinking what could have gone wrong? I mean, if you had managed to keep the airplane going straight on the ground, it should have tracked straight once airborne. After all it had probably gained additional speed which had made the rudder more authoritative. I can only think you have a twist on the wing?
It would be helpful if you post pictures or video of the actual take off run.
Regards,
Jose
 06-07-2015, 02:43 AM
#648
Thread Starter
Jose - Unfortunately, there were only the three of us at the airfield. My friend David, the Heavy Model Inspector and myself, so there was nobody taking photos or video once we were going.
The rudder was effective, and had enough authority to correct the heading direction, which was required during the take off run.
After the previous attempt, the wing was checked both by David and myself and by the inspector and no visible wrap could be detected.
The inspector, my friend David (whom is a highly qualified and experience RC pilot and is also full size pilot and instructor) and myself could not come to any explanation as to what caused both ground loops. This second attempt was meticulously planned, from checking the grass runway for imperfections and making sure that the aeroplane travel within that space, to throttle management during the take off run, elevator use to keep the back wheel steering for as long as practical to maintain heading, to all scenarios of post take off issues. However, with the ground loop happening so quickly with no warning, we run out of ideas as to the cause.
One last request - can you please advise if by any chance you have close up photos of the spinner on your own ME-109 as requested previously?
W1nd6urfa - With the ground loop happening in less than 0.5 second from start to finish (the aeroplane was near lift off speed at the time), and with no visible warning, I find it hard to believe that "109-experienced pilot" would have made any difference. To your question, no, I do not know anybody who has this experience in our club (of 220 members).
I think that this kit, that Jose manufactures, is the best looking and is the most accurate I ever seen. Everybody who saw this aeroplane were commenting on its great look. I will not take the credit to myself on its finish, as the green and blue paint job was applied by a friend of mine, and he did a phenomenal job. I only applied the small sections of yellow, red and white markings.
Without talking up my own flying skills, lets just say that I am reasonably experienced and am holding the highest proficiency level available under the Australian schema, being certified as "Gold Wing, Instructor". I have no doubt that I am capable of flying the ME-109.
Chris Nicastro - Thank you for the kind words.
Cheers,
Eran
06-07-2015, 04:24 AM
#649
Senior Member
My Feedback: (4)

Join Date: Aug 2008
Location: EllinikoAthens, GREECE
Posts: 1,079
Likes: 0
Received 5 Likes
on
5 Posts
No offense to anyone's flying skills intended, the 109 is notorious for its bad take-off habits and will humble even the most experienced pilot.
All I meant is that someone who flies 109's regularly is anticipating the sudden left yaw / roll and will react faster - with adrenaline pumping nonetheless !
I would assume that this time it was the left wing catching the ground that caused the cartwheel?
All I meant is that someone who flies 109's regularly is anticipating the sudden left yaw / roll and will react faster - with adrenaline pumping nonetheless !
I would assume that this time it was the left wing catching the ground that caused the cartwheel?
06-07-2015, 05:51 AM
#650
Thread Starter
w1nd6urfa - nothing got "caught". The aeroplane "lifted off" and immediately started rolling, missing the left wing on the roll to the left, hitting nose first into the tarmac (hitting in very "shallow dive" attitude, but the left wing lower then the right wing).
Then the left wing hit the tarmac as the aeroplane "settled" on its back (on the tarmac) still moving forward ripping the wing-tip.
I think that the increase in damage to the wing-tip / wing is due to the stronger spar we constructed during the repair from the first ground roll.
Eran
Then the left wing hit the tarmac as the aeroplane "settled" on its back (on the tarmac) still moving forward ripping the wing-tip.
I think that the increase in damage to the wing-tip / wing is due to the stronger spar we constructed during the repair from the first ground roll.
Eran