


Martin Baker MB.5 Refurbish
 12-05-2011, 05:36 AM
#26

Thread Starter
My Feedback: (139)
Join Date: Jan 2002
Location: Lexington , KY
Posts: 869
Likes: 0
Received 0 Likes
on
0 Posts
Hey Larry,
G-10 is basically pre-finished fiberglass sheets that can be bought in different thicknesses. You can find it here.
http://www.franktiano.com/scaleproductFrameset.htm
You can use them to make anything.
G-10 is basically pre-finished fiberglass sheets that can be bought in different thicknesses. You can find it here.
http://www.franktiano.com/scaleproductFrameset.htm
You can use them to make anything.
 12-05-2011, 08:35 AM
#27
Senior Member
Join Date: Jun 2003
Location: coral springs,
FL
Posts: 167
Likes: 0
Received 0 Likes
on
0 Posts
P.J.........What class are you prepping this for? We don't want you involved in the politics of who built it, who owns it, who designed it, etc.
12-05-2011, 08:55 AM
#28
Thread Starter
My Feedback: (139)
Join Date: Jan 2002
Location: Lexington , KY
Posts: 869
Likes: 0
Received 0 Likes
on
0 Posts
Hey Doug!
I don't think my skills are up to Unlimited which is judged on everything so I will keep flying her in Pro-Am Pro. Seeing that I didn't build/design it, that is the only class I can go in. I will only be judged on flying besides my 25pts for outline and accurate markings. Ha, they only built one so I better get that right! No sailor jerrys the night I paint it!!!

I don't think my skills are up to Unlimited which is judged on everything so I will keep flying her in Pro-Am Pro. Seeing that I didn't build/design it, that is the only class I can go in. I will only be judged on flying besides my 25pts for outline and accurate markings. Ha, they only built one so I better get that right! No sailor jerrys the night I paint it!!!
12-05-2011, 09:19 AM
#29
Senior Member
Join Date: Jun 2003
Location: coral springs,
FL
Posts: 167
Likes: 0
Received 0 Likes
on
0 Posts
I could see how that would play........after a trip to the Warbird Alley Bar & Grille you would be swearing that they made 6 of the things.......lol Doug
12-05-2011, 09:39 AM
#30
My Feedback: (1)
Join Date: May 2003
Location: North Las VegasNV
Posts: 789
Likes: 0
Received 0 Likes
on
0 Posts
ORIGINAL: lovetoflyguy
Hey Larry,
G-10 is basically pre-finished fiberglass sheets that can be bought in different thicknesses. You can find it here.
http://www.franktiano.com/scaleproductFrameset.htm
You can use them to make anything.
Hey Larry,
G-10 is basically pre-finished fiberglass sheets that can be bought in different thicknesses. You can find it here.
http://www.franktiano.com/scaleproductFrameset.htm
You can use them to make anything.
PS Merry Christmas to you and all your family and friens
 12-06-2011, 05:55 AM
#33
Thread Starter
My Feedback: (139)
Join Date: Jan 2002
Location: Lexington , KY
Posts: 869
Likes: 0
Received 0 Likes
on
0 Posts
Chad,
I gotta tell you that I don't think that thing will every fly because it is just simply too ugly! I think they ran out of money flying it and found some sort of aerodynamic flaw. I could be wrong, but I think that was the story I heard. It looks nothing like the real thing.
I gotta tell you that I don't think that thing will every fly because it is just simply too ugly! I think they ran out of money flying it and found some sort of aerodynamic flaw. I could be wrong, but I think that was the story I heard. It looks nothing like the real thing.
12-12-2011, 07:23 AM
#34
Thread Starter
My Feedback: (139)
Join Date: Jan 2002
Location: Lexington , KY
Posts: 869
Likes: 0
Received 0 Likes
on
0 Posts
I was late getting new pictures up because I went to Frank Tiano's 12 O'clock High and man what a great event it was! You NEED to go there next year. Great flying weather and an awesome field to fly out of.
Anyway, back to work. After getting the canopy complete I wanted to see how well it all blended in and if it did give a "real" effect. I think it is getting there. Next was to paint my base coat. I used "Flat Aluminum" spray cans that you can get from Home Depot or Lowes. Everything really came out when this was done. After I sprayed the entire plane, I rubbed the top glossy part off with a paper towel. This enables the paint to have something to grab. I found out in earlier builds, that if you don't "buff" it a bit, the top layer of paint will peal right off when you try to mask anything.
Anyway, back to work. After getting the canopy complete I wanted to see how well it all blended in and if it did give a "real" effect. I think it is getting there. Next was to paint my base coat. I used "Flat Aluminum" spray cans that you can get from Home Depot or Lowes. Everything really came out when this was done. After I sprayed the entire plane, I rubbed the top glossy part off with a paper towel. This enables the paint to have something to grab. I found out in earlier builds, that if you don't "buff" it a bit, the top layer of paint will peal right off when you try to mask anything.
12-12-2011, 07:25 AM
#35
Thread Starter
My Feedback: (139)
Join Date: Jan 2002
Location: Lexington , KY
Posts: 869
Likes: 0
Received 0 Likes
on
0 Posts
Next I needed to lay down my first top layer coat. I chose to go with the grey. I sprayed a basic line of paint according to the 3 views I have. After, I placed the wing on top of the fuse to make sure there was consistency with the pattern. It didn't have to be perfect because I would clean it all up with the green.
12-12-2011, 07:28 AM
#36
Thread Starter
My Feedback: (139)
Join Date: Jan 2002
Location: Lexington , KY
Posts: 869
Likes: 0
Received 0 Likes
on
0 Posts
Next I needed to paint the green. I first sprayed the basic outline again without touching the grey. Then with a smaller airbrush, I outlined the green up to the grey. This ensures there isn't much over spray if any. I really wish I had a paint booth and professional paint gear, but it is looking good. It just takes longer. After several passes with the green and the grey through my smaller airbrush, I got the effect and look I wanted.
12-12-2011, 07:30 AM
#37
Thread Starter
My Feedback: (139)
Join Date: Jan 2002
Location: Lexington , KY
Posts: 869
Likes: 0
Received 0 Likes
on
0 Posts
I wanted to see how the weathering would look, so I decided to cheat a little and start my process of removing some of the top layer. I'm nowhere near complete with this wing, but wanted to show you the cool effect it gives when you wet sand the top off. I use 400 grit sandpaper as well as steel wool to get the look. The rivets popped right out. You have to be careful, because you can sand right through the silver and into the primer if you are not careful.
12-12-2011, 10:46 AM
#38
My Feedback: (43)
Seeing that plane outdoors, it must be a whole lot warmer in Lexington than here in Cinci!
Here, it's colder than a witches 'you know what' in a 'you know where'!
I got my outdoor shop up to low 60's from about 33 so I could do some sanding.
Here, it's colder than a witches 'you know what' in a 'you know where'!
I got my outdoor shop up to low 60's from about 33 so I could do some sanding.
12-13-2011, 03:10 PM
#39
Thread Starter
My Feedback: (139)
Join Date: Jan 2002
Location: Lexington , KY
Posts: 869
Likes: 0
Received 0 Likes
on
0 Posts
Hey Sam,
I actually got that done about 2 weekends ago. I just couldn't get the thread updated in time before I went to the airshow. By the way, you NEED to go next year!
I actually got that done about 2 weekends ago. I just couldn't get the thread updated in time before I went to the airshow. By the way, you NEED to go next year!
 12-14-2011, 01:15 PM
#41
Thread Starter
My Feedback: (139)
Join Date: Jan 2002
Location: Lexington , KY
Posts: 869
Likes: 0
Received 0 Likes
on
0 Posts
Thanks Wayne,
Unfortunatly I only had one scheme to choose from.
I was able to start some of the graphics today. I've got the letters on and was able to paint my exhaust black. Not much to say seeing it doesn't take much skill to paint over a mask.I need to get some more tape so I can start painting the rest. Oh what fun this is all going to be....
Unfortunatly I only had one scheme to choose from.
I was able to start some of the graphics today. I've got the letters on and was able to paint my exhaust black. Not much to say seeing it doesn't take much skill to paint over a mask.
I need to get some more tape so I can start painting the rest. Oh what fun this is all going to be....
12-16-2011, 06:21 AM
#46
Thread Starter
My Feedback: (139)
Join Date: Jan 2002
Location: Lexington , KY
Posts: 869
Likes: 0
Received 0 Likes
on
0 Posts
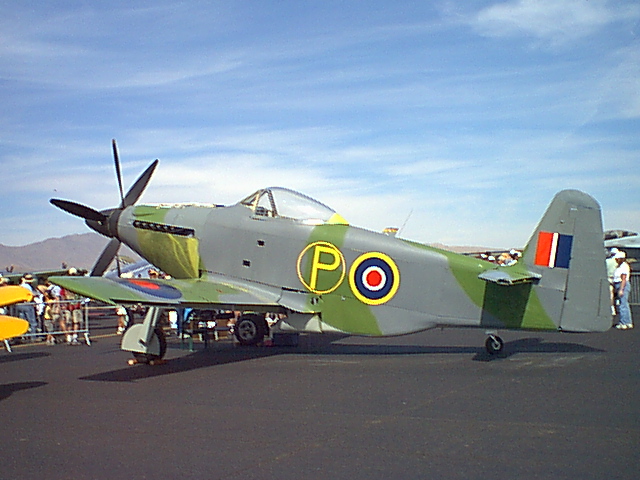
This is the part for me that gets really boring. I decided not to use any decals on this one. That means I have to paint everything. You Britts love your colors! The main roundel on the fuse has Yellow, Blue, Whit, then Red! Really guys? Didn't yall know that I would want to model this thing some day?
Well, in order to do this, I would have to layer each color with a stencil. I met Dennis Kerby from Kerby's Custom Graphics at our local event and found out that he would do stencils. He did an excellent Job for me and his price was very reasonable. All I did was take pictures and give him the measurements and he did the rest. The only part that stinks is laying one stencil down, painting that color then waiting for it to dry so I could lay the other down and do the same thing. Just one roundel is gonna take me 4 times!
I decided to start on the fuse. because it was the most lengthy. I was lucky that the first layer would be yellow. I have a "Circle P" that is in yellow as well. I could knock that out on the first layer as well. Now I HATE painting yellow and if anyone has painted with it before, you know. It will only go over white. So, with that said, I had to paint a white base coat then over the top with the yellow.
12-16-2011, 06:24 AM
#47
Thread Starter
My Feedback: (139)
Join Date: Jan 2002
Location: Lexington , KY
Posts: 869
Likes: 0
Received 0 Likes
on
0 Posts
After letting the Yellow dry, the next color would be blue. I placed the second stencil over the first and started spraying the blue. I decided to start on the flag that goes on the tail. Dennis just made me 1 decal for the whole flag and I could simply tape off areas I didn't want to paint.
12-16-2011, 06:32 AM
#48
Thread Starter
My Feedback: (139)
Join Date: Jan 2002
Location: Lexington , KY
Posts: 869
Likes: 0
Received 0 Likes
on
0 Posts
I stepped back for the hundredth time to make sure everything was straight and had to laugh....all I can say is this pictures is titled, "PJ takes the Martin-Baker to a toga party" [X(]
[X(]
12-18-2011, 05:00 PM
#49
Thread Starter
My Feedback: (139)
Join Date: Jan 2002
Location: Lexington , KY
Posts: 869
Likes: 0
Received 0 Likes
on
0 Posts
I was able to get some more work done over the weekend. Still cranking away at it! I am so happy with the outcome. I wanted to finish the flag on the tail so I was able to mask off the blue, paint the red and then pull that off. This gave me the strength (and boy did I need it) to finish the roundel on the fuse.
12-18-2011, 05:02 PM
#50
Thread Starter
My Feedback: (139)
Join Date: Jan 2002
Location: Lexington , KY
Posts: 869
Likes: 0
Received 0 Likes
on
0 Posts
Now for the roundel. As you can see this took 4 separate masks and 5 colors of paint. I painted a base white for the yellow and red. This is what took the longest, but after I was able to pull the masks off, I was really happy with the over all look! I can't wait to start scuffing this stuff up. The plane looks way to "new" looking for me, but its nice to get her back to looking the way she did.