


ZIROLI 120" B-25 MITCHELL


 11-10-2014, 11:03 AM
#403
Aluminum tape (cont)
Finished one cowl working from the back to the front.
The front sharp radius required 1 1/4" wide strips cutting each side from a 1/4" at one end to get tapered edges, then laid on the outside cowl's curve and using a burnishing stump to secure, from the center out, the tape in each direction.
The cowl flaps got the usual size rivet heads while the removable cowl side panels got a larger diameter using a hobby screw driver to make the screw head recess.
11-10-2014, 01:05 PM
#404


Join Date: May 2003
Location: Ikast, DENMARK
Posts: 138
Likes: 0
Received 0 Likes
on
0 Posts
Hello Sam
Looking good, nice Work as usual , mine has passed 40 flights this summer and I have had no problems at all, very stable model.


And a Little video taken by my wife with an I-Phone
https://www.youtube.com/watch?v=au-rI4dzay4
Looking good, nice Work as usual
, mine has passed 40 flights this summer and I have had no problems at all, very stable model.And a Little video taken by my wife with an I-Phone
https://www.youtube.com/watch?v=au-rI4dzay4
11-12-2014, 10:40 AM
#407
Aluminum tape (cont)
Finished up the cowls.
Assembly (cont):
With winter 'moving' in, everything has been moved to the basement.
It's been a little slow lately for hobbies, with needing to mulch leaves from 18 trees, vehicle work and personal stuff to do.
Except for some hatches, the application of the aluminum tape is done.
The rudders and elevators still need to be covered with aluminum solartex.
The stab is presently dry fitted to the fuse.
The gear struts were spray painted with aluminum paint.
01-07-2015, 04:47 PM
#408
Senior Member
My Feedback: (1)
Join Date: Dec 2010
Location: Mt Morris, IL
Posts: 1,433
Likes: 0
Received 0 Likes
on
0 Posts
Looks great Sam, very nice..
I have my plans on the bench as we speak, putting together my wood orders as I am cutting my own kit.. Your choice to use AP on your center section is something I plan to do as well, do you have a good source for aircraft ply??
I measured my wing plan tonight and mine came out to 120 7/8" gonna stretch it to 121 lol... I still have to make sure they will fit, but the plan is to use a pair of DLE 61's. I'm with you, extra power is nice if needed and I don't plan on building light so to say.. Servos on each surface as well as chokes...
I appreciate the great build thread your doing, I almost feel guilty having such a great manual to follow...
Jimbo
01-08-2015, 01:28 PM
#410
Senior Member
My Feedback: (1)
Join Date: Dec 2010
Location: Mt Morris, IL
Posts: 1,433
Likes: 0
Received 0 Likes
on
0 Posts
24" wide goods will lay out better for less waste.
Jimbo
01-08-2015, 01:34 PM
#411
Senior Member
My Feedback: (3)

Join Date: Mar 2002
Location: League City, TX
Posts: 252
Likes: 0
Received 0 Likes
on
0 Posts
Not to hijack this thread, but I'm building a 118 as well. Though I came to a grinding halt when I discovered that most of the center wing ribs did not match the plans! So I hav enot touched it since (4-6 months). So I have the Fuse framed, Rudders, and Elevator framed. But this wing thing is disapointing. I tried a dry fit of the center and half the ribs are short or misaligned. Stringers dont fit. Then engine pod well, you get the idea. What is everyone else doing? I hate to waste not using a 500 laser cut kit.
Shawn
Shawn
01-08-2015, 02:24 PM
#412
We had two cut kits with the same "no fit" problems. We finally cut our own. Balsa USA supplied most of the wood. Very high quality.
i guess it's part of building these big planes. Especially from blown up plans. Even some parts cut from updated plans don't fit the old stuff. A good point is building a new wing for my 20 yr old Corsair. The new plans didn't quit fit the old templates. I'm sure there are lots of factors but I just used the new stuff and adjusted where necessary. I try not to let my nose get too bent out of shape over it. It hurt enough getting hit with hockey pucks and baseballs. Haha.
I'm following these builds with joy and sadness. Joy for you guys and sadness for us as the big bomber went in last fall.
Best of fortunes for all!!!
Last edited by bentwings; 01-08-2015 at 02:29 PM.
01-09-2015, 05:03 AM
#413
Senior Member
My Feedback: (3)
Join Date: Mar 2002
Location: League City, TX
Posts: 252
Likes: 0
Received 0 Likes
on
0 Posts
We had two cut kits with the same "no fit" problems. We finally cut our own. Balsa USA supplied most of the wood. Very high quality.
i guess it's part of building these big planes. Especially from blown up plans. Even some parts cut from updated plans don't fit the old stuff. A good point is building a new wing for my 20 yr old Corsair. The new plans didn't quit fit the old templates. I'm sure there are lots of factors but I just used the new stuff and adjusted where necessary. I try not to let my nose get too bent out of shape over it. It hurt enough getting hit with hockey pucks and baseballs. Haha.
I'm following these builds with joy and sadness. Joy for you guys and sadness for us as the big bomber went in last fall.
Best of fortunes for all!!!
i guess it's part of building these big planes. Especially from blown up plans. Even some parts cut from updated plans don't fit the old stuff. A good point is building a new wing for my 20 yr old Corsair. The new plans didn't quit fit the old templates. I'm sure there are lots of factors but I just used the new stuff and adjusted where necessary. I try not to let my nose get too bent out of shape over it. It hurt enough getting hit with hockey pucks and baseballs. Haha.
I'm following these builds with joy and sadness. Joy for you guys and sadness for us as the big bomber went in last fall.
Best of fortunes for all!!!
I'm not sure what I will do at this point. But will see. My plans are in the garage, and on the table. I'm worried that humidity may have altered them at this point. What is the proper measurement of say ribs W-2 and W-5? Want to see if it matters.
Shawn
01-09-2015, 01:00 PM
#415
We had G-45's with scale exhaust. They ran 68-6900 on the ground. Electronic ignition and spring starters. They had 45 pounds static thrust. Really hauled.
Ours needed about 3 pounds in the nose even with all the batteries forward.......we never found the weight...too far in the ground.
The new one will have a lighter tail and we may move the motors 1/2 to 1 inch forward.
Keep in mind that with the big motors, engine out flying can be difficult. Things happen fast. Next time there Will be a Guardian in it to hit the rudders sooner and correctly.
I can't wait to see these new builds.
01-27-2015, 11:12 AM
#416
Join Date: Dec 2003
Location: manchester, AE, UNITED KINGDOM
Posts: 1,795
Likes: 0
Received 0 Likes
on
0 Posts
Does anyone have any thoughts on the 6 inches from the leading edge CG point? Looks awfully far forward, a friends is to maiden on sunday, we havevreservations about this balance point, its the 118 inch span version, many thanks
OLSEN, ive sent you a PM, but its hard to spot them, i had one for weeks before i found it!
OLSEN, ive sent you a PM, but its hard to spot them, i had one for weeks before i found it!
01-27-2015, 12:04 PM
#417
Join Date: May 2003
Location: Ikast, DENMARK
Posts: 138
Likes: 0
Received 0 Likes
on
0 Posts
Hi Alan
I have found your PM I actually got a notification on top of the page here, mine has the CG 6,5 inch back from the leading egde next to the fuselage and it flies very well with that. I have sent you a PM back with ,more details.
I have found your PM I actually got a notification on top of the page here
, mine has the CG 6,5 inch back from the leading egde next to the fuselage and it flies very well with that. I have sent you a PM back with ,more details.
01-27-2015, 12:12 PM
#418
Join Date: Dec 2003
Location: manchester, AE, UNITED KINGDOM
Posts: 1,795
Likes: 0
Received 0 Likes
on
0 Posts
Many thanks for that, he is using the heavy duty retracts from ribart, with the twin cylinders, and what look like glennis type wheels, the CG shift on operating the gear is large, bit worrying! Model jas been galanced, at 6 inches, gear up,
01-27-2015, 12:22 PM
#419
Join Date: Dec 2003
Location: manchester, AE, UNITED KINGDOM
Posts: 1,795
Likes: 0
Received 0 Likes
on
0 Posts
Just read your PM, many thanks for that, as i said above, when the model is balanced at 6 inch, the CG shift is substantial, its going to be a nose heavy flapped landing wirh this bird!! Many thanks to you,
01-27-2015, 01:36 PM
#420
Join Date: May 2003
Location: Ikast, DENMARK
Posts: 138
Likes: 0
Received 0 Likes
on
0 Posts
Hi Alan
You are welcome, glad if I can help, I use the Robart retracts too with the double cylinder but I have two 6 inch 10 spoke Robart Tough Treads Alu-Wheels they are not that heavy and the change in the CG is very small on mine. I have attached a couple of Photos, they are not the best but I hope you can see the attitude of the plane with gear almost Up and Down. The model is hanging in two wires from the ceiling in the CG and even if lt looks tail heavy on the last Photo it is not, it must be the Photo cheating
You are welcome, glad if I can help, I use the Robart retracts too with the double cylinder but I have two 6 inch 10 spoke Robart Tough Treads Alu-Wheels they are not that heavy and the change in the CG is very small on mine. I have attached a couple of Photos, they are not the best but I hope you can see the attitude of the plane with gear almost Up and Down. The model is hanging in two wires from the ceiling in the CG and even if lt looks tail heavy on the last Photo it is not, it must be the Photo cheating
Last edited by Olsen; 01-27-2015 at 01:39 PM.
02-15-2015, 11:08 AM
#422
Join Date: Dec 2003
Location: manchester, AE, UNITED KINGDOM
Posts: 1,795
Likes: 0
Received 0 Likes
on
0 Posts
Well, after an abortive atempt at flight last week, on a fog bound airfield, with us all saying, it will lift soon, ( weve all done it ) Today was the day, balanced wheels up, at 6 inches from the leading edge, soon as she lifted, it was obvious she was nose heavy, got the gear up, good job we had dialled in lots of elevator, it took some holding up, landed, took out a slug, this carried on, until near a half pound of church roof was removed, She flies superb, bring her in on flap, you can hold her nose off thevrunway until speed decays, absolute *****cat, Just as good as thev1st one, sadly lost, and traced to an after market servo reverse lead on flaps, We have had a great day, need to get the 6 flights in, then strip down and paint, Fancy silver, with all the top surface lined and rivetted, Should look very nice,
04-13-2015, 02:55 PM
#423
Assembly (outer wings)
Now that the temperature is in the 70's, I moved the airplane out to the detached shop and started working on her again (it's been awhile).
The flaps were attached using 4X40 bolts and locking nuts where G10 was used for the hinges.
The HS-645 servos are mounted in some homemade servo trays. I used 4 servo screws to hold the servo in place with the top ply plate. On the 110" P-47, I only used two servo screws and, on PM after a few flights, the servos were pushing the top plate so 4 servo screws are needed to secure them on these large planes with lots of servo torque.
All linkages are 4/40 with ball links on the control horn side as well as the servo side. The 4/40 rod also gets brass tubing to make the rod more rigid.
I'm also using the new double are servo arms from dubro. One negative of the double servo arm is a larger slot is needed in the servo cover for the ailerons.
I silver painted all the linkages to help blend them with the aluminum covering.
The ailerons got dubro's heavy duty nylon hinges. I replaced the individual brass pins with one long piano wire.
In the past, I've always epoxied these hinges in place but this time I used CA. The bond seems strong but it's a hassle as the CA wicks into the hinge pin area. I put oil on that area but it's still needed cleaning up after the CA dried.


I used plated screws to match the aluminum.
The two hatches are flap and landing light access hatch.

Wiring will be done, later.
Now that the temperature is in the 70's, I moved the airplane out to the detached shop and started working on her again (it's been awhile).
The flaps were attached using 4X40 bolts and locking nuts where G10 was used for the hinges.
The HS-645 servos are mounted in some homemade servo trays. I used 4 servo screws to hold the servo in place with the top ply plate. On the 110" P-47, I only used two servo screws and, on PM after a few flights, the servos were pushing the top plate so 4 servo screws are needed to secure them on these large planes with lots of servo torque.
All linkages are 4/40 with ball links on the control horn side as well as the servo side. The 4/40 rod also gets brass tubing to make the rod more rigid.
I'm also using the new double are servo arms from dubro. One negative of the double servo arm is a larger slot is needed in the servo cover for the ailerons.
I silver painted all the linkages to help blend them with the aluminum covering.
The ailerons got dubro's heavy duty nylon hinges. I replaced the individual brass pins with one long piano wire.
In the past, I've always epoxied these hinges in place but this time I used CA. The bond seems strong but it's a hassle as the CA wicks into the hinge pin area. I put oil on that area but it's still needed cleaning up after the CA dried.
I used plated screws to match the aluminum.
The two hatches are flap and landing light access hatch.
Wiring will be done, later.
Last edited by samparfitt; 04-13-2015 at 03:09 PM.
04-14-2015, 09:56 AM
#424
Join Date: May 2003
Location: Ikast, DENMARK
Posts: 138
Likes: 0
Received 0 Likes
on
0 Posts
Sam
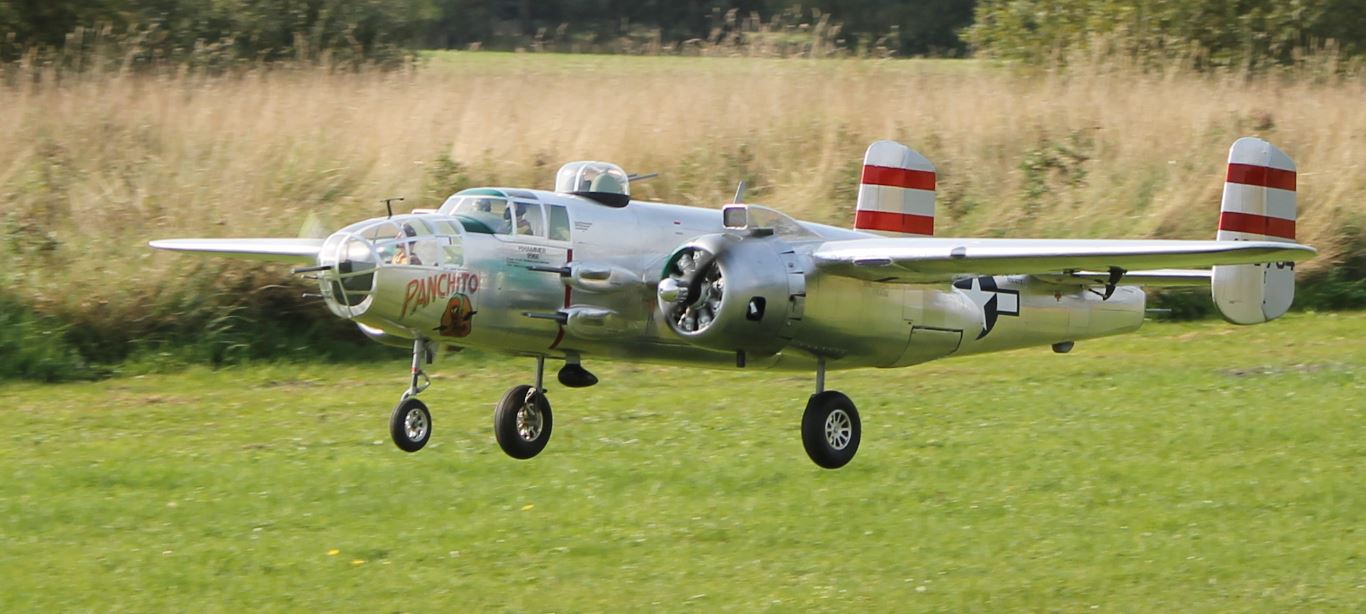
As usual, great Work from you Sam, I just got mine startet for the third season of flying, you will love this model it is fantastic cant wait to see when yours is finished
Here are a couple of Photos and as usual it is my wife who operates the camera
As usual, great Work from you Sam, I just got mine startet for the third season of flying, you will love this model it is fantastic
cant wait to see when yours is finished Here are a couple of Photos
and as usual it is my wife who operates the camera