


TF FW190 GIANT ARF
 09-02-2014, 04:20 PM
#3226
Frank,
Yes sir, you will need to lean a bit up here at 1 mile high. Reason I know that is I always need to richen a turn or so when I get down to Phoenix at the OEAF scale fly in's. I gotta ask, Is that a picture of you on your post? It makes me smile everytime I look at it........
Cheers Captain Ron
Yes sir, you will need to lean a bit up here at 1 mile high. Reason I know that is I always need to richen a turn or so when I get down to Phoenix at the OEAF scale fly in's. I gotta ask, Is that a picture of you on your post? It makes me smile everytime I look at it........
Cheers Captain Ron
 09-03-2014, 06:57 AM
#3227

My Feedback: (10)

Join Date: Jun 2002
Location: Ladera Ranch, CA
Posts: 678
Likes: 0
Received 0 Likes
on
0 Posts
Thanks, Ron... I'm not a big fan of playing with the needles since it seems like the planes take a tank or two to settle into new settings... but I'll give it a go...
That's me... look for the oversized, goofy, sweaty guy at WOR next week... it'll be me! haha
That's me... look for the oversized, goofy, sweaty guy at WOR next week... it'll be me! haha
09-03-2014, 03:29 PM
#3228

Join Date: Aug 2012
Location: San Antonio, TX
Posts: 62
Likes: 0
Received 0 Likes
on
0 Posts
I'm starting my build now. Have the Saito 84cc radial. Also putting in Sierra retracts.
Has anyone put in landing lights and position lights? Port and Starboard wing tip lights and white top and bottom lights? Can't seem to find anything good for this. Looking for help.
Also anyone know of a bomb drop mechanism for this model?
Lastly if anyone has modified the wing for Sierra gear, appreciate any lessons learned.
Thanks, Brad
 09-03-2014, 05:50 PM
#3232
You gotta stop you guys...............Your killin me................Dastinex..............Now that was some funny sh*t Maun...............curly, now why didn't I think of that.........
09-03-2014, 08:10 PM
#3233
My Feedback: (10)
Join Date: Jun 2002
Location: Ladera Ranch, CA
Posts: 678
Likes: 0
Received 0 Likes
on
0 Posts
Welcome aboard, Captain Ron! you are our newest member (number 19) of the Not So Scale, Almost Ready to Fly, Soon to be Scrap, Warbird Brotherhood.
http://www.rcuniverse.com/forum/rc-w...otherhood.html
http://www.rcuniverse.com/forum/rc-w...otherhood.html
09-04-2014, 03:06 AM
#3235
Thank Sparky 4 (Frank) Lawndart............I feel so much better now. I feel like I've accomplished something in this crazy hobby. I have plenty of scrap arf's also..........
09-04-2014, 07:16 AM
#3236
My Feedback: (43)
09-04-2014, 09:04 PM
#3237
My Feedback: (10)
Join Date: Jun 2002
Location: Ladera Ranch, CA
Posts: 678
Likes: 0
Received 0 Likes
on
0 Posts
Very scale cockpit (but not cheap!); http://www.iflytailies.com/store/ins...-cockpit-sets/
that's about as nice as I've ever seen.. I'm gonna have to sell another kidney... damn
09-05-2014, 03:31 AM
#3238
Senior Member
 09-05-2014, 07:31 AM
#3240
Senior Member
 09-05-2014, 11:45 PM
#3242
Hi to everyone in the thread!
Enjoyed lurking here for some time - thanks to everyone for a wealth of info. I now got the bird and started on a (slow) build.
Decided on Robart pneumatics to avoid headscratching with the electrics (long discussions here!).

To complement the retracts, a set of Williams Bros #12200's has been also purchased and some scale makeovers done on them.
I know this has been covered before in the thread, but here's how I tried to do it:
Step #1. Get a protractor and mark the bolt holes.
There's 12 bolts, at 30 degrees interval each (initially). Holes are about 3mm inboard of the hub lip.


Step #2. Create the filler valve recess.
The WB wheel hubs have enough "meat" on them so that a depth of about 5mm can be carefully "dug-out" without piercing through.
A dremel with a cylindrical grinding bit was used at low-mid rpm (plastic melts/re-solidifies and accumulates otherwise).
The Williams Bros plastic lends itself nicely to some sanding for smoothing out the edges and grinded-surface imperfections.
After the recess is done, the assymetrical bolt placement next to it can be eyeballed and re-marked for a more scale result.
Model filler can be used to take up any small surface nicks.
.


Step #3. Bolts
The the technique developed for a quick and easy results is as follows:
- Get a number of 2mm or 2-56 bolts and the respective hex nuts. The longer the bolts, the better.
- Drill out the marked positions with a 1.5mm dril bit.
- Put on a number of nuts on a bolt (the longer the bolt, the more nuts).
- Then use a screwdriver (or allen key) to drive the bolt into the plastic in a self-tapping fashion. Drive the bolt in long enough to have a solid "bite" but being careful so that the rubber on the other side of the hub is not pushed/pierced.
- Put on a small dab of thin CA on the bolt/plastic interface and then drive the first nut down so that it counterlocks the bolt and also comes into contact with any CA left on around the bolt on the plastic. This will secure the whole assembly so that it cannot be knocked-off in a hard landing.
- Simply snip-off the bolt protruding above the couterlocked nut and grind the cut to a flat finish with a Dremel (same bit). Take it easy, as the temp on the metal comes up very easily and can melt it (then the bolt will come.. flying out!") ).
).
- Grind off any irregularities on the cut thread of the remaining cut-out bolt so that it can start a new self-tapping thread on the next hole and repeat the whole procees. takes about 5mins to do one wheel this way.


The reason to go this route is to retain the bolt head on the bolt to make self-tapping easy; without it, one will be foced to use pliers (thus the small thread will be destroyed). Also why the nuts must go onto the bolt before the cuts and not after..
Enjoyed lurking here for some time - thanks to everyone for a wealth of info. I now got the bird and started on a (slow) build.
Decided on Robart pneumatics to avoid headscratching with the electrics (long discussions here!).
To complement the retracts, a set of Williams Bros #12200's has been also purchased and some scale makeovers done on them.
I know this has been covered before in the thread, but here's how I tried to do it:
Step #1. Get a protractor and mark the bolt holes.
There's 12 bolts, at 30 degrees interval each (initially). Holes are about 3mm inboard of the hub lip.
Step #2. Create the filler valve recess.
The WB wheel hubs have enough "meat" on them so that a depth of about 5mm can be carefully "dug-out" without piercing through.
A dremel with a cylindrical grinding bit was used at low-mid rpm (plastic melts/re-solidifies and accumulates otherwise).
The Williams Bros plastic lends itself nicely to some sanding for smoothing out the edges and grinded-surface imperfections.
After the recess is done, the assymetrical bolt placement next to it can be eyeballed and re-marked for a more scale result.
Model filler can be used to take up any small surface nicks.
.
Step #3. Bolts
The the technique developed for a quick and easy results is as follows:
- Get a number of 2mm or 2-56 bolts and the respective hex nuts. The longer the bolts, the better.
- Drill out the marked positions with a 1.5mm dril bit.
- Put on a number of nuts on a bolt (the longer the bolt, the more nuts).
- Then use a screwdriver (or allen key) to drive the bolt into the plastic in a self-tapping fashion. Drive the bolt in long enough to have a solid "bite" but being careful so that the rubber on the other side of the hub is not pushed/pierced.
- Put on a small dab of thin CA on the bolt/plastic interface and then drive the first nut down so that it counterlocks the bolt and also comes into contact with any CA left on around the bolt on the plastic. This will secure the whole assembly so that it cannot be knocked-off in a hard landing.
- Simply snip-off the bolt protruding above the couterlocked nut and grind the cut to a flat finish with a Dremel (same bit). Take it easy, as the temp on the metal comes up very easily and can melt it (then the bolt will come.. flying out!
).- Grind off any irregularities on the cut thread of the remaining cut-out bolt so that it can start a new self-tapping thread on the next hole and repeat the whole procees. takes about 5mins to do one wheel this way.
The reason to go this route is to retain the bolt head on the bolt to make self-tapping easy; without it, one will be foced to use pliers (thus the small thread will be destroyed). Also why the nuts must go onto the bolt before the cuts and not after..
Last edited by hpergm; 09-06-2014 at 12:05 AM.
09-05-2014, 11:51 PM
#3243
Step #4: The fill valve
I have decided to go with brass Tee's for the pneumatics. The plastic Tees on the Deluxe XL Robart kit, then lent themselves to something more useful.
The pics below tell the story...
The drill bit is 1.5mm and a dab of thin CA is used to secure the stem.


I have decided to go with brass Tee's for the pneumatics. The plastic Tees on the Deluxe XL Robart kit, then lent themselves to something more useful.
The pics below tell the story...
The drill bit is 1.5mm and a dab of thin CA is used to secure the stem.
09-06-2014, 12:01 AM
#3244
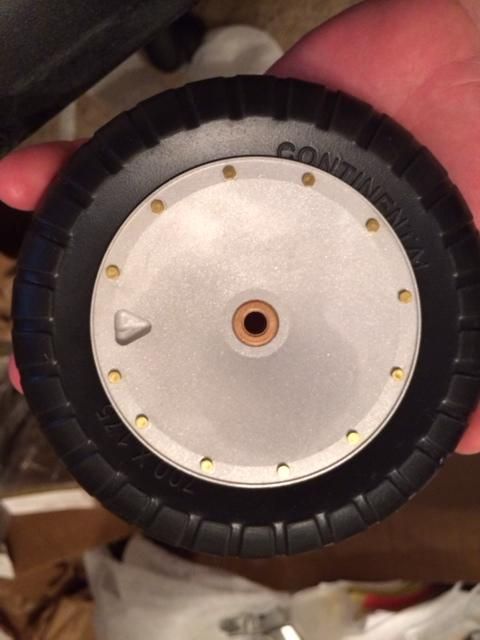
Step #5. Masking & Priming

Step #6. Painting
I chose to paint the wheels a dark grey (Testors engine grey or close to RLM66) and not the more usual black, because this would flatten out any details.
I used my trusty Badger 200 and 3 coats to obtain good opaque coverage. Last coat was thinned down a bit more to give some "shading" near the bolts.
The valve stem was hand painted copper/gold.
Final touch was some light dry-brushing with silver to accentuate details near the valve recess and the bolts.
One thing to note here is that this technique of putting the bolts on means that they are fixed before paint - so they will have to be overpainted (no natural metal finish).
(It was for this reason that the wheels were not painted black).
Final result:
Its not Glennis-perfect, but for 35bucks and a couple of hours its not bad either!
Last edited by hpergm; 09-06-2014 at 09:44 AM.
09-06-2014, 12:39 AM
#3245

Very nice result, hpergm ! You are right, it isnt too much work getting some descent wheels.

Before first flight, it might be smart to check whether the wheels can me moved when retracted in the wheel wells.
(They might be easier to turn when the plane is upright the correct way, instead of upside down. Gravity will pull them a bit away
from the bottom then)
If not, you might risk a belly landing. I have done 2 belly landings because of this.
First did many flights with original wheels.
Next installed the williams wheels.
A couple of flights, then a belly landing. Only one wheel came down.
Next a shims, 2.5 mm which I believed was enough.
A couple more flights, then another belly landing.
A new shims so the total now is 5 mm.. One more flight after that with success. We will see how it goes forwards from here.
Whether the wheel comes down or not if they are clamped against the bottom of the well, depends on how much pressure there is in the system.
Pressure means force, so therefore it could be a bit random on whether they come down or not.( When clamped against the well)
Last edited by kwik; 09-06-2014 at 12:43 AM.
09-06-2014, 01:15 AM
#3246

Join Date: Feb 2014
Location: Dumfries, Scotland, UK
Posts: 111
Likes: 0
Received 0 Likes
on
0 Posts
very nice wheels hpergm. I have been considering the Williams brothers wheels .
could you post back your results with these wheels are there has been some concerns about them. thanks....
could you post back your results with these wheels are there has been some concerns about them. thanks....
09-06-2014, 08:04 AM
#3247
My Feedback: (43)
Wheels look great hpergm. The problem I've had with Williams Bros wheels is they don't hold up to heavier planes like this one. Tires want to deform and come off the wheels and the hubs wear quickly at the axle. Another option is Sierra Giant wheels. Heavy duty rubber tires with aluminum wheels and bronze bushings.
These are available directly from Sierra Giant or VQWarbirds.com. I have had great success with their retracts and wheels.
These are available directly from Sierra Giant or VQWarbirds.com. I have had great success with their retracts and wheels.
 09-06-2014, 09:36 AM
#3248
Before first flight, it might be smart to check whether the wheels can me moved when retracted in the wheel wells.
(They might be easier to turn when the plane is upright the correct way, instead of upside down. Gravity will pull them a bit away
from the bottom then)
If not, you might risk a belly landing. I have done 2 belly landings because of this.
First did many flights with original wheels.
Next installed the williams wheels.
A couple of flights, then a belly landing. Only one wheel came down.
Next a shims, 2.5 mm which I believed was enough.
A couple more flights, then another belly landing.
A new shims so the total now is 5 mm.. One more flight after that with success. We will see how it goes forwards from here.
Whether the wheel comes down or not if they are clamped against the bottom of the well, depends on how much pressure there is in the system.
Pressure means force, so therefore it could be a bit random on whether they come down or not.( When clamped against the well)
Trial-fitting the retract into the well shows no hang-ups between the wheel periphery and the well contours. The wheel is smaller than the well by a considerable amount. However, there is no play between the wheel axle head and the well (although the Robart pin on the trunnion is nicely aligned with the 77 degree "up" groove and it seems that the gear would lock effortlesly).
So, where do you think your hang-up was coming from?? Also unclear is where you used the shims - on the retract base's inboard holes to give you a bit more "luft" between the wheel axle and the well floor??
Wheels look great hpergm. The problem I've had with Williams Bros wheels is they don't hold up to heavier planes like this one. Tires want to deform and come off the wheels and the hubs wear quickly at the axle. Another option is Sierra Giant wheels. Heavy duty rubber tires with aluminum wheels and bronze bushings.
These are available directly from Sierra Giant or VQWarbirds.com. I have had great success with their retracts and wheels.
These are available directly from Sierra Giant or VQWarbirds.com. I have had great success with their retracts and wheels.
 ). The Sierra wheels look sweet but they are $$$ and heavier. Also I am having little luck getting through to Sierra (email is still unanswered - I need the tailwheel!)...
Hector.
Last edited by hpergm; 09-06-2014 at 09:46 AM.