


TF FW190 GIANT ARF

 09-07-2016, 09:02 AM
#4253

My Feedback: (56)
Anyone happen to have the retract modification mount made by Skyshark for the T/F FW190 so I can use Sierra gear. Skyshark is closed, website says opening again in the fall. I have used Sierra gear in my T/F Mustang and never had a problem. Don't want to use anything else because a buddy of mine has a different set in his Zero and can't get flight without problems.
 09-15-2016, 06:56 AM
#4255

My Feedback: (2)
So I did something stupid and damaged the left wing on my 190. If by any chance someone here has a crashed one and the outer part of your left wing is still intact I'd love to have it so I can use parts of it to repair mine. I'd have no problem paying you for it. See pic for my damage so you know what I need. Thanks
09-16-2016, 06:15 AM
#4256
Junior Member
Join Date: Jul 2012
Location: CrowboroughEast Sussex, UNITED KINGDOM
Posts: 15
Likes: 0
Received 0 Likes
on
0 Posts
OK finally got the new legs from CJ and they do fit with a bit of fiddling and dremmel work! the doors will take a bit of thinking but so far so good 


09-17-2016, 08:43 AM
#4259
I had the CJM units and there was quite a bit of work to get them to fit so I returned them. A big portion of the inside wing rib will need to me removed. Also, I think the design is very poor. Those 3 little Allen head screws screw the mounting plate to the retract unit. I think that is a huge failure point. I really had high hopes for the CJM gear but I was very disappointed for a few reasons.
09-19-2016, 10:11 PM
#4260

Any close up pics of the FG84 installed in this FW cowl?
I have installed that engine in TF Corsair and had to use a H9 cowl to make it work. I've checked the FG84 against my SisT FW cowl and it's too big to fit without modifying it.
And, FYI, the FG84 will fit the H9 Corsair cowl without mods to the cowl if you install it with zero thrust angle compensation.
Will the FG84 fit the TF FW cowl without any mods?
09-20-2016, 03:12 AM
#4261
My Feedback: (1)
Any close up pics of the FG84 installed in this FW cowl?
I have installed that engine in TF Corsair and had to use a H9 cowl to make it work. I've checked the FG84 against my SisT FW cowl and it's too big to fit without modifying it.
And, FYI, the FG84 will fit the H9 Corsair cowl without mods to the cowl if you install it with zero thrust angle compensation.
Will the FG84 fit the TF FW cowl without any mods?
I have installed that engine in TF Corsair and had to use a H9 cowl to make it work. I've checked the FG84 against my SisT FW cowl and it's too big to fit without modifying it.
And, FYI, the FG84 will fit the H9 Corsair cowl without mods to the cowl if you install it with zero thrust angle compensation.
Will the FG84 fit the TF FW cowl without any mods?
09-21-2016, 03:57 AM
#4262
Junior Member
Join Date: Jul 2012
Location: CrowboroughEast Sussex, UNITED KINGDOM
Posts: 15
Likes: 0
Received 0 Likes
on
0 Posts
you do have to do a little dremmel work with a sanding wheel where the air cylinder goes into the main wing, to thin it the rib out out so that it fits, the main thing is to detach the unit from the main plate then its quite easy to fit.and once in screw it back together.
09-26-2016, 01:36 PM
#4263

At page 167 I have a post were I say that the Robart gear was bendt after just one landing.
An almost perfect landing.
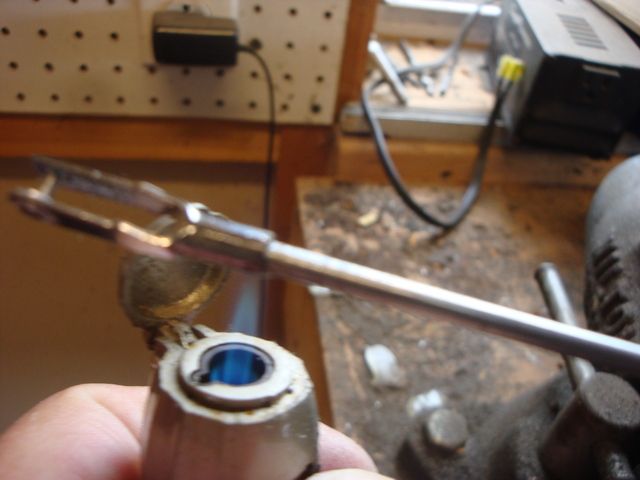
Today I took it aapart and had a look;
I chopped off the bendt china-steel-pin with a dremel, and drilled a 6mm hole where it had been.
And inserted a 6 mm bolt;


The nut you see there on the bolt is made a bit "flatter" to make room for the "slider" that the pin is stuck into.
Had to dremel off a mm of the slider as well to make it work.
We will see if that bolt will be bendt!! I don't think so.
After assembling everything, I tested the mechanism. It seems to work very well.
An almost perfect landing.
Today I took it aapart and had a look;
I chopped off the bendt china-steel-pin with a dremel, and drilled a 6mm hole where it had been.
And inserted a 6 mm bolt;
The nut you see there on the bolt is made a bit "flatter" to make room for the "slider" that the pin is stuck into.
Had to dremel off a mm of the slider as well to make it work.
We will see if that bolt will be bendt!! I don't think so.
After assembling everything, I tested the mechanism. It seems to work very well.
Last edited by kwik; 09-26-2016 at 01:44 PM.
09-26-2016, 08:09 PM
#4264
Senior Member

Join Date: Dec 2007
Location: BLENHEIM Malbourough, NEW ZEALAND
Posts: 276
Likes: 0
Received 0 Likes
on
0 Posts
Has anyone got a set of inserts from skyshark for Sierra Gear for the FW there shop appears closed and there unsure when they will open happy to pay above what they cost and postage via Paypal
Cheers
Cheers
09-27-2016, 03:46 AM
#4265
At page 167 I have a post were I say that the Robart gear was bendt after just one landing.
An almost perfect landing.
Today I took it aapart and had a look;
I chopped off the bendt china-steel-pin with a dremel, and drilled a 6mm hole where it had been.
And inserted a 6 mm bolt;
The nut you see there on the bolt is made a bit "flatter" to make room for the "slider" that the pin is stuck into.
Had to dremel off a mm of the slider as well to make it work.
We will see if that bolt will be bendt!! I don't think so.
After assembling everything, I tested the mechanism. It seems to work very well.
On second thought looking at the no 1 Pic if it does bend U can replace it a lot easier.
Last edited by HoundDog; 09-27-2016 at 03:48 AM.
09-27-2016, 04:38 AM
#4266
Senior Member

 09-27-2016, 09:15 AM
#4268
Senior Member
The paint would start to blister long before any of the temper is reduced from what it has currently.
09-27-2016, 09:46 AM
#4270
I am using a bolt, and Im happy with the solution.

 10-03-2016, 04:55 AM
#4273

The DLE55RA is an easy install. I'd recommend that you make a heat shield to go between the carb and the muffler. If you put a 55RA on a Mustang or Spit it's a must, but it is still a good idea on the FW-190 to prevent heat soaking the carb on a hot day.
We use a piece of G10 fiberglass or something similar. We put some aluminum tape on the muffler side to reflect the heat. Strap it to the mounts with some tie straps. Sorry, I don't have a photo of the install.
We use a piece of G10 fiberglass or something similar. We put some aluminum tape on the muffler side to reflect the heat. Strap it to the mounts with some tie straps. Sorry, I don't have a photo of the install.
10-03-2016, 06:43 PM
#4275
Tailskid; here is a photo of the heat shield I installed on my TF P-51. The shield is 1/8 plywood covered with self adhesive aluminum tape and secured to the standoffs with tie wraps.
Roger
Roger
Last edited by ForcesR; 10-03-2016 at 06:48 PM.