


150% enlarged WingontheWeb HO-229
 12-30-2012, 07:32 AM
#251

Pandi,
The batteries were cheap enough $65) so even if they only last a season or three, i would be happy. These ESC's actually have a pretty good history and came highly recommended by many. I will definitely work out a support like you have on the 262 for them.
If the model flies well, i will most likely end up upgrading it with a pair of Jet Fan 90mm edf's on 12s. This setup will get some good esc's and batteries. The current setup is to just get it flying at a reasonable price.
Exit diameter is 80mm which is what i got from researching the other site as the "just right" size (actually 80mm is a bit larger, but with the tube extensions, it will get reduced to the just right point.
Are you itching for one yet?
Thomas
 12-30-2012, 07:51 AM
#252

My Feedback: (134)
Join Date: Jul 2005
Location: Ladera Ranch,
CA
Posts: 825
Likes: 0
Received 0 Likes
on
0 Posts
I am for sure interested in one of these and watching closley your progress. Hoping for success here.
As others have suggested it is acceptable to put the ESC on the thrust tube for cooling....that has worked for years on other EDF projects. The best possible options is to have the esc inside the tail cone if one is availalbe. Down the road you may wish to look at Tams website to see if he sells one to fit your motor diameter.
On the new big twin EDF I am wrenching on....(Actually its on Burley Bench at the moment for some custom work)....I am experimenting with putting the ESC in the inlet ducting as shown. This is the Skymaster F4 running twin TJ100 fans....12S. In the end may shift the ESC back to the tail cone location inside the rear ducting...but looking at options.
I got two more TJ100's PNP waiting for a new home...when you get frustrated with those fans
12-31-2012, 01:34 PM
#254
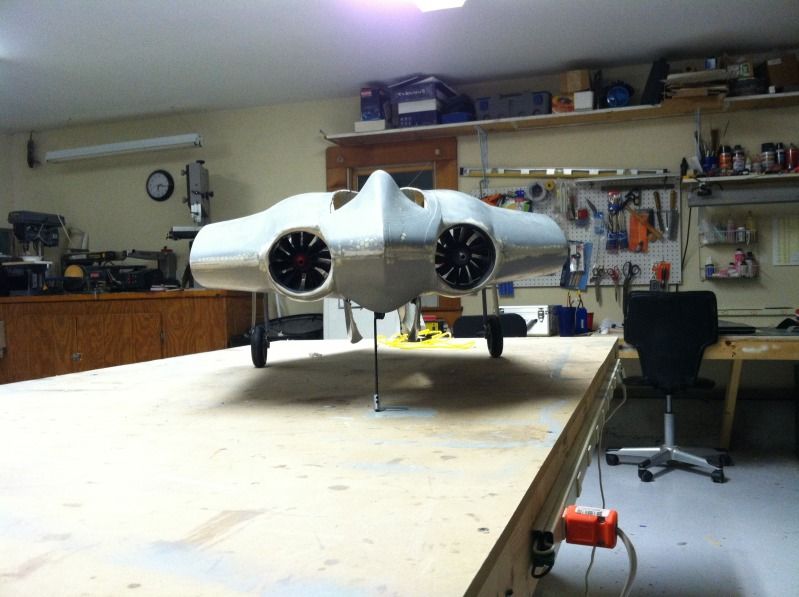
Wasted all day yesterday painting that stupid flite metal'd P-51's insignia's and stuff with Dope (which i told the guy wouldn't stick to the the flite metal, but he said use it anyways)... so 8 1/2 hours later when it was time to pull the paint masks off.... the paint came with them! [:@][:@][:@][:@][:@][:@][:@][:@] )#(*$#)(*@$(*)@($*)#@(*$#)(*$#)(*$)($ [:@][:@][:@][:@][:@][:@][:@][:@]
In between coats of paint drying, i did a little to the Horten. First i did some flite metaling on the top of it..
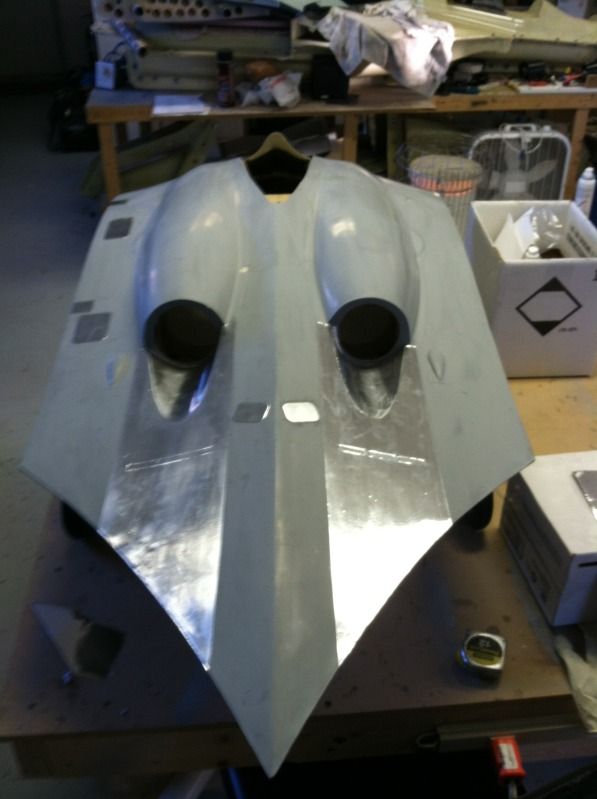
First up was the exhaust indentations and outlining the stainless skinned area with 2 layers of masking tape:
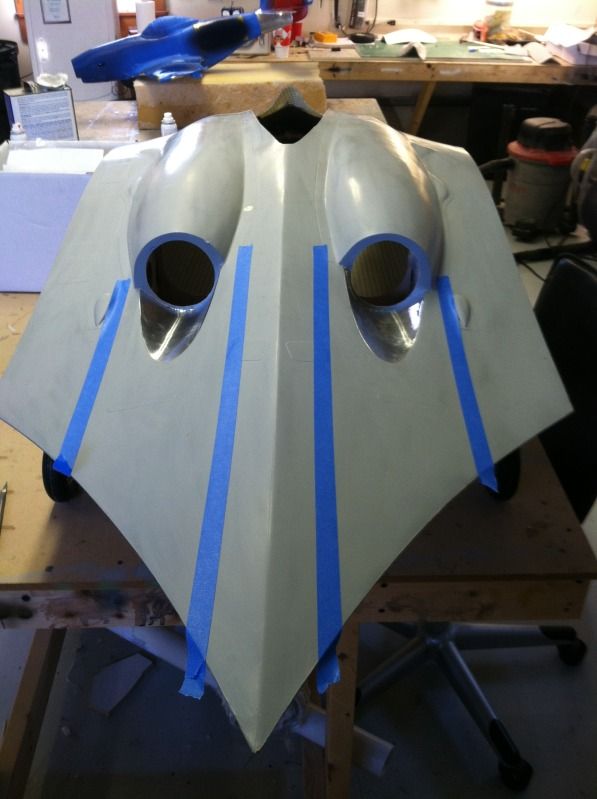
The the stainless skinned area and some hatch's were done:
And then today, i got started on the gear doors.
First and so far the only ones done are the inner main gear doors. I figured these would be a night-mare to do, but they actually turned out to be extremely easy.
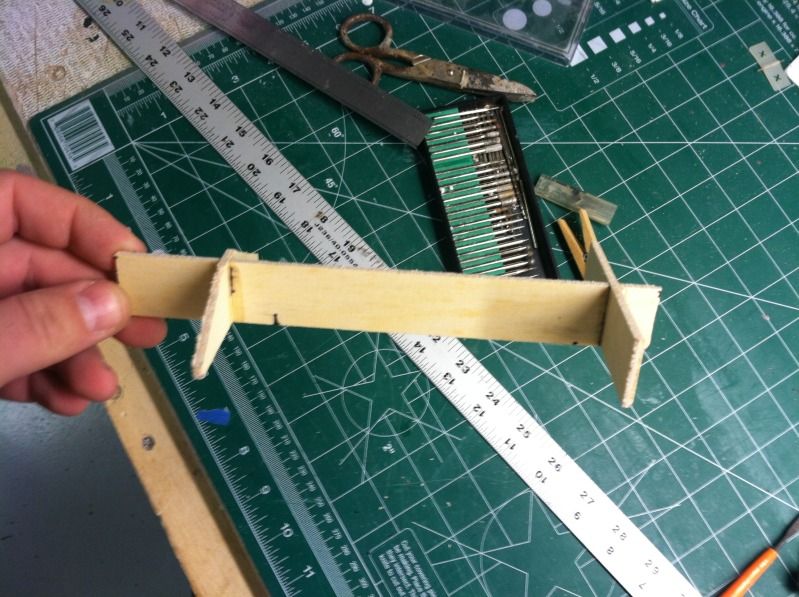
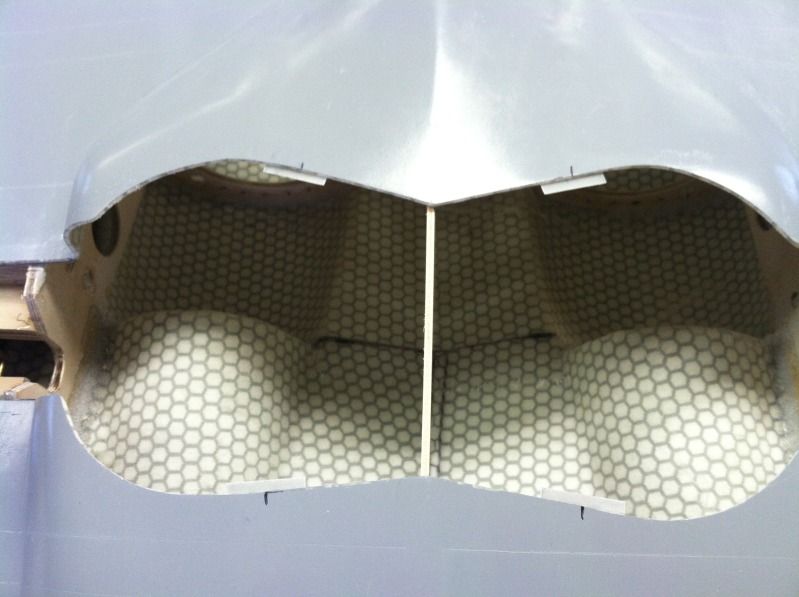
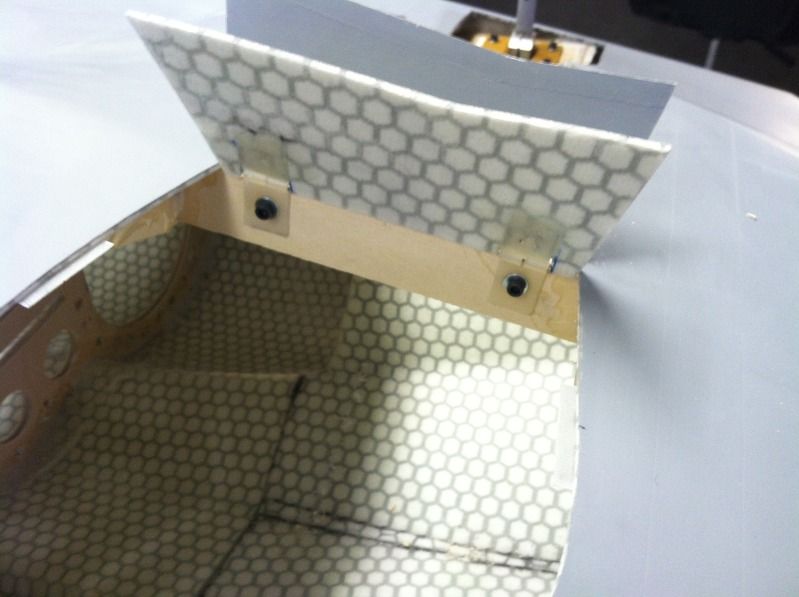
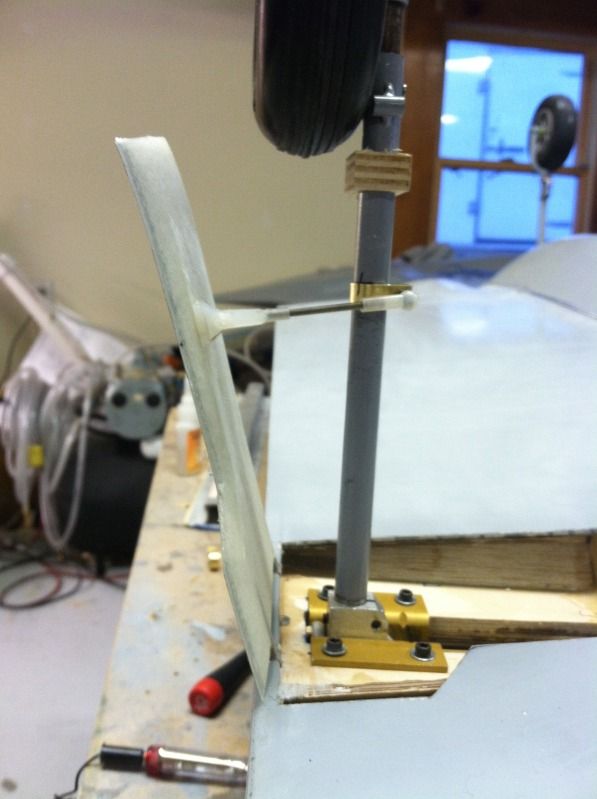
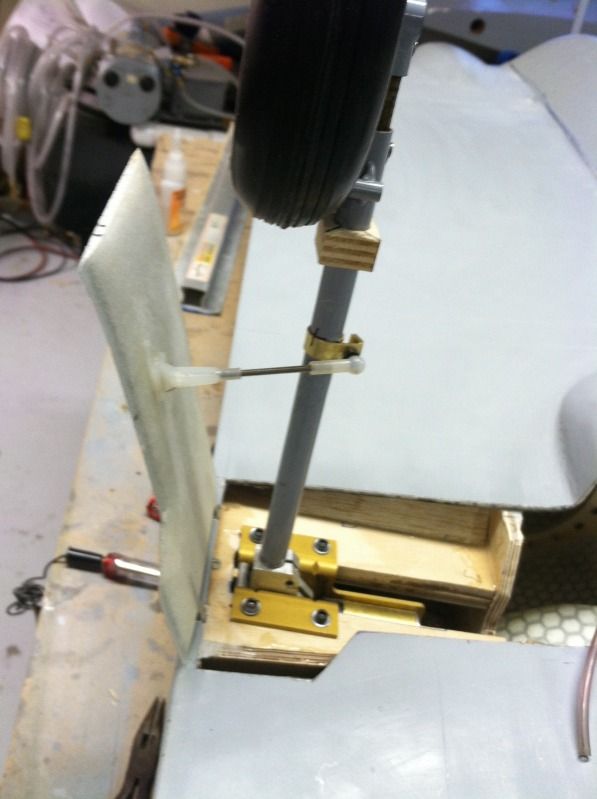
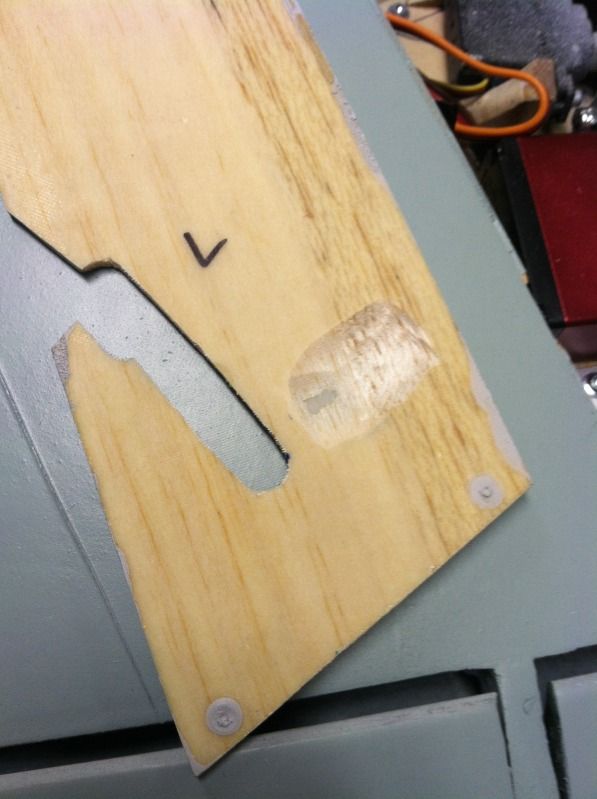
I made up a hinge support structure to span the gap between the front and rear edge of the gear openings. It is all 1/8" lite-ply and the 2 pieces going perpendicular to it are cut so the entire thing "keys" together. The rear side is the one with the rectangular shape. I chose this shape so it could be used as a air cylinder mount as well if necessary.. but i've got a nifty idea to make these doors mechanically open and close Simplicity is the name of the game for this airplane, its complicated enough:
Then It was glued into position. I also made up some 1/2" x 1" .030" G-10 door stops. The stops are position where the inner gear door and the lower strut door joints are..
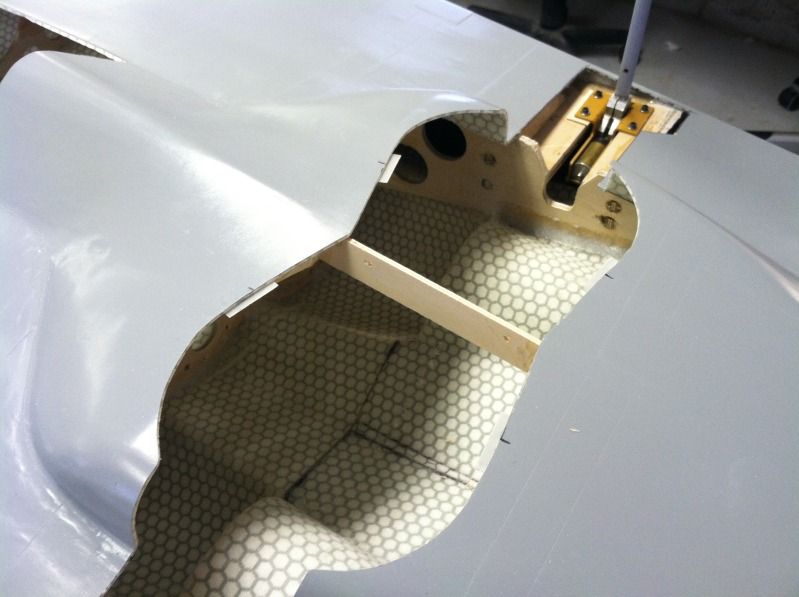
Then a pair of 1/4 scale size pinned hinges were cut in half. The inner gear doors then had the inner layer of glass and about 1/2 of the soric material ground out with a rotary file and the door notched for the Pin edge of the hinge. Then the hinges were epoxied into place. in order to make sure the hinge line was parallel from the front to rear, i move the hinges to a 90* angle and then hang them over the table edge and push the flap against the edge of the table..

Then the doors are placed into position and the hole in the center of the hinges transferred to the ply cross brace. The holes were then drilled out for a 4-40 bolt. Then a Bolt was placed through the hinges on one door, through the ply cross-brace, then through the other doors hinges and then a lock-nut put in place to bolt both doors to the cross-brace. This makes the doors easily removable for maintenance.

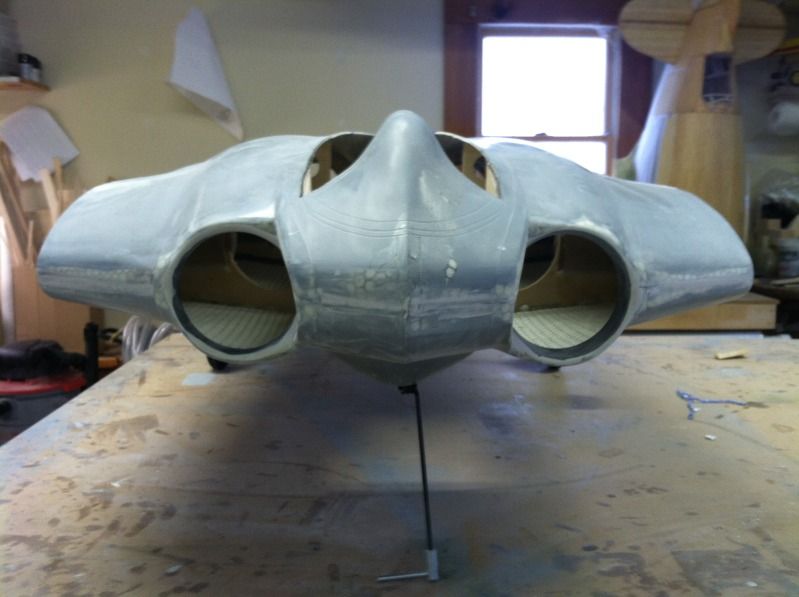
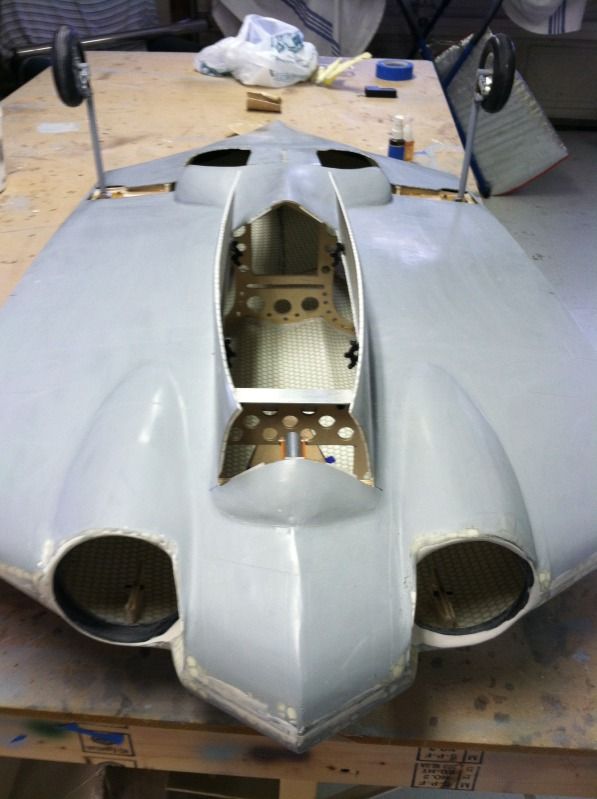
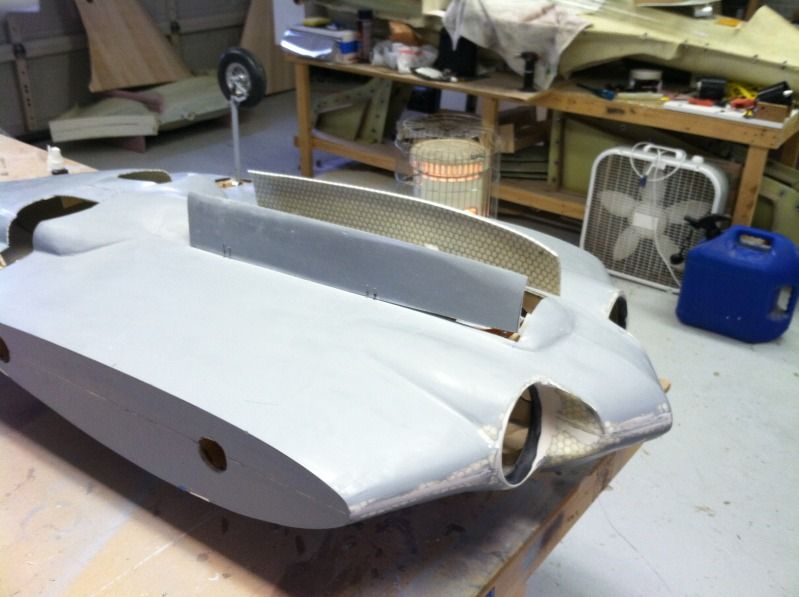
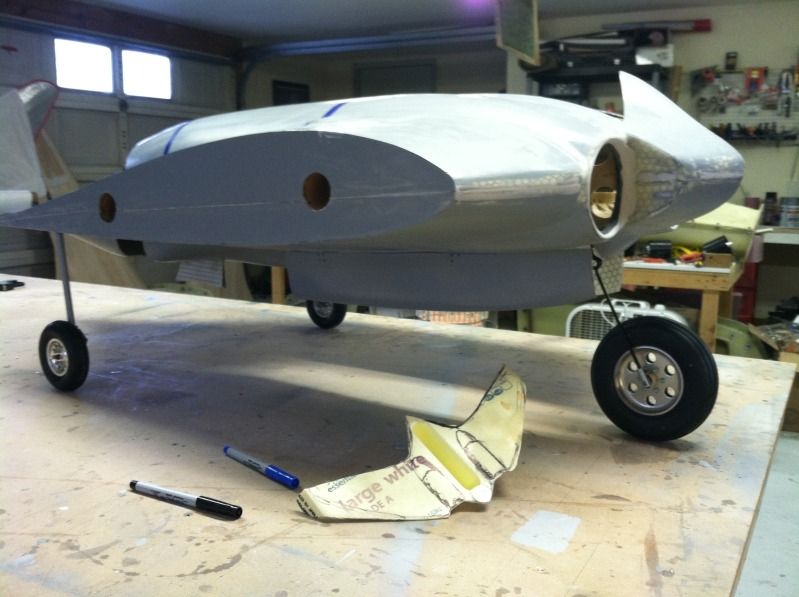
The inlet lips and leading edges were also all filled and sanded to shape. I can start flite-metaling the engine cowling now... well, once all the gear door stuff is done so it doesn't have to keep getting flipped up-side down.
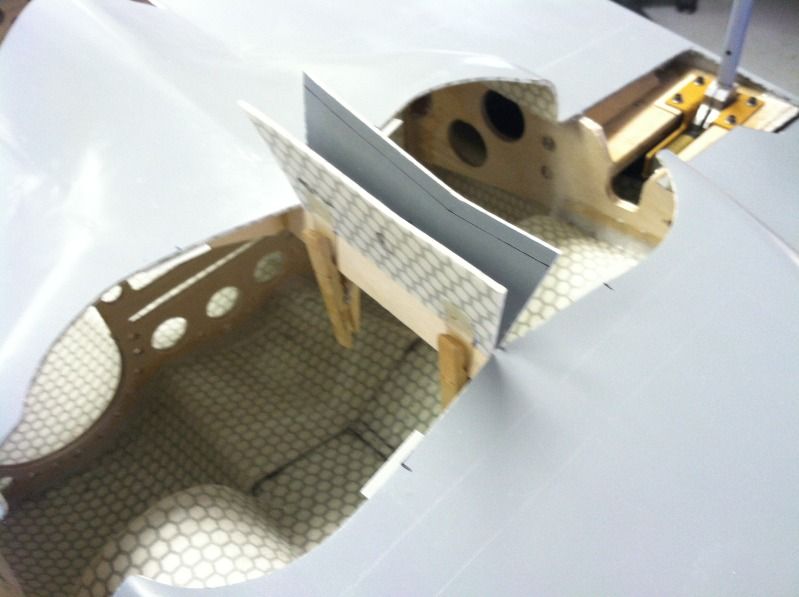
Then I stuck the whole-thing together again so I could fill the few gaps between the center section and outer wing panels with body filler:
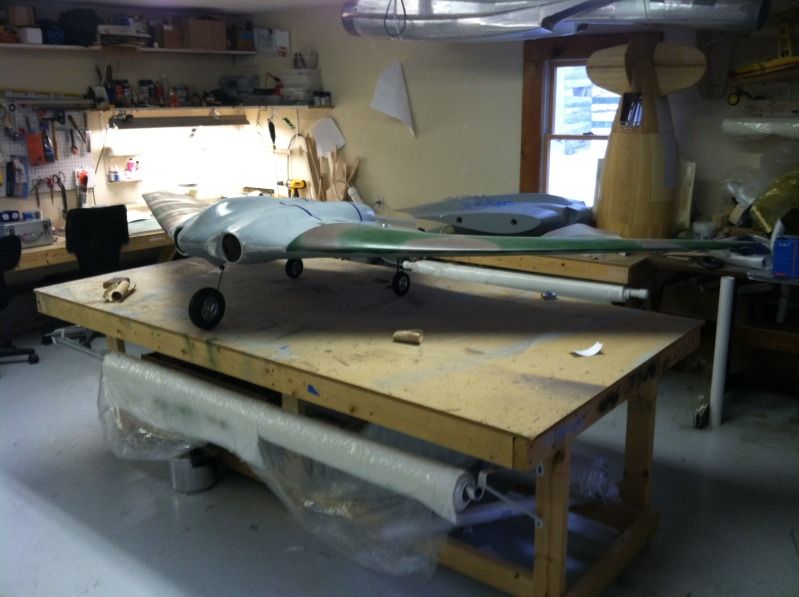
I also did an initial balance. With the gear down, and 2- 6s 5000mah lipo's as far forward as they can go, the balance point is around 5 1/2" aft of where it needs to be.. not to bad, considering there are no fan units or anything else in the model.
I have already decided that if the airplane needs nose-weight, it will be added in the form of more battery. So it will either fly as a 6s 5,000 6s 10,000 or 12s 5000 Depending on how much weight is needed to get it to balance.
In between coats of paint drying, i did a little to the Horten. First i did some flite metaling on the top of it..
First up was the exhaust indentations and outlining the stainless skinned area with 2 layers of masking tape:
The the stainless skinned area and some hatch's were done:
And then today, i got started on the gear doors.
First and so far the only ones done are the inner main gear doors. I figured these would be a night-mare to do, but they actually turned out to be extremely easy.
I made up a hinge support structure to span the gap between the front and rear edge of the gear openings. It is all 1/8" lite-ply and the 2 pieces going perpendicular to it are cut so the entire thing "keys" together. The rear side is the one with the rectangular shape. I chose this shape so it could be used as a air cylinder mount as well if necessary.. but i've got a nifty idea to make these doors mechanically open and close
Simplicity is the name of the game for this airplane, its complicated enough:Then It was glued into position. I also made up some 1/2" x 1" .030" G-10 door stops. The stops are position where the inner gear door and the lower strut door joints are..
Then a pair of 1/4 scale size pinned hinges were cut in half. The inner gear doors then had the inner layer of glass and about 1/2 of the soric material ground out with a rotary file and the door notched for the Pin edge of the hinge. Then the hinges were epoxied into place. in order to make sure the hinge line was parallel from the front to rear, i move the hinges to a 90* angle and then hang them over the table edge and push the flap against the edge of the table..
Then the doors are placed into position and the hole in the center of the hinges transferred to the ply cross brace. The holes were then drilled out for a 4-40 bolt. Then a Bolt was placed through the hinges on one door, through the ply cross-brace, then through the other doors hinges and then a lock-nut put in place to bolt both doors to the cross-brace. This makes the doors easily removable for maintenance.
The inlet lips and leading edges were also all filled and sanded to shape. I can start flite-metaling the engine cowling now... well, once all the gear door stuff is done so it doesn't have to keep getting flipped up-side down.
Then I stuck the whole-thing together again so I could fill the few gaps between the center section and outer wing panels with body filler:
I also did an initial balance. With the gear down, and 2- 6s 5000mah lipo's as far forward as they can go, the balance point is around 5 1/2" aft of where it needs to be.. not to bad, considering there are no fan units or anything else in the model.
I have already decided that if the airplane needs nose-weight, it will be added in the form of more battery. So it will either fly as a 6s 5,000 6s 10,000 or 12s 5000 Depending on how much weight is needed to get it to balance.
01-01-2013, 07:09 PM
#256
Progress... slowly!
Today's progress included gear doors.. more gear doors and boy was it fun!
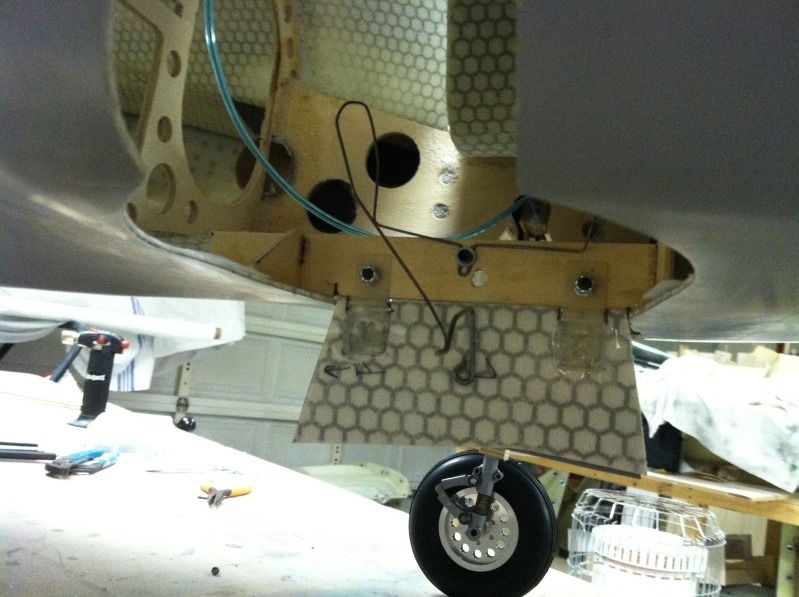
First up, was cutting the nose gear door into its separate halves. Then some G-10 stop strips were placed at the front and aft edges of the doors and the door's hinged. The hinges were then epoxied and screwed to the center section. Surprisingly, it only took about an hour to hinge both doors, it went fairly quickly and easily.
Then the upper strut doors were hinged. The upper strut doors are a separate molding and uses conventional robart hinge points (the smallest ones) for its hinges. All of the doors except the nose gear doors use conventional hinges for simplicity (not by design, by luck! LOL). So, 2 holes were drilled into the core material of the door for the hinge so where the opening for the hinges fit flush up against the edge of the door. Then the center section was notched for the hinge and a hole drilled vertically down through the edge of the gear plate for the hinges to fit into. Then the entire thing epoxied together. Again, this was the most simplistic way of doing the doors and it just worked out perfectly and completely by luck (who am I kidding, it was all skill! haha)..

And a picture of it on the gear with the doors all attached (except the lower strut doors):

All the doors are now hinged. All that is left, is determining the opening/closing method for the big nose gear door and doing the lower strut doors, which are going to require some head scratching..
We also discovered that our nose gear setup is definitely not going to work, so we have to find an alternative..
AND
the airplane weights around 20lbs right now as airframe, landing gear and two 6s 5000 mah lipo's.
We also assembled the other 2 fan units that Tom got and put a pair of fans into my model:
Then we did a run-up to check the thrust of the motors. It appears that we will be upgrading our power system sooner than we expected. With the expected weight of 30lbs (We expect to need another pair of 6s 5000mah lipo's to use as useable "ballast" to get the airplane to the balance point) and only 12lbs of thrust with the current power package, that is only a .4:1 thrust/weight ratio. While I think it will fly at this, performance will probably be lack luster. Unless you guys think differently? Either way, i'll be saving up for some JetFan 90's on 12S which will give us around 20lbs of thrust.
You can see in this video how crap the nose leg is once the weight of the fans and a batteries is installed.. now just imagine another 5lbs of batteries... the nose would be sitting on the ground! lol
[link=http://smg.photobucket.com/albums/v433/Flamed04R6/HO-229%20build/?action=view¤t=55B535AC-F3FE-4345-8C5D-832AE3EBB97C-10947-00000BAE5FCB90C6.mp4]http://smg.photobucket.com/albums/v433/Flamed04R6/HO-229%20build/?action=view¤t=55B535AC-F3FE-4345-8C5D-832AE3EBB97C-10947-00000BAE5FCB90C6.mp4[/link]
Today's progress included gear doors.. more gear doors and boy was it fun!
First up, was cutting the nose gear door into its separate halves. Then some G-10 stop strips were placed at the front and aft edges of the doors and the door's hinged. The hinges were then epoxied and screwed to the center section. Surprisingly, it only took about an hour to hinge both doors, it went fairly quickly and easily.
Then the upper strut doors were hinged. The upper strut doors are a separate molding and uses conventional robart hinge points (the smallest ones) for its hinges. All of the doors except the nose gear doors use conventional hinges for simplicity (not by design, by luck! LOL). So, 2 holes were drilled into the core material of the door for the hinge so where the opening for the hinges fit flush up against the edge of the door. Then the center section was notched for the hinge and a hole drilled vertically down through the edge of the gear plate for the hinges to fit into. Then the entire thing epoxied together. Again, this was the most simplistic way of doing the doors and it just worked out perfectly and completely by luck (who am I kidding, it was all skill! haha)..
And a picture of it on the gear with the doors all attached (except the lower strut doors):
All the doors are now hinged. All that is left, is determining the opening/closing method for the big nose gear door and doing the lower strut doors, which are going to require some head scratching..
We also discovered that our nose gear setup is definitely not going to work, so we have to find an alternative..
AND
the airplane weights around 20lbs right now as airframe, landing gear and two 6s 5000 mah lipo's.
We also assembled the other 2 fan units that Tom got and put a pair of fans into my model:
Then we did a run-up to check the thrust of the motors. It appears that we will be upgrading our power system sooner than we expected. With the expected weight of 30lbs (We expect to need another pair of 6s 5000mah lipo's to use as useable "ballast" to get the airplane to the balance point) and only 12lbs of thrust with the current power package, that is only a .4:1 thrust/weight ratio. While I think it will fly at this, performance will probably be lack luster. Unless you guys think differently? Either way, i'll be saving up for some JetFan 90's on 12S which will give us around 20lbs of thrust.
You can see in this video how crap the nose leg is once the weight of the fans and a batteries is installed.. now just imagine another 5lbs of batteries... the nose would be sitting on the ground! lol
[link=http://smg.photobucket.com/albums/v433/Flamed04R6/HO-229%20build/?action=view¤t=55B535AC-F3FE-4345-8C5D-832AE3EBB97C-10947-00000BAE5FCB90C6.mp4]http://smg.photobucket.com/albums/v433/Flamed04R6/HO-229%20build/?action=view¤t=55B535AC-F3FE-4345-8C5D-832AE3EBB97C-10947-00000BAE5FCB90C6.mp4[/link]
01-02-2013, 01:05 PM
#259

My Feedback: (12)
Join Date: Jul 2002
Location: Alexandria,
VA
Posts: 706
Likes: 0
Received 0 Likes
on
0 Posts
Any idea how much current you were drawing on 6s? I know they aren't that sexy but the HET fans are cheap and work. You can put about as much power as you want through them as well. If you want a 12s setup you could go with 700-68-1200 or probably better the 1125kv motor. It should be close to 9lbs of thrust per side. If the HET fans don't work the motors will also work in the Jetfan as well. The nose wheel is very sad looking  Good luck
Good luck
01-05-2013, 06:28 PM
#260
Not a whole lot of gettin stuff done today, I think Tom and I both are starting to get the burn-out setting in. My work trip will be nice just to kind of get away for 2 weeks and get my mind clear of some things (not to mention make some money!).
Anyways, We replaced the wire nose strut for a 3/8" diameter offset Robo-strut. This fixed the lame duck nose gear, but with all the weight needed to get this thing to balance, its fully compressed. The plus, is we still have a bit of a positive AoA, so we are going with this setup for the initial flights. No pictures though.
We also did another CG check. We put everything in its respective positions and balanced it at the CG point (around 19" from the nose). We ended up with: two- 6s5000 lipo's, four- 4s4000 Lipo's, one- 3s2300, one-2s2300 A123, a 4cell 1500mah nicad, a 4cell 3300mah nimh, and a 9 channel Receiver. This is what it took to to get it to roughly the correct CG.. The total weight of all this stuff.. 31.XX pounds. So I suspect the flying weight to be 32-33lbs when all is painted and done.
With 4000watts available and 33lbs, that is 121 watts/pound. It may still fly with this ,but we are definitely doing a 12S jetfan 90 setup in the near future.
This also brings up a good point. We made up a CG doohicky (basically some pointed dowels mounted in a 2x4 that the center section can teeter on. The problem is, when you get it close to being balanced at the CG, depending on which end is lower (nose or tail) dictates if it shows as nose or tail heavy. For instance, without changing the position of anything, we can level the center section and it will sit there for a bit. But if when we are leveling it, the nose is slight to low, it will show as nose heavy, and vice versa if the tail is low. This is without moving the position of Anything!
We really need a more reliable and accurate method of balancing this thing! I have a feeling that the Weight on wheels CG method is going to be the only way to accurately and reliably determine the CG within 1/16" accuracy. For those who don't know the W.o.w. method, it involves some measuring and weighting the weight at each axle, its essentially identical to how they balance full-size airplanes and VERY accurate.
So back to the work:
We got the upper strut door linkages built it. It involves some brass straps, 2-56 ball-links, clevis' threaded rod and a modified small control horn. Like I have said before, simplicity is the name of the game for these gear doors.
Then we did the closing and opening mechanism for the inner doors. The doors are pulled close via a piano-wire "lever" that is epoxied and glassed to the inner doors. The wires are visible under the center section when the gear is down, but the fact they are so simple to close and keep closed makes it worthwhile to me! To open the doors, we took some small piano wire and bent a torsion rod style setup. This is bolted the gear door spine and then the bends were modified so the doors would close completely, open completely and so that if one gear went up and closed the door before the other side, the other door would still close. It took about 30-45mins of fiddling with, but worked out great in the end.
And a little youtube video:
https://www.youtube.com/watch?v=4wmCN8DXeWQ
01-06-2013, 07:35 AM
#261
My Feedback: (12)
Join Date: Jul 2002
Location: Alexandria,
VA
Posts: 706
Likes: 0
Received 0 Likes
on
0 Posts
You do know that the 3/8" robostrut is rated for up to 12lbs airplanes. Should be looking at least the 1/2" strut for the nose and probably the 5/8" for the mains. Make sure you have all that weight as far forward as possible. Keep going on this, dont get burned out.
For the CG the WOW method works fine, but you can also look at the CG sling or Vanessa method. Good luck.
For the CG the WOW method works fine, but you can also look at the CG sling or Vanessa method. Good luck.
01-06-2013, 07:40 AM
#262
The nose gear supports around 1/2 the weight of the airplane, at 32lbs the nose gear is supporting 16lbs. Its over the specs for the gear, but i dont plow my models into the ground on landing and rarely ever bounce, so im not concerned about the 3/8" struts.
The point of the first one is to prove it flies, much of the stuff for this one Tom and myself had about 75% of the stuff laying around our shops, even if it wasnt exactly the best thing for the job (struts) it was better than wasting a couple hundred bucks on new stuff that may or may not last on a slightly unproven model.
The point of the first one is to prove it flies, much of the stuff for this one Tom and myself had about 75% of the stuff laying around our shops, even if it wasnt exactly the best thing for the job (struts) it was better than wasting a couple hundred bucks on new stuff that may or may not last on a slightly unproven model.
01-07-2013, 05:38 PM
#263
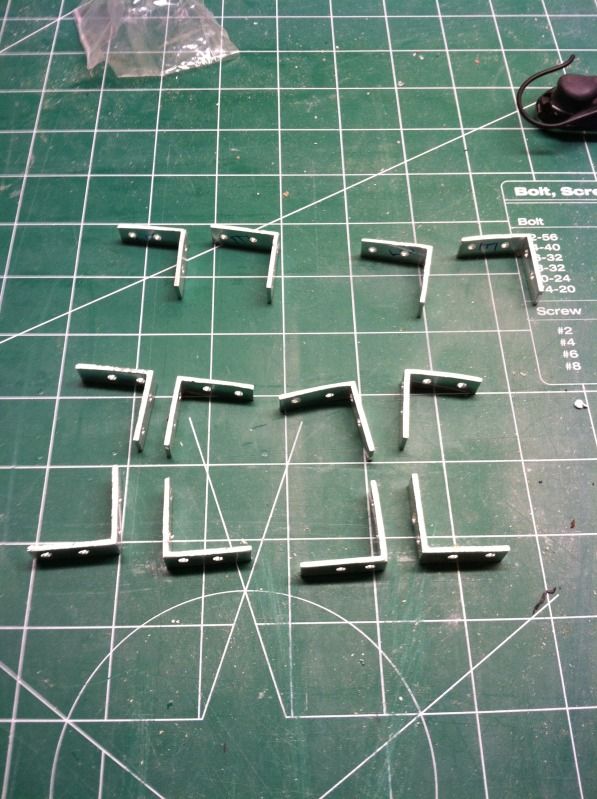
The wife decided to leave for her parents a day early, so I got the evening to goof off before leaving tomorrow.
I spent a few hours cleaning up the shop since it was a wreck.
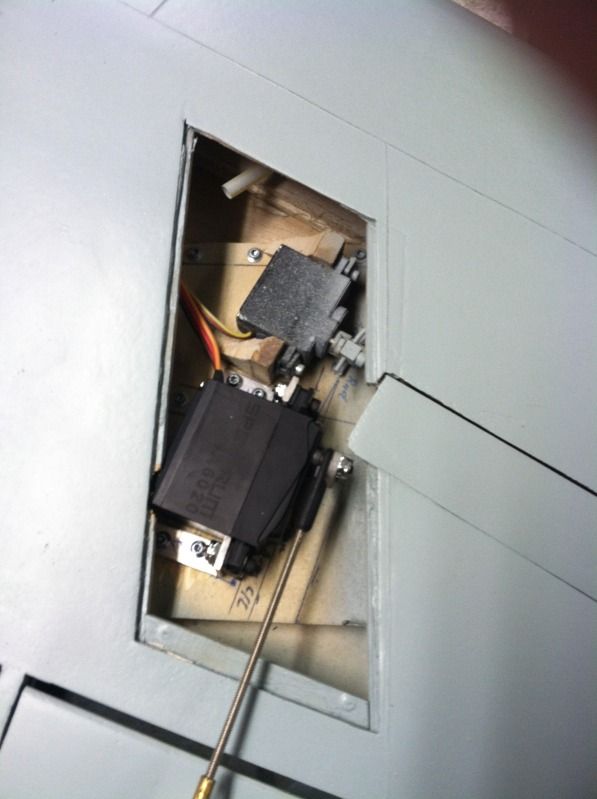
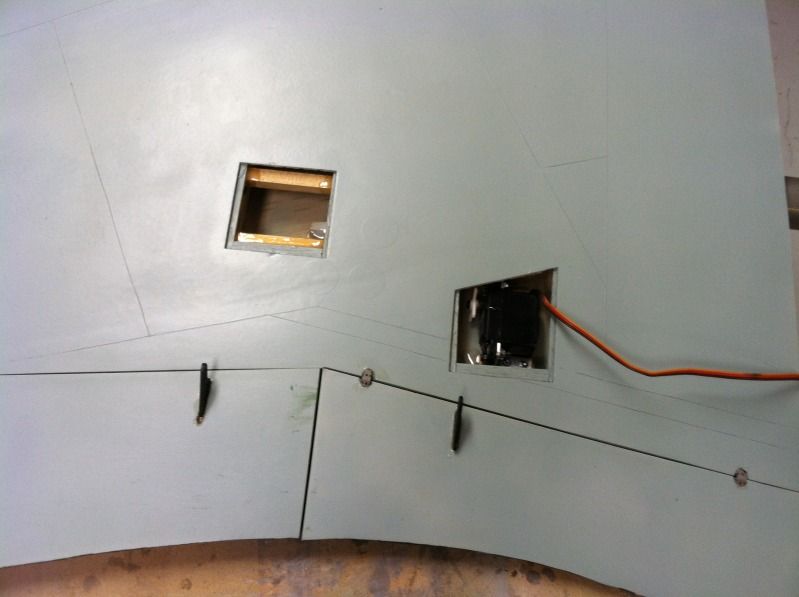
Then I chopped out 16 L brackets for servo mounts:
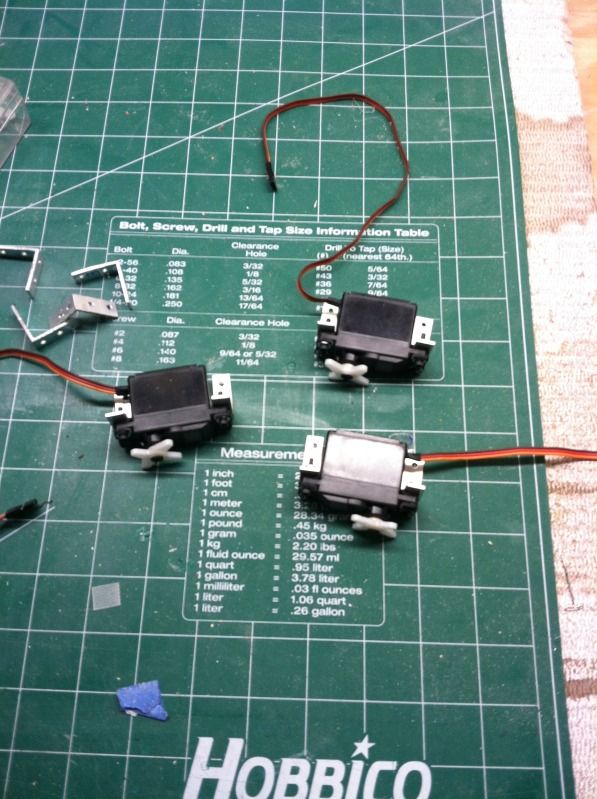
then I bolted up the flap servo's (JR ST-126MG) and the one elevon servo (jR 8711) to the brackets.
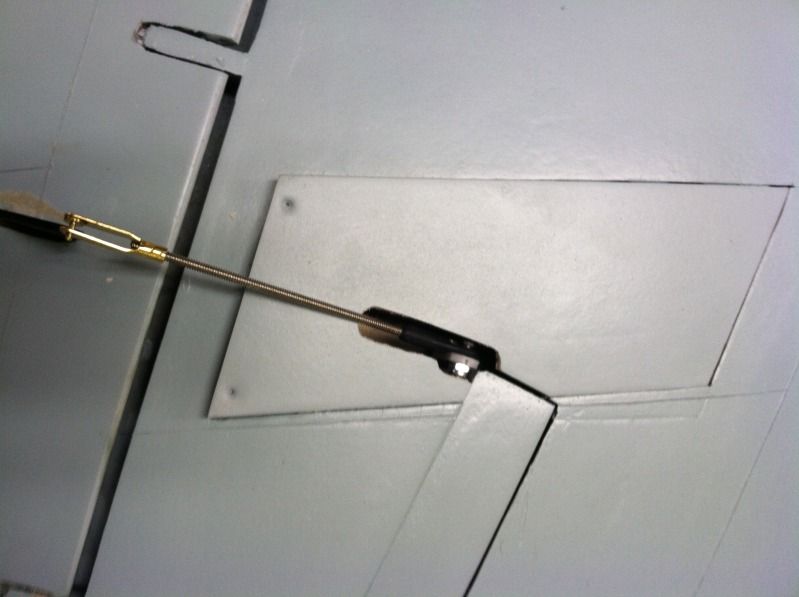
Then I installed the elevon servo to its mount plate and made up the linkage. There is VERY VERY little room between the lock-nut/servo arm and the drag rudder. so little in fact, that i had to sand a bit of the bottom edge of the corner of the drag rudder away. Its a very tight fit, but it fits.. barely!
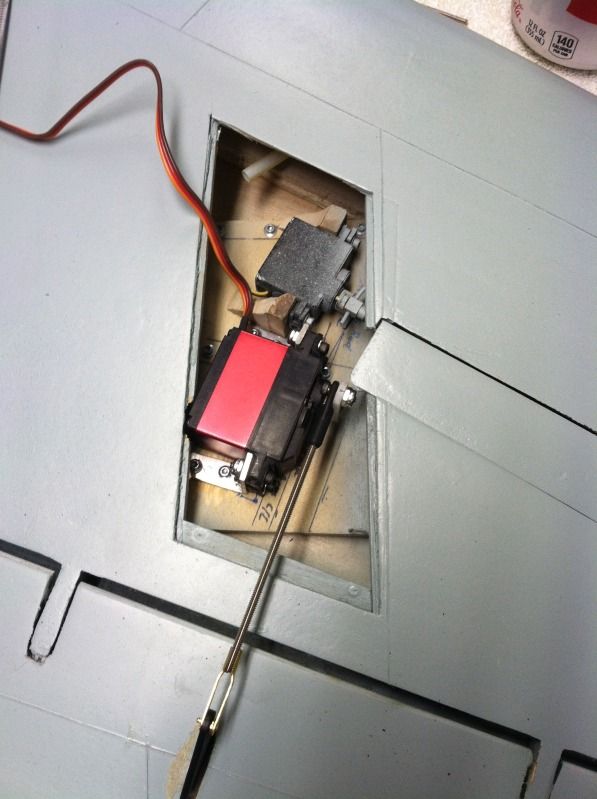
Then I cut out the access panel for the linkage to clear. If I wanted, I could apply some .005" G-10 over the majority of the linkage hole and blend it in to conceal the linkage. but the way it currently is, you can remove the access panel without disconnecting any of the linkages. I like how this is convenient so i'll leave it as is:
since the available mounting area for the elevon servo is limited, I had to route out a bit of the access panel in order for it to fit flush over the aft edge of the servo:
and a youtube vid:
http://youtu.be/_aovvsWa4r8
I spent a few hours cleaning up the shop since it was a wreck.
Then I chopped out 16 L brackets for servo mounts:
then I bolted up the flap servo's (JR ST-126MG) and the one elevon servo (jR 8711) to the brackets.
Then I installed the elevon servo to its mount plate and made up the linkage. There is VERY VERY little room between the lock-nut/servo arm and the drag rudder. so little in fact, that i had to sand a bit of the bottom edge of the corner of the drag rudder away. Its a very tight fit, but it fits.. barely!
Then I cut out the access panel for the linkage to clear. If I wanted, I could apply some .005" G-10 over the majority of the linkage hole and blend it in to conceal the linkage. but the way it currently is, you can remove the access panel without disconnecting any of the linkages. I like how this is convenient so i'll leave it as is:
since the available mounting area for the elevon servo is limited, I had to route out a bit of the access panel in order for it to fit flush over the aft edge of the servo:
and a youtube vid:
http://youtu.be/_aovvsWa4r8
01-18-2013, 04:46 PM
#264
Back home.. for about 2 days.. soo while i've got time and before the wife and lil guy come back, its time to knock some stuff out.
My buddy Tom worked on the main gear doors while I was gone, I think he had fun, but he figured out most of those issues.
I got back to a few packages containing nearly everything needed to finish the prototype:
The I swapped out the JR 8711 elevon servo for a Spektrum A6020.
Then epoxied in the flap servo mounts;
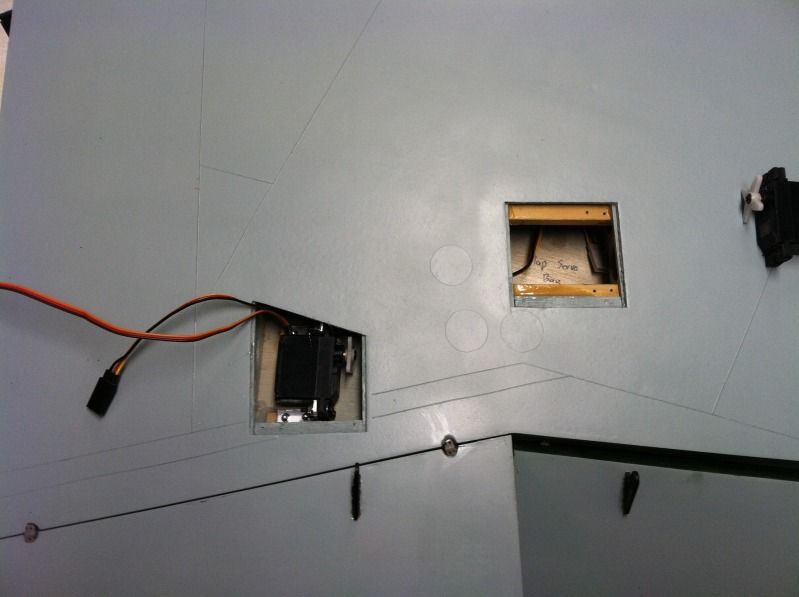
Then made up two of the four Octopus servo extensions. These go into the outer wing panel and consist of about 15 feet of wire. I have two more that run from the Rx to the wing root. Those will consume about 20 feet of servo wire alone.

And the gear for next winter's project arrived from Sierra:

My buddy Tom worked on the main gear doors while I was gone, I think he had fun, but he figured out most of those issues.
I got back to a few packages containing nearly everything needed to finish the prototype:
The I swapped out the JR 8711 elevon servo for a Spektrum A6020.
Then epoxied in the flap servo mounts;
Then made up two of the four Octopus servo extensions. These go into the outer wing panel and consist of about 15 feet of wire. I have two more that run from the Rx to the wing root. Those will consume about 20 feet of servo wire alone.
And the gear for next winter's project arrived from Sierra:
01-18-2013, 05:12 PM
#265
My Feedback: (427)
Tom,
Fantastic build!! Should be awesome in the air. Judging by your new retracts , looks like there is a large P 39 in your future. Something a little more conventional. LOL
Can't wait to see it finished and the flight report.
Thanks,
Fred Menna Check6
Fantastic build!! Should be awesome in the air. Judging by your new retracts , looks like there is a large P 39 in your future. Something a little more conventional. LOL
Can't wait to see it finished and the flight report.
Thanks,
Fred Menna Check6
 01-18-2013, 06:08 PM
#266
My Feedback: (134)
Join Date: Jul 2005
Location: Ladera Ranch,
CA
Posts: 825
Likes: 0
Received 0 Likes
on
0 Posts
Thomas
On your "octopus" leads. What are they all coming together at? Hard to see in the photo. Also do you run and RF filters with this length?
On your "octopus" leads. What are they all coming together at? Hard to see in the photo. Also do you run and RF filters with this length?
01-18-2013, 06:22 PM
#267
Fred,
Nope.. Not a P-39, and the project definitely isnt conventional. It was the largest and fastest fighter of WW2.
Pandi,
Is a 12 pin ashlock connector. No rf filters or anything like that, in my experience, they never helped wit what they say they were supposed to do.
Nope.. Not a P-39, and the project definitely isnt conventional. It was the largest and fastest fighter of WW2.
Pandi,
Is a 12 pin ashlock connector. No rf filters or anything like that, in my experience, they never helped wit what they say they were supposed to do.
 01-19-2013, 08:16 AM
#269
ORIGINAL: glazier808
do-335...
do-335...
It arrived over half an hour before the Mustangs sent to escort it back to England.
Casey
Yea sir! Ive got to order the glennis wheels/brakes and then put in an order for all the airframe stuff as well. Im not sure how i am going to do the rear prop, but electric is out due to the weight and cost. Most likely i will use an extended prop shaft with the engine mounted mid ship.
Like i said. Nothing conventional! Especially for me. Lol
01-19-2013, 06:54 PM
#272
I had to run some errands and do some stocking up on hardware at the LHS this morning, so i didn't get much done. I did get the right elevon servo mounted and its linkage hooked up, so both elevon's are complete now.
I also finished up the last of the two octopus harness'/extensions. The center section wiring harness consists of a pair of 12 pin ashlock connectors with four 30" long Heavy Duty servo extensions. Each connector is a different color (which match's the color of each female connector in the outer wing panels) to coordinate each servo with its Rx channel. There are also two Smart Fly Equalizer 2's that are plugged into Aux 1 and the 2nd into Aux2 channels, and then the outer flaps plug into one equalizer and the inner flaps into the other equalizer. This allows the outer flaps to be mixed to go up when the inner flaps go down AND the outer flaps to deflect up when up elevator is selected (helper elevators). The helper elevator function may not be 100% necessary, so i'm going to have it programmed so this function can be turned on and off by the flip of a switch. That way I can use them during takeoff on the maiden flight and then turn them off at altitude, this will tell me if they need to be used this way all the time or not (i'm assuming not, but you never know!)
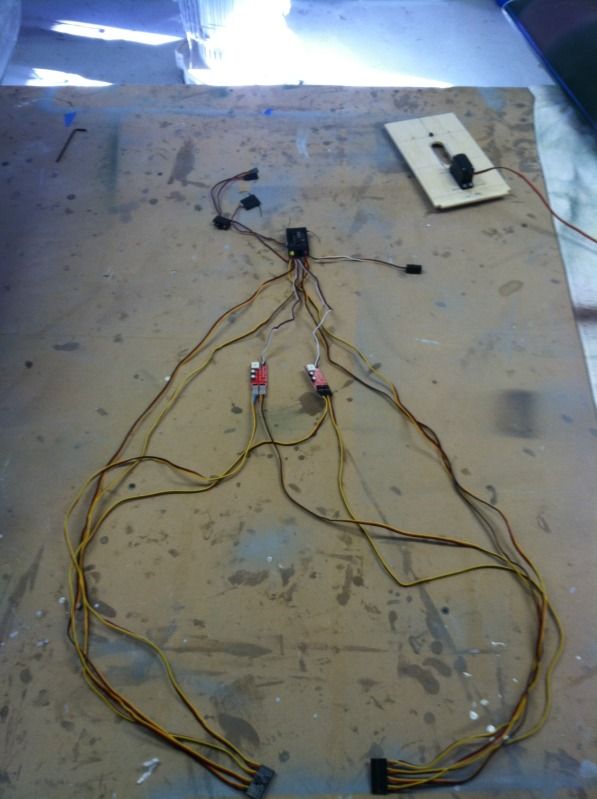
I also finished up the last of the two octopus harness'/extensions. The center section wiring harness consists of a pair of 12 pin ashlock connectors with four 30" long Heavy Duty servo extensions. Each connector is a different color (which match's the color of each female connector in the outer wing panels) to coordinate each servo with its Rx channel. There are also two Smart Fly Equalizer 2's that are plugged into Aux 1 and the 2nd into Aux2 channels, and then the outer flaps plug into one equalizer and the inner flaps into the other equalizer. This allows the outer flaps to be mixed to go up when the inner flaps go down AND the outer flaps to deflect up when up elevator is selected (helper elevators). The helper elevator function may not be 100% necessary, so i'm going to have it programmed so this function can be turned on and off by the flip of a switch. That way I can use them during takeoff on the maiden flight and then turn them off at altitude, this will tell me if they need to be used this way all the time or not (i'm assuming not, but you never know!)
01-19-2013, 09:24 PM
#273
Senior Member
ORIGINAL: glazier808
Always loved the Do-335. Makes you wonder how it would have done if it had flown in combat.
Always loved the Do-335. Makes you wonder how it would have done if it had flown in combat.
Casey
01-20-2013, 01:32 PM
#274
My Feedback: (10)
I'm sorry, I don't understand your comment please. How would the Do 335 been any more untouchable than the ME 262 which was shot down by allied fighters both in the landing pattern, and (rarely) at altitude?
I agree that it would have made little difference,at wars end the Germans had more 262s than pilots or gas and the Russians were going to Berlin unless you had a lot more fighter bombers, tanks and troops than Germany could ever hope to field.
Whit
I agree that it would have made little difference,at wars end the Germans had more 262s than pilots or gas and the Russians were going to Berlin unless you had a lot more fighter bombers, tanks and troops than Germany could ever hope to field.
Whit
ORIGINAL: jeffk464
It should have been untouchable by allied fighters at risk from ground fire. But the allied manufacturing base was far away in the US so its overall impact would have been small. Germany needed good fighters and good fighter pilots in more numbers then they had.
ORIGINAL: glazier808
Always loved the Do-335. Makes you wonder how it would have done if it had flown in combat.
Always loved the Do-335. Makes you wonder how it would have done if it had flown in combat.
Casey
01-20-2013, 02:06 PM
#275
The me262 was hindered due to lack of fuel, pilots and the slow acceleration during takeoff and long approaches needed for landing, not to mention the high maintenance.
The 335 could of provided higher performance (compared to other piston planes) without any of the drawbacks that the 262s were hindered by.
The 335 could of provided higher performance (compared to other piston planes) without any of the drawbacks that the 262s were hindered by.