


150% enlarged WingontheWeb HO-229


 12-14-2012, 03:29 PM
#202

Lol, ehh thats a piece of cake after doing the molds for the F14! The F14 fuselage mold has over 125 hours of labor in just the layups! Each of the six segments took on average of 21hours of non-stop work!
12-15-2012, 08:01 PM
#205
Ohh.. where to start...
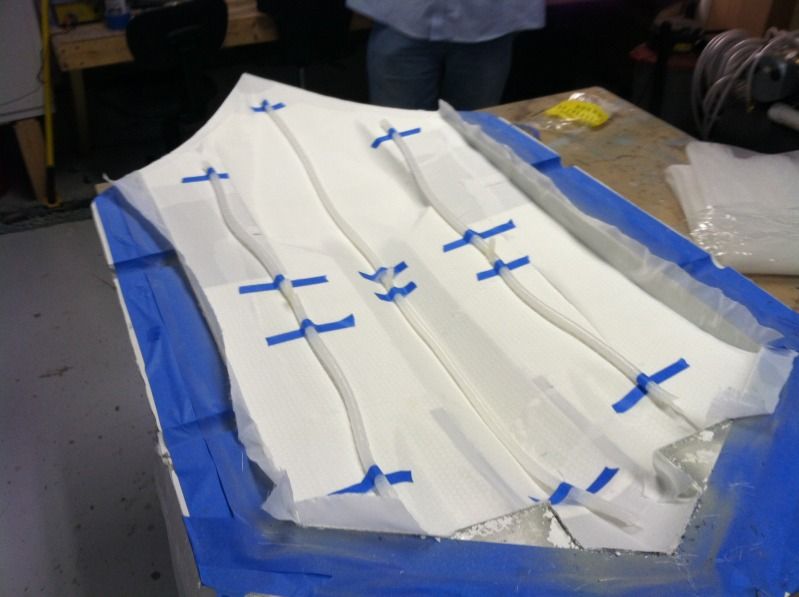
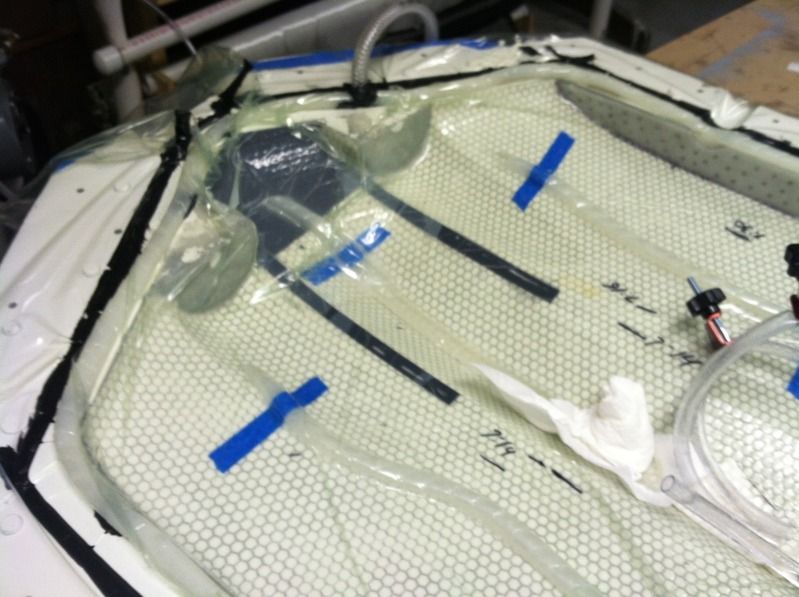
First up was finishing the layup schedule on the bottom fuse mold. You can see there is a good bit of carbon fiber around the nose gear and main gear mounting locations:
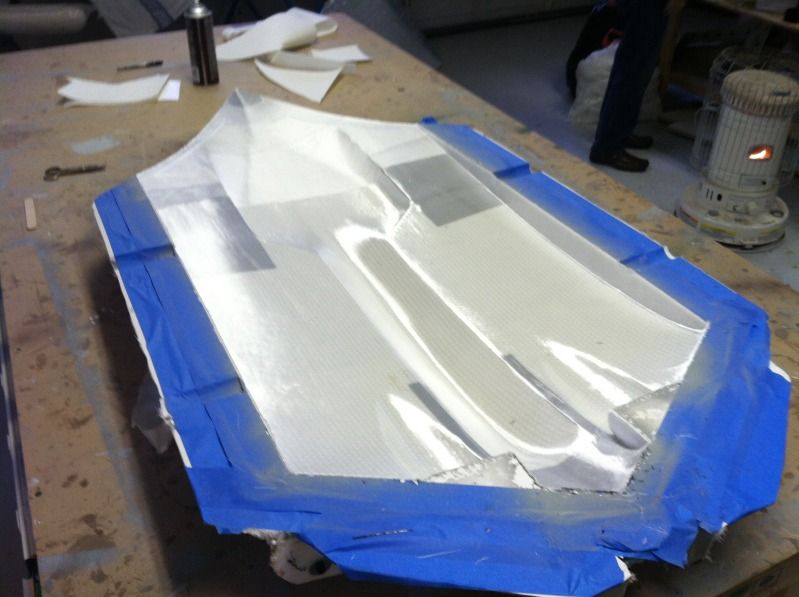
Then the peel ply, resin feed lines, and flow mesh was put in place:
The the vacuum bag was put in place, the resin feed line "T" fittings popped through the bag and sealed along with the feed tubes installed and clamped off. The vacuum line "T" fitting was popped through the bag, sealed and hooked up to the resin trap as well. Then the entire thing was sucked down to 25" hg.

This was left under vacuum for about 2 hours while we ate some dinner and did the majority of the remainder of the layup schedule on the top mold half:
Then we infused the bottom mold half. I've got a video saving right now and will post the you tube video link when I get it posted..
First up was finishing the layup schedule on the bottom fuse mold. You can see there is a good bit of carbon fiber around the nose gear and main gear mounting locations:
Then the peel ply, resin feed lines, and flow mesh was put in place:
The the vacuum bag was put in place, the resin feed line "T" fittings popped through the bag and sealed along with the feed tubes installed and clamped off. The vacuum line "T" fitting was popped through the bag, sealed and hooked up to the resin trap as well. Then the entire thing was sucked down to 25" hg.
This was left under vacuum for about 2 hours while we ate some dinner and did the majority of the remainder of the layup schedule on the top mold half:
Then we infused the bottom mold half. I've got a video saving right now and will post the you tube video link when I get it posted..
 12-16-2012, 01:20 PM
#210

My Feedback: (10)
Impressive....
Questions: the spiral wrap is what we use to bind cables together? Here it holds feed lines inside and prevents crushing or it IS the feed lines? Flow medium?? Where is the peel ply in this and why is it used? What is the materials cost per fuse half and what of that is reusable? Like is the bag material reusable? How do you clean out the resin trap?
Answer only what you want to, I'm far from being able to do this, no hard feelings as your obviously busy.
I'm fascinated by this, it really looks professional.
Whit
12-16-2012, 07:44 PM
#211
ORIGINAL: wphilb
Impressive....
Impressive....
Questions: the spiral wrap is what we use to bind cables together? Here it holds feed lines inside and prevents crushing or it IS the feed lines? Flow medium?? Where is the peel ply in this and why is it used? What is the materials cost per fuse half and what of that is reusable? Like is the bag material reusable? How do you clean out the resin trap?
Answer only what you want to, I'm far from being able to do this, no hard feelings as your obviously busy.
I'm fascinated by this, it really looks professional.
Whit
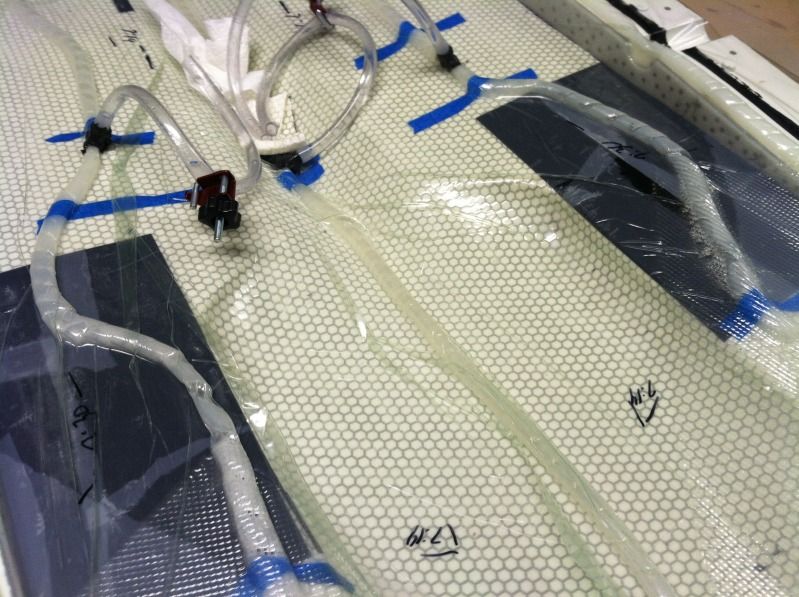
1. Yup same kind of spiral wrap used to hold electrical wires together.
2. The Spiral wrap Is the feed line
3. Flow medium (it helps the resin flow through the entire layup to wet it all out).. the soric (hexagon looking stuff) is a flow media and sandwich material as well. We then used a specialty expanded plastic mesh that also hows the resin flow quicker.
4. Peel ply is used between the layup and the resin feed lines. It makes the surface ready for any secondary bonding once it is pulled away.
5. Materials cost... there's around $150 worth of one time use consumables per mold half
6. Nothing gets reused once it part is infused...
7. No cleaning of the PVC resin trap.. its $8 in parts for one and can be used till its full, then it gets trashed and a new one made up. If i wanted to spend $300+ on a commercial unit, I could clean it out then.
 12-16-2012, 07:49 PM
#212
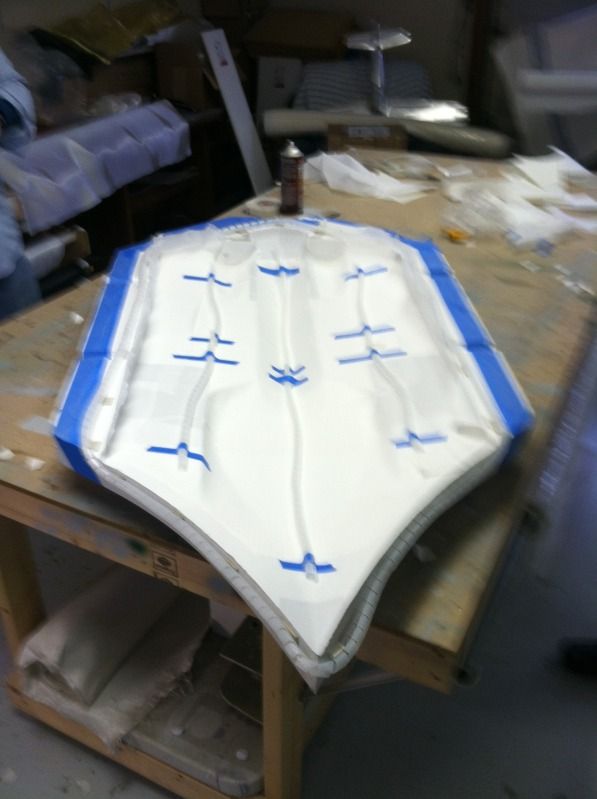
Top half is done:
First up was getting the layup all done, peel ply in place, resin feed and vacuum lines in all place..
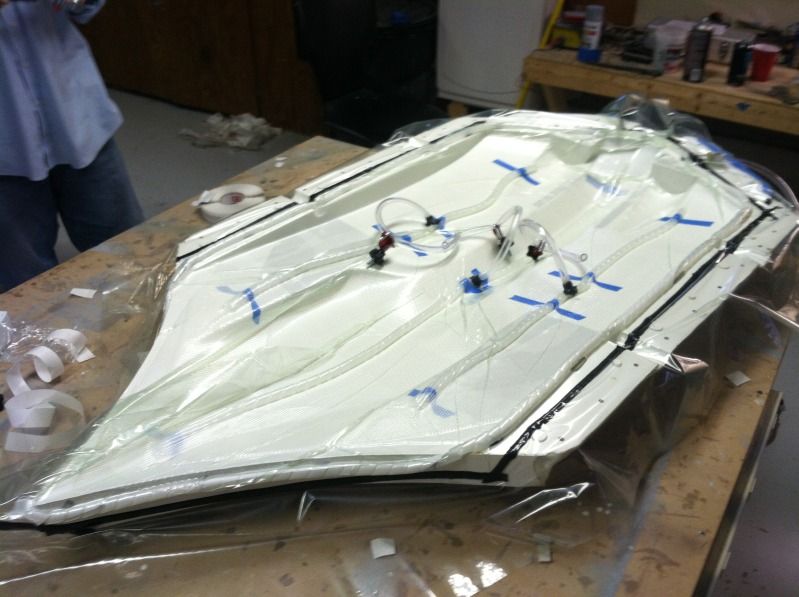
Then the vac. bag was put in place, fought with for an hour or so finding and fixing leak(s) (mostly just one stubborn one).. then it was infused. This one turned out Great as well!
Then sometime between all that, we torn all the trash off the bottom section and got it ready for internals and joining. We still have a good bit of work to do on the internal structure and determining fan unit mounts, battery tray's, nose gear stuff, etc.. but its mostly figured out. So here's a few shots of the bottom mold half and some views of the internal structure that is still far from done.
And a video of the infusing of the top half:
http://www.youtube.com/watch?v=ljldN...=youtube_gdata
First up was getting the layup all done, peel ply in place, resin feed and vacuum lines in all place..
Then the vac. bag was put in place, fought with for an hour or so finding and fixing leak(s) (mostly just one stubborn one).. then it was infused. This one turned out Great as well!
Then sometime between all that, we torn all the trash off the bottom section and got it ready for internals and joining. We still have a good bit of work to do on the internal structure and determining fan unit mounts, battery tray's, nose gear stuff, etc.. but its mostly figured out. So here's a few shots of the bottom mold half and some views of the internal structure that is still far from done.
And a video of the infusing of the top half:
http://www.youtube.com/watch?v=ljldN...=youtube_gdata
12-16-2012, 07:57 PM
#213
My Feedback: (10)
Thanks for all the answers!
Does that $150 include the resin and cloth that will be a part of the final part? What do you think you might be selling these for? I'm not a prospective buyer, just curious about the economics, when it makes sense to go this route vs just building the wooden plug but glassing and using it, from an economics POV vice any structural/performance/flying/maintence aspects.
Really enjoying this thread.
Whit
12-16-2012, 08:08 PM
#214
ORIGINAL: wphilb
Thanks for all the answers!
Thanks for all the answers!
Does that $150 include the resin and cloth that will be a part of the final part? What do you think you might be selling these for? I'm not a prospective buyer, just curious about the economics, when it makes sense to go this route vs just building the wooden plug but glassing and using it, from an economics POV vice any structural/performance/flying/maintence aspects.
Really enjoying this thread.
Whit
Nope, that $150 is just in peel ply, bag film, bag tape, spiral wrap, nylon fittings and feed/vacuum tubes. There is around $1000 worth of materials in each complete part. Projected price was hopefully going to be around $900-1000, but its going to have to go up.. Once we get the 2nd and 3rd center section done, we will have a better idea of the costs associated and a selling cost.
To put it into perspective, there is about $200 in plywood in one center section. $180 worth of balsa, $30 in epoxy, $40-50 in fiberglass in just the plug. Not to mention about 2 weeks worth of work to cut out all the interlocking 'notch's in all the parts, And we didn't even put in all the lightning holes, or all the structure needed for man unit mounts, landing gear mounts, etc etc etc! It weights about 20 pounds to!
While our center sections will be expensive (compared to wood), it'll save allot of time, it will be significantly lighter AND stronger, and will be ready for paint, hatch mounting, equipment install and door hinging. Essentially if you work at a moderate pace, you could have the center section completely done and waiting on the outer wing panels in a week.
12-16-2012, 08:13 PM
#215
My Feedback: (10)
Thanks again! Very educational.
How many do you plan on making? Slightly different question, how many could you get from your mold before you would have to make another one from that plug?
And those are the last questions!
For today at any rate LOL
Whit
12-16-2012, 08:17 PM
#216
ORIGINAL: wphilb
Thanks again! Very educational.
Thanks again! Very educational.
How many do you plan on making? Slightly different question, how many could you get from your mold before you would have to make another one from that plug?
And those are the last questions!
For today at any rate LOL
Whit
The mold should be good for 50-100+ parts. I ensure my molds are all very thick so they stay stable and last. The only thing that really wear's on the mold, is light details (panel lines in this case) so while these details may get less prominent over time, they will still be there.. But it takes ALLOT of parts for that to happen.
12-16-2012, 08:24 PM
#217
My Feedback: (10)
OK, I would love one but sounds like a $3K plane "on the hoof?" (Whoops, another question). Plus I'm not familiar enough with high wattage electrics to make a go at this project.
But I will happily fly one in my head drifting off to sleep tonight.
Please keep up the thread and the videos, especially the maiden flight.
Whit
12-17-2012, 07:19 PM
#219
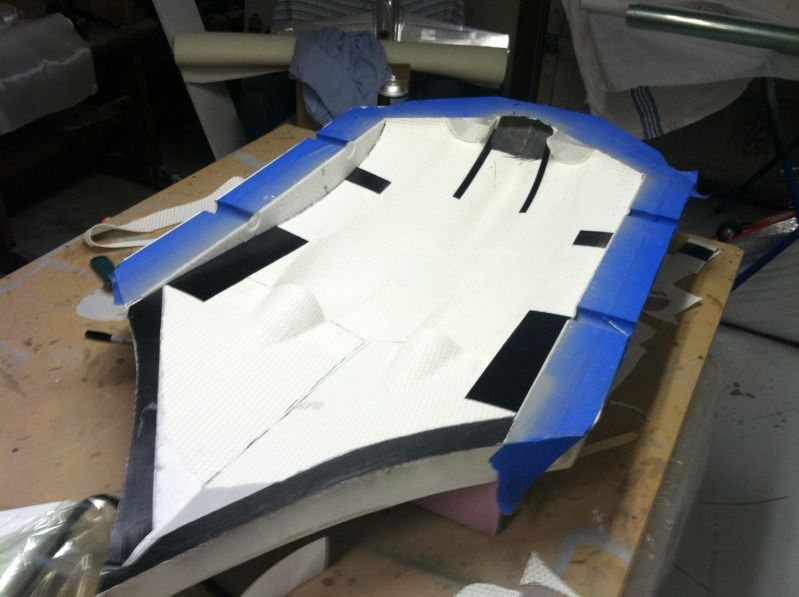
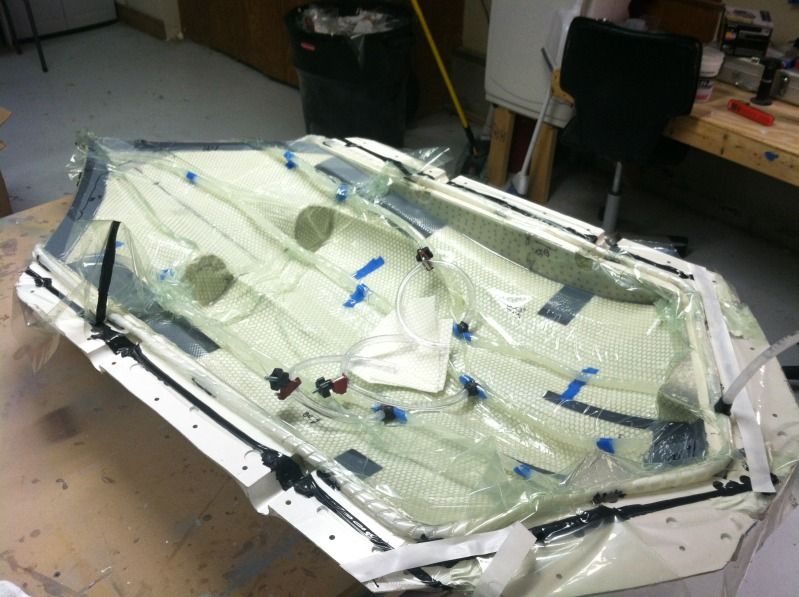
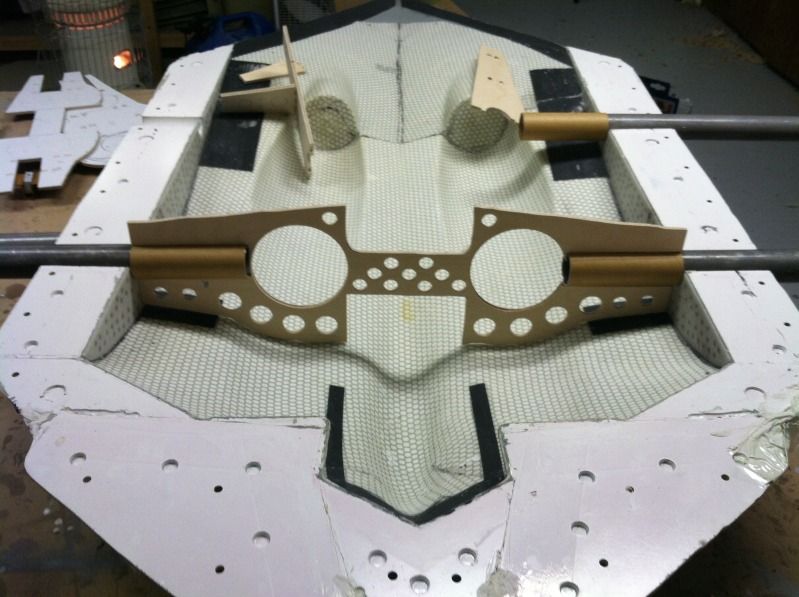
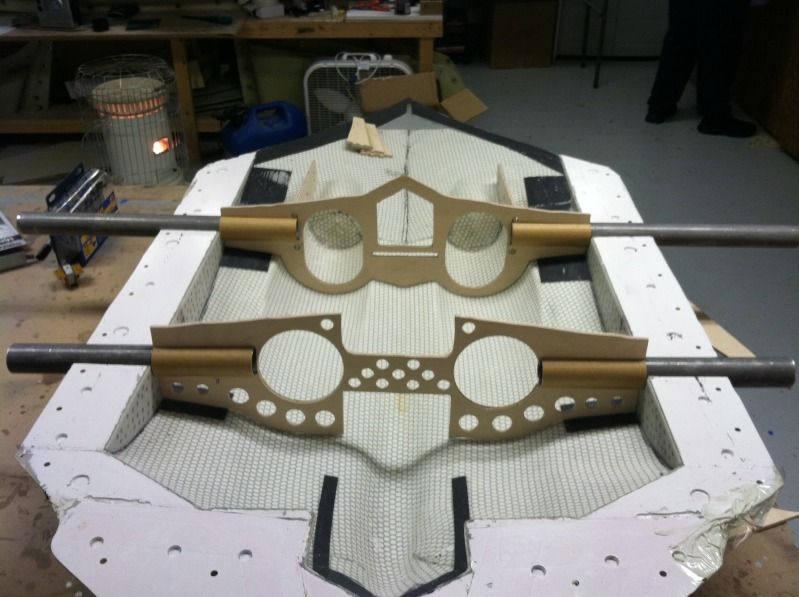
Pulled all the bagging, feed lines, etc off of the molded top part. Again it turned out pretty good... I'm begging to think the CF has a defect in it as there is another spot that appears to not have fully wet out either... but it is very stiff. It may just be some sort of contaminant on the surface of the CF... either way, off we go!

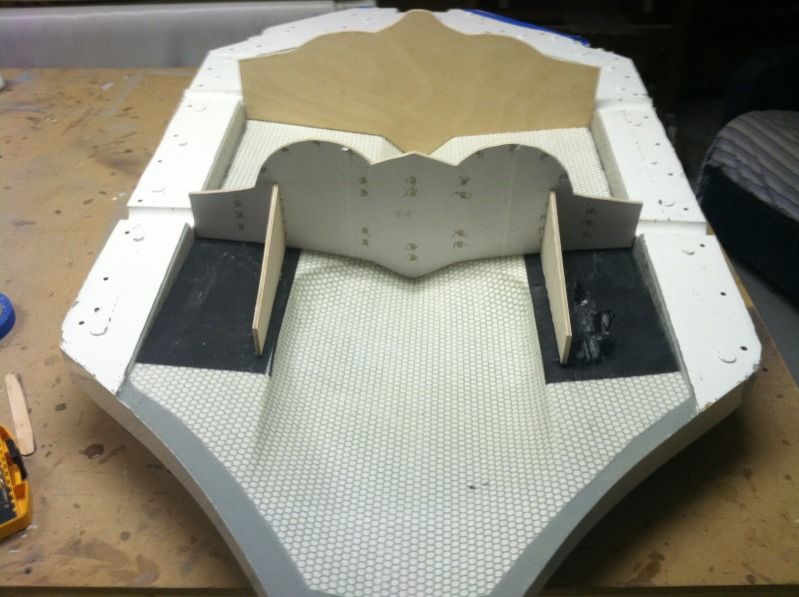
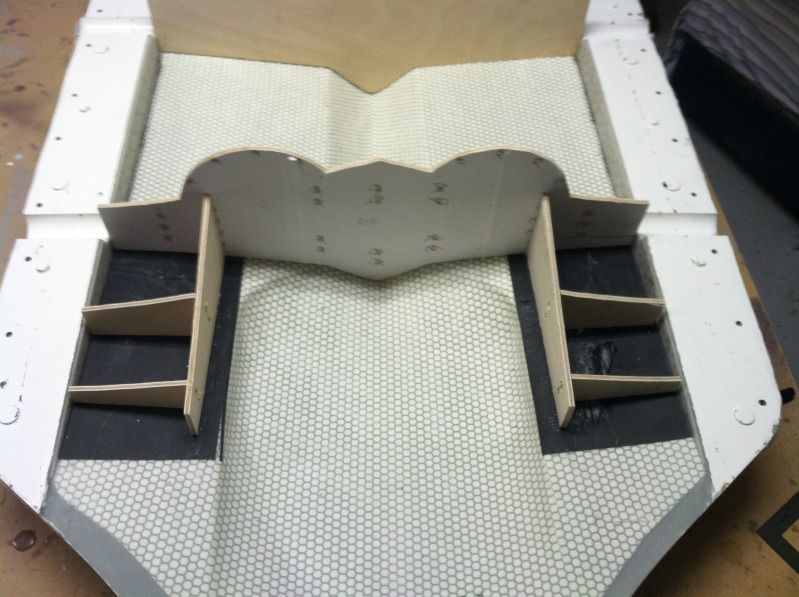
Then we tested the fit of the structure to the top half. We need to do a little bit of adjustments, but they fit pretty good. We also closed the mold halves together and they fit reallly good. The aft half didn't close completely, but that's due to the structure needing a bit of trimming. Wed. we are planning to get the structure layout and lightning holes finalized and then start installing all that stuff this weekend:
Then we tested the fit of the structure to the top half. We need to do a little bit of adjustments, but they fit pretty good. We also closed the mold halves together and they fit reallly good. The aft half didn't close completely, but that's due to the structure needing a bit of trimming. Wed. we are planning to get the structure layout and lightning holes finalized and then start installing all that stuff this weekend:
12-19-2012, 07:02 PM
#220
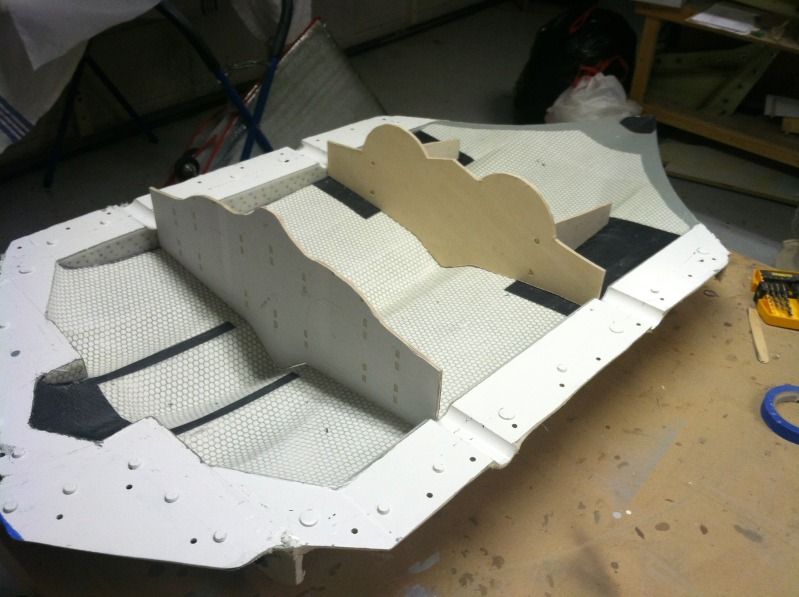
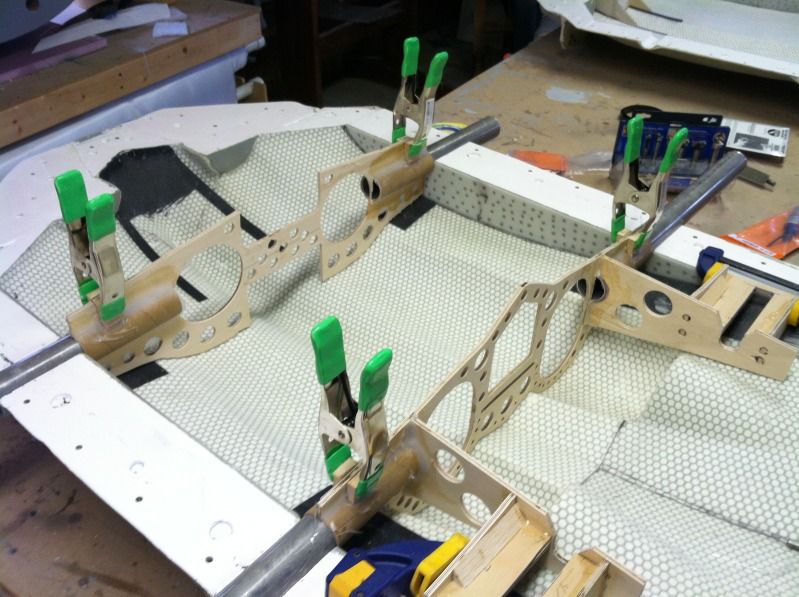
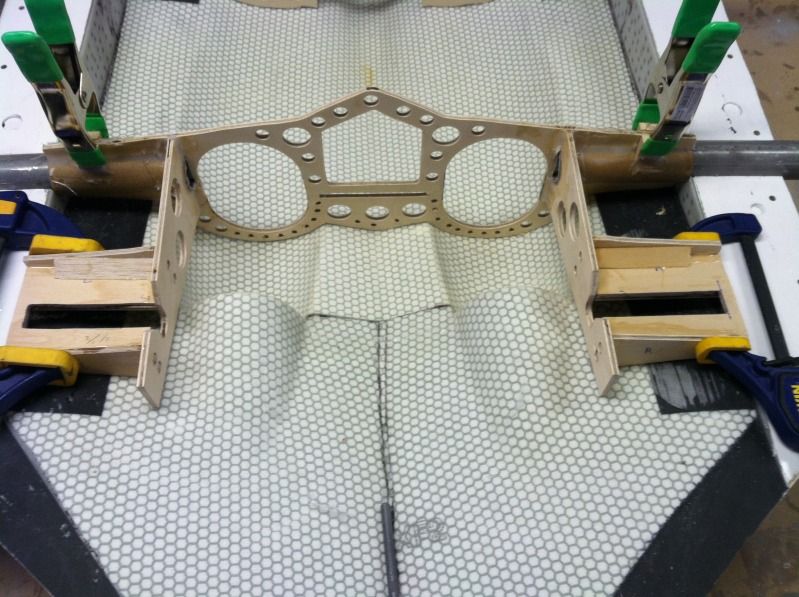
My budd and I essentially got all the templates done, and the majority of the interior structure for the first model done. All that is left, is the nose gear mount parts and fan unit mounts. We left ourselves two options for mounting batteries which we will show later on. Interior structure comes in at around 1 pound and is all aircaft ply. I plan to take some time tomorrow or friday and get the wing tube so kets epoxied and glassed to there spars, the nose gear mounts cut and readied and the main landing gear doublers glued into place.
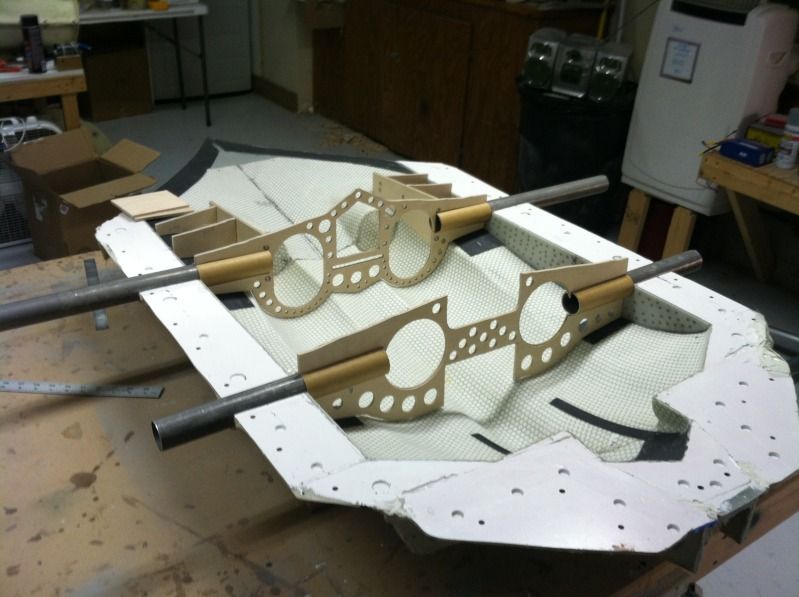
For those wondering, the holes in the bulkheads should support a 110-120mm edf unit. There is also plenty of room for future fuel tanks for turbines.
For those wondering, the holes in the bulkheads should support a 110-120mm edf unit. There is also plenty of room for future fuel tanks for turbines.
12-20-2012, 09:15 AM
#221

My Feedback: (2)
Join Date: May 2002
Location: Jacksonville,
IL
Posts: 142
Likes: 0
Received 0 Likes
on
0 Posts
Invert, dude I have to say I'm so jealous of your skills. I wish I could come 1/10th the builder you are, keep up the amazing work man...
12-20-2012, 09:13 PM
#222
The first Horten is getting closer to being born!
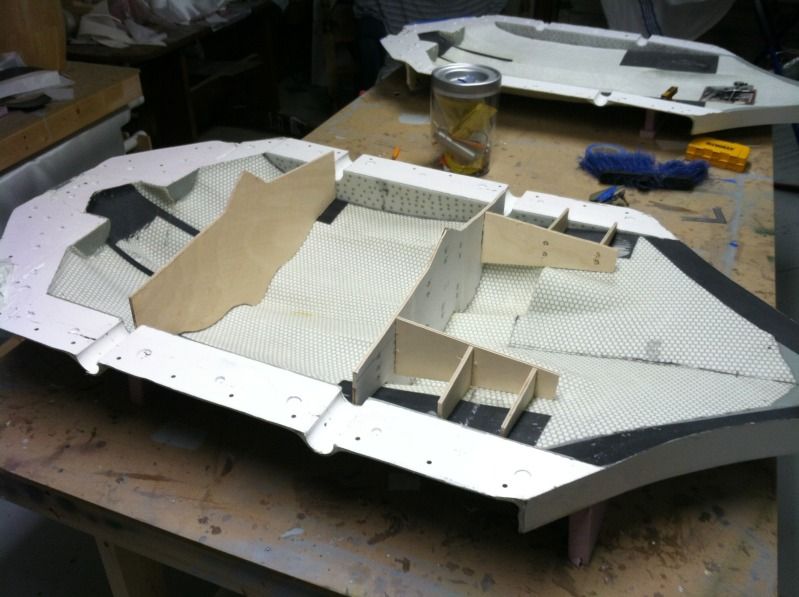
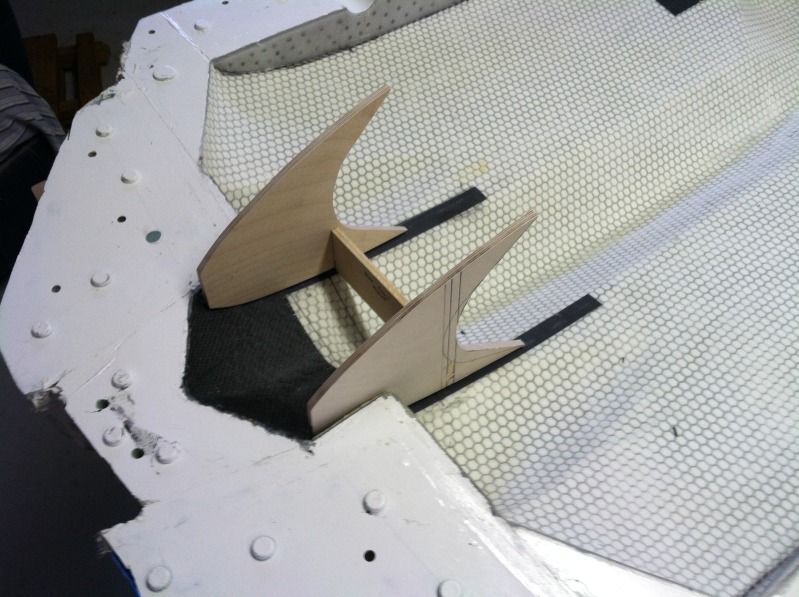
Tonight I got the wing tube sockets epoxied and glassed to their carry-through spars/bulkheads. I also epoxied the main gear mount doublers in place. And I got started on designing the nose gear structure parts. I've got to wait for the nose gear to show up to verify they are long enough, but I'm pretty sure they are. They are also oddly shaped so you can get to the fan mount parts.. This big ole' center section is getting crammed pretty quickly with its guts..
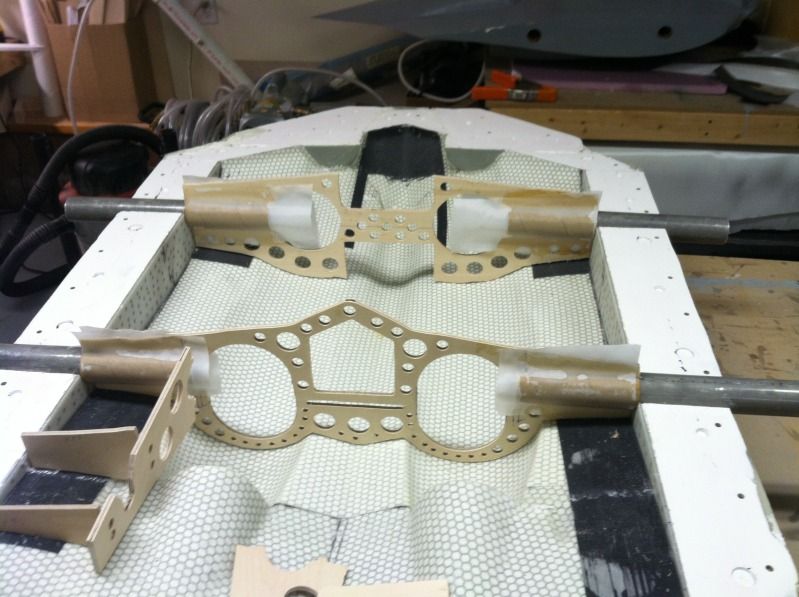
Tonight I got the wing tube sockets epoxied and glassed to their carry-through spars/bulkheads. I also epoxied the main gear mount doublers in place. And I got started on designing the nose gear structure parts. I've got to wait for the nose gear to show up to verify they are long enough, but I'm pretty sure they are. They are also oddly shaped so you can get to the fan mount parts.. This big ole' center section is getting crammed pretty quickly with its guts..
 12-20-2012, 09:31 PM
#224
Thanks Casey.. We are determined to have a Horten for Christmas! And if it all go's well, We will have a PAINTED horten for christmas... now If i could just get some snow to get a good snow camo inspiration. lol
12-21-2012, 10:52 AM
#225
While I wait for the firewood delivery, I went out in the shop and got some stuff done..
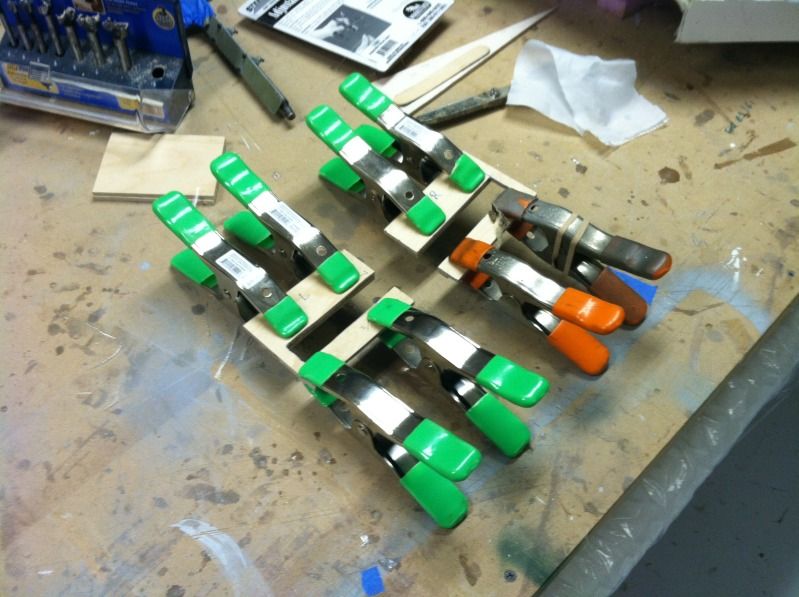
First up was cutting and epoxying all of the outer wing panel attachment bolt blocks into place on the carry through bulkheads. I'll drill and tap these blocks for a 4-40 bolt to hold the wings on after the halves are joined.
I then got the main landing gear plates aligned and epoxied that entire assembly of plates and ribs together. 1/2" tri-stock was placed in the corners for added strength:
And my buddy Tom brought over the Robart nose gear retract. So with the retract here and some slight modifications to the nose gear structure, It is ready for install. We have decided to wait to install this till after we join the halves due to it possibly interfering with the canopy frame openings, which may require it to modified again..
So, now that everything is essentially complete, tomorrow we close the mold halves!