


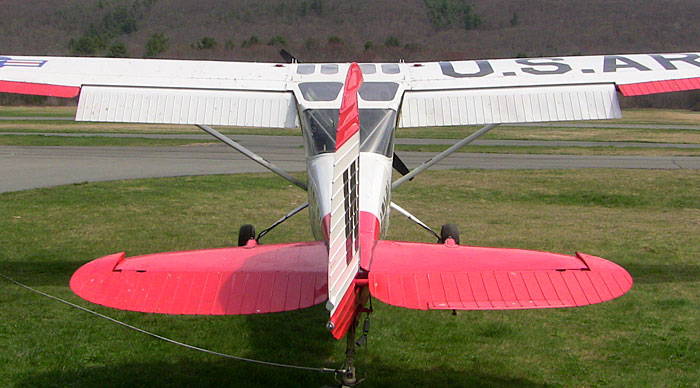
Cessna L19 Bird Dog
 01-05-2013, 08:06 PM
#1

Thread Starter

Join Date: Feb 2012
Location: Fairfield, CT
Posts: 416
Likes: 0
Received 0 Likes
on
0 Posts
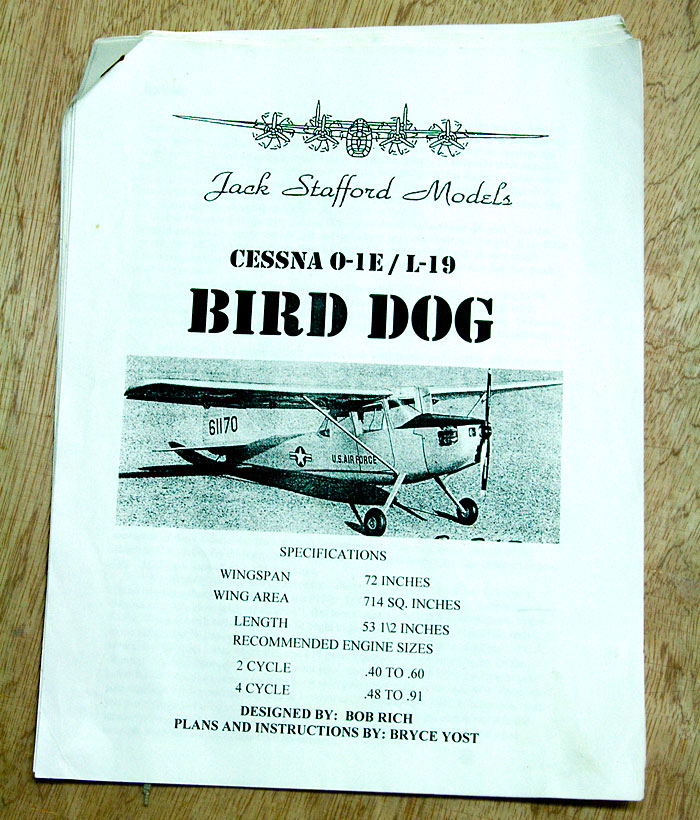
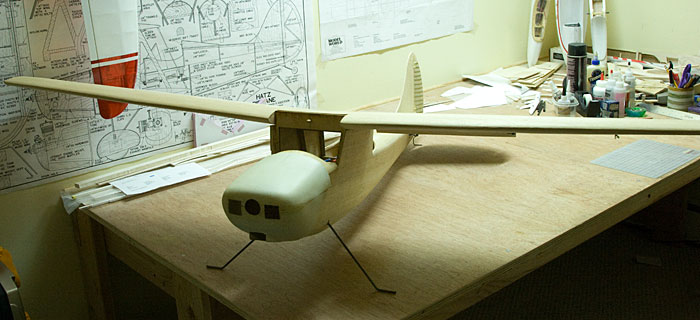
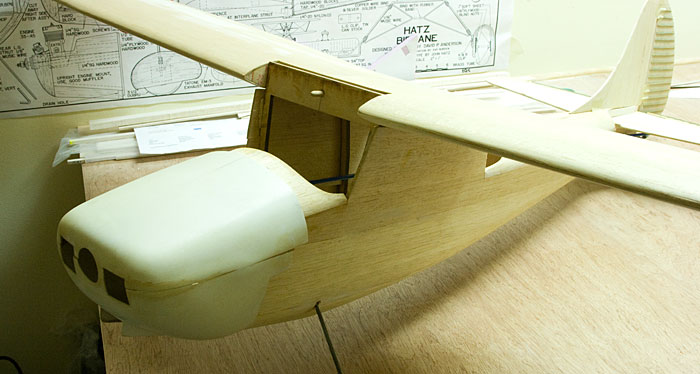
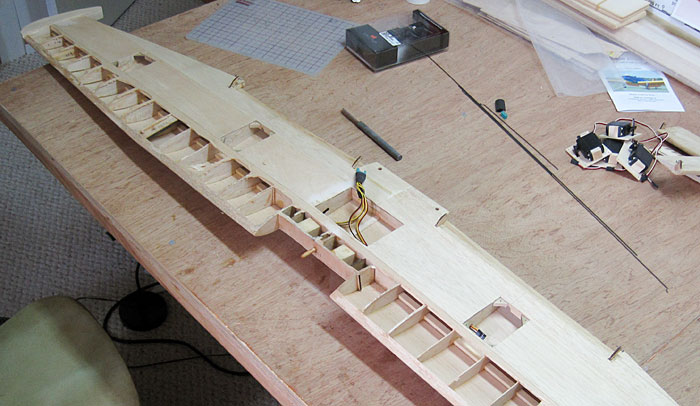
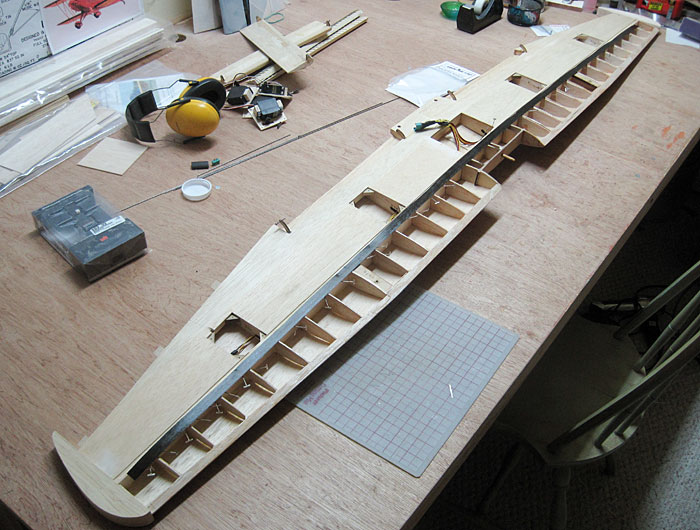
It seems I'm the happy recipient of this beautiful 1/6 scale airframe. The previous owner/builder (Dr. Joe Makovich) wasn't able to complete her & so she sat for many years. When I heard she was just gathering dust I happily volunteered to take over the project. As you can see she's been masterfully crafted...
All balsa/plywood construction (note the side windows haven't been cut out yet)...
She's a nice size at 72" (1828mm)...
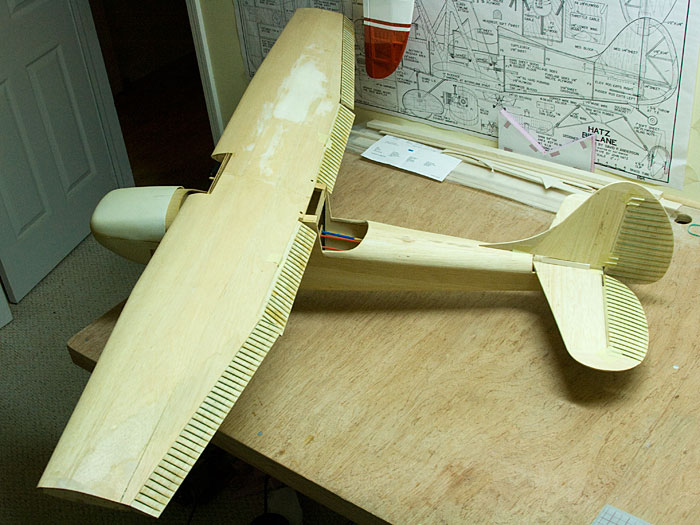
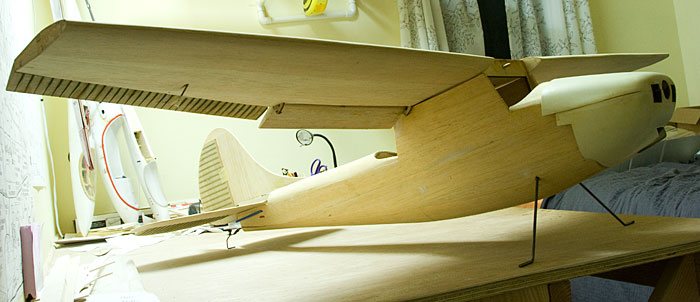
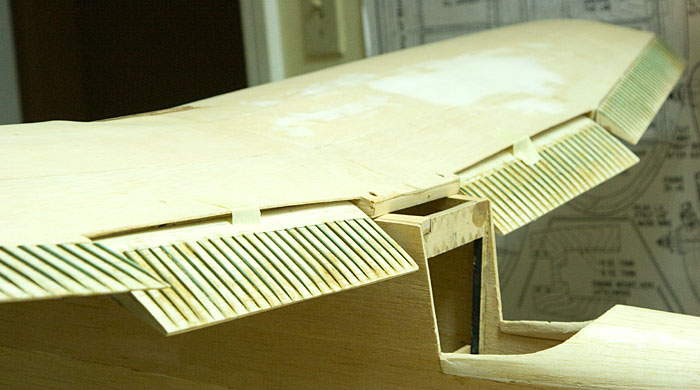
Love the scale corrugation work on the control surfaces...
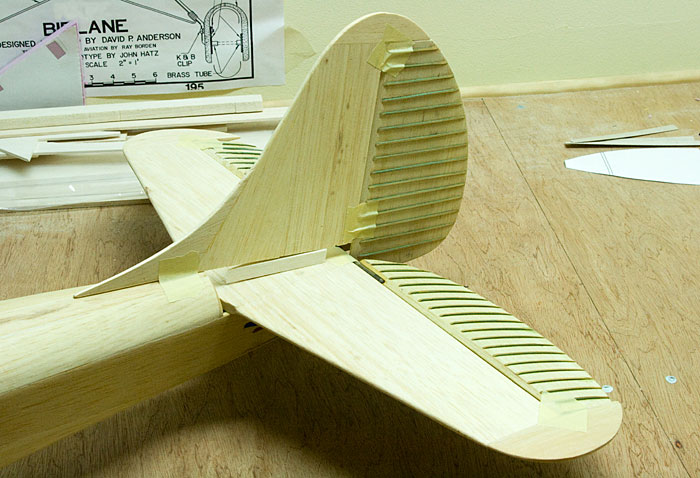
Beautiful functional fowler flaps...
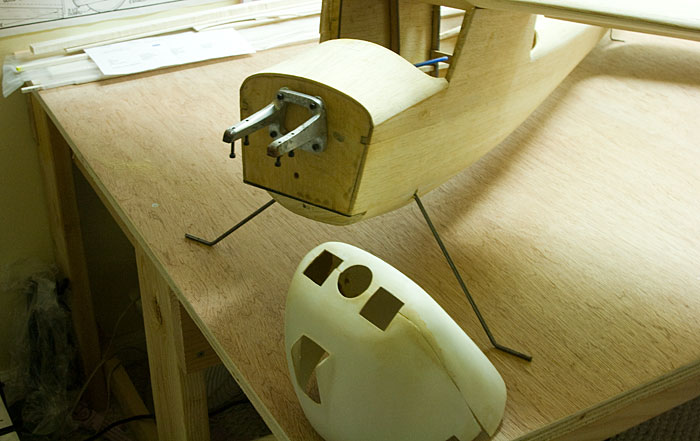
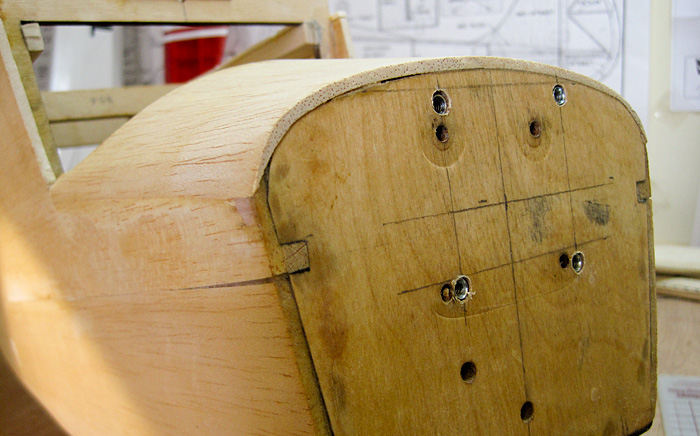
Beneath the fiberglass cowl lurks a gas motor mount...
ARF
So technically this is a kit built airframe (someone built her from the plans up) but for my purposes, she's ARF. From what I've read about Jack Stafford's kits, this was no easy build. Even though I enjoy kit building, its nice to have the bulk of the work done, especially as it appears to have been done well.
So what are my intentions for this Bird Dog?
As an avid RC sailplane pilot I spent last Summer learning the finer arts of being towed aloft by an RC tow-plane. This year I'd like to return the favor & do my share by aerotowing with my own tug. So I'm entertaining the idea of outfitting this bird-puppy as an aerotowing workhorse.
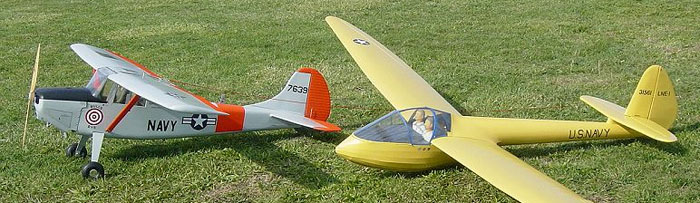
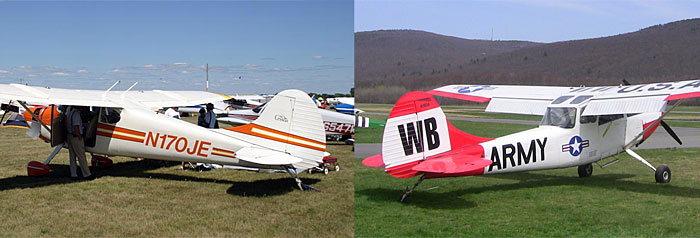
Ben Diss' L19 Bird Dog tow-plane
Its high-wing layout should make for a nice stable platform. Its 72" wingspan, 1/6th scale should allow me to tow everything from an Easy Glider to a three meter glass-slipper. As a noob tug pilot I don't want to tow anything larger or should I say more expensive, until I have more experience. The big fowler-flaps should come in handy for diving back to the field after release. And lastly she's scale so should be a welcome addition at many of the scale aerotowing events I attend.
Gas Vs Electric
Yeap there's no doubt Gas rules when it comes to hauling sailplanes up, up & away. You can tow all day with just a couple gallons of the smelly stuff. With a line of eager glider-jockeys waiting to fly you don't want them waiting around while you're charging batteries.
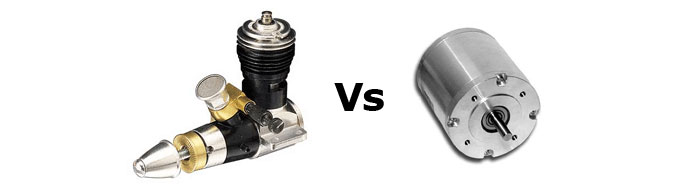
I'm not a gas kinda guy though. I have not-so-fond childhood memories of my father having to start my 0.49 cox engine for me. I was afraid to stick my fingers anywhere near that thing, hated everything about it, the prop, the noise, the smell, did I mention the prop? 35 years later I still feel uncomfortable around gas planes which makes no sense, as electrics are just as likely to lob off a few digits *shrug*
Irrational phobias standing, this will be an electric aerotow tug
Several of my club mates have electric tugs & as long as there's extra batteries, they work out just fine. We've been averaging around five or six tows per battery, at say five to ten minutes per tow, all together that's enough time to fast-charge a second pack while towing with the other. Theoretically an electric tug should be able to tow non-stop with only minimal downtime while swapping out batteries.
Weight
One of the concerns with this airframe is the weight. The fuselage is primarily 1/4" balsa planking. The wing is fully sheeted top & bottom. She seems pretty hefty so I ran the numbers...
33 oz fuselage
28 oz wing
5 oz tail
13 oz aprox .60 sized brushless motor
15 oz 4S 4000mAh LiPo
3 oz 100a ESC
11 oz 8 standard servos
16 oz odds & ends
24 oz fiber-glass, paint, covering
____________________
148 oz or 9.25 lbs total (4.19 kg total)
With 714 sq/in wing area that equates too...
30 oz/sq.ft (91 g/sq.dm)
13 oz/cubic.ft
27 mph stall speed (43 Km/h)
Coming from a glider background those numbers scare the heck out of me. Then again if I run the full scale Bird Dog's numbers I get the same cubic wing loading.
Do I need to find ways to lighten her up?
I'm somewhat loathed to go hacking up the fuselage cutting lightening holes all over the place but maybe that'd what I need to do. I was also thinking about maybe removing some of the wing's sheeting, maybe cut lightening holes in the ribs. Leave the wing as a partial open structure & recover with Ultracote instead of sheeting. Basically put her on a diet. What do you guys think?
 01-06-2013, 05:53 AM
#2

Join Date: Mar 2002
Location: Smithfield,, VA
Posts: 1,013
Likes: 0
Received 0 Likes
on
0 Posts
I'd say put a good .60 glow in it and get rid of the heavy batteries and esc. That does seem like a heavy model..
I flew Bird dogs in the Army flight school; It was a fun plane to fly. With full flaps (60 degrees) you could make a VERY steep approach at 100 mph that seemed like it was almost vertical and still touch down on the numbers. FUN!
Dash
an edit.
t
I'd also make sure you don't have to add any ballast in the nose for balance., Ddo what you can in the rear to lighten it back there. If you want to mount a towhook, that will add some weight back there. You will need to be able to release the towline if it should become neccessary. If you are thinking about going into the wing and cutting holes in the ribs, that is hardly worth the effort. Opening up the bays on the bottom of the wing between the ribs would have good results. I'm just in the final stages of building a 1/5 scale Pica Waco. The kit had 1/8 lite ply ribs. I built the bottom wing first and thought it felt pretty heavy, so I took to my dremal and cut holes in the ribs, I think I ended up saving less than three ounces. I used balsa ribs in the top wing which was about five inches longer and it came out noticably lighter.
As for the pros and cons of electric, safety wise, I'm much more afraid of elecrtic than glow engines. You have to physically start a glow engine. An electric is "HOT" as soon as you connect the battery. To me, that is a little scary. I"ve heard too many horror stories, one which was in my club!
01-06-2013, 06:06 AM
#3
Senior Member

ORIGINAL: Dash7ATP
I'd say put a good .60 glow in it and get rid of the heavy batteries and esc. That does seem like a heavy model..
I flew Bird dogs in the Army flight school; It was a fun plane to fly. With full flaps (60 degrees) you could make a VERY steep approach at 100 mph that seemed like it was almost vertical and still touch down on the numbers. FUN!
Dash
I have a coroplast US Aircore "Nighthawk" that has similar WS & a bit more wing area.
It is set up W/a Saito FA91S on C&H CDI. It weighs about 7 1/2# all up W/a a full (12oz) tank. Altough it flys well, it lands HOT!
Adding another 1 3/4# to that is going to result in poor flight handling IMO.
Ditch the electrons & burn some methanol. Use whatever size engine balances out the CG W/O added ballast. You sould be able to get in # 7# or less.
01-06-2013, 06:10 PM
#4
Thread Starter
Join Date: Feb 2012
Location: Fairfield, CT
Posts: 416
Likes: 0
Received 0 Likes
on
0 Posts
Thanks for the input guys but I'm not going to fly gas. That's simply not gonna happen. Electric is my thing with all its pros & cons.
That's pretty cool to hear you flew Bird Dogs. Yeah I'm totally stoked about this model, should be a lot of fun especially with those big flaps.
I'm still concerned about the weight although some seasoned aerotow guys over at one of my mirror threads seem to be indicating my worries maybe unfounded. Apparently they've been successfully towing with a 2 meter Porter that's 11 lbs! So that's encouraging. Still though I'll be taking steps to keep the weight down but at this point I don't think I'll be doing any major surgery.
The aerotow release will be mounted up on top of the wing or on the turtle deck directly behind the wing. That's pretty standard procedure for an RC tug.
05-12-2013, 07:19 PM
#5
Thread Starter
Join Date: Feb 2012
Location: Fairfield, CT
Posts: 416
Likes: 0
Received 0 Likes
on
0 Posts
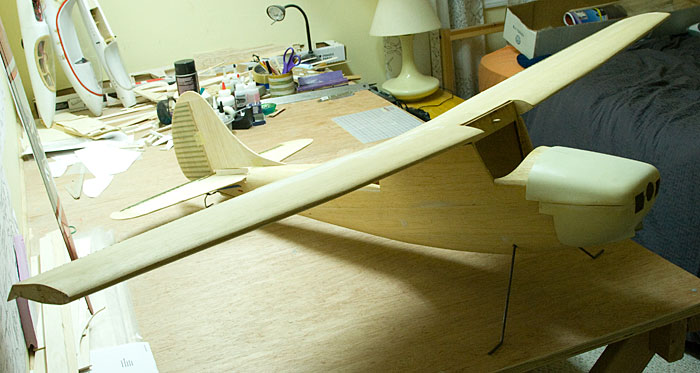
It's been a while but I'm back working on this project, woohoo!
Motor Selection
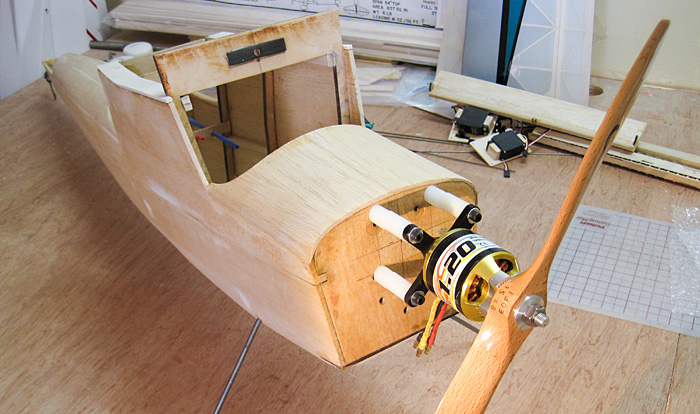
I did some chatting with my buddies over at RCAerotowing.com & after considerable deliberation, I ended up acquiring this bloody great hunk of copper & aluminum...

This L19 is not going to be lacking for power *evil grin*
I check out the real thing
Here's a real Bird Dog aerotowing at the Wurtsboro 1-26 Fun Fly last weekend...
YouTube Video - Click to Play
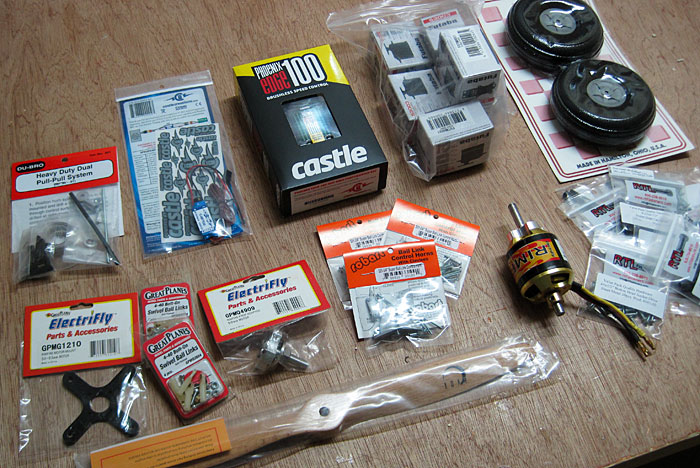
More goodies arrived...
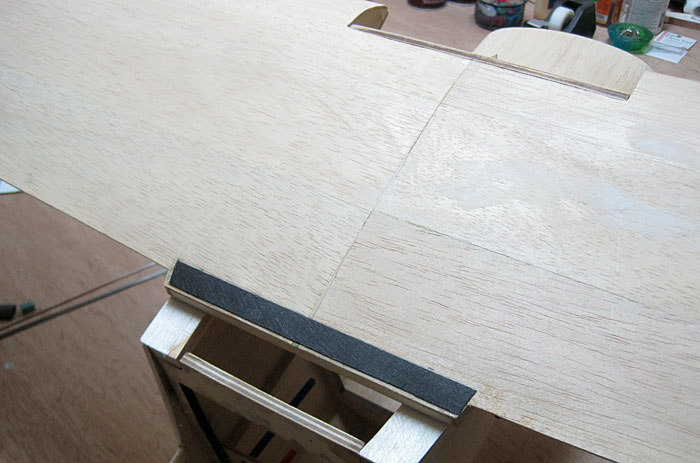
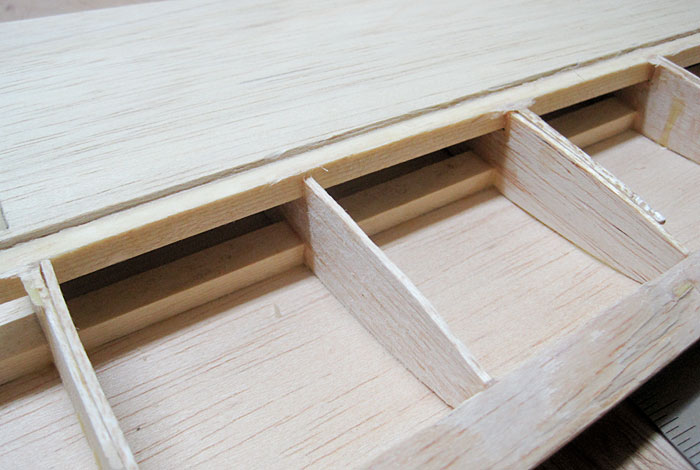
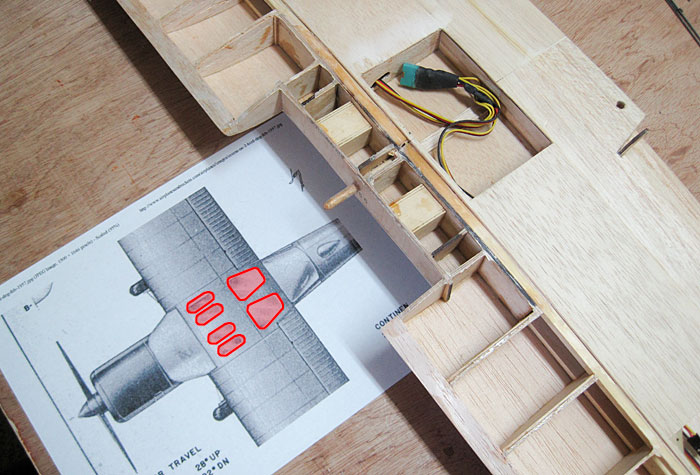
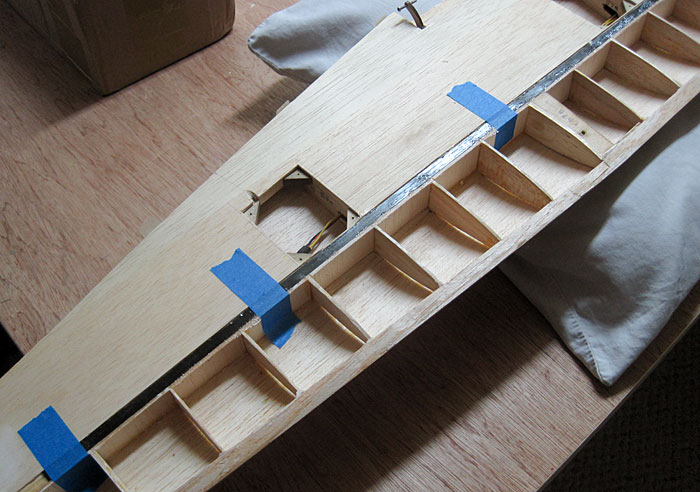
Started work on the wing saddle area. The stock setup seemed pretty wimpy, especially as I'll be removing much of the side planking for the windows. So I'm reinforcing the area some...

Bellcranks? Umm no
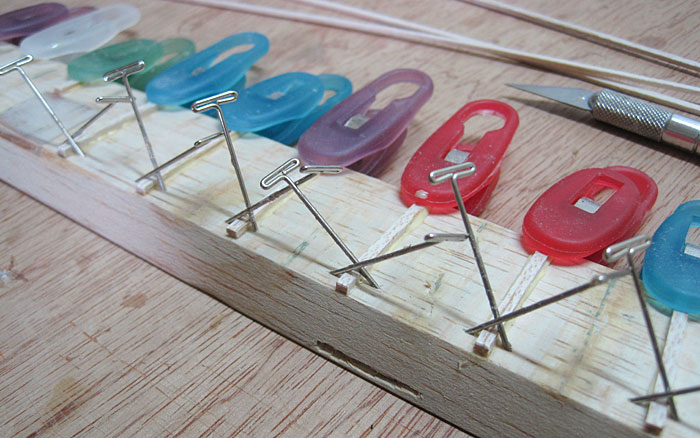
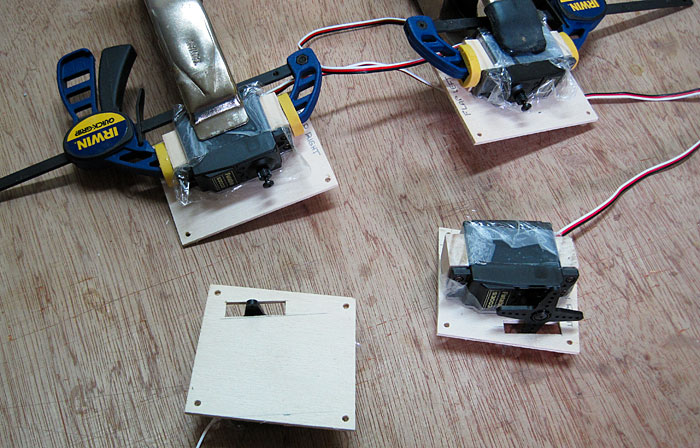
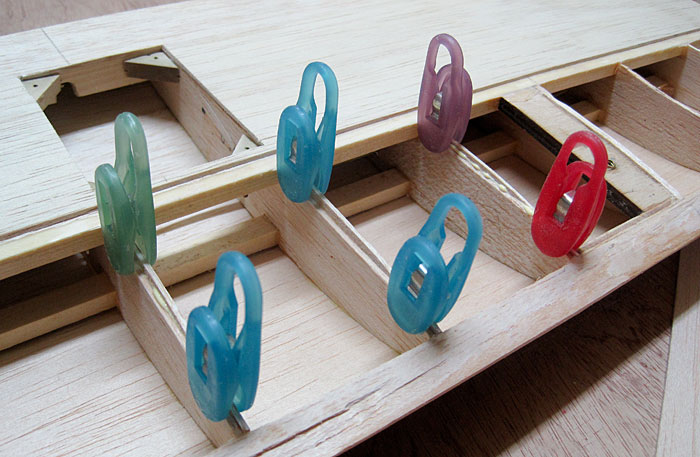
The wing's ailerons & flaps are hooked up via old school bellcrank linkages connected to a couple of servos mounted in the center of the wing. I'm going to modernize things by installing four servos, one for each control surface. First order of business is to go digging for bellcranks...
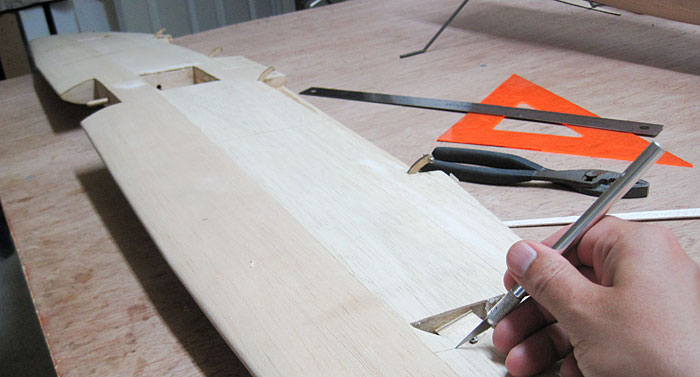
How quaint...
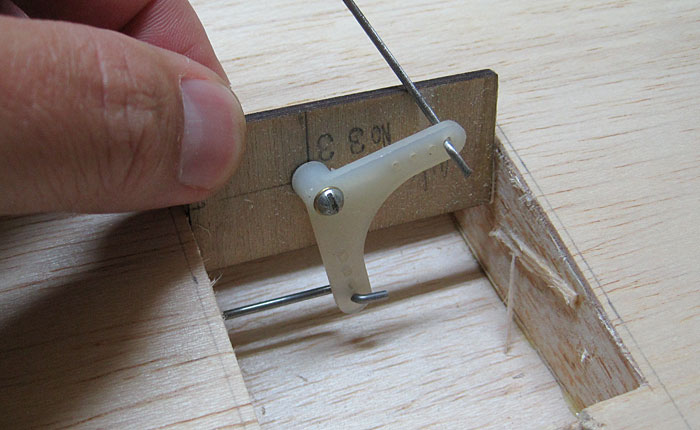
Anyone need bellcranks?..
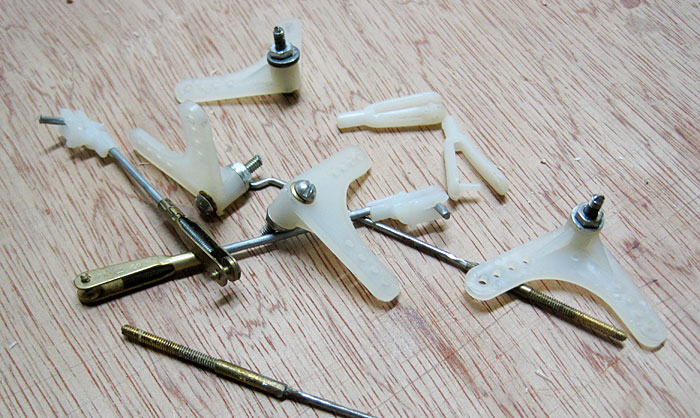
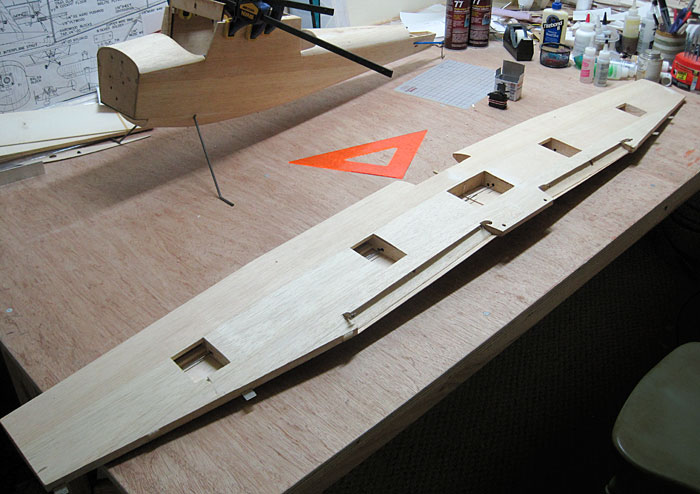
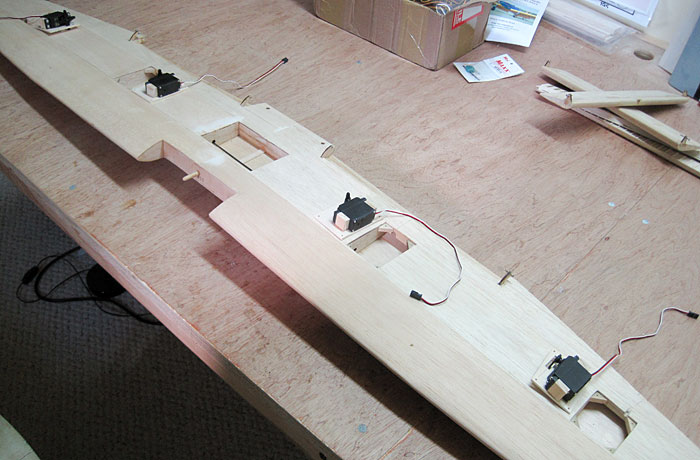
The old linkage system is out. Holes are cut ready to install the four servos...
Corrugation
Looking at the reference photos I took at Wurtsboro the other day, you can clearly see corrugations in the control surfaces...
My L19 has corrugations too...
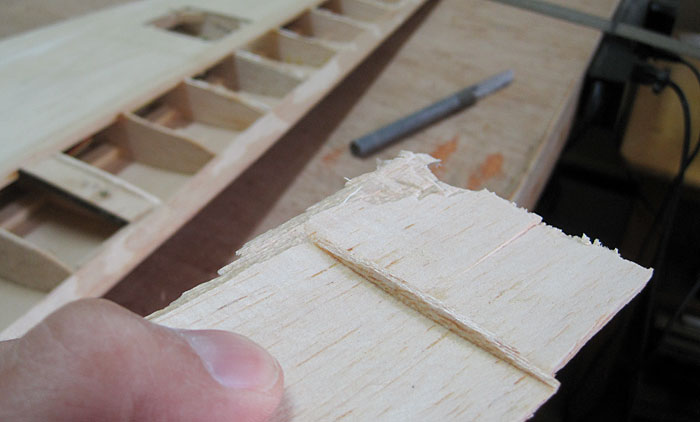
Having recently spent a LOAD of time glassing, finishing & painting another project I'm not in the mood to paint this one too. Instead I'm simply going to cover her with Ultracote. Those cool corrugations I figured would be a problem so I decided to get rid of them...
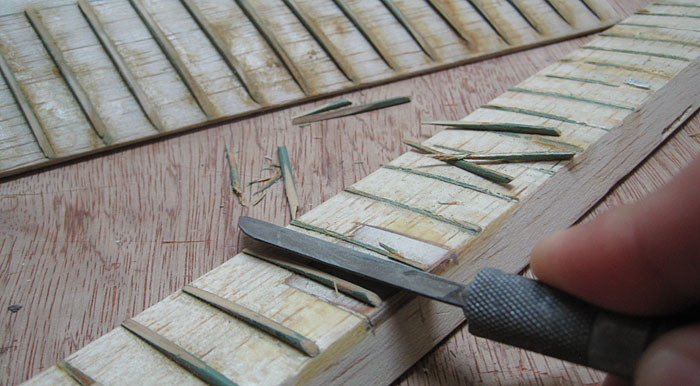
What was I doing? The corrugations are cool, leave them be! After hacking up just one aileron thankfully I came to my senses.
I decided to do a quick test & see how they'd look covered with Ultracote...
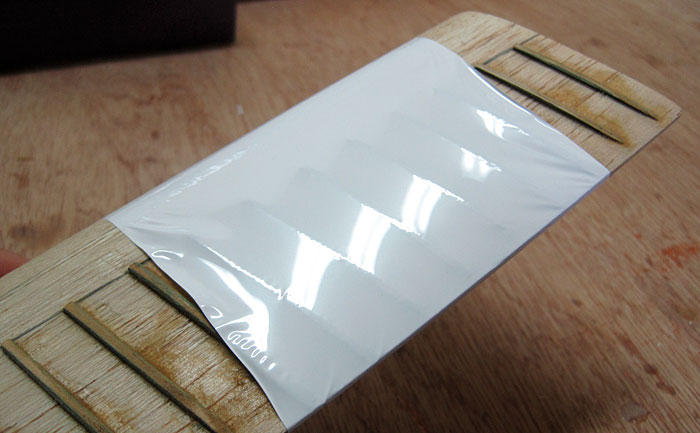
Okay so that doesn't look exactly like the real corrugations but it kinda works. It's certainly more interesting than a without them. I'm sold, lets keep the corrugations. Only problem is I'd already hacked them off one aileron.
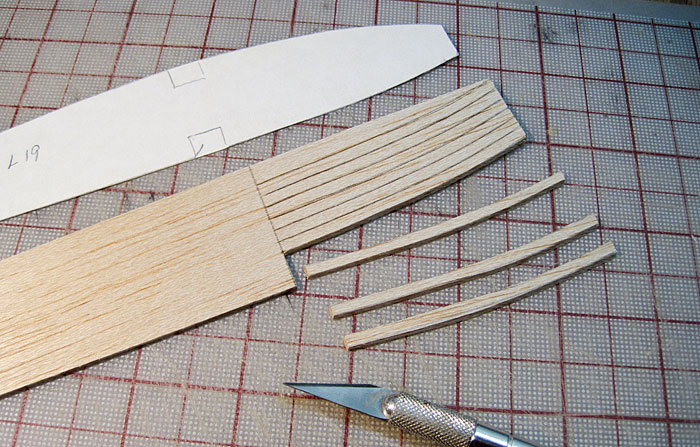
Two hours later I had a new found respect for Joe, the original builder. Wow corrugations are a LOT of work, cutting, sticking, trimming, sanding...
On the plus side I got to use my nifty strip cutting tool...
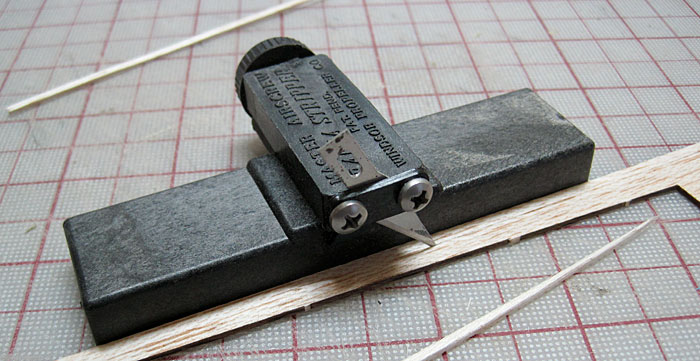
Remind me, never to go hacking up other people's hard work before putting some serious thought into it...
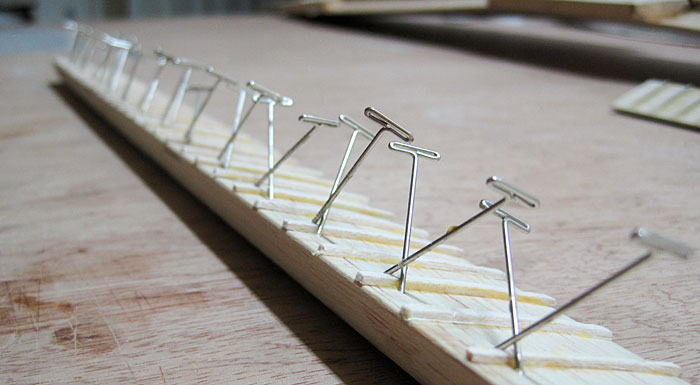
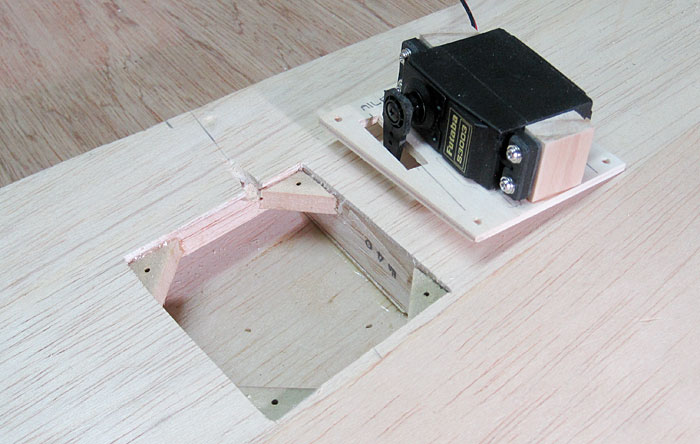
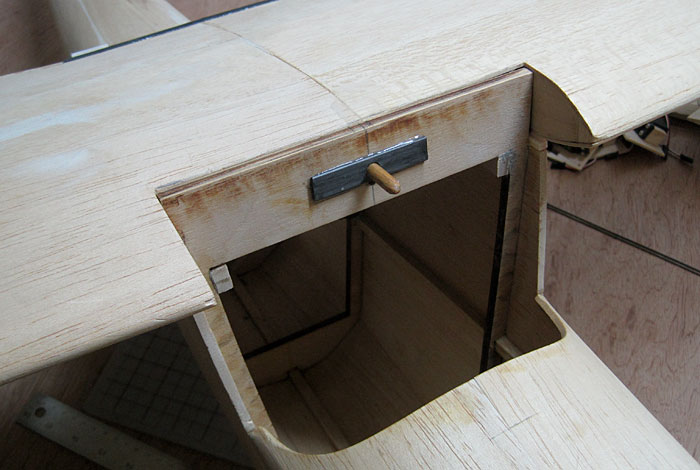
Servo Hatches
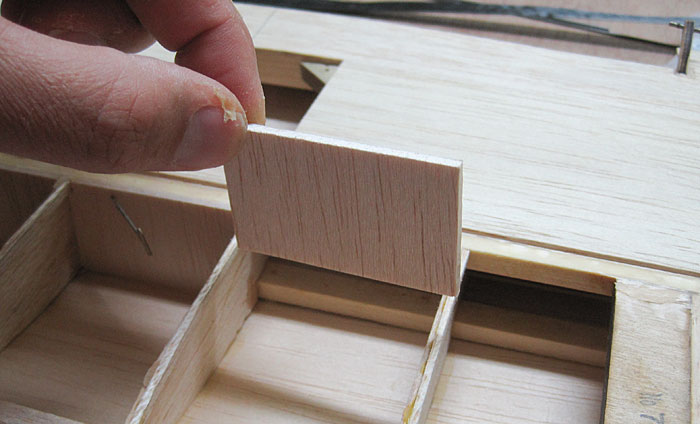
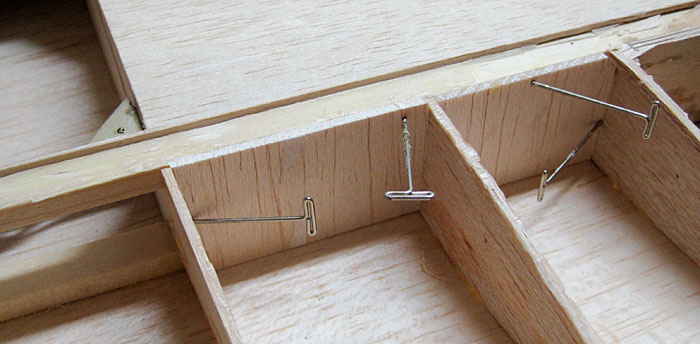
With the aileron restored to its former corrugated glory I turned my attention to the wing's servos. Triangle pieces of hardwood were added to each servo bay...
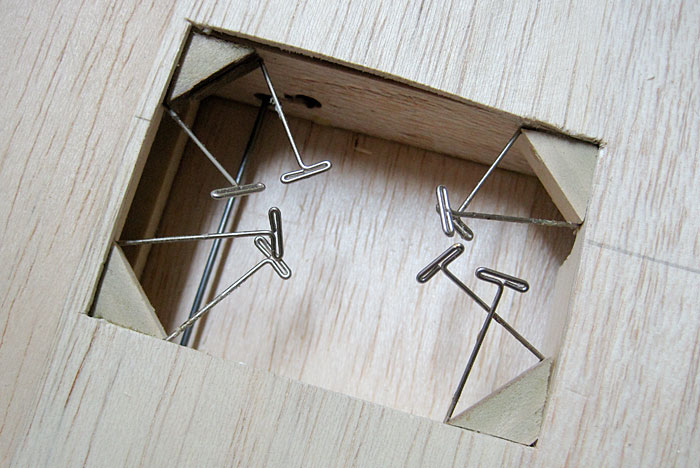
I created servo hatch covers & drilled holes for the mounting hardware...
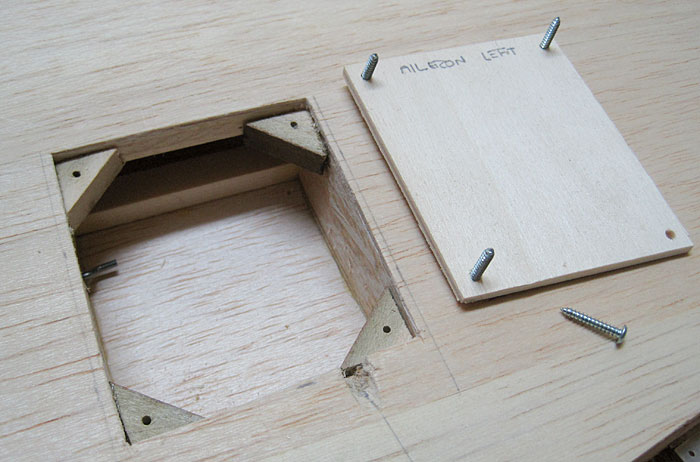
I was hoping to get the servos installed but spent most of my time messing with the corrugation issue instead. Hope to get more accomplished tomorrow...
Motor Selection
I did some chatting with my buddies over at RCAerotowing.com & after considerable deliberation, I ended up acquiring this bloody great hunk of copper & aluminum...
This L19 is not going to be lacking for power *evil grin*
I check out the real thing
Here's a real Bird Dog aerotowing at the Wurtsboro 1-26 Fun Fly last weekend...
YouTube Video - Click to Play
More goodies arrived...
Started work on the wing saddle area. The stock setup seemed pretty wimpy, especially as I'll be removing much of the side planking for the windows. So I'm reinforcing the area some...
Bellcranks? Umm no
The wing's ailerons & flaps are hooked up via old school bellcrank linkages connected to a couple of servos mounted in the center of the wing. I'm going to modernize things by installing four servos, one for each control surface. First order of business is to go digging for bellcranks...
How quaint...
Anyone need bellcranks?..
The old linkage system is out. Holes are cut ready to install the four servos...
Corrugation
Looking at the reference photos I took at Wurtsboro the other day, you can clearly see corrugations in the control surfaces...
My L19 has corrugations too...
Having recently spent a LOAD of time glassing, finishing & painting another project I'm not in the mood to paint this one too. Instead I'm simply going to cover her with Ultracote. Those cool corrugations I figured would be a problem so I decided to get rid of them...
What was I doing? The corrugations are cool, leave them be! After hacking up just one aileron thankfully I came to my senses.
I decided to do a quick test & see how they'd look covered with Ultracote...
Okay so that doesn't look exactly like the real corrugations but it kinda works. It's certainly more interesting than a without them. I'm sold, lets keep the corrugations. Only problem is I'd already hacked them off one aileron.
Two hours later I had a new found respect for Joe, the original builder. Wow corrugations are a LOT of work, cutting, sticking, trimming, sanding...
On the plus side I got to use my nifty strip cutting tool...
Remind me, never to go hacking up other people's hard work before putting some serious thought into it...
Servo Hatches
With the aileron restored to its former corrugated glory I turned my attention to the wing's servos. Triangle pieces of hardwood were added to each servo bay...
I created servo hatch covers & drilled holes for the mounting hardware...
I was hoping to get the servos installed but spent most of my time messing with the corrugation issue instead. Hope to get more accomplished tomorrow...
05-13-2013, 06:11 PM
#6
Thread Starter
Join Date: Feb 2012
Location: Fairfield, CT
Posts: 416
Likes: 0
Received 0 Likes
on
0 Posts
Servos
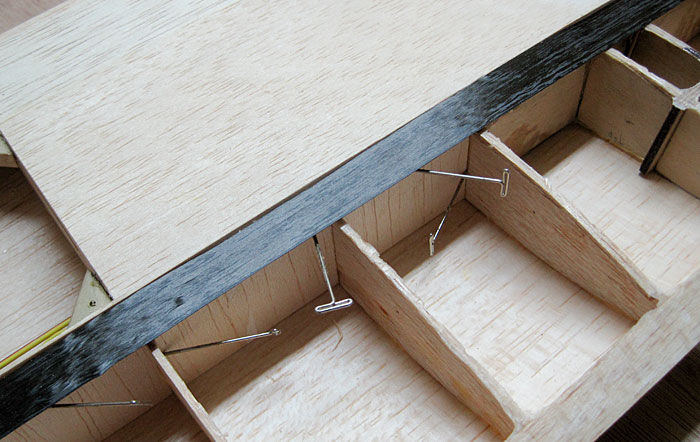
Attaching the servos to their hatches. The kitchen wrap is to keep them from sticking to the epoxy while it dries...
Servos mounted...
I was hoping to setup the linkages next but the receiver I'm planning to use crapped out so with will have to wait until I can get a replacement...
Besides I need to take care of this spaghetti before I can drive the servos anyway...
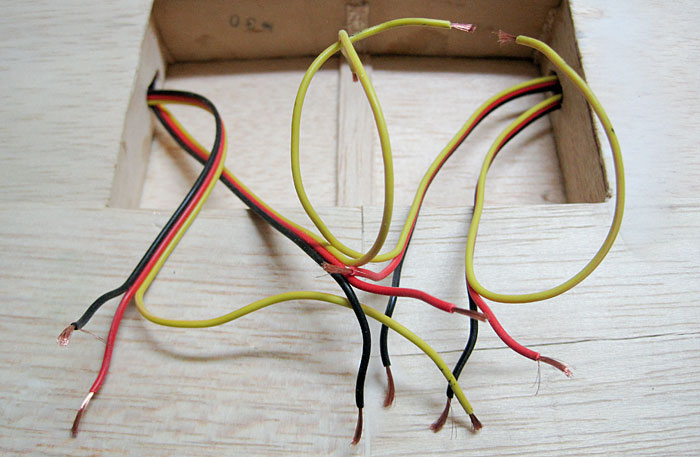
There that looks somewhat neater...
Wing Mount
The stock wing mounts (nylon bolts) are fine but there's not a whole lot of meat holding those in there...
Nothing a little carbon fiber can't fix...
Stuck that to the trailing edge...
I'll let that setup over night then drill out the bolt holes. I may fiber-glass over the area also, we'll see...
The front of the wing is held in place with a hardwood pin. I may swap that out for a metal or CF rod but I wanted to reinforce the area too...
Then again the wing pin & nylon rods are supposed to fail in a crash. I don't want to make those too strong but the holes they mount through should be bullet proof in my opinion.
For whatever reason the wingtips where never installed. Looks like I have some carving to do, fun fun...
Well that's all for today...
Attaching the servos to their hatches. The kitchen wrap is to keep them from sticking to the epoxy while it dries...
Servos mounted...
I was hoping to setup the linkages next but the receiver I'm planning to use crapped out so with will have to wait until I can get a replacement...
Besides I need to take care of this spaghetti before I can drive the servos anyway...
There that looks somewhat neater...
Wing Mount
The stock wing mounts (nylon bolts) are fine but there's not a whole lot of meat holding those in there...
Nothing a little carbon fiber can't fix...
Stuck that to the trailing edge...
I'll let that setup over night then drill out the bolt holes. I may fiber-glass over the area also, we'll see...
The front of the wing is held in place with a hardwood pin. I may swap that out for a metal or CF rod but I wanted to reinforce the area too...
Then again the wing pin & nylon rods are supposed to fail in a crash. I don't want to make those too strong but the holes they mount through should be bullet proof in my opinion.
For whatever reason the wingtips where never installed. Looks like I have some carving to do, fun fun...
Well that's all for today...
05-13-2013, 06:28 PM
#7
Thread Starter
Join Date: Feb 2012
Location: Fairfield, CT
Posts: 416
Likes: 0
Received 0 Likes
on
0 Posts
Here's some interesting Bird Dog trivia I just heard. The L19's tail is actually off the Cessna 170. Check it out, they're exactly the same...
 05-14-2013, 08:11 PM
#9
Thread Starter
Join Date: Feb 2012
Location: Fairfield, CT
Posts: 416
Likes: 0
Received 0 Likes
on
0 Posts
Glad you're enjoying it, thanks.
I love working with carbon fiber... I hate working with carbon fiber
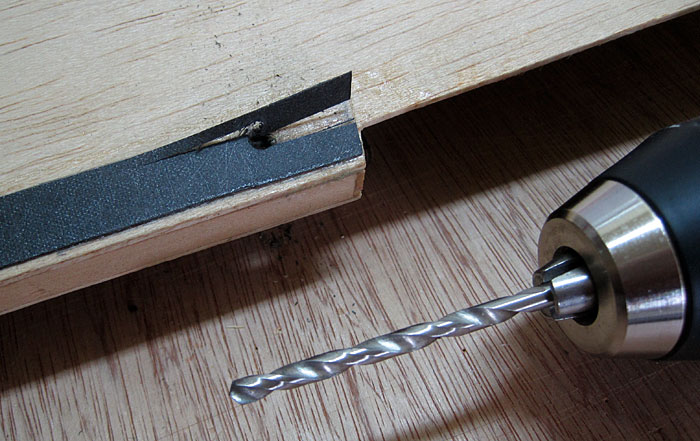
I know better than to use large drill-bits on CF ribbon, stupid mistake...
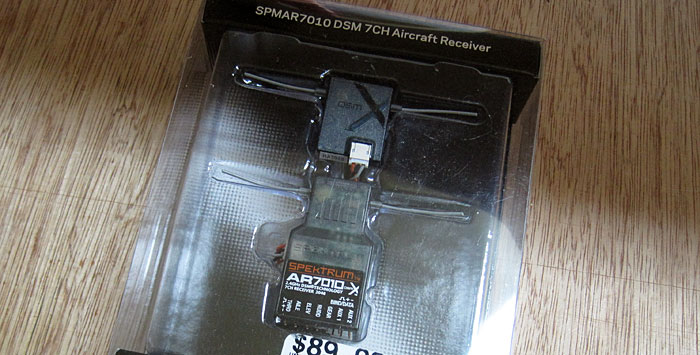
I'll deal with that later. On a more positive note, we have a Rx...
Remember the other day when I said something about not messing up someone else's hard work? Well I'm at it again.
Today I started ripping the wing apart...
I removed the bottom sheeting ahead of the spar...
Why? WHY!
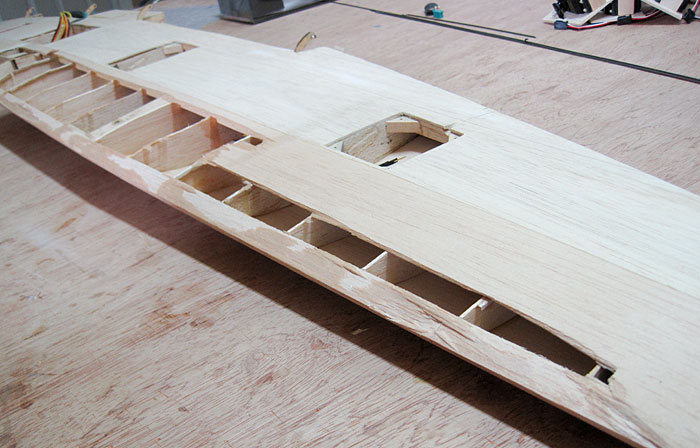
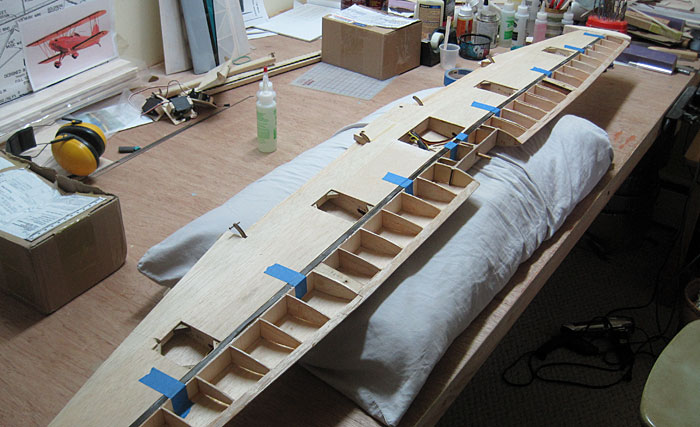
Well I noticed there's no sheer-webbing between the two spruce spars (scarey). I'm not into wings that snap (have some experience with that I do). Now maybe no sheer-webbing is fine on a fully sheeted wing, the skin carries the load/stress blah blah blah. Only trouble is I've chopped four bloody great servo access hatches in the wing's skin. So I'm thinking sheer-webbing would be good. So off comes the bottom sheeting so I have access.
Unfortunately while pulling the sheeting off, part of the ribs came off with it...
Oops. Well I have a fix for that...
Maybe if I don't say anything, nobody will notice...
Anyway back to the sheer-webbing. As you can see there isn't any. So lets add some...
Ideally the webbing should go between the two spars but as they're already assembled, getting a good fit would be nearly impossible. Next best thing, mount em to the side...
Despite being a not so ideal C shaped spar, that should still add a lot of strength. It's better than no webbing at all that's for sure...
Yes I could create a box spar by adding webbing to both sides but I really don't feel like removing the rear sheeting as well. I think this'll do just fine.
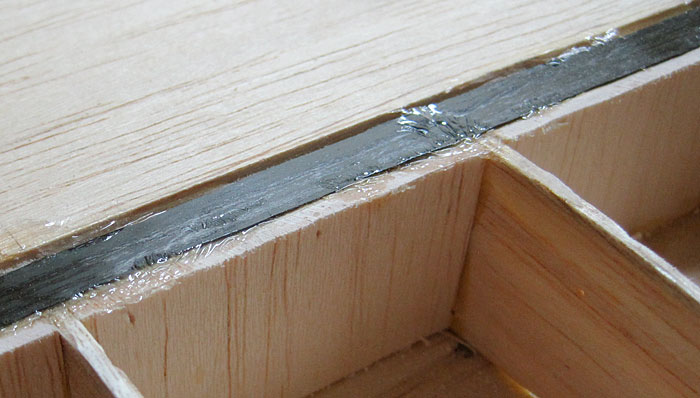
While I'm at it, lets spruce-up these spruce spars...
Adding a strip of carbon fiber ribbon will turn my lowly spruce spar into a bar-o-kryptonite...
Of course I'll need to add CF to the top spar as well.
Sun Roof
The real L19 sports an array of spiffy windows in the top of the wing...
As you can see, on my Bird Dog I have two major wing-spars running right through where the windows should go...
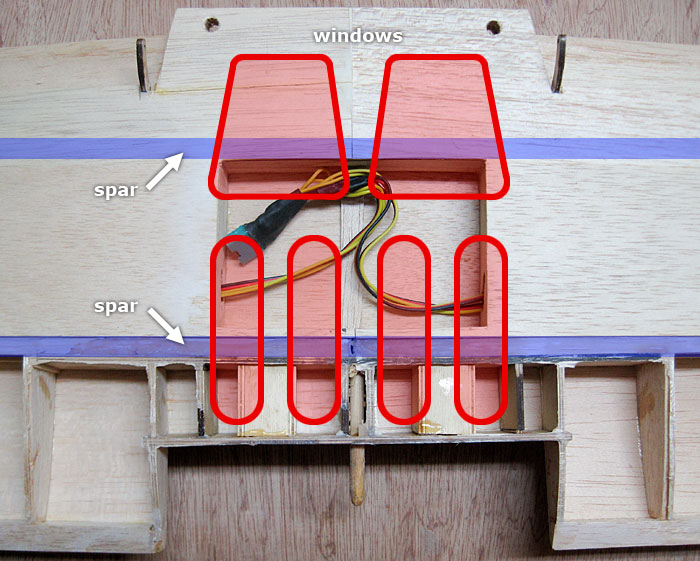
So what to do? I could go re-engineer the center section of the wing & move the spars but that seems a little extreme (I'd like to be flying this thing sometime this Summer). I could change the shape & location of the windows so they don't interfere with the spars. But then every L19 guru would be giving me grief. What I think I'm going to do instead is simply make fake "painted on" windows. They'll look scale & won't compromise the structure. We'll just pretend they're limo tinted glass right?
Anyway I'm not sure if I've made progress today or just created more work for myself. I think I'll be a lot happier knowing the wing has at least some reinforcing when I'm nose down in a dive, returning to the field after a tow. Can't wait.
I love working with carbon fiber... I hate working with carbon fiber
I know better than to use large drill-bits on CF ribbon, stupid mistake...
I'll deal with that later. On a more positive note, we have a Rx...
Remember the other day when I said something about not messing up someone else's hard work? Well I'm at it again.
Today I started ripping the wing apart...
I removed the bottom sheeting ahead of the spar...
Why? WHY!
Well I noticed there's no sheer-webbing between the two spruce spars (scarey). I'm not into wings that snap (have some experience with that I do). Now maybe no sheer-webbing is fine on a fully sheeted wing, the skin carries the load/stress blah blah blah. Only trouble is I've chopped four bloody great servo access hatches in the wing's skin. So I'm thinking sheer-webbing would be good. So off comes the bottom sheeting so I have access.
Unfortunately while pulling the sheeting off, part of the ribs came off with it...
Oops. Well I have a fix for that...
Maybe if I don't say anything, nobody will notice...
Anyway back to the sheer-webbing. As you can see there isn't any. So lets add some...
Ideally the webbing should go between the two spars but as they're already assembled, getting a good fit would be nearly impossible. Next best thing, mount em to the side...
Despite being a not so ideal C shaped spar, that should still add a lot of strength. It's better than no webbing at all that's for sure...
Yes I could create a box spar by adding webbing to both sides but I really don't feel like removing the rear sheeting as well. I think this'll do just fine.
While I'm at it, lets spruce-up these spruce spars...
Adding a strip of carbon fiber ribbon will turn my lowly spruce spar into a bar-o-kryptonite...
Of course I'll need to add CF to the top spar as well.
Sun Roof
The real L19 sports an array of spiffy windows in the top of the wing...
As you can see, on my Bird Dog I have two major wing-spars running right through where the windows should go...
So what to do? I could go re-engineer the center section of the wing & move the spars but that seems a little extreme (I'd like to be flying this thing sometime this Summer). I could change the shape & location of the windows so they don't interfere with the spars. But then every L19 guru would be giving me grief. What I think I'm going to do instead is simply make fake "painted on" windows. They'll look scale & won't compromise the structure. We'll just pretend they're limo tinted glass right?
Anyway I'm not sure if I've made progress today or just created more work for myself. I think I'll be a lot happier knowing the wing has at least some reinforcing when I'm nose down in a dive, returning to the field after a tow. Can't wait.
05-15-2013, 04:44 PM
#10
Thread Starter
Join Date: Feb 2012
Location: Fairfield, CT
Posts: 416
Likes: 0
Received 0 Likes
on
0 Posts
Poor Man's Wing Bagging
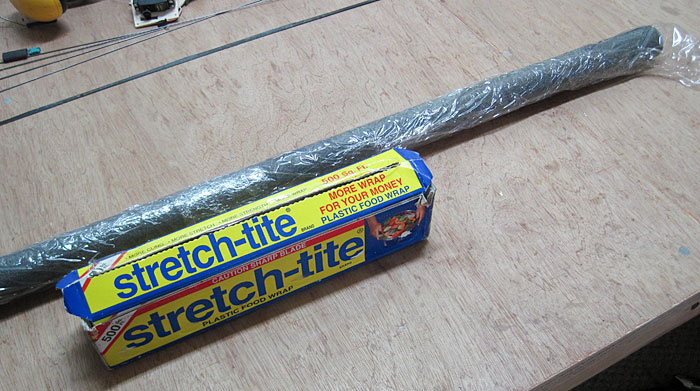
Okay so I have this carbon fiber ribbon I want to stick to my spruce spar. Gluing 72" all at once & applying some pressure to keep it down is a bit of a challenge...

I could use a vacuum bag to apply pressure while it dries. I don't have one of those though. I do have an idea however. First I need a pillow...
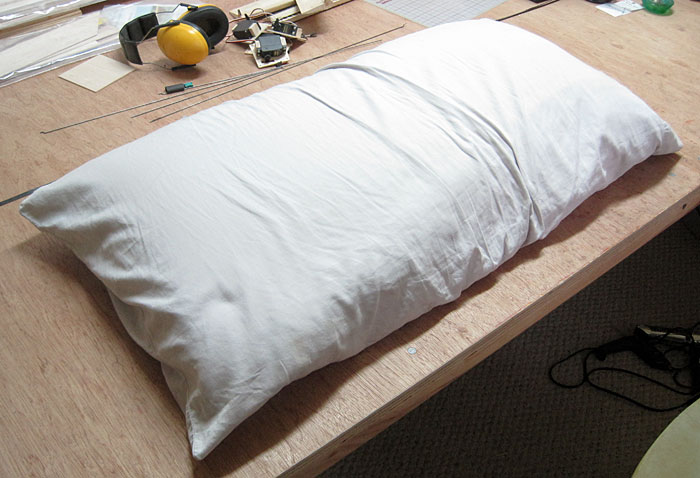
A length of foam insulation noodle wrapped in kitchen-wrap...
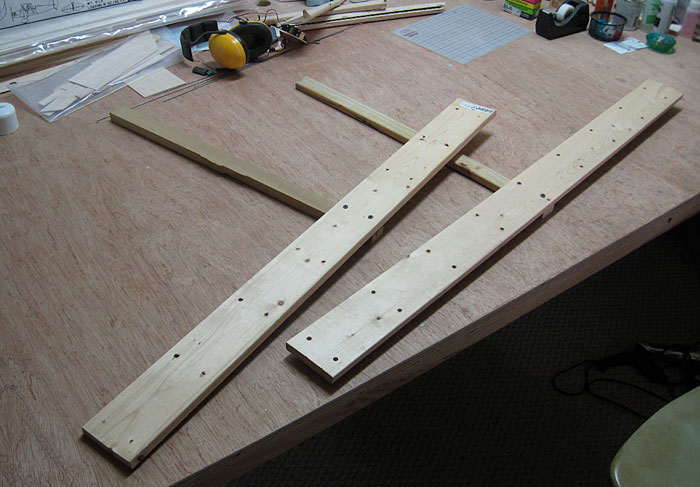
Left over pieces of wood from Ikea furniture (always wondered why it wobbles). Some scrap wood screwed to those at 90°...
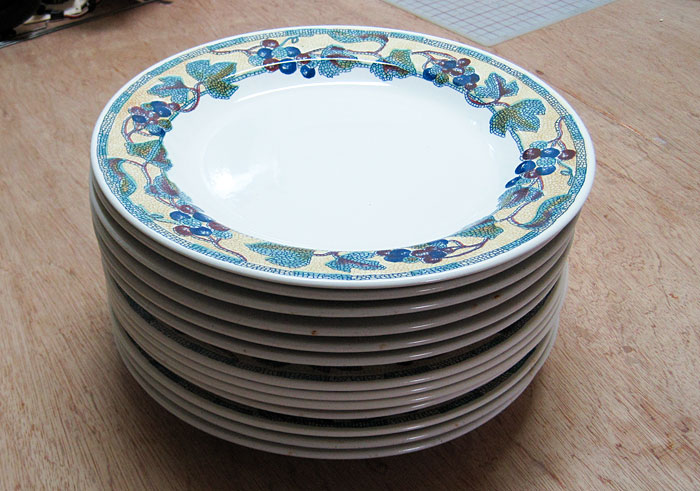
The wife's best china...
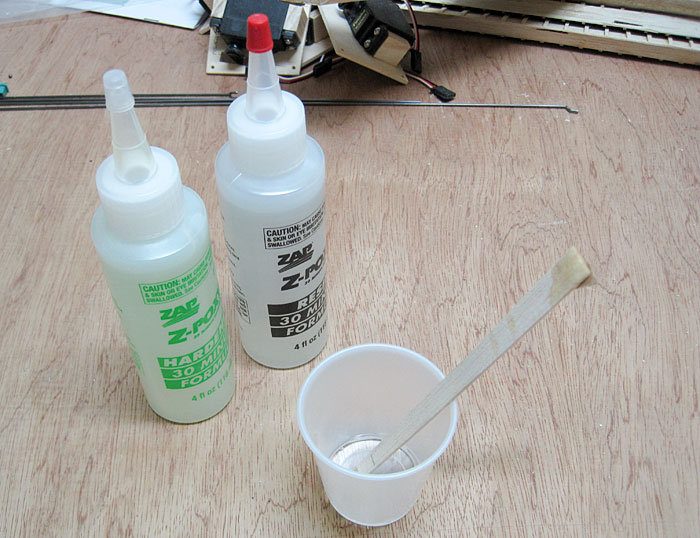
And of course some glue...
Set the wing atop the pillow. Apply the glue & tape the CF in place...
Place the foam noodle on top of that...
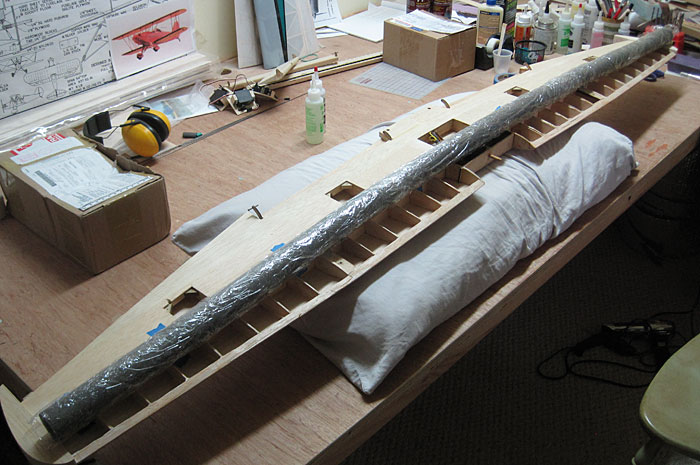
The Ikea T things go on next. Note the use of a pair of HobbyKing goody boxes as stands...
Plates go on top to add weight...
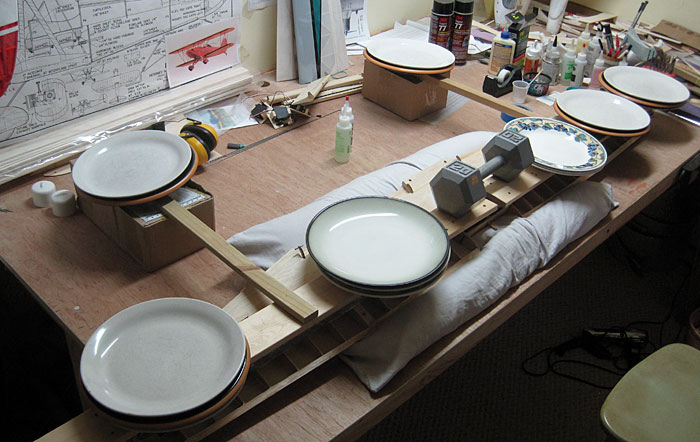
So I think you get the idea here. The wooden Ts distribute the weight evenly to the foam noodle that in turn applies nice even pressure to the CF/spar...

Let's see if that worked...
That looks promising. Yeap worked like a charm...
Sweet! Okay I have people coming over tonight so that's all for today.
Okay so I have this carbon fiber ribbon I want to stick to my spruce spar. Gluing 72" all at once & applying some pressure to keep it down is a bit of a challenge...
I could use a vacuum bag to apply pressure while it dries. I don't have one of those though. I do have an idea however. First I need a pillow...
A length of foam insulation noodle wrapped in kitchen-wrap...
Left over pieces of wood from Ikea furniture (always wondered why it wobbles). Some scrap wood screwed to those at 90°...
The wife's best china...
And of course some glue...
Set the wing atop the pillow. Apply the glue & tape the CF in place...
Place the foam noodle on top of that...
The Ikea T things go on next. Note the use of a pair of HobbyKing goody boxes as stands...
Plates go on top to add weight...
So I think you get the idea here. The wooden Ts distribute the weight evenly to the foam noodle that in turn applies nice even pressure to the CF/spar...
Let's see if that worked...
That looks promising. Yeap worked like a charm...
Sweet! Okay I have people coming over tonight so that's all for today.
05-16-2013, 04:15 PM
#11
Thread Starter
Join Date: Feb 2012
Location: Fairfield, CT
Posts: 416
Likes: 0
Received 0 Likes
on
0 Posts
No more progress on the Bird Dog for a little while
I'm headed to a big aerotow this weekend & then doing some fishing, will get back to this next week.
I'm headed to a big aerotow this weekend & then doing some fishing, will get back to this next week.
05-26-2013, 03:56 PM
#13
Thread Starter
Join Date: Feb 2012
Location: Fairfield, CT
Posts: 416
Likes: 0
Received 0 Likes
on
0 Posts
You're welcome Al, glad you're diggin it.
Woohoo I'm back!
I spent the last week at an aerotow event & also got in a few days of fishing. Towed lots of fish & caught plenty of airplanes, had great time! Anyway back to the Bird Dog...
1/16" Vs 3/32"
Well I picked up some balsa to re-sheet the wing. Turns out I needed 1/16", brought 3/32". So that's on hold until I visit the hobby shop later this week.
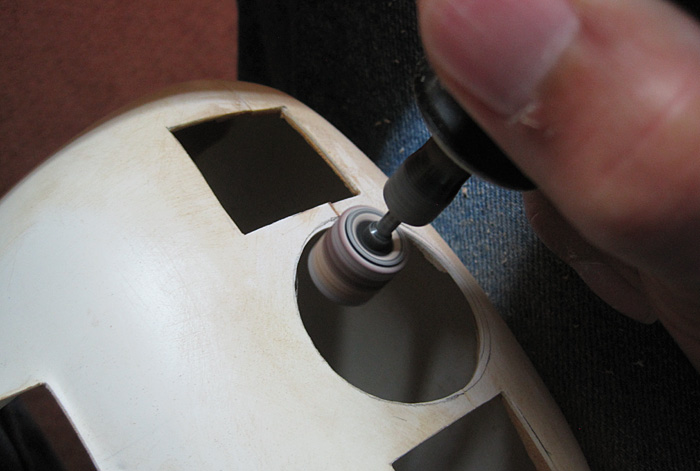
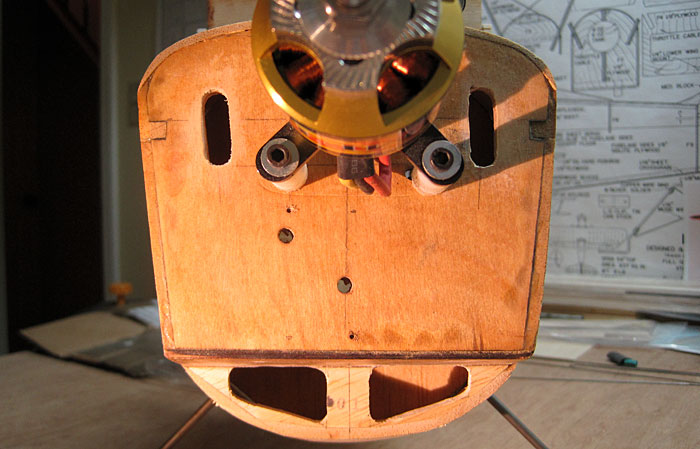
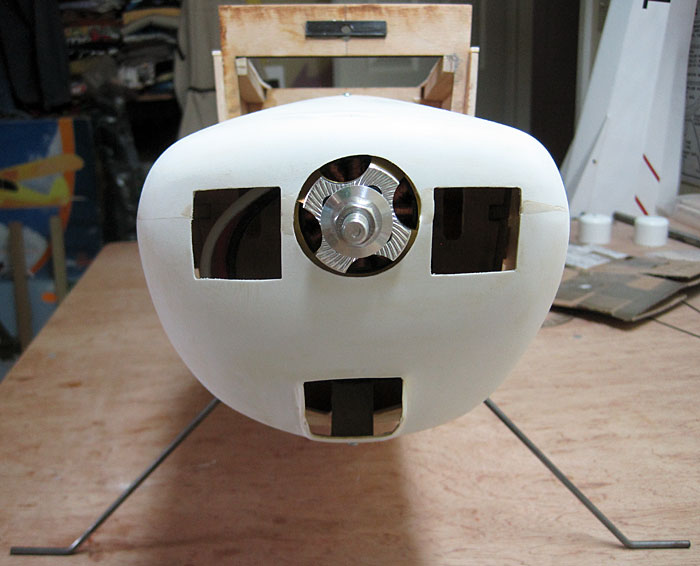
Motor Mount
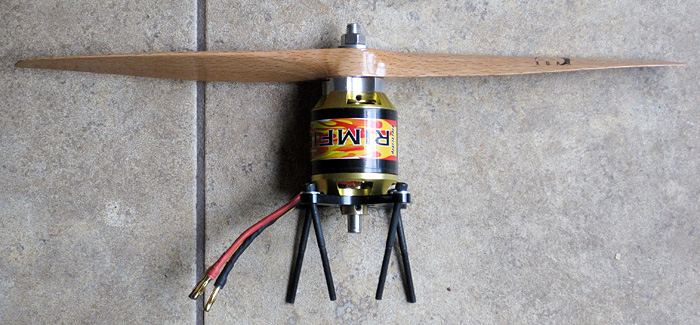
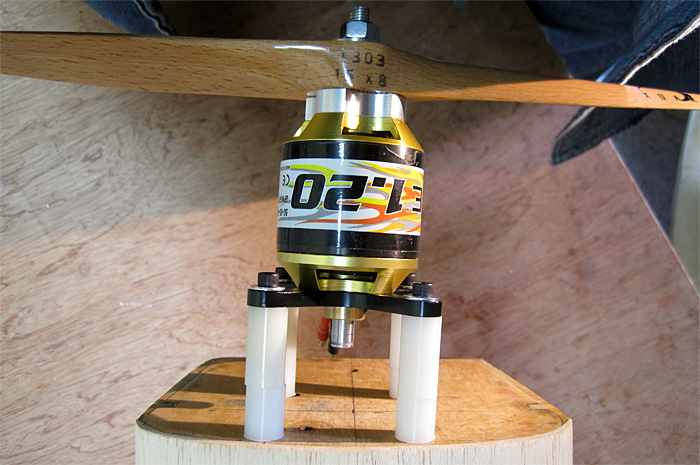
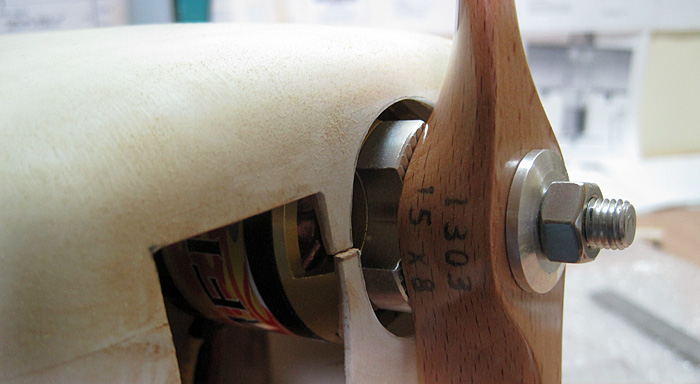
I looked at lots of motor mount options & decided to go with a bolt & shims system...
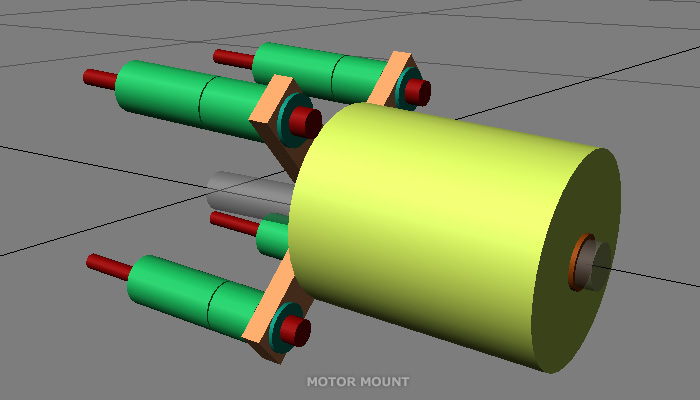
Figuring out the geometry is always a bit of a challenge. First thing was to set the fuselage level on the bench. Kindle Fire bubble level app to the rescue...
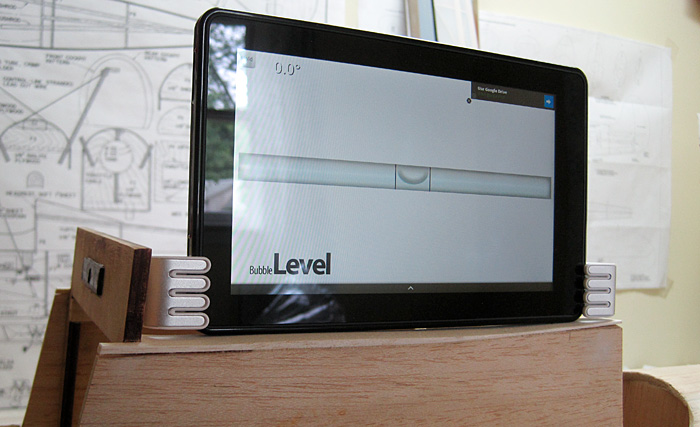
Looks like the firewall is 90° to the datum line, that makes life easy...
I want to setup thrust angles, offset & hopefully end up with the prop somewhat centered in my cowl. Time for some CAD...
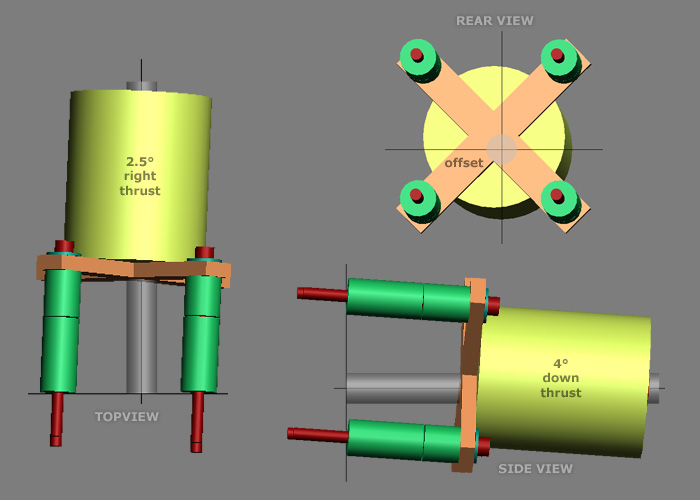
These drawings provided the exact length to cut the nylon shims so I'd end up with 4° down, 2.5° right thrust. Gotta love computers...
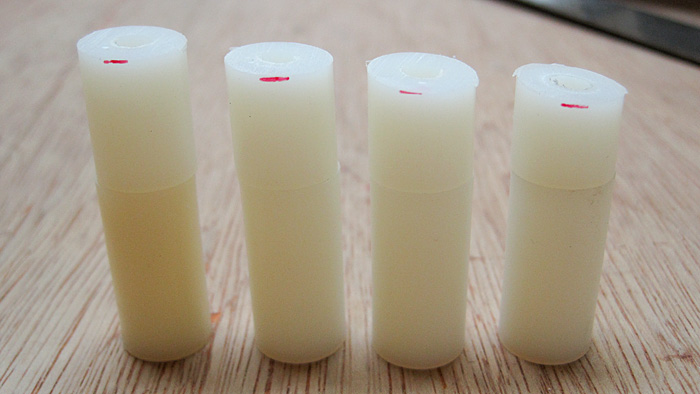
Next I drilled & installed a fresh set of blind nuts...
Yeap that's a BIG motor although it doesn't look crazy big...
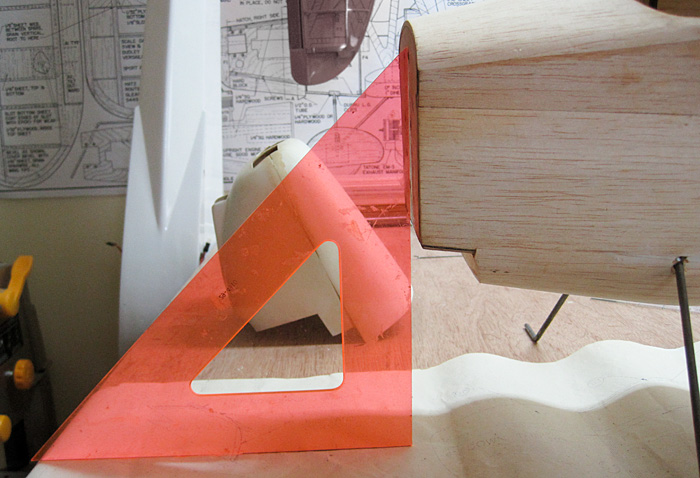
4° down, confirmed...
2.5° right, confirmed...
And will the cowl fit?...
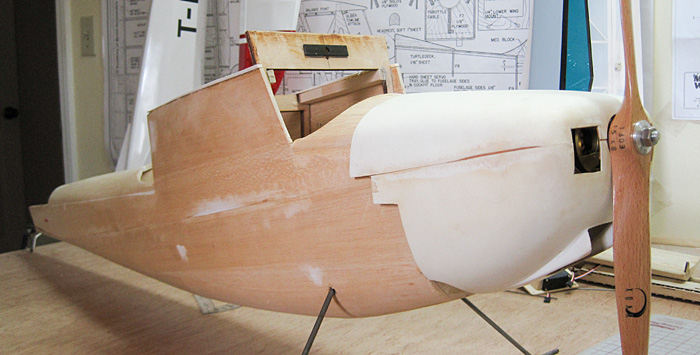
A little trimming...
That looks promising...
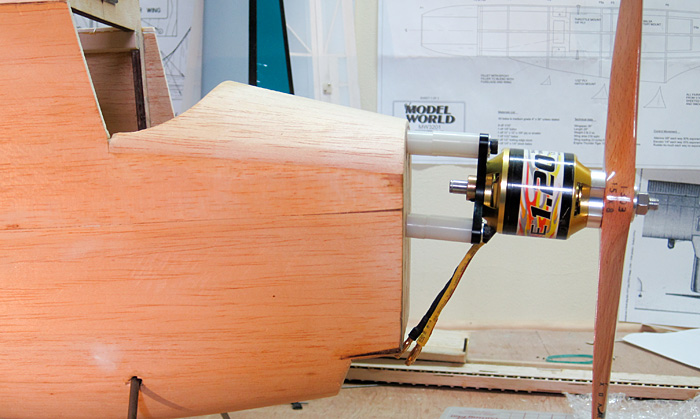
Happy with that, nice to have the motor in...
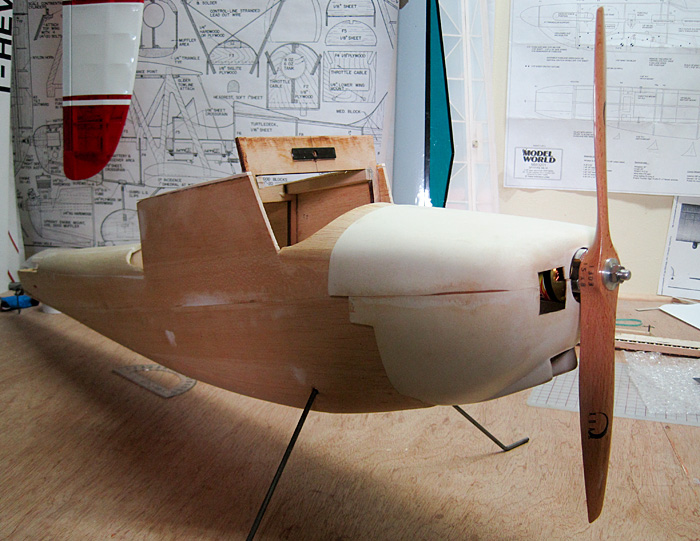
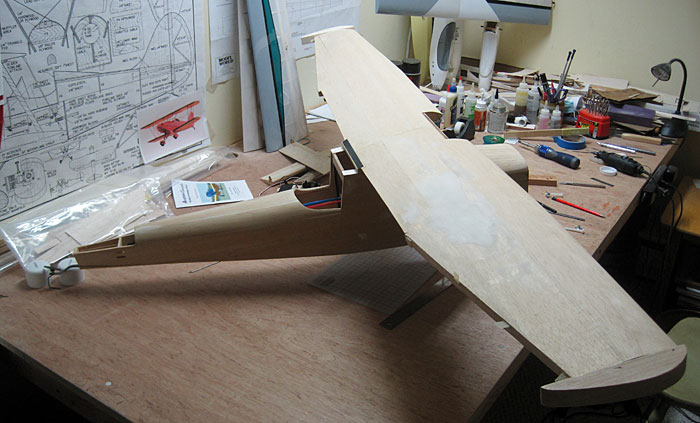
She's starting to look like an airplane, sweet!
Woohoo I'm back!
I spent the last week at an aerotow event & also got in a few days of fishing. Towed lots of fish & caught plenty of airplanes, had great time! Anyway back to the Bird Dog...
1/16" Vs 3/32"
Well I picked up some balsa to re-sheet the wing. Turns out I needed 1/16", brought 3/32". So that's on hold until I visit the hobby shop later this week.
Motor Mount
I looked at lots of motor mount options & decided to go with a bolt & shims system...
Figuring out the geometry is always a bit of a challenge. First thing was to set the fuselage level on the bench. Kindle Fire bubble level app to the rescue...
Looks like the firewall is 90° to the datum line, that makes life easy...
I want to setup thrust angles, offset & hopefully end up with the prop somewhat centered in my cowl. Time for some CAD...
These drawings provided the exact length to cut the nylon shims so I'd end up with 4° down, 2.5° right thrust. Gotta love computers...
Next I drilled & installed a fresh set of blind nuts...
Yeap that's a BIG motor although it doesn't look crazy big...
4° down, confirmed...
2.5° right, confirmed...
And will the cowl fit?...
A little trimming...
That looks promising...
Happy with that, nice to have the motor in...
She's starting to look like an airplane, sweet!
05-27-2013, 05:32 PM
#14
Thread Starter
Join Date: Feb 2012
Location: Fairfield, CT
Posts: 416
Likes: 0
Received 0 Likes
on
0 Posts
Today was the first nice day we've had in a while, spent most of it at the flying field. I did manage to spend an hour in the workshop though.
Firewall
Added some ventilation holes to cool the battery...
Installed the ESC...
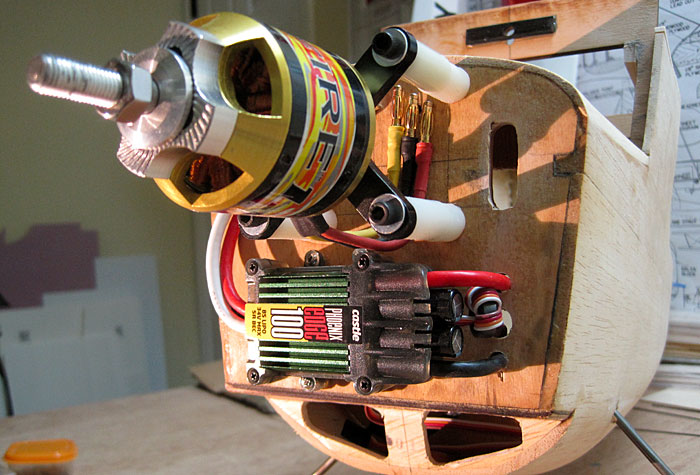
I also did some fiberglass work on the cowl but nothing worth photographing.
Firewall
Added some ventilation holes to cool the battery...
Installed the ESC...
I also did some fiberglass work on the cowl but nothing worth photographing.
05-29-2013, 03:54 PM
#15
Thread Starter
Join Date: Feb 2012
Location: Fairfield, CT
Posts: 416
Likes: 0
Received 0 Likes
on
0 Posts
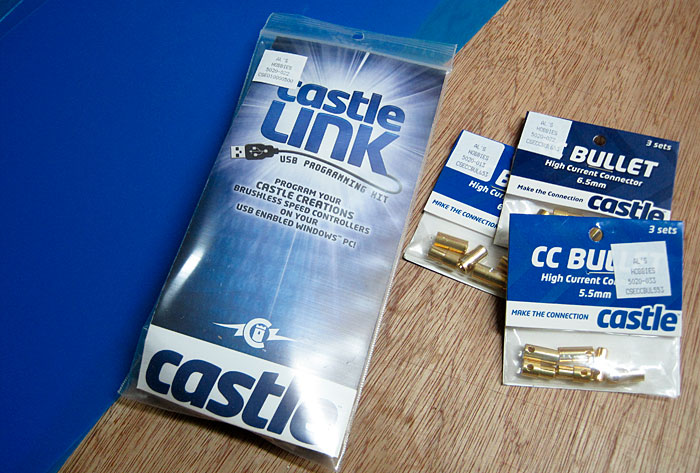
More goodies from the hobby shop
USB doohicky to program the ESC, heavy duty bullet connectors, 1/16" balsa (not shown) & the blue stuff is clear plastic to make the windows with...
Cowl
I didn't have a whole lot of time for work on her today so figured I'd tackle a fairly quick job, mount the cowl...
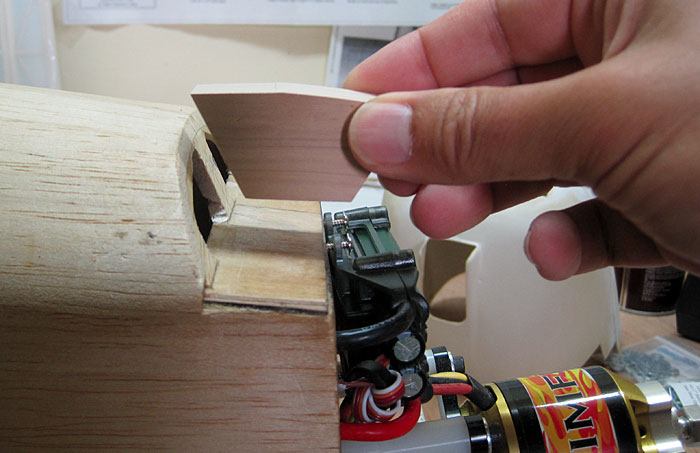
I added hardwood anchor points here & there...
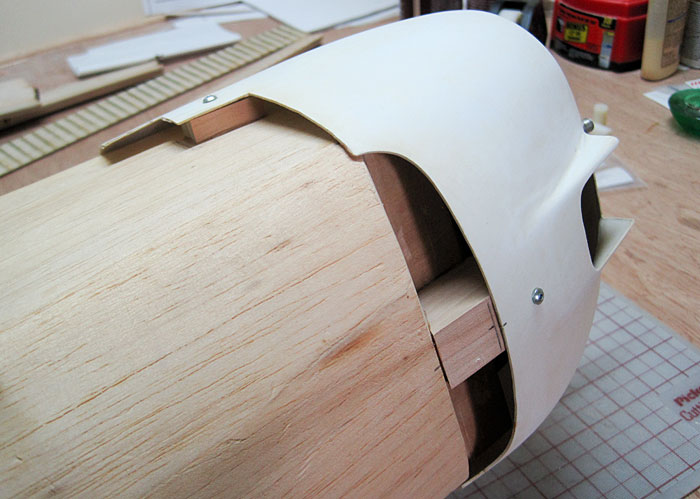
I also sanded my fiberglass work, got the cowl nice-n-smooth ready for paint...
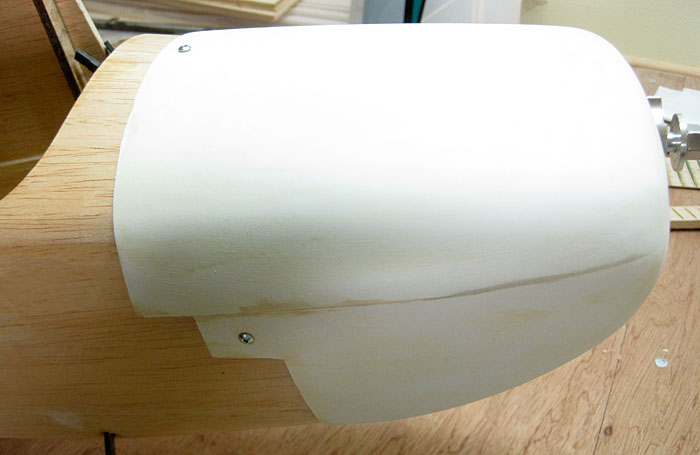
What really blows my mind... it fits!...
Fingers crossed I don't need to adjust the thrust angle but even if I do, there's room enough to tweak.
USB doohicky to program the ESC, heavy duty bullet connectors, 1/16" balsa (not shown) & the blue stuff is clear plastic to make the windows with...
Cowl
I didn't have a whole lot of time for work on her today so figured I'd tackle a fairly quick job, mount the cowl...
I added hardwood anchor points here & there...
I also sanded my fiberglass work, got the cowl nice-n-smooth ready for paint...
What really blows my mind... it fits!...
Fingers crossed I don't need to adjust the thrust angle but even if I do, there's room enough to tweak.
05-30-2013, 07:21 PM
#16
Thread Starter
Join Date: Feb 2012
Location: Fairfield, CT
Posts: 416
Likes: 0
Received 0 Likes
on
0 Posts
Flat Spots
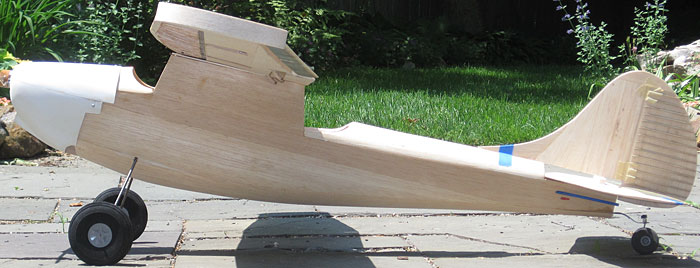
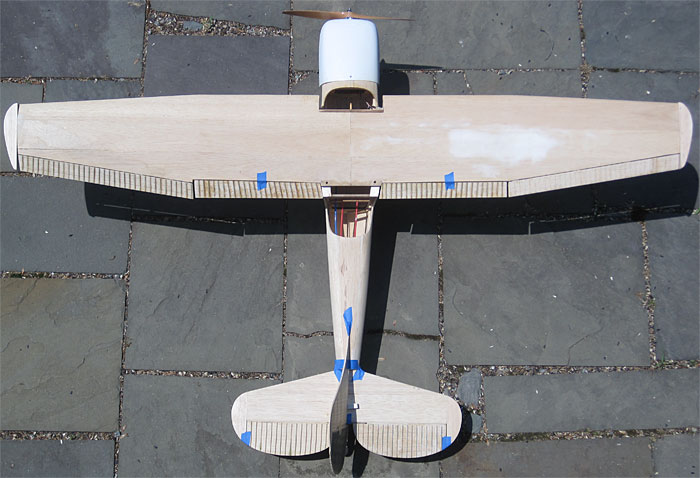
I can't seem to get too excited about the Bird Dog photos I've seen online so I've decided to create my own custom graphics for this project. I know, I know, the scale police will have my head but what can you do? Anyway in preparation for that I took her outside for a quick photo shoot...
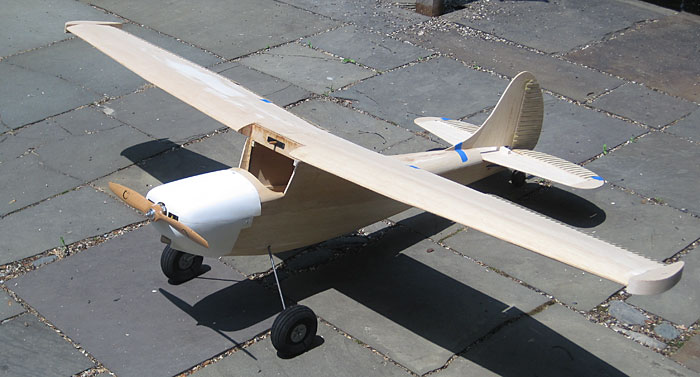
I wanted a side view...
And another from the top down...
The plan is to pull these photos into my graphic software & work up some cool designs. When I took her back inside I noticed my spiffy foam Lite Flight wheels weren't exactly round anymore...
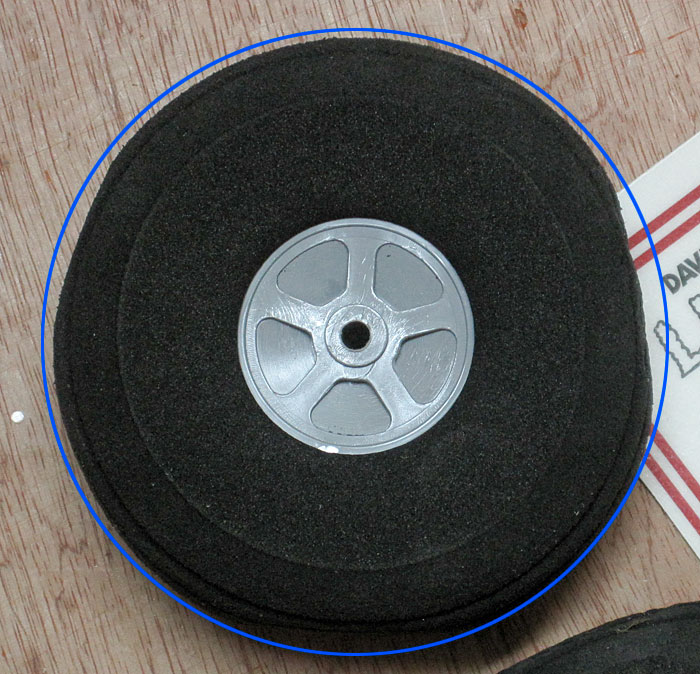
Now granted the flag stones in my back yard were pretty warm & maybe that caused these flat spots but what am I going to do, never fly from an asphalt runway in the Summer? Not sure these wheels are going to work out...
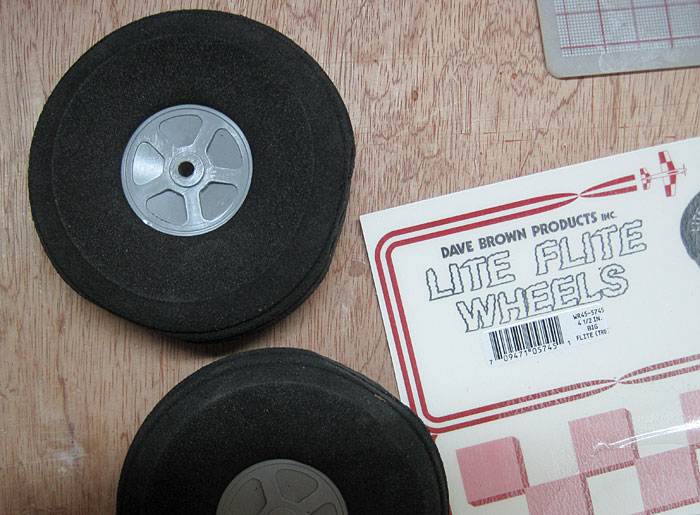
Weird because I've been pretty happy with Dave Brown Products. Oh well.
I can't seem to get too excited about the Bird Dog photos I've seen online so I've decided to create my own custom graphics for this project. I know, I know, the scale police will have my head but what can you do? Anyway in preparation for that I took her outside for a quick photo shoot...
I wanted a side view...
And another from the top down...
The plan is to pull these photos into my graphic software & work up some cool designs. When I took her back inside I noticed my spiffy foam Lite Flight wheels weren't exactly round anymore...
Now granted the flag stones in my back yard were pretty warm & maybe that caused these flat spots but what am I going to do, never fly from an asphalt runway in the Summer? Not sure these wheels are going to work out...
Weird because I've been pretty happy with Dave Brown Products. Oh well.
06-06-2013, 06:29 PM
#17
Thread Starter
Join Date: Feb 2012
Location: Fairfield, CT
Posts: 416
Likes: 0
Received 0 Likes
on
0 Posts
Graphics
I spent some time today working up a graphics design...
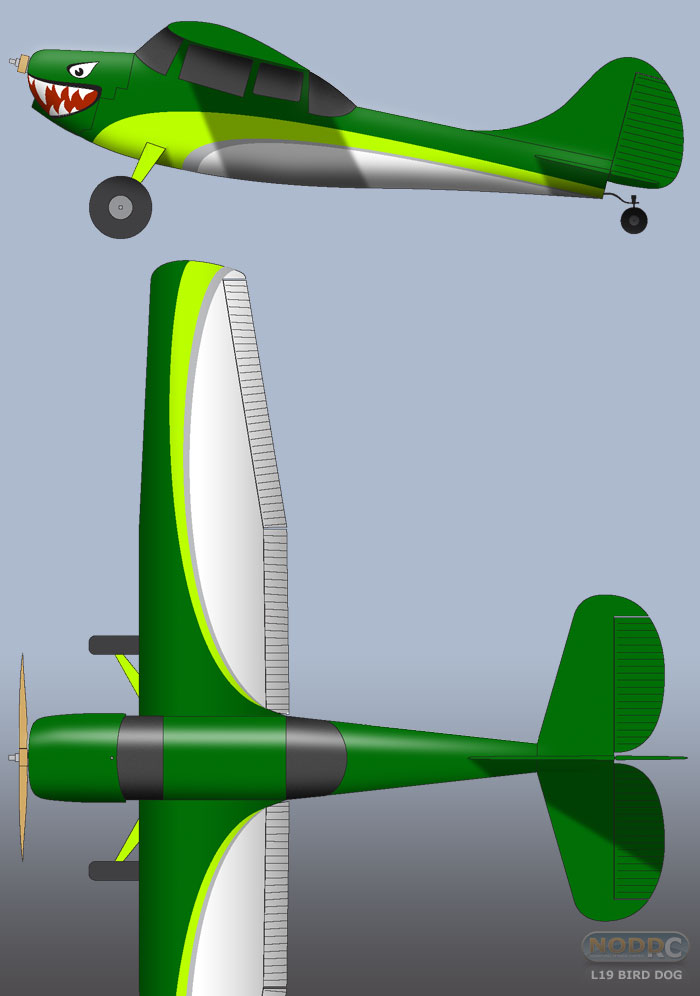
And to really get a feel for how this might look I imported the design into Real Flight simulator...
 Click below to view
YouTube Video - Paint Scheme A001
Okay so these graphics aren't scale but I like the way this is looking.
I spent some time today working up a graphics design...
And to really get a feel for how this might look I imported the design into Real Flight simulator...
YouTube Video - Paint Scheme A001
Okay so these graphics aren't scale but I like the way this is looking.
06-07-2013, 04:50 PM
#18
Thread Starter
Join Date: Feb 2012
Location: Fairfield, CT
Posts: 416
Likes: 0
Received 0 Likes
on
0 Posts
It's been suggested that I add some contrast to the bottom of the wings. Although hard to see in the video I have the bottom of the wing painted all black for contrast. I've become a big fan of black undersides, definitely helps make the plane pop against a bright sky. I may also add a couple of bold white stripes or something for those overcast days...

Covering material has been ordered, should be here soon.
Covering material has been ordered, should be here soon.
06-07-2013, 07:35 PM
#19
Thread Starter
Join Date: Feb 2012
Location: Fairfield, CT
Posts: 416
Likes: 0
Received 0 Likes
on
0 Posts
Why have one when you can have three?
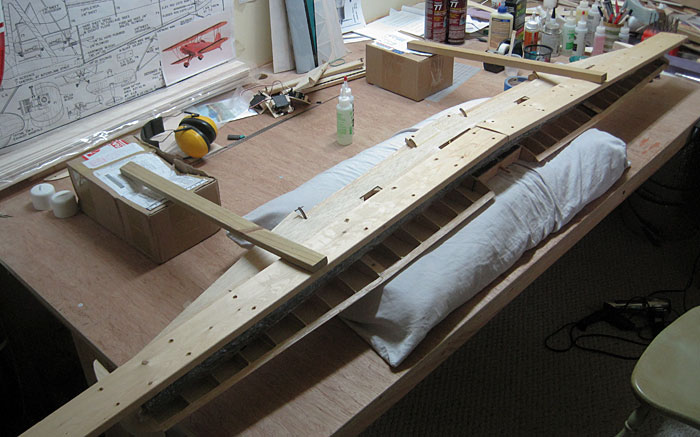
I don't like the idea of just one wimpy little dowel holding the entire wing in place. I considered swapping it out for a carbon-fiber rod but in a crash I need that to fail Vs ripping my fuselage apart. So I installed two additional dowels. I'll likely remove the original though. Again I want this to be strong but not so strong it can't fail in a crash...

I don't like the idea of just one wimpy little dowel holding the entire wing in place. I considered swapping it out for a carbon-fiber rod but in a crash I need that to fail Vs ripping my fuselage apart. So I installed two additional dowels. I'll likely remove the original though. Again I want this to be strong but not so strong it can't fail in a crash...
06-09-2013, 07:54 PM
#20
Thread Starter
Join Date: Feb 2012
Location: Fairfield, CT
Posts: 416
Likes: 0
Received 0 Likes
on
0 Posts
NACA Wing Droops
I've seen a few planes that use these plastic doohickeys mounted to the wing's leading edge...

From what I've read they help reduce tip-stalls, spins, reduce wing loading & increase lift. Well that all sure sounds handy. I'm a little concerned about the Bird Dog's wing loading so something like this might make sense. I also like the clear plastic approach as it doesn't mess with the scale outline too much...

If I decide to give these a try I figure I could just wrap some 1 mm canopy plastic around the LE & screw it down to some internal hard-points, maybe add a few plastic "riblets" to help hold the shape...

So in anticipation of maybe taking that route I added a few hard-wood pieces to the wing...

Again I'm not totally sold on this idea. I'll likely see how she flies first. At least I have a way to mount a NACA wing droop if I decide to.
Back to the build
Enough screwing around, time to get this wing back together. Putting the sheeting back...

Sanding, sanding & more sanding...

Feels good to have her closed up again & feels very good knowing there's some reinforcements under there too...

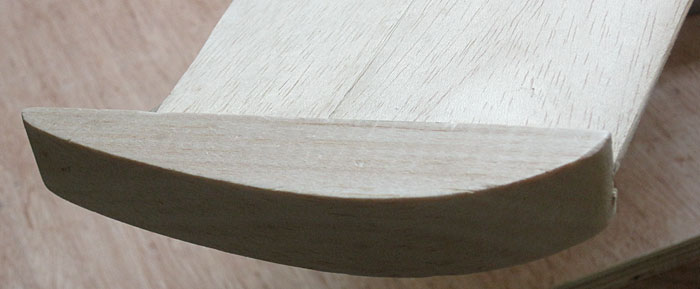
Now's a good time to shape the wingtips...

Sanding blocks on sticks, very handy...

A few guidelines here & there...

Whittling time *queue the banjo music*...

That looks pretty good...

Windows
I've been itching to cut the side windows out since day one. Finally got my wish...

Ahh that looks so much cooler...

Sweet!...

Pretty pleased with today's progress, nice to get the wing back together & those windows make a huge difference. Good stuff.
I've seen a few planes that use these plastic doohickeys mounted to the wing's leading edge...
From what I've read they help reduce tip-stalls, spins, reduce wing loading & increase lift. Well that all sure sounds handy. I'm a little concerned about the Bird Dog's wing loading so something like this might make sense. I also like the clear plastic approach as it doesn't mess with the scale outline too much...
If I decide to give these a try I figure I could just wrap some 1 mm canopy plastic around the LE & screw it down to some internal hard-points, maybe add a few plastic "riblets" to help hold the shape...
So in anticipation of maybe taking that route I added a few hard-wood pieces to the wing...
Again I'm not totally sold on this idea. I'll likely see how she flies first. At least I have a way to mount a NACA wing droop if I decide to.
Back to the build
Enough screwing around, time to get this wing back together. Putting the sheeting back...
Sanding, sanding & more sanding...
Feels good to have her closed up again & feels very good knowing there's some reinforcements under there too...
Now's a good time to shape the wingtips...
Sanding blocks on sticks, very handy...
A few guidelines here & there...
Whittling time *queue the banjo music*...
That looks pretty good...
Windows
I've been itching to cut the side windows out since day one. Finally got my wish...
Ahh that looks so much cooler...
Sweet!...
Pretty pleased with today's progress, nice to get the wing back together & those windows make a huge difference. Good stuff.
06-11-2013, 07:31 PM
#21
Thread Starter
Join Date: Feb 2012
Location: Fairfield, CT
Posts: 416
Likes: 0
Received 0 Likes
on
0 Posts
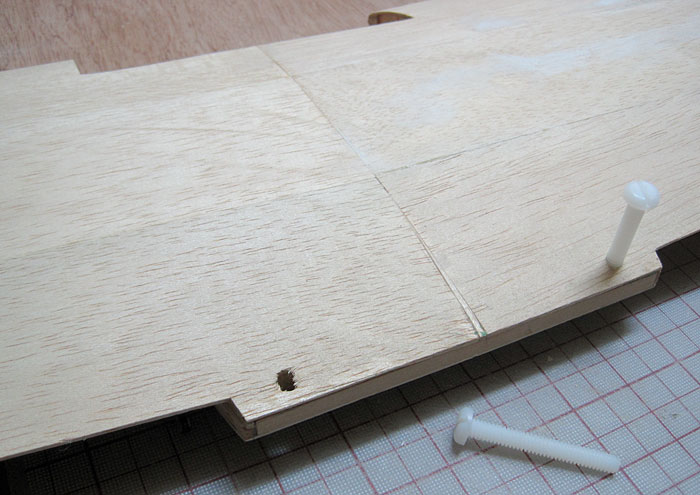
Wing Mount
I got rid of the middle wing dowel. Aligning three pegs at once was making the wing difficult to install/remove. Two pegs should be plenty strong (fingers crossed)...

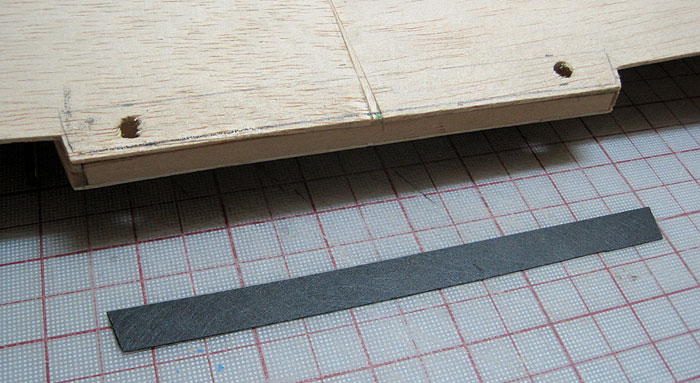
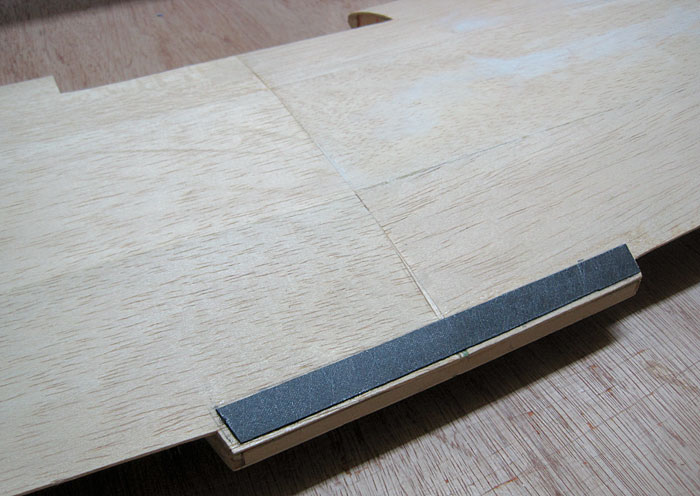
A while back I tried & failed to reinforce this area. This time I have more beefy CF. After removing the sheeting I noticed there's hard-wood under there. It really doesn't need reinforcing but I've already done the work, may as well drop in the CF anyway...

Rear wing hold-down hardware...

That's looking good...

Tow Release
I have a commercial tow-release (thanks Conio) but it's a bit bulky & doesn't fit well with my tow location. I really like the DIY release featured at RC Aerotowing so I'm going with one of those instead. Here I am bending piano wire around a bolt..

A little gentle persuasion, bending the hoop part over...

Looks promising...

I made this odd looking hardwood piece to mount the whole thing just behind the wing's trailing edge. Drilling a few holes...

Here's my release hardware, a block, the hoop we just made, a heavy pushrod & a brass guide tube...

Oooh sparks...

Here's how the hoop & release pin are looking. A servo retracts the pin to release the towline...

And here's that servo, the biggest in the whole plane. I don't want any hesitation when I hit the release, that has to work instantly in an emergency...

A simple no nonsense setup, I like it...

I figure there might be a fair amount of pull on the release structure so I added these lightweight dowel braces...

I also started installing the rudder & elevator servos...

That'll have to do for today...

I got rid of the middle wing dowel. Aligning three pegs at once was making the wing difficult to install/remove. Two pegs should be plenty strong (fingers crossed)...
A while back I tried & failed to reinforce this area. This time I have more beefy CF. After removing the sheeting I noticed there's hard-wood under there. It really doesn't need reinforcing but I've already done the work, may as well drop in the CF anyway...
Rear wing hold-down hardware...
That's looking good...
Tow Release
I have a commercial tow-release (thanks Conio) but it's a bit bulky & doesn't fit well with my tow location. I really like the DIY release featured at RC Aerotowing so I'm going with one of those instead. Here I am bending piano wire around a bolt..
A little gentle persuasion, bending the hoop part over...
Looks promising...
I made this odd looking hardwood piece to mount the whole thing just behind the wing's trailing edge. Drilling a few holes...
Here's my release hardware, a block, the hoop we just made, a heavy pushrod & a brass guide tube...
Oooh sparks...
Here's how the hoop & release pin are looking. A servo retracts the pin to release the towline...
And here's that servo, the biggest in the whole plane. I don't want any hesitation when I hit the release, that has to work instantly in an emergency...
A simple no nonsense setup, I like it...
I figure there might be a fair amount of pull on the release structure so I added these lightweight dowel braces...
I also started installing the rudder & elevator servos...
That'll have to do for today...
06-12-2013, 05:56 PM
#22

ORIGINAL: Nodd
NACA Wing Droops
I've seen a few planes that use these plastic doohickeys mounted to the wing's leading edge...
[img][/img]
From what I've read they help reduce tip-stalls, spins, reduce wing loading & increase lift. Well that all sure sounds handy. I'm a little concerned about the Bird Dog's wing loading so something like this might make sense. I also like the clear plastic approach as it doesn't mess with the scale outline too much...
[img][/img]
If I decide to give these a try I figure I could just wrap some 1 mm canopy plastic around the LE & screw it down to some internal hard-points, maybe add a few plastic ''riblets'' to help hold the shape...
[img][/img]
So in anticipation of maybe taking that route I added a few hard-wood pieces to the wing...
[img][/img]
Again I'm not totally sold on this idea. I'll likely see how she flies first. At least I have a way to mount a NACA wing droop if I decide to.
Back to the build
Enough screwing around, time to get this wing back together. Putting the sheeting back...
[img][/img]
Sanding, sanding & more sanding...
[img][/img]
Feels good to have her closed up again & feels very good knowing there's some reinforcements under there too...
[img][/img]
Now's a good time to shape the wingtips...
[img][/img]
Sanding blocks on sticks, very handy...
[img][/img]
A few guidelines here & there...
[img][/img]
Whittling time *queue the banjo music*...
[img][/img]
That looks pretty good...
[img][/img]
Windows
I've been itching to cut the side windows out since day one. Finally got my wish...
[img][/img]
Ahh that looks so much cooler...
[img][/img]
Sweet!...
[img][/img]
Pretty pleased with today's progress, nice to get the wing back together & those windows make a huge difference. Good stuff.
06-13-2013, 07:50 PM
#23
Thread Starter
Join Date: Feb 2012
Location: Fairfield, CT
Posts: 416
Likes: 0
Received 0 Likes
on
0 Posts
Whoa giant quote, umm?
Funny you're the second to suggest I avoid the NACA wing droops. Then again I also have one other guy who swears by them. *shrug* Having personally never flown with a set I can only go by what I've read & what I've seen. The jury is still out on them as far as I'm concerned. We'll have to see how she flies as is & then maybe I'll consider them if need be. There's nothing I can do about the weight at this point but I'll likely try the reflexed aileron trick. That'll help tame any tip stalling. I'm not too worried though, I think she'll fly just fine.
Battery Box
So I have this bloody enormous 5000 mah 6S LiPo that needs to fit somewhere...

I needed to figure out where to place the pack to balance the plane. Apparently the Bird Dog is too big for my usual balance stand so I hung her up on a couple of chairs...

And what do you know? She balances just perfect with the pack sitting directly under the wing. Very nice!
While I was at it, I figured now was a good time to check the weight situation...

I still have covering & some final assembly items to add so that'll go up a little before we're done. It's about what I was expecting though.
The bottom of the cabin is anything but flat so I created this frame to mount the battery tray on...

And here's the frame installed...

Paint
The major cabin items are complete, time for some color. For the interior I went with this olive green...

I think that works, has a cool military feel...

Hopefully my Ultracote will arrive soon so I can begin covering the outside.
Funny you're the second to suggest I avoid the NACA wing droops. Then again I also have one other guy who swears by them. *shrug* Having personally never flown with a set I can only go by what I've read & what I've seen. The jury is still out on them as far as I'm concerned. We'll have to see how she flies as is & then maybe I'll consider them if need be. There's nothing I can do about the weight at this point but I'll likely try the reflexed aileron trick. That'll help tame any tip stalling. I'm not too worried though, I think she'll fly just fine.
Battery Box
So I have this bloody enormous 5000 mah 6S LiPo that needs to fit somewhere...
I needed to figure out where to place the pack to balance the plane. Apparently the Bird Dog is too big for my usual balance stand so I hung her up on a couple of chairs...
And what do you know? She balances just perfect with the pack sitting directly under the wing. Very nice!
While I was at it, I figured now was a good time to check the weight situation...
I still have covering & some final assembly items to add so that'll go up a little before we're done. It's about what I was expecting though.
The bottom of the cabin is anything but flat so I created this frame to mount the battery tray on...
And here's the frame installed...
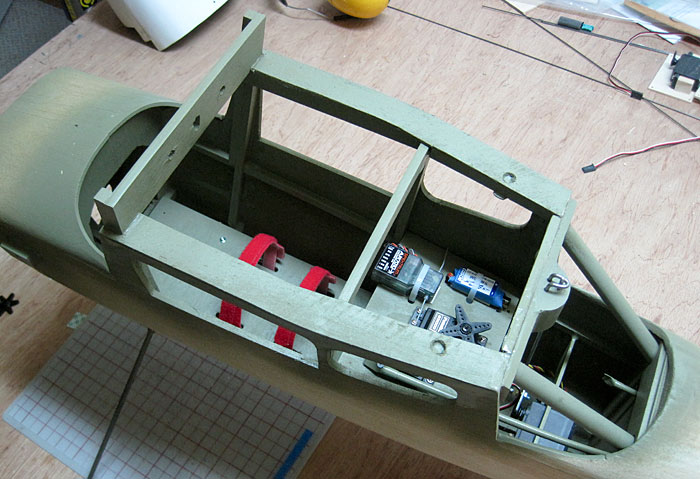
Paint
The major cabin items are complete, time for some color. For the interior I went with this olive green...
I think that works, has a cool military feel...
Hopefully my Ultracote will arrive soon so I can begin covering the outside.
06-16-2013, 06:37 PM
#24
Thread Starter
Join Date: Feb 2012
Location: Fairfield, CT
Posts: 416
Likes: 0
Received 0 Likes
on
0 Posts
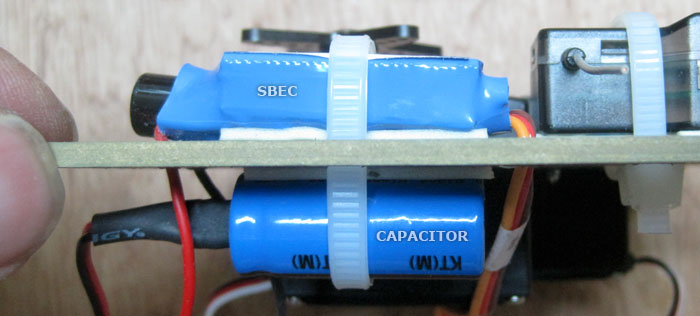
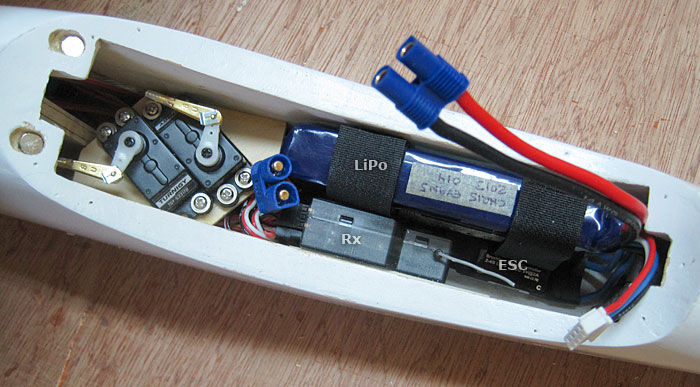
Radio Tray
This is looking good, got some of the electronics installed...
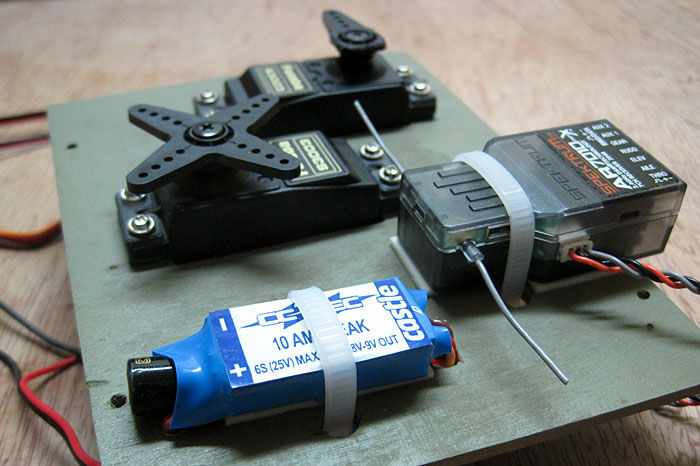
I'm running a separate SBEC just in case the ESC goes up in smoke. In theory that'll keep the servos working while I get her back on the ground. I also have a capacitor in the loop. Those help stabilize the voltage to the receiver & thus protect against the dreaded brown-out-o-doom...
Battery Tray (continued)
Trying out different Velcro tie-downs, not sure I like these...
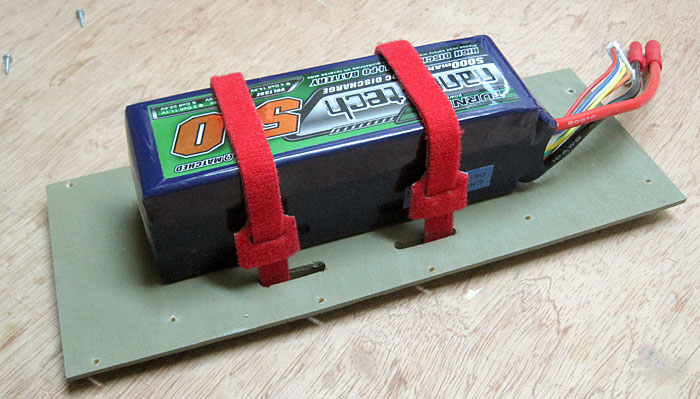
I have another set with a proper buckle that you can pull against to really tighten down the pack. I much prefer those but they're too short, might have to make something custom.
Anyway with the radio in, she's officially an RC airplane. Woohoo...
This is looking good, got some of the electronics installed...
I'm running a separate SBEC just in case the ESC goes up in smoke. In theory that'll keep the servos working while I get her back on the ground. I also have a capacitor in the loop. Those help stabilize the voltage to the receiver & thus protect against the dreaded brown-out-o-doom...
Battery Tray (continued)
Trying out different Velcro tie-downs, not sure I like these...
I have another set with a proper buckle that you can pull against to really tighten down the pack. I much prefer those but they're too short, might have to make something custom.
Anyway with the radio in, she's officially an RC airplane. Woohoo...
06-17-2013, 08:54 AM
#25
Thread Starter
Join Date: Feb 2012
Location: Fairfield, CT
Posts: 416
Likes: 0
Received 0 Likes
on
0 Posts
High-Beams
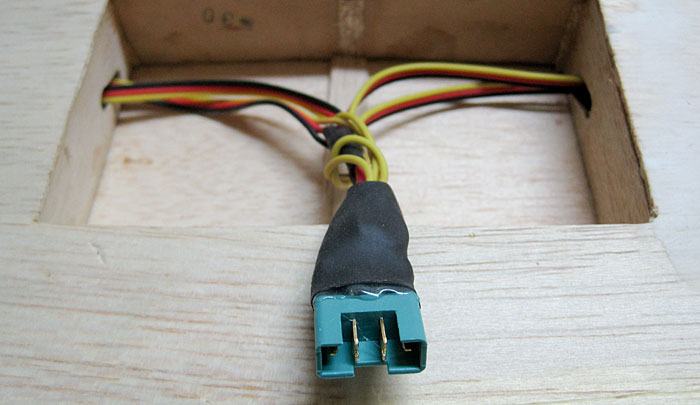
I've had a few comments about the proximity of my receiver to the other electronics. It's been suggested that I separate the components more to guard against interference. In this setup's defense I present my electric sailplane that I've successfully flown at fairly long range without any issues...
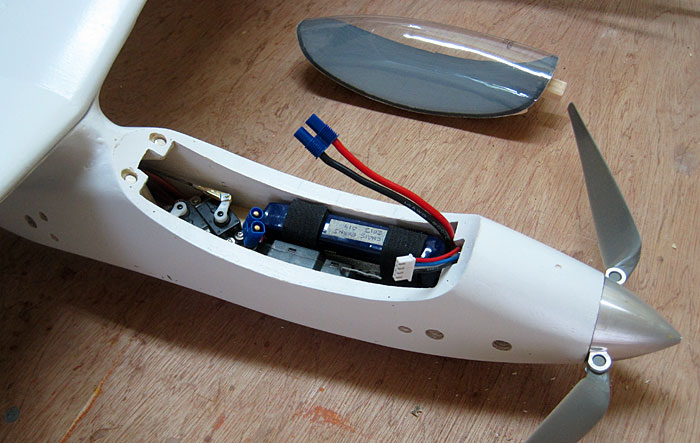
As you can see the Rx is stuffed in there very close to the other electronics...
Now in that airframe I didn't have much choice (although maybe some external whip antennas would help) but in practice, this setup works fine. However, and here's an obscure example, a friend of mine once explained: "No, I don't use my high-beams on dark roads. I can see okay without them". Clearly he was missing the point. High-beams let you see better. And as everyone (except my friend) knows, better is... well... better. He should use them, it makes driving easier & yeah duh, it's safer. So not wanting to be that guy I think I'm going to move my components around some. Thanks guys for setting me straight.
I've had a few comments about the proximity of my receiver to the other electronics. It's been suggested that I separate the components more to guard against interference. In this setup's defense I present my electric sailplane that I've successfully flown at fairly long range without any issues...
As you can see the Rx is stuffed in there very close to the other electronics...
Now in that airframe I didn't have much choice (although maybe some external whip antennas would help) but in practice, this setup works fine. However, and here's an obscure example, a friend of mine once explained: "No, I don't use my high-beams on dark roads. I can see okay without them". Clearly he was missing the point. High-beams let you see better. And as everyone (except my friend) knows, better is... well... better. He should use them, it makes driving easier & yeah duh, it's safer. So not wanting to be that guy I think I'm going to move my components around some. Thanks guys for setting me straight.