


Macchi 205 : Veltro [98" WS]
 08-24-2014, 07:01 PM
#26

So - a little more progress . . .
In the typical, let's never get this thing done fashion... I decided it would be good to add a few panel lines and hatches to "enhance" this "Way stand off Scale" Macchi. Hmm, wasting time, I know. Just can't stand the smooth naked wing surface.
So - I took some liberties, and used the In Action books to generally, guide panel line and hatch placements. Then I added the first coat of Khaki to hide the gosh awful factory colors, UGH. Really, just testing to see if the paint will lock down the chart tape, which I intend to leave on the airframe.
Now, just need to rig up the elev and rudd servos, then get serious about the painting. Maybe, If I stop goofing around, this thing may fly this year ??
Also, notice the "recylcled" cannons from my old Spifire.... the are held on with magnets. Need some clean up on the mounting, but they look "close".
Last edited by IFLYRC-RCU; 08-24-2014 at 07:10 PM.


 08-30-2014, 05:47 PM
#29
So - long weekend . . . Hmm, go fly, or work on the plane. Today, I chose to stay home and do a bit of painting.
However, needed to glass the cowl extension in first. So find the pics... glass, sand, add a second coat, sand again. OK, thats ready [mostly]
Next, add a few more hatches and panels. Some of these are scale - and others are to hide defects in the gelcoat. Seems that the surface tends to crack... so I added some alum tape panels to hide the issues and hold it together once the engine is shaking the airframe.
Next, instal the servos in the stabs for the elevators. Glue hinges... knock-off China "Robart" hinges included in kit btw.
Add some chart tape panel lines and simulated "rib stitching" tape to elev. I added some alum tape to hide the large hinge cut-outs as well. The cut outs were huge and I didn't like the way they looked.
Added some panels and such to the round oil coolers... and then split the carb intake and glued it on. Added some details to that as well. In general, and I mean VERY general, I am using the ref books as a guide, but only at a high level. The airframe is decent, but missing a lot of subtle details.
Play around with the graphics I had made.. scanned them from my ref books, and he made them to my requested sizes. I have to go back though.. need to get some symetrically opposite images made. Each side is the opposite of the other.
Now, I was just going to paint the lower airframe the light blue.. but that led to putting the initial coat of tan on the entire airframe. Spray bombs, but easy and cheap. Had to do some taping on the fresh light blue, to spray the top. 3 cans of Khaki camo, 2 cans of the blue. Now, it's minor stuff.... like taping off the canopy frame for painting.
I am SO HAPPY to not see that ugly ass color scheme any more. It was horrible !!
Last edited by IFLYRC-RCU; 08-30-2014 at 05:53 PM.
09-03-2014, 06:24 PM
#31
Well, I have found many, many variations and color combinations documented on 202s and 205s.
Including one that is very like the German RLM underside blue. So - this is a stand off scale model for sure.. and I found some spray bombs that are close to that color and flat!.
So, after I weather it up a bit.. aka - it will darken some, I am hoping it will look OK. After all, we look at the bottom MOST of the time we are flying !
Heck, even the Khaki is too light.. but again, it will weather up a bit and darken with use. Time will tell how it comes out in the end.
09-06-2014, 09:46 PM
#32
So - getting all the less than exciting stuff done... one item I felt needed to be addressed was the stab mounting. The ARF has a tube that is held on with 2 screws into the stab - tube when assembled. However, I noticed a fair amount of slop at the front of the stab. Probably not a failure point, but it bugged me.
So ... I took a couple of gear hold down straps and mounted them into a slot I cut into the fuse. This is on the bottom of the leading edge of the stab. Then I cut out a smatching depression in the stab and carefully drilled into the
hardwood end spar. [Not as easy as it seems btw!]
]


Add a servo screw through the hold.. and now it's good and tight.
So ... I took a couple of gear hold down straps and mounted them into a slot I cut into the fuse. This is on the bottom of the leading edge of the stab. Then I cut out a smatching depression in the stab and carefully drilled into the
hardwood end spar. [Not as easy as it seems btw!]
]
Add a servo screw through the hold.. and now it's good and tight.
09-06-2014, 09:56 PM
#33
And then the canopy.. the last of the ugly yellow parts . . .
Well, it is appartent the China gent who originally taped off the canopy frame for painting must be paid by how many parts an hour he could do. Really sloppy.. and I have to match it with my taping to hide the yellow. Oh well.
Tape the outer panels.. then add sometape to protect the inner area from overspray. After the initial spray, it becomes apparent the yellow will show on the inner canopy. Ugh. So - I use a brush and some flat black to hide that as best I can.
Have a brain fart here .. start to pull off the tape after spraying the sand .. and oops! Duh, I still need it taped so I can add the final camo. Retape 1/2 again. Ugh.
Of course, no dash panel, so make up a stand off scale one.. and make a gunsight. Tape off the cockpit area, spray that flat black. Make a spacer for the pilot, glue him in.. then glue the canopy down. It fits - "mostly" Next . . .
Last edited by IFLYRC-RCU; 09-08-2014 at 04:51 PM.
09-06-2014, 10:02 PM
#34
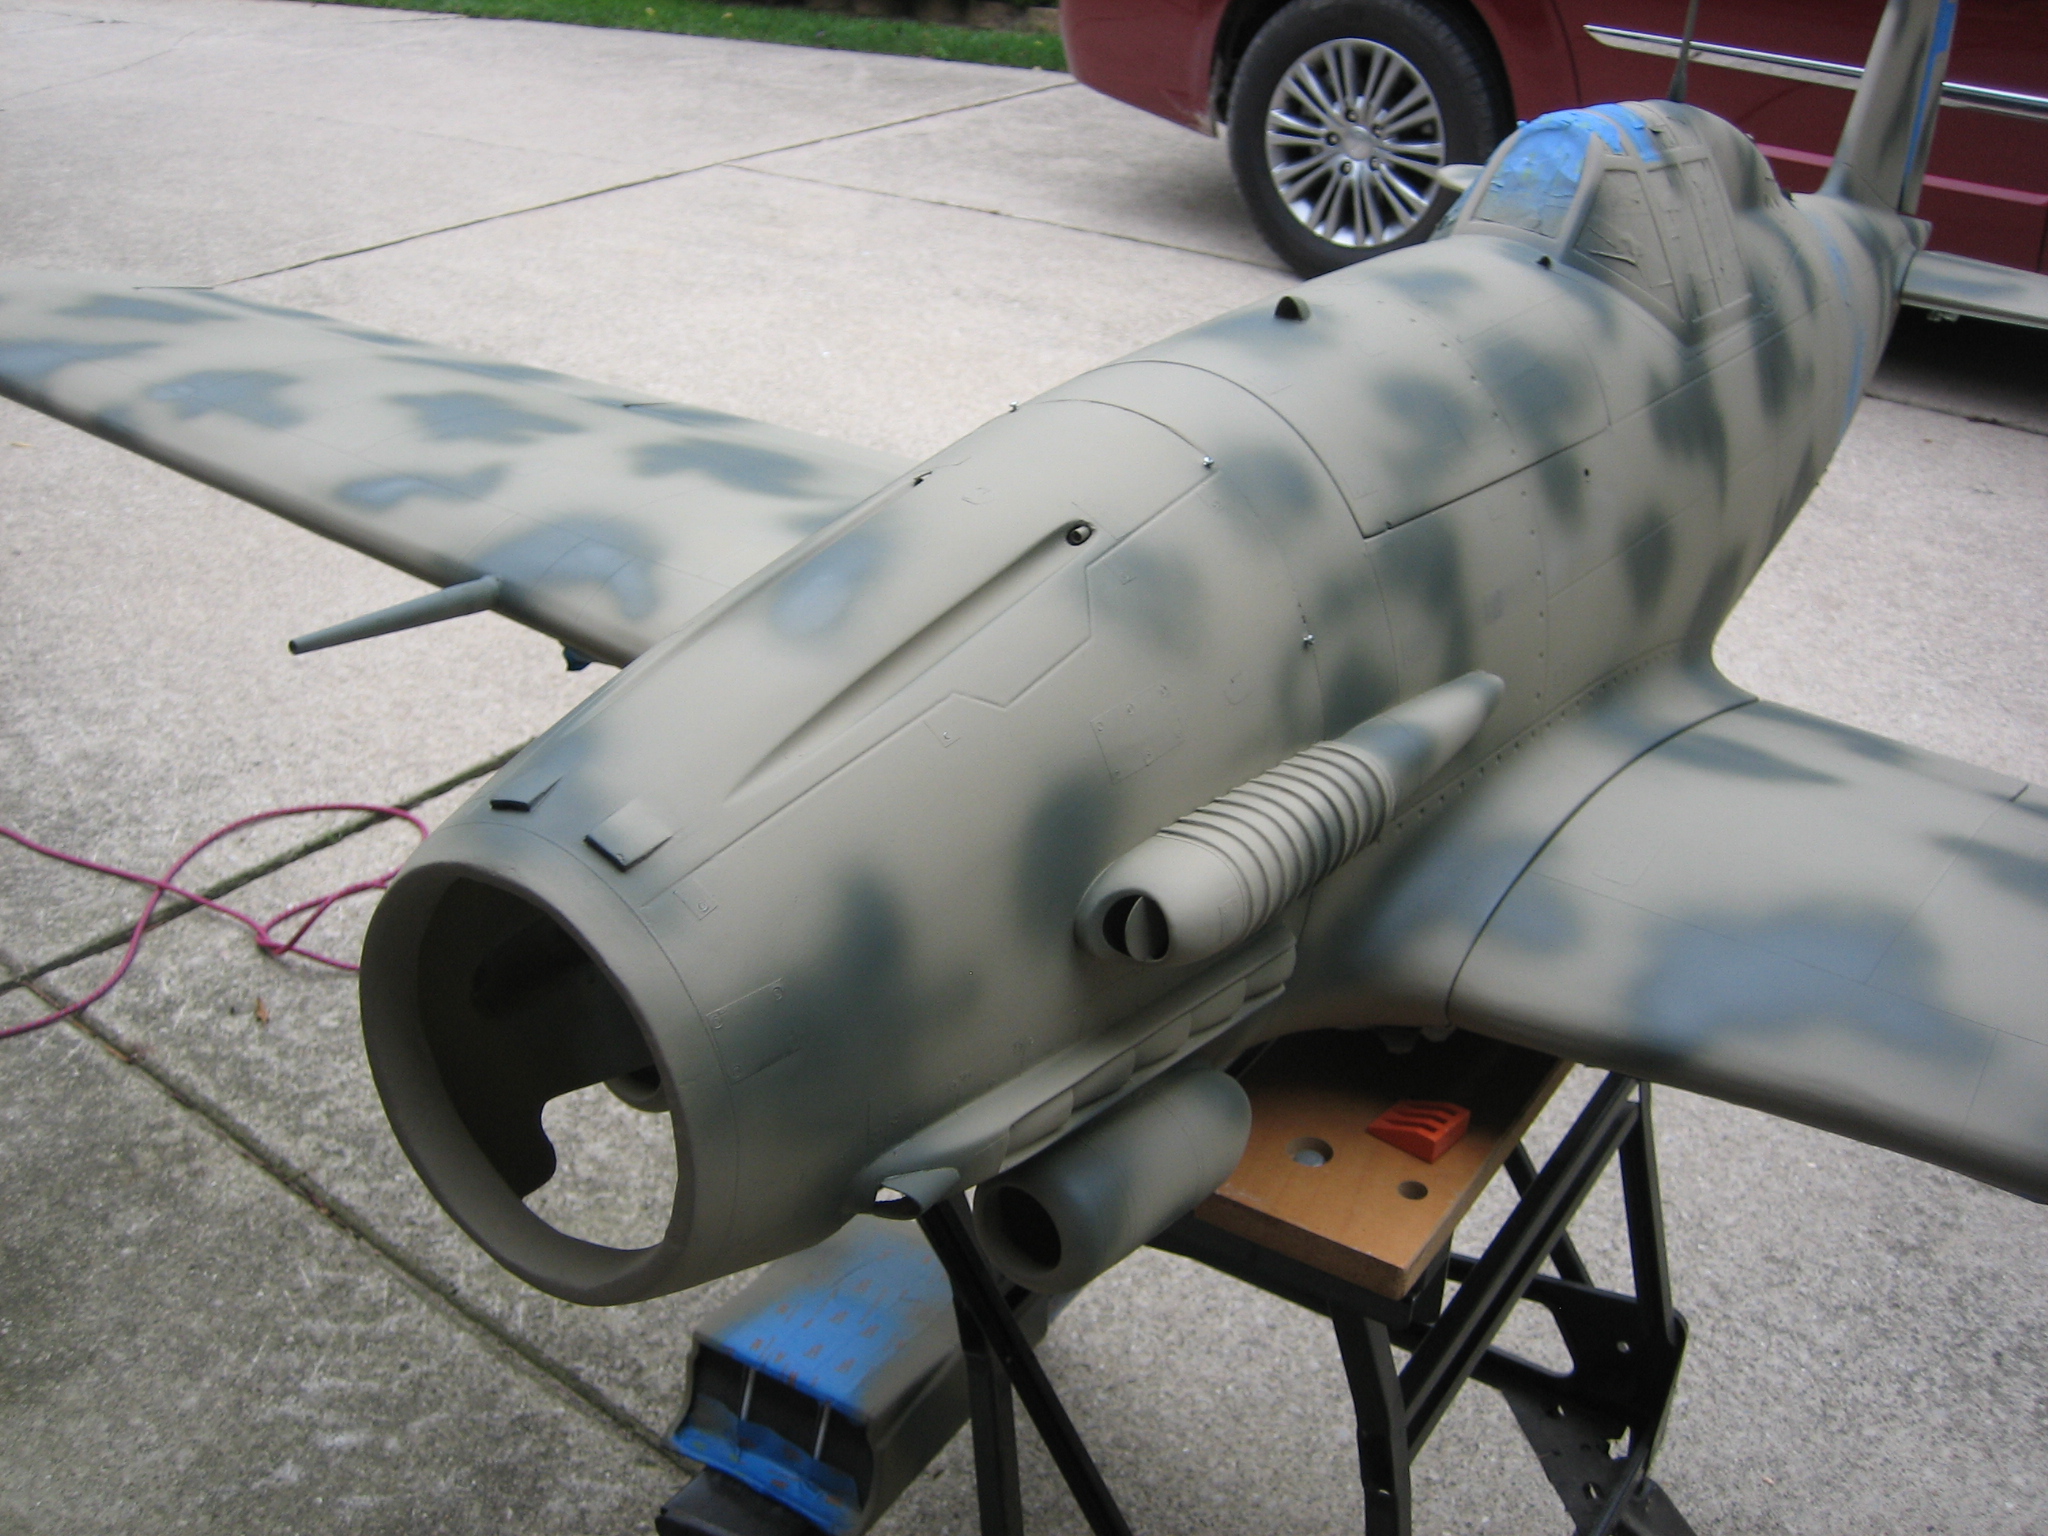
Now .. thinking about the camo paint... but get distracted yet again.. the exhaust shroud area is not even close to correct. I decide to attempt some modification to represent the cooling scoops that are on the exhaust shroud.
Took some servo cover linkage shrouds and cut them to match the cowl part.. glued them on, the drill / grind a hole to simulate the intake area. Not perfectly correct mind you, but better than before.
I look at scale modeling this way... what is made, is to "fool" the eye into thinking it's reality. An optical illusion so to speak.
Oh - made an antenna as well .. with my usual magnet / stud mounting method. Wasting time again !
OK = off to bed, tomorrow is flying day !!
Next . . . the list is getting shorter.... now, about the underbelly radiator.. uh oh, more delay coming !! And then there's the tailwheel ....
Last edited by IFLYRC-RCU; 09-08-2014 at 05:00 PM.
09-08-2014, 07:37 PM
#35
Few more details.. . first, the exhaust shroud scoop painted.
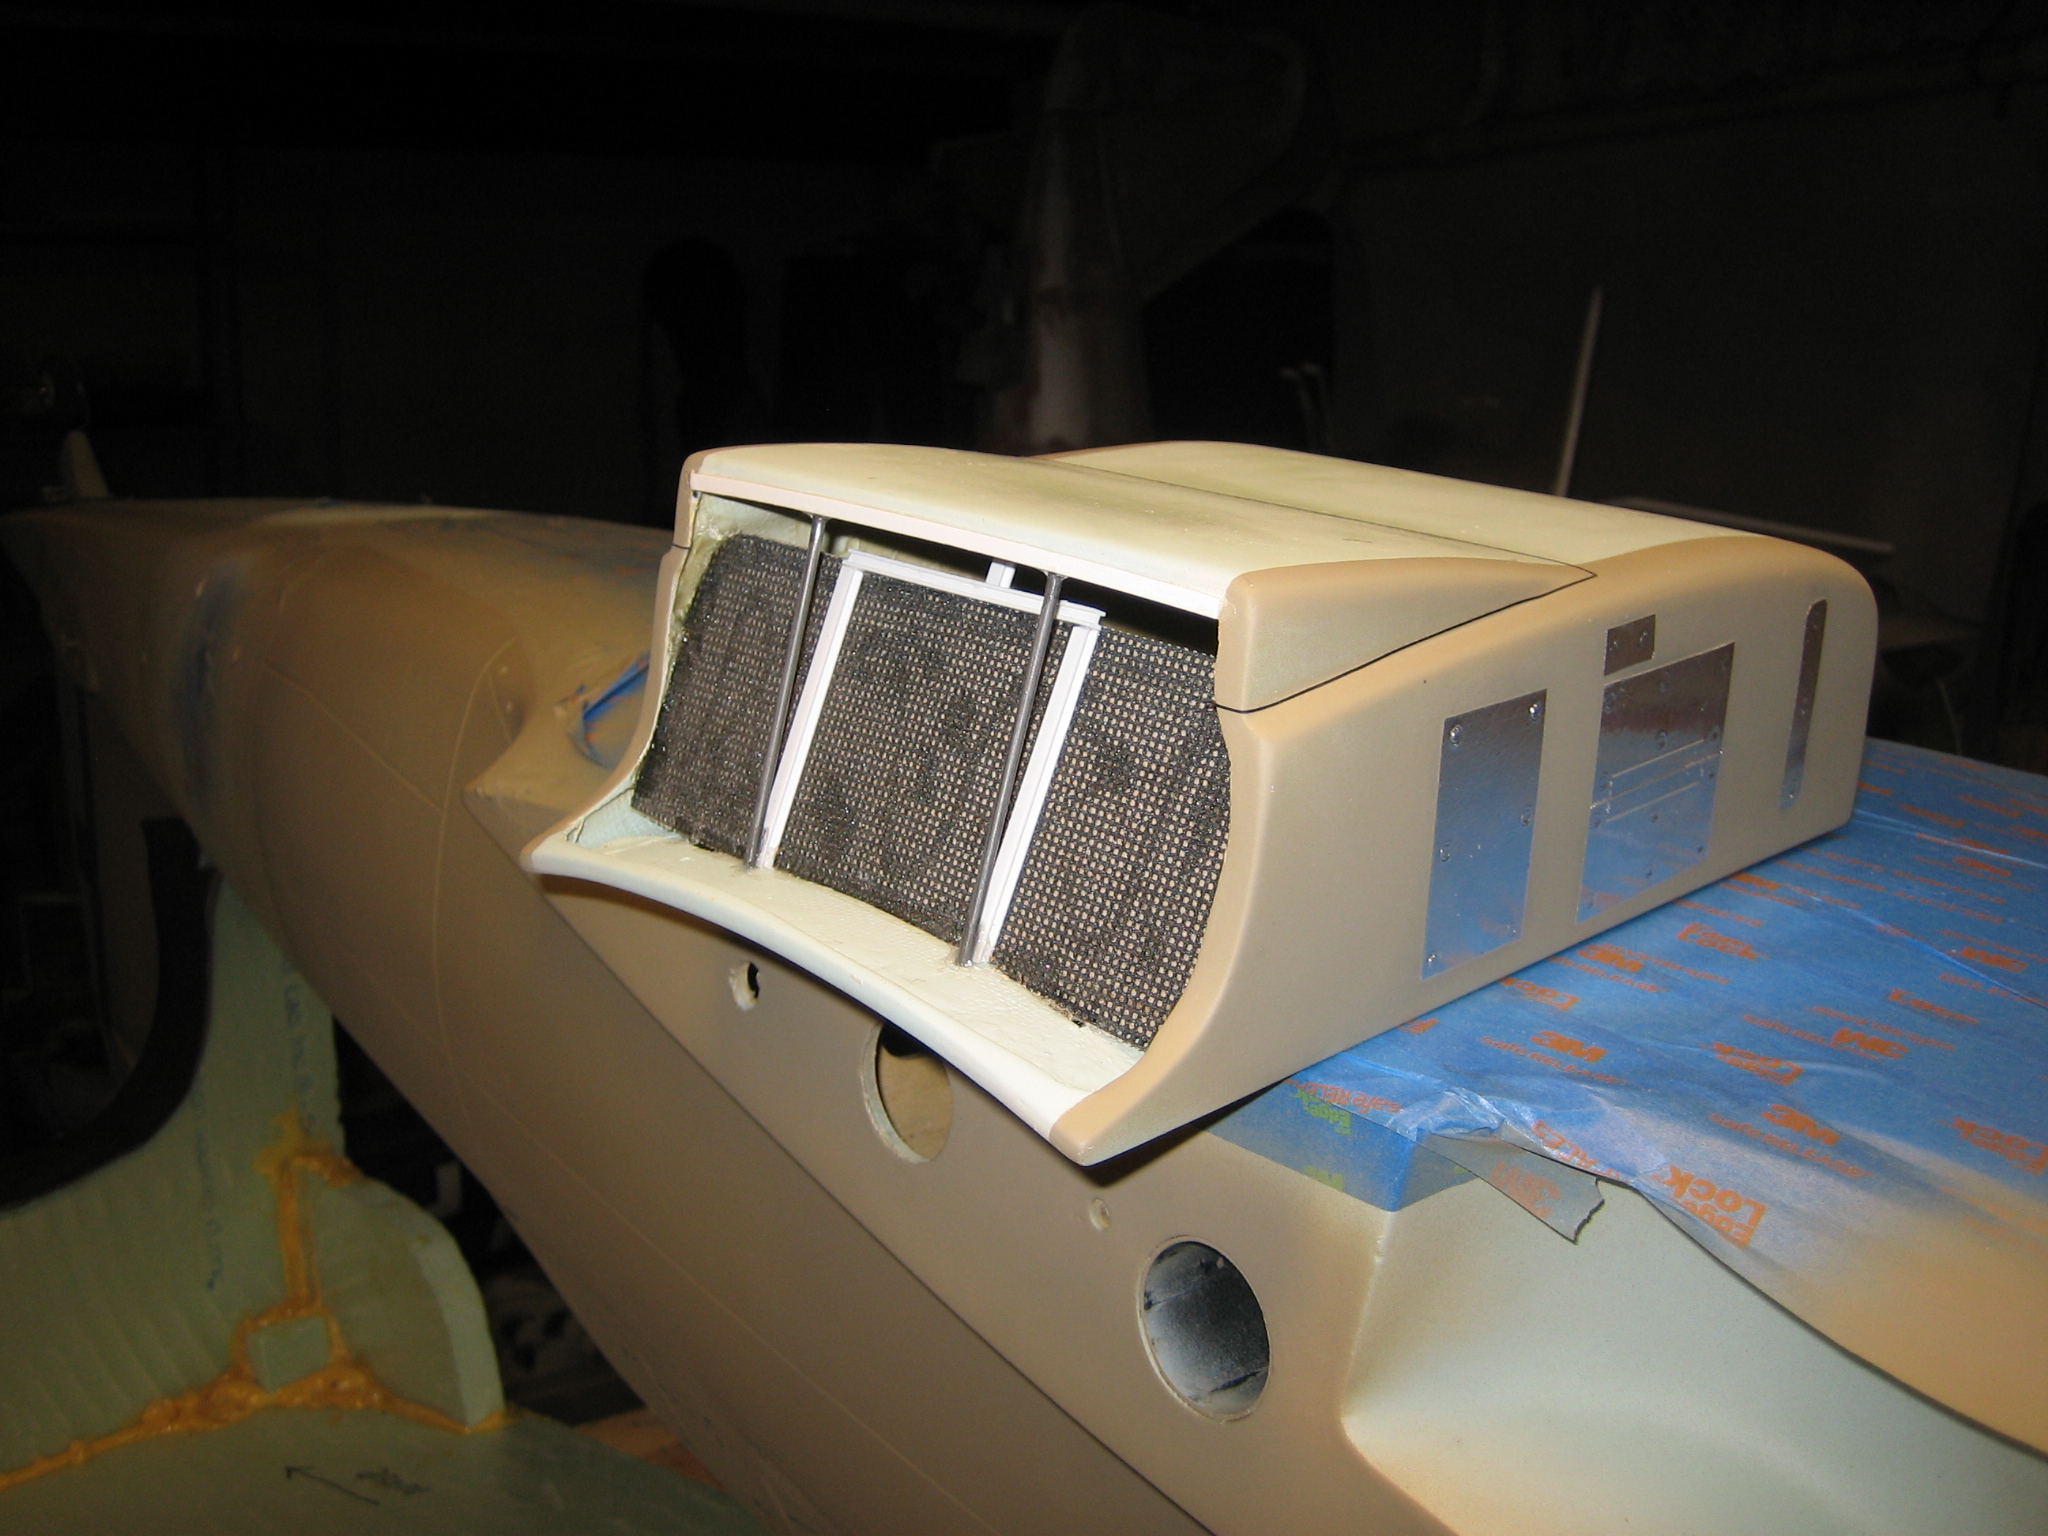
Then I added some details to the lower radiator. Of course, the openings were way too small, and then just "hollow". So cut the opening larger in the front, and made some simulated radiators from balsa and sanding screen. These will be painted flat black later. The rear also had the rad showing - and some struts to open / close the lap at the rear to regulate airflow. Why bother? Well, IF I have to belly the plane in one day - this will take the full brunt of the impact. I used some metal rod to add some structure which "may" min any damage. Hopefully I'll never test this theory, but you know .. it's a warbird.
Also added the pilot cockpit air scoop - and some tape over the canopy seam. When painted, this should hide the large gap that's there. I also made a tailwheel cover - the kit came with a standard looking mount, I added some depth ala the real plane by making a balsa pc to shape, then glued it onto the alum mount.
09-12-2014, 04:59 PM
#36
OK = day off today .. to set up our club field for the Giant Scale fly we have this weekend - 31 st year ! [ flyingpilgrims.com ]
Anyway, get home about 3:30 or so - and decide to paint and touch up the khaki color... to finish up the panels and make them the same color. I think I am done adding stuff for now.
Decide the slide the parts together... again, wasting time to see what the plane looks like all one color finally. I haven't had it together since I first brought it home some time ago.
Fairly happy with it so far - so glad the puke yellow is all gome!
09-12-2014, 05:05 PM
#37
Well . . . now that I have it updstairs ... and it's together. Get a burst of motivation to do some more. It's not windy, so out comes the airbrush.
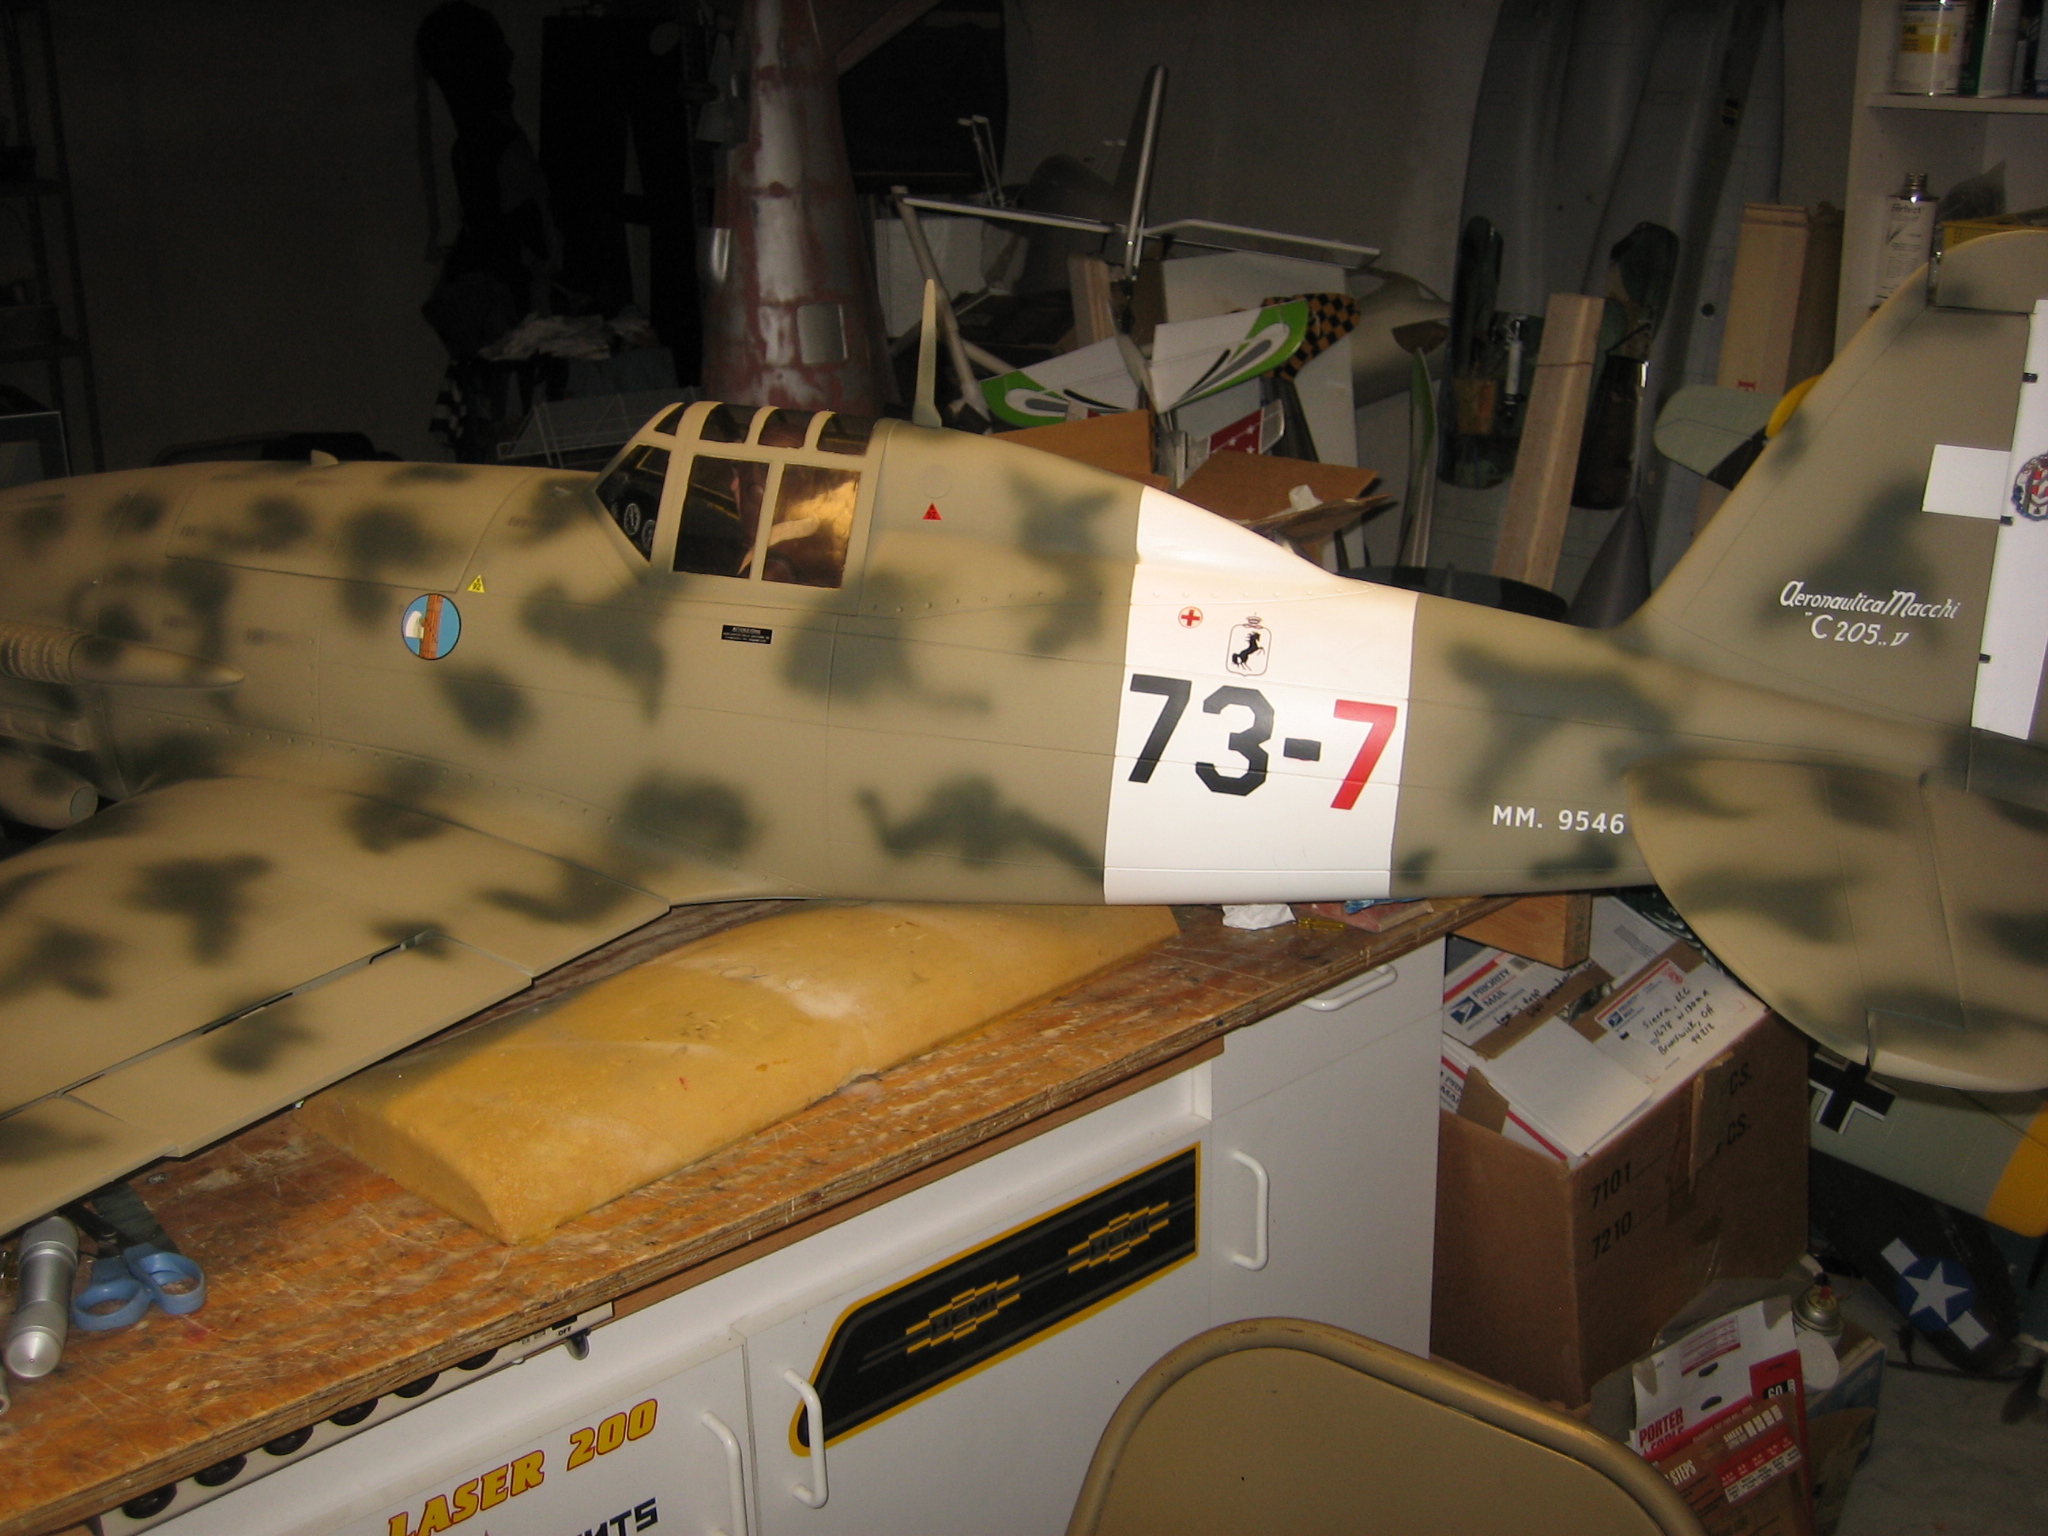
Have some Model Master paint... so add the camo contrast color. Now, I do NOT like the "onion ring" camo much, and decide to follow more of a 202 pattern for teh camo. AFter all, this is a way stand off scale plane after all.
So, here's how it looks in the high tech spray booth. Starting to look better.
09-12-2014, 05:12 PM
#38
Of course, I get impaitient to see what the contrasts will be with the white bands and a few of the decals I had made.. so start pulling the masking tape off . . .
And here's the result - again, looking better! I had to sit it on the ground and get a high level view of the very random pattern I did. Overall, I am happy with the repaint. Now, finish radio, fuel system, and teh retract install .... etc.


And here's the result - again, looking better! I had to sit it on the ground and get a high level view of the very random pattern I did. Overall, I am happy with the repaint. Now, finish radio, fuel system, and teh retract install .... etc.
 09-13-2014, 08:29 PM
#41
Fly all day.. and come home to "rest". That of course means fiddle around with the Macchi.
Finished up the lower radiator for instal on the fuse. Had to black out the rad area and intakes.
Then, added some of the graphics, such that they are, to the airframe. only on one side for now until I decide they look OK.


Finished up the lower radiator for instal on the fuse. Had to black out the rad area and intakes.
Then, added some of the graphics, such that they are, to the airframe. only on one side for now until I decide they look OK.
Last edited by IFLYRC-RCU; 09-13-2014 at 08:32 PM.
09-18-2014, 07:36 PM
#42
Well, in spite of my best efforts.. the plane is not done. Leaving in the am for the Elkhart warbird fly in. Thought it would be done enough for display anyway....Nope
Got the white details painted on... very similar to the german desert identification markings.
Anyway, added some more graphics... Notice, they are shiney. I spray them with Testors dull coat. This flattens the gloss so they blend a bit better. Hey, it's an ARF !
Installed the retracts. Of course, they don't fit well and there are no mounting screws. NP, but really? And missing a couple of the 4mm tail bolts as well.
More pics: getting close.


So - finally get to see it on it's legs.. albiet in a rather "un-natural" environment for a warbird.
Got the white details painted on... very similar to the german desert identification markings.
Anyway, added some more graphics... Notice, they are shiney. I spray them with Testors dull coat. This flattens the gloss so they blend a bit better. Hey, it's an ARF !
Installed the retracts. Of course, they don't fit well and there are no mounting screws. NP, but really? And missing a couple of the 4mm tail bolts as well.
More pics: getting close.
So - finally get to see it on it's legs.. albiet in a rather "un-natural" environment for a warbird.
Last edited by IFLYRC-RCU; 09-20-2014 at 03:03 PM.
09-22-2014, 07:00 PM
#43
Back to work after attending the Elkhart show ..
Rigging the gear, fitting the gear doors. Hmm, they are a bit "short" for some reason? So make a balsa extension, and decide to add a few of the details to make them look a little bit more scale.. Add paint, ready to install.
Concerned abouit the retract quality.. wondering "if" they will hold up to some hard landings. If not, bring on the Robart 635s!. These appear to be exact copies of them. We'll see ....
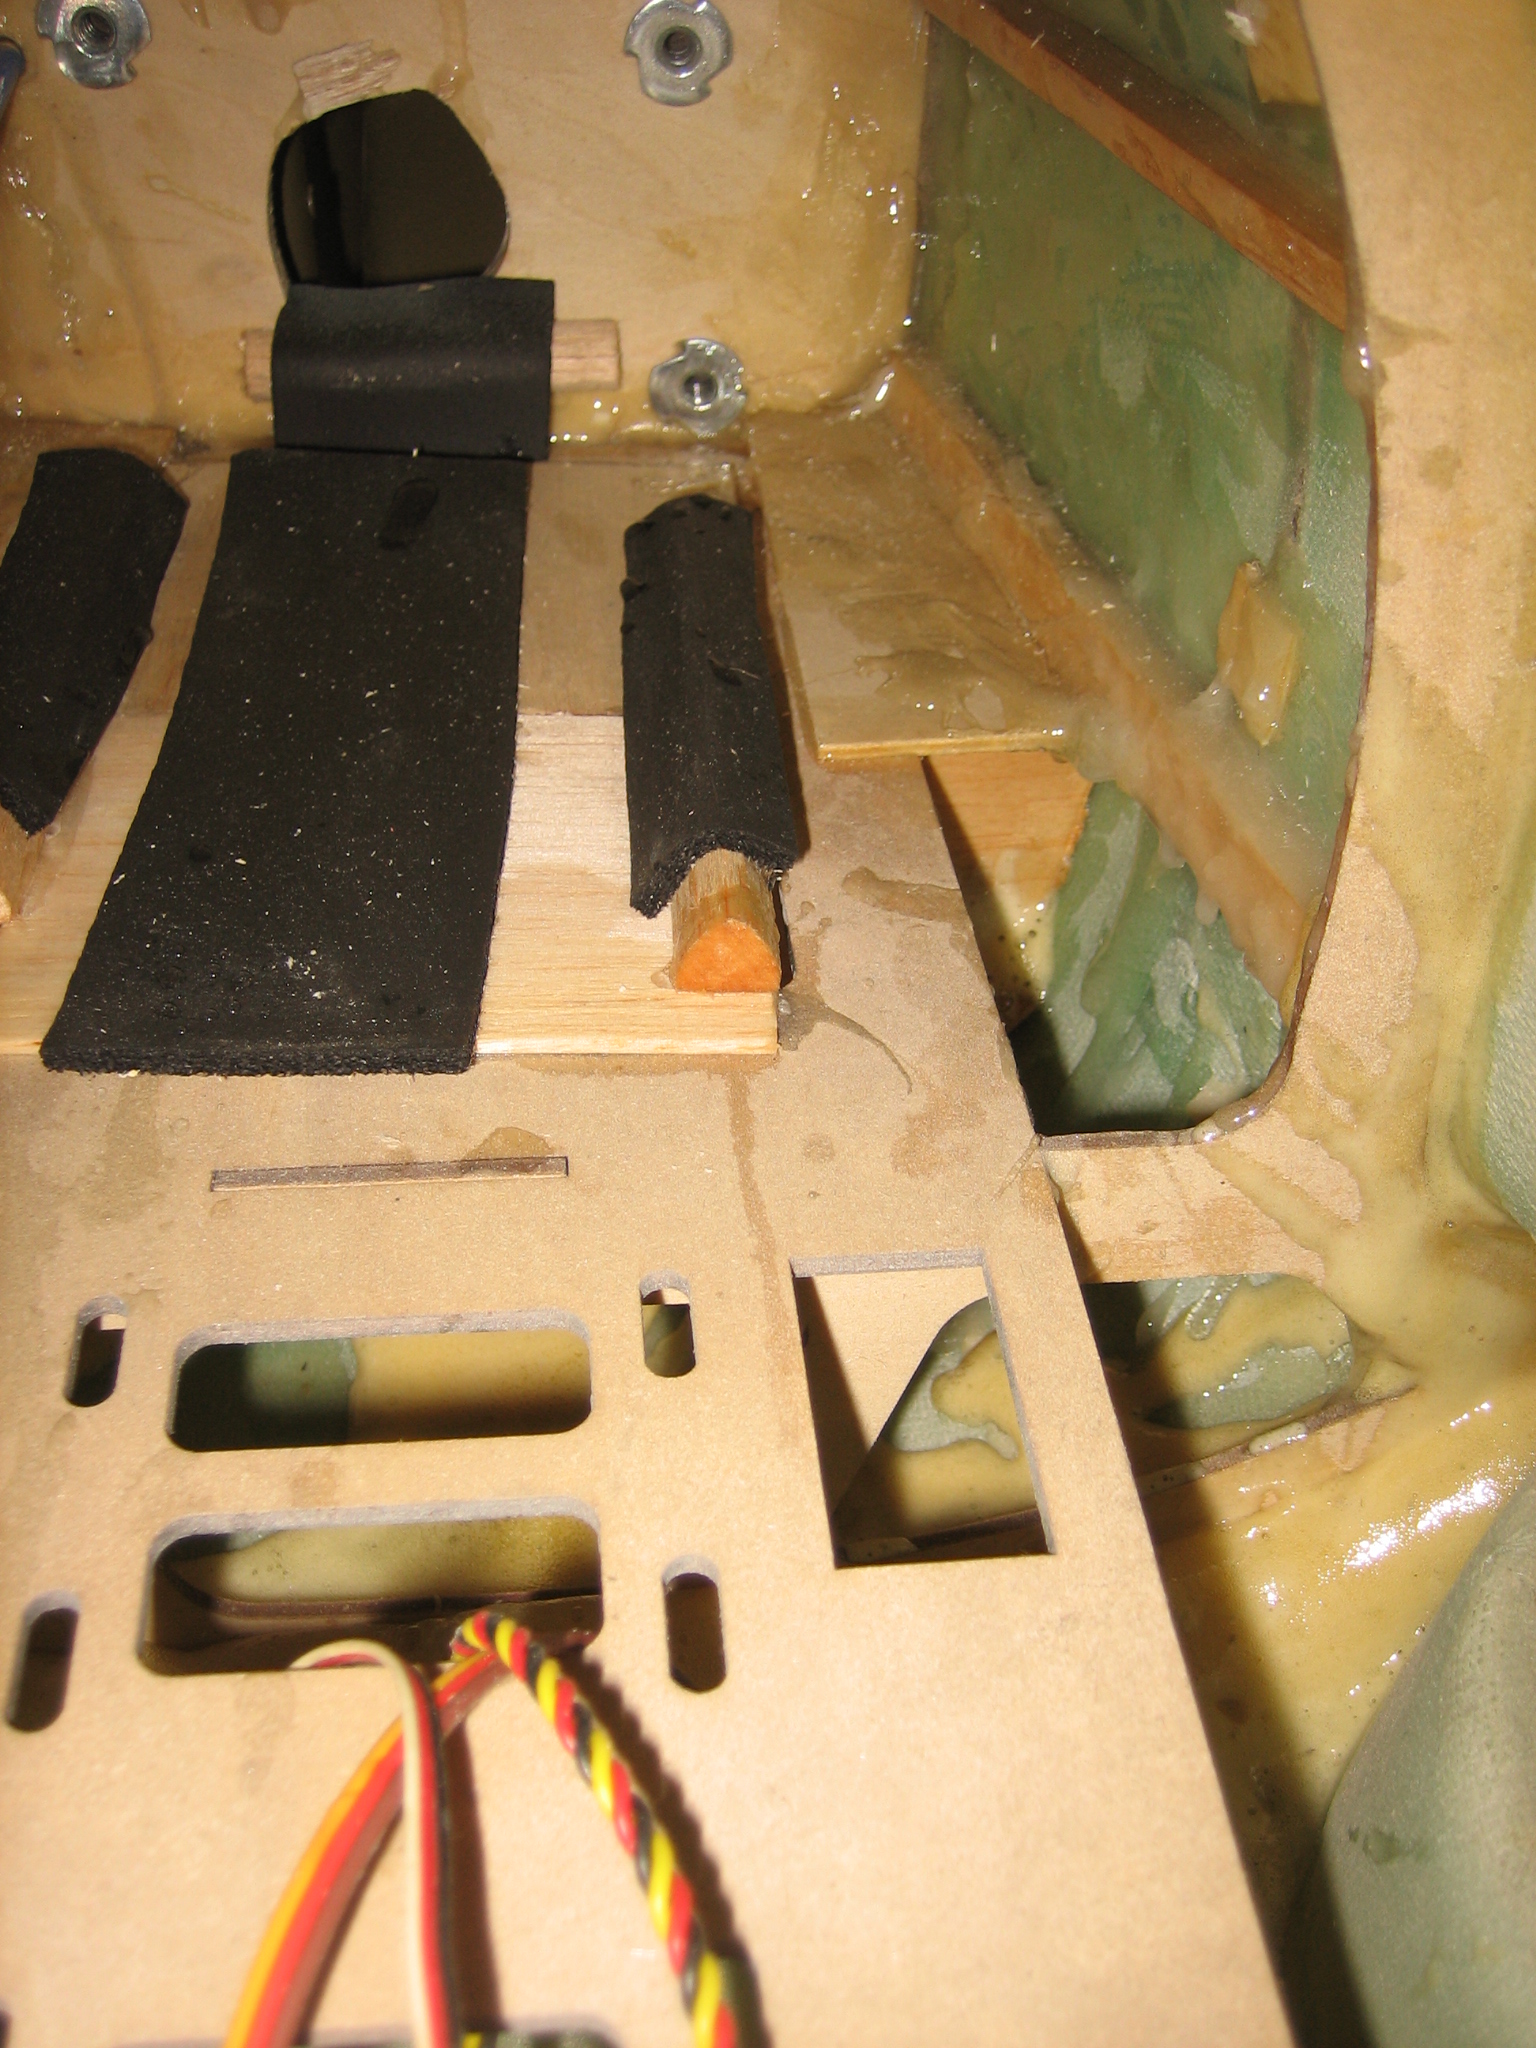
And - a pic indise the front of the fuse, fuel tank mounting. Notice, I added some hardwood stringers, and glass inside to beef up the front a bit. Also, the formers are not a perfect fit, so I added some Gorilla glue to "expend" the contact area and lock the main formers in place. This stuff is great for filling gaps.
Getting very close to a test flight guys... very little to do now to "Git -er- Done !"


Rigging the gear, fitting the gear doors. Hmm, they are a bit "short" for some reason? So make a balsa extension, and decide to add a few of the details to make them look a little bit more scale.. Add paint, ready to install.
Concerned abouit the retract quality.. wondering "if" they will hold up to some hard landings. If not, bring on the Robart 635s!. These appear to be exact copies of them. We'll see ....
And - a pic indise the front of the fuse, fuel tank mounting. Notice, I added some hardwood stringers, and glass inside to beef up the front a bit. Also, the formers are not a perfect fit, so I added some Gorilla glue to "expend" the contact area and lock the main formers in place. This stuff is great for filling gaps.
Getting very close to a test flight guys... very little to do now to "Git -er- Done !"
09-29-2014, 04:25 PM
#44
Getting very close now ... final radio install/ program radio.. with some help from Jack. aka jkezel.
Gear cycle, up, down, up down. Check.
Final engine install? Check.
Fuel tanks and lines. Check.
3 am ! Check. Ugh. Trying to get it ready for test flight on Sunday....
Up at 8 am, work on it til 1.. head to the flying field. Check.


Gear cycle, up, down, up down. Check.
Final engine install? Check.
Fuel tanks and lines. Check.
3 am ! Check. Ugh. Trying to get it ready for test flight on Sunday....
Up at 8 am, work on it til 1.. head to the flying field. Check.
Last edited by IFLYRC-RCU; 09-29-2014 at 05:26 PM.
09-29-2014, 04:46 PM
#45
Now - catching up on the weekend event ... of test flying.
So, I am a bit tired on Sunday, but it's a perfect day, warm, light wind. Gotta push on to the testing ..... Of course, the plane is "not quite done yet".
Sunday morning, I realize the spinner and adaptor don't really work as I planned.. so, drill and tap the hub, after struggling to get it off the engine.. and we have a "solution". Hmm, a machinist I am NOT !
I could not balance the plane well by myself.. and Jack was at the field. So - leave it apart and take it to the flying field and get it on one of the work tables... which are usually for minor field maint. BUT - today, I plan to "finish" my plane, and fly it! The other pilots are "skeptical. But they watched and help me as well.
Of course, I don't know if it'll balance OK, and I have never run the old school Q 100 I repaired after my buddies P 47 crashed with it.. and the gear is a little funky, In fact, I've never had the whole airplane together at one time really but hey, did I mention it was perfect weather ? Good stuff for late Sept in Mich!
Assemble the plane for the first time.. get some air in the retracts.. and get 3 guys to help.. Ooops, not good, tail heavy! I brought some scrap lead, CA, and epoxy. Add some weight on top of the cowl.. Hmm, getting closer. CG is 4.5 to 5 inches btw. Still not good. So, add more weight.... , now close. So I remove the cowl, stick the weights on, then CA them in place.. and mix a batch of 5 min epoxy to lock it all down well. Repeat again ... and again ....
Re-assemble the front for the 3rd or 4 th time, recheck balance... not enough. So, take it apart, again. Starting to get very tired !! Add some lead shot with more epoxy at the front of the cowl, Put it all back together, again.. It's at the rear of the CG range - I decide that's good.. with fuel, it'll be fine, right ?
Now, about the engine.. time to test run that, or see if it even runs. Had some damage from the previous owners crash, but I have a few Q 100s and some extra parts.. so it should run.
Add fuel.. it pops.. and pops.. then roars to life. Minor tweaks to the needles.. ready.
Next, take a few pics before the flight.. just in case...
Last edited by IFLYRC-RCU; 09-29-2014 at 05:29 PM.
09-29-2014, 05:10 PM
#47
Many comments at the field, and we have a lot of "builders", about the unique look of this aircraft. Ahh - I love it ! Weird is perfect! Shouldn't see too many of these at fly ins.
So.. off we go. Gas? Check. Air, test gear again? Check. Engine runnning OK ? Check. Let's do this!
So. running for 5 min waiting for another pilot to land.. yell to the pilots at the far end of the field- this is a new plane and test flight.. look out just in case. Taxi out, turn around.... engine stalls. Hmm, too much idle time? Whatever.. walk out and restart it. Figure I am on the runway, lets just go. So add power . . off it goes.
Plane tracks staright down the centerline of the runway, wobbly gear and all - and lifts off, straight, no drama at all. In fact, it's sort of a non event ? Right away I can tell this is a stable aircraft. Gear up.. walk back to the fence now. First lap? Good. Whoa! this is very fast.! Add 1 click of up at full power for trim.. and it's all good. No other trim required. Kinda surprised as the wings don't locate all that positively.. I lined them up by the wing root when I put it together.
Anyway, slow it down and make some laps.. Opps, right gear not up. First roll, and that is solverd. Make a few passes and then come low... stable and plane is grooving well. Next pass - I can't resist .. add the power, slight dive.. and zoom! It's a movin' now!
What was that ?? Something flew off the plane, right in front of me - not sure what happened.. Oops.
Plane seems to still fly?? Then Jack says the lower radiator scoop came off. Whew... all I saw was something big leave the plane at 100 mph or so....
6 minutes and counting.. all good, basics are checking well for flight, figure I better land.. drop the gear? Check, all good. Add some flap? no trim changes.. Check.Get in the pattern, line it up.. keep a bit of power.. glideslope is good, right on the centerline.. and flare it in. Easy Peasy ! Lands like a champ. Roll out into the grass as I carried a bit of speed to feel the plane out on the first landing.
Gents - we have a test flight ! Hope the link works.... not the best videos, but you get the idea.
https://www.youtube.com/watch?v=AXV8PJkZN_o
https://www.youtube.com/watch?v=h9w4hnc_-k4
https://www.youtube.com/watch?v=Vf9C1nKdPUM
Last edited by IFLYRC-RCU; 10-19-2014 at 05:40 AM.
10-06-2014, 06:37 PM
#49
So - some post flight observations after airframe inspection...
Overall, not bad.
Re-glued the lower radiator back on.. Roughed up the fuse some more, drilled some small holes to help the glue attach itself. Added some screws this time. Used Gorilla glue. Suspect that will hold it on now.
However, found the rear stab seemed a bit loose. Strange. Check it out.. and guess what? The "tube sleeve" glued in the fuse.. was loose! Uh oh ! That could have been bad.. very bad. So CA'd it back in place, and now have to figure out how to get some glue to that joint inside teh back of the fuse.. that'll be fun! So - if you happen to have one of these .. check this out before flying. Might save your plane.
Few other minor items, fill line needed some refinement... prop slipped slightly... retracts are OK, but wobbly and do not hold the wheels straight. AND - retracts need a stronger strut spring.. will be adding a dowl shim the stiffen the strut action. Not very happy with the retracts overall.
10-12-2014, 06:39 PM
#50
And another flight today .. and more "drama" of course. This is a plane that keeps on "giving" apparently. Read on -
So, after addressing the obvious items that came up after the initial flight, decided to give it another go today. Bright and sunny, there was a good 10 - 15 mph breeze. However, it was mostly down the runway, well sometimes anyway.
So assemble the airplane, and get it fuel and full of air. Ready. Engine is a bit grumpy on the first start today, but it finally fires. OK - good. Taxi out ---
Turn into the wind.. hit the power and she's off.. in like 20 feet. I guess I have enough power. Maybe the Q 100 is overkill, but I have a few laying around and it needed the weight up front. So - gear goes up.. well sort of. Again, the right gear doesn't lock up ? Hmm. Oh well, a roll and a rapid push of evelvator take care of that. All good.
Make several passes for the camera.. than start to feel the airframe out. Seems to groove fairly well, even with the wind. After maybe 7 minutes of laps, loops, and rolls.. decide to open it up for a low high speed pass. Here it comes.... wow - it's really, really fast. Zoom. Turn it around and set up for a downwind pass.. it's really screaming now... engine is crankin', and it's hauling. Then it happens . . .
I hear it before I instictivrely pull the throttle and add up elevator to bleed some speed. The rudder is in flutter mode... uh oh! Of course, all the co-pilots on the ground are yelling the warning by now!
Anyway, get it slowed, and check for control - Aiel? Yep, elev? yep. Rudder ? Hmm, strangely, I still have rudder? One more lap for gear check, add full flap, set it up... get it lined up, fight the wind a bit, but landing is really not an issue.
Taxi it back in. LUCKY. When is the last time you saw an airframe in full rear end flutter still have control? Very lucky I was able to fly the plane to a safe landing. Rule #1 for me ... when there's an issue - fly the plane.. fly the plane, fly the plane. I have fought them all the way down sometimes, but I never give up.
Now, after engine shutdown, there appears to be no damage? Hmm. Then I grab the verticle stab.. oh, it's loose alright! The fuse was developing a crack on the joining seam on the top right before the verticle fin. I can see why the rudder was shaking now. Shop inspection showed that the formers at the rear of the airframe were not attached well.. one large, full former actually came completely loose. There is no vertical post on the fin, just a couple of horizontal formers. When I removed the tailcone, I saw that the light ply at the rear of the vert fin had cracked completely.
I cut an opening in the rear of the fuse under the fin - and can see clearly that most, if not all of the formers are loose. Not sure if the flutter caused this, or poor manufacturing. 50 -50 guess at this point. I will say this - I had commented on the lack of fin strength before both flights. It lacked rigidity from the start in my opinion. Now, plan B is to reglue what is there now, then add some veritical posts to beef up the structure back there.
So - lessons learned, if you happen to have an easy Tiger ARF, check and maybe re-glue the formers before flight. The airplane flies great BTW, that part makes it worth messing with. And it looks strangely cool in the air.
Couple more pics from today - post flight I might add.
Last edited by IFLYRC-RCU; 10-12-2014 at 06:45 PM.