


TF 1/5 Scale P-51 ARF Assembly (1ST MISHAP!!!)
 11-22-2014, 06:18 PM
#3301

Here are some photos of the surgery to get into the ARF wing to install the reinforcements. It is a new wing, I peeled the covering off in one piece as it had never had wrinkles shrunk out. I use a Hobbico razor knife to make the cuts. It leaves a smaller kerf than a saw, it also slices through the fiberglass wheel well and the glue used by the factory making it easier to reassemble after repairs. I noticed that they actually used glue in this wing although the hot knife slices right through it. And it has vertical grain shear web on the front of the spars. These last two are new. So, ten years after my first ARF there are structural improvements. I think if you are building a kit you could replace the landing gear ribs with aircraft grade ply and all this would be unnecessary.


 11-22-2014, 07:45 PM
#3302
Senior Member

1-2; Amount removed from wooden rails to mount CJM gear. Makes center mounting hole useless as there in very little rail left.
3; Gear installed in position, will mark for existing holes and make determination on new holes to be drilled in gear to hit max wood rail. I will use material in place of an in addition to the rails.
4-5; Gear scissors as shipped. Scissors attach point pressed fit moved up the strut 7/8" to make the scissors fit.
6; Full gear installed in gear well.
7; Cover plate with cutout for claw. I have had enough work on gear, shifting to other much needed work.
1-2: Jtec muffler stacks cut off and cowl opened up for fit.
3; Fuel dot installed.
4: Hatch door opening for switches, hinged at front.
5; Monocoat covering for hatch door.
6; Switches and ign. light. I need to paint and re-install the switches with switches turned around so that the on position is down.
7; Ign. controller and gear controller installed.
Last edited by rossmick; 11-22-2014 at 10:36 PM.
11-22-2014, 09:18 PM
#3303

Great progress....
i noticed in your wheel wells you have not modified the spar webbing like most of us did with plywood.
the plane notoriously have a tendency of ripping the wheels off the rails even with mild landing and with a bounce or two.
reinforcing the whole section with plywood and fiberglass as illustrated many pages ago, will save you the aggravation to do the mod later.
perhaps you are planning already this fix so I shut up and enjoy your build.
11-22-2014, 10:09 PM
#3305
Senior Member
Doomking
Thanks for comment. I do intend to do the ply and fiberglass upgrade, but at the moment I am geared out. From reading this thread, I am convinced that the gear mount is a major weak area and the work needs to be done.
I'll put in some time tomorrow on other items; cowl mount, servo mount and control connections to rudder and elevator, fuel tank vent and fill lines. The big issue is the tail wheel mount and connection. I may have only 6 hours tomorrow so I'll see what I can get done. The CJM tail wheel assembly is different, and there is no design for how to mount it so it will take some time.
I hope to tackle the main gear actual install and wing modification on Monday when I have the full day and in a better frame of mind about the gear.
Last edited by rossmick; 11-22-2014 at 10:20 PM.
11-23-2014, 02:31 AM
#3306
If I were you and time is limited I would just install the fixed TW mount that comes with the ARF. The CJM mount will require you to cut into the bottom planking on the plane, install a couple of bulkheads, one to mount the retract and one to mount the steering (think nose wheel steering parts). I have a p 51 kit that some one else built and I had to cut into it to repair it (wouldn't steer). I found a nightmare installation required by the fact that the control rods go through the reverse TW bulkhead back to the steering bulkhead with the rudder and elevator rods also going through the mess. The amount of engineering is incredible. The memory of spending an entire summer break working on the TW retract with doors on my b model kit caused me to rip it out and install the fixed gear and go flying. If you have never work with the CJM tail wheel before you will find you can assemble an entire p 51 ARF in the time it takes to install the CJM tail retract.
You can wait until you are snowed in for the winter and then go into it with plenty of time. And you might need some anti-depressant and sleep meds to help you along. The guy I got my plane from happily demonstrated that the CJM gear went up and down every time- it just needed some work on the steering( and there's the stick in your bicycle spokes).
In fact, if any one wants a CJM tail wheel retract I'll make you a good deal on one.
The only thing it has got going for it is scale location and operation.
 11-23-2014, 05:33 PM
#3308
Here are some pics showing the steps after gluing in the rib reinforcements. 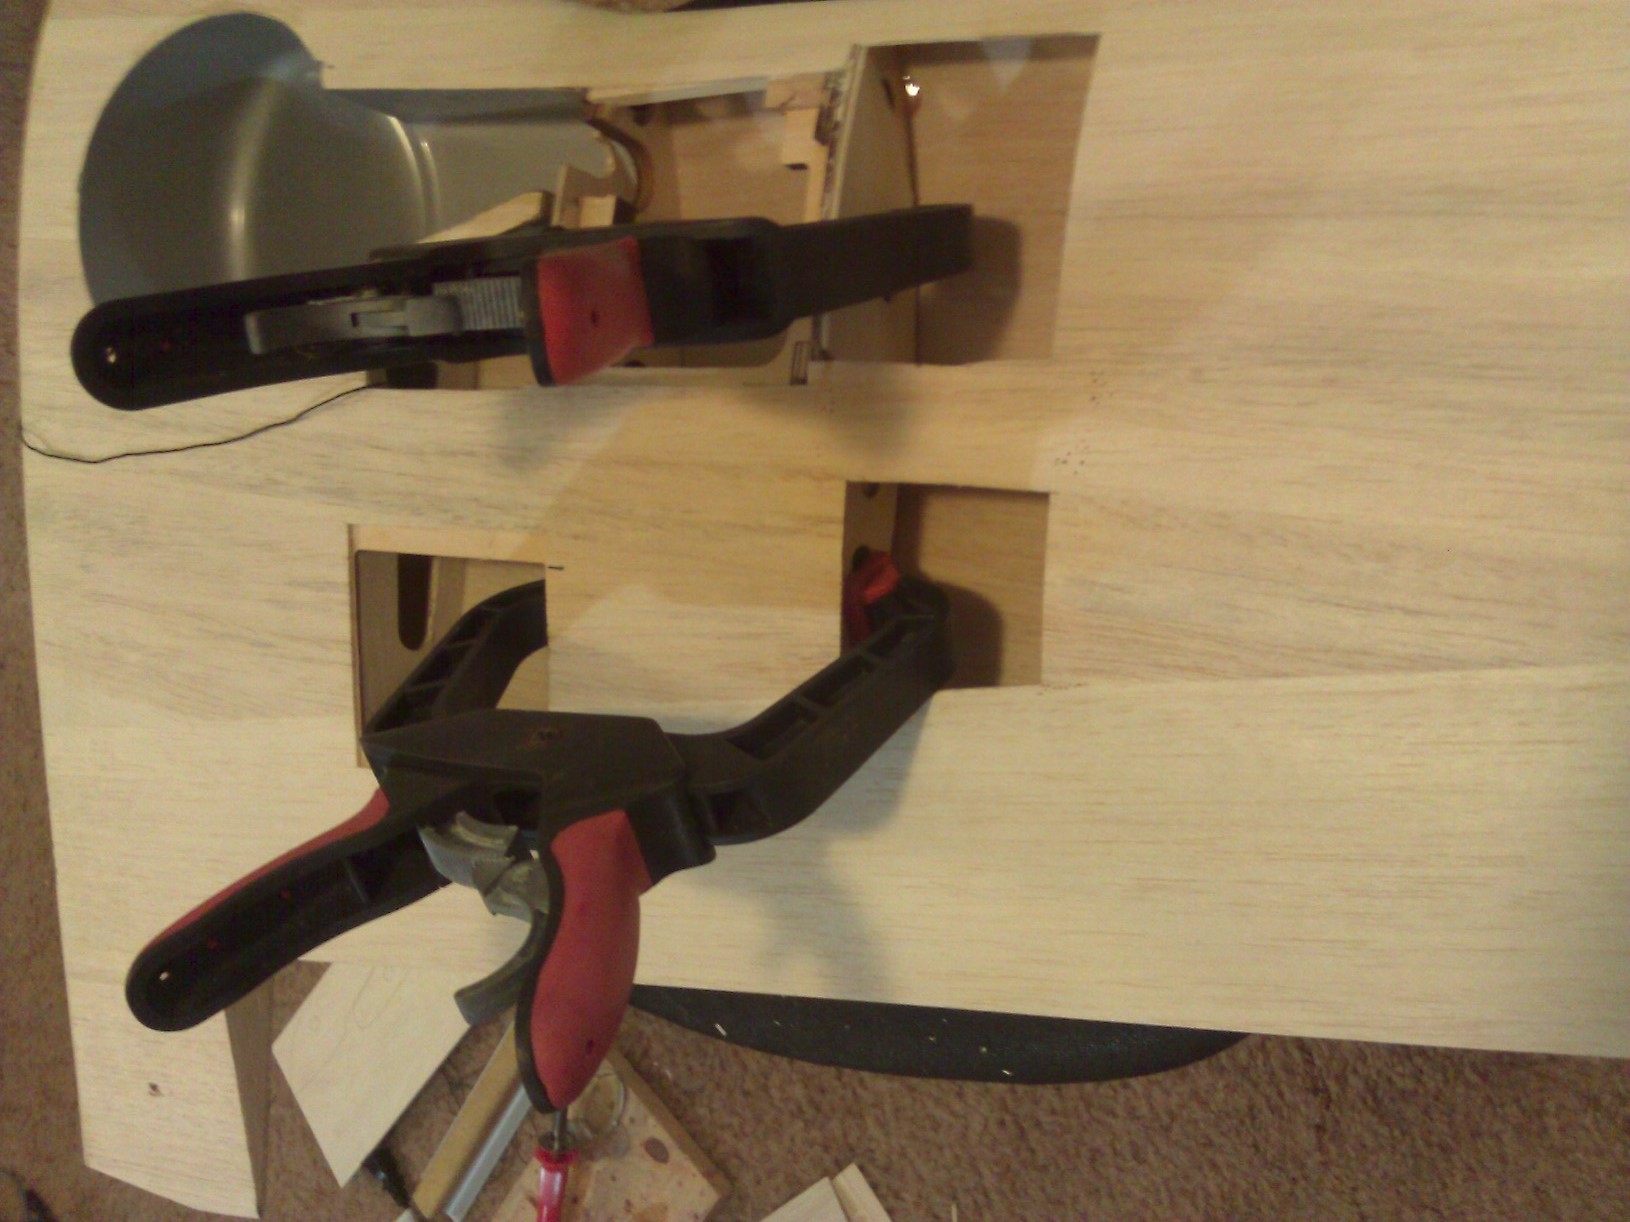

 The first is the clamping of the new pieces after gluing. Gorilla glue needs an hour to set. The second is the balsa pieces laid in under the wing sheeting with super glue gel. the third is the original sheet pieces that were cut out to gain access put back in their original locations for a trial fit before final gluing. This method is as strong as the uncut sheeting and has withstood my sometimes ham fisted landing technique. A light sanding with fine paper on a long block and they are barely visible. Don't press down hard when sanding or the sheeting will become too thin over the ribs. Use DAP light weight spackle applied with a credit card to fill voids, wait over night to finish sand and it is ready to cover. I am using the opportunity to cover with Ultracote (Oracover) silver as the original North American paint used was primer over a putty glaze to fill the rivets and panel lines then silver. Some theaters got different colors. Earlier models were camo and replacement planes were silver. When you see panel lines and rivets on a model wing it is because the builder is copying an airshow plane. I have seen some racers use the glaze finish method for speed. Most surviving warbirds have been refinished many times and the glaze has been omitted as expensive, heavy and time consuming. The only detail you should see on a combat model is fuel filler, static ports, machine gun access ports, and gun and fueling nomenclature. There is usually a few other stencils applied but you have to look at photos a the particular plane you are copying. As for the control surfaces go by the pictures you have. I like the Ultra cote because it goes around compound curves a little better than the TF stuff and wrinkles less in the Fla. sun.
11-23-2014, 10:53 PM
#3309

My Feedback: (133)
Join Date: Aug 2008
Location: Keizer,
OR
Posts: 590
Likes: 0
Received 0 Likes
on
0 Posts
this is a lengthy ''old'' thread.....have to wonder if TF techs. and people have ever read thru this thread????? the arf kits prices keep going up but not the quality!!!!!!! just my thots on the subject. have a lot of mods on it just to make it safe and keep it from self destructing. i'm just too far into it to stop now!!!!!!!
11-24-2014, 08:34 AM
#3310
Senior Member
sjhanc
Today's the big day for gear well upgrade. Thanks for the photos. I don't think I can strip the wing as I really reheated the covering, but might get the cutout areas removed and then recover just that section - not sure but will try. How did you handle the removal of the balsa spar web? Did you only apply ply to the front of the spar? I am still wondering if the alum. angle is not a better approach, just thinking.
Thanks for the tail wheel idea. Some times the obvious is right in front of you and you don't see it. I will install the fixed tail wheel. However, getting the retract in there is an interesting challenge.
Didn't get but about 3 hours yesterday on the plane as I am the web master for tucsonrcclub.net and there was some major work to be done on the site. Did get cowl mounting blocks on and added several more. Also got servos in and rudder connected. Control horn had to be moved for left elevator as it was way off for push rod alignment. Photos later tonight.
Last edited by rossmick; 11-30-2014 at 10:18 PM.
11-24-2014, 10:45 AM
#3311
To get to the webs you need to make your spanwise cut along the edge of the spar and the other cuts 1/4" inside from the ribs and front. I use a 25 watt hot knife which slices right through wood and glue easily with slow steady pressure. Otherwise just be careful you don't damage the spars. You can locate the spar by probing with a pin, set the pin in the web right next to the spar and use a metal straight edge to cut even with the spar edge. Once the square sheeting panel is removed the web can be attacked by gently sawing-slicing and the pry the web out away from the spar to slice the bottom glue joint with a long knife. The glue they use doesn't hold very well so you can remove the web pretty much intact. I noticed that the factory web is made from very hard balsa so is probably adequate for flight. The main problem here is the long p 51 gear legs have a lot of leverage and the air ply ribs cant' resist the down ward twisting torque of a 20# + plane bouncing more than 3-4". I have found that the spars move quite a long war under stress with out breaking, but there is always damage to surrounding structure.
The main solution is to always land gently. That's why I spend all my local practice time doing touch and goes. And I never accept a bad approach, always go around for another try. And I some times practice in strong gusty winds with cross winds. The p 51 has a powerful rudder. If you have full scale experience you can use those techniques for success in less than ideal conditions. Slips and skids are good tools for war bird pilots. In Fla. some of the fields I visit always have 15-20 mph prevailing winds with up to 90 degree crosswinds. If they are not more than 30-40 degrees I fly, and some times one other Mustang pilot and I are the only ones flying, everyone else sits around mumbling about the weather. The Jacksonville club has a Cub pilot that flies no matter how bad the weather is. He does one wheel take offs and landings while the others wonder how he does it.
You can always get full scale pilots to describe exactly how they do it. At one Ocala meet I met 3 Tuskegee air men pilots who were happy to spend an hour and a half discussing p 51 piloting techniques. I can honestly say that in spite of a life time of aviation experience I didn't know the p 51 until I talked to those gentlemen. After that my landing success rate zoomed.
Last edited by sjhanc; 11-24-2014 at 10:51 AM.
11-24-2014, 08:02 PM
#3312
Senior Member
sjhanc
Thanks for the words. Just so you know, I flew F-100, F-105, F4 and F-16 in the USAF, also flew MD80 for TWA and then American. It is interesting that I don't always apply what I knew to do in the cockpit to flying RC. Thanks for the reminder, you are absolutely correct. Also, I love to shoot touch and goes and it is one reason I chose electric gear. Most of our guys dread the landing phase and stay airborne as long as they can and then struggle when they have to land.
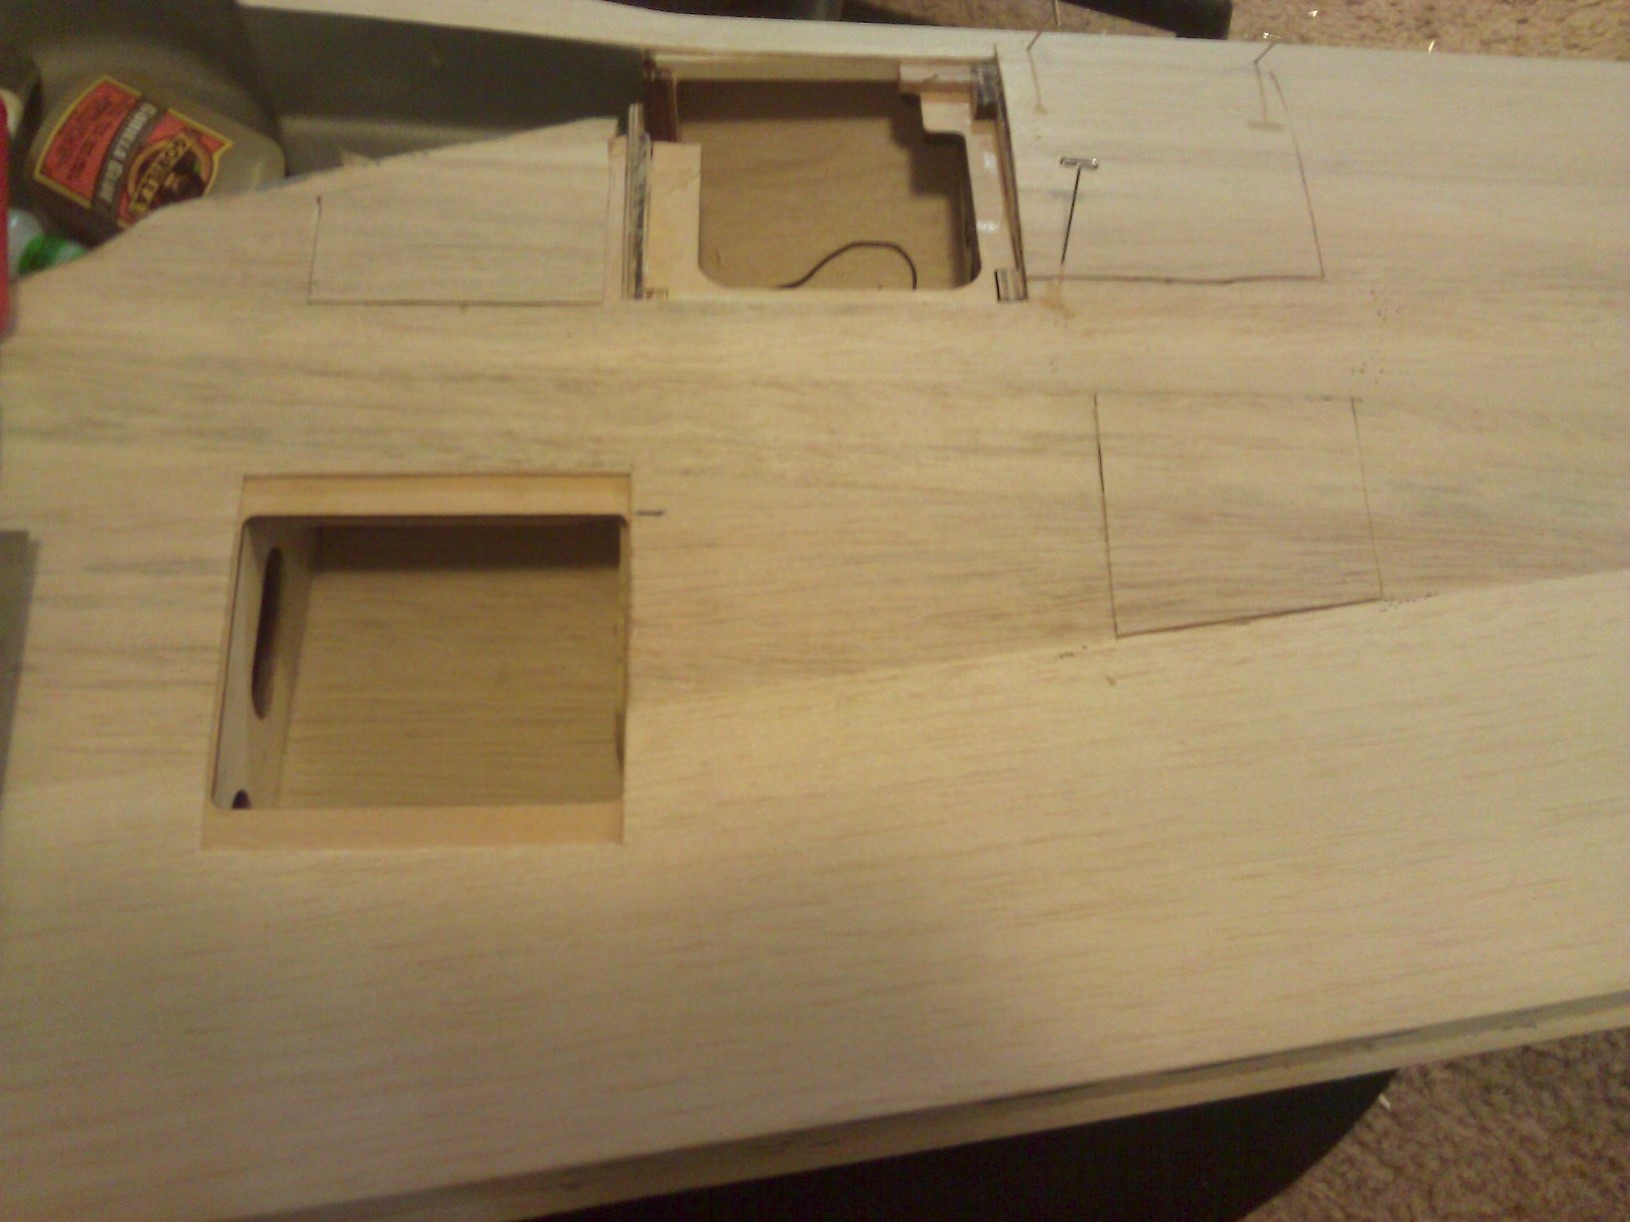
Well, here is my version of the upgrade, I did choose to use 1/16" alum angle as it just made more structural sense especially after seeing the glue job in the ARF.


1-2; First cuts in the wing.
3-4; Discovered I needed to remove move material around the mount area. In the process found that the dark hardwood was never glued in place. Also while removing the webs found that there was minimal, or no, glue used to hold them in. Note; Front webs were vertical while the back webs are horizontal, this is just cover up poor work. I intend to fill the three areas between the spars with 3/8" ply to stiffen then 1/8 ply for the webs, maybe overkill but will absorb the twist and compression motion the gear could put on the spar beam.


1: Designed the alum mount to go on the outside of the rib and cross over the existing 3/8" built up rib. A spacer had to be made to fill in next to the center rib behind the spar to match the rib in the front of the spar. I used the tried and true method of, make a paper template, upgrade to cardboard template and then cut the alum. Took some additional trimming to get the alum mount to slip in. Two holes drilled through ribs and alum for bolts to bind the alum to the now 1/4" rib behind the spar and to the 3/8" rib in front of the spar, epoxy will also be used to hold everything together. The bolts should relieve the shear force on the epoxy glue joint as this is its weakest glue joint.
2-4; Views of alum mount in position, tabs needed to be trimmed back slightly to allow gear to install.
5-7; Gear just setting in position, but all appears to work as planned. I will put a 1/8" alum shim under the angle so I will have 3/16 of alum to tap and bolt the gear to the mount. This height will be slightly low of the wood mount but close, less than 1/16", enough to make the gear work. I will bolt, glue, close and cover tomorrow and try and finish the plane as close as possible.
I will change subject here and offer an opinion on ARF. From what I have see the glue used is practically nonexistent. Maybe not all ARFs are made this way but the TF build is minimal at best and will be my last ARF I ever buy. At least when I make it I know what I have got, this way, I am not certain what I have here with this plane. Don't know about the rest of you, but I have spent too much money in getting this plane ready to go to just have it come apart because someone could not use glue and who knows what else.
Thanks for the words. Just so you know, I flew F-100, F-105, F4 and F-16 in the USAF, also flew MD80 for TWA and then American. It is interesting that I don't always apply what I knew to do in the cockpit to flying RC. Thanks for the reminder, you are absolutely correct. Also, I love to shoot touch and goes and it is one reason I chose electric gear. Most of our guys dread the landing phase and stay airborne as long as they can and then struggle when they have to land.
Well, here is my version of the upgrade, I did choose to use 1/16" alum angle as it just made more structural sense especially after seeing the glue job in the ARF.
1-2; First cuts in the wing.
3-4; Discovered I needed to remove move material around the mount area. In the process found that the dark hardwood was never glued in place. Also while removing the webs found that there was minimal, or no, glue used to hold them in. Note; Front webs were vertical while the back webs are horizontal, this is just cover up poor work. I intend to fill the three areas between the spars with 3/8" ply to stiffen then 1/8 ply for the webs, maybe overkill but will absorb the twist and compression motion the gear could put on the spar beam.
1: Designed the alum mount to go on the outside of the rib and cross over the existing 3/8" built up rib. A spacer had to be made to fill in next to the center rib behind the spar to match the rib in the front of the spar. I used the tried and true method of, make a paper template, upgrade to cardboard template and then cut the alum. Took some additional trimming to get the alum mount to slip in. Two holes drilled through ribs and alum for bolts to bind the alum to the now 1/4" rib behind the spar and to the 3/8" rib in front of the spar, epoxy will also be used to hold everything together. The bolts should relieve the shear force on the epoxy glue joint as this is its weakest glue joint.
2-4; Views of alum mount in position, tabs needed to be trimmed back slightly to allow gear to install.
5-7; Gear just setting in position, but all appears to work as planned. I will put a 1/8" alum shim under the angle so I will have 3/16 of alum to tap and bolt the gear to the mount. This height will be slightly low of the wood mount but close, less than 1/16", enough to make the gear work. I will bolt, glue, close and cover tomorrow and try and finish the plane as close as possible.
I will change subject here and offer an opinion on ARF. From what I have see the glue used is practically nonexistent. Maybe not all ARFs are made this way but the TF build is minimal at best and will be my last ARF I ever buy. At least when I make it I know what I have got, this way, I am not certain what I have here with this plane. Don't know about the rest of you, but I have spent too much money in getting this plane ready to go to just have it come apart because someone could not use glue and who knows what else.
Last edited by rossmick; 11-24-2014 at 08:45 PM.
11-24-2014, 09:04 PM
#3313
rossmick,
The glue problem is why I suggested in an earlier post to squirt lots of super glue in every opening in the wing in all directions.
Glad to here of your extensive aviation career, my full size experience included Crew chief-door gunner in the 1st Cav 67-68 and 2 years working as aircraft technical inspector at Hunter Army airfield, Savannah Ga. After the service I got my private pilot's ticket and then was hired by Bell Helicopter Textron to work over seas training foreign Army mechanics to work on helicopters.
Don't be discouraged by the problems with this particular ARF, after you get it in the air you'll discover why this less than perfect product continues to sell. It is just plain fun to fly.
I personally am looking forward to the 60cc P 51 D that Hanger Nine is releasing soon and am glad that they won't turn it loose until they get it right. I am sure that Hanger Nine people read this and other forums on the problems with this plane and realize that there is a large market for the plane. The TF version has been around for at least 10 years in spite of its faults. Maybe when they experience a drop in sales after the P 51 fans move on to a better product they will improve it. Or not, and it will disappear.
11-24-2014, 10:01 PM
#3314
Senior Member
sjhanc
When you were a crew chief I was just going to pilot training in 1968 at Web AFB in Big Spring TX. Sounds like you had a very interesting career as well, thanks for your service. I am not too discouraged, but certainly aware of the limitations of some ARF manufactures. Are TF ARFs all like this, or are other brands a better quality product? For what TF is getting for this plane it should be substantially better built in my opinion. I don't like cheap, and I don't buy the most expensive, but I do look for value and don't mind paying for it when I get it. This product is not a good value. Glad to hear Hanger 9 is coming up with something, and I will watch to see what other guys, or maybe you, post on its assembly. I am looking forward to flying the P-51D, and will let you know how it went later this week.
When you were a crew chief I was just going to pilot training in 1968 at Web AFB in Big Spring TX. Sounds like you had a very interesting career as well, thanks for your service. I am not too discouraged, but certainly aware of the limitations of some ARF manufactures. Are TF ARFs all like this, or are other brands a better quality product? For what TF is getting for this plane it should be substantially better built in my opinion. I don't like cheap, and I don't buy the most expensive, but I do look for value and don't mind paying for it when I get it. This product is not a good value. Glad to hear Hanger 9 is coming up with something, and I will watch to see what other guys, or maybe you, post on its assembly. I am looking forward to flying the P-51D, and will let you know how it went later this week.
11-24-2014, 10:48 PM
#3315
rossmick,
My first TF ARF I ripped off the covering and modeled it after the wartime mount of LT. Jim Brooks who, I understand lives somewhere in Arizona too.This plane had the right gear ripped out on the 11th flight on a grease-it-in landing at a meet in Orlando. Post mortem inspection revealed no glue in most of the right wing. TF wanted me to ship it back at my expense. After I check out the cost of crating and shipping a 7 foot wing I bit the bullet and repaired it just like a lot of others describe in these forums. After that it gave me 2 years and 202 flights that I enjoyed thoroughly until it lost it's right wing panel while doing a slow roll in formation with a Ziroli Sky Raider. It was going fast and I was able to keep in Knife edge until an almost level forced landing that saved a considerable amount of parts from destruction. Another inspection revealed that the balsa wing joiner had failed. I read later in RC Report that Frank T. knew of over 30 other people that had the same problem with the joiner, most of them totaled. My kit B model wasn't completed yet so I got a fuse and wing kit and was flying again in less than a month. I guess I was hooked on P 51s.
My first TF ARF I ripped off the covering and modeled it after the wartime mount of LT. Jim Brooks who, I understand lives somewhere in Arizona too.This plane had the right gear ripped out on the 11th flight on a grease-it-in landing at a meet in Orlando.
11-25-2014, 01:10 AM
#3316
My Feedback: (133)
Join Date: Aug 2008
Location: Keizer,
OR
Posts: 590
Likes: 0
Received 0 Likes
on
0 Posts
sjhanc
When you were a crew chief I was just going to pilot training in 1968 at Web AFB in Big Spring TX. Sounds like you had a very interesting career as well, thanks for your service. I am not too discouraged, but certainly aware of the limitations of some ARF manufactures. Are TF ARFs all like this, or are other brands a better quality product? For what TF is getting for this plane it should be substantially better built in my opinion. I don't like cheap, and I don't buy the most expensive, but I do look for value and don't mind paying for it when I get it. This product is not a good value. Glad to hear Hanger 9 is coming up with something, and I will watch to see what other guys, or maybe you, post on its assembly. I am looking forward to flying the P-51D, and will let you know how it went later this week.
When you were a crew chief I was just going to pilot training in 1968 at Web AFB in Big Spring TX. Sounds like you had a very interesting career as well, thanks for your service. I am not too discouraged, but certainly aware of the limitations of some ARF manufactures. Are TF ARFs all like this, or are other brands a better quality product? For what TF is getting for this plane it should be substantially better built in my opinion. I don't like cheap, and I don't buy the most expensive, but I do look for value and don't mind paying for it when I get it. This product is not a good value. Glad to hear Hanger 9 is coming up with something, and I will watch to see what other guys, or maybe you, post on its assembly. I am looking forward to flying the P-51D, and will let you know how it went later this week.
i think the problem is that the people who are building these TF arfs are NOT model builders per-say, just swat shop employees in china, and other countries TF uses. any knowledgable model builder knows where and how much glue to use and what kind to use (not hot glue for sure). shame on TF for allowing this 51 to continue to be built and sold and at such a high price that they are asking at that. yes i fell for it....... but money wise i'm bared in mine, dumb, dumb me. my 2 cents worth.
as posted a little while back and after reading this entire thread i opted for a foam wing and using a full span main spar (1/4'' aircraft 5 ply) a secondary spar (1/8'' ply) with carbon tape re-enforcement. lite ply ribs and aircraft ply gear mounts tied in with aluminum tri stock and bolts to the main spar. 1/16'' biscuits inserted thru the leading edge and into the ribs that support the gear mounts. i thot i would use ply wood covering but i believe i'll use 1/16'' balsa and then glass the wing with some carbon fiber strips for under laments top and bottom of wing.
i'll also address the all the fuse issues, firewall, wing saddle, horizontal stab re-location and beefing the rear fuse at that attachment. i'll do my best to not OVER build the 51 and make a flying tank out of it. my 51 will be in the order of a reno racer like Precious Metal unlimited racer. i went with sierra gear, converted to electrics (went with Down and Locked conversion). tail wheel retract will be by servo operation. i'm powering mine with a DLE 55RA engine, if that ain't enough then i will hang my Taurus 72cc on it.
Last edited by fujiman; 11-25-2014 at 01:38 AM. Reason: add to comment
11-25-2014, 06:36 AM
#3317

My Feedback: (13)
sjhanc
When you were a crew chief I was just going to pilot training in 1968 at Web AFB in Big Spring TX. Sounds like you had a very interesting career as well, thanks for your service. I am not too discouraged, but certainly aware of the limitations of some ARF manufactures. Are TF ARFs all like this, or are other brands a better quality product? For what TF is getting for this plane it should be substantially better built in my opinion. I don't like cheap, and I don't buy the most expensive, but I do look for value and don't mind paying for it when I get it. This product is not a good value. Glad to hear Hanger 9 is coming up with something, and I will watch to see what other guys, or maybe you, post on its assembly. I am looking forward to flying the P-51D, and will let you know how it went later this week.
When you were a crew chief I was just going to pilot training in 1968 at Web AFB in Big Spring TX. Sounds like you had a very interesting career as well, thanks for your service. I am not too discouraged, but certainly aware of the limitations of some ARF manufactures. Are TF ARFs all like this, or are other brands a better quality product? For what TF is getting for this plane it should be substantially better built in my opinion. I don't like cheap, and I don't buy the most expensive, but I do look for value and don't mind paying for it when I get it. This product is not a good value. Glad to hear Hanger 9 is coming up with something, and I will watch to see what other guys, or maybe you, post on its assembly. I am looking forward to flying the P-51D, and will let you know how it went later this week.
Last edited by SWORDSN; 11-25-2014 at 06:40 AM.
11-25-2014, 08:05 PM
#3318
Senior Member
The plan was to close the wing, but that did not happen. I elected to add the correct spacers to get the correct height for the gear. Drilling and tapping prove to be a much longer task than I had imagined. Original bolt size was 6-32 and I managed to break off the tap in the mount. Took some time to get it out and a trip the hardware store to get 8-32 bolts as 6-32 proved too hard to tap through the extra alum. 8-32 proved to be the answer and all finally went well. Extra time spent widening extension line holes to accept the cardboard tube.
1-2; Gear mounted and epoxied in and waiting for the epoxy to setup while in the clamps. Decided to use just 4 bolts as center location really only has 1/16 to bolt to on motor side.
3; Well, another misstep, in the process of cutting out the cardboard tube to get the alum mounts in place I forgot to pull the extension lead out on one side and cut the whole thing into. So it was solder and heat shrink it back together - more lost time. Also I can't really get to the spar webs as the clamps are in the way so off to other items to be completed.
1-2; Got major controls hooked up to the servos, visually aligned.
3-4; Fixed tail wheel install had top screws to be drilled in to a ply bulkhead going in to the laminations. I have never seen this done before and did not think it the correct thing to do. I cut out a oak hardwood block and epoxied it to the bulkhead. This caused the gear to be more inside the fuselage and looked better to me. I plan to use a single pushrod for control and will get that in tomorrow, should be interesting.
4; Cowl hardwood mounting blocks sanded to shape. Cowl then aligned and holes drilled to the hardwood mounting blocks with screws installed for position. I will epoxy in standoff disks tomorrow.
5; There will be no cockpit detail, or pilot, as I am out of time and the pilot never arrived. I added some thin ply inside the canopy to help in attaching it with screws. I will see how this works out, should keep the plastic from tearing out is my thinking.
I will close the wing tomorrow and most likely strip existing covering just larger than the sum of the openings rather than a bunch of small patches. No gear doors for this first flight as attach points never arrived with the gear. I may not retract the gear until I get several flights under my belt and some good landings, then I may try the gear and hope I get full retraction and extension. I don't look forward to tearing up that wood prop, they are not exactly giving them away. CJM says I will have the replacement motor and drive screw on Friday - we will see. I plan to fly on Friday for the maiden test flight. However, I am so wrapped up with the pressure of finishing the plane I may have one of the clubs most experienced pilots take it on the first flight.
Last edited by rossmick; 11-25-2014 at 08:42 PM.
11-25-2014, 08:41 PM
#3319
My Feedback: (53)
Join Date: Jul 2003
Location: milwaukee, WI
Posts: 941
Likes: 0
Received 0 Likes
on
0 Posts
Hey Guys,
Your are all working to hard on your wing fixes. I have fixed 5 wings, do not remove balsa shear webs, just epoxy 1/8 ply on both sides of the spar over the balsa webs. Double the rib the gear blocks attach to, tie the gear blocks to the spar box with 3/8/ x 3/8 hard wood blocks. Glue the gear blocks in with Hysol.
I have never had one come apart again.
Of course, you can do what ever you feel is best. I don't worry to much about the weight, I would rather have sturdy.
11-25-2014, 09:43 PM
#3320
Actually I have been doing exactly what you did with the extra block on the tail wheel mount for about 8 years. That and adapting a Sullivan wire from their tail dragger steering kit. I used the Sullivan wire for a couple of years (with brass tube bushings and drilling out the TF tw bracket to fit the tube). I did this when I found that the plane could easily be pushed into a turn by a gust of wind or taxiing on the side of a slope. My field had lots of slopes. The Sullivan wire positions the wheel axle in front of the steering axis. This resists any tendency to be pushed off course. The weight of the plane can actually force the servo to move opposite the control input. And I use strong servos. and if you use a digital servo it may just bend the wire or break the steering arm. It looks like the designer set the steering axis vertical with the tail in the air and the set up I use has it vertical when the tail wheel is on the ground.
When I built the second B model with a ZDZ 80 that weighed 29.5 lbs. The Sullivan wire was not adequate so I switched to larger diameter music wire and don't have any more steering problems. All this is necessary because of all the club fields I visit only two have smooth grass runways. And several that have hard top have very rough surfaces. I was please to see that the Deland Golden Hawks had improved theirs last week. The Flying Giants web page has some good pictures of their 25 anniversary meet.
I am making good progress on my new wing, I bought some new speakers (louder) for the Benedini system I am using. They will go in the new wing. I am waiting for a more powerful amplifier to drive the speakers, should arrive soon. There were several camera men filming my flights there. Although electric planes are not new to that club it was the first time any of them had seen a 29 lb. P 51 ripping up the sky. They seemed to really be impressed with the speed and the vertical climbs. It actually out performs the ZDZ 80 B model I flew 6-8 years ago. The brushless motor spins 26-15 props faster than the ZDZ could turn a 26-10. I will post a picture of the wire I use on my tw later.

 11-26-2014, 07:12 AM
#3322
rossmick,
Here is a pic of the tail wheel wire I use, the plane is setting on all three wheels. The steering axis is close to vertical and the tw is slightly forward of the pivot point. side loads tend to turn the tw opposite the turn direction limiting ground loops and putting very little load on the servo. If you use the stock setup a side load at the tail makes the servo growl and a strong push will force the servo to move against the control input. You can eliminate the spring coil but then the tail bounces excessively when taxiing. I have had the plane go over on its nose and break the prop when this happens. It ain't scale but nobody notices it when flying.
 The century Jet tw retract has a similar position when down. I don't know how you could do this with the Robart retract but the only experience I have with it was my B model with the ZDZ 80. This Engine swings a 26-10 or 26-12 prop and had no tendency to torque left on take off. In fact, take off runs were so short with this plane that I had to consciously limit throttle application to prevent it getting into the air too soon. It doesn't look scale for a p 51 to get off the ground in 15 feet from stopped. The brushless electric motor I fly now will do the same thing. I have to slowly advance the throttle a couple of clicks and wait until the tail comes up then give it a little more and at 1/4 throttle it is off safely and at a shallow climb angle. At that point I hit the retract switch and wait until the gear is up then go to half throttle for climb out. At first it made me nervous not having full throttle for take off and climb out but when I flew formation take offs with other war birds I found that even though I always let them go first my plane would catch up quickly and I could climb above them, extend the climb straight ahead until they were well into the turn and then close in for formation flying. The best pilot was a kid named Kirby who has gone off to college so I miss flying with him. After he gets married and settles down he will get back into the hobby.
Here is a pic of the tail wheel wire I use, the plane is setting on all three wheels. The steering axis is close to vertical and the tw is slightly forward of the pivot point. side loads tend to turn the tw opposite the turn direction limiting ground loops and putting very little load on the servo. If you use the stock setup a side load at the tail makes the servo growl and a strong push will force the servo to move against the control input. You can eliminate the spring coil but then the tail bounces excessively when taxiing. I have had the plane go over on its nose and break the prop when this happens. It ain't scale but nobody notices it when flying.
11-27-2014, 01:54 AM
#3323
rossmick,
Did you know Jim Boyd? Did you ever execute the flat-plate evasive maneuver in the F 100? This jet was my favorite plane behind the F 16. I never attempted to build a flying model of it, but did successfully build and fly 5 models of the F 16, the first one was scratch built from magazine 3 views with help from a photographer friend who blew up the 3 views to the size I needed to make templates for the parts. I still have 2 f 16's in my hanger. The small one is electric and flies better than seems possible. It got me interested in converting the larger BYRON plane to electric. The battery packs and electronic speed control I bought for the jet conversion are presently being used in the p 51 B that I am having some pleasing success with.
ON the constant criticism that the manufacturer (TF) gets for the deficiencies in the design, my experience with ARF planes goes back to the fifties and I don't think that a single one that I have had experience with ever measured up to the quality you can get with a kit-built plane. I have always accepted this fact and work on them to get them to measure up to my standards.
When I evaluate a plane like the Top Flite p 51, I see a plane whose flying qualities are so much better than the average ARF that it is simply worth the effort and money it takes to get a better all-round package out of it. During my 3-d phase I bought several large ARF's that had problems just as bad as the structural gigs this plane has. It's a shame that the wing problems require advanced modeling SKILLS to fix, but I see very few of the owners of these planes giving up on it, only those who don't have the skill, patience, or money to get the job done effectively. Unfortunately these individuals continually harp on what is wrong without actually doing anything about it, like read the info in this forum and get on with it. I have read most of the posts in this forum and see that a couple of the members ( whose posts go back for four or more years) constantly re-inject their criticism of the plane and the manufacturer and detail what they would do to fix it. And yet if you read what they wrote years ago and compare it to what they write today you can come to the conclusion that they will never go into their shop and FIX the plane.
Just like the automotive performance parts industry there are a number of individuals who have gone into business supplying after-market products for this plane. I have tried out some of them and have been pleasantly surprised at how well they improve the looks and performance. I bought Tony Howard's exhaust kit ( I paid a lot of money for a competitors product only to be disappointed with the quality), and when I received it and looked at the parts and the methods of construction, could see right away that Tony's kit is the way to go. I bought a brand new engine cowling, installed it and the exhaust kit and have received numerous complements on how it improves the look of my plane. And this on a plane that is strictly stand off scale with no panel lines or rivets. Spectators who visit the events seem to like it and the way I fly it and that pleases me. I have been buying this plane since it first came out and have been developing my own fixes for the design deficiencies in parallel with the work going on by the individuals who post in this forum. I was not aware of the forum until recently and was pleased to see that what I was doing was similar to that which others are doing. It proved to me that I was on the right track. My two cents.
Last edited by sjhanc; 11-27-2014 at 02:01 AM.
11-27-2014, 02:25 PM
#3324
Senior Member
Out of the blue yesterday about 1530 I started feeling really terrible and by 2000 had a 102 fever. Not sure what it is but most likely the flu bug. So much for getting the P-51 done for our 50th.


1; I got the 3/8 ply between the spars and epoxied in. The wing will not come apart here at least.
2; Wing closed up. I expanded the two openings in to one as the strip between them was never glued to the rib anyway.
Cowl was finished and works great with some extra sanding done on the hardwood blocks to allow for the ply disks that were epoxied in to slip over them
Found that the dimension for the tail wheel between lower attach point and upper attach point needed a 1/16 spacer to work correctly. No big deal, but you would have thought that it would have been the correct height for the TW.
Feeling a little rough right now, so I will pick this up tomorrow.
Last edited by rossmick; 11-30-2014 at 10:34 PM.
11-27-2014, 10:32 PM
#3325
Senior Member
Chris923
Now you tell me! Just kidding. I had the same thought as you on the ply over the balsa webs until I took one off and there was little or NO glue. I don't need to tell you that a box beam has to have a really good bond between top and bottom members to the side web pieces in this case. So putting ply on the balsa does not appear to be of much help. Hysol is great, but not recommended for flat surface adhesion, but perfect on corner bonds. Ever tried to cut, saw, or sand Hysol, it is one tough stuff. Design wise, the plane appears to be solid, but totally degraded with bad manufacture.
Seems like the whole wing structure is suspect for lack of glue, for sure that is what I have found in this particular ARF. Once the wing is closed up who knows if there is any real glue bond between ribs and skin. As the wing is really a box beam on its side, no glue to the skin makes the structure compromised. I just hope there is enough bond for a couple of first flights before I strip the covering and glass it, that should fix the structural problems as I see it.
How's winter time? Stay warm and dry. It was 84 here today, to bad as I was too ill to get out in it.
Last edited by rossmick; 11-27-2014 at 11:15 PM.