


Ziroli p-47 92" blown up to 110"


 09-17-2015, 02:43 PM
#378
Fuse repair (cont)
Belly pan:
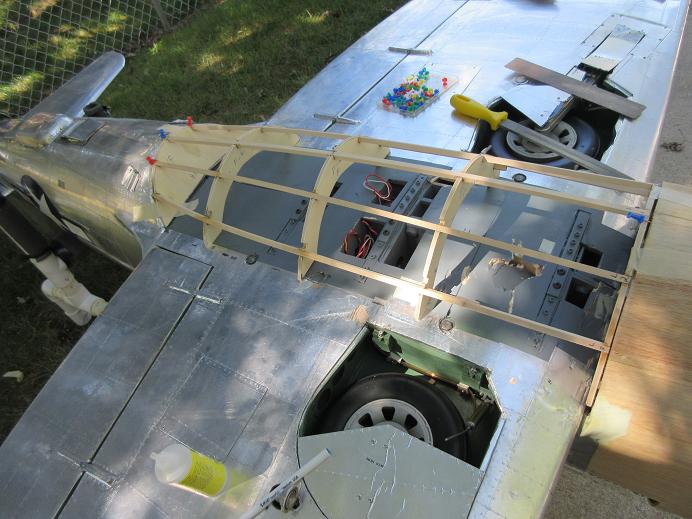
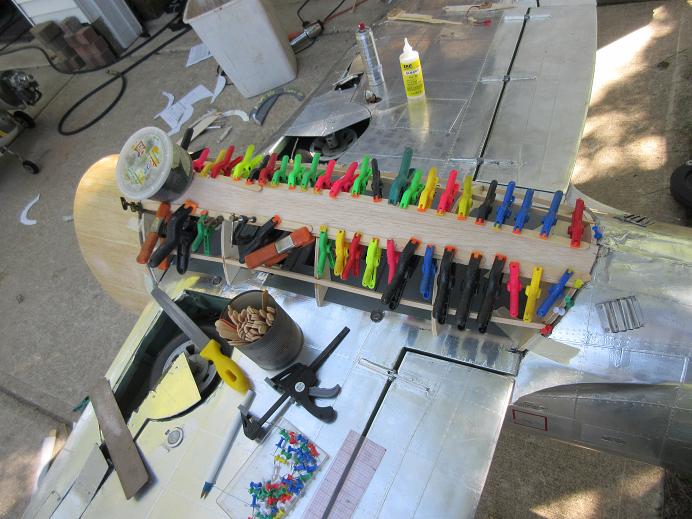
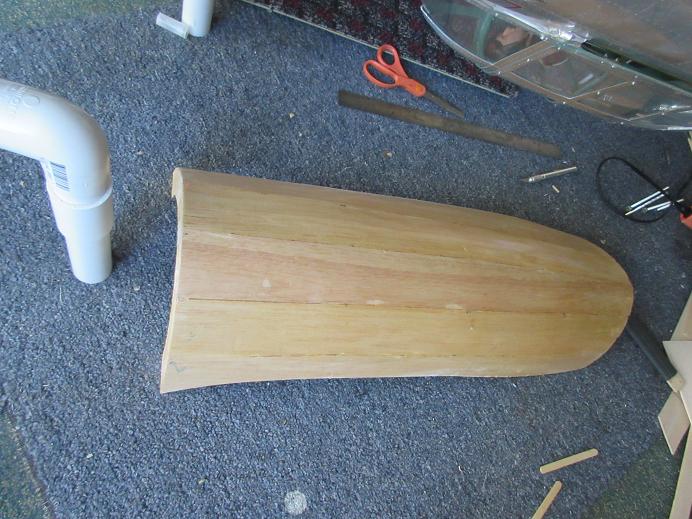
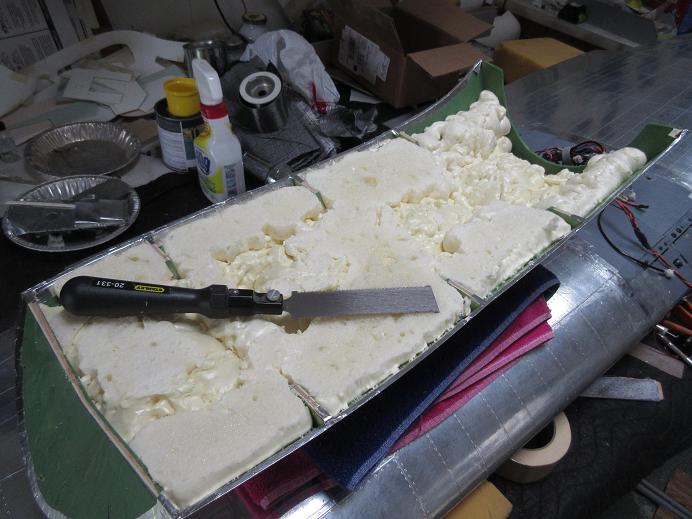
Taking the brunt of the belly landing, it was beyond repair so a new one was built.
Had to take all the foam out to get to the formers, made paper templates and then cut new formers, epoxied some spruce stringers to the formers and laid up the first piece of 1/8" thick balsa planking.
The planking has to be done while the belly pan is mounted to the plane to insure it doesn't warp.


Belly pan:
Taking the brunt of the belly landing, it was beyond repair so a new one was built.
Had to take all the foam out to get to the formers, made paper templates and then cut new formers, epoxied some spruce stringers to the formers and laid up the first piece of 1/8" thick balsa planking.
The planking has to be done while the belly pan is mounted to the plane to insure it doesn't warp.
09-22-2015, 01:43 PM
#380
Fuse repair (cont)
Belly pan:
Sanded off the excess FG cloth, which comes off easily with some 100 grit sandpaper
Fuse:
Part of the fuse sheeting behind the belly pan got damaged.
After trimming away the tape and old FG cloth, some thin CA on the sheeting while holding the sheeting up from inside, secured the damaged parts. Some FG cloth and resin to finish off securing that area.
12-04-2015, 04:53 PM
#382
MOKI 250 back from TBM.

Fortunately, no major damage to the engine when it 'rolled' around on the ground after the belly landing.
Report from Jon at TBM
" WHAT I FOUND: FOUR EXHAUST VALVES WERE COATED WITH HEAVY CARBON. ONE OF THE FOUR WAS STUCK OPEN. I CLEANED ALL VALVES AND RAN A COMPRESSON TEST. THE RESULTS ARE BELOW. ALSO REPLACED SIX PUSHRODS (BENT OR MISSING), ONE ROCKER ARM ADJUSTER. I SET ALL VALVE ADJUSTMENTS AND PUT LIGHT OIL ON ALL ROCKERS.
I RAN THE ENGINE FOUR TIMES OF ABOUT FIVE MINUTES EACH WITH A FIFTEEN MINUTE COOL DOWN. THE RESULTS ARE BELOW. ALSO MY RECOMMENDATIONS FOR OIL ARE ANY GOOD SYNTHITIC OIL THAT MEETS ISO/JASO XD OR HD SPECIFICATIONS. WE USE REDLINE OR ECHO OIL. ALSO I DO NOT RECOMMEND USING ANY ADDITIVE.
FUEL OIL MIX: REGULAR GAS MIXED 50:1
PROP 34x12
IDLE: 847 TOP RPM: 5115
TEMP: 76 DEGRESS AND 61% HUMIDITY.
COMPRESSION: CYL 1 181, CYL 2 176, CYL 3 190, CYL 4 184, CYL 5 190
"
I found that Home Depot sells Echo oil so I bought some:

My previous oil must be OK for the 2 stroke, 1 cylinders engines but not for the Moki's.
I'll be following Jon's advise for the oil. I also had some Saber oil that is ISO/JASO quality.
I took the plugs out of the F4U's Moki 250 and found the plugs to be heavily carboned so I'm sending this engine to TBM to have Jon PM it. The F4U has about 100 flights on her.
I'm glad to be getting these engines PM'ed so I don't have any more dead sticks in the future.
Fortunately, no major damage to the engine when it 'rolled' around on the ground after the belly landing.
Report from Jon at TBM
" WHAT I FOUND: FOUR EXHAUST VALVES WERE COATED WITH HEAVY CARBON. ONE OF THE FOUR WAS STUCK OPEN. I CLEANED ALL VALVES AND RAN A COMPRESSON TEST. THE RESULTS ARE BELOW. ALSO REPLACED SIX PUSHRODS (BENT OR MISSING), ONE ROCKER ARM ADJUSTER. I SET ALL VALVE ADJUSTMENTS AND PUT LIGHT OIL ON ALL ROCKERS.
I RAN THE ENGINE FOUR TIMES OF ABOUT FIVE MINUTES EACH WITH A FIFTEEN MINUTE COOL DOWN. THE RESULTS ARE BELOW. ALSO MY RECOMMENDATIONS FOR OIL ARE ANY GOOD SYNTHITIC OIL THAT MEETS ISO/JASO XD OR HD SPECIFICATIONS. WE USE REDLINE OR ECHO OIL. ALSO I DO NOT RECOMMEND USING ANY ADDITIVE.
FUEL OIL MIX: REGULAR GAS MIXED 50:1
PROP 34x12
IDLE: 847 TOP RPM: 5115
TEMP: 76 DEGRESS AND 61% HUMIDITY.
COMPRESSION: CYL 1 181, CYL 2 176, CYL 3 190, CYL 4 184, CYL 5 190
"
I found that Home Depot sells Echo oil so I bought some:
My previous oil must be OK for the 2 stroke, 1 cylinders engines but not for the Moki's.
I'll be following Jon's advise for the oil. I also had some Saber oil that is ISO/JASO quality.
I took the plugs out of the F4U's Moki 250 and found the plugs to be heavily carboned so I'm sending this engine to TBM to have Jon PM it. The F4U has about 100 flights on her.
I'm glad to be getting these engines PM'ed so I don't have any more dead sticks in the future.
Last edited by samparfitt; 12-04-2015 at 04:58 PM.
 05-16-2016, 03:28 PM
#384
Toxic,
Yah, little dollar signs appear in your eyes on the maiden flight.
I love flying with them though: a whole new experience with a prop only turning 3500-4000 rpm's. I always rationalize that I'd rather have 10 real nice planes rather than 50 average planes!
==============
Wing repair:
Been getting down into the 30's but heated the detached shop to get a few things done (so much for global warming!).
Got the wing on the bench.
One wing tip broke off. It was a clean break of the balsa block tip and easy to epoxy back on.
Really not much damage to the wing. The two pylons have to be rebuilt as they took the brunt of the belly landing.
The gear doors got banged up.
The two thin, movable gear doors needed to be re-built.
Either ABS 1/16" plastruct or ABS 1/16" with fake looking CF look can be used.
I just used the old ones as templates to make the new doors, glued 1/4" square balsa to the inside, covered them with aluminum tape and screwed on the hinges and ball link connections.
Last edited by samparfitt; 05-16-2016 at 03:34 PM.
05-19-2016, 12:26 PM
#385
Repair
Wing (cont)
Doors:
The right side needed a new lower door that secured to the bottom of the strut.
Some new hinges were needed on both inner doors.
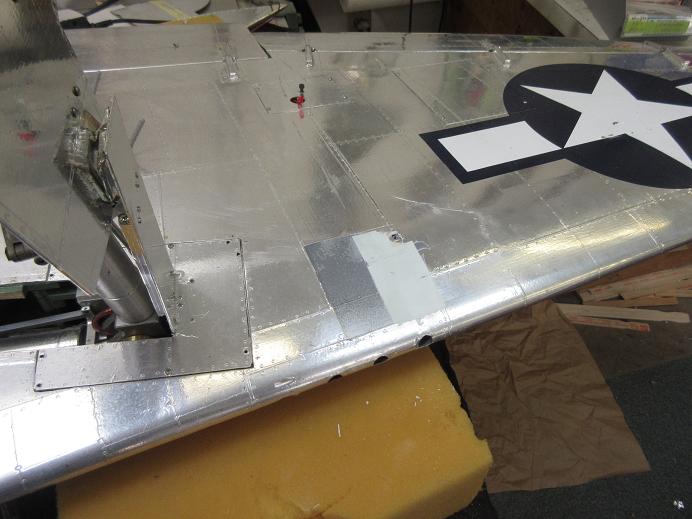
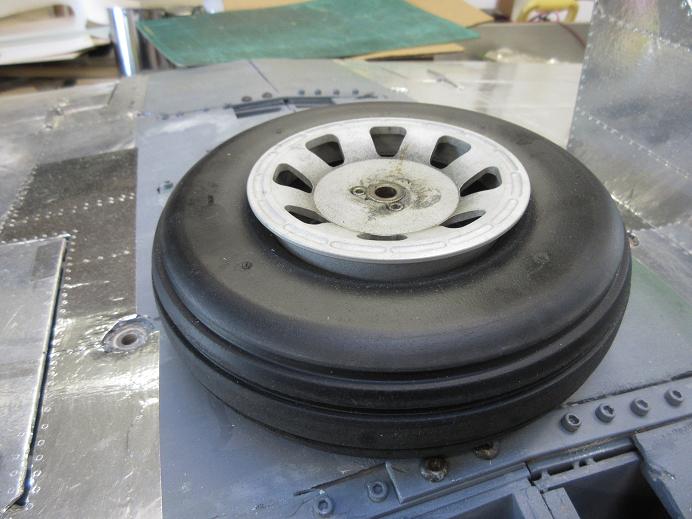
Bottom of wing:
Some small holes along the center part of the wing needed some new balsa.
The aluminum tape was removed in areas around the pylons where the pylons cracked the surface sheeting when the plane landed on the pylons (gear up on belly landing in field).
Some thin CA and easy sand so smooth out the damaged areas.
Sanded, then brushed on some 2 part epoxy primer and then added new aluminum tape to the bare surfaces.
One new air cylinder with bent rod needed replacing on one of the inner doors.
Next are the pylons.


Wing (cont)
Doors:
The right side needed a new lower door that secured to the bottom of the strut.
Some new hinges were needed on both inner doors.
Bottom of wing:
Some small holes along the center part of the wing needed some new balsa.
The aluminum tape was removed in areas around the pylons where the pylons cracked the surface sheeting when the plane landed on the pylons (gear up on belly landing in field).
Some thin CA and easy sand so smooth out the damaged areas.
Sanded, then brushed on some 2 part epoxy primer and then added new aluminum tape to the bare surfaces.
One new air cylinder with bent rod needed replacing on one of the inner doors.
Next are the pylons.
05-22-2016, 08:13 PM
#388


Repair
Wing (cont)
Doors:
The right side needed a new lower door that secured to the bottom of the strut.
Some new hinges were needed on both inner doors.
Bottom of wing:
Some small holes along the center part of the wing needed some new balsa.
The aluminum tape was removed in areas around the pylons where the pylons cracked the surface sheeting when the plane landed on the pylons (gear up on belly landing in field).
Some thin CA and easy sand so smooth out the damaged areas.
Sanded, then brushed on some 2 part epoxy primer and then added new aluminum tape to the bare surfaces.
One new air cylinder with bent rod needed replacing on one of the inner doors.
Next are the pylons.
Looking good.
05-23-2016, 07:00 AM
#389
Gary,
Not only they are easy to repair but I love how they look in the air
https://www.youtube.com/watch?v=4AFXW9ryEdg
https://www.youtube.com/watch?v=5u1RRUYQ7Tc
https://www.youtube.com/watch?v=bNfeyqWyrBw
==============
Repair
Wing (cont)
Gear:
One tire 'out of place'.
Took the gear out to check all the assembly bolts, greased the axles and oleos and checked the set screws.

Wing:
Checked aileron and flap hinges and their servos.

Wing's done, next is the fuse.

Not only they are easy to repair but I love how they look in the air
https://www.youtube.com/watch?v=4AFXW9ryEdg
https://www.youtube.com/watch?v=5u1RRUYQ7Tc
https://www.youtube.com/watch?v=bNfeyqWyrBw
==============
Repair
Wing (cont)
Gear:
One tire 'out of place'.
Took the gear out to check all the assembly bolts, greased the axles and oleos and checked the set screws.
Wing:
Checked aileron and flap hinges and their servos.
Wing's done, next is the fuse.
Last edited by samparfitt; 05-23-2016 at 07:06 AM.
05-23-2016, 12:44 PM
#390
Repair:
Cowl:
The bottom seam had to be repaired as well as several stress fractures around the cowl needed re-enforcement. Zap finishing resin used to secure the CF cloth to the cowl.

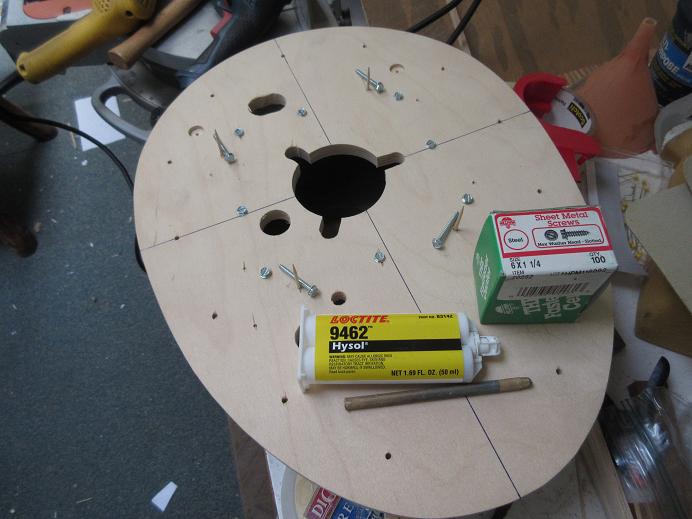
Removable fire wall:
The old fire wall was used as a template plus the old engine box was removed, sanded and reattached to the new fire wall. Twelve #6X1 1/4" screws plus hysol was used to secure the engine box to the fire wall.


Cowl:
The bottom seam had to be repaired as well as several stress fractures around the cowl needed re-enforcement. Zap finishing resin used to secure the CF cloth to the cowl.
Removable fire wall:
The old fire wall was used as a template plus the old engine box was removed, sanded and reattached to the new fire wall. Twelve #6X1 1/4" screws plus hysol was used to secure the engine box to the fire wall.
Last edited by samparfitt; 05-23-2016 at 12:46 PM.
05-24-2016, 10:04 AM
#391
Repair:
Removable fire wall:
The old fire wall had a burn mark where the exhaust touched it so some CF cloth was resin'ed over that spot.

Belly pan:
A sander was used to align the belly pan edges to the wing.

A new mounting block cut to hold the belly pan at the front of the fuse.
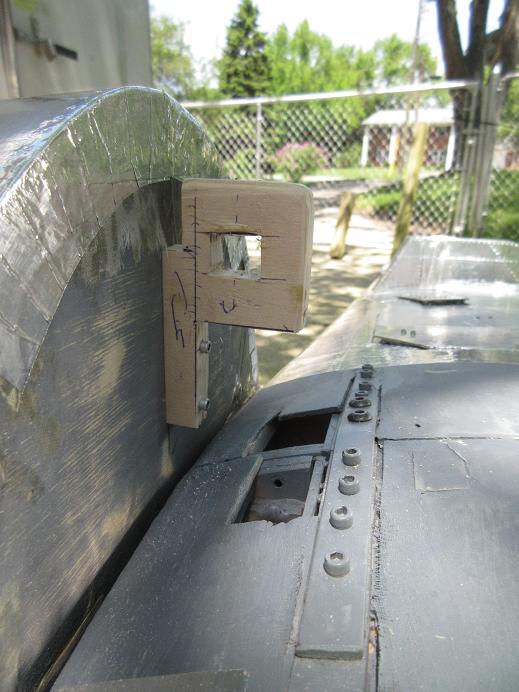
Aluminum tape and rivets added:


Removable fire wall:
The old fire wall had a burn mark where the exhaust touched it so some CF cloth was resin'ed over that spot.
Belly pan:
A sander was used to align the belly pan edges to the wing.
A new mounting block cut to hold the belly pan at the front of the fuse.
Aluminum tape and rivets added:
05-24-2016, 09:41 PM
#393
Gary,
Not only they are easy to repair but I love how they look in the air
https://www.youtube.com/watch?v=4AFXW9ryEdg
https://www.youtube.com/watch?v=5u1RRUYQ7Tc
https://www.youtube.com/watch?v=bNfeyqWyrBw
==============
Repair
Wing (cont)
Gear:
One tire 'out of place'.
Took the gear out to check all the assembly bolts, greased the axles and oleos and checked the set screws.
Wing:
Checked aileron and flap hinges and their servos.
Wing's done, next is the fuse.
So true Sam.
05-25-2016, 06:02 AM
#394
Repair (cont)
Belly pan:
Put a 2nd layer of foam in as this stuff expands by 50% and didn't want a huge mound of foam sticking out of the pan. I let the foam dry overnight as it takes a good 8 hours to fully cure in the center. Used my wood workers flush cutting saw to remove excess waste.
Engine:
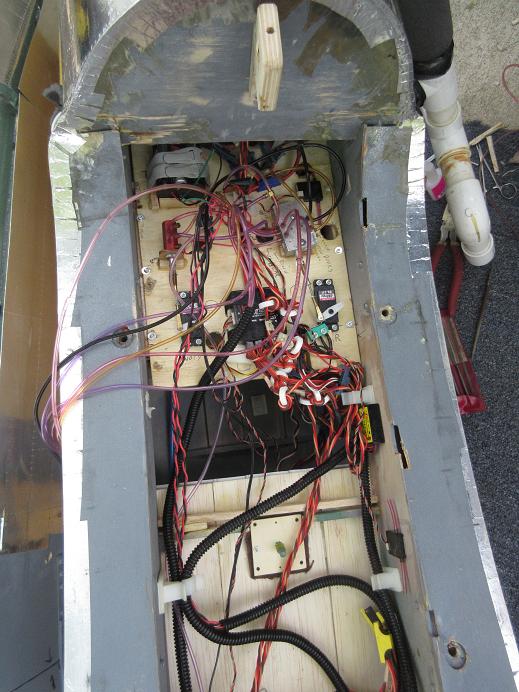
Mounted the Moki 250 to the fire wall. I have a 1/2" thick aluminum plate plus another 1/2" ply on the engine box so it won't go anywhere!

The best thing I like about removable fire walls is the ease of connecting/testing the throttle/choke servos. Since there was stress on the wires of the throttle/choke servos, I replaced them with duplicate HS-645's. The old ones will be used on the functional cowl flaps since they are located at the bottom of the cowl and they were 'first at the scene of the belly landing': Use the servos on something that's not critical if they fail to work, in the future.

Belly pan:
Put a 2nd layer of foam in as this stuff expands by 50% and didn't want a huge mound of foam sticking out of the pan. I let the foam dry overnight as it takes a good 8 hours to fully cure in the center. Used my wood workers flush cutting saw to remove excess waste.
Engine:
Mounted the Moki 250 to the fire wall. I have a 1/2" thick aluminum plate plus another 1/2" ply on the engine box so it won't go anywhere!
The best thing I like about removable fire walls is the ease of connecting/testing the throttle/choke servos. Since there was stress on the wires of the throttle/choke servos, I replaced them with duplicate HS-645's. The old ones will be used on the functional cowl flaps since they are located at the bottom of the cowl and they were 'first at the scene of the belly landing': Use the servos on something that's not critical if they fail to work, in the future.
05-25-2016, 03:54 PM
#395
Repair (cont)
guts:
Put the tank back in and the service tray on top of the tank.
Back on her feet again:


Engine:
Last thing for the night was to build a new exhaust using 3/4" diameter copper pipe. The JB weld will take overnight to harden.

guts:
Put the tank back in and the service tray on top of the tank.
Back on her feet again:
Engine:
Last thing for the night was to build a new exhaust using 3/4" diameter copper pipe. The JB weld will take overnight to harden.
05-26-2016, 11:42 AM
#396
Repair (cont)
Engine:
After the JB weld cured overnight, I added some auto exhaust heat wrap and screwed some straps over the exhaust to the fire wall.
Connected all the wires up and screwed the removable fire wall to the fuse.

Carf prop:
Three of the blades were damaged so I had to put new ones on the hub. I marked off 7" from the hub and used a machinist protractor to get the 17 degree angles.
I got 3870 RPM's. A little too high for me as I want around 3600 so I put tape on the blades and tic marks on the hub and blades and move the blades about 1/32" counter clockwise. Actually, the protractor was at 16.5 but I thought that was close enough (the 17 would probably have been perfect!).
I went to check rpm's again and the engine died at idle and all surfaces went 'hay wire': Voltwatch had red so I'm charging the batteries.


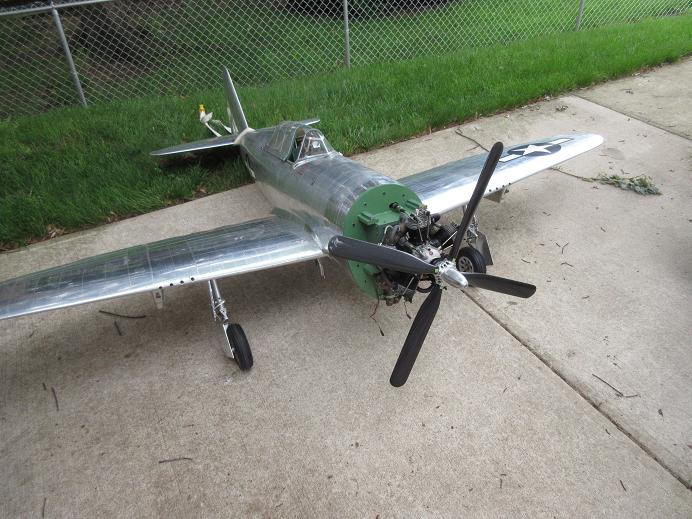
Had to re-glue the weight box that got damaged in the belly landing.

Engine:
After the JB weld cured overnight, I added some auto exhaust heat wrap and screwed some straps over the exhaust to the fire wall.
Connected all the wires up and screwed the removable fire wall to the fuse.
Carf prop:
Three of the blades were damaged so I had to put new ones on the hub. I marked off 7" from the hub and used a machinist protractor to get the 17 degree angles.
I got 3870 RPM's. A little too high for me as I want around 3600 so I put tape on the blades and tic marks on the hub and blades and move the blades about 1/32" counter clockwise. Actually, the protractor was at 16.5 but I thought that was close enough (the 17 would probably have been perfect!).
I went to check rpm's again and the engine died at idle and all surfaces went 'hay wire': Voltwatch had red so I'm charging the batteries.
Had to re-glue the weight box that got damaged in the belly landing.
Last edited by samparfitt; 05-26-2016 at 11:49 AM.
06-04-2016, 09:13 AM
#399
I used to by at the local auto parts store a product that came in a clear plastic tube and looked like a Tootsie Roll Brown Outside White inside. I would cut off a half to 1" piece dependent on the job. Mix it all up and make an angle worm out of it. I used it to repair (reattach) the stacks on gas model mufflers after a hard or Gear up landing. The Material got Rock hard in 24 hours and bound well to clean (wire Brushed) aluminum. Unless U did another Gear up. Just talked to a friend at the Local Advanced Auto Parts store and they carry JB Weld STICK that is just like the stuff I used to Use. I would clean the parts with a wire wheel then fit them as best as I should. Then mix up some materiel (It is like clay) make a ling string out of it and proceed to wrap it around the muffler extension where it entered the Muffler. U then make a filet all around the stack about 1/4 to 3/8 of an inch around the stack and on the muffler. Let sit 24 hours and it will get rock Hard and hold till the next Gear up. Hope this works have an Awesome Day.

