Go Back  RCU Forums > RC Airplanes > RC Warbirds and Warplanes
Reload this Page >

2014 Winter Build = 13 foot Vought SB2U Vindicator

Community
Search
Notices
RC Warbirds and Warplanes Discuss rc warbirds and warplanes in this forum.

2014 Winter Build = 13 foot Vought SB2U Vindicator

Thread Tools
 
Search this Thread
 
Old 11-10-2014, 09:15 AM
  #51  
F4u5
Thread Starter
My Feedback: (81)
 
Join Date: Jan 2002
Location: Apple Valley, MN
Posts: 3,236
Received 3 Likes on 3 Posts
Default

OK, I sheeted the front half of the wing bottom and the washout held. Now I have the servo tray installed for the aileron and am preparing to close up the bottom of the wing.


JQ
Attached Thumbnails Click image for larger version

Name:	bottomsheetservotray.JPG
Views:	325
Size:	4.50 MB
ID:	2046304  
Old 11-10-2014, 09:36 AM
  #52  
Nordicz
My Feedback: (7)
 
Join Date: Dec 2008
Location: Owatonna, MN
Posts: 226
Likes: 0
Received 0 Likes on 0 Posts
Default

Queesy nice to see your awesomeness' work out for you. Looks good.

Z
Old 11-11-2014, 09:46 AM
  #53  
F4u5
Thread Starter
My Feedback: (81)
 
Join Date: Jan 2002
Location: Apple Valley, MN
Posts: 3,236
Received 3 Likes on 3 Posts
Default

Hey Marty, I will get this wing panel right. I have started the right wing panel. Getting ready to add trailing edge structure then will pop off the table and mate to center section for good fit.


JQ
Attached Thumbnails Click image for larger version

Name:	rightwingpanelstart.JPG
Views:	294
Size:	4.55 MB
ID:	2046641  
Old 11-13-2014, 07:56 AM
  #54  
F4u5
Thread Starter
My Feedback: (81)
 
Join Date: Jan 2002
Location: Apple Valley, MN
Posts: 3,236
Received 3 Likes on 3 Posts
Default

Right wing panel is all framed and a\partially sheeted. I am fitting it to the wing center section and the forward main wing tube:


JQ
Attached Thumbnails Click image for larger version

Name:	RTwingpanelfit.JPG
Views:	278
Size:	4.49 MB
ID:	2047100  
Old 11-13-2014, 08:59 AM
  #55  
ByLoudDesign
 
ByLoudDesign's Avatar
 
Join Date: Sep 2005
Location: Mesa, AZ
Posts: 1,456
Likes: 0
Received 0 Likes on 0 Posts
Default

Nice work! You are using doublers where the tube/sleeves go through right?
Old 11-13-2014, 10:30 AM
  #56  
F4u5
Thread Starter
My Feedback: (81)
 
Join Date: Jan 2002
Location: Apple Valley, MN
Posts: 3,236
Received 3 Likes on 3 Posts
Default

Originally Posted by ByLoudDesign
Nice work! You are using doublers where the tube/sleeves go through right?
Correct....1/4 ply on each end of the tube and on the middle rib and 1/8 ply on the other 4 ribs.

JQ

Last edited by F4u5; 11-13-2014 at 12:02 PM.
Old 11-13-2014, 10:35 AM
  #57  
ByLoudDesign
 
ByLoudDesign's Avatar
 
Join Date: Sep 2005
Location: Mesa, AZ
Posts: 1,456
Likes: 0
Received 0 Likes on 0 Posts
Default

I the bigger designs I use 1/4" Birch ply, smaller one 1/8" Birch ply. With Liteply in between. If the tubes are long there may be alternating Liteply and balsa rig. I figure that if you secure the ends properly then the middle should not take to much strain!
Old 11-16-2014, 07:09 AM
  #58  
F4u5
Thread Starter
My Feedback: (81)
 
Join Date: Jan 2002
Location: Apple Valley, MN
Posts: 3,236
Received 3 Likes on 3 Posts
Default

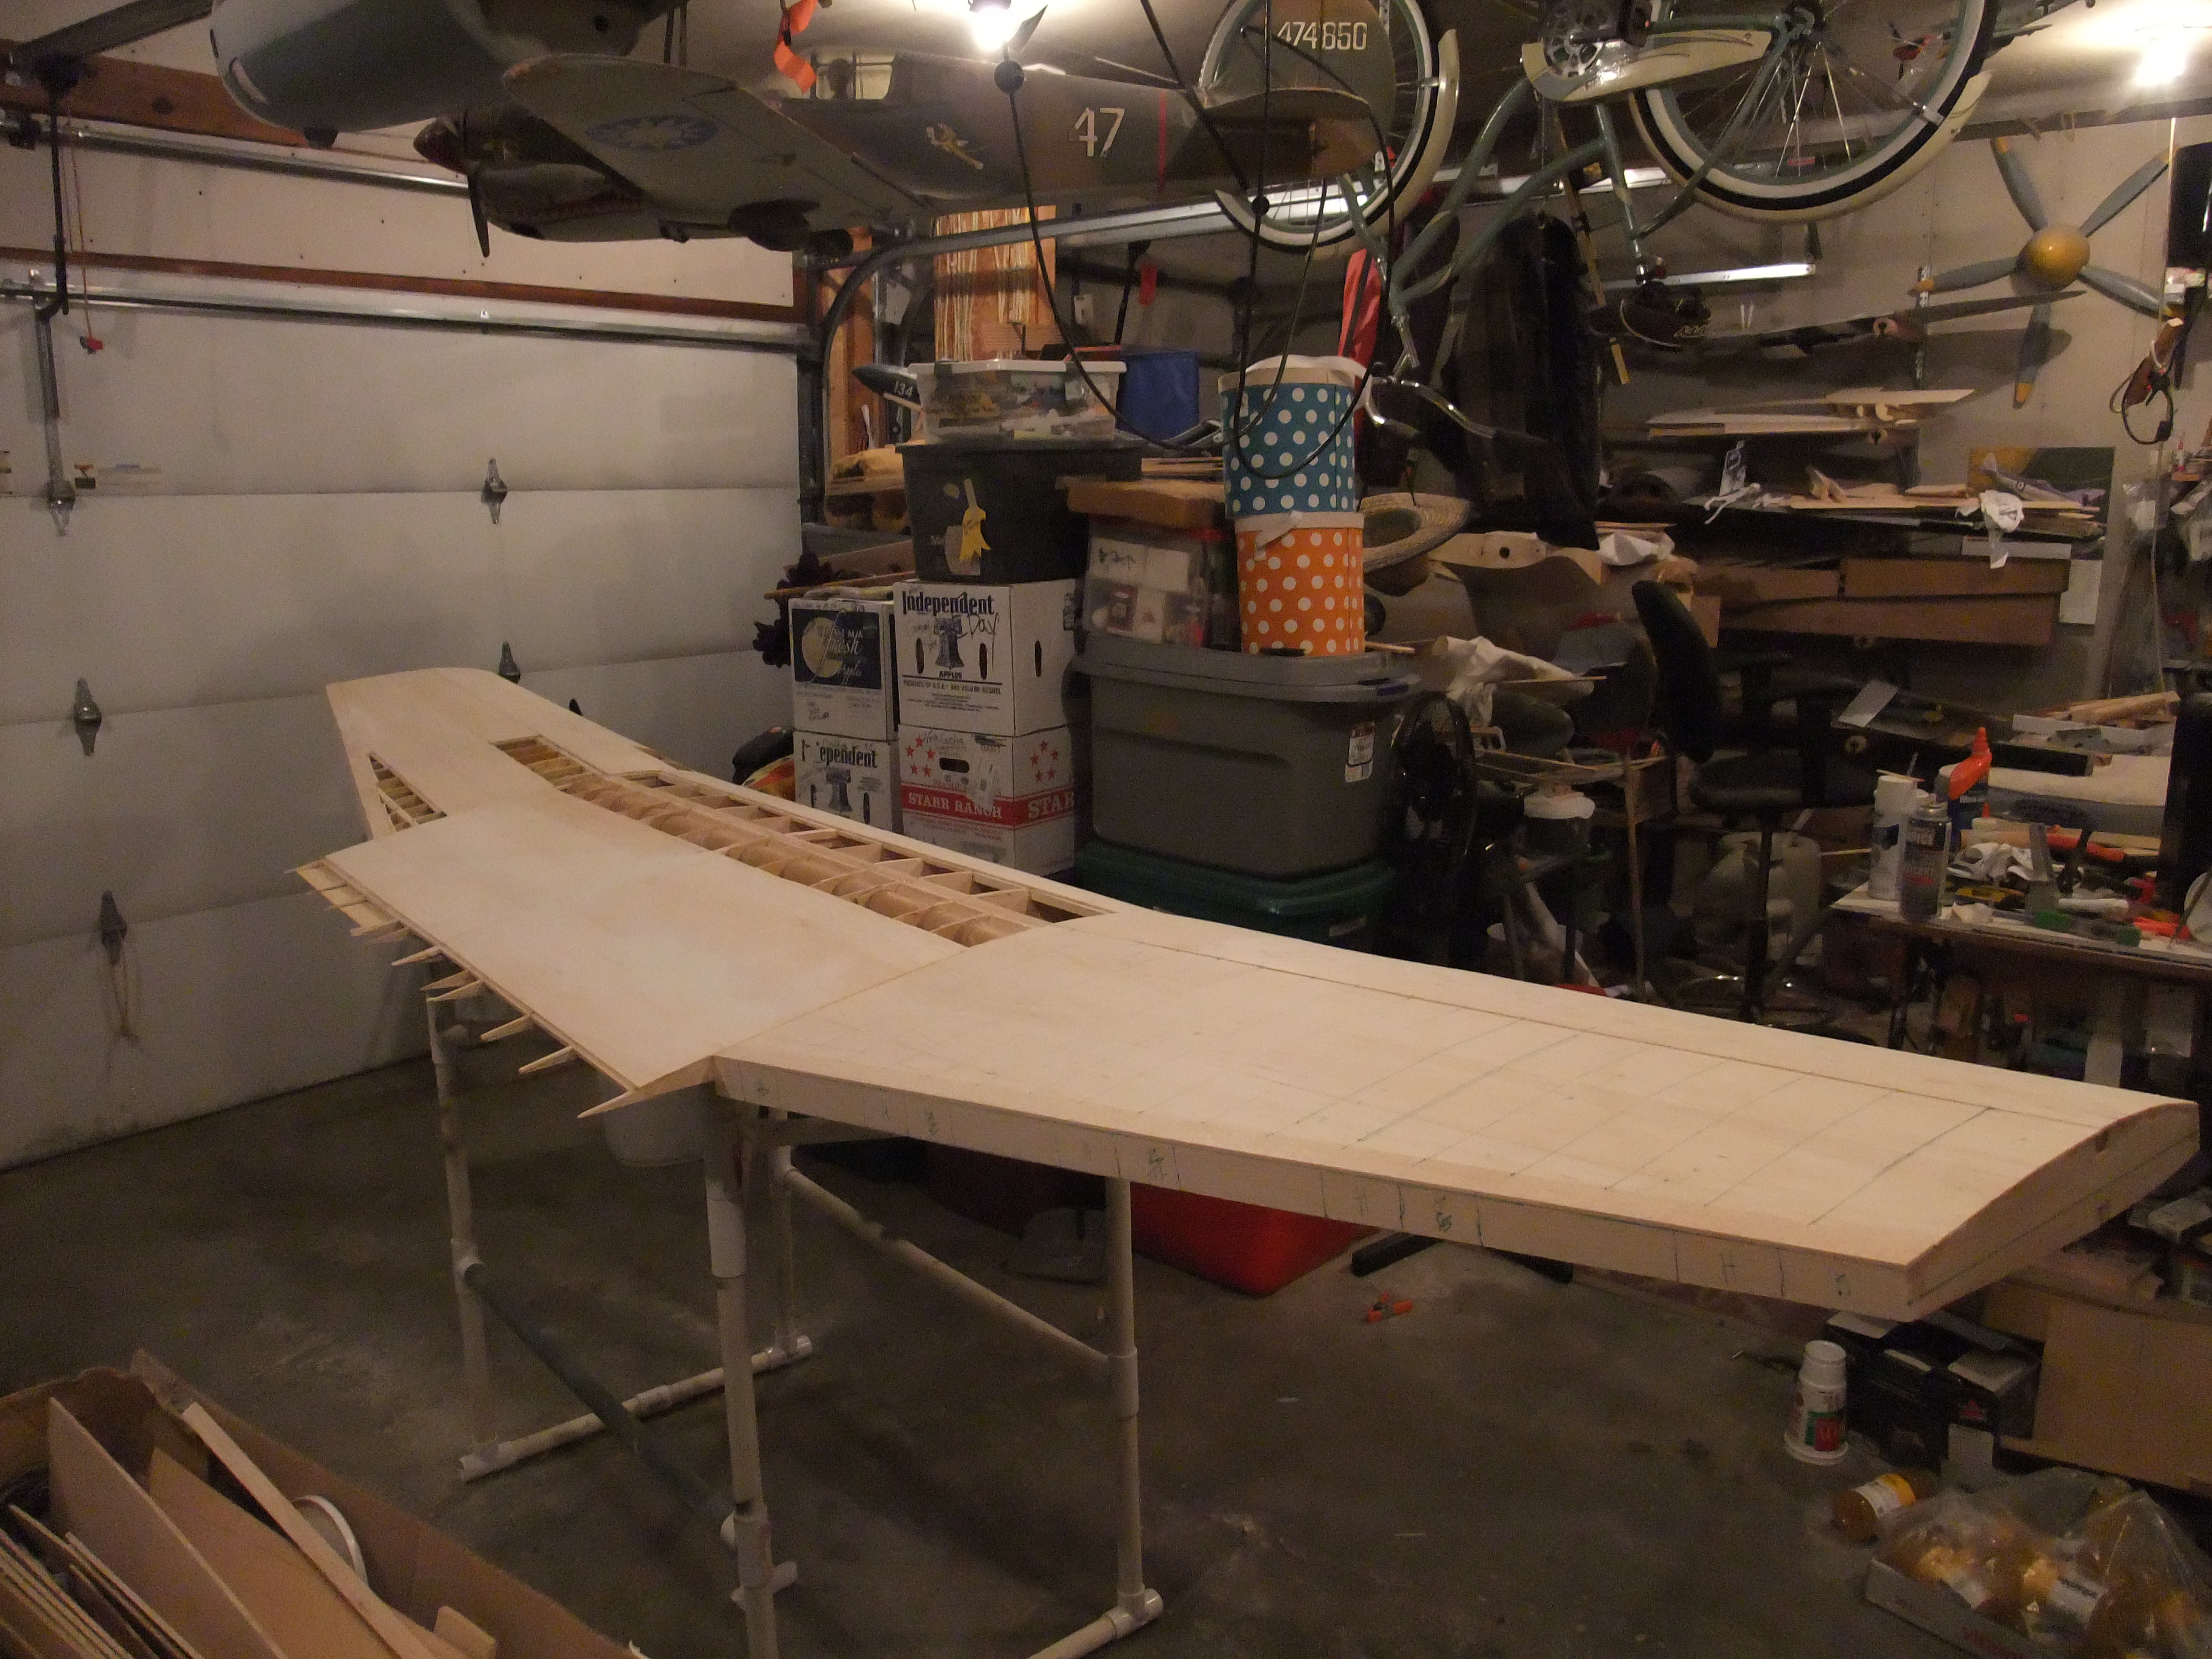
OK, I have the basic wing pretty much done, I put it all together and overall a very nice fit. Personaly, I just dislike wing tubes, but pretty much a necessity on a wing this big. I just need to close up a couple spots on the left top outer panel and center section and sheet the bottom of the right outer panel. Then I will toss the wing aside and start the fuse,so I can fit the wing to the fuse. I will come back later and build the wingtips and flaps and ailerons. Here are a couple of shots of the wing put together:


JQ
Attached Thumbnails Click image for larger version

Name:	wingtogether1.JPG
Views:	330
Size:	4.52 MB
ID:	2047801   Click image for larger version

Name:	wingtogether2.JPG
Views:	318
Size:	4.51 MB
ID:	2047802  

Last edited by F4u5; 11-16-2014 at 07:12 AM.
Old 11-16-2014, 10:26 AM
  #59  
ByLoudDesign
 
ByLoudDesign's Avatar
 
Join Date: Sep 2005
Location: Mesa, AZ
Posts: 1,456
Likes: 0
Received 0 Likes on 0 Posts
Default

Looking GREAT!!! I like your PVC furniture!! Dose the center section get permanently attached to the fuselage or is it removable also!!
Old 11-16-2014, 12:51 PM
  #60  
F4u5
Thread Starter
My Feedback: (81)
 
Join Date: Jan 2002
Location: Apple Valley, MN
Posts: 3,236
Received 3 Likes on 3 Posts
Default

center section removeable....gotsta have PVC furniture...
JQ
Old 11-16-2014, 04:32 PM
  #61  
ByLoudDesign
 
ByLoudDesign's Avatar
 
Join Date: Sep 2005
Location: Mesa, AZ
Posts: 1,456
Likes: 0
Received 0 Likes on 0 Posts
Default

Is it knock down for travel?
Old 11-17-2014, 05:16 AM
  #62  
F4u5
Thread Starter
My Feedback: (81)
 
Join Date: Jan 2002
Location: Apple Valley, MN
Posts: 3,236
Received 3 Likes on 3 Posts
Default

Yes sir.
Old 11-17-2014, 09:35 AM
  #63  
SWORDSN
My Feedback: (13)
 
Join Date: Jun 2004
Location: WILLIAMSTON, SC
Posts: 1,126
Likes: 0
Received 2 Likes on 2 Posts
Default

Be careful,a lot of pilots killed flying her!
Old 11-17-2014, 10:51 AM
  #64  
F4u5
Thread Starter
My Feedback: (81)
 
Join Date: Jan 2002
Location: Apple Valley, MN
Posts: 3,236
Received 3 Likes on 3 Posts
Default

Shallow dive runs.....
JQ
Old 11-17-2014, 10:13 PM
  #65  
hellcat56
My Feedback: (21)
 
hellcat56's Avatar
 
Join Date: Sep 2002
Location: Hurst, TX
Posts: 728
Likes: 0
Received 2 Likes on 2 Posts
Default

I am trying to post a photo
see if this works
Attached Thumbnails Click image for larger version

Name:	7-08.JPG
Views:	234
Size:	945.2 KB
ID:	2048303   Click image for larger version

Name:	tank coming off 2.jpg
Views:	209
Size:	2.9 KB
ID:	2048304   Click image for larger version

Name:	static.JPG
Views:	201
Size:	471.8 KB
ID:	2048305  
Old 11-18-2014, 07:16 AM
  #66  
F4u5
Thread Starter
My Feedback: (81)
 
Join Date: Jan 2002
Location: Apple Valley, MN
Posts: 3,236
Received 3 Likes on 3 Posts
Default

Very Nice Hellcat! I will go a similar scheme, except with green trim instead of your red. Thx for posting.

JQ
Old 11-18-2014, 12:00 PM
  #67  
Nordicz
My Feedback: (7)
 
Join Date: Dec 2008
Location: Owatonna, MN
Posts: 226
Likes: 0
Received 0 Likes on 0 Posts
Default

Jeff,

There is a lot of pride in that scheme your going with.

Z
Old 11-19-2014, 06:41 AM
  #68  
F4u5
Thread Starter
My Feedback: (81)
 
Join Date: Jan 2002
Location: Apple Valley, MN
Posts: 3,236
Received 3 Likes on 3 Posts
Default

Originally Posted by Nordicz
Jeff,

There is a lot of pride in that scheme your going with.

Z
Just sayin'
Old 11-20-2014, 06:20 PM
  #69  
F4u5
Thread Starter
My Feedback: (81)
 
Join Date: Jan 2002
Location: Apple Valley, MN
Posts: 3,236
Received 3 Likes on 3 Posts
Default

Now that I have the basic wing completed, I am moving on to the fuselage. But, first I need to build the rudder and vertical stab. Here I have drawn out the rudder core on very hard balsa, with 1/8 balsa flase rib locations, hinges and tiller are marked:
Attached Thumbnails Click image for larger version

Name:	ruddercore.JPG
Views:	272
Size:	4.50 MB
ID:	2048942  
Old 11-20-2014, 06:26 PM
  #70  
F4u5
Thread Starter
My Feedback: (81)
 
Join Date: Jan 2002
Location: Apple Valley, MN
Posts: 3,236
Received 3 Likes on 3 Posts
Default

Here is the basic rudder completed. I will fine tune it and finish it up once the vertical stab is completed. Then, I started framing the vertical stab in my jig:
Attached Thumbnails Click image for larger version

Name:	Rudderroughed.JPG
Views:	268
Size:	4.37 MB
ID:	2048943   Click image for larger version

Name:	Stabstart.JPG
Views:	263
Size:	4.48 MB
ID:	2048945  
Old 11-20-2014, 06:31 PM
  #71  
CRJDriver
My Feedback: (57)
 
CRJDriver's Avatar
 
Join Date: Feb 2002
Location: Owatonna, MN
Posts: 332
Received 1 Like on 1 Post
Default

Nice jig!
Old 11-20-2014, 07:27 PM
  #72  
ByLoudDesign
 
ByLoudDesign's Avatar
 
Join Date: Sep 2005
Location: Mesa, AZ
Posts: 1,456
Likes: 0
Received 0 Likes on 0 Posts
Default

I see what looks like flanges on the forward part of the rudder, is there a web under there forming a "I" beam? I use the in my designs ans put legs on the webs to facilitate forming a jig for the wing, and H stab.
Old 11-22-2014, 07:15 PM
  #73  
F4u5
Thread Starter
My Feedback: (81)
 
Join Date: Jan 2002
Location: Apple Valley, MN
Posts: 3,236
Received 3 Likes on 3 Posts
Default

I have completed the vertical stab and rudder


JQ
Attached Thumbnails Click image for larger version

Name:	verticaldone.JPG
Views:	238
Size:	4.43 MB
ID:	2049461  

Last edited by F4u5; 11-22-2014 at 07:48 PM.
Old 11-22-2014, 07:27 PM
  #74  
F4u5
Thread Starter
My Feedback: (81)
 
Join Date: Jan 2002
Location: Apple Valley, MN
Posts: 3,236
Received 3 Likes on 3 Posts
Default

I have now started the fuselage. I am laying up the right side of the fuse box here. I had to do some thinking on this fuse due to the design and build technique. I strayed from the planes on teh foward potion of the fuse box. Instead of 3/8 square truss structure here, the forward part of the fuse box is made from 3/8 play and I cut in large lightening holes. It saved me just over 2 pounds. This piece makes up the motor box and runs back to Former F-5. I tied the 3/8 square stringers to this piece as well, and made the truss structure from 3/8 square poplar. You can see the gusseting I added. I will let tis epoxy dry overnight and come back tomorrow and start the left side box.

JQ.
Attached Thumbnails Click image for larger version

Name:	rightfusesid1.JPG
Views:	268
Size:	4.49 MB
ID:	2049457   Click image for larger version

Name:	rightfusesid2.JPG
Views:	272
Size:	4.49 MB
ID:	2049459  
Old 11-22-2014, 07:43 PM
  #75  
ByLoudDesign
 
ByLoudDesign's Avatar
 
Join Date: Sep 2005
Location: Mesa, AZ
Posts: 1,456
Likes: 0
Received 0 Likes on 0 Posts
Default

Nice work!! Love to see there is someone else that uses a nice big "T" square to check his giant!


Contact Us - Archive - Advertising - Cookie Policy - Privacy Statement - Terms of Service -

Copyright © 2024 MH Sub I, LLC dba Internet Brands. All rights reserved. Use of this site indicates your consent to the Terms of Use.