Go Back  RCU Forums > RC Airplanes > RC Warbirds and Warplanes
Reload this Page >

125% (1/4 scale) Anderson TA-152H

Community
Search
Notices
RC Warbirds and Warplanes Discuss rc warbirds and warplanes in this forum.

125% (1/4 scale) Anderson TA-152H

Thread Tools
 
Search this Thread
 
Old 06-25-2015, 01:25 PM
  #476  
invertmast
Thread Starter
My Feedback: (23)
 
invertmast's Avatar
 
Join Date: Dec 2003
Location: Capon Bridge, WV
Posts: 8,198
Received 225 Likes on 116 Posts
Default

All the panel line layouts are done. The top was quick and simple, the bottom a little more time consuming, but here's some photos:


And a shot to verify the gear will actually fit the door opening:

Old 06-27-2015, 05:40 PM
  #477  
invertmast
Thread Starter
My Feedback: (23)
 
invertmast's Avatar
 
Join Date: Dec 2003
Location: Capon Bridge, WV
Posts: 8,198
Received 225 Likes on 116 Posts
Default

The daughter has been sick the past few things so i havent gotten as much done as i would like. But, things are getting there.


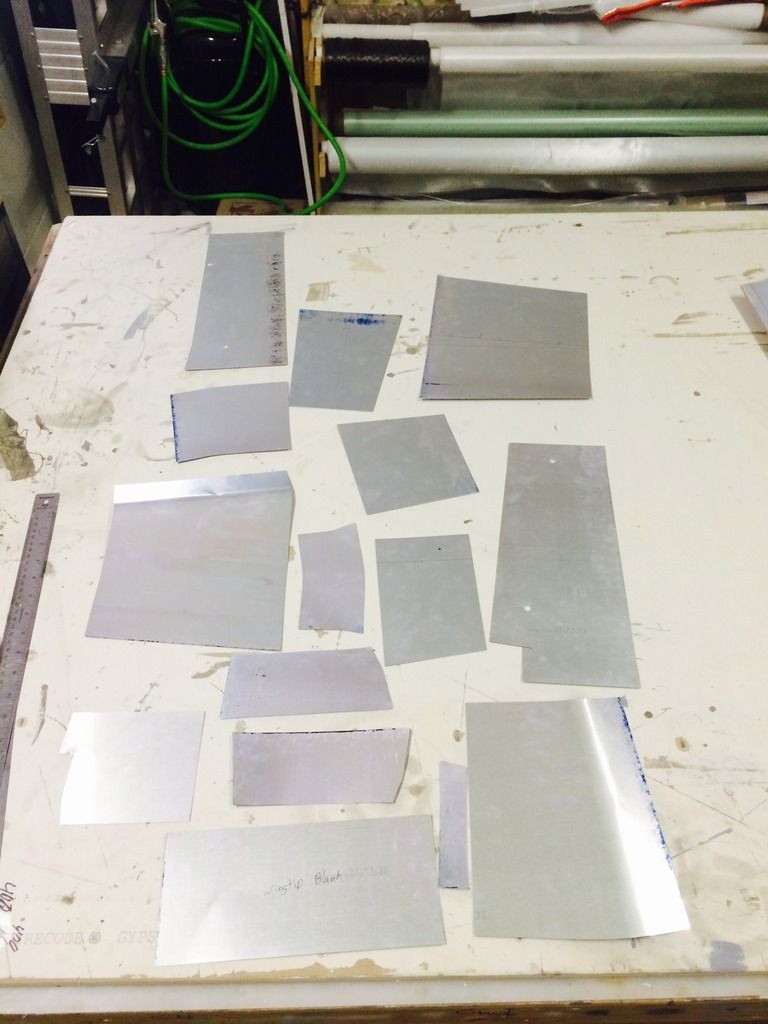
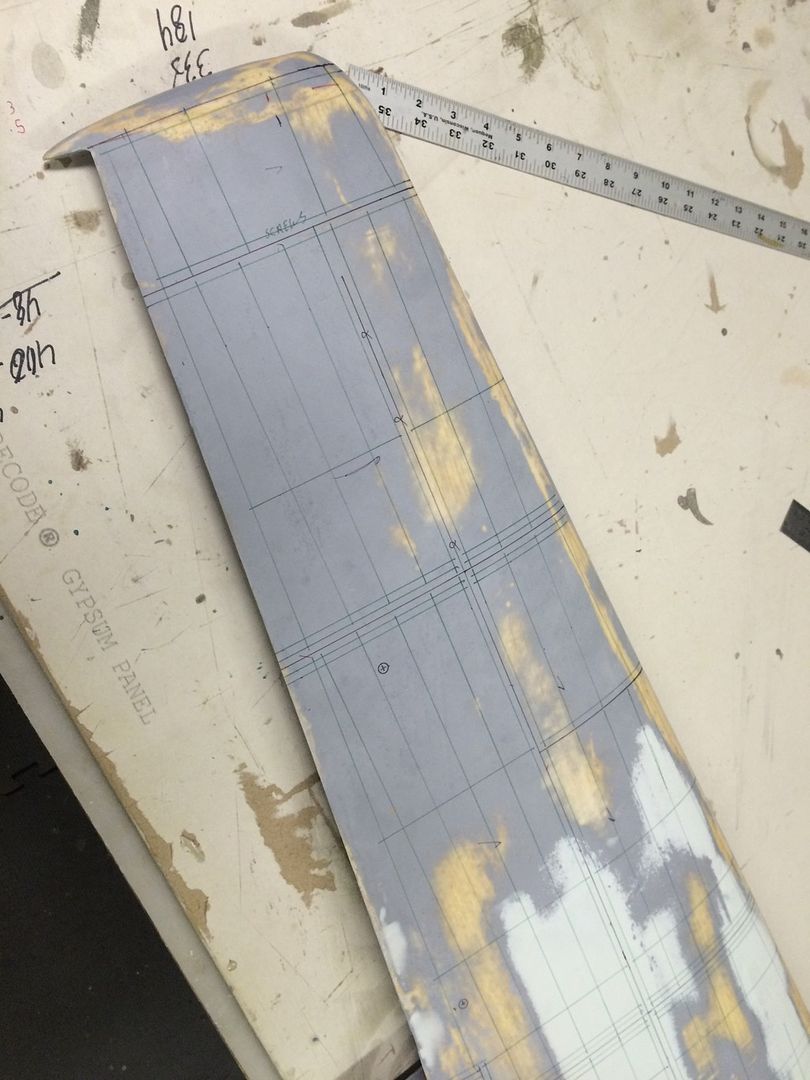
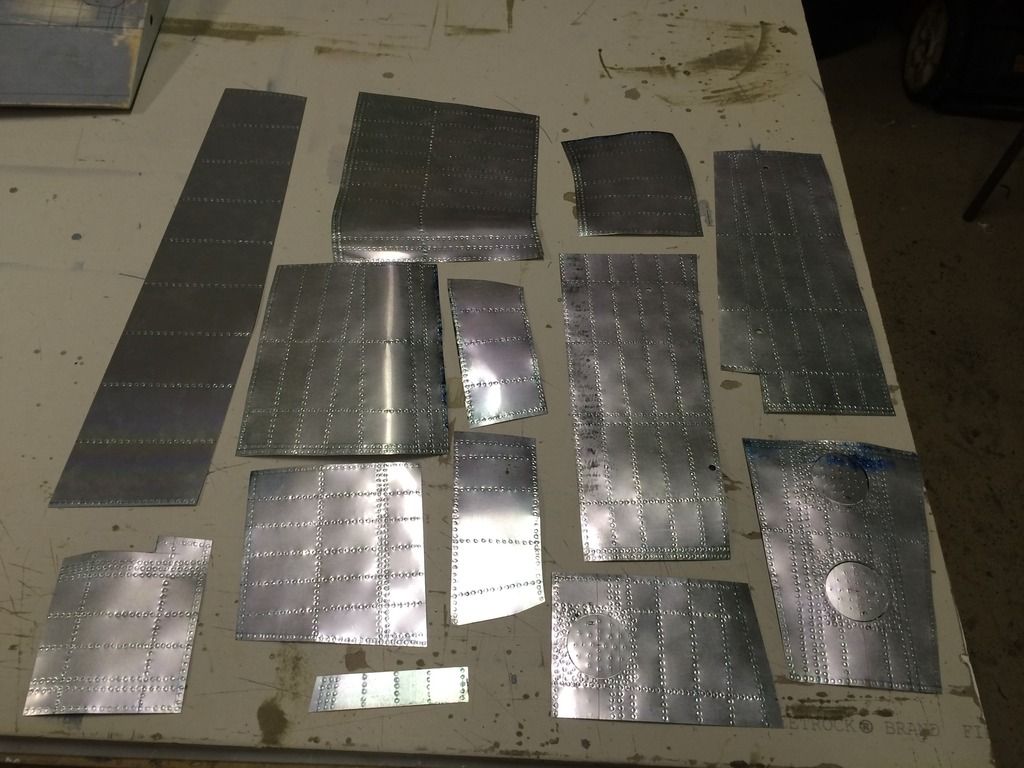
Ive got all but 6 panels for the outer wing panels cut out of litho. My litho sheets arent large enough for the remaining ones, so i have to pick up some 24x48" ones from a source on monday (hopefully they'll work).
Here is a photo of the panels for one wing.


Don also twisted my arm/insulted/bugged/insert whatever adjective you want to use me enough to the point if doing some videos on working with litho plate. The first video is just basics on cutting panels to size and the tools to do so. When i get all the panels made up, ill do the next video installment.


http://youtu.be/-V0J5AOllnI
Old 06-27-2015, 06:48 PM
  #478  
side oiler
My Feedback: (24)
 
Join Date: May 2008
Location: , MI
Posts: 47
Likes: 0
Received 0 Likes on 0 Posts
Default

In your video you mentioned there is a single flying TA-152? I was not aware of that.
Old 06-27-2015, 06:52 PM
  #479  
invertmast
Thread Starter
My Feedback: (23)
 
invertmast's Avatar
 
Join Date: Dec 2003
Location: Capon Bridge, WV
Posts: 8,198
Received 225 Likes on 116 Posts
Default

Originally Posted by side oiler
In your video you mentioned there is a single flying TA-152? I was not aware of that.
No theres only one. TA152 left in the world, which is in storage. If i said it was flying, my mouth ran ahead of my mind and i mispoke.

but... There may be a 60% TA152 flying one day, if i decide to do that project...

Last edited by invertmast; 06-27-2015 at 06:55 PM.
Old 06-27-2015, 06:56 PM
  #480  
side oiler
My Feedback: (24)
 
Join Date: May 2008
Location: , MI
Posts: 47
Likes: 0
Received 0 Likes on 0 Posts
Default

AH OK, that's what I though. My kids were complaining about having to go to bed, It was hard to listen in with all the whining going on.
Originally Posted by invertmast
No theres only one. TA152 left in the world, which is in storage. If i said it was flying, my mouth ran ahead of my mind and i mispoke.

but... There may be a 60% TA152 flying one day, if i decide to do that project...
Old 06-27-2015, 07:02 PM
  #481  
invertmast
Thread Starter
My Feedback: (23)
 
invertmast's Avatar
 
Join Date: Dec 2003
Location: Capon Bridge, WV
Posts: 8,198
Received 225 Likes on 116 Posts
Default

Originally Posted by side oiler
AH OK, that's what I though. My kids were complaining about having to go to bed, It was hard to listen in with all the whining going on.

Lol, i know exactly what you mean!
Old 06-28-2015, 01:31 PM
  #482  
invertmast
Thread Starter
My Feedback: (23)
 
invertmast's Avatar
 
Join Date: Dec 2003
Location: Capon Bridge, WV
Posts: 8,198
Received 225 Likes on 116 Posts
Default

Since its waaayyy to hot to do anything outside, im hoarding up in the shop.


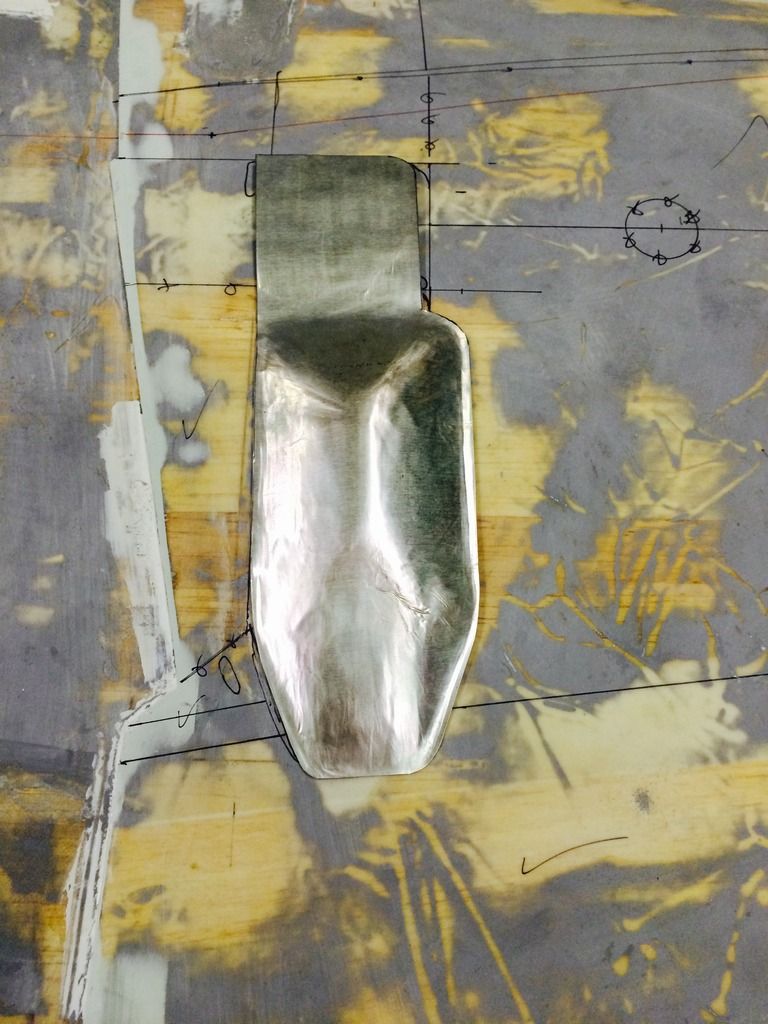
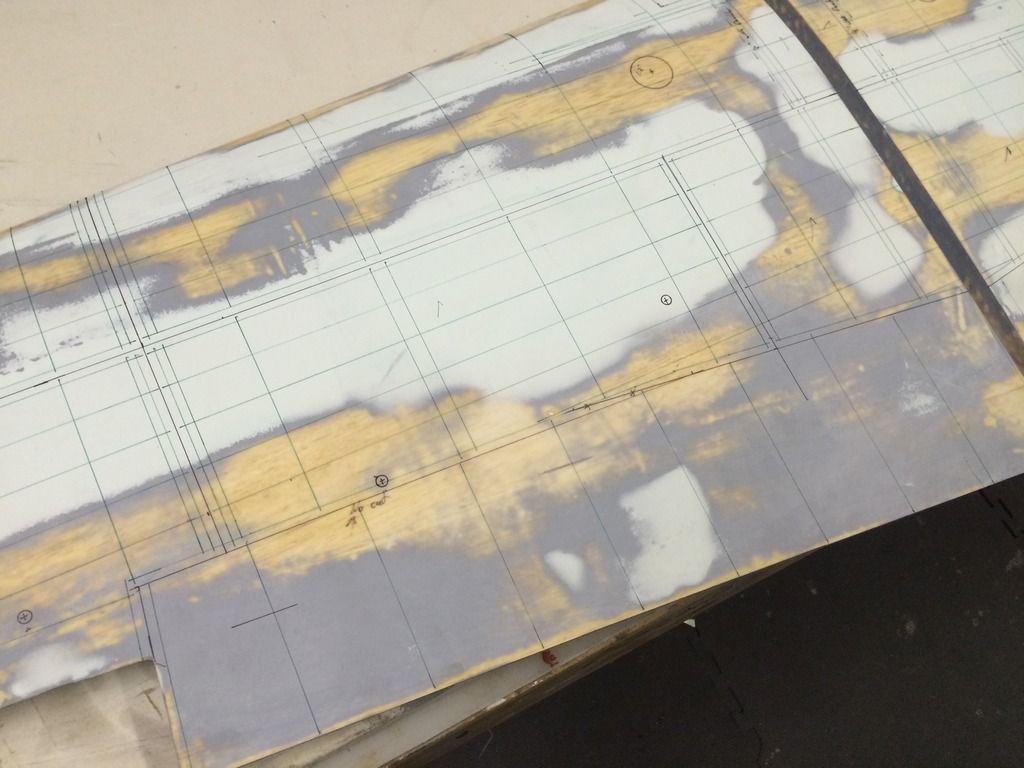
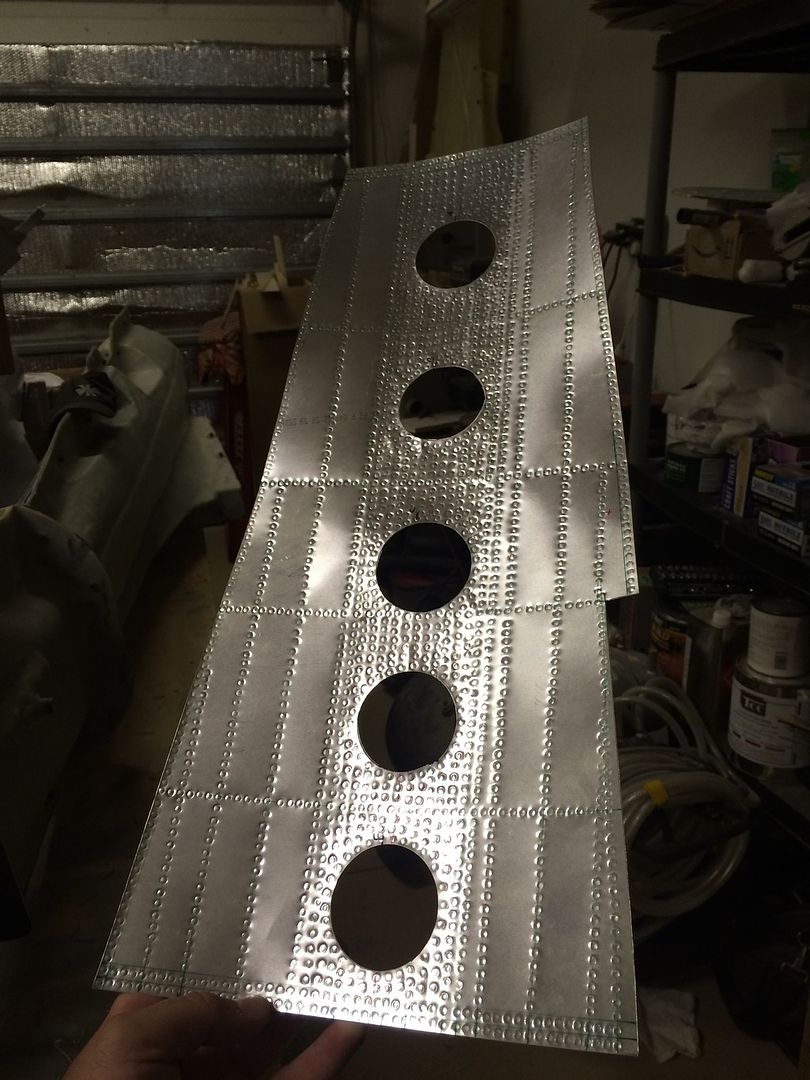
All but 8 panels are done on the wings, including the complex ones like this:


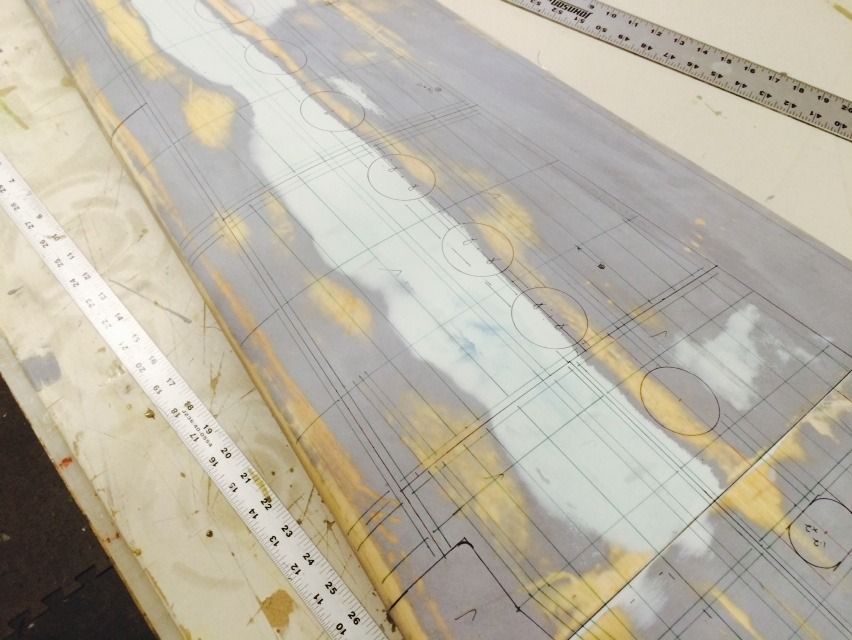
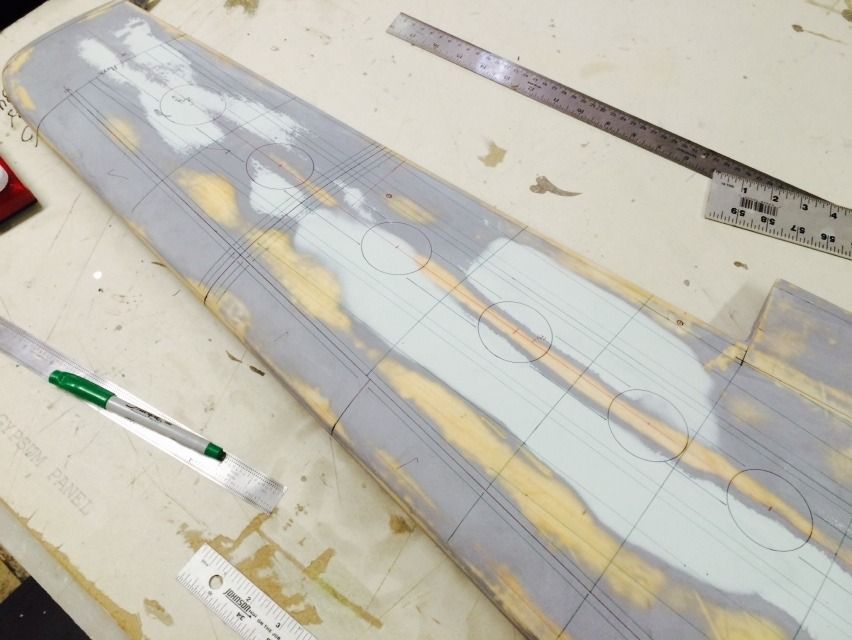
I also started laying out all of the rivet lines onto the bottim of the wing... Ive got 75% of them on the bottom done, leaving only the leading edges, flaps and gear door areas.


Old 06-28-2015, 07:05 PM
  #483  
invertmast
Thread Starter
My Feedback: (23)
 
invertmast's Avatar
 
Join Date: Dec 2003
Location: Capon Bridge, WV
Posts: 8,198
Received 225 Likes on 116 Posts
Default

Top rivet lines are done... Well mostly, theres still a few, but ill leave those till later.


The top proves much more difficult then the bottom due to the fact there are absolutely Zero Good photos of the top of the Ta152H wing. So i just tried to replicate the bottom onto the top as much as possible. Im sure someone will come up with good photos of the top of the wing as soon as im doing lithoing this thing, but until then.. Well even after then... Prove me wrong! Lol


Old 06-28-2015, 10:27 PM
  #484  
fokke
 
fokke's Avatar
 
Join Date: Jan 2007
Location: Sofia, BULGARIA
Posts: 1,803
Received 10 Likes on 9 Posts
Default

Hi Thomas , impressive work so far ! What plans you use for panel lines and rivets ?
Old 06-29-2015, 04:42 AM
  #485  
invertmast
Thread Starter
My Feedback: (23)
 
invertmast's Avatar
 
Join Date: Dec 2003
Location: Capon Bridge, WV
Posts: 8,198
Received 225 Likes on 116 Posts
Default

Originally Posted by fokke
Hi Thomas , impressive work so far ! What plans you use for panel lines and rivets ?

Pictures only
Old 06-29-2015, 07:33 AM
  #486  
side oiler
My Feedback: (24)
 
Join Date: May 2008
Location: , MI
Posts: 47
Likes: 0
Received 0 Likes on 0 Posts
Default

I'm heading to DC this weekend. When I stop in at the Smithsonian I'll ask if I can snap some pictures of the wings. I wish they'd let me.
Old 06-29-2015, 07:47 AM
  #487  
invertmast
Thread Starter
My Feedback: (23)
 
invertmast's Avatar
 
Join Date: Dec 2003
Location: Capon Bridge, WV
Posts: 8,198
Received 225 Likes on 116 Posts
Default

Originally Posted by side oiler
I'm heading to DC this weekend. When I stop in at the Smithsonian I'll ask if I can snap some pictures of the wings. I wish they'd let me.
Its in their storage facility in Maryland, so unless you know someone who can get you in, you'll probably not get to see it until they place it on display, whenever that may be.
Old 06-29-2015, 08:37 AM
  #488  
EGRUNE
Member
My Feedback: (10)
 
Join Date: Dec 2008
Location: HUDSONVILLE, MI
Posts: 39
Likes: 0
Received 0 Likes on 0 Posts
Default

You are my hero!
AWESOME!
Old 06-29-2015, 05:29 PM
  #489  
invertmast
Thread Starter
My Feedback: (23)
 
invertmast's Avatar
 
Join Date: Dec 2003
Location: Capon Bridge, WV
Posts: 8,198
Received 225 Likes on 116 Posts
Default

Originally Posted by EGRUNE
You are my hero!
AWESOME!
Then buy one! Lol
Old 06-30-2015, 02:48 PM
  #490  
invertmast
Thread Starter
My Feedback: (23)
 
invertmast's Avatar
 
Join Date: Dec 2003
Location: Capon Bridge, WV
Posts: 8,198
Received 225 Likes on 116 Posts
Default

Video #2 of lithoplating:


http://youtu.be/uduZFgUX310


I also found four panels i forgot to do last night. I also now have all of the rivet lines transferred over to the litho panels.


Old 07-05-2015, 04:17 PM
  #491  
invertmast
Thread Starter
My Feedback: (23)
 
invertmast's Avatar
 
Join Date: Dec 2003
Location: Capon Bridge, WV
Posts: 8,198
Received 225 Likes on 116 Posts
Default

Rain and to dang humid, so i stayed inside.


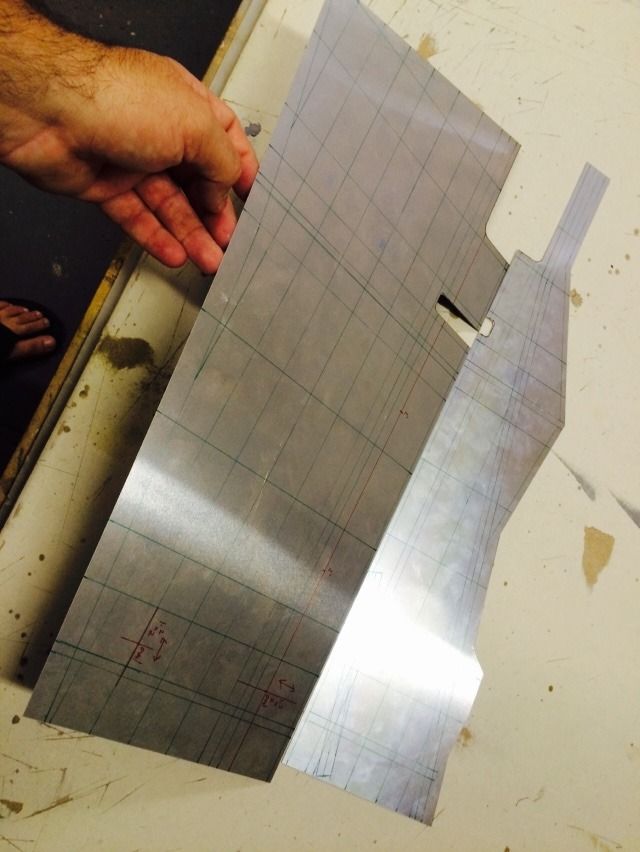
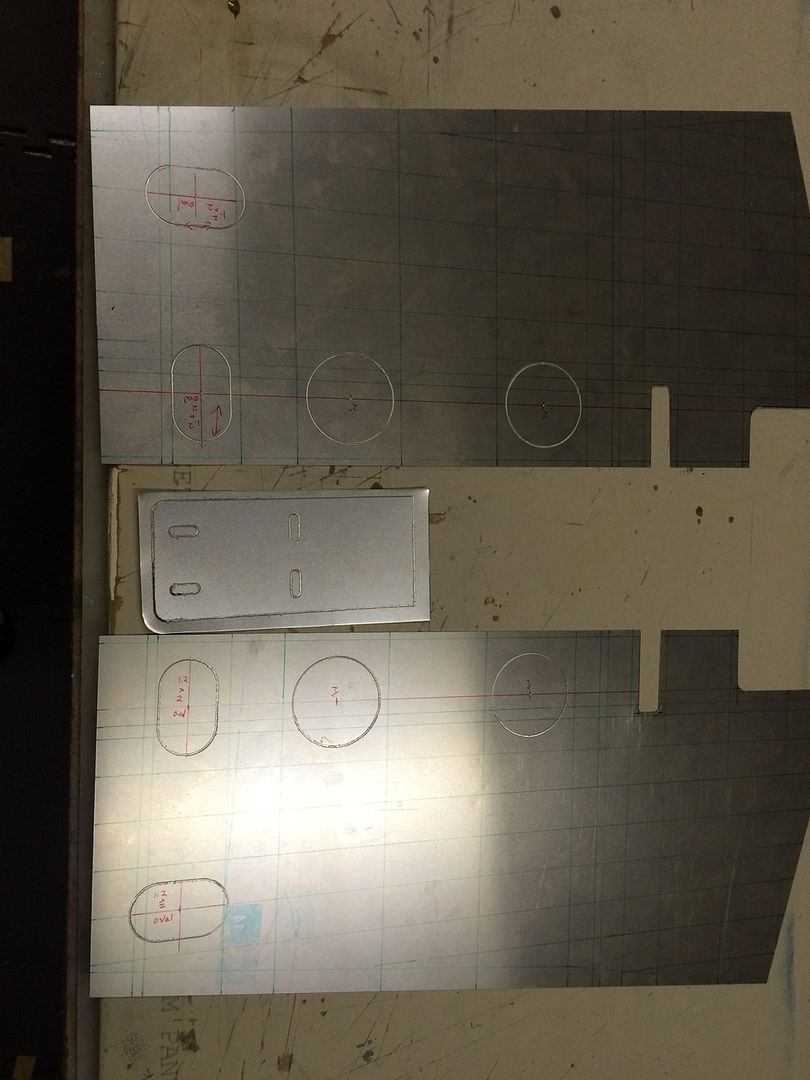
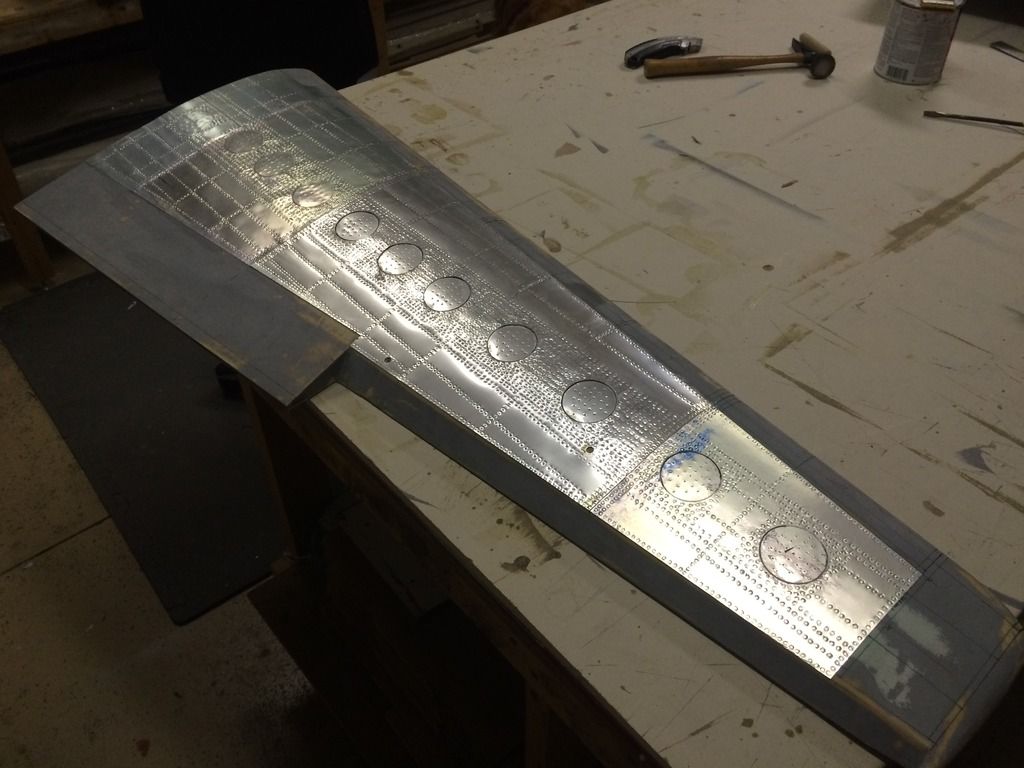
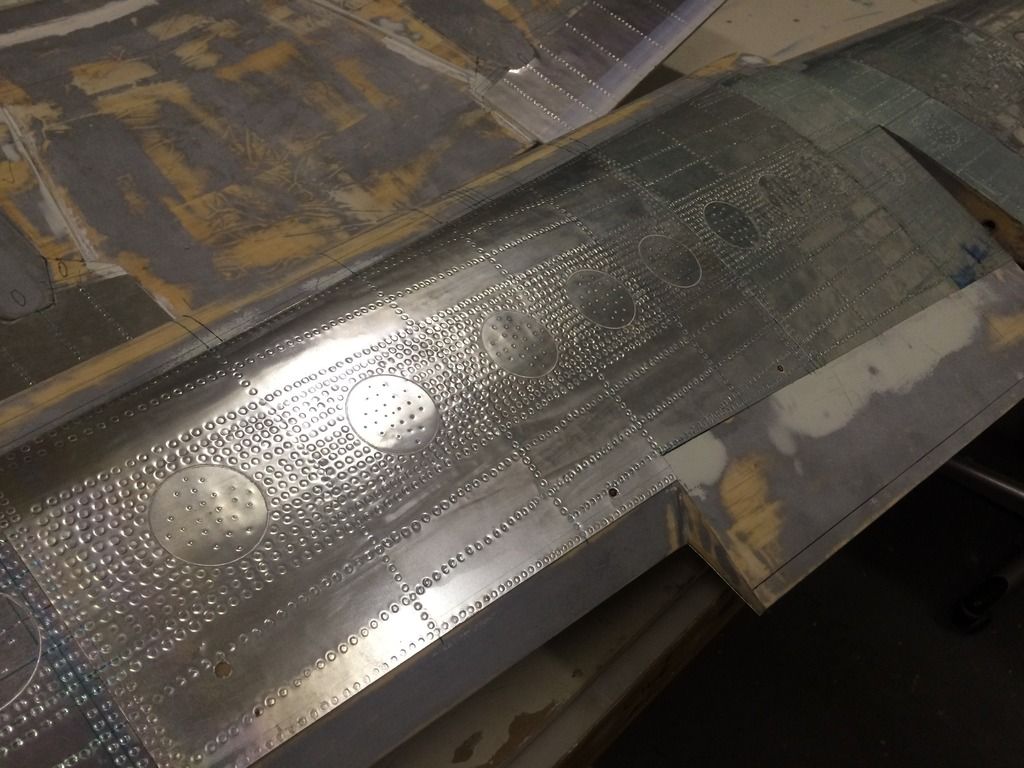
I used the cnc router to engrave all of the hatches onto the litho panels. This will save my the hassle of having to glue all the little hatches on individually. I also engraved the ammo doors as well. These I'll cut out when they are ready to go on.


Heres yesterdays work. This is all but three panels for the left outer wing.


Here is one of the larger panels. This one the engraved hatches were a little to deep.


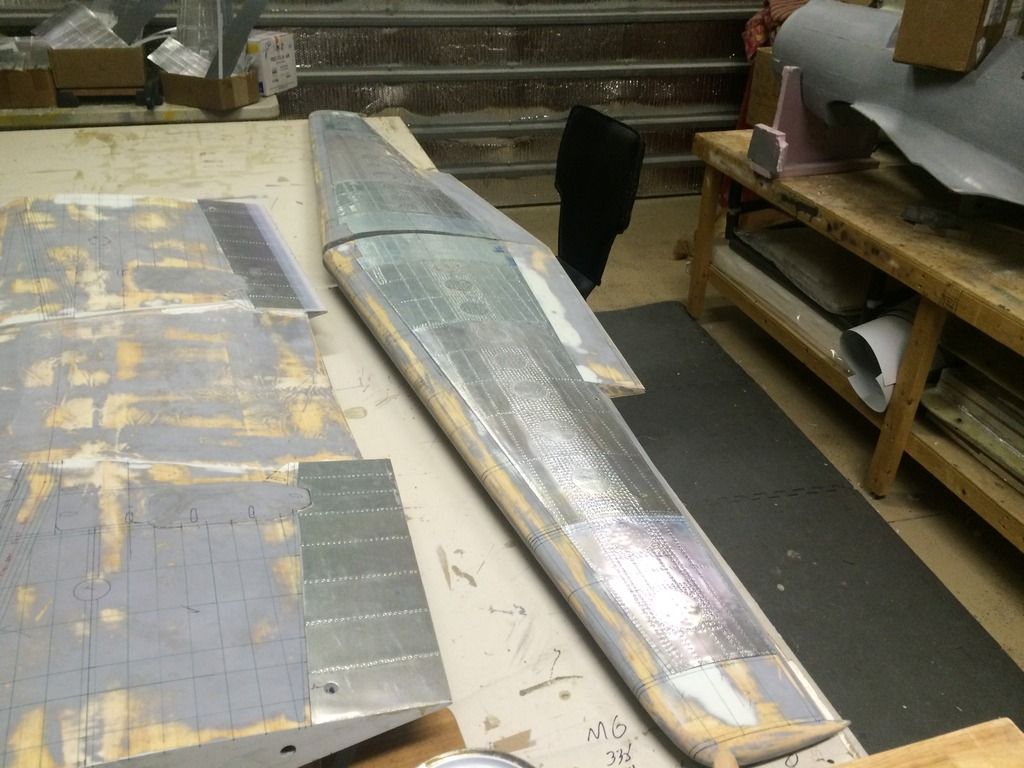
Left outer wing lower panels installed:


Right outer wing lower panels on:


Close up of the lower wing section:


And for those wondering, all of the panels for Both outer wings are done Except the wingtip panels. At this pace, if no work jobs pop up, i should be building parting planes by the weekend.
Old 07-05-2015, 05:34 PM
  #492  
Melchizedek
 
Melchizedek's Avatar
 
Join Date: Jul 2012
Location: Missouri
Posts: 1,127
Likes: 0
Received 0 Likes on 0 Posts
Default

Thomas,

Do you know the reason they used so dang many rivets in proximity to each other ?
Looks like a series of shot gun blasts.

Kevin
Old 07-05-2015, 05:43 PM
  #493  
invertmast
Thread Starter
My Feedback: (23)
 
invertmast's Avatar
 
Join Date: Dec 2003
Location: Capon Bridge, WV
Posts: 8,198
Received 225 Likes on 116 Posts
Default

Originally Posted by Melchizedek
Thomas,

Do you know the reason they used so dang many rivets in proximity to each other ?
Looks like a series of shot gun blasts.

Kevin
Only thing i can assume (as its what i would expect to see in a current aircraft) is they did a doubled skin in those areas to make up for the numerous cutouts in the bottom skin. Those round panels are 2" in diameter, so 8" at full size (and im betting they are probably closer to 10-12" on the real thing). Thats alot of material missing along the bottom.

Normally you would expect panels like that to be screwed on around the perimeter, but these Arent. These use a central screw that tightens on a bar that spans slightly larger than the diameter of the hatch. The central screw is tightened which has the sing structure between it and the panel to hold it into place. nofty idea for quick access for maintenance, but the lack of numerous attach screws has to be made up. All those rivets and a second skin doubler is prbably that make up.

Either way, those panels were a bear. The one panel with 4 hatches on it has around 1500-1600 rivets on it alone! (Yes i counted)
Old 07-06-2015, 05:51 PM
  #494  
invertmast
Thread Starter
My Feedback: (23)
 
invertmast's Avatar
 
Join Date: Dec 2003
Location: Capon Bridge, WV
Posts: 8,198
Received 225 Likes on 116 Posts
Default

Busy busy. All but a handful of small panels are done. All of the litho detailing should be done by the weekend.


Old 07-06-2015, 05:54 PM
  #495  
Nordicz
My Feedback: (7)
 
Join Date: Dec 2008
Location: Owatonna, MN
Posts: 226
Likes: 0
Received 0 Likes on 0 Posts
Default

Insanity,

But I love the work.

Z
Old 07-06-2015, 06:24 PM
  #496  
Melchizedek
 
Melchizedek's Avatar
 
Join Date: Jul 2012
Location: Missouri
Posts: 1,127
Likes: 0
Received 0 Likes on 0 Posts
Default

That looks just amazing

Kevin
Old 07-07-2015, 04:33 PM
  #497  
invertmast
Thread Starter
My Feedback: (23)
 
invertmast's Avatar
 
Join Date: Dec 2003
Location: Capon Bridge, WV
Posts: 8,198
Received 225 Likes on 116 Posts
Default

Both wings are now at the same point of completion.


I got all four of the wingtip panels shaped:


I also began forming the wingtip cap panels:


Then a bunch of other panels were riveted:


At this point, all but 6 panels are done.
Old 07-07-2015, 04:51 PM
  #498  
invertmast
Thread Starter
My Feedback: (23)
 
invertmast's Avatar
 
Join Date: Dec 2003
Location: Capon Bridge, WV
Posts: 8,198
Received 225 Likes on 116 Posts
Default

Both wings are now at the same point of completion.


I got all four of the wingtip panels shaped:


I also began forming the wingtip cap panels:


Then a bunch of other panels were riveted:


At this point, all but 6 panels are done.
Old 07-08-2015, 04:55 AM
  #499  
w1nd6urfa
Senior Member
My Feedback: (4)
 
w1nd6urfa's Avatar
 
Join Date: Aug 2008
Location: EllinikoAthens, GREECE
Posts: 1,079
Likes: 0
Received 5 Likes on 5 Posts
Default

Amazing
You're a very fast builder
Old 07-08-2015, 07:22 AM
  #500  
side oiler
My Feedback: (24)
 
Join Date: May 2008
Location: , MI
Posts: 47
Likes: 0
Received 0 Likes on 0 Posts
Default

Originally Posted by w1nd6urfa
Amazing
You're a very fast builder
Yes I agree! I can't generate money fast enough to cover the wing part of the kit. LOL


Contact Us - Archive - Advertising - Cookie Policy - Privacy Statement - Terms of Service -

Copyright © 2024 MH Sub I, LLC dba Internet Brands. All rights reserved. Use of this site indicates your consent to the Terms of Use.