


Don Smith A-26 Build
 02-07-2015, 08:08 AM
#51

Thread Starter
Join Date: Nov 2005
Location: fort collins,
CO
Posts: 448
Likes: 0
Received 0 Likes
on
0 Posts
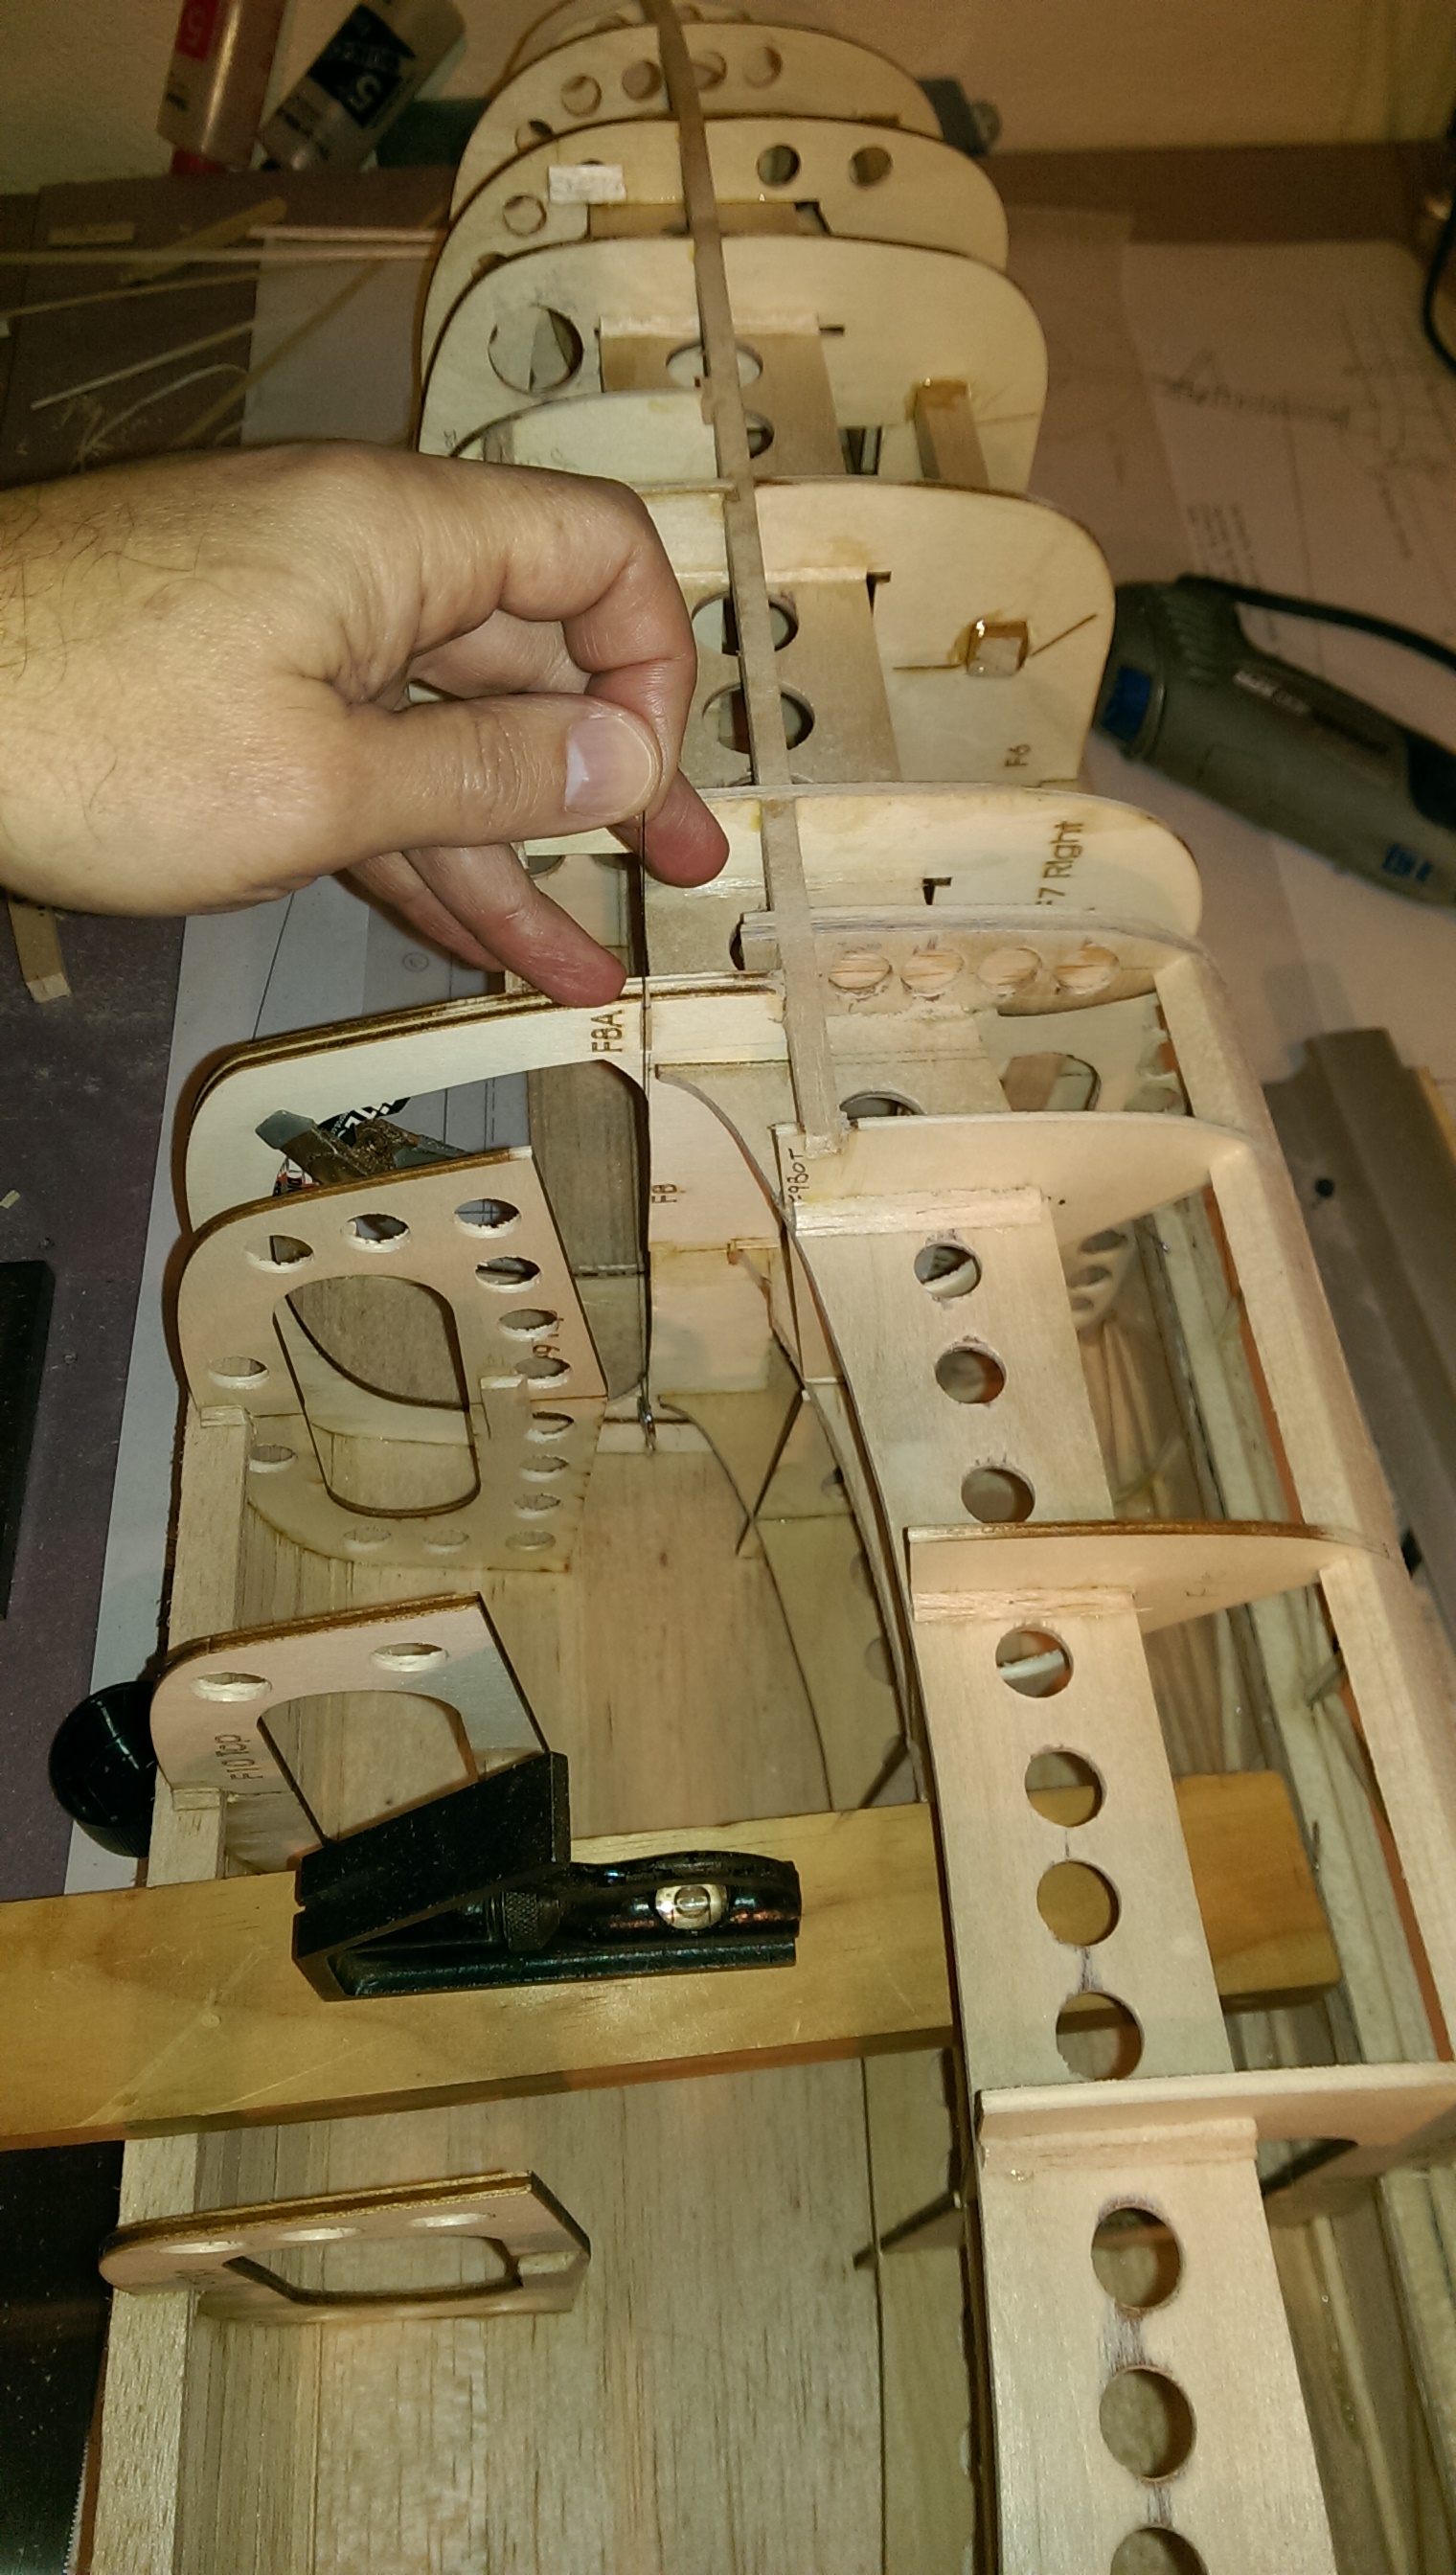
Ready to start planking the right side. According to the plans the wing is set at 1.5 degrees positive incidence. this is set by cutting the fuse planking with right airfoil shape and angle (via the chord line). I set the chord line on the LEFT side while building over the plans. Now that I'm on the RIGHT side, there is no way to transfer them from the plans. I marked the chord line on the LEFT side by gluing the end of a tooth pick to fuse formers at the wing's LE and TE locations. To transfer these locations to the RIGHT side, I made a mini plum-bob. Setting the fuse level I marked the RIGHT side and glued tooth picks in place again. The tooth picks stick 1/4" above the fuse former. When I put the sheeting on I will gently push the sheeting over the toothpick. This will leave 2 small points on the outside of the sheeting. I will use these points as the chord line for the wing.
 02-07-2015, 09:34 PM
#52
Thread Starter
Join Date: Nov 2005
Location: fort collins,
CO
Posts: 448
Likes: 0
Received 0 Likes
on
0 Posts
After completing 75% of the right side planking I pulled the fuse from the board. Here you see the chord line and airfoil shape transferred to the outside of the fuse.

I want to get the elevator and rudder push-rods installed before finishing the planking. But the H-stab needs to be in position for this. The fuse is blocked up at 0 degrees and I am just starting to fit the stab into position. Definitely need some fuse trimming for a good fit!

I want to get the elevator and rudder push-rods installed before finishing the planking. But the H-stab needs to be in position for this. The fuse is blocked up at 0 degrees and I am just starting to fit the stab into position. Definitely need some fuse trimming for a good fit!
02-08-2015, 10:00 AM
#53
Thread Starter
Join Date: Nov 2005
Location: fort collins,
CO
Posts: 448
Likes: 0
Received 0 Likes
on
0 Posts
The H-stab is close to being set. The plans don't give any thought to attaching the stab to fuse, if you do just what's there you'll just glue the stab sheeting to the fuse structure. I don't really find that satisfying.  So you can see in the photos below, I have opened up some of the stab sheeting on top and bottom. This will provide me access to glue some lite ply bracing from the stab ribs to the fuse formers F22 and F23 (in the closeup photos). This also provides more access for making elevator control horn connections before the top is closed up.


So you can see in the photos below, I have opened up some of the stab sheeting on top and bottom. This will provide me access to glue some lite ply bracing from the stab ribs to the fuse formers F22 and F23 (in the closeup photos). This also provides more access for making elevator control horn connections before the top is closed up.
02-15-2015, 03:16 PM
#54
Thread Starter
Join Date: Nov 2005
Location: fort collins,
CO
Posts: 448
Likes: 0
Received 0 Likes
on
0 Posts
Recent progress has been on fitting the H-stab and V-stab. Need to be sure everything aligns properly before closing the fuse. Hours of sanding and fitting to get the incidence correct. Also, everything needs to be in the right place to align the pushrods and control horns. I'm satisfied that it all lines up very nicely now.

Here you can see the access holes (which really helped!) and where the hatch will go to provide access to the linkages.


Next steps will be to install the pushrods and finish the planking.
Here you can see the access holes (which really helped!) and where the hatch will go to provide access to the linkages.
Next steps will be to install the pushrods and finish the planking.
02-24-2015, 08:49 PM
#56
Eldher, I wanted to share a video I had posted on my FB thread from the NASA group I am a member of (which I highly recommend you look into, as they organize most of the scale events in the U.S.) Anyway, there is some important info here on fiberglassing.
https://www.youtube.com/watch?v=ujk-...ature=youtu.be
Enjoy, good luck on your wings!
https://www.youtube.com/watch?v=ujk-...ature=youtu.be
Enjoy, good luck on your wings!
02-27-2015, 07:17 AM
#57
Thread Starter
Join Date: Nov 2005
Location: fort collins,
CO
Posts: 448
Likes: 0
Received 0 Likes
on
0 Posts
Thanks VG! Very helpful. Lots of good technique. The only thing I questioned was the amount of resin he used. His goal looked like "make a really hard shell to protect the model". When I did my P-40 my goal was "create a smooth surface for finish". I focused on using as little resin as possible to fill the weave (2 coats). The result is very thin, very light, but does not add much to the durability. Note his comment "essentially turns a piece of balsa wood into a rock". I don't need any rocks in my plane .... it's heavy enough!  Regardless, his technique for complex curves will be very useful as I have lots of them on the A-26. Thanks again.
Regardless, his technique for complex curves will be very useful as I have lots of them on the A-26. Thanks again.
02-27-2015, 10:20 AM
#58
The point that I got out of his presentation mostly was thinning the resin 50% with denatured alcohol. I have always been leary of doing this, as the threat of a "Solvent" trap exists. The 2 big benefits here, is that the resin penetrates the wood on the first application, and also, it is nice to be able to "paint" down the glass during the initial application. Especially with the curves. Just globbing puddles of resin and spreading it with the credit card, can be tricky on a complex curved fuselage. The thin resin is the key to the whole presentation I believe. That last, 3rd, "Flow coat", is one of the old secrets of the scale guys to get a good finish.
Also, I am not sure on the ratio being biased more towards resin than hardener. It would be easy to find out if this was a mistake, as it kind of goes against what you would think. I just make sure I get my resin measured out accurately, and have found the best way to do this is to use a small scale. Ever since I started weighing my resin, it comes out perfect everytime. I am sold on 'EZ lam", from ACP composites. When it is fully cured, it sands very easily. I use the 30 min, and it takes 12 hours or more to cure. Which is fine with me as I do not want it setting up while I am in the middle of a glassing project.
I am just now in the finishing stages of my glassing on the TA 152, so this process is at the fore front of my thoughts. I just wish it would warm up again. Resin does not like to cure when it is cold!
02-27-2015, 06:09 PM
#59
Thread Starter
Join Date: Nov 2005
Location: fort collins,
CO
Posts: 448
Likes: 0
Received 0 Likes
on
0 Posts
A few quick comments.
- thinning epoxy with alcohol weakens the bond strength.
- I use West Coat Systems, so there is no added thinning, you must mix _exactly_ as described
- I do not agree with the thinning idea anyway. Soaking into the wood is adding a LOT of weight (that 3rd coat). What's the value? Yes the surface is tough/durable (but NOT stronger). If I were building a boat, I'd do it. For my planes, I want them light as possible.
03-14-2015, 03:00 PM
#60
All of the laminating resins I have used are thin. That is what defines them as such, that and they are easier to sand than standard epoxy.
Having glassed several curvaceous fuselages, the very thin resin, as described by Greg Hahn, is of great benefit in getting a good even coat over the entire area. I have never had good luck dragging stock viscosity laminating resin with a credit card or squeegee on a fuselage. Especially in the wing fillet area. A flat wing is a different matter.
I guess we shall see if I have a finish failure, as I used this method on my fuselage and it created the best results I have seen to date with many of the other methods I have used. Strength is relative to the application. We are not gluing in firewalls and landing gear blocks here. The 2nd and 3rd coat of resin was so light, I would be surprised if it even adds up to 2 coats applied typically with the squeegee drag method.
I did a test before I committed to this process, but having seen Gregs models in person, and going by his track record of winning every major scale event consistently over the last 20 years, I trust his judgement.
My final coat of resin went on last night. I did feel it needed the 3rd application. Much of it it gets sanded down anyway.
03-30-2015, 09:54 AM
#62
Thread Starter
Join Date: Nov 2005
Location: fort collins,
CO
Posts: 448
Likes: 0
Received 0 Likes
on
0 Posts
It's been a while since I last posted progress. Lent is a busy season for me, so been slow building.
Regardless, there has been some. Been finishing planking the fuse and fitting the rear canopy. I've built a frame for the canopy to be glued to that will fit into the opening. This will be removable, as a big hatch in the rear to access servos, air tanks, and the bomb drop controller. Here's the work in progress pics. will post some of the final fit once it's ready.


Regardless, there has been some. Been finishing planking the fuse and fitting the rear canopy. I've built a frame for the canopy to be glued to that will fit into the opening. This will be removable, as a big hatch in the rear to access servos, air tanks, and the bomb drop controller. Here's the work in progress pics. will post some of the final fit once it's ready.
03-30-2015, 12:14 PM
#63
Lookin' good.
Not sure if you will need any guns, but here is a good source. His line seems to continue to expand.
http://www.iflytailies.com/store/guns-ordnance/
Not sure if you will need any guns, but here is a good source. His line seems to continue to expand.
http://www.iflytailies.com/store/guns-ordnance/
04-01-2015, 06:13 PM
#65
Thread Starter
Join Date: Nov 2005
Location: fort collins,
CO
Posts: 448
Likes: 0
Received 0 Likes
on
0 Posts
Lookin' good.
Not sure if you will need any guns, but here is a good source. His line seems to continue to expand.
http://www.iflytailies.com/store/guns-ordnance/
Not sure if you will need any guns, but here is a good source. His line seems to continue to expand.
http://www.iflytailies.com/store/guns-ordnance/
Hey VG! Great site. We will only need gun barrels for our plane. HOWEVER, we will need scale ordinance for the wing racks.
Here's part of my scale documentation:
Here's the 1/8th scale 500 lb bomb from the site you shared:
This will be perfect.
04-12-2015, 01:02 PM
#67
Thread Starter
Join Date: Nov 2005
Location: fort collins,
CO
Posts: 448
Likes: 0
Received 0 Likes
on
0 Posts
Well the fuse planking in finally complete. Thank God. Unfortunately, there are still 2 huge nacelles to plank.
At this point all the control rods and servos for the elevator and rudder are in, ya just can see them in the picts.
There are 2 hatches under the H-stab, one on each side, to access the far ends of the control rods. And the rear gunner's canopy is a hatch for access to servos, air tanks, etc.


Unfortunately, there are still 2 huge nacelles to plank.At this point all the control rods and servos for the elevator and rudder are in, ya just can see them in the picts.
There are 2 hatches under the H-stab, one on each side, to access the far ends of the control rods. And the rear gunner's canopy is a hatch for access to servos, air tanks, etc.
 04-18-2015, 09:42 AM
#69
Thread Starter
Join Date: Nov 2005
Location: fort collins,
CO
Posts: 448
Likes: 0
Received 0 Likes
on
0 Posts
after sanding to shape, fiberglassing of the H & V stab begins. Note I have added carbon fiber cloth to the top of the H-stab spar. There is already carbon fiber rod embedded in the bottom of the spar.

04-18-2015, 10:04 AM
#71
If I remember right, you had mentioned that this would be a competition model? If so, I have a website I would like to recommend. These guys are great. They organize the AMA nationals each year, as they are the AMA special interest group for scale. One of the great things they have on their site are the rules, and also great diagrams of the available maneuvers for competition. There are only minor deviations from their rules and the Scale Master and Top gun. You may wanna check it out sometime, as it is good to know what to expect during your build.
http://www.nasascale.org/
http://www.nasascale.org/
04-18-2015, 01:02 PM
#72
Thread Starter
Join Date: Nov 2005
Location: fort collins,
CO
Posts: 448
Likes: 0
Received 0 Likes
on
0 Posts
04-18-2015, 01:06 PM
#73
Thread Starter
Join Date: Nov 2005
Location: fort collins,
CO
Posts: 448
Likes: 0
Received 0 Likes
on
0 Posts
If I remember right, you had mentioned that this would be a competition model? If so, I have a website I would like to recommend. These guys are great. They organize the AMA nationals each year, as they are the AMA special interest group for scale. One of the great things they have on their site are the rules, and also great diagrams of the available maneuvers for competition. There are only minor deviations from their rules and the Scale Master and Top gun. You may wanna check it out sometime, as it is good to know what to expect during your build.
http://www.nasascale.org/
http://www.nasascale.org/
04-18-2015, 01:10 PM
#74
Awesome! I have had great luck with my DLE 35. I have been flying a new DLE 55 in an Ultimate bipe since late last summer, and am thinking about pulling it out and installing it in the TA 152. It is well on it's way to being broken in, and it runs great. Good to know you have a perfectly running and tuned engine ready to drop into these big important builds.
Oh, BTW, your membership card is on the frequency board. (or was last weekend) Man, when are you gonna move to 2.4 ghz! lol jk
Oh, BTW, your membership card is on the frequency board. (or was last weekend) Man, when are you gonna move to 2.4 ghz! lol jk