


Ziroli 92" p-47 build thread


 08-11-2017, 08:00 AM
#127
Cowl (cont)
Started with some wood dowel rod as risers to hold the cowl to the firewall but, after tapping the dowels, I found the wood too soft to hold threads so I got some of my red oak and used that. Some thin CA used to strengthen the threads. Tapped for button head 10X32 bolts to secure the cowl to the firewall. The risers covered a couple of the holes to secure the removable firewall to the fuse but I 'over killed' on the number of bolts used so a few missing won't hurt.
Some shallow holes drilled in risers and firewall for some 'tooth' for the hysol to set up, which will take several hours: A negative but it's very strong. After drying, will also secure the risers to the firewall with some screws. A long shank hex driver will make it easy to remove the cowl.
Last edited by samparfitt; 08-11-2017 at 08:06 AM.
08-11-2017, 03:54 PM
#128
Removable firewall (back side).
Finished up securing engine box and to firewall using wood screws (besides epoxy).
Some sullivan easy connect ball connectors used for throttle and choke on the engine end and sullivan golden rod.
Had to attach fire wall to fuse to pencil mark outline of fuse former F-1 onto back of removable firewall to insure I don't glue the tank/servo platform where it'll interfere with F-1.
Glad I kept the old removable firewall as the sides of the platform had to be cut at an angle to clear former F-2.
08-12-2017, 12:13 AM
#129

Join Date: Jan 2007
Location: HOUDANCOURT, FRANCE
Posts: 20
Likes: 0
Received 0 Likes
on
0 Posts
Hello Sam;
I read in your comments some time ago that you thought to install as a DLE120 engine by modifying a little the cowl engine.
I see that you install the DA 85, can you tell me why you did not, because I plan to install a DLE 120 on my new project: P47 Ziroli 92'' of course !!
Congratulations on all the work you post on the forum, it is a great help for all.
Fr�d�ric
PS: sorry for my english, I use translate Google .....
08-12-2017, 05:41 AM
#131
Join Date: Jan 2007
Location: HOUDANCOURT, FRANCE
Posts: 20
Likes: 0
Received 0 Likes
on
0 Posts
Thanks for your reply sam;
I built my first P47 ziroli in 2005, it still flies with the 3W 80 XI, I turn the propeller 26X10 at 6300rpm. The plane weighs 14kg, it flies super but I would like a little more power. I thought that the DLE120 could be a good solution between financial budget and power ratio. I will think again.
Good construction and soon to the frequency .....
Fr�d�ric
08-12-2017, 07:39 AM
#132
Removable fire wall (cont)
Finished up this with a removable tray for the engine ignition and battery. A large hole was needed in the FW to route the spark plug wire to the engine. Should be better for the ignition being behind the firewall versus in front of.
Some heavy duty auto FG cloth and zap finishing resin for the main gear wells.
The hole behind the gear well is for the landing light: made it removable for easier servicing and install.
ps: nice change allowing more than 5 pictures to be loaded at once on this web site!
08-13-2017, 12:01 PM
#133
Panel lines and 2nd coat of primer.
Took about 6 hours to lay the chart tape over the panel lines.
1/64" wide would be more scale but I use 1/32" wide. 1/16" wide was used for fake gaps ie, trim tabs, removable panels.
Doing the 'zig-zag' pattern on the elevators and rudder was the most time consuming.
Two part epoxy primer used; 2-3 coats over the chart tape and then one coat over the entire surface.
Last edited by samparfitt; 08-13-2017 at 01:13 PM.
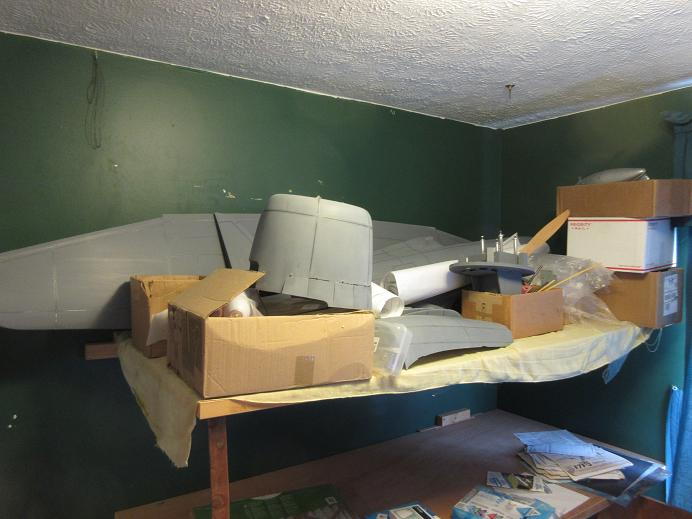
09-22-2017, 10:07 AM
#134
Wet sanding.
Lots of water and 220 sandpaper finished off the final coat of primer.
Everything is now on a shelf as I'm not sure when I'll get back to this plane but, I can now add the aluminum tape during the cold, winter months.
Still lots to do:
make FG canopy frame.
install full cockpit (dynamic balsa)
functional sliding cockpit canopy
aluminum tape application (130 hours)
make doors.
hardware,
engine.
Last edited by samparfitt; 09-22-2017 at 10:14 AM.
06-06-2018, 02:27 AM
#137
Harry,
Haven't done anything on the plane.
It's sitting on a shelf.
Have a Phoenix 95" spitfire ARF that I'll probably work on for this summer.
PM'ed 3 planes last week for my first flyin at CARDS warbird flyin at Lansing, Michigan.
Got around 13 planes that I can fly and not too motivated to work on finishing up 3 others that are sitting on shelves: Z C-45 and P-51 along with the P-47.
This winter, I did a lot of work on my other hobby: model railroading.
Also, have a lot of work to do on the house: Clean up stuff and need to put all new faucets in all the rooms. Got the kitchen done, so far.
Also, my daughter keeps very busy with her dog grooming business and only takes one day off a week and hasn't been doing anything else so we started taking mini trips on her day off (Mondays).
 02-19-2019, 01:40 PM
#142

My Feedback: (2)
Join Date: Feb 2008
Location: Fullerton, CA
Posts: 101
Likes: 0
Received 0 Likes
on
0 Posts
I have just started my build, and have been reading your posts and have learned so much! Where can I find 1/8� & 1/16� G10? I see you used it for your flaps but I believe not for the ailerons. Is there a reason?
02-19-2019, 02:03 PM
#143
My Feedback: (360)
https://www.dreamworksrc.com/catalog.../result/?q=g10
02-19-2019, 02:55 PM
#144
Got some of mine from Fran Tiano.
https://www.franktiano.com/product-p...erglass-sheets
Also:
radical rc:
https://www.radicalrc.com/category/Fiberglass-Sheet-558
mcmasters:
https://www.mcmaster.com/=1guwkr3
https://www.franktiano.com/product-p...erglass-sheets
Also:
radical rc:
https://www.radicalrc.com/category/Fiberglass-Sheet-558
mcmasters:
https://www.mcmaster.com/=1guwkr3
03-28-2019, 01:34 PM
#146
My Feedback: (2)
Join Date: Feb 2008
Location: Fullerton, CA
Posts: 101
Likes: 0
Received 0 Likes
on
0 Posts
I am making the first four formers out of 1/4" AC ply. How do recommend cutting the slots for the formers? I am unsure the best way to get the correct depth and a flat bottom. Any tips? To sand the inside curves of the formers I used a sanding drum attached to my router. Is there a better way?
04-11-2019, 08:59 PM
#148
My Feedback: (2)
Join Date: Feb 2008
Location: Fullerton, CA
Posts: 101
Likes: 0
Received 0 Likes
on
0 Posts
Sam, a couple questions if you don't mind.
1) My next step is to glue F3A to F3 and F7B to F7A using 1/32 spacers. I don't understand why we would glue these to each other as I am picturing that I will need to separate them later when I cut/remove the belly pan from the fuselage. I was thinking of just tacking the spacers in place. You said your were going to make your belly pan removable. How did you handle that? Looks like you have to remove your belly pan to get to the four bolts holding the wing on.
2) To make the firewall removable with a gas tank and servo tray, won't I have to remove the first 2 or 3 cross members of the crutch? Do you have a picture showing how far back your tray goes? Or a picture with the firewall removed and looking head on at former F1?
Thank You so much - Harry
04-12-2019, 03:27 AM
#149
Harry,
1) The 1/32" spacer between the two formers will allow you to cut the belly pan out. I used a razor saw to cut that space. Spacers allow a nice even, constant space between the two formers and guides the razor saw so one get a clean, straight line I use dowels and/or machine screws to hold the belly pan to the wing. You could also, just glue the belly pan to the wing.
2) Once the stringers and, usually the sheeting, are on the fuse, the crutch is no longer needed and cross members can be removed. Those form no strength to the fuse and are only there to give the initial crutch some strength.
