Go Back  RCU Forums > RC Airplanes > RC Warbirds and Warplanes
Reload this Page >

BT 83" Spitfire Mk.IX SQN no. 312

Community
Search
Notices
RC Warbirds and Warplanes Discuss rc warbirds and warplanes in this forum.

BT 83" Spitfire Mk.IX SQN no. 312

Thread Tools
 
Search this Thread
 
Old 12-17-2014, 08:41 PM
  #51  
w1nd6urfa
Senior Member
My Feedback: (4)
 
w1nd6urfa's Avatar
 
Join Date: Aug 2008
Location: EllinikoAthens, GREECE
Posts: 1,079
Likes: 0
Received 5 Likes on 5 Posts
Default

Originally Posted by Prekin
I admire your work on rivets Nick. It looks fantastic!
You're making me blush!

Looking forward to your build and the Czech livery
Old 12-19-2014, 11:48 AM
  #52  
Prekin
Thread Starter
My Feedback: (19)
 
Prekin's Avatar
 
Join Date: Jan 2008
Posts: 2,087
Received 78 Likes on 71 Posts
Default

Those are origin fibreglass parst. Now I´m working on more detailed.
Attached Thumbnails Click image for larger version

Name:	DSC08786.JPG
Views:	85
Size:	328.8 KB
ID:	2056289   Click image for larger version

Name:	DSC08787.JPG
Views:	77
Size:	486.9 KB
ID:	2056290   Click image for larger version

Name:	DSC08788.JPG
Views:	84
Size:	450.8 KB
ID:	2056291   Click image for larger version

Name:	DSC08789.JPG
Views:	75
Size:	489.4 KB
ID:	2056292   Click image for larger version

Name:	DSC08790.JPG
Views:	84
Size:	469.8 KB
ID:	2056293  

Last edited by Prekin; 02-06-2018 at 09:06 AM.
Old 12-19-2014, 12:56 PM
  #53  
Prekin
Thread Starter
My Feedback: (19)
 
Prekin's Avatar
 
Join Date: Jan 2008
Posts: 2,087
Received 78 Likes on 71 Posts
Default

The composite mold for a fibreglass frame of canopy is done. Probably I´ll be able also to use this form for vacuum canopy.
Attached Thumbnails Click image for larger version

Name:	PC121446.JPG
Views:	90
Size:	696.5 KB
ID:	2056307   Click image for larger version

Name:	PC121447.JPG
Views:	85
Size:	721.9 KB
ID:	2056308  

Last edited by Prekin; 12-19-2014 at 11:55 PM.
Old 12-19-2014, 01:44 PM
  #54  
piperjon
Senior Member
 
piperjon's Avatar
 
Join Date: Jan 2013
Location: Sunny CornerNew South Wales, AUSTRALIA
Posts: 203
Likes: 0
Received 0 Likes on 0 Posts
Default

Bob Holman said his work was really good, the cowl and chin scoop look really great. I did email that guy you told me to but no reply as yet.
nice work keep it up.
John
Old 12-19-2014, 02:09 PM
  #55  
fokke
 
fokke's Avatar
 
Join Date: Jan 2007
Location: Sofia, BULGARIA
Posts: 1,803
Received 10 Likes on 9 Posts
Default

Realy great work on cowl and canopy !!!

Regards
Rumen
Old 12-19-2014, 02:15 PM
  #56  
piperjon
Senior Member
 
piperjon's Avatar
 
Join Date: Jan 2013
Location: Sunny CornerNew South Wales, AUSTRALIA
Posts: 203
Likes: 0
Received 0 Likes on 0 Posts
Default

Hello Fokke,

Did you receive my PM regarding your spitfire kit??
John
Old 12-19-2014, 02:35 PM
  #57  
fokke
 
fokke's Avatar
 
Join Date: Jan 2007
Location: Sofia, BULGARIA
Posts: 1,803
Received 10 Likes on 9 Posts
Default

Yes John , I send you answer before 10 hour , check your PM box or mail me on [email protected] SORRY FOR THE OFF TOPIC


Prekin , how you think to wacoom the canopy, with positive mold or with this negative mold ?

Rumen
Old 12-19-2014, 04:32 PM
  #58  
piperjon
Senior Member
 
piperjon's Avatar
 
Join Date: Jan 2013
Location: Sunny CornerNew South Wales, AUSTRALIA
Posts: 203
Likes: 0
Received 0 Likes on 0 Posts
Default

Hi Fokke,
Thank you for your reply.
John
Old 12-19-2014, 08:38 PM
  #59  
w1nd6urfa
Senior Member
My Feedback: (4)
 
w1nd6urfa's Avatar
 
Join Date: Aug 2008
Location: EllinikoAthens, GREECE
Posts: 1,079
Likes: 0
Received 5 Likes on 5 Posts
Default

Originally Posted by Prekin
As you can see, I´ve finally received my package from VicRc. I´ve bought a composite cowl and chin scoop. His fibreglass is much better than for example ESM or CMP composite.
To get a thin, light and strong composite fuse you must use vacuum-bag moulding - like we do in surfboard repairs.

I bet that's how Vic does it (and most certainly ESM do not!)

Old 12-20-2014, 12:02 AM
  #60  
Prekin
Thread Starter
My Feedback: (19)
 
Prekin's Avatar
 
Join Date: Jan 2008
Posts: 2,087
Received 78 Likes on 71 Posts
Default

Originally Posted by fokke
Prekin , how you think to wacoom the canopy, with positive mold or with this negative mold ?

Rumen
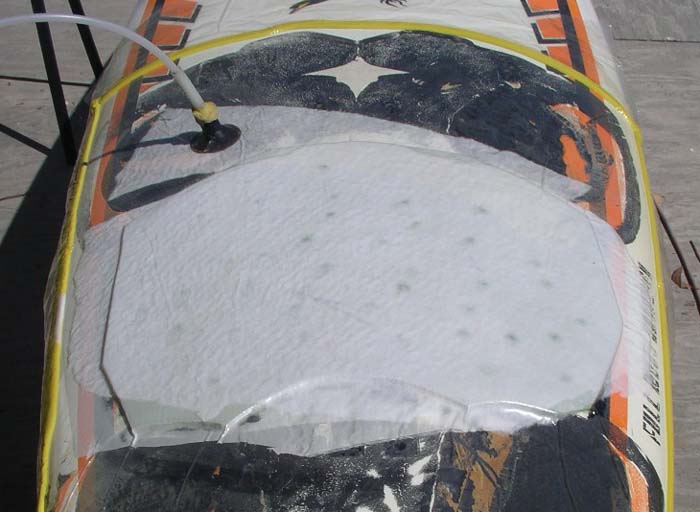
Hi Rumen, I would like to wacoom the canopy on my negative mold. I found some pictures how to do it. In this case I would need only one mold for fibreglass frame and wacoom canopy. But as you sure now, anytime everything goes as we want or await.
Attached Thumbnails Click image for larger version

Name:	1.jpg
Views:	120
Size:	90.1 KB
ID:	2056394   Click image for larger version

Name:	2.jpg
Views:	123
Size:	70.9 KB
ID:	2056395   Click image for larger version

Name:	3.jpg
Views:	123
Size:	85.8 KB
ID:	2056396   Click image for larger version

Name:	4.jpg
Views:	129
Size:	96.3 KB
ID:	2056397   Click image for larger version

Name:	5.jpg
Views:	125
Size:	45.0 KB
ID:	2056398  
Old 12-20-2014, 12:16 AM
  #61  
fokke
 
fokke's Avatar
 
Join Date: Jan 2007
Location: Sofia, BULGARIA
Posts: 1,803
Received 10 Likes on 9 Posts
Default

Oh yes , this is the work of a guy from RCSB forum , the result of his method is really great , but I wonder how will work the system with this small holes, I don't know. My idea for becoming my canopies was the same , I have the negative mold and I just need to try to


Last edited by fokke; 12-20-2014 at 12:19 AM.
Old 12-20-2014, 12:38 AM
  #62  
Prekin
Thread Starter
My Feedback: (19)
 
Prekin's Avatar
 
Join Date: Jan 2008
Posts: 2,087
Received 78 Likes on 71 Posts
Default

Fokke, I think your result looks good. Did you also use negative mold? I can´t see any hole for air.
Old 12-20-2014, 12:43 AM
  #63  
fokke
 
fokke's Avatar
 
Join Date: Jan 2007
Location: Sofia, BULGARIA
Posts: 1,803
Received 10 Likes on 9 Posts
Default

No I"am not yet. I wonder how will work the negative sistem with so small holes for air. I do not make yet this idea, but soon I will try for sure

Maybe 1mm holes will be ok ?
Old 12-20-2014, 03:59 AM
  #64  
Prekin
Thread Starter
My Feedback: (19)
 
Prekin's Avatar
 
Join Date: Jan 2008
Posts: 2,087
Received 78 Likes on 71 Posts
Default

I don´t know Rumen. I´ve never try to make a canopy in negative mold. I´m also thinking about the thickness and temperature of a plastic desk.
Old 12-20-2014, 08:39 AM
  #65  
fokke
 
fokke's Avatar
 
Join Date: Jan 2007
Location: Sofia, BULGARIA
Posts: 1,803
Received 10 Likes on 9 Posts
Default

Do you know What thickness of the material is of VicRc ?
Old 12-20-2014, 09:13 AM
  #66  
Prekin
Thread Starter
My Feedback: (19)
 
Prekin's Avatar
 
Join Date: Jan 2008
Posts: 2,087
Received 78 Likes on 71 Posts
Default

Unfortunately I don´t know it. But the canopy from Traplet shop which I´ve already had is made from 0,2; 0,3 mm or some similar. It is not more than 0,5 mm. But it looks like, that this one is made on positive mold.
Old 12-20-2014, 10:16 AM
  #67  
fokke
 
fokke's Avatar
 
Join Date: Jan 2007
Location: Sofia, BULGARIA
Posts: 1,803
Received 10 Likes on 9 Posts
Default

If your model is 1/5 scale or up nothing under 0.5mm I think ! I made my canopies from 0.5mm material and is OK , but if is more thinner I think is bad idea
Old 12-20-2014, 11:12 AM
  #68  
Prekin
Thread Starter
My Feedback: (19)
 
Prekin's Avatar
 
Join Date: Jan 2008
Posts: 2,087
Received 78 Likes on 71 Posts
Default

Thank you for advice Rumen.
Old 12-21-2014, 03:38 AM
  #69  
Prekin
Thread Starter
My Feedback: (19)
 
Prekin's Avatar
 
Join Date: Jan 2008
Posts: 2,087
Received 78 Likes on 71 Posts
Default

ounting for tail wheel is almost done.
Attached Thumbnails Click image for larger version

Name:	PC191456.JPG
Views:	133
Size:	677.3 KB
ID:	2056602   Click image for larger version

Name:	PC191457.JPG
Views:	124
Size:	698.6 KB
ID:	2056603   Click image for larger version

Name:	PC211460.JPG
Views:	119
Size:	694.8 KB
ID:	2056604  

Last edited by Prekin; 02-06-2018 at 09:08 AM.
Old 12-23-2014, 03:41 PM
  #70  
Prekin
Thread Starter
My Feedback: (19)
 
Prekin's Avatar
 
Join Date: Jan 2008
Posts: 2,087
Received 78 Likes on 71 Posts
Default

I found some time and started to build elevator. If I should follow the plan, I had to made it from 2mm balsa. I´m going to cover it by fibreglass, so I made it from 1,5mm balsa wood.
Attached Thumbnails Click image for larger version

Name:	P4031662.JPG
Views:	157
Size:	671.6 KB
ID:	2057324   Click image for larger version

Name:	P4041663.JPG
Views:	96
Size:	689.7 KB
ID:	2057325   Click image for larger version

Name:	P4041664.JPG
Views:	96
Size:	702.8 KB
ID:	2057326   Click image for larger version

Name:	P4041665.JPG
Views:	97
Size:	699.1 KB
ID:	2057328   Click image for larger version

Name:	P4041666.JPG
Views:	100
Size:	669.6 KB
ID:	2057330  

Last edited by Prekin; 12-23-2014 at 03:47 PM.
Old 12-24-2014, 01:30 AM
  #71  
Prekin
Thread Starter
My Feedback: (19)
 
Prekin's Avatar
 
Join Date: Jan 2008
Posts: 2,087
Received 78 Likes on 71 Posts
Default

I opened a technical book about Spitfire and I´ve just done a model of spinner. I´m thinking to make CNC negative mold from piece of some metal and make a composite spinner.
Attached Thumbnails Click image for larger version

Name:	kužel 1.jpg
Views:	107
Size:	106.2 KB
ID:	2057417   Click image for larger version

Name:	kužel2.jpg
Views:	99
Size:	74.9 KB
ID:	2057418   Click image for larger version

Name:	kužel3.jpg
Views:	81
Size:	81.3 KB
ID:	2057419   Click image for larger version

Name:	kužel4.jpg
Views:	72
Size:	46.2 KB
ID:	2057420   Click image for larger version

Name:	kužel5.jpg
Views:	84
Size:	48.7 KB
ID:	2057421   Click image for larger version

Name:	kužel6.jpg
Views:	72
Size:	51.1 KB
ID:	2057422  
Old 12-24-2014, 12:38 PM
  #72  
Prekin
Thread Starter
My Feedback: (19)
 
Prekin's Avatar
 
Join Date: Jan 2008
Posts: 2,087
Received 78 Likes on 71 Posts
Default

Molds for Spitfire´s and Bf-109´s dummy exhausts are done. I´ve also made a mold for dummy cal. 0.50. Now I can provide dummy exhausts 1/5 scale, the cal. 0.50 is approximately 1/7 scale- suitable for ESM Dauntless.

Last edited by Prekin; 02-06-2018 at 09:09 AM.
Old 12-25-2014, 03:06 AM
  #73  
Prekin
Thread Starter
My Feedback: (19)
 
Prekin's Avatar
 
Join Date: Jan 2008
Posts: 2,087
Received 78 Likes on 71 Posts
Default

Base of stabilizer is done. Now I´ll sheet it and glue both of the halfs together.
Attached Thumbnails Click image for larger version

Name:	P4061673.JPG
Views:	87
Size:	723.0 KB
ID:	2057660   Click image for larger version

Name:	P4061674.JPG
Views:	98
Size:	701.9 KB
ID:	2057661  
Old 12-25-2014, 07:14 AM
  #74  
Prekin
Thread Starter
My Feedback: (19)
 
Prekin's Avatar
 
Join Date: Jan 2008
Posts: 2,087
Received 78 Likes on 71 Posts
Default

Here are the products: dummy cal .50, Spitfire exhaust and Bf109 dummy exhaust.
Attached Thumbnails Click image for larger version

Name:	DSC_0104.JPG
Views:	73
Size:	403.7 KB
ID:	2253705   Click image for larger version

Name:	DSC_0106.JPG
Views:	65
Size:	369.7 KB
ID:	2253706   Click image for larger version

Name:	DSC_0105.JPG
Views:	64
Size:	549.4 KB
ID:	2253707  

Last edited by Prekin; 02-06-2018 at 09:12 AM.
Old 12-26-2014, 04:14 PM
  #75  
piperjon
Senior Member
 
piperjon's Avatar
 
Join Date: Jan 2013
Location: Sunny CornerNew South Wales, AUSTRALIA
Posts: 203
Likes: 0
Received 0 Likes on 0 Posts
Default

Hello my friend,

Your doing a nice job there!! Keep it up!!
John


Contact Us - Archive - Advertising - Cookie Policy - Privacy Statement - Terms of Service -

Copyright © 2024 MH Sub I, LLC dba Internet Brands. All rights reserved. Use of this site indicates your consent to the Terms of Use.