


3W Bearcat with Moki 300
 08-30-2015, 06:10 PM
#101

My Feedback: (28)
Join Date: Jan 2008
Location: San Angelo,
TX
Posts: 120
Likes: 0
Received 0 Likes
on
0 Posts
Added a 12 channel Rx so I could run the fuel pump. But, still probably a little rich. I think the bottom cylinder is flooding and it's missing. Are there any links over the Moki 300 that I can get help with? Thanks
 08-30-2015, 06:54 PM
#102

Thread Starter

You can try the "MOKI RADIAL Care and Maintenance" thread but not too many running the 300. I had the same problem with mine flooding badly with the fuel pump. to the point where fuel was flowing out the carb. This may sound strange, but I ending up running my fuel pump and ignition kill on two separate switches. I choke the engine with the pump on.. right after it "pops", I then turn the choke off, give it a couple flips then turn off the pump. then flip a few more times and the engine starts. immediately after it starts, I turn the pump back on and it starts every time. weird procedure, but it works for me. no more flooding. you just have to be quick with turning the pump back on when the engine start. then I give it a good 3-4 minute warm up. It seems to take that long for all cylinders to start running smooth. If I leave the pump on the whole time I try starting, it just floods out.
10-02-2015, 12:52 AM
#103
You can try the "MOKI RADIAL Care and Maintenance" thread but not too many running the 300. I had the same problem with mine flooding badly with the fuel pump. to the point where fuel was flowing out the carb. This may sound strange, but I ending up running my fuel pump and ignition kill on two separate switches. I choke the engine with the pump on.. right after it "pops", I then turn the choke off, give it a couple flips then turn off the pump. then flip a few more times and the engine starts. immediately after it starts, I turn the pump back on and it starts every time. weird procedure, but it works for me. no more flooding. you just have to be quick with turning the pump back on when the engine start. then I give it a good 3-4 minute warm up. It seems to take that long for all cylinders to start running smooth. If I leave the pump on the whole time I try starting, it just floods out.
any more flights on your Bearcat?
I am just building up a second hand 3W Bearcat and - as you did- plan to put in a new Moki 300. Mine has collected about one hour on the test bench now.
I would like to know how your experience with the engine is, how many hours does it have on the clock now, how does it performm / run? Wet cylinders?
Thank you in advance
Detlef
10-03-2015, 06:19 AM
#104
Thread Starter
Hello Detlef,
I only have around 12 flights on the Bearcat right now. During some of the initial flights, as I described, it had aileron flutter. As a result, I broke the hinges on one aileron. It's all fixed and ready for flight again. I was hoping this weekend but the weather here is extremely windy. My experience with the engine was difficult in the beginning. It seems to flood easily. it's been difficult to start when the engine is warm. If I wait about 15-20 minuted between flights, it starts right up. I ended up putting the fuel pump on it's own switch. This way I can prime/choke the engine with the fuel pump on, I then turn the pump off and choke off. Once the engine starts, I "flip" the pump on quickly and it starts right up. May not be the best method but works.
I only have around 12 flights on the Bearcat right now. During some of the initial flights, as I described, it had aileron flutter. As a result, I broke the hinges on one aileron. It's all fixed and ready for flight again. I was hoping this weekend but the weather here is extremely windy. My experience with the engine was difficult in the beginning. It seems to flood easily. it's been difficult to start when the engine is warm. If I wait about 15-20 minuted between flights, it starts right up. I ended up putting the fuel pump on it's own switch. This way I can prime/choke the engine with the fuel pump on, I then turn the pump off and choke off. Once the engine starts, I "flip" the pump on quickly and it starts right up. May not be the best method but works.
10-03-2015, 06:26 AM
#105

Rob,
I still think you have something hooked up wrong in you fuel system to create this flooding issue. My Wildcat doesn't have this issue with the pump running and it starts just fine every time. I would really like to see how it's hooked up cause it sounds as if it's not returning the excess fuel back into the fuel tank like it is designed to do.
I still think you have something hooked up wrong in you fuel system to create this flooding issue. My Wildcat doesn't have this issue with the pump running and it starts just fine every time. I would really like to see how it's hooked up cause it sounds as if it's not returning the excess fuel back into the fuel tank like it is designed to do.
10-04-2015, 05:52 PM
#106
Thread Starter
Hi Greg... I totally agree with you. I can just can't figure it out. That would be great to have you look it over. It really drives me crazy.. when started, it runs great, never stalls/dies.
 10-16-2015, 07:18 AM
#112
My Feedback: (28)
Join Date: Jan 2008
Location: San Angelo,
TX
Posts: 120
Likes: 0
Received 0 Likes
on
0 Posts
Not sure this will help anyone here but, I have a newbie mistake that I remedied with the little head scratching. I could not get the 300 to run properly after I did the replacement from the DA 170 on the comp or yak. After going over and over and over all of the systems, I forgot to clear the throttle curve in my radio that was programmed for the DA 170. Once I went back to factory settings, and tried it again. The whole thing just sang. Can't believe the power this thing puts out! Also the custom exhaust that is piped into the aluminum beer cans is amazing! Now for the bearcat......😆
10-16-2015, 08:31 AM
#113
2Brave,
I have actually on my 250 needed to do a throttle curve due to the lack of it not having any throttlel change between half and full throttle. Even though there is full motion between servo and carb it had no noticable power change from half throttle to full power.
So i did a curve and now it's a bit more linear with stick movement.
10-19-2015, 02:01 AM
#115
Going to bolt the 300 to the BC fuselage by the end of the week.
Removed the existing equipment that the 250 had before, and replaced it with a custom made carbon support.
In my eyes the Bearcat needs all areas you can have for hot air to exit.
There will also be a channel at the fuse bottom that leads to the 2 flaps between the gear doors.
Pic 3 shows the carbon covered dome, getting some heat treatment on the radiator over night.
So far, other changes have been done to the tail ( some reinforcements) and reworked elevator, rudder and aileron hinging.
Much stronger servo types have been put in, and all servos have been installed on new stronger base plates.
One other nice thing would be scale main retracts, so sad sierra doesn't make it in this scale.
10-19-2015, 04:17 AM
#116
Junior Member
Join Date: Sep 2006
Location: Horten, , NORWAY
Posts: 21
Likes: 0
Received 0 Likes
on
0 Posts
Hi Kunkel,
Really nice work on the motor support.
You mention it is a custom made support. Have you made it yourself or is it made by a company?
IOW - is it possible to order?
KR
Frode
Really nice work on the motor support.
You mention it is a custom made support. Have you made it yourself or is it made by a company?
IOW - is it possible to order?
KR
Frode
10-19-2015, 04:25 AM
#117
Going to bolt the 300 to the BC fuselage by the end of the week.
Removed the existing equipment that the 250 had before, and replaced it with a custom made carbon support.
In my eyes the Bearcat needs all areas you can have for hot air to exit.
There will also be a channel at the fuse bottom that leads to the 2 flaps between the gear doors.
Pic 3 shows the carbon covered dome, getting some heat treatment on the radiator over night.
So far, other changes have been done to the tail ( some reinforcements) and reworked elevator, rudder and aileron hinging.
Much stronger servo types have been put in, and all servos have been installed on new stronger base plates.
One other nice thing would be scale main retracts, so sad sierra doesn't make it in this scale.
10-19-2015, 04:26 AM
#118
Hi Frode,
the shape of the plug is made of the yellow foam you see in the first pics. Took most of one weekend to form it.
I am am not sure if it will survive the process.
There is no commercial interest from my side, so I did not care for a professional mould.
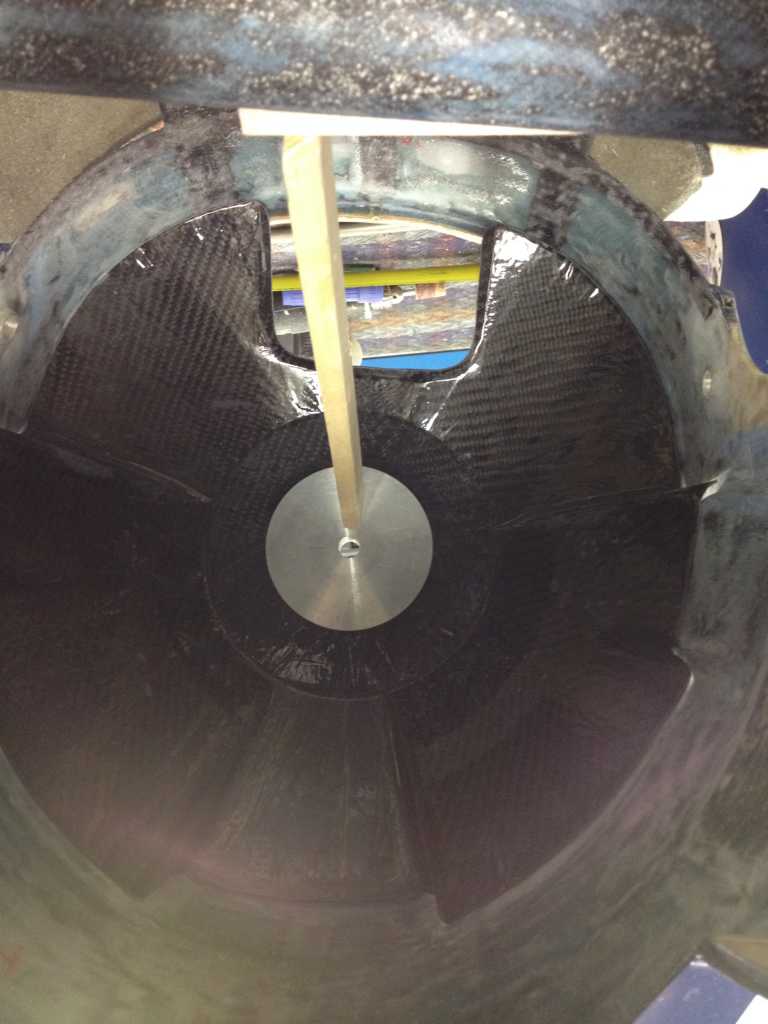
2 layers of carbon are laminated under, and 2 layers above the plywood ring that will carry the engine. 2 layers of fine glass are making a nice surface on both inner and outer side.
10-19-2015, 06:26 AM
#119
Junior Member
Join Date: Sep 2006
Location: Horten, , NORWAY
Posts: 21
Likes: 0
Received 0 Likes
on
0 Posts
Many thanks Detlef. This brought more clarity to it for me.
I did not realize it the plug was foam material for now.
Did you bake all layers (carbon and fiber glas) wet on wet or did you take it in several processes?
KR
Frode
I did not realize it the plug was foam material for now.
Did you bake all layers (carbon and fiber glas) wet on wet or did you take it in several processes?
KR
Frode
10-19-2015, 06:32 AM
#120
everything baked wet on wet, the simple plug design was made in a way to allow this in one step.
2 layers, apply the wooden ring, again 2 layers and then followed by the heat treatment. That's all.
2 layers, apply the wooden ring, again 2 layers and then followed by the heat treatment. That's all.
Last edited by Detlef Kunkel; 10-19-2015 at 06:34 AM.
10-19-2015, 06:36 AM
#121
 10-19-2015, 10:22 PM
#123
After 24 hours of heat treatment, the engine mount is rock hard. As I supposed, the foam core has been damaged by removing the mount.
After some trimming it fits really nice. The engine position will not need any more fine adjustment, it centres perfectly


Rob, sorry for hijacking your build report; I thought this chapter fits well here. :-)
After some trimming it fits really nice. The engine position will not need any more fine adjustment, it centres perfectly
Rob, sorry for hijacking your build report; I thought this chapter fits well here. :-)
11-18-2015, 03:47 AM
#125
The engine has finally made it to the fuselage ( or is it the other way round?)
Just thinking whether to make the cooling flaps steerable or just fix them in an open porition?
Those at the bottom of the fuse should be at least flexible in case you lay the aircraft upon the fuse...


Just thinking whether to make the cooling flaps steerable or just fix them in an open porition?
Those at the bottom of the fuse should be at least flexible in case you lay the aircraft upon the fuse...

