


Skyshark Dauntless Build

 02-16-2016, 10:19 PM
#52

I am assembling a VQ Dauntless AND going with my 9303 also!
I'm having a lot of trouble getting the air brakes to be activated by flaps, or the flaps activating the brakes.
I can can get the flaps to work on Ch 6 and the brakes on Aux 2. I programmed the "Px-6" to have Aux 2 as Master and Flaps as slave....but when I flip the Aux2 switch, only the brakes move!
Help!
Jerry
02-17-2016, 04:38 AM
#53

Wow, that sucks! Sleeping on the job and losing his head. My kingfisher has one from H9 (made in England) in the front but that plane stays in my spare bedroom during most of it's life. I guess it's probably the sun that does them in. The rear pilot is one of the three VA ones I got here on RCU for sale section a couple years back. You would think they could shrink the scale down but if you read, they only make the face with the 3D and put it on one of their current pilot bodies. There's not enough of 1/9th builders around and probably barely enough builders in all scales to make it worth it for them.
 02-17-2016, 05:51 PM
#54

My Feedback: (15)
Congrats on the car, great find and looks to be a awesome project. I picked up a 74 Dodge Challenger in 1979 for $2000 ! I was a kid and it was difficult to maintain but it was mint !
You would not believe what that car sold for !
On the Pilot for some reason I think that Chad was doing some printing, I know I have seen some of his P47 interior kits and assumed they were printed.
I am shocked that good pilots are so scarce in this scale.
You would not believe what that car sold for !
On the Pilot for some reason I think that Chad was doing some printing, I know I have seen some of his P47 interior kits and assumed they were printed.
I am shocked that good pilots are so scarce in this scale.
02-17-2016, 05:52 PM
#55

Thread Starter
I am assembling a VQ Dauntless AND going with my 9303 also!
I'm having a lot of trouble getting the air brakes to be activated by flaps, or the flaps activating the brakes.
I can can get the flaps to work on Ch 6 and the brakes on Aux 2. I programmed the "Px-6" to have Aux 2 as Master and Flaps as slave....but when I flip the Aux2 switch, only the brakes move!
Help!
Jerry
I'm having a lot of trouble getting the air brakes to be activated by flaps, or the flaps activating the brakes.
I can can get the flaps to work on Ch 6 and the brakes on Aux 2. I programmed the "Px-6" to have Aux 2 as Master and Flaps as slave....but when I flip the Aux2 switch, only the brakes move!
Help!
Jerry
I have my radio set up this way:
Mix-6
Aux2 to flap
Pos0 69%
100%
Pos1 +100%
+125%
Offset- 90
Of course, these setting have to be fine tuned for your plane.
Last edited by chistech; 02-17-2016 at 05:56 PM.
 02-19-2016, 07:33 PM
#59
Thread Starter
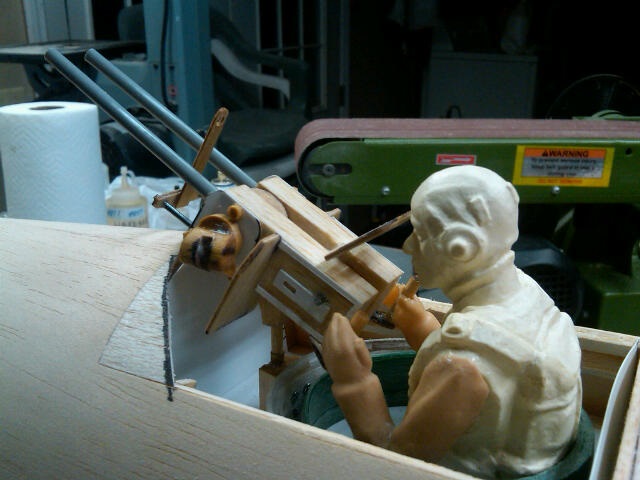
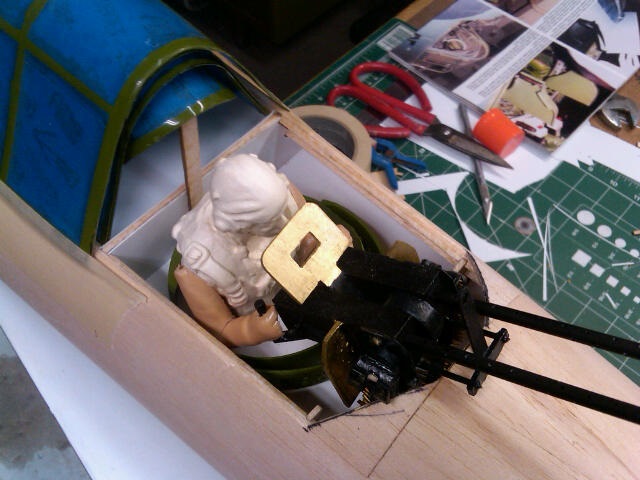
Putting more detail on the guns. Added some plastic edges, gun sides, cocking knobs, ammo chutes, forward gun sight, ammo belt, and then painted it. Needs some work but coming along. Will make up a rear sight out of very fine brass wire, a ring of brass tube drilled and the wire run through to make cross hairs.

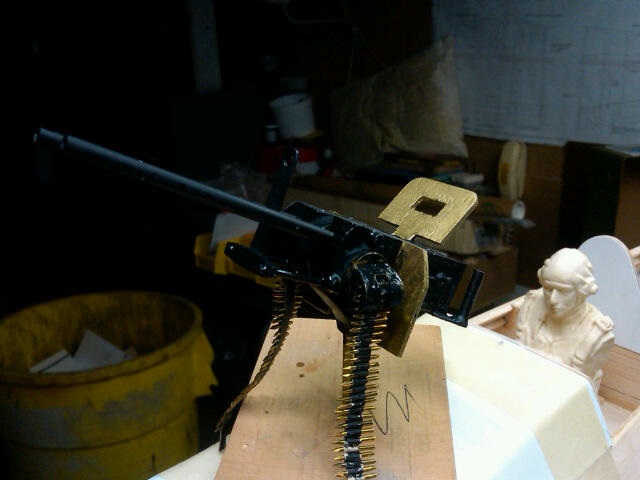
Recoil rods and front sight (?) attached. Ammo chutes and gun frame highlights.
Another view.
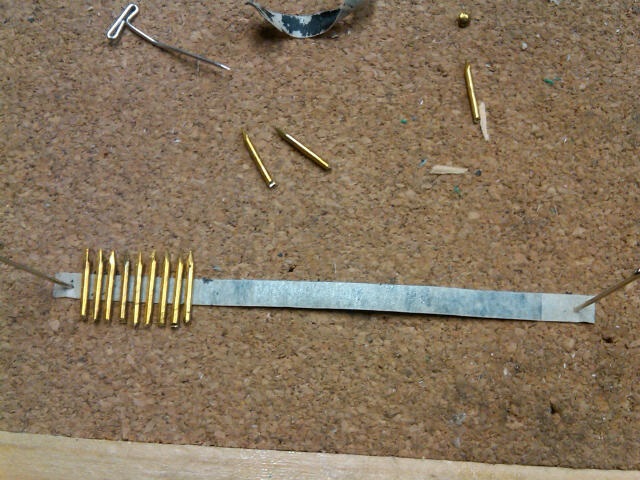
Small brass brads with the head cut off put on a piece of masking tape.
Wanted to post a picture of the completed ammo belt but it's a little too big.
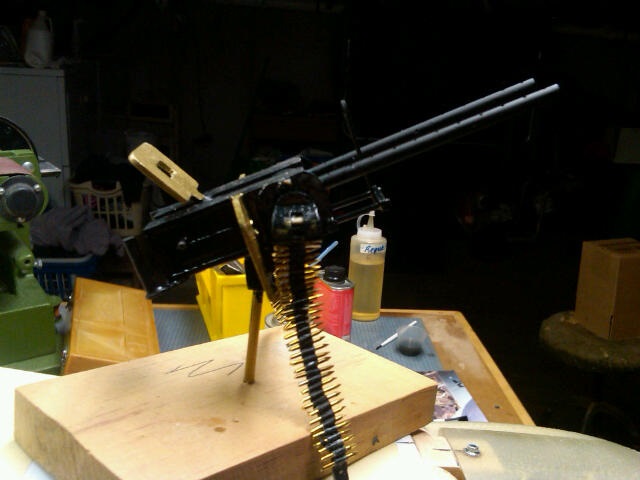
Here's the ammo belt attached to the ammo chutes. Once the belts are situated in the plane they'll get thin CA'd to stiffen them up and secure the bullets in the belt.
I used colors on the gun that I saw in the Signal Squadron book. Some guns are black with the fuse color on parts and others were the same with brass colored armor plates.
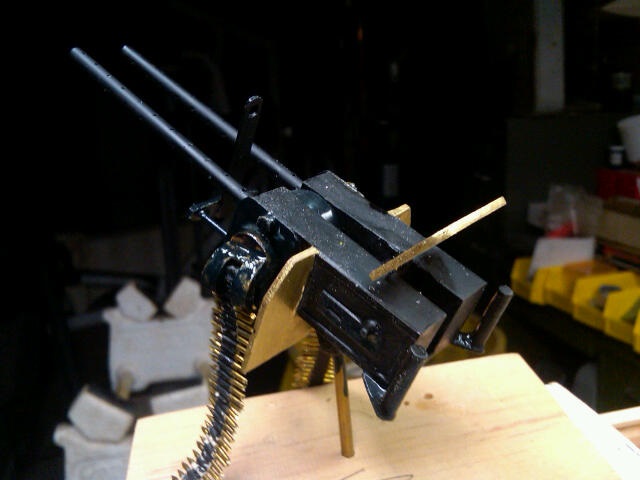
Doesn't look have bad.
Recoil rods and front sight (?) attached. Ammo chutes and gun frame highlights.
Another view.
Small brass brads with the head cut off put on a piece of masking tape.
Wanted to post a picture of the completed ammo belt but it's a little too big.
Here's the ammo belt attached to the ammo chutes. Once the belts are situated in the plane they'll get thin CA'd to stiffen them up and secure the bullets in the belt.
I used colors on the gun that I saw in the Signal Squadron book. Some guns are black with the fuse color on parts and others were the same with brass colored armor plates.
Doesn't look have bad.
02-26-2016, 07:20 AM
#64
Thread Starter
Going to be getting some glassing done and waiting on some styrene sheeting to come in so I can finish up the cockpits. Been doing the tedious masking and painting of the canopies on the inside. Always happy when this part is done!
02-26-2016, 08:44 PM
#66
Thread Starter
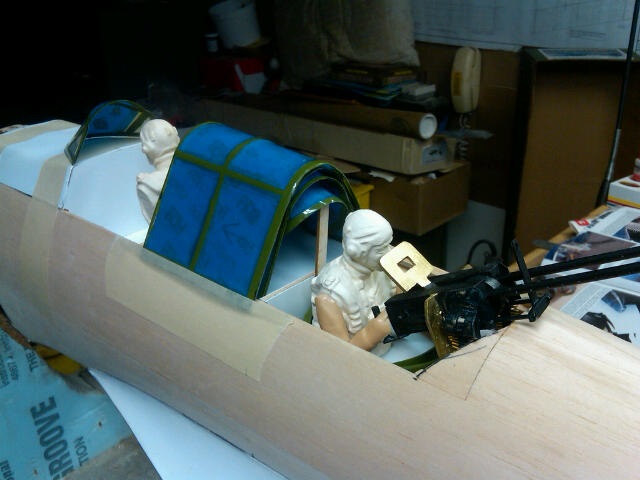
My styrene sheets arrived today and I started covering up all the areas in the cockpits and radio deck area. Using all the sprue sheets left over after the bulkheads were removed made for perfect tracing on the styrene. Ended up taking the canopy pieces and trying them out in the stowed position. I put the second canopy inside the gunnel on the top of the radio deck, the next one inside that, then the rear most section inside that. I used a small piece of balsa to hold it up in the prototypical position. The front main section of canopy I taped to the outside of the fuse over the radio deck. I believe this is probably the best way of stowing the canopies when I go glue them up. Of course, they need the outer frames painted up yet and the deck needs more details. Just trying to figure out how to get it done the best way. Still have to make the ammo boxes to put the belts into at the twin .30's.
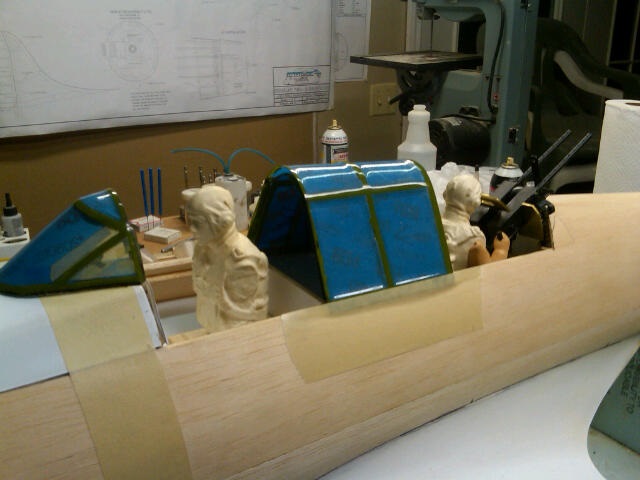
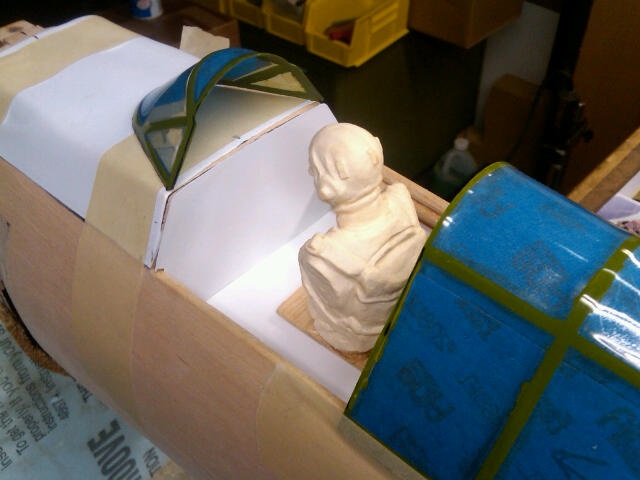
Windscreen just sitting on the top with the main canopy taped over the radio deck.
View from the rear with the rest of the canopies in the stowed position. The balsa stick holding the rear canopy is only temporary of course. With all but the main canopy on the inside of the gunnel, the separation of the canopies actually looks pretty good compared with pictures I've seen.
Plenty of .010 styrene down. I brought the front piece right up and flush with the top of the front deck. Once the fuse is glassed and the deck glued down, then this front piece and instrument panel will be glued in.
More styrene strips to be glued in yet over the top of the bulkheads, some radio boxes and antenna to be put in yet. Need to put in the ammo boxes along the back of the gunner's cockpit. Also need to make the pilot's headrest and armor plate framing.
02-28-2016, 10:12 PM
#69
Thread Starter
Didn't take many pictures but glassing has begun. Gotten about 1/3 of the air frame glassed in the last couple days. We use the West Systems resin and the credit card/heat gun technique. Hope to have it glassed completely before the end of the week.
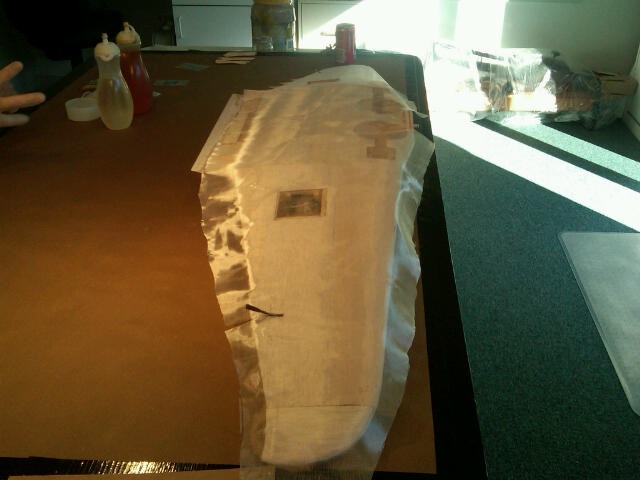
Only picture I took. Glass had just been laid out and hadn't even started putting the resin down.
Only picture I took. Glass had just been laid out and hadn't even started putting the resin down.
 03-02-2016, 06:25 PM
#71
Thread Starter
How you doing Fred. I love the old Goats. A good friend of my sister has owned his since high school. I think it's a 69'. I'm pretty sure it's also a 389, 4 speed. My sister and he graduated in 73' so he's pretty much owned it since new. It's maroon with a black vinyl roof. It's beautiful. Congrats on yours and hope you enjoy every minute. I just put all my kits together these past few days and realize I might not have enough time to get to them all. I have a few unique and valuable ones that I might sell instead of building like an original Marutaka Rufe and a Pilot Lake Buccaneer. I actually bought a new issue Tangiku kit of the Rufe. They are a Japanese made kit that is basically updated Marutaka kits, so I can sell the Marutaka and still have my Rufe. As you know I like the .50 size kits so what I have is basically all the good old kits I can find in that size. I have a bunch of Jemcos on the right in the picture, more Tangiku ones in the middle, and other old Marutakas on the left. There's about 15 kits and 3 ARF's in total right now. The only reason I have the ARF's is two of them are the ultra rare and great flying Kyosho Zero's with the fiberglass fuse. They bring at least $300 for a .50 ARF, it's pretty crazy.
05-05-2016, 04:09 PM
#74
Thread Starter
Been doing a few days here and there getting the glassing done. My buddy Gerry has also been doing a lot on it in between his working. Everything has been glassed and just one lower wing panel to get the second coat of resin. Today Gerry and I got the rest of the air frame all sanded. Once the last panel is resined, then sanded, the whole thing gets inspected and marked off for any areas needing additional attention before priming. Any low or dinged areas will get bondo filled then again sanded. Then it will be ready for primer. Both of us has so much going on that we only touch this during the week and when there's time for us to hook up.
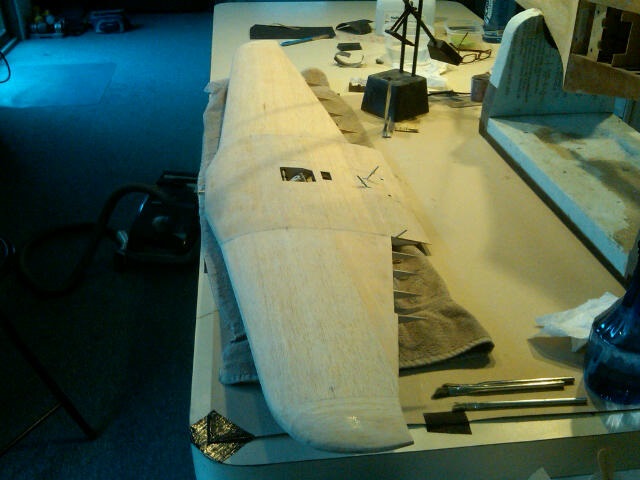
Wing is completely sanded on the top just waiting for any low spots to get attention before priming.
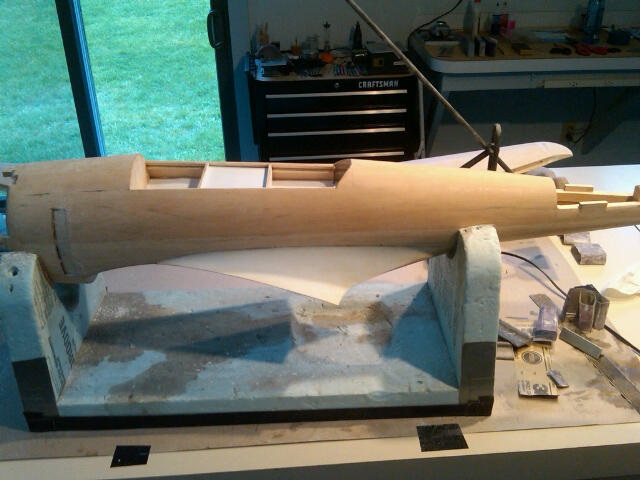
Fuse is all glassed and sanded. Not to many areas needing attention. Going to put in the hand/foot holds.
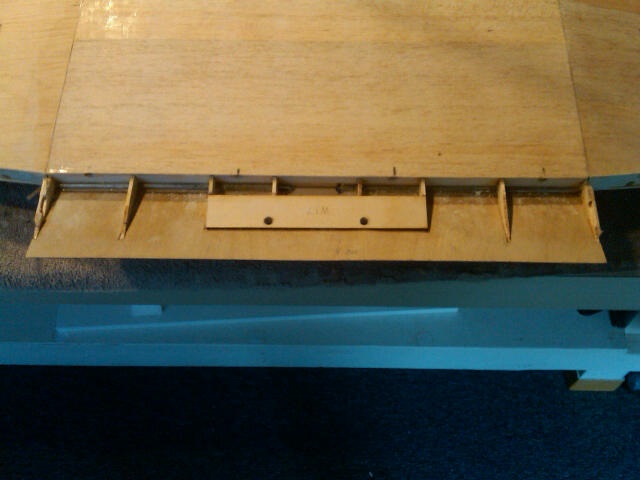
One area that needs attention is the thin balsa trailing edge of the top sheeting. Gerry came up with a great idea of epoxying in a piece of 1/64 ply with the grain running across the grain of the sheeting. It was clamped between two thick, straight pieces of wood to keep it nice and straight. Once dry, the back edge was tapered to match the flap's tapered edge. This is super solid and nice now.
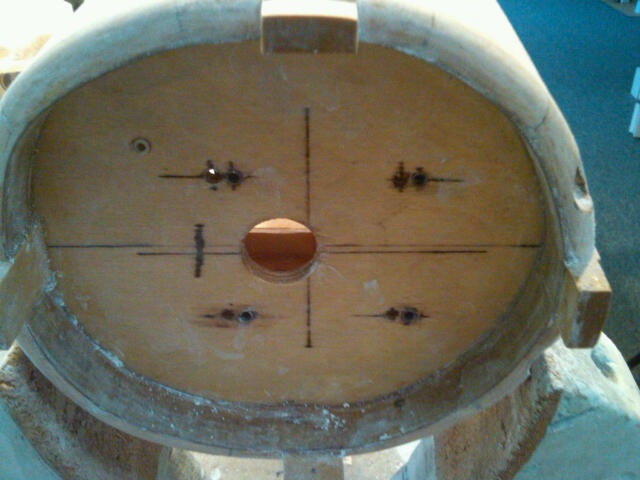
Again, Gerry saw a problem area and had a great solution. At the front of the fuse, the design on the plans creates a "catch-all" for any fuel residue and debris. Another ring of 1/64th ply epoxied down sealed this whole area. Much better than designed.
Wing is completely sanded on the top just waiting for any low spots to get attention before priming.
Fuse is all glassed and sanded. Not to many areas needing attention. Going to put in the hand/foot holds.
One area that needs attention is the thin balsa trailing edge of the top sheeting. Gerry came up with a great idea of epoxying in a piece of 1/64 ply with the grain running across the grain of the sheeting. It was clamped between two thick, straight pieces of wood to keep it nice and straight. Once dry, the back edge was tapered to match the flap's tapered edge. This is super solid and nice now.
Again, Gerry saw a problem area and had a great solution. At the front of the fuse, the design on the plans creates a "catch-all" for any fuel residue and debris. Another ring of 1/64th ply epoxied down sealed this whole area. Much better than designed.
09-12-2016, 09:14 AM
#75
Junior Member
Join Date: Feb 2007
Location: Interlochen, MI
Posts: 5
Likes: 0
Received 0 Likes
on
0 Posts
I found your reference to this thread on RC Groups and came on over to have a look at your build. A Skyshark Dauntless kit is sitting on the shelf in my shop. You have made a lot of progress with your Dauntless and I will be reading the entire build log; that is unless I get stopped again at the photos of your Oldsmobile and Chevy! Kind regards.
Soft landings,
Joe
Soft landings,
Joe