


ESM Focke Wulf FW-190 Model Airplane ARF
 02-25-2016, 11:46 AM
#1

Thread Starter
Join Date: May 2003
Location: GIBRALTAR (Europe) GX11 1AA
Posts: 286
Likes: 0
Received 0 Likes
on
0 Posts
Hi All I am going to build an
ESM Focke Wulf FW-190 Model Airplane ARF
[TABLE]
[TR]
[TD]Wing span (spanwijdte)[/TD]
[TD] 1800 mm [/TD]
[TD] 70.9"[/TD]
[/TR]
[TR]
[TD] Length[/TD]
[TD] 1449 mm[/TD]
[TD] 57"[/TD]
[/TR]
[TR]
[TD] Flying weight[/TD]
[TD] 5.8 kg [/TD]
[TD] 12.8 lbs [/TD]
[/TR]
[TR]
[TD] Radio[/TD]
[TD="colspan: 2"] 6 channels, 8 servos [/TD]
[/TR]
[TR]
[TD] Engine Gas (benzine)[/TD]
[TD="colspan: 2"] 30cc - 35cc[/TD]
[/TR]
[TR]
[TD] Engine Glow (gloeiplug)[/TD]
[TD="colspan: 2"] 20cc 4-cycle (1.20)
[/TD]
[/TR]
[TR]
[TD][/TD]
[TD="colspan: 2"][/TD]
[/TR]
[/TABLE]
[TABLE="width: 436"]
[TR]
[TD]Wing area[/TD]
[TD="colspan: 2"] 56.1 dm2[/TD]
[TD] 6 sq.ft[/TD]
[/TR]
[TR]
[TD] Wing loading[/TD]
[TD="colspan: 2"] 103.4 gr/dm2 [/TD]
[TD] 33.7 oz/sq.ft [/TD]
[/TR]
[TR]
[TD] Radio[/TD]
[TD="colspan: 3"] 6 channels, 8 servos (throttle, rudder,
elevator, 2 aileron, 2 flaps, retract) [/TD]
[/TR]
[TR]
[TD] Engine Brushless (elektro)[/TD]
[TD="colspan: 3"] Brushless: FC6362 ~2 kW[/TD]
[/TR]
[TR]
[TD] Options[/TD]
[TD="colspan: 3"] Two wheel retract system[/TD]
[/TR]
[TR]
[TD] Documentation[/TD]
[TD="colspan: 3"] Instruction Manual[/TD]
[/TR]
[TR]
[TD] Manufacturers website[/TD]
[TD="colspan: 3"] ESM-Website[/TD]
[/TR]
[/TABLE]
I have been browsing the net and i have not seen any review or build of her,
she is quite a nice looking model let's see how many challenges i come across.
 02-25-2016, 11:50 AM
#2
Thread Starter
Join Date: May 2003
Location: GIBRALTAR (Europe) GX11 1AA
Posts: 286
Likes: 0
Received 0 Likes
on
0 Posts
Hi a gain here you have the link where the model came from.
http://www.bigplanes.nl/contents/en-...uig-plane.html
Well not really as we bought this one at TB Models in Spain.
http://www.tb-model.com/es/95-esm-warbirds

http://www.bigplanes.nl/contents/en-...uig-plane.html
Well not really as we bought this one at TB Models in Spain.
http://www.tb-model.com/es/95-esm-warbirds
Last edited by Francis L M; 02-25-2016 at 11:59 AM.
02-25-2016, 07:19 PM
#4
My Feedback: (13)
not sure if you have seen this its a massive thread on this plane http://www.rcuniverse.com/forum/rc-w...ld-thread.html its gotten a bit old and dead, but its worth a read just for the information.
02-26-2016, 01:39 AM
#5
Thread Starter
Join Date: May 2003
Location: GIBRALTAR (Europe) GX11 1AA
Posts: 286
Likes: 0
Received 0 Likes
on
0 Posts
Hi Bigtim
Hey thanks for the information.
I have been reading through the thread and that model is completely different,
they look very alike but the wing is totally different and even the control links clevis and even the
way this FW190 wing has been designed.
Thinking it would come from more or less the same place she would be constructed the same way
but that is not the case.
Don't know if there is any other threads or people out there that have built this model?
We will try our best to place all the information about the build.
02-26-2016, 10:06 AM
#7
Thread Starter
Join Date: May 2003
Location: GIBRALTAR (Europe) GX11 1AA
Posts: 286
Likes: 0
Received 0 Likes
on
0 Posts
Just going to start by gluing the two wings half's together.
What a surprise the wing dowels have been drilled out, so i have had to rill the lining dowels with a template provided.

What a surprise the wing dowels have been drilled out, so i have had to rill the lining dowels with a template provided.
02-26-2016, 10:22 AM
#8
Thread Starter
Join Date: May 2003
Location: GIBRALTAR (Europe) GX11 1AA
Posts: 286
Likes: 0
Received 0 Likes
on
0 Posts
Having build the AMD FW190 before i have realized what this company have done,
What i can see going through all the kit and the parts in the box, It's quite clear that they have either copied the AMD or just simply bought out all there stock and updated the kit, they have just changed the wing from a foam wing to a buildup ribbed wing and the elevators again they have just changed from a flat balsa to an airfoil shape tail plane.
When i removed the ailerons from the wing they had the bullet hole from the other wing and they have inserted miler hinges, so what they have done here is just use the ailerons from the foam wing.
Here you have a picture of the AMD FW190.
02-26-2016, 01:06 PM
#10
Thread Starter
Join Date: May 2003
Location: GIBRALTAR (Europe) GX11 1AA
Posts: 286
Likes: 0
Received 0 Likes
on
0 Posts
here you have the wing as you can see they have added miler hinges and on the aileron
you can see the hole of the bullets hinges.


Don't know why?
you can see the hole of the bullets hinges.
Don't know why?
02-27-2016, 03:53 PM
#12
Thread Starter
Join Date: May 2003
Location: GIBRALTAR (Europe) GX11 1AA
Posts: 286
Likes: 0
Received 0 Likes
on
0 Posts
Well i don't know you but you can clearly see the difference
The KMP/YT has the belly pan all ready part of the wing.

But in the case of my ESM doesn't have the belly pan.
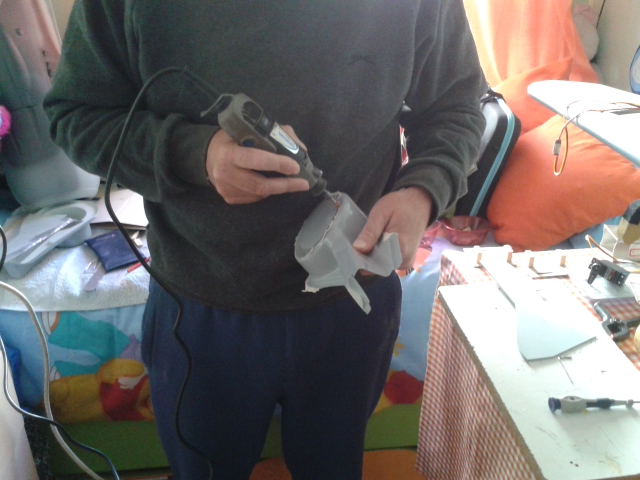
It has a little yellow fiber glass molding just to cover the leading edge of the wing so it pairs of with the trailing edge of the cowl.


Don't know why but they have done it wrong.
looks great on the video demo when they are introducing the model but this is not the case when you can clearly see the difference.
The KMP/YT has the belly pan all ready part of the wing.
But in the case of my ESM doesn't have the belly pan.
It has a little yellow fiber glass molding just to cover the leading edge of the wing so it pairs of with the trailing edge of the cowl.
Don't know why but they have done it wrong.
looks great on the video demo when they are introducing the model but this is not the case when you can clearly see the difference.
02-27-2016, 08:38 PM
#13
My Feedback: (24)
The KMP/YT was made by ESM. KMP was the North American distributor, YT Europe, and sold under the KMP name here, guess the YT in Europe. Not an expert here, but ESM decided to make the kits with built up, covered wings and sell under the ESM name with different distributors. Under the KMP name, many of their models had composite wings, which is what those in the picture look like. I think the QC and finish may have been better on the KMP than they are now.
That other thread (as a few of the other threads) started as KMP build, and continued on once the ESM version came along
My comment was in regards to the picture you posted. It looks just like the ESM FW I have sitting downstairs. There is a lot of info in the other thread for your plane, but a new warbird thread is always welcome
02-28-2016, 05:26 AM
#14
Thread Starter
Join Date: May 2003
Location: GIBRALTAR (Europe) GX11 1AA
Posts: 286
Likes: 0
Received 0 Likes
on
0 Posts
Hey Thanks for all the info.
It's a great pity for such a nice model and the time they have put into the painting and the construction of the wing, that they have left out little miner details, also the fact that when i come to start fitting the wing to the fuselage i am going to get the same issue as the AMD, as they have not even bothered to add the dowels holes to the leading edge of the wing, just a simple thing for them to do when they redesigned the wing on the pc software.
I am just trying to point out the luck of consideration to the modeler when this is a big issue, i feel that the alignment of the leading edge of the wing to the fuselage is paramount for the model to fly correctly.
I hope you agree on this point.
When it come to point of the assembly of the wing i will try my best to illustrate it.
And again thanks for the information as every little thing helps which that's what this is all about i suppose helping and informing others.
02-28-2016, 05:36 AM
#15
Thread Starter
Join Date: May 2003
Location: GIBRALTAR (Europe) GX11 1AA
Posts: 286
Likes: 0
Received 0 Likes
on
0 Posts
I just starting the installation of the retract on the right wing, due to the difference shape and size of the electric retracts, I have had to make some wood mounting plates to accommodate the retract, as you can see on the picture i have cut out the location of the wheel well to install the plastic cover.


02-28-2016, 05:42 AM
#16
Thread Starter
Join Date: May 2003
Location: GIBRALTAR (Europe) GX11 1AA
Posts: 286
Likes: 0
Received 0 Likes
on
0 Posts
Here you can see the ply wood parts needed to accommodate the electrical retract,


I have installed it with a few screws just to do a few pre run test before epoxying all the parts.


I have installed it with a few screws just to do a few pre run test before epoxying all the parts.
02-28-2016, 05:47 AM
#17
Thread Starter
Join Date: May 2003
Location: GIBRALTAR (Europe) GX11 1AA
Posts: 286
Likes: 0
Received 0 Likes
on
0 Posts
I have temporary installed the wheel cover just to see how it fit's and the operation of the retract with wheel just for the clearance.
look really cool.


look really cool.
02-28-2016, 06:27 AM
#18
Thread Starter
Join Date: May 2003
Location: GIBRALTAR (Europe) GX11 1AA
Posts: 286
Likes: 0
Received 0 Likes
on
0 Posts
Here you have a little video of the retract in operation.
https://youtu.be/wfWcurPAaM0 https://youtu.be/09dXzcJ3v0o Enjoy.

https://youtu.be/wfWcurPAaM0 https://youtu.be/09dXzcJ3v0o Enjoy.
03-02-2016, 01:53 AM
#20
Thread Starter
Join Date: May 2003
Location: GIBRALTAR (Europe) GX11 1AA
Posts: 286
Likes: 0
Received 0 Likes
on
0 Posts
I have cut out the under side of the wheel well, because when the the retract comes down the main wheel hits the bottom of the wheel well, the cause of this due to the fact that the wheel well has been molded at an angle you can clearly see it in the picture.


03-02-2016, 02:26 AM
#21
Thread Starter
Join Date: May 2003
Location: GIBRALTAR (Europe) GX11 1AA
Posts: 286
Likes: 0
Received 0 Likes
on
0 Posts
Fixing the Ailerons and flaps it's quite strait forward, Just mix 5 min epoxy and glue the wooden blocks to the servo covers and job done.


Just a mutter of installing it to the model.
Just a mutter of installing it to the model.
03-02-2016, 02:33 AM
#22
Thread Starter
Join Date: May 2003
Location: GIBRALTAR (Europe) GX11 1AA
Posts: 286
Likes: 0
Received 0 Likes
on
0 Posts
Screwing the servo to the servo mount, then just add it to the wing mounting.
I have aliened the servo rod to the flap to make the drill hole for the control horns, I have had to cut out the flap to accomodate the bolt and washer.


I have aliened the servo rod to the flap to make the drill hole for the control horns, I have had to cut out the flap to accomodate the bolt and washer.
03-02-2016, 02:38 AM
#23
Thread Starter
Join Date: May 2003
Location: GIBRALTAR (Europe) GX11 1AA
Posts: 286
Likes: 0
Received 0 Likes
on
0 Posts
Just do more or less the same thing to the aileron, glued the miler hinges to the wing then to the aileron drill the bolts through, screw on the nylon nuts and install the the control horns.


03-02-2016, 05:47 AM
#25
Thread Starter
Join Date: May 2003
Location: GIBRALTAR (Europe) GX11 1AA
Posts: 286
Likes: 0
Received 0 Likes
on
0 Posts
Hi all again,
Here we go installing the wing to the fuselage.
Well i have gone through the manual and things done not look promising, so i have decided to do it my way,
where did i here that before?
Here are the only two pictures explaining how great stuff.


Here we go installing the wing to the fuselage.
Well i have gone through the manual and things done not look promising, so i have decided to do it my way,
where did i here that before?
Here are the only two pictures explaining how great stuff.