


All New 1/10 scale B-17 from Century Jet Models! WOW.....
 05-08-2016, 05:54 PM
#1

Thread Starter
My Feedback: (139)
Join Date: Jan 2002
Location: Lexington , KY
Posts: 869
Likes: 0
Received 0 Likes
on
0 Posts
I love B-17s and when I had the opportunity to build this all composite beauty, I just had to. This thing comes out of the box super nice. All panels, rivets, hatches, etc. are already in the mold. I was very surprised to see how light the thing was. The Fuse. was only 4.5lbs and each wing was 5.5lbs! So far everything fits nice and I am way excited to finish and fly this bird.
The cool part is that you can add modifications and choose which B-17 you want. There are two different nose sections, two different rear gunner sections, two top turret selections, as well as bombs, working turrets, nav. position.and landing lights, as well as actually "shooting" .50 cals! You basically buy the kit, then add whatever you want. I decided to go all out and modify mine with EVERYTHING!
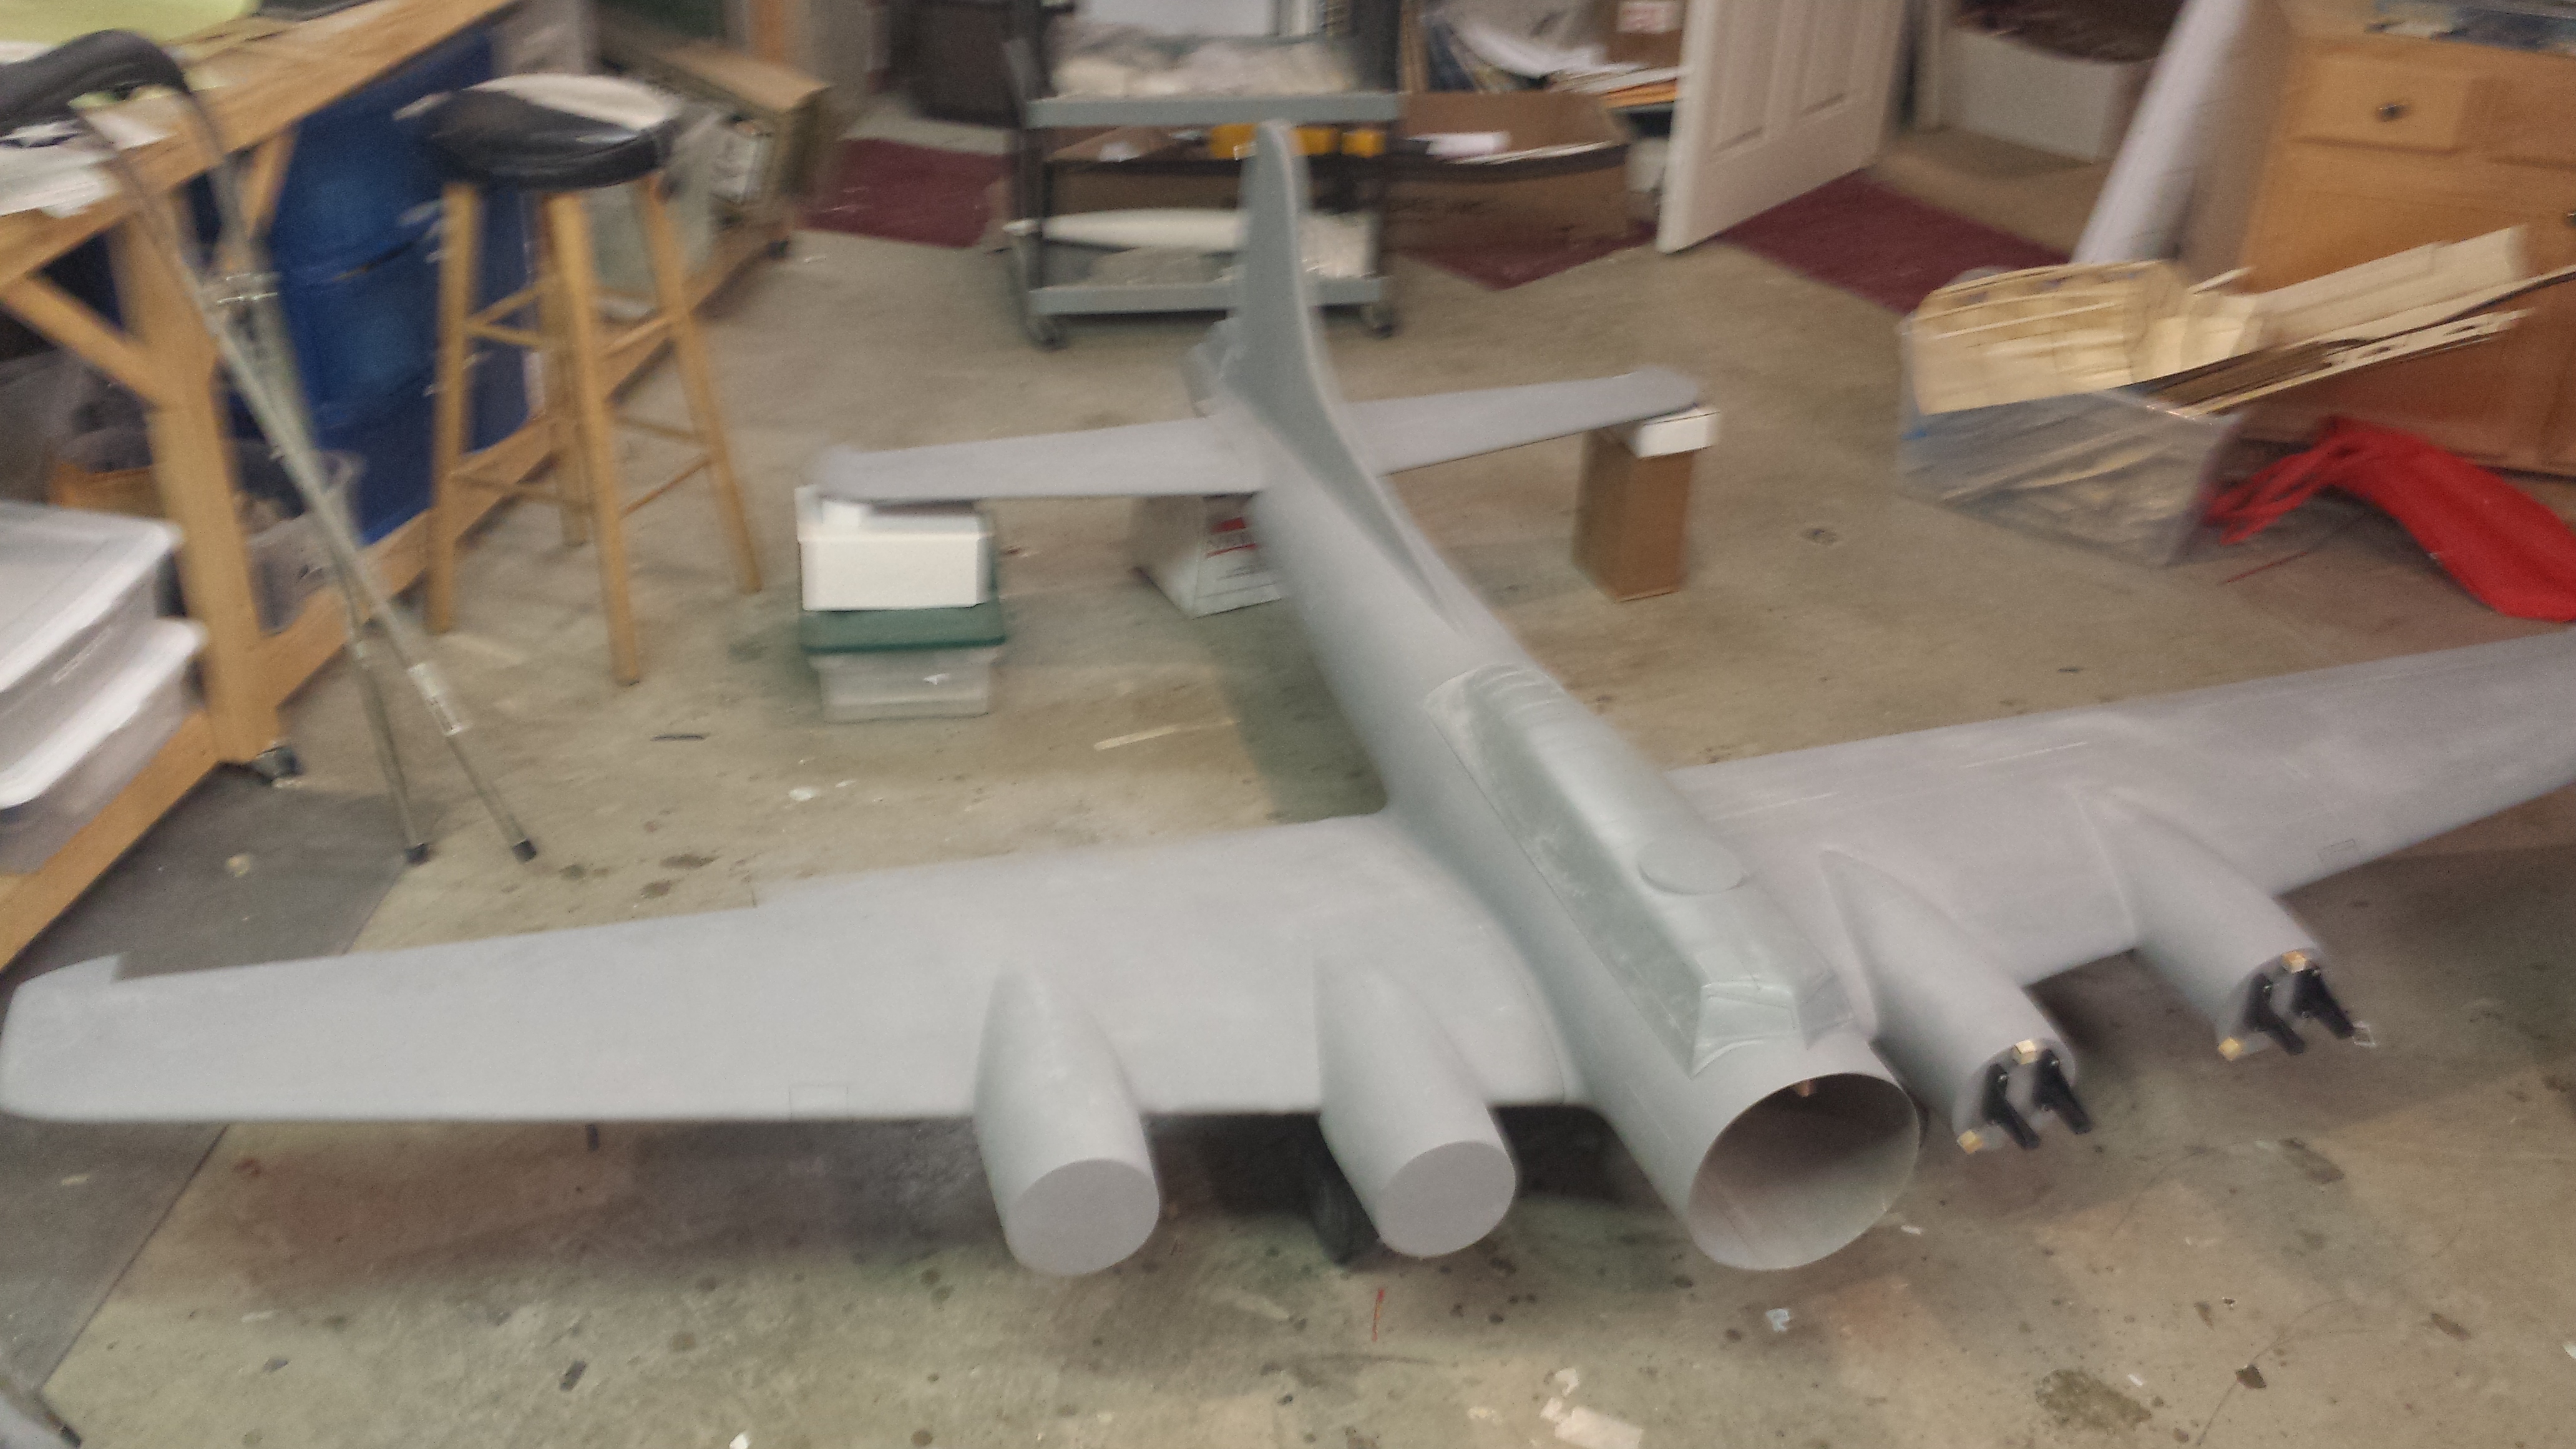
The first thing I wanted to do was to get the landing gear installed and place the plane on its wings. The wings slide into either side of the fuselage with two spars that are "tongue and groove" set up. The plane's cockpit area comes up as a large hatch for you to get into everything. Some B-17s have you go through the Bombay doors, but this is much easier. Within 1 hour, I had the airplane setting on its gear!


The cool part is that you can add modifications and choose which B-17 you want. There are two different nose sections, two different rear gunner sections, two top turret selections, as well as bombs, working turrets, nav. position.and landing lights, as well as actually "shooting" .50 cals! You basically buy the kit, then add whatever you want. I decided to go all out and modify mine with EVERYTHING!
The first thing I wanted to do was to get the landing gear installed and place the plane on its wings. The wings slide into either side of the fuselage with two spars that are "tongue and groove" set up. The plane's cockpit area comes up as a large hatch for you to get into everything. Some B-17s have you go through the Bombay doors, but this is much easier. Within 1 hour, I had the airplane setting on its gear!
 05-08-2016, 05:59 PM
#2
Thread Starter
My Feedback: (139)
Join Date: Jan 2002
Location: Lexington , KY
Posts: 869
Likes: 0
Received 0 Likes
on
0 Posts
Here are the basic specs for the plane:
1/9.85 Scale Wing Span: 126.65” Wing Area: 2000+ sq. in Length: 91.0”
Four Eevolution 15 Engines Cowl Width: 5 1/2” Weight of Empty Basic Kit: Approx. 35 pounds
You can also get more information here: http://centuryjet.com/shop/airplane-...t/boeing-b-17/
1/9.85 Scale Wing Span: 126.65” Wing Area: 2000+ sq. in Length: 91.0”
Four Eevolution 15 Engines Cowl Width: 5 1/2” Weight of Empty Basic Kit: Approx. 35 pounds
You can also get more information here: http://centuryjet.com/shop/airplane-...t/boeing-b-17/
05-09-2016, 06:49 AM
#3
Thread Starter
My Feedback: (139)
Join Date: Jan 2002
Location: Lexington , KY
Posts: 869
Likes: 0
Received 0 Likes
on
0 Posts
I decided after getting the main gear on, I wanted to see how she would set on the tail gear. This was easily achieved because the former wasn't installed. I basically slid the tail gear in place and screwed it in with the included 4x40 hardware. Then, after it was installed, I tack glued the former in place. When I was happy with the location and fit, I used hysol to hold it forever!


05-09-2016, 04:52 PM
#4
Thread Starter
My Feedback: (139)
Join Date: Jan 2002
Location: Lexington , KY
Posts: 869
Likes: 0
Received 0 Likes
on
0 Posts
The next thing I wanted to accomplish was to glue the stab to the fuse. The stab has a spar that you simply slide into place and hysol or epoxy to a bulkhead as well as screw it in place. I did not want any seam so I decided, once the stab was glued into place, to use some putty and sand down. This way the stab looks like part of the plane.


05-11-2016, 06:07 AM
#7
Thread Starter
My Feedback: (139)
Join Date: Jan 2002
Location: Lexington , KY
Posts: 869
Likes: 0
Received 0 Likes
on
0 Posts
Thanks Guys,
Its been a lot of fun building this. I decided seeing the weather was good, to take the plane out for some pictures. I chose the Memphis Bell nose on mine. Plus, you can see the size comparison up against me!


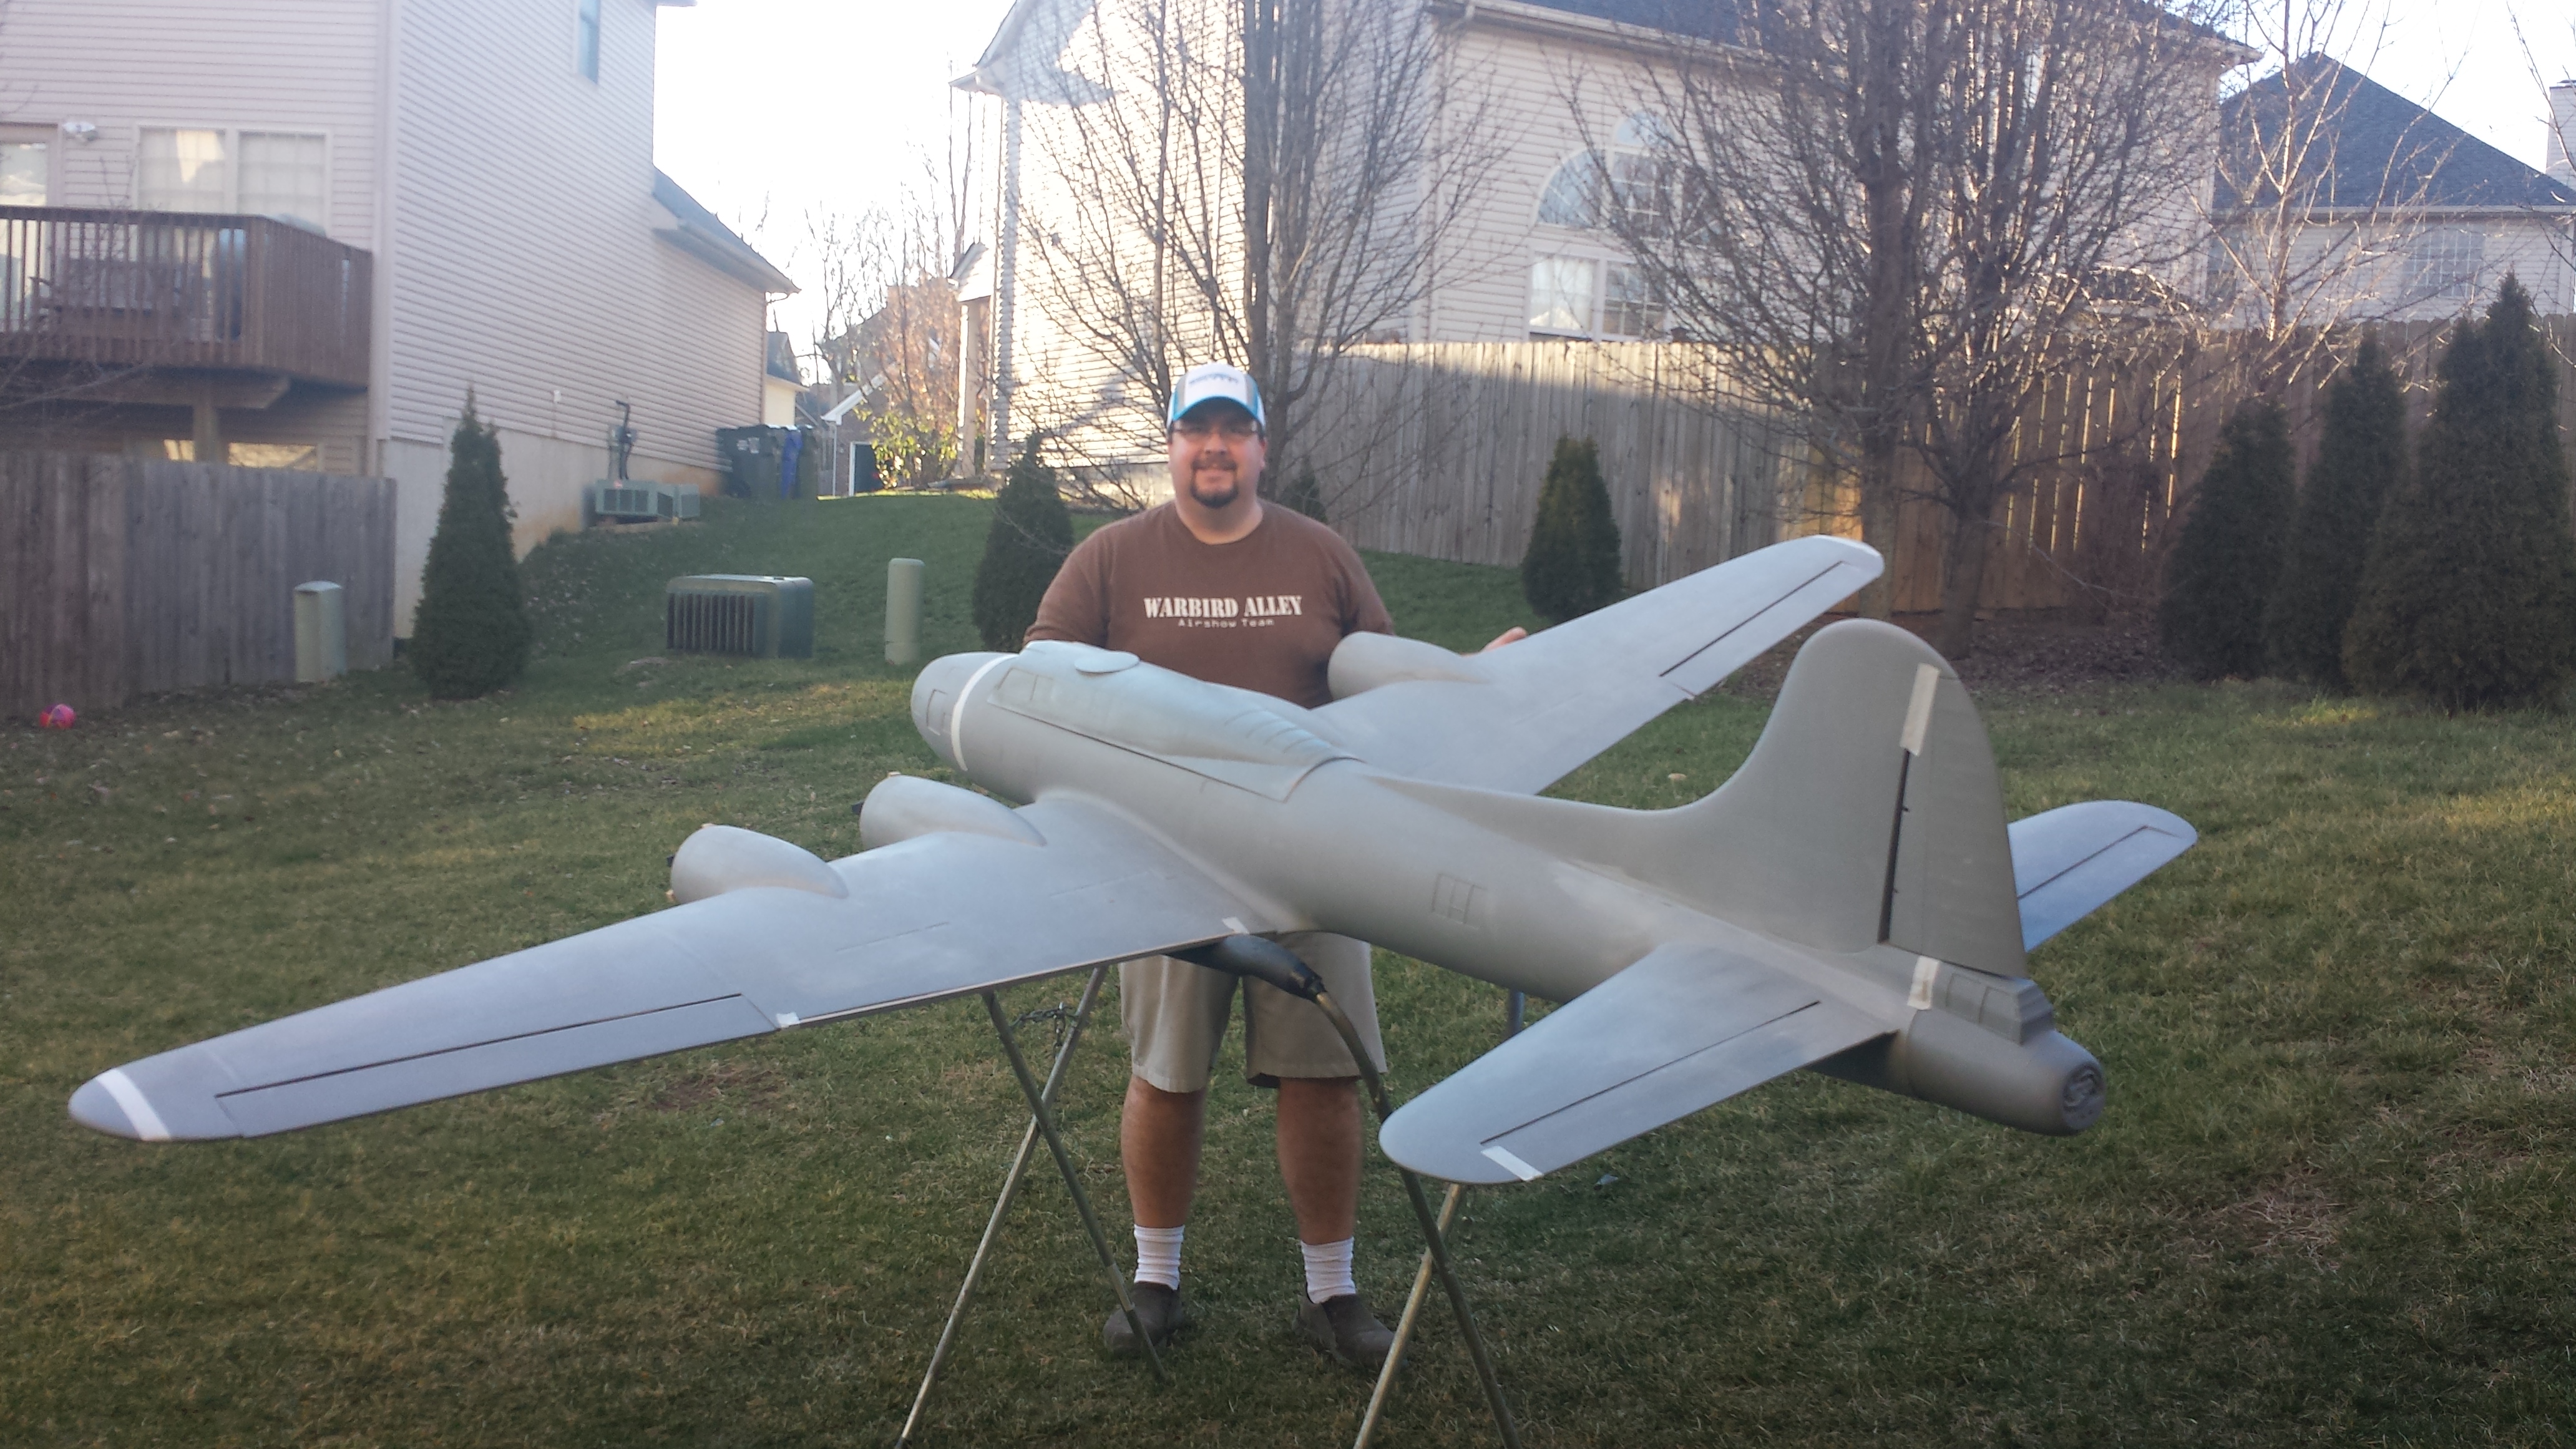
Its been a lot of fun building this. I decided seeing the weather was good, to take the plane out for some pictures. I chose the Memphis Bell nose on mine. Plus, you can see the size comparison up against me!
05-11-2016, 10:09 AM
#8
My Feedback: (2)
Looks like decent size. I'd like to know the weight as it sits now. It'd be good to see how the weight increases at various stages. I fly a Don Smith B-17 at 50lbs dry. But it's got a lot, brakes, smoke, landing lights, bomb drop, and animated guns. TONS of FUN when everything is right. I know a few people interested in this build.
Edwin
Edwin
05-12-2016, 09:42 AM
#11
My Feedback: (2)
Good choice. I plan on changing engines in my B-17 to the evo 15gx also. I get three flights to the gallon using saito 1.00's. I have two of the early muffler pressure 15gx and they run fine. I had thought about the dle20ra, but I already get rudder flutter at full throttle on the saito's so that would be pointless.
Edwin
Edwin
05-13-2016, 06:59 AM
#12
Thread Starter
My Feedback: (139)
Join Date: Jan 2002
Location: Lexington , KY
Posts: 869
Likes: 0
Received 0 Likes
on
0 Posts
Edwin,
I agree. In fact Peter Goldsmith and I were talking at Top Gun and he feels that even the Evo. .10s would work. However, with this set up, it actually will use the correct size 3 blade props and that will look awesome.
I wanted to take a few more pictures to show how nice everything fits. This IS a kit, not an ARF, but with that said, so much of the detail work is done. That is one reason why I love this idea so much. Now, they have two different tail gunner sections. The Memphis Bell had this one.
05-16-2016, 03:42 PM
#14
Thread Starter
My Feedback: (139)
Join Date: Jan 2002
Location: Lexington , KY
Posts: 869
Likes: 0
Received 0 Likes
on
0 Posts
Next was time to glue the nose section to the fuselage. Now, this piece, once glued makes a very small seam that isn't really noticeable, but because I have a "scale complex" I wanted everything to match as does the real one. So, with that said, I puttied, sanded, and formed to shape. Doing this, I would sand away some of the current panel lines. All I did was lay down 1/64 chart tape and paint over it with 3 coats of primer. Once the primer dries, I wet sand with 1200 grit sand paper then pull the tape up. The lines all matched perfect with a seamless nose!


05-18-2016, 05:17 PM
#16
Thread Starter
My Feedback: (139)
Join Date: Jan 2002
Location: Lexington , KY
Posts: 869
Likes: 0
Received 0 Likes
on
0 Posts
Mike, I'll look that up and get back to you.
I decided next to open the bomb bay area. There is a nice outline under the plane where you need to cut. Another really nice addition is the scale insert that is glued to the inside of the bomb bay. I also like how the bomb housing is scale and was all in place when I got the kit. The insert matched the curvature of the bomb bay door perfectly so it was very easy to glue into place. I really like the offset hinges that come with the bomb bay kit as well. 4 actuators on the leading edge and trailing edge is all that is needed and I have a working bomb bay door set up!


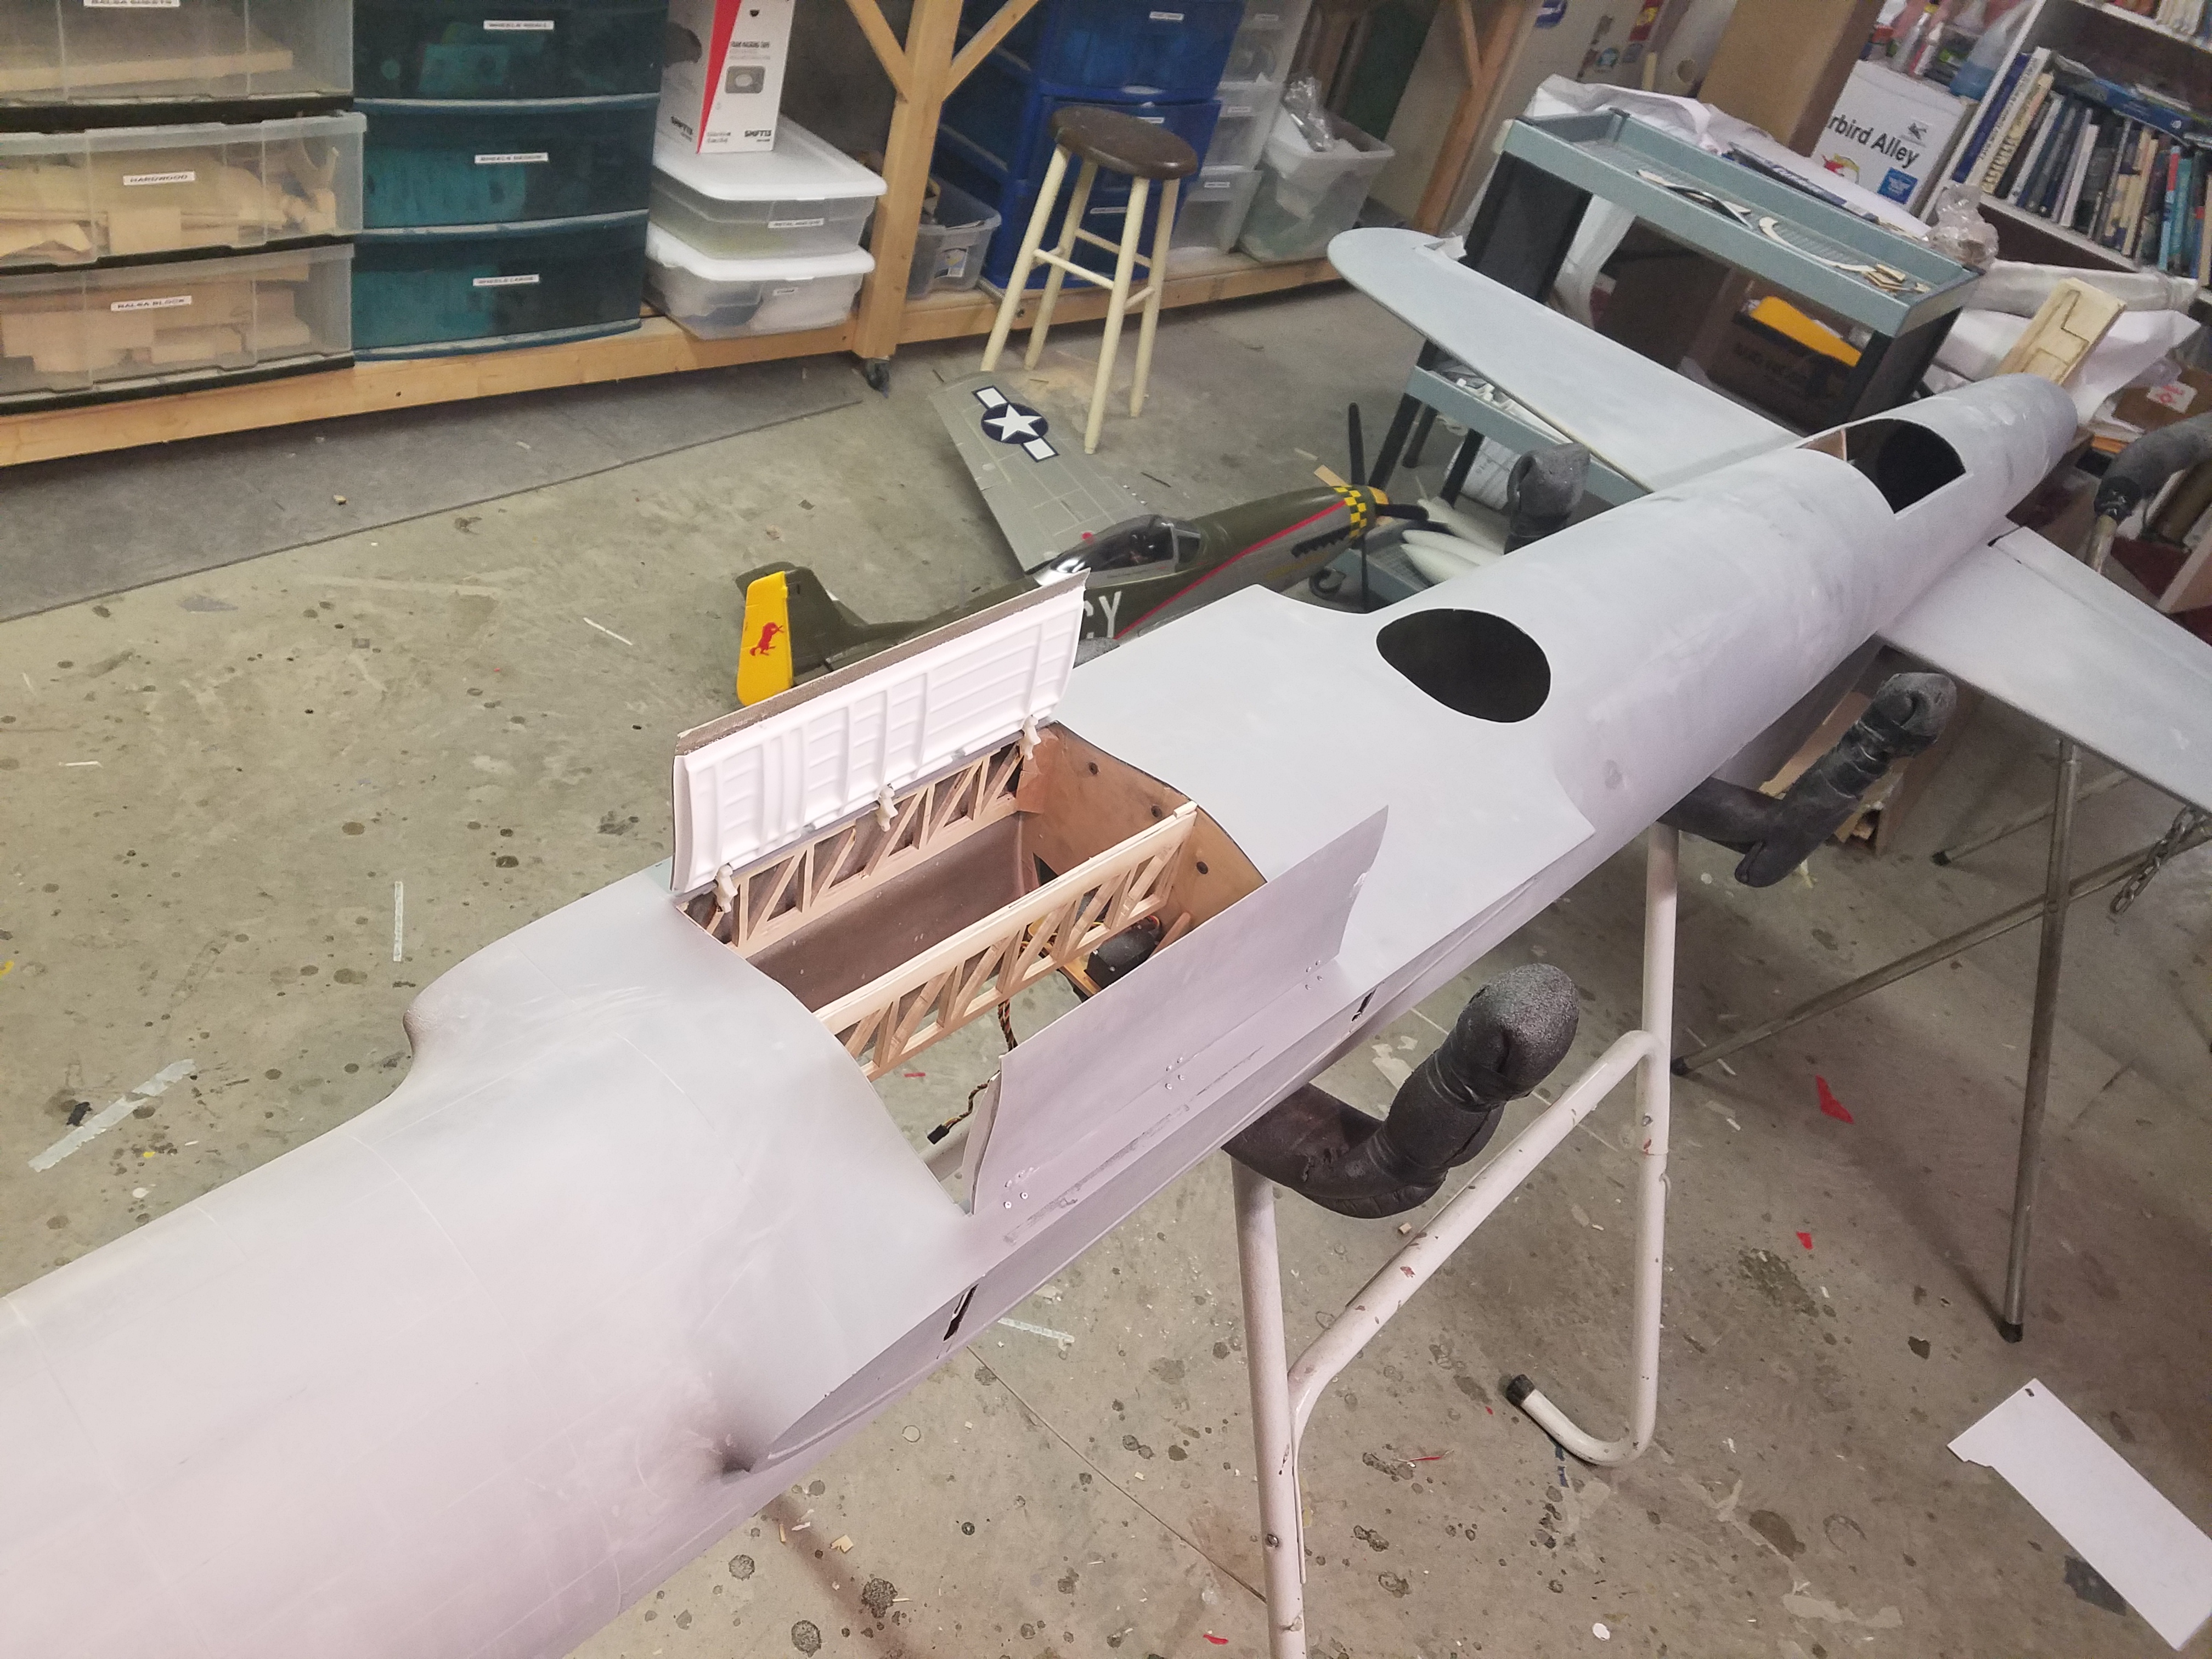

I decided next to open the bomb bay area. There is a nice outline under the plane where you need to cut. Another really nice addition is the scale insert that is glued to the inside of the bomb bay. I also like how the bomb housing is scale and was all in place when I got the kit. The insert matched the curvature of the bomb bay door perfectly so it was very easy to glue into place. I really like the offset hinges that come with the bomb bay kit as well. 4 actuators on the leading edge and trailing edge is all that is needed and I have a working bomb bay door set up!
05-25-2016, 06:28 AM
#18
Thread Starter
My Feedback: (139)
Join Date: Jan 2002
Location: Lexington , KY
Posts: 869
Likes: 0
Received 0 Likes
on
0 Posts
I do have some good news regarding the B-17. Sounds like CJM is now offering removable stabs for those who are interested. I was told that the stabs will slide in with a tongue and groove set up exactly like the main wing. That will be great for people who need the extra room. Setting on the gear without engines, the plane weighs a bit less than 24lbs! I was really surprised how light that was.
06-10-2016, 08:03 PM
#19
Thread Starter
My Feedback: (139)
Join Date: Jan 2002
Location: Lexington , KY
Posts: 869
Likes: 0
Received 0 Likes
on
0 Posts
Sorry it has been a while since I've posted. I was asked to perform in an airshow in Hawaii on Ford Island. It was a total honor, but now back to the 17. I really like how scale the gear is on this one. The nicest thing is that the landing gear has the scale over center struts just like the real one. Once you get the gear in, you can adjust it in any direction in order to get them to fit in. Not sure if I was lucky, or what, but I really didn't have to adjust much. I am going to wait to get fuel tanks in, etc. before I lock them in place, but this gives you a really good idea of how the whole thing looks.


06-20-2016, 01:58 PM
#20
Thread Starter
My Feedback: (139)
Join Date: Jan 2002
Location: Lexington , KY
Posts: 869
Likes: 0
Received 0 Likes
on
0 Posts
Decided that it was time to finish up the interior. The cockpit and nose kit went together perfect and slid into place with no problems. There is a ton of room to add more details depending on what you want to do. I also painted the interior of the bombay doors. With the scale inserts, it looks fantastic. I can't wait to see bombs come out of it. Next is to paint and detail....my favorite!
06-25-2016, 06:28 AM
#24
Thread Starter
My Feedback: (139)
Join Date: Jan 2002
Location: Lexington , KY
Posts: 869
Likes: 0
Received 0 Likes
on
0 Posts
Steve,
I agree and Bruce and I both noticed the nose. This has already been fixed. Remember, this one is the first and "Trial" B-17. We have updated a ton on the 17 kit from what we've learned from this one. When so many companies just send it out with no real R&D, its nice to know that a plane that is made in America and I can tell you that Bruce doesn't want this one out without it right.
Tony,
I'm sorry you feel that way. I don't have that experience, however...send me a private message or email ([email protected]) and I'll get things situated for you. I talk to Bruce almost daily over this plane.