


*Seagull Westland Lysander*

 07-11-2017, 12:40 PM
#177

Join Date: Jan 2017
Posts: 52
Likes: 0
Received 0 Likes
on
0 Posts
I used the 2 into 1 MPX harness from Taildragger RC -- (*NEW* MPX (Flange Mounted) 6" Male 8"-24" Staggered Female Dual servo harness (2 servo's one plug) with 100 Strand 20 AWG Silicon Wire - Taildragger Rc, LLC)
I used light green bubble Tea straws (don't ask why I have those -- I have a daughter...) that I split to cover the wires as they run down one of the formers... I have attached the best picture that I have on hand (lots of scotch tape as I was fitting the canopy)...
I used light green bubble Tea straws (don't ask why I have those -- I have a daughter...) that I split to cover the wires as they run down one of the formers... I have attached the best picture that I have on hand (lots of scotch tape as I was fitting the canopy)...
I'm getting excited about flying it I have never flown with flaps before you have any suggestions.
thanks Tom
07-11-2017, 01:00 PM
#178

My Feedback: (18)
Galen thanks for your help I have the canopy cut out for the cockpit and the wings it's glued on and screwed on I have it all wired up. I used the bus system which I like really well. I'm in the process of getting it balanced .
I'm getting excited about flying it I have never flown with flaps before you have any suggestions.
thanks Tom
I'm getting excited about flying it I have never flown with flaps before you have any suggestions.
thanks Tom
1. You will need a little down elevator mixed in with flap deployment as the plane, typically, balloons upward. This offset is usually 6% or less, so be conservative until you can fly it and make adjustments as needed.
2. This plane doesn't really need full flaps, so start with 1/2 to 2/3rds deployment and adjust to fit your style of flying.
3. Flaps at any level of deployment add drag, so you will need to carry more power into your landing flare. The more flap you deploy the more drag you will get.
I suspect the Seagull Lysander is not a good "3 point" lander, and will benefit from being gently flown onto the runway in a wheel landing...
07-11-2017, 01:06 PM
#179

Galen thanks for your help I have the canopy cut out for the cockpit and the wings it's glued on and screwed on I have it all wired up. I used the bus system which I like really well. I'm in the process of getting it balanced .
I'm getting excited about flying it I have never flown with flaps before you have any suggestions.
thanks Tom
I'm getting excited about flying it I have never flown with flaps before you have any suggestions.
thanks Tom
Tom, The Lysander flies like a big Cub. You can use flaps or you can ignore them until you want to play with them.
She lands very slow without flaps, but you may want to try them on a calm day (so you don't balloon on landing to an unexpected gust)
I started by slowing the plane down to slow flight at 200ft AGL, then I feed in 1/3rd flaps and see how it flys. You will want to increase the throttle a bit and trim the nose down and just fly figure eights to get comfortable.
For landings, I start high and start turning base keeping my nose down as I add flaps. I continue the turn to final and fly the Lysander to the runway where I want to start flaring out
You'll love it!
07-13-2017, 09:01 AM
#180
Join Date: Jan 2017
Posts: 52
Likes: 0
Received 0 Likes
on
0 Posts
Galen I was wondering how much weight has people been putting in their planes to get it balanced. My friend and I used a Xicoy CG balancer and it ended up telling me that I needed to add a pound and a half I wait to the front. So he suggested that I glue buckshot in the front of the cowl. turn it upside down and there's left there and glue it around that lip.
Tom
Tom
07-13-2017, 11:20 AM
#182
My Feedback: (18)
Galen I was wondering how much weight has people been putting in their planes to get it balanced. My friend and I used a Xicoy CG balancer and it ended up telling me that I needed to add a pound and a half I wait to the front. So he suggested that I glue buckshot in the front of the cowl. turn it upside down and there's left there and glue it around that lip.
Tom
Tom
I would be very careful about adding any nose weight, especially permanent weight (epoxied lead shot).
Since you are using a Xicoy and I am using a Xicoy we should be able to match things up. Since the distance between the tailwheel and main axles are the same for the copies of this ARF we can compare and match CG distances as needed. At what distance back from the axles are you trying to set the CG? My last setting was 141mm back from the axles. I am a little forward of that in flight since 17 oz or fuel is forward of the CG. I was able to attain this CG with no lead at all -- anywhere. I am also sure that I can move my CG back at least another 10 to 20 mm. There is ample data to conclude that 150mm back from the main axles is a safe CG, and there are those that are even further back than that...
07-17-2017, 06:44 AM
#183
Update:
Air Supremacy over Goshen was a great event with over 100 preregistered pilots. I arrived early and flew the Lysander Thursday as much as I could. Flew if 5 times and nearly an hour and still had fuel in the 16 ounce tank.
The next morning I refueled and tried to be the first in the air. The breeze was nearly down the runway and Lee Watkins & I were shooting touch and goes down the length of the runway. (Don't tell Lee, but he was much better at it then I). After 20 minutes of this I was flying low & slow heading downwind to turn base when my Saito quit (apparently I forgot to charge the ignition battery) at 40 feet of altitude I pulled a rookie mistake and tried to turn left into the wind. (Dumb!) Naturally I stalled it and it went in.
I knew it was dumb as I did it. I could have just let it land downwind and it would have been fine. Now I need to build another!
I put out the call and found that Leo Spychalla of Milwaukee had (2) kits in stock and Brian Bucar of Dynamic Balsa (Chicago) has (1) kit in stock. I made arrangements to meet Leo on my way home to Minneapolis and pick up the kit. I got it home and I've started assembly. I've sent my Saito FG60-R3 to HH service center to be checked out and tested before I put it back in.
I have my custom markings coming and I'll get my rear gunner ready!
I'll have Lizzie flying again for the Northern Alliance Military Fly-in in Owatonna and the Warbirds over the Midwest in Fond Du Lac in August!
07-17-2017, 09:49 AM
#184
Hi Scott,
thanks for the info. Since i am going to put a pilot figure in the rear with two machine guns then I too will screw the rear canopy to the fuselage.
i am using a Saito fg 60-r3 three cyl radial.
i am in the Milwaukee area but will not be at the Michigan event. I plan on bringing it to Warbirds and Classics over the Midwest in Fond Du Lac in August.
were you at the scale event at Owatonna a few years ago? My friend Jerry and I entered team scale with a Morane Saulnier.
Had a ball flying the Lysander at Goshen last week until I dumb-thumbed it in. I dropped by Leo's place on the way home to Minneapolis Saturday and picked up another so I'm moving my hardware from the wreck into the new kit. Since I was a smidge nose heavy (no added weight) I'll mount the tailwheel servo in the back this time.
The plane was fantastic on the FG60-R3 radial! the 16 ounce RotoFlow tank lasted 60 minutes the way I flew it!.
Have you flown yours?
07-17-2017, 09:59 AM
#185
The Sergeant Clifford Stewart Westland Lysander IIIA > Vintage Wings of Canada
07-17-2017, 07:01 PM
#187
Junior Member
Join Date: Aug 2003
Location: Brookfield,
WI
Posts: 5
Likes: 0
Received 0 Likes
on
0 Posts
Hi Cliff!
Had a ball flying the Lysander at Goshen last week until I dumb-thumbed it in. I dropped by Leo's place on the way home to Minneapolis Saturday and picked up another so I'm moving my hardware from the wreck into the new kit. Since I was a smidge nose heavy (no added weight) I'll mount the tailwheel servo in the back this time.
The plane was fantastic on the FG60-R3 radial! the 16 ounce RotoFlow tank lasted 60 minutes the way I flew it!.
Have you flown yours?
sorry about your crash, glad Leo had another kit for you.
i have not flown mine yet but expect to in the next week or so. I have a 24 oz tank in mine which is probably overkill based on what you are experiencing. Are you certain that the right cg is about where the forward anti rotation dowels are? I am about ready to balance mine.
best regards,
Cliff
07-18-2017, 03:38 AM
#188
Galen's CG work came up with a location of 141 mm behind the wheel axles for a level fuselage. My measurements placed that approx. 15 mm (about 5/8") behind the forward former (the LE of the wing at the fuselage). I balanced mine close to there, roughly 3/4" back. The anti-rotation holes are further back and I would consider that the most rear CG if you choose to use it.
The Oklahoma team is balancing close to that but they are changing the incidence of the horizontal stab as well.
I believe in keeping it simple. I did NOT change the horizontal stab and balanced near 3/4" back from the LE at the fuse and it flew very well.
Scott
The Oklahoma team is balancing close to that but they are changing the incidence of the horizontal stab as well.
I believe in keeping it simple. I did NOT change the horizontal stab and balanced near 3/4" back from the LE at the fuse and it flew very well.
Scott
Last edited by Fly2XS; 07-18-2017 at 04:26 AM.
07-18-2017, 11:20 AM
#189
Join Date: Jan 2017
Posts: 52
Likes: 0
Received 0 Likes
on
0 Posts
Galen I put the buckshot in the lip on the cowl I instead the wooden tin plates that they sent with the kit tells me where the CG is which is 27mm ahead of the Leading Edge and that balance. Just fine Tom
07-18-2017, 11:31 AM
#190
My Feedback: (18)
I strongly suggest that you move you CG back to at least the leading edge at the root.
07-18-2017, 11:38 AM
#191
Join Date: Jan 2017
Posts: 52
Likes: 0
Received 0 Likes
on
0 Posts
Galen Your engine is a pound-and-a-half heavier than mine I have the rcgf 70 I put the tail wheel servo way back by the tail wheel.
I guess I don't understand why we're not using the CG that the factory gave us if my plane balance is at that why won't it fly at that.
thanks Tom
I guess I don't understand why we're not using the CG that the factory gave us if my plane balance is at that why won't it fly at that.
thanks Tom
Last edited by ttmv321; 07-18-2017 at 12:20 PM.
07-18-2017, 12:20 PM
#192
My Feedback: (18)
I understand what you are saying, but it doesn't matter how much anything weighs -- it only matters where you set the CG to get a well flying plane. Even though my engine is heavier, and I have the batteries and ignition module on the firewall my CG is just behind the wing leading edge at the root. Right now your CG is 107mm behind the axles and mine is 141mm behind the axles, and mine is still a little nose heavy. I used a very accurate electronic, and expensive, CG machine to arrive at the numbers mentioned. I had read many reports about the recommended CG being much too far forward so I invested in the tools to accurately measure mine.
No one that has survived a flight at the erroneous CG printed in the manual enjoyed the experience.
Again -- I strongly recommend that you move you CG back at least 27-35mm -- your plane will fly much better, and more importantly land better!
Again -- I strongly recommend that you move you CG back at least 27-35mm -- your plane will fly much better, and more importantly land better!
07-18-2017, 06:11 PM
#194
My Feedback: (18)
Galen Your engine is a pound-and-a-half heavier than mine I have the rcgf 70 I put the tail wheel servo way back by the tail wheel.
I guess I don't understand why we're not using the CG that the factory gave us if my plane balance is at that why won't it fly at that.
thanks Tom
I guess I don't understand why we're not using the CG that the factory gave us if my plane balance is at that why won't it fly at that.
thanks Tom
In this case the factory screwed up royally. The recommended CG is simply wrong. Fly2XS (Scott), dmyers0403, and I have all done research on the CG issue and have all concluded, and successfully flown, our Lysanders at a more appropriate CG. At least 27-35mm further back than factory, and in dmyers0403 case, much further back. You should also look at the manual for the 126" Phoenix Lysander at TowerHobbies.com and compare that factory CG to the Seagull CG. Theirs is way farther back than is the Seagull recommendation. How can that be? The planes are about the same size and have the same double taper wing -- simple -- the Seagull recommendation is wrong.
I know moving the CG back goes against everything you know about setting the CG of a new plane, but in this case moving it back is the right thing to do. The plane will fly, glide, and land much better at a more aft CG.
Your plane will fly at the forward CG -- it just won't fly well, and you might not have enough elevator authority to raise the nose for landing. If you persist with the factory CG at least setup double the recommended elevator throw so you have a chance of getting the nose
up for landing. At least one maiden flight ended poorly because of the wrong CG and too little elevator throw.
Yourplane will likely need to fly much faster than needed to get enough airflow over the elevators to give them enough authority the overcome the too forward CG. This is not good for take offs and landings.
When properly setup this plane is a joy to fly -- slow and stable, and will draw a crowd where ever you take it as it is so unusual. Every weekend my flying club members ask me: "Where's the Lysander?" when I don't bring it out.
07-19-2017, 09:35 AM
#195
My Feedback: (34)
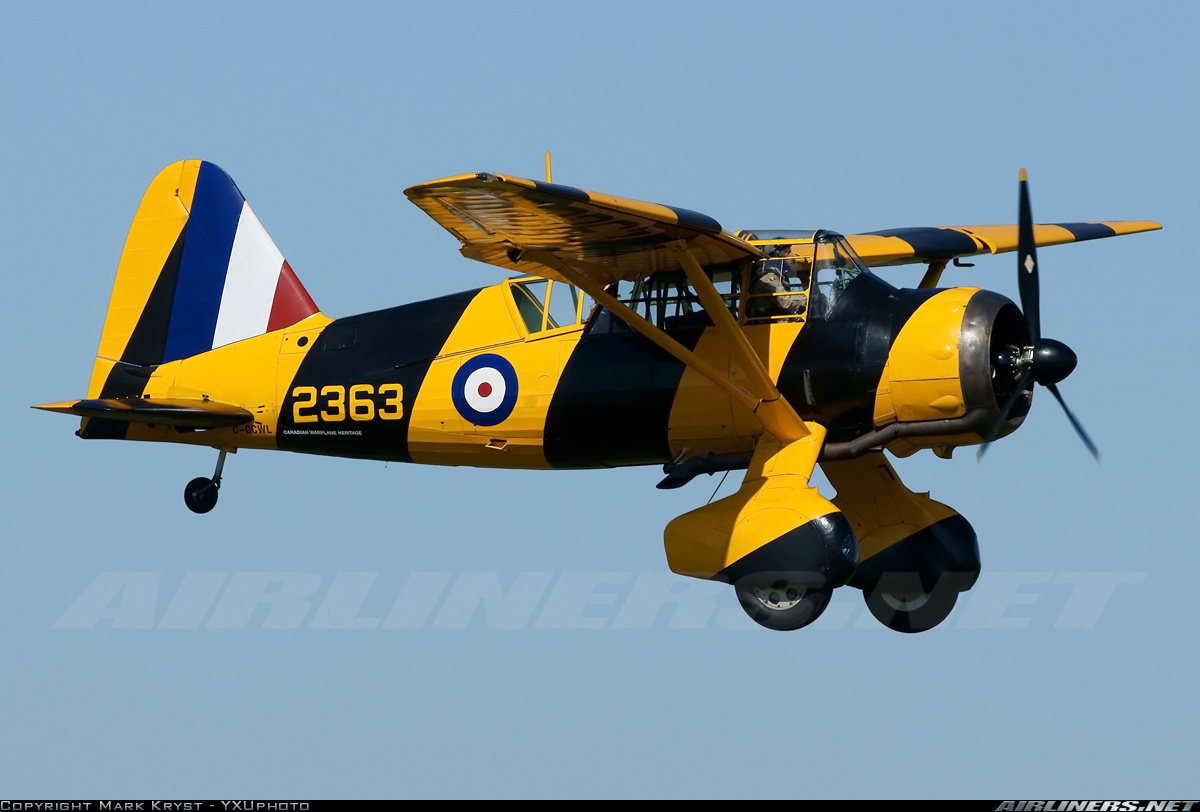
This Seagull Lysander is really cool! I keep looking at photographs of the full scale in the "Bumble Bee" paint configuration that is up in Canada. Really attractive. If I didn't already have about 6 other projects on the bench I would pull the trigger and build one of these up. Thanks to Scott for purchasing his replacement. I sure hope to see it in Owatonna MN. It is the second one I sold and I do have a 3rd in NIB that I will bring to Owatonna and Fond Du Lac until it sells. Leo
 07-19-2017, 12:04 PM
#198
I have my new markings for LX-T and will start bashing this new ARF kit!
This time I'll see if it takes 10-15 hours to assemble the basic airframe!
The beauty of building it a second time is that I know exactly what needs to be done and I can re-use my harnesses.
I hope I have time to get my cockpits roughed out before Fondy!
Let's have a Lizzie Gaggle at Warbirds & Classics over the Midwest (Fond Du Lac)!
Last edited by Fly2XS; 07-19-2017 at 12:07 PM.